Back
to Full Sigma SD9 Review
Back
to Full Sigma SD9 ReviewGo to Sigma SD9 Data Sheet
Go to Sigma SD9 Pictures Page
Up to Imaging Resource Cameras Page
Use your browser's "Back" button to return to the previous page, or the links at the top and bottom of this page to navigate to related information. If you have difficulty fitting the text on this page onto your printer output, simply resize your browser window to a narrower width and print again.
Remember us when it's time to buy!
Dave here: Have our reviews been helpful to you? (Is this article you're reading right now useful?) Preparing this level of information on as many products as we do is incredibly hard work, not to mention expensive. Things on the Internet may look like they're free, but they're not. (As a lot of big dot.com companies are finding out these days.) Somewhere, somebody has to pay to produce worthwhile content. YOU can help us though, by remembering us when it comes time to make your purchase. Would you consider coming back to our site and clicking-through to one of our advertisers to make your purchase? Every dollar you spend with one of our advertisers helps us directly (in affiliate fees) or indirectly (the advertiser will keep renewing their ad contract with us). To make it easy for you to support us, here's a URL you can visit, to see all our current advertisers, with links to click on that will register your visit to them as having come from our site. It's up to you where you buy, but Mike, Mike, Kim, Yazmin, Marti and I would be really grateful if you'd help us out by choosing one of our advertisers to purchase from.
Thank you for your support!
Dave Etchells, Founder & Publisher
Visit our "Buy Now" Page:
https://www.imaging-resource.com/buynow.htm
Back
to Full Sigma SD9 Review
Go to Sigma SD9
Data Sheet
Go to Sigma SD9
Pictures Page
Up to Imaging Resource Cameras
Page
Sigma SD9Sigma's digital SLR uses Foveon's "X3" sensor technology to deliver more detail per pixel! Review First Posted: 11/09/2002 |
|
 |
|
3.43 megapixel sensor with
"X3" technology from Foveon has 10.29 million effective photosensors
for unparalleled sharpness and resolution. |
|
|
"Full color" pixels eliminate color moire in fine, high-contrast detail. | |
|
|
RAW-format image capture preserves
full image data for post-exposure adjustment. |
|
|
|
Excellent Photo
Pro software from Foveon offers excellent post-exposure color and tonal
adjustment. |
|
|
|
Interchangeable Sigma lenses
offer excellent optical performance at affordable prices. |
Manufacturer Overview
Sigma is a company with a long history in the photo industry, although they're
better known for their broad line of lenses than their cameras. Sigma's lenses
for 35mm cameras have developed a reputation for delivering sharp images at
affordable prices, a combination that's brought them a huge share of the market
among "enthusiast" film photographers. While their lenses enjoy wide
popularity among both Canon and Nikon camera owners, a proprietary bayonet lens
mount has somewhat limited the market reach of their own camera line.
This year, Sigma has entered the digital market in dramatic fashion, leaping directly into the digital SLR fray, eschewing any intermediate steps in the consumer camera marketplace as a prelude. This move makes sense, given Sigma's strong position as a lens manufacturer, and the presence this has brought them in the SLR marketplace as a whole. What's remarkable though, is the extent to which they've achieved parity with other major manufacturers in a single step.
Much of the credit for this of course, goes to Sigma's use of Foveon's revolutionary "X3" sensor technology, which stacks separate red, green, and blue sensors behind every pixel of the sensor array. When compared to conventional CCD or CMOS sensors, which use a mosaic array of red, green, and blue filters over the pixels, Foveon's X3 approach should yield almost twice the resolution for a given pixel count. The lack of any offset between color samples also promises to completely eliminate the color aliasing most digicams are prone to when confronted with fine patterns of high-contrast detail. Of course, there's no free lunch anywhere, so the Foveon sensor isn't automatically a be-all, end-all for the digicam market. As I get more time with the camera, I'll be doing a series of carefully-controlled tests and experiments with it and other leading digital SLRs, to find where its strengths and weaknesses lie. As with each camera I test, I expect that the SD9 be an excellent match for some users needs and budgets, but less so for others.
Given the extreme level of interest in this camera among our readers, I'm taking a somewhat fragmentary approach to my review of it. The first thing I did was quickly snap some shots of the ISO-12233 laboratory resolution target and my own "Davebox" target, so interested readers could quickly evaluate the SD9's resolution, color purity, and image noise for themselves. I've posted these on a temporary sample-pictures page for your perusal. With the bare imaging performance basics out of the way, I'm now turning to a review of the camera's functional aspects, covering such things as overall design, user interface issues, shutter lag and cycle time performance, and power consumption. Once this is done (it is, if you're reading this), I'll turn back to the test shooting, with an eye toward comparisons against other SLRs on the market, to see how the SD9 fits into the mix. Given the dramatic new sensor technology, I'll be spending a fair bit of time looking at imaging performance, going quite a bit beyond my normal d-SLR review treatment.
So read on below for a full description of the SD9's functioning, and my timing and power performance measurements. Check out the preliminary sample photos I've posted, if you'd like to pick apart some carefully-controlled test images. Then stay tuned for a complete set of test photos, a gallery of random "pretty pictures" shot with the camera, and a detailed look at the performance of the X3 sensor technology itself.
High Points
Executive Overview
With the comfortable heft of a traditional 35mm SLR film camera, the SD9 is Sigma's ground breaking entry into the prosumer digital SLR marketplace. Featuring a 3.34-megapixel Foveon CMOS sensor with full-color pixels, the SD9 is the first in its price category to offer such a high-grade image sensor, and indeed is the first camera in the world to use Foveon's "X3" sensor technology. Capturing and storing images as lossless raw sensor data files, the SD9's included software provides an unusual level of post-exposure image adjustment. Add to this the benefit of full manual exposure control and an interchangeable lens design (with a very affordable line of high-performance lenses), and you have a worthy new contender in the digital SLR marketplace.
The SD9's body is slightly larger than the competing D60 and D100 models from Canon and Nikon respectively, but quite a bit smaller and lighter than the pro-level D-SLRs from those companies. (As embodied by the EOS-1D, 1Ds, and Nikon D1x/D1h.) The SD9 feels pretty rugged overall, although I felt that the rather thin body panels on the front of the unit contributed to a slighly "tinny" feel there. While it does have the heft of an SLR design, the SD9 isn't by any means a heavy camera. It features af SA-type, bayonet lens mount, which accommodates a wide range of Sigma lenses. (This is Sigma's own proprietary lens mount, as used on their film SLR models for a number of years now.) Manual focus is activated via a switch on the lens, but the SD9 itself features both Single and Continuous autofocus modes. A TTL optical viewfinder provides an accurate display of the frame area, with a unique view that lets you see a good bit of area outside the actual capture region. (Called "Sports Framing" by Sigma, this is great for keeping an eye on fast-moving action outside the frame, but I felt that it resulted in an uncomfortably small active area.) In my tests, the marked viewfinder region indicated the active frame area with almost 100% accuracy. A detailed information display inside the viewfinder reports exposure and basic camera settings, and a center AF target is useful for lining up your subject. As with most SLRs, the 1.8-inch LCD monitor doesn't act as a "live" viewfinder, instead serving primarily for image review, and for displaying the camera's setup menu. In image review mode, a detailed information screen not only reports exposure settings, but also includes a histogram for checking your exposure. (Read the "viewfinder" section of this review for my comments on Sigma's unique histogram display.)
Four main exposure modes are available, including Program AE, Aperture Priority, Shutter Priority, and Manual. While aperture settings will vary with the lens in use, shutter speeds range from 1/6,000 to 15 seconds (1/6,000 to one second at the ISO 200 and 400 settings). For long exposures, the SD9 has a cable release terminal, which lets you remotely trip the shutter via cable release, avoiding any movement of the camera caused by your finger hitting the Shutter button. (The SD9 is also compatible with an optional IR remote release.) By default, the SD9 employs an Eight-Segment Evaluative metering system to determine exposure. It does provide the options of Center (spot) or Center-Weighted metering modes as well, though. In all exposure modes except Manual, you can decrease or increase exposure from -3 to +3 exposure equivalents (EV) in one-half-step increments. (I'd much prefer to see 1/3 step increments.) ISO choices include 100, 200, and 400 equivalent settings, but keep in mind that the slow end of the shutter speed range contracts dramatically with ISO settings higher than 100. The final exposure option is white balance, with Auto, Sunlight, Shade, Overcast, Incandescent, Fluorescent, Flash, and Custom modes. Because the SD9 captures files in the raw sensor format, any further image adjustments can be made with the interface software. (The SD9's software offers a really remarkable level of control, and is overall one of the best pieces of image adjustment software I've seen to date.)
The SD9 doesn't offer a built-in flash, but does have an external flash hot shoe on top of the camera, compatible with Sigma's EF-500 DG Super SA and EF-500 DG ST SA flash units, as well as conventional "dumb" hot shoe flash units. Available Drive settings on the SD9 include an Autoexposure Bracketing mode, two self-timer modes, and a Continuous Shooting mode. The bracketing mode captures three exposures, each at different exposure settings (one at the metered value, one underexposed, and one overexposed). The self-timer modes offer two- and 10-second countdowns from the time the Shutter button is fully pressed until the shutter actually opens. Continuous Shooting mode captures a series of images in rapid succession, with the actual frame rate and maximum number of images varying with the resolution setting and available memory card space. (The frame rate runs about 1.9 frames/second for large images, and about 2.7 frames/second for small ones.)
The SD9 saves images to CompactFlash Type I or II memory cards, and is compatible with the IBM MicroDrive. All files are recorded as raw sensor data, and three resolutions are available. For downloading images, the SD9 has both USB and IEEE-1394 ports, and comes with both cables, although I found that downloads from the camera were very slow, particularly when connecting via USB. A video cable also comes with the camera, for viewing images on a television set. For power, the SD9 utilizes two CR123A lithium batteries, as well as either two CR-V3 lithium battery packs or four AA-type batteries. An AC adapter is also included for use in the studio, or when the camera is connected to the computer for lengthy downloads.
Design
With an exterior that closely resembles a mid-sized 35mm film-based SLR, Sigma's SD9 digital SLR is an exciting new contender in the prosumer digicam marketplace. Its body panels appear to be made of plastic, but the camera seems pretty substantial nonetheless, apart from a slightly "tinny" feel to the panels on its face. Equipped with a 3.43-megapixel Foveon X3 CMOS sensor, the SD9 is the first in its class (actually, the first anywhere) to offer a sensor capable of capturing red, blue, and green light with each pixel. Another innovation on the SD9 is its Sports Finder viewfinder display, which lets you see an extended area outside of the actual frame, unlike any other digital SLR viewfinder I've seen. An SA-type, bayonet lens mount accommodates a wide range of Sigma lenses, and an optional full manual exposure mode provides total user control. The SD9's somewhat bulky body requires a two-handed grip in most cases, and measures 6.0 x 4.7 x 3.1 inches (152 x 120 x 79 millimeters). Excluding the lens, batteries, and memory card, the SD9 weighs a substantial 28.4 ounces (805 grams), but somehow still manages to feel fairly light in the hand.
The front of the SD9 features the lens mount and only two control buttons. On the bottom, left side of the lens mount is the lens release button, which unlocks the lens so it can be rotated to remove it from the mount. A Depth of Field Preview button is on the upper right side of the lens mount (difficult to see in this view), while the remote control sensor in the upper right-hand corner of the body. The large hand grip provides a secure hold on the camera, with a rubbery coating that provides good friction against your fingers as they wrap around the camera.
The memory card compartment is on the right side of the SD9 (as viewed from the rear), protected by a hinged, plastic door. A latch on the back panel flips the door open, revealing the CompactFlash (Type I and II) / IBM MicroDrive slot. Just above the card slot is one of the eyelets for attaching the neck strap. A minor ergonomic note: The neck strap eyelets are positioned so the camera body will hang level by itself, but attaching a lens of any sort unbalances the camera, leaving it tilted down at a significant angle. While there's no way camera-mounted eyelets could possible balance even moderately long lenses, moving the eyelets as far forward as possible would let the camera hang nearly level with modest primes and short zooms attached. At bottom right of the memory card compartment is a cable release socket, protected by a tiny, plastic cap. My only concern here is that the tiny cap removes completely from the camera body, and thus could easily be lost.
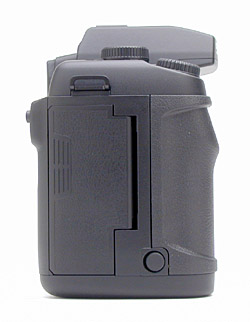
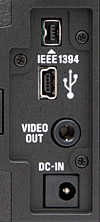
The opposite side of the camera houses the connector compartment, which includes the Video Out, DC In, USB, and IEEE-1394 connector terminals. Just below the connectors is the battery compartment, which locks into place with a metal latch. Once unlocked, a tray pulls out completely from the compartment. (I really appreciate side battery access like this, especially on SLR cameras, as it lets you quickly change camera batteries without dismounting from a tripod. Many digicams provide battery access on the bottom panel, and put the battery compartment too close to the tripod mount.) The second neck strap attachment eyelet is also on this side of the camera, just above the connector compartment.
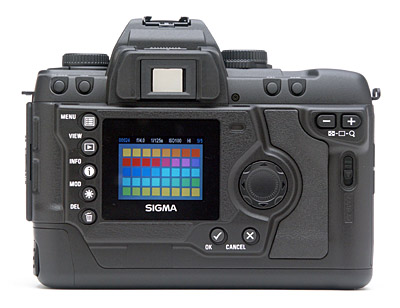
The majority of the SD9's external controls are on the rear panel, sharing space with the LCD monitor and optical viewfinder. The optical viewfinder eyepiece features a diopter adjustment control, just on top of the eyepiece. A Four Way Arrow pad on the rear panel navigates through the SD9's LCD-based menu system and scrolls through captured images on the memory card while in review mode. (Initially, the arrow pad on my evaluation sample was a little finicky about moving up and down in the menu system, but that seemed to diminish over time - or I simply became accustomed to pressing it in just the right way.) The Menu, View, Info, Modify, and Delete buttons lines the left side of the LCD monitor, while the Resolution, ISO, AE Lock, and Exposure Compensation buttons line the top of the rear panel. Two enlargement (+/-) buttons control image enlargement while in image review mode. Just beside the top right corner of the LCD monitor, a small LED flashes whenever the camera is accessing the memory card.

The SD9's top panel has no shortage of controls, including the Shutter, Metering, Function, and AF buttons, and Command, Mode, Shutter, and Drive dials. Also on the top panel is the external flash hot shoe and small status display panel. I generally really liked the SD9's control layout, as it was very clear what each control did, and very easy to select various camera functions. I appreciated having the major camera functions spread around on separate control buttons, rather than being ganged up on a control dial or actuated through combinations of two buttons at once.
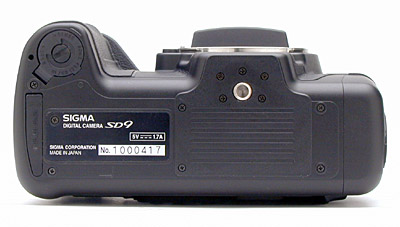
The SD9's bottom panel is smooth and fairly flat, with a metal tripod mount close to dead center. - It's located under the centerline of the lens, and positioned fairly far forward on the camera body. While it's impossible to position the tripod mount on an SLR under the lens' nodal point, having the mount located fairly far forward like this minimizes the amount of parallax distortion in panoramic shots. I also appreciated that there was a fair bit of flat area around the socket, making for a secure, stable attachment to tripod mounting plates. Also on the bottom panel are the CR123A battery compartment and a power pack connection terminal (hidden beneath a rubber flap) that I assume is for an optional accessory handgrip.
Viewfinder
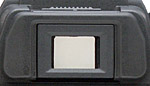 The SD9 features a true, TTL
(through the lens) optical viewfinder, much like a traditional SLR film camera.
The pentaprism viewfinder allows for accurate framing, which Sigma estimates
as around 98 percent frame-accurate horizontally, and 97 percent vertically.
(Figures that agree quite well with my own measurements.) A diopter adjustment
switch just above the eyepiece adjusts the view for eyeglass wearers, with a
range from -3dpt to +1dpt. I don't have a calibration for what this translates
to in terms of a range of human vision, but did note that the "nearsighted"
end of its range was almost enough to compensate for my 20/180 uncorrected vision,
something relatively few viewfinders can do. The "sports finder" design
also gives a very high viewpoint, making this camera an excellent choice for
eyeglass wearers. In the center of the viewfinder display, a central autofocus
/ autoexposure target mark helps you line up shots. There's also a detailed
information readout along the bottom of the display, reporting exposure information
such as aperture and shutter speed, focus, exposure compensation, etc.
The SD9 features a true, TTL
(through the lens) optical viewfinder, much like a traditional SLR film camera.
The pentaprism viewfinder allows for accurate framing, which Sigma estimates
as around 98 percent frame-accurate horizontally, and 97 percent vertically.
(Figures that agree quite well with my own measurements.) A diopter adjustment
switch just above the eyepiece adjusts the view for eyeglass wearers, with a
range from -3dpt to +1dpt. I don't have a calibration for what this translates
to in terms of a range of human vision, but did note that the "nearsighted"
end of its range was almost enough to compensate for my 20/180 uncorrected vision,
something relatively few viewfinders can do. The "sports finder" design
also gives a very high viewpoint, making this camera an excellent choice for
eyeglass wearers. In the center of the viewfinder display, a central autofocus
/ autoexposure target mark helps you line up shots. There's also a detailed
information readout along the bottom of the display, reporting exposure information
such as aperture and shutter speed, focus, exposure compensation, etc.
The actual image area display in the viewfinder is divided into two sections. The central rectangular area of the display is the active image area, and reflects what will be captured in the final image. Outlining this area is a dimmed field of view, dubbed the Sports Finder, as it lets you see what's going on outside the actual frame of view. Thus, if you're tracking a moving subject (as is frequently the case in sports photography), you can see any side action outside the main frame just before it moves into the active area.
The "sports finder" concept has a definite attraction, and the central, transparent portion of the viewfinder quite accurately represents the final image area, but the net result is an active viewfinder area that occupies a rather small portion of the overall field of view. I didn't personally have any difficulty manually focusing based on what I saw in the viewfinder. I do wonder though, whether people with less acute vision might have a hard time focusing due to the much smaller size of the subject in the viewfinder.
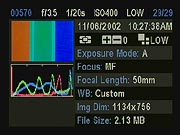
For image review and menu display, the SD9 offers a 1.8-inch, color TFT LCD monitor. During image review, limited image information also appears in the display. Pressing the INFO button on the rear panel displays more detailed information, such as the exposure settings and a histogram, which graphs the tonal distribution of the current view of the image, making it easier to determine any over- or underexposure. The camera's index display (aptly titled "Contact Sheet View") shows as many as nine thumbnail images at a time on the screen.
 A
Playback zoom option enlarges captured images as much as 400 percent, for exceptionally
detailed viewing, practically at the pixel level. When you zoom in on an image
the display zooms immediately, but shows a very coarse, pixelated version of
the image that "fills in" with a detailed display after a few seconds.
The same thing happens when you use the arrow pad to pan around in the enlarged
image - The display will pixelate while you move around, then fill-in the fine
detail a few seconds after you stop.
A
Playback zoom option enlarges captured images as much as 400 percent, for exceptionally
detailed viewing, practically at the pixel level. When you zoom in on an image
the display zooms immediately, but shows a very coarse, pixelated version of
the image that "fills in" with a detailed display after a few seconds.
The same thing happens when you use the arrow pad to pan around in the enlarged
image - The display will pixelate while you move around, then fill-in the fine
detail a few seconds after you stop.
 If
the Overexposure Warning feature is activated through the setup menu, a solid
red overlay appears during image review, highlighting any areas of potential
overexposure. This warning overlay cuts in at a level a little short of absolute
saturation, a good design feature in my book. I'd like to see some way of controlling
the level at which the warning occurs though, since you sometimes only want
to see those parts of the image that actually do go all the way to pure white.
If
the Overexposure Warning feature is activated through the setup menu, a solid
red overlay appears during image review, highlighting any areas of potential
overexposure. This warning overlay cuts in at a level a little short of absolute
saturation, a good design feature in my book. I'd like to see some way of controlling
the level at which the warning occurs though, since you sometimes only want
to see those parts of the image that actually do go all the way to pure white.
 The
SD9's histogram deserves special commendation, as it's by far the most useful
I've seen in a digicam. Two characteristics make the SD9's histogram noteworthy.
The first and most apparent one is that it displays separate curves for the red,
green, and blue color components, This can be very helpful for times when you
want to avoid losing "shape" (tonal gradation) in the highlights of
a brightly colored object. A conventional histogram, which only shows overall
brightness (luminance) would give no indication that you were in danger of losing
detail in such situations, since the luminance of the object in question could
be within acceptable limits, even though one of the color channels was approaching
saturation.
The
SD9's histogram deserves special commendation, as it's by far the most useful
I've seen in a digicam. Two characteristics make the SD9's histogram noteworthy.
The first and most apparent one is that it displays separate curves for the red,
green, and blue color components, This can be very helpful for times when you
want to avoid losing "shape" (tonal gradation) in the highlights of
a brightly colored object. A conventional histogram, which only shows overall
brightness (luminance) would give no indication that you were in danger of losing
detail in such situations, since the luminance of the object in question could
be within acceptable limits, even though one of the color channels was approaching
saturation.
By far the biggest benefit of the SD9's histogram readout though, is the fact that it will display the histogram of just portions of the image, based on what's shown at the current zoom level of the playback display. This is really useful, because it lets you zoom in on "problem" areas in an image and really see what's going on. A major weakness of histogram displays on digital cameras is that they calculate and display the histogram for the entire image at once. This gives you a good idea of what's happening with the bulk of the pixels in the image, but we often care a great deal about what's going on in relatively small areas of our photos. Because small areas represent small numbers of pixels, these critical regions may only produce an imperceptible "blip" on the overall histogram curve. Overexposure warnings help somewhat, in that they'll tell you where you're about to lose detail, even if only a small portion of the image is affected, but they're a fairly crude tool because they only show whether or not the exposure has crossed some threshold. With the S9D, you can zoom in on a specific area of the image, and then see a detailed histogram of just that small area, showing you exactly what's happening with the exposure in that part of the subject.
It may seem odd to get excited about something as obscure as a camera's histogram display, but I see this as one of the most useful features of the SD9 for photographers who care about the detail recorded in their photos. It certainly provides a better view of what's happening in your images exposure-wise than anything else I've seen in the last 5 years or so that I've been doing this. Bottom line: Big kudos to Sigma for an exceptionally informative playback display.
Optics
 The
SD9 is an interchangeable-lens SLR (the body ships by itself, with no lens included),
with the lens attached via an SA-type, bayonet lens mount on the front panel.
Maximum aperture, focal length, and focusing distance range will thus vary with
the particular lens being used. A small release button below the bottom of the
mount releases the lens, allowing it to turn and slide out of the mount. A Depth
of Field Preview button (next to the top left side of the lens mount, when viewing
the camera from the front) stops the lens down to the designated aperture setting,
so that you can preview the depth of field you'll have in the shot through the
viewfinder.
The
SD9 is an interchangeable-lens SLR (the body ships by itself, with no lens included),
with the lens attached via an SA-type, bayonet lens mount on the front panel.
Maximum aperture, focal length, and focusing distance range will thus vary with
the particular lens being used. A small release button below the bottom of the
mount releases the lens, allowing it to turn and slide out of the mount. A Depth
of Field Preview button (next to the top left side of the lens mount, when viewing
the camera from the front) stops the lens down to the designated aperture setting,
so that you can preview the depth of field you'll have in the shot through the
viewfinder.
Because most current digital SLRs have a sensor that's smaller than a 35mm film frame, they have what's referred to as a "focal length multiplier" relative to 35mm cameras. This is the factor by which the camera reduces the field of view (effectively magnifying the image) with a given lens, relative to how that lens would function on a 35mm camera. The SD9 has a focal length multiplier of 1.7x, which means that a "normal" 50mm lens will show the same field of view as an 85mm lens on a 35mm camera. This makes it difficult to do true wide angle photography with the SD9. By way of example, the normally "extra wide" 20-40mm zoom lens Sigma shipped along with my eval camera is the equivalent of a 34-68mm zoom on a 35mm film body. Focal length multiplier is a fact of life with all but a few of the digital SLRs currently on the market, but 1.7x is a higher ratio than any I'm aware of on other models. (Most run between 1.5 and 1.6x.) Not a crippling defect by a long shot, but a factor to consider if you like wide angle shots.
The SD9 offers Single and Continuous autofocus modes (manual focus is activated via a switch on the lens, if available). Single AF adjusts focus only when the Shutter button is halfway pressed, using a TTL phase difference detection system. Conversely, Continuous AF mode constantly adjusts the focus, without waiting for you to press the Shutter button. Continuous AF uses an AF Predict function, which "predicts" where the subject will move to next, based on its current pattern of movement. Combined with the Sports Finder viewfinder display, the SD9's Continuous AF system makes tracking moving subjects a little easier.
I don't have any objective test for autofocus speed, so I hesitate to say too much on the subject here, not wanting to color my reviews with purely subjective impressions. That said though, I found the SD9's AF system rather uncertain at times, as it would sometimes "hunt" quite a bit for the correct focus setting. It also on several occasions got "stuck" when I moved from a very close subject to one far away, or vice versa. In these situations, the focus mechanism seemed to traverse a fair distance in the right direction, but then suddenly reverse itself, and end up locking against the opposite focus limit. Several times I needed to "help" the camera by manually turning the focus ring until I got it somewhere close to the right setting. Low light focusing was also a bit limited, as the camera would only focus down to light levels of about 1/2 foot-candle (about 5.5 lux), and then only with just the right subject. (A nice, sharp, high-contrast edge.) Reliable focusing is limited to 1 foot-candle and above, a level roughly corresponding to normal city streetlighting at night. Overall, the impression I have of the SD9's AF system isn't a favorable one.

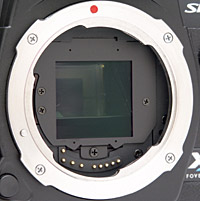
The SD9 has a "dust cover" right behind the lens mount, protecting the mirror/shutter/sensor chamber. The idea is to keep dust from reaching the sensor, an issue for most digital SLRs. Dust on the sensor is a much more severe problem with digital SLRs than it is on film-based cameras, since the film is more or less continuously cleaned as it passes through the light seal on the cannister. With a digital SLR though, any dust that makes its way into the camera body and ends up on the sensor is there permanently, or at least until you clean the sensor, a delicate operation that's best avoided if at all possible. Sigma's approach seems like a good one, for two reasons. First, cleaning the dust cover is a relatively easy and risk-free proposition. Second, any dust that settles on the dust cover won't be imaged, because it's too far up the optical path. (In other words, it won't cast sharp shadows on the sensor, and so won't affect the images.
|
|||||
There are two downsides to the dust cover approach though. First, it introduces two additional optical surfaces into the light path, potentially affecting sharpness, aberration, flare, etc. The second issue is only a potential downside, but based on my eval unit, could be a very real one: If dust does manage to get into the camera body, you've got an even bigger problem that if the dust cover wasn't there, because you'll have to remove it to get the dust out. But how would the dust get in there in the first place? - Probably in manufacturing: My test camera had several prominent dust specks on the mirror that were obviously there when it left the factory, since it had come directly to me from Sigma in Japan. Dust on the mirror is one thing, but dust on the sensor is another, and my unit unfortunately had that problem as well. - In spades. I didn't notice the sensor dust at first, since most of my shots were being taken at larger aperture settings - f/6.7 or larger. I saw large, very faint ghostly blotches on the images, very slightly darker than the surrounding area, and only visible if I was looking for them. Later though, I stopped down the lens (the Sigma 20-40mm f/2.8 zoom) to f/22, aimed it at a clear patch of sky, set the focus to a relatively macro distance (to guarantee that nothing in the scene would be sharply imaged on the sensor), and snapped the shot shown above. - The sensor is really dirty! Sigma can easily correct this in future production by implementing better cleanliness standards in their assembly area and instituting better QC procedures to insure that no dirty units go out, but I'd advise early purchasers to conduct this test for themselves, so they can have the problem addressed under warantee.
|
Exposure
|
Exposure control is straightforward on the SD9, with a range of external dials and buttons to adjust settings. The camera offers a full range of exposure control, with Program AE, Aperture Priority, Shutter Speed Priority, and Manual exposure modes available via a Mode Selector on the top panel. Program AE mode lets the camera control both aperture and shutter speed, while Aperture Priority and Shutter Speed Priority modes let the user control one of the exposure variables. In Program AE mode, I really appreciated the automatic "vari-program" operation, that let me select different combinations of shutter speed and aperture simply by turning the command dial (C-Dial in Sigma parlance). I find variable program modes like this more useful than pure aperture or shutter priority modes. Their advantage is that they let the camera set the aperture or shutter speed as needed to get a good exposure, but let the photographer adjust the exposure parameters toward larger or smaller apertures, higher or lower shutter speeds. If you're in shutter priority mode and select a shutter speed that's too fast for the maximum aperture of the lens you're using, you'll end up with an underexposed shot. With a vari-program approach like the SD9's though, the camera will simply use the largest aperture available to it, and set the shutter speed accordingly.
In Manual mode, the user can control aperture and shutter speed simultaneously. Aperture settings will vary with the lens in use, but shutter speeds range from 1/6,000 to 15 seconds. When the ISO set to 200 or 400 though, the maximum exposure time drops to one second, limiting the SD9's low-light capabilities a fair bit.
To determine the exposure value, the SD9 uses an eight-segment, Evaluative metering system, which divides the image into eight regions and takes individual readings from each section. The readings are evaluated (not simply averaged) to determine the best overall exposure values based on a combination of brightness and contrast between the different areas. Besides the default evaluative metering though, the top-panel metering button lets you opt for Center or Center-Weighted modes as well. Center mode, traditionally called "spot" metering on other cameras, reads the exposure only from a tiny area in the center of the frame. Center-Weighted metering reads a larger area in the center of the frame, and bases the exposure on that, ignoring the periphery of the image.
An AEL (Auto Exposure Lock) button locks the exposure, helpful when shooting off-center subjects. You simply frame the portion of the subject that you want to expose for in the center of the frame and press (and hold) the AEL button while half-pressing the shutter button to lock the exposure, and then reframe the shot for capture. The "lock" is held only as long as you hold down the AEL button with your thumb, with the exposure not changing when you release and press the shutter button again. (Which triggers the autofocus system again.) Interestingly, the exposure will continue to be held even if you snap multiple shots. This AEL operation is different from most other cameras I've tested. Most lock with a single press of the AEL button (not requiring it to be held down), but release again as soon as you trip the shutter, or press the AEL button a second time. I found it a little awkward to have to keep my thumb on the SD9's AEL button, but liked being able to hold the lock across multiple exposures.
In all exposure modes except for Manual, you can adjust the camera-determined exposure from -3 to +3 exposure equivalents (EV) in one-half-step increments. (This is a wider than average range for most digicams, but typical of that offered by professional-level digital SLRs.) This is an area where I felt the SD9's designers fell down a bit. It's been my experience that digital cameras really need finer-grained exposure control than do film cameras, with 1/3-stop increments being about right. Half-stop exposure adjustments are just too coarse, often leaving you choosing between blowing the highlights or having a dull, underexposed image. With the SD9, you do at least have the ability to adjust the photo post-capture, thanks to Sigma's excellent software and the SD9's raw-format data files, but I'd still really like to see at least an option for 1/3-stop exposure adjustments.
If you're uncertain about the exposure, the SD9's Autoexposure Bracketing mode (listed as "AB" on the Drive dial) captures three images at different exposures (one at the metered exposure, one underexposed, and one overexposed). You can then choose the best exposure from the three. AB mode lets you select exposure increments between exposures of anywhere from +/-0.5 EV to +/-3.0 EV, a wide range. AB is activated by setting any nonzero value in the LCD data readout when the Drive Dial is in this position. It's disabled by setting the exposure increment back to zero. NOTE that the AB setting applies regardless of the shooting mode selected (single or continuous exposure). While some cameras only apply auto bracketing to continuous shooting mode, the SD9 implements it for single shots as well. Thus, the camera will calculate and vary exposure across groups of three shots, even if you're just shooting single frames. - This makes it important to remember to turn off the AB function when you're done with it, so it doesn't skew exposures on it when you're not expecting it to.
The SD9 offers sensitivity settings equivalent to ISO 100, 200, and 400, adjustable by pressing the ISO button and turning the Command dial. - Remember though, that the higher ISO settings limit the maximum exposure time to one second. Image noise does appear to be an issue with the X3 sensor technology, hence the limitation on maximum shutter time as the ISO increases. If you intend to do a lot of night shooting, this limitation of the SD9 might give you pause. White balance options include Auto, Sunlight, Shade, Overcast, Incandescent, Fluorescent, Flash, and Custom (the manual setting), and are adjusted through the LCD menu. Because the SD9 captures all files in the raw sensor format, any other color or image adjustments are handled via the camera's exceptionally capable host software.
The SD9's self-timer function features a two-second and a 10-second countdown. In either mode, the shutter is released the specified amount of time after the Shutter button is fully pressed. Both self-timer modes are accessed via the Drive Mode dial on top of the camera.
Flash
The SD9 does not have a built-in flash unit. It does, however, feature an external flash hot shoe on its top panel. For full integration with the SD9's exposure system, you'll need to use one of Sigma's dedicated flashes, such as the Sigma EF-500 DG Super SA or EF-500 DG ST SA flash unit. Both flash units work with the SD9's TTL metering system to give accurate exposures regardless of the lens you have attached. The hot shoe does have the standard center contact though, so any conventional "dumb" flash unit will work fine too, although you'll forego Sigma's advanced TTL metering.
Continuous Shooting
Set via the Drive Mode dial, the SD9's Continuous Shooting mode captures a rapid burst of images for as long as the Shutter button is held down. Actual frame rates and the maximum number of frames in each burst will vary depending on the amount of available memory space, as well as the file size and quality settings selected. Sigma estimates that at the highest resolution setting, the SD9 will capture as many as six frames at approximately 1.9 frames per second. At the lowest resolution setting, Sigma estimates the camera will capture a maximum of 30 frames at approximately 2.5 frames per second. (These figures seem pretty accurate: In my own tests, I clocked the SD9 at 1.88 frames/second for large files, and 2.67 frames/second for small ones.)
Shutter Lag and Cycle Times
When you press the shutter release on a camera, there's usually a lag time or delay before the shutter actually fires. This corresponds to the time the autofocus and autoexposure mechanisms take to do their work, and can amount to a fairly long delay in some situations. Since this number is almost never reported on, and can significantly affect the picture taking experience, I now routinely measure it with a test system I designed and built for the purpose. (Crystal-controlled timing, accurate to 0.001 seconds.)
|
|
||
|
|
(secs) |
|
| Power On -> First shot |
|
Fast.
|
| Shutdown |
|
Fast. |
| Play to Record, first shot |
|
Time until first shot is captured. Quite fast.
|
| Record to play |
|
Time to display a large/fine file after capture. Pretty fast.
|
| Shutter lag, full autofocus |
|
Time is for a standard 50mm lens. |
| Shutter lag, prefocus |
|
Time to capture, after half-pressing Shutter button. Faster than average. (Average is 0.3 seconds.)
|
| Cycle Time, max/min resolution |
0.44 |
First numbers are for large/fine files, bottom number is time for small/basic images. In large/fine, the SD9 captures about six files fairly quickly, but times slow down to anywhere from 7.8 to 11.5 seconds between shots after that, depending on the speed of the card you're using. After shooting six large/fine shots, the buffer took anywhere from 45 to 65 seconds to clear. (This is a *very* long time for buffer clearing.) |
| Cycle Time, continuous mode, max/min resolution |
0.37 |
First number is for large/fine files, second number is time for small/basic images. You get six shots before having to wait for the buffer to clear in large/fine mode, then need to wait from 45-65 seconds to clear the buffer before you can capture the next series. With the small/basic quality setting though, you get about 30 images in a series, at the 0.37 interval, with buffer-clearing times of 114 to 124 seconds. |
I measured the SD9's cycle time using three different memory cards: A Lexar "12x" 256MB, a SimpleTech 512MB, and a Mr. Flash 256MB. Cycle times were fastest with the SimpleTech card, which seems to be the fastest CompactFlash card in my collection. As expected, times were slower with the Mr. Flash card, although there wasn't nearly as large a spread between the fastest and slowest cards as I've found with some cameras. - The SD9 doesn't appear to take maximum advantage of faster CF cards. Shutter lag times were much faster than typical consumer cameras, but slower than those of the best pro SLRs. Shot to shot speeds were pretty good, but the buffer took a long time to clear, most likely a consequence of the large files (4-10 MB, depending on subject matter) that the SD9 has to write due to its RAW-only file format.
Operation and User Interface
Although the SD9 boasts a plethora of controls and settings dials, camera operation is actually quite logical and straightforward once you learn the locations of the various control buttons. The abundance of external controls means less reliance on the LCD menu system, which is in itself limited to about two and a half pages of settings. The one-to-one correspondence of control buttons to camera functions means that it takes little time to learn which button to press for each setting. Once up the learning curve, the combination of pushbuttons and the command dial makes for very fast operation.
The LCD menu system presents just under 20 options, most of which involve basic camera setup features. Exposure, ISO, metering, focus mode, resolution, and exposure compensation are all made with external controls, with the white balance setting the only primary exposure option tucked away in the LCD menu. Here's my usual "walk around the camera", showing the various controls and their functions.
Control Enumeration

Shutter Button: Located on top of the camera, in the center of the Command
dial, this button sets focus and exposure when halfway pressed, and fires the
shutter when fully pressed.
Command Dial: Beneath the Shutter button on the top panel, this dial adjusts a range of camera settings when turned while holding down one of the settings buttons. In programmed exposure mode, turning this dial shifts the exposure parameters to use larger or smaller apertures, with the shutter speed automatically changing to maintain the same exposure. This is often referred to as "variable program" exposure control, offering a convenient combination of automatic and manual control.

Shutter Dial: To the left of and behind the Shutter button and Command dial,
this dial adjusts the shutter speed setting in Shutter Priority and Manual exposure
modes. Turning the dial toward the Fast setting decreases the exposure time
(increases shutter speeds), while turning it toward the Slow setting increases
exposure times (decreases shutter speeds).
Mode Selector: Underneath the Shutter dial, this tabbed selector ring sets the camera's exposure mode. Choices are Program AE, Aperture Priority, Shutter Speed Priority, and Manual.

Drive Dial: On the left-hand side of the SD9's top panel, this dial sets
the camera's drive mode. Choices are Off (turns the camera off), Single, Continuous
Shooting, 10-Second Self-Timer, Two-Second Self-Timer, Up (mirror lockup mode),
and Autoexposure Bracketing (AB position). The AB position isn't an actual shooting
position, but rather activates the command dial to set the step size for bracketing.
AB is activated by setting any nonzero value in the LCD data readout when the
Drive Dial is in this position. It's disabled by setting the exposure increment
back to zero. NOTE that the AB setting applies regardless of the shooting mode
selected (single or continuous exposure). While some cameras only apply auto
bracketing to continuous shooting mode, the SD9 implements it for single shots
as well. Thus, the camera will calculate and vary exposure across groups of
three shots, even if you're just shooting single frames. - This means it's important
to remember to turn off the AB function when you're done with it, so it doesn't
skew exposures on it when you're not expecting it to.
![]()
Metering Mode Button: Adjacent to the Drive dial on the upper left-hand
side of the top panel, pressing this button and turning the Command dial sets
the camera's metering mode to Eight-Segment Evaluative, Center, or Center-Weighted.
![]()
Function Button: Just below the Metering Mode button, this button sets the
remote control channel (either C1, C2, or C3) and also controls the focus indicator
sound. Pressing the button once displays the remote control icon in the status
display panel. Once the icon appears, holding down the Function button and turning
the Command dial sets the channel. (Having multiple channels available is important
if more than one Sigma camera is being triggered remotely in close proximity.)
To activate or deactivate the focus indicator sound, press the button twice,
and the speaker icon appears. At that point, holding down the button and turning
the Command dial turns the sound on or off.
![]()
AF Mode Button: Located directly beneath the Function button, pressing this
button and rotating the Command dial sets the AF mode to Single or Continuous.
![]()
Diopter Adjuster: On top of the optical viewfinder eyepiece, this slide
control alters the viewfinder display to accommodate eyeglass wearers. (As noted
above, it seems to offer a very wide range of adjustment, and the viewfinder
has a very high eyepoint as well, both characteristics helpful for eyeglass
wearers.)

Depth of Field Preview Button: Nestled on the top right-hand side of the
lens mount (as viewed from the front), this button stops down the lens to the
selected aperture setting without firing the shutter, letting you check the
depth of field through the viewfinder.

Lens Release Button: Tucked under the lens mount on the bottom left (as
viewed from the front), this button unlocks the lens, letting you rotate it
and remove it from its mount.

Resolution Button: In the top left corner of the rear panel, this button
sets the image resolution to High (2,268 x 1,512 pixels), Medium (1,512 x 1,008
pixels), or Low (1,134 x 756 pixels). Pressing the button while turning the
Command dial changes the setting. Note that there is no "quality"
setting on the SD9, since the camera only stores images in a raw (uncompressed)
format, hence there's no JPEG compression ratio to adjust.

ISO Button: Immediately to the right of the Resolution button, pressing
this button while turning the Command Dial sets the camera's light sensitivity
to 100, 200, or 400 ISO equivalents.

AE (Auto Exposure Lock) Button: In the top right corner of the rear panel,
pressing this button while the shutter button is held halfway down locks the
exposure. The "lock" is held only as long as you keep pressing the
AEL button. The exposure will remain locked even if you release and press the
shutter button again. Interestingly, the exposure will continue to be held even
if you snap multiple shots. This AEL operation is different from most other
cameras I've tested. Most lock with a single press of the AEL button (not requiring
it to be held down), but release again as soon as you trip the shutter, or press
the AEL button a second time. I found it a little awkward to have to keep my
thumb on the SD9's AEL button, but liked being able to hold the lock across
multiple exposures.

Exposure Compensation Button: Directly to the right of the AE Lock button,
this button adjusts the overall exposure from -3 to +3 EV in half-step increments.
Adjust the exposure by holding down this button and turning the Command dial.
The +/- 3EV range is wider than average, matching that generally found on professional
SLR cameras.

+/- Control Buttons: Below the AE Lock and Exposure Compensation buttons,
these buttons control the amount of digital enlargement applied to images displayed
on the LCD screen in playback mode. When an image is displayed at normal size,
pressing the "-" button switches to a nine-image index display. You
can scroll through the thumbnail images quickly using the arrow pad, and pressing
the "+" button brings you back up to a normal sized display of the
currently selected picture.
![]()
CF Open Release Lever: Below the +/- buttons, this lever unlocks and releases
the door covering the memory card slot.

Four-Way Arrow Pad: Just to the right of the LCD monitor, this rocker button
features four arrows. In any settings menu, the arrows navigate through menu
selections. In image review mode, the right and left arrows scroll through captured
images, while the up and down arrows jump forward and backward by three frames.
I found the action of this control a little finicky on the SD9, as I had to
hit it at just the right spot to get it to scroll up or down. The more
I used the camera, the less of an issue this became, as I apparently subconsciously
learned to how to press it, but it was rather annoying at first.

OK Button: Below the lower right corner of the LCD monitor, this button
confirms any menu selections. Through the settings menu, you can assign one
of several shortcut functions to this button, available only during image review.

Cancel Button: To the right of the OK button, this button backs out of settings
menus without making any changes.

Delete Button: Adjacent to the bottom left corner of the LCD monitor, this
button deletes images from the memory card in playback mode.

Modify Menu Button: Just above the Delete button, this button displays a
short review menu whenever image review is active, with the following options:

Info Button: Above the Modify Menu button, this button displays a range
of information about the current image, on a screen that also includes a histogram
of the currently-displayed portion of the image (if the playback view has been
zoomed, the histogram corresponds only to the currently visible area).

View Button: Directly above the Info button, this button activates the image
review mode. NOTE that pressing this button won't wake the camera from its "sleep"
mode. If the camera has powered down due to non-activity, you'll need to wake
it up by half-pressing the shutter button first, after which you can press the
view button to see the last picture shot. (I'd really like to see the View Button
also be able to wake the camera.)

Menu Button: Next to the top right corner of the LCD monitor, this button
displays the settings menu in any mode.
Camera Modes and Menus
Record Mode: The SD9 enteres Record mode by default whenever the camera is powered on. A Mode Selector dial on the top panel sets the exposure mode to Program AE, Aperture Priority, Shutter Priority, or Manual modes, and a full range of exposure and drive options are available.
Playback Mode: Pressing the View button on the back panel activates the camera's LCD monitor, and displays the most recently captured image. The arrow pad lets you navigate through captured images, and you can delete, protect, rotate, or enlarge images, as well as play back captured frames in a slide show.
 Settings
Menu: The following settings menu can be accessed in any camera mode, simply
by pressing the Menu button. (I've chosen to show each option as a separate
screen, since some of them contain quite a bit of information, and my usual
practice of using an animate sequence could be confusing.)
Settings
Menu: The following settings menu can be accessed in any camera mode, simply
by pressing the Menu button. (I've chosen to show each option as a separate
screen, since some of them contain quite a bit of information, and my usual
practice of using an animate sequence could be confusing.)
|
|||||||||||||||||||||||||||||||||||||||||
Image Storage and Interface
 The
SD9 stores images on either Type I or II CompactFlash cards, and is compatible
with IBM MicroDrives. The SD9 doesn't come with a memory card, so you'll want
to purchase a card along with the camera. Note too, that you're going to want
a LARGE card, as the raw-format images the SD9 saves occupy a lot of
space, particularly at the High resolution setting. Three image resolutions
are available: High (2,268 x 1,512 pixels), Medium (1,512 x 1,008 pixels), or
Low (1,134 x 756 pixels). All images are recorded in the raw file format, which
records data directly as captured by the sensor, losslessly compressed. (The
camera's interface software provides a useful and very flexible tool for correcting
and adjusting exposure and color values, and saving JPEG or TIFF images from
the raw sensor data files.)
The
SD9 stores images on either Type I or II CompactFlash cards, and is compatible
with IBM MicroDrives. The SD9 doesn't come with a memory card, so you'll want
to purchase a card along with the camera. Note too, that you're going to want
a LARGE card, as the raw-format images the SD9 saves occupy a lot of
space, particularly at the High resolution setting. Three image resolutions
are available: High (2,268 x 1,512 pixels), Medium (1,512 x 1,008 pixels), or
Low (1,134 x 756 pixels). All images are recorded in the raw file format, which
records data directly as captured by the sensor, losslessly compressed. (The
camera's interface software provides a useful and very flexible tool for correcting
and adjusting exposure and color values, and saving JPEG or TIFF images from
the raw sensor data files.)
As noted, the SD9 uses lossless data compression as it saves the data onto the memory card, but interestingly there seems to be little compression used for the medium and low resolution images. (Although the compression figures shown are based on a baseline of 8 bits per color channel, and the SD9 actually digitizes to 12 bits per channel - So there's actually an additional factor of 1.5 that's applied, but not reflected in the compression figures below.)
Following is the number of files, and their approximate sizes, that will fit on a 256MB memory card. (As you can see, you'll really want a large memory card or cards to use with the SD9! As I write this, 512 MB cards are appearing on sale various places for prices as low as $150, and I'd really advise getting at least one card that large for use with the SD9. - And while you're at it, think about upgrading the hard disk on your computer too.)
|
Resolution/Quality 256MB Memory Card |
|
|
| Full Resolution 2,268x1,512 |
Images (Avg size) |
32 8 MB |
| Approx. Compression |
1.3:1 | |
| Medium Resolution 1,512x1,008 |
Images (Avg size) |
54 4.7 MB |
| Approx. Compression |
1:1 | |
| Low Resolution 1,134x756 |
Images (Avg size) |
2.5 MB |
| Approx. Compression |
|
|
The SD9 is equipped with both USB and FireWire (IEEE 1394) interfaces, the USB interface conforming to version 1.1 of that standard. The camera apparently does not function as a storage-class device, as it didn't show up on my Mac OS 9 desktop, but rather required me to connect via the provided Photo Pro software application.
When I tested download times with the camera, I had a hard time believing the results - They were so slow. It's possible that there were software/driver conflicts on the machines I used for testing, but if so, the SD9 was the only camera that succumbed to them, as other cameras worked just fine. On the Mac, I never managed to get the USB interface to work reliably at all, the Photo Pro software froze up whenever I connected the camera. The FireWire interface worked on the Mac (a now somewhat aging G4, with a 500 MHz processor and 640 MB of RAM), but *very* slowly. I clocked the FireWire transfer rate at 268 KB/second, a number that would be on the slow side even for a USB interface. Giving up on the Mac, I switched to my even more elderly PC to test the USB download speed, and was amazed to find that it could only move data at 35.7 KB/second. (That was on a 350 MHz PII machine, with 512MB of RAM, running Windows 98.) - I haven't seen transfer rates that slow since the days of serial-port-connected digicams. Just to make sure that there wasn't something radically amiss with the PC (as well as to check operation with a more modern operating system), I also installed the Photo Pro software on my Sony VAIO laptop, running Windows XP. (1.2 GHz PIV, 256 MB RAM.) The performance there was a little better, but only marginally so, as I clocked the transfer rate at 47 KB/second.
It's entirely possible that there was something wrong with all three computers I tested the SD9 with, but I strongly doubt it. As noted, other cameras and scanners work fine on all three machines, producing normal transfer rates for the interfaces involved. The bottom line that it's only marginally feasible to download directly from the camera via FireWire, and completely pointless with USB. - Plan on buying a fast external card reader along with the SD9, if you don't already own one.
Lost Images? - Download this image-recovery program so you'll have it when
you need it...
Since we're talking about memory and image storage, this would be a good time
to mention the following: I get a ton of email from readers who've lost photos
due to a corrupted memory card. It's tragic when it happens, there are few things
more precious than photo memories. Corrupted memory cards can happen with any
card type and any camera manufacturer, nobody's immune. "Stuff happens,"
as they say. A surprising number of "lost" images can be recovered
with an inexpensive, easy to use piece of software though. Given the amount
of email I've gotten on the topic, I now include this paragraph in all my digicam
reviews. The program you need is called PhotoRescue, by DataRescue SA. Read
our review of it if you'd like, but download the program now,
so you'll have it. It doesn't cost a penny until you need it, and even then
it's only $29, with a money back guarantee. So download PhotoRescue for
Windows or PhotoRescue for
Mac while you're thinking of it. (While you're at it, download the PDF
manual and quickstart
guide as well.) Stash the file in a safe place and it'll be there when you need
it. Trust me, needing this is not a matter of if, but when... PhotoRescue
is about the best and easiest tool for recovering digital photos I've seen.
(Disclosure: IR gets a small commission from sales of the product, but I'd highly
recommend the program even if we didn't.) OK, now back to our regularly
scheduled review...
Video Out
 The
SD9 features a Video Out connector jack, and offers options both NTSC and PAL
signal timing through the setup menu. A video cable accompanies the camera,
letting you connect it to a television set for use with image review. All LCD
menus and screen displays are mirrored on the video output.
The
SD9 features a Video Out connector jack, and offers options both NTSC and PAL
signal timing through the setup menu. A video cable accompanies the camera,
letting you connect it to a television set for use with image review. All LCD
menus and screen displays are mirrored on the video output.
Power
The SD9 uses either four AA-type batteries or two CRV3 lithium battery packs for power, plus a set of two CR123A lithium batteries in a secondary compartment. Both sets of batteries must be in place for the camera to operate. No batteries come with the camera, so I highly recommend picking up two sets of rechargeable batteries a reliable battery charger, and keeping a spare set of batteries charged at all times. Also, don't forget to pick up a couple of sets of the (expensive) CR123A lithium cells too, as you'll definitely want to have spares on hand when your first set runs out. (Click here to read my "battery shootout" page to see which rechargeable batteries currently on the market are best, or here for my review of the Maha C-204F charger, my longtime favorite.)
The main batteries load into a tray that inserts into the side of the camera, while the two lithium cells load into a smaller compartment on the bottom panel. An AC adapter does come with the camera, and is useful for time-consuming tasks such as image review and downloading. (See my notes above under "Image Storage and Interface" though - You probably won't want to bother with downloads from the camera, but rather just get a good card reader.) The SD9 also features an automatic shutoff, which turns off the camera after a period of inactivity (from 10 seconds to five minutes).
It's important to note that you need to remember to turn the SD9 off when you're not using it. Although I left the camera's automatic shutoff option set to its default of 30 seconds, I was dismayed to discover that not turning the Drive control to "off" drained the CR123A lithium cells. - I say "dismayed" because I discovered that a set of two of these batteries cost $13.99 at my local Radio Shack.
Power consumption on the SD9 is really a mixed bag, and a little hard to project, since it turns out to depend so heavily on the camera happens to be doing. When the camera is in a quiescent state (neither actively capturing nor displaying an image), power consumption is quite low, and a set of freshly charged, high-capacity NiMH cells should last six hours or more in this state. (Although they'll actually last about four, see my comments a couple of paragraphs further on.) Steady-state power drain in playback mode is also fairly low, such that you should get over two hours of continuous run time viewing the same image. (Actually, a bit over an hour and a half in playback mode.)
There lies one rub though: "Viewing the same image." The SD9 apparently has a pretty beefy processor in it, because the power drain increases dramatically whenever you ask the camera to do something with an image. When it's actively saving images to the memory card, the current drain runs 500-600 mA at 5 volts, with spikes as high as 1500 mA at the beginning of the operation. And since it can take a good 10 seconds to save each image, even with a fast memory card, this represents an appreciable amount power. There's more though: Any time you view an image, zoom in on one, or even scroll around the zoomed display, the power drain spikes upward again, into the 900 mA range, albeit for a fairly short time. Thus, if you spend much time reviewing your images, particularly zooming in and panning around them, your battery life could be fairly short.
A significant factor in the SD9's apparently short battery life though, is that it seems to have a fairly high cutofff voltage below which it won't operate. This means that even fairly high-capacity NiMH batteries may not power the camera for very long, depending on how their voltage varies as they're discharged. Since NiMH have lower initial terminal voltages than other types, the camera may turn off prematurely, even though there's still quite a bit of capacity left in the batteries.
As it happens, I'm a bit of a "battery geek," so was well-equipped to test how completely the SD9 could drain NiMH AA cells. I do a lot of battery testing (see my battery shootout page for the sordid details), so have both a reliable means of measuring the remaining charge capacity in batteries, as well as quite a few sets of batteries with well-characterized capacities. As a test, I took a set of very high capacity NiMH cells (Kodak 1850 mAh units - about the best I've currently found, although they're not yet added to my shootout page), and ran the SD9 from them until it shut down due to low supply voltage. I immediately put these cells into my "MSD" (Mad Scientist's Device) battery tester, and drained them to my standard endpoint of a bit under 1 volt per cell, measuring in the process the total power they delivered before reaching exhaustion. These cells reliably show a "full" capacity of roughly 8.2 watt-hours, and after the SD9 stopped working, they still had fully 2.47 watt-hours left. - This means that the SD9 left fully 30% of the batteries' total capacity untouched.
I don't want to convey the idea that the SD9 has unusually bad battery
life, but do need to point out that its run times are a good 30% shorter than
the numbers in my standard table below would indicate, and point out that "your
mileage may vary,"
depending on the voltage profile of the particular batteries you're using. Also,
this table is based on quiescent, steady-state power drain, while the SD9's
actual power consumption fluctuates a good deal, depending on what the camera
is doing. Bottom line, the SD9's battery life isn't awful, but it's also not
the best I've seen either. - Be sure to get several sets of high-capacity NiMH
cells and keep them charged and available when shooting. Also, be sure to pack
along an extra set of the CR123A lithium cells, so they'll be handy when the
set in the camera runs out.
|
|
(@ 5v) |
Run Time (1600mAh, 4.8v 4 NiMH Cells) |
| Capture Mode, no LCD |
|
(Plan on 4 or less) |
| Capture Mode, Cont AF |
|
(2.8 or less) |
| Half-pressed shutter button |
|
(2.8 or less) |
| Memory Write (transient) |
|
|
| Image Playback |
|
(1.4 or less) |
| Image Playback, zooming/panning |
|
(1.2 or less) |
Included Software
| |
|
|
To my mind, the excellent Foveon-developed Photo Pro software is a big part of the allure of the SD9. I don't usually pay too much attention to the software that's included with the cameras I review, but the Photo Pro application justifies an exception to that rule. The degree of control it gives the photographer over color and (particularly) tonal rendition is nearly unprecedented.
At this writing, I don't have my review of the Photo Pro software ready to share yet, so for now will just say "stay tuned." I hope to have a full report on it appearing in this space within a week or so.
In the Box
Included in the box are the following items:
Test Results
|
For the full set of my standardized digicam test photos, check out the SD9 Test Photos Page, where you'll find a detailed commentary as well as the photos themselves.
|
For an interesting side by side comparison between the
SD9 and three other competing digital SLRs (with a variety of subjects)
see my Digital SLR Shootout pages. |
This is much longer than my usual Test Results summary, but several factors
dictated the length. The "full color pixel" technology of the Foveon
X3 sensor used in the SD9 has captured the public's imagination to an unprecedented
degree, and with some justification. It's something genuinely new in the digicam
market, and the concept and its apparent advantages are easy to explain and
understand. This has led to a level of excitement in the digicam community beyond
anything I've seen previously, with claims and counterclaims abounding, fueled
by a paucity of hard information. Many enthusiasts have decided that the SD9
should be their next camera, based entirely on the strength of the concept,
rather than objective evidence its performance. Discussions on the 'net regularly
devolve to the level of religious dogma, and few people seem to be taking a
dispassionate look at what the technology in general and the camera in particular
is really capable of.
In the face of this, I wanted to be careful to describe the benefits and shortcomings
accurately and completely. I don't plan to make this level of discussion a habit
in my camera reviews (I don't remotely have the time), but the level of communal
agitation produced by Foveon and Sigma seem to call for it in this instance.
For the full set of my standard test shots, as well as my detailed comments
thereon, see the _SD9's Pictures Page._ For a set of more photographically interesting
subjects, shot with four competing SLRs, see our _SLR Shootout Page._ For a
condensed summary of my findings and some more general comments on the camera
and sensor, read on below.
My initial reaction to the SD9 was generally pretty favorable. It seemed like
a capable camera, offering high resolution and good color at an affordable price.
The more time I spent with it though, the more I found some of its behavior
problematic, leading me to revise my overall opinion of it somewhat. Here's
a summary of some of my findings, good, bad, and otherwise.
User Interface
I'll start out with something positive. I liked the SD9's user interface quite
a bit. The one-function-per-button design is both very easy to master, and fast
to use in practice. The rear-panel LCD menu system is very clear and easy to
navigate. I particularly liked the Sigma/Foveon implementation of the histogram
display, easily superior to any other I've seen. All in all, it's a convenient
camera to use, quite easy to get used to after only a little shooting with,
and quick to navigate while shooting.
Resolution
Foveon claims that the X3 sensor technology delivers twice the resolution per
pixel of conventional striped sensor arrays. By that measure, the 3.43 (effective)
megapixel chip in the SD9 should deliver resolution early equivalent to that
captured by 7-megapixel conventional sensors. In my tests though, the SD9 actually
resolved slightly less detail than its 6-megapixel competition. Images from
the SD9 are very sharp, thanks both to the sensor technology itself,
but also to the lack of an anti-aliasing filter. This may lead some to regard
the SD9's photos as being "higher resolution" than those from its
6-megapixel brethren, but the bottom line is that it captures slightly less
picture information. Lacking an antialiasing filter, it is also more prone to
luminance aliasing. While not subject to the sort of color aliasing seen
in striped sensors, the X3 sensor is still a sampled-data device, and so is
prone to jaggies along sharp contrast boundaries, and moire patterns in fine-grained,
repeating detail.
Aliasing
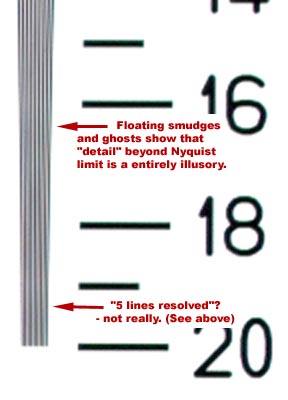 Having just mentioned aliasing, I want
to spend just a moment in an attempt to clear the air on aliasing, as there's
been a tremendous amount of confusion on the 'web lately about this. In particular,
because artifacts arising in aliasing can look like subject detail on resolution
target images, some people have been misled into thinking that the sensor was
actually imaging some (but not all) of the target lines. In actuality,
what was appearing in the image at that point was a pure illusion, in no way
representing the original image data. The enlargement at right of an SD9's shot
of a resolution target element shows what I'm referring to. At the very bottom
of the hyperbolic resolution wedge I've cropped out,four or five vertical lines
do indeed appear, so it's easy to see why some would interpret these as being
representative of the target lines. Consider though, that none of these lines
correspond in either size or position to the lines of the target itself. As
further evidence, look higher in the image, and observe the patches of gray
that seem to "float" around on the image. There's clearly nothing
in the original target to correspond to these, but they nonetheless appear in
the final image. Just to state it clearly, aliasing is always a bad thing,
because it introduces spurious information into an image that doesn't reflect
the subject detail (and in most cases, actually obscures it).
Having just mentioned aliasing, I want
to spend just a moment in an attempt to clear the air on aliasing, as there's
been a tremendous amount of confusion on the 'web lately about this. In particular,
because artifacts arising in aliasing can look like subject detail on resolution
target images, some people have been misled into thinking that the sensor was
actually imaging some (but not all) of the target lines. In actuality,
what was appearing in the image at that point was a pure illusion, in no way
representing the original image data. The enlargement at right of an SD9's shot
of a resolution target element shows what I'm referring to. At the very bottom
of the hyperbolic resolution wedge I've cropped out,four or five vertical lines
do indeed appear, so it's easy to see why some would interpret these as being
representative of the target lines. Consider though, that none of these lines
correspond in either size or position to the lines of the target itself. As
further evidence, look higher in the image, and observe the patches of gray
that seem to "float" around on the image. There's clearly nothing
in the original target to correspond to these, but they nonetheless appear in
the final image. Just to state it clearly, aliasing is always a bad thing,
because it introduces spurious information into an image that doesn't reflect
the subject detail (and in most cases, actually obscures it).
The misconception seems so widespread, that I feel I have to say this again: It is absolutely incorrect to say that the SD9 is "resolving detail above it's resolution limit" or words to that effect. What people are seeing is not scene detail, but rather just artifacts that they're mistaking for such. (In a past life, I specialized in image processing computer architectures and algorithms, so it makes me grate my teeth to see people looking at image artifacts and thinking that they're a good thing to have.)
Now, if aliasing is (apparently) so bad, it's natural to ask why Sigma and Foveon would design a camera that is so prone to it. The answer is that there's a tradeoff involved, and the other side of that tradeoff is a very desirable increase in edge acuity and sharpness. By leaving out the antialiasing filter, Sigma and Foveon produced a camera with very abrupt transitions across contrast boundaries in the image, something that our eyes interpret as "sharp". The downsides are aliasing, as we saw above, and also "jaggies" along gently curving or slightly angled edges. But some people may not be bothered by jaggies, and end up liking the "look" of the SD9's images in spite of them. Likewise, aliasing will only be apparent when dealing with finely-spaced, high-contrast detail, as with some man-made textures, particularly certain fabrics. If you don't shoot a lot of that sort of subject, you may not encounter the aliasing problem at all. (And interestingly enough, both problems will be reduced if you're shooting with a lower-quality lens with less resolving power than a pro-grade one. The lens itself can act as an antialiasing filter. - So if you cheap out on lenses for your SD9, you may actually end up with smoother-looking photos.) The bottom line is that this is going to come down to a matter of personal preference. Some people will like the very crisp-looking images that the SD9 produces, and either not be bothered by or be willing to accept the jaggies and aliasing that come along with it. Others will find the artifacts objectionable enough that they're unwilling to accept them in exchange for the sharp images.
Autofocus
This appears to be one of the SD9's problem areas. Autofocus speed will obviously
depend on the particular lens being used, but overall the SD9 is no speed demon
in this area. Worse, it can sometimes fail to focus altogether, even with well-lit
subjects. Our pro shooter Gibbs and I both saw this, although not frequently
enough to be able to fully determine what triggered it. The problem seems to
occur when the focus mechanism has to traverse a large part of its range when
shifting from one subject to another. - I know I saw it several times when using
the 50mm macro lens, which has a very broad focus range, but I think Gibbs saw
it both with that lens and the 20-40mm zoom. What happens is that the lens will
rack back and forth, "hunting" for the correct focus setting, but
never actually find it. The camera eventually seems to "give up,"
stopping at some intermediate position far from the correct focus point. At
least once for both of us, continuing to hold down the shutter button led to
the camera waking up again after a few seconds, and eventually finding the correct
focus position. This was disconcerting behavior to say the least, and is something
I've never before seen in a digicam, except under low-light conditions, which
was not where both Gibbs and I encountered it.
Exposure
I found the SD9's exposure system to rather unpredictable, often underexposing
the subject significantly. With low-contrast subjects, it usually produced correct
exposures, but even then sometimes got it quite wrong. (The "Musicians"
poster was one example of this. - This isn't by any means what I'd consider
a high contrast or difficult subject to meter, but the SD9 consistently underexposed
it by a full f-stop.) When dealing with high-contrast scenes, the SD9 almost
always underexposed the subject, apparently trying to hold onto highlight detail,
even when the highlights covered a very small portion of the total frame area.
This was a particular problem when shooting night scenes with small bright lights
included in the frame. - I found I had to dial in as much as +3EV (3 f-stops)
of exposure compensation to get a reasonably bright image in such situations,
while competing SLRs required far less.
Tonality
The SD9 tends to produce rather contrasty images straight from the camera. This
no doubt is part of the reason for its bright, saturated color: Pumping contrast
always helps color saturation. The high contrast can cause problems with highlight
detail and shadow noise though, when you try to compensate for it post-capture
in the Photo Pro software. Worse, the high native contrast means that even the
raw image data often lacks detail in the highlights. (See my comments on post-capture
exposure correction below.)
Color
Color was a bit of a mixed bag, but generally good. Under daylight-balanced
lighting, colors were rich and vibrant. (No doubt a bit too saturated for some
photographers, but that's easily handled in the Photo Pro software.) Hues are
generally accurate, and the only weakness I observed was a tendency to undersaturate
greens a bit. Color was a bit less well-behaved under imperfect lighting conditions,
with high-contrast subjects sometimes resulting in lower color saturation in
the final image files.
Color loss in highlights (and other findings by Phil Askey)
I can't take credit for this one - I noticed the effect in shots I took with
neon signs in them, but didn't tumble to what was actually happening until I
read my friendly competitor Phil Askey's excellent review
of the SD9. Phil correctly identified the issue as being that the camera
drops the chroma (color) to zero as it runs into the highlight range. Phil also
identified a number of other image-quality problems on the page of his review
linked above, including unnaturally blue skies, strange halos around light sources
in night shots, some odd chromatic aberration that seems to be linked to UV
light, image softness and loss of saturation at high ISO, and an odd nighttime
exposure bug. Definitely worth reading if you're considering an SD9 for purchase.
White Balance
White balance was a bit of an Achilles heel for the SD9. It worked quite well
in lighting that was more or less daylight-balanced, but had quite a bit of
difficulty with light having strong color casts. The most prominent example
of this in my own shooting was our "indoor portrait" test, shot under
household incandescent lighting. This shot has proven to be a pretty harsh test
of digicams' white balance systems, as it's a *very* warm-toned light source.
- The conventional wisdom in the photo industry is that household incandescent
lighting has a color temperature of 2800K (vs the 3200K of professional tungsten
and the roughly 5500K of standard daylight). By my actual measurement though,
household incandescent is generally closer to 2300K, a very yellow hue. The
SD9's auto white balance couldn't correct for this strong a color cast, leaving
a fair bit of yellow in the image. The SD9's custom white balance resulted in
greenish casts under this light source, and in fact in general produced noticeable
color casts in most of my tests. Most cameras have difficulty with the incandescent
lighting in their automatic white balance modes, but competing SLRs do better
than the SD9 when using manual or custom white balance settings.
Image Noise
There seems to be a fair bit of confusion and controversy over the SD9's noise
performance. As is always the case, some of the noise is doubtless attributable
to the X3 sensor itself, while some of which likely has its origins in the SD9's
signal processing circuitry. - This means that at this point, we can't fully
determine how much noise is a consequence of the X3 technology, and how much
might be caused by electrical noise in the SD9's signal-conditioning and -processing
chain.
The noise controversy has doubtless been further fueled by the fact that the
noise varies quite a bit depending on the subject, being a fairly strong function
of subject color and saturation. I'm making some in-depth noise measurements
of the SD9 and several other SLRs, for later presentation on this site, but
my initial results have been illuminating. In neutrals (shades of gray), noise
at low ISO is actually fairly close to that of competing SLR models, perhaps
an average of 20% or so higher. (That's a very ballpark figure though, so don't
hold me too closely to it when my more detailed analysis comes out. The bottom
line is that it's clearly higher, albeit not by a large amount.) Where noise
really skyrockets though is in the red/magenta portion of the spectrum. In that
range of colors, the SD9's noise levels are as much as 2-3x higher than competing
models. At higher ISOs, the SD9's noise performance appears to lag that of other
SLRs, but I haven't done the data reduction yet to be quantify that.
Software
A significant feature of the SD9 is the Foveon-developed Photo Pro software.
This is clearly one of the best post-capture image adjustment programs I've
yet used, with a very "photographic" sensibility. - By that I mean
that I think photographers will find it very natural to use and easy to learn.
I do have one piece of feedback for Foveon on Photo Pro though, which is that
I'd like to see a more continuous range of control in its color balance adjustment.
I often found that moving from a correction of, say, 5C+4M to 6C+4M produced
a larger increment of color shift than I wanted. - A "5.5C" setting
or its equivalent would have been nice. In saying this though, I don't want
to detract too much from Photo Pro, as it's an exceptionally effective and intuitive
tool for adjusting color and tone in photos.
I was less impressed with Photo Pro's "auto" correction capability
though. It worked pretty well for images that were close to the correct exposure
and with modest color casts. If the exposure was off by more than half an f-stop
though, or if the subject was too contrasty, Photo Pro's automatic adjustment
rarely resulted in what I'd consider a usable photo. Given the SD9's mediocre
white balance performance, this means that many photos are likely to need manual
adjustment. Not a problem if you enjoy tweaking photos on the computer, but
for many users the need to tweak significant numbers of their photos could be
an impediment.
RAW-only File Format
This is both a strength and weakness of the SD9's design. For all the conceptual
simplicity of the X3 technology, it apparently requires some pretty hefty number
crunching to unscramble the data in the color channels. This means that it's
not feasible to process the images to a final JPEG format on the camera, hence
the SD9's RAW-only file format. While Photo Pro does let you batch-extract your
images to TIFF or JPEG, as noted above I felt that I needed to manually tweak
most of the images I shot, negating the benefits of batch processing.
Of course, another factor with RAW-format files is that they're a lot bigger
than even high-quality JPEGs. This translates into both greater storage requirements
(a need for larger memory cards) and slower buffer-clearing times when shooting
series of photos. - The SD9 took a really long time to clear its buffer to the
CF card, after shooting a set of 6 images. As to card size, you should consider
a 256 MB memory card as the bare minimum to work with, especially if you're
at all inclined to bracket your exposures.
Post-Capture Exposure Correction
One benefit that's held out for RAW-format image files is the ability to correct
for over- or underexposure after the fact. The idea is that the file contains
12-bit (or at least some bit depth greater than the eight bits/channel in the
final file), so you should be able to select the "best" 8 bits for
final output. Indeed, in the professional realm, Kodak has made quite effective
use of this capability as a marketing tool for their high-end SLRs. Unfortunately,
just having a RAW file format doesn't automatically mean that it has sufficient
data in it to permit this sort of post-capture exposure manipulation.
In the shots I snapped of my standard test subjects, I found little or no "hidden"
data present in the SD9's RAW files, at least in the case of blown highlights.
This seemed odd, as other reviewers have claimed that they've seen a full f-stop
of detail that could be recovered from blown highlights, where I saw essentially
none.
Given this discrepancy, I to test the exposure headroom of the Sigma/Foveon RAW files directly.
The approach I took was quite simple. I made a test target in Photoshop, consisting of a couple of density ramps that faded off into pure white. To provide a more subtle gray-on-gray measurement (rather than gray against the stark white of the paper), I put a second ramp inside each primary one, with the density values of the secondary ramps adjusted so as to produce a fairly consitent step between them. The resulting target (see the illustration photos below) isn't calibrated to any absolute standard, but it turns out that it really doesn't need to be for the sort of rough measurement we're doing here. - All we need to do is to compare the point at which the camera loses the grayscale with various combinations of exposure and post-capture processing.
| A simple test target for observing exposure headroom in RAW files. | ||
 |
 |
 |
| Nominal Exposure | Moderate Overexposure | Strong overexposure |
The table above shows what the target itself looks like, and what happens when it is overexposed to varying degrees. Note how you can clearly see where the visible highlight detail stops in each image, and how the point at which it stops moves lower the more the target is overexposed.
As it turned out, this approach worked very well for testing the SD9's RAW-file exposure headroom. What's more, it completely confirmed the informal impression I had developed from looking at my standard test shots. - It turns out there's only a quarter-stop or less of headroom in the SD9's raw images, certainly not an amount that's useful photographically. (Keep in mind that the total overexposure below is only a half an f-stop.)
The images below show crops from shots of this target taken at two different exposures and with different post-capture treatments. Note that the way I conducted this test was actually quite generous to the SD9, in that I wasn't judging it by whether I could reproduce a nice-looking approximation of the default tone curve in the overexposed images, but instead was simply looking to see at what point it could pull out any detail from the images. To see this, I jacked the tone curve around quite a bit with the Levels control in Photoshop, so I could see just where the first hints of data began to appear. In the table below, I've included both the original images and the ones that I've adjusted in Photoshop. I've also included links to TIFF-format crops from the TIFFs I extracted from the RAW files, and notes on the settings I used in Photoshop's Levels control to produce the tweaked images, so everyone can see exactly what I did.
| Results of Exposure Headroom Test | ||
|
Default exposure
|
Plus 0.5 EV
|
Plus 0.5 EV, adjusted in PhotoPro
|
 |
 |
 |
 |
 |
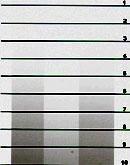 |
|
As above, but adjusted with Photoshop's "Levels" control to show point at which highight detail stops.
|
As above, but adjusted with Photoshop's "Levels" control to show point at which highight detail stops.
|
As above, but adjusted with Photoshop's "Levels" control to show point at which highight detail stops.
|
| Original TIFF File | Original TIFF File | Original TIFF File |
As you can see, the PhotoPro software only managed to pull back the tiniest amount of the highlight detail that was lost when the exposure was increased by only 0.5 EV (1/2 of an f-stop). In the middle example, extracted with PhotoPro's default settings, the detail stops just below line 5. (What looks like detail above that point is actually just a variation in noise patterns. You can tell that there's something there, but the differences you see there amount to only one brightness unit in the file itself. They're visible here because of the extent to which I've cranked on the Levels adjustment to make the cutoff point visible.) In the example on the right, where I've pulled the exposure down by a full f-stop in PhotoPro, the detail stops just under line 4, althought the same sort of noise patterning shows the presence of the target pattern one level above that. (For those who may be wondering, I pulled the exposure down by a full stop in PhotoPro to be sure that I'd be able to see anything at all that was in the RAW file to be found. While this made the overall image darker, including the pure white areas, this assured me that any information that might be present would be moved down into the active tonal range.)
Given that a half an f-stop of overexposure produced a highlight loss of between four and five divisions on my makeshift chart, the roughly one division's worth of highlight that I managed to bring back from the RAW file amounts to less than a quarter of an f-stop of recoverable data.
So why have people been claiming that there's a full stop's worth of headroom in the SD9's RAW files? I think it's simply a matter of not having looked carefully at the data that was actually present in the images extracted with PhotoPro's default settings. What I think has been happening is that manipulations in PhotoPro are simply bringing detail that was present in the default images down into a tonal range where it becomes easily visible on-screen. There data was right there all along, and could have been seen simply by tweaking the tone curve in Photoshop without going back to the RAW file at all. Thus, while it looked like more detail was appearing, it was simply a case of detail that was already there being made visible. My guess is that nobody until now has thought or taken the time to do the sort of comparison shown above.
Given the controversy that I expect my findings to create, I've provided crops of the TIFF images extracted from the RAW camera files for anyone who'd like to play with them in Photoshop to see for themselves what data is or is not present in them. Simply click on the links below each image above to download these TIFF files to your local hard drive. In most cases, your browser won't know what to do with files with .tif extensions, so will simply ask you if you want to download them or not. (And before I get the inevitable emails about them, those spots you see on the images are from dust particles on the SD9's sensor surface, not blotches on the target itself.)
Phew... OK, on to one remaining issue, and then my conclusion:
Dust and Quality Control
This was a real shocker, but at least ought to be able to be fixed with a bit
better control of Sigma's manufacturing environment. The sample SD9 I received
was laden with dust inside the body (behind the dust screen), clearly visible
on the mirror, and painfully evident in photos shot with the lens stopped down.
(I'm pretty certain I was the first reviewer to comment on this.) As noted,
this should be easy for Sigma to correct, but the fact that the dust was there
in the first place is a little troubling.
Conclusion
As I said above, my initial reaction to the SD9 was pretty positive. Now that
I've had more time to work with it though, some of my enthusiasm for it has
waned. In particular, it has obvious issues with its autofocus, and I found
its exposure metering to be problematic as well. It's white balance also struck
me as less effective than that of its competition, and the camera's maximum
400 ISO and limited maximum exposure times further restrict its utility.
The SD9's X3 sensor does indeed deliver more resolution per pixel than conventional
striped sensor arrays, but it still doesn't resolve quite as much detail as
the six-megapixel competition. Its images are very sharp, but that's at least
partially because it has no antialiasing filter. Thus, while it is pretty completely
immune to color aliasing, it is much more subject to luminance aliasing than
its competition. It's possible that including an aliasing filter in the design
would indeed show the X3 sensor delivering 2x the resolution per pixel of conventional
arrays, but as it is the strong luminance aliasing obscures the finest detail.
The combination of full-color pixels and lack of an antialiasing filter clearly
produces images with a different "look" to them though, so there will
doubtless be shooters who will prefer its images to those of other camera models.
- Raw performance measurements rarely translate well into personal preferences.
The SD9's exposure flexibility is quite good, with all the modes and controls
you'd expect to find on an SLR, although its 0.5 EV exposure adjustment steps
are a little coarse for a digicam. Its combination of a RAW file format and
the excellent Photo Pro software provides an excellent ability to adjust images
post-capture, but at this point I have to say that the jury is still out as
to whether the RAW files actually contain significant highlight detail beyond
what appears in images converted to JPEG using the default settings.
The Sigma lenses that couple with the SD9 body do indeed appear to have very
good optical characteristics, as well as very competitive prices in the marketplace.
This could be viewed as a reason to buy the SD9, for those interested in accumulating
a large collection of lenses on a budget. On the other hand, most of the same
Sigma lenses are available for roughly the same prices with Nikon or Canon mounts,
so anyone would be free to use them with one of the competing SLR designs if
they wished.
I commented in the conclusion to my original "first look" at this
camera that I expected something of a holy war to erupt on the 'net over the
SD9's color rendition, resolution, and image noise, and that indeed has come
to pass. It does appear though, that the images I and others have posted from
the camera have injected a healthy level of reality into the discussions, and
I hope that the test shots I've now posted, as well as the raw-format highlight
headroom results (and eventually, some truly detailed noise measurements) will
continue that trend.
As the first digital camera from a company not previously involved in the digital
world at all, the SD9 is a remarkable achievement. It clearly has a number of
limitations though, some of them serious. Taken as a whole, I think users give
up an awful lot of capability for the roughly $400 in price that separates it
from the competing models from Nikon and Canon (and the roughly $800 diference
relative to Fuji's S2 Pro). I do think though, that the SD9 will nonetheless
find happy homes with many shooters drawn by that price difference, and by the
different "look" of the images produced by its full color pixels and
non-antialiased optical design. Ultimately, the decision to purchase an SD9
will be a very personal one - I hope that the information I've presented here
will help people make it in an informed fashion.
<<SD9 Sample Images | Additional Resources and Other Links>>
Reader Comments!
Questions, comments or controversy on this product? Click
this link to see what other Imaging Resource readers have had to say about
the Sigma SD9, or add comments of your own!