Canon PowerShot TX1 Design
Built almost entirely of stainless steel, the Canon TX1 is a hefty, rectangular digital camera. All resemblance to the Digital ELPH line disappears there, however. It's built more like a camcorder placed on its back. The 10x zoom lens deploys from behind a sliding metal door, the 1.8 inch screen swivels up from the side like a bird wing, and most of the important controls are on the back toward the top half of the TX1. Its unique shape has no grip, because the camera is the grip, fitting completely into and quite filling your hand. Measuring only 3.5 x 2.36 x 1.14 inches (88.8 x 59.9 x 29mm), it's a little thick for a pocket, but does go well into cargo pant and jacket pockets. Its 8.5 ounces (241 grams) gives it the proper density for a better hold when shooting movies or stills. Shooting vertical images is a little awkward with the Canon TX1, and we recommend attaching and using the included wrist strap to guard against accidental drops. Whether you find using the Canon TX1 easy or difficult to use depends heavily on finger length and hand size. Big thumbs will not like the TX1's rear controls, and neither will short fingers be able to reach the shutter button; but long fingers will have a tough time staying away from the lens.

From the front, the Canon TX1's lens emerges from its heavy sliding metal door. Above is the Flash bar and Self-Timer/AF assist lamp. Beneath the lens is a small raised metal accent that gives tactile reminder of the lens's location to keep your fingers out of the way before the lens deploys. Then there's the logo and the lanyard loop at the bottom. With the screen open you can see the stereo microphones on the back of the screen.
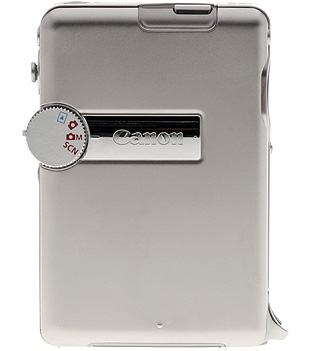
The right side shows the Mode dial and the side view of the shutter button (top).
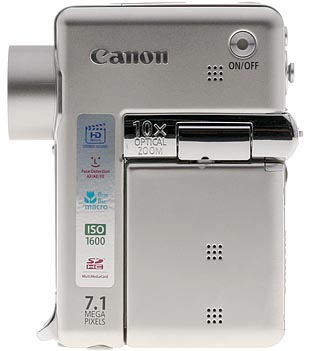
On the left you can see how far the lens sticks out. The Power button is awkwardly located on the upper right, just next to the speaker. Below that is the hinged, articulating LCD screen, again with stereo microphones.
On the top deck are the Shutter button and the Print/Share button, whose purpose can be re-programmed for use in any of the Record modes.

The back is where the rest of the action is. The Display button is upper left, the Menu button upper right. The Four-Way joystick controller is centered below them. Just below this is the zoom rocker and below that is the Record button. Finally, the SDHC card door is below that, opening with a slide to the left. The LCD display must be opened to slide the door.
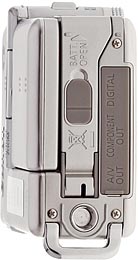
The bottom has the final items: A metal tripod socket, a very fragile-feeling battery door, and a difficult-to-remove rubber port cover. The latter conceals an A/V Out jack, a Component out port, and a USB port.
Canon PowerShot TX1 External Controls

Shutter Button: Located on the top panel, toward the front, this button sets focus and exposure when halfway pressed, and fires the shutter when fully pressed. If the Self-Timer is activated, a full press of the Shutter button triggers the countdown. Unlike other digicams, the Shutter button does not start a Movie recording.

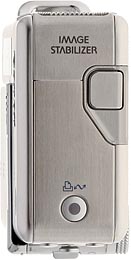
Movie Button: Directly under the Zoom Lever on the back, this button starts and stops movie recording. Movie mode can be entered from any of the Canon TX1's Record modes.
![]()
Zoom Lever (see image above): On the back panel, toward the middle two-thirds up from the bottom, this lever controls the optical and digital zoom in any record mode. Move the lever up for telephoto and down for wide angle.
In Playback mode, the wide-angle end activates first a nine-image index display, and then a Jump mode that allows you to page through screens of nine thumbnails at once. The telephoto setting zooms in on captured images for closer inspection of fine details.
![]()
Power Button: On the left panel, above the LCD screen is the Canon TX1's Power button; this button turns the camera on or off. When on, the opaque center of the button turns green.

Mode Dial: On the right panel, this rotating dial controls the camera's operating mode, offering the following options:
- Playback Mode: Replays captured images, and movies, with options for image management, and printing.
- Auto Record Mode: Sets the camera for automatic still image and movie capture, with limited user options.
- Manual Record Mode: Sets the camera for still image and movie capture (actually a Programmed Auto mode), with varying exposure options available through the Function menu (though still no direct aperture or shutter speed controls).
- Scene Mode: Accesses the 10 preset Scene modes, which include: Portrait, Night Snapshot, Indoor, Foliage, Snow, Beach, and Aquarium modes.
![]()
Print/Share Button: On the top panel, toward the back, the Print/Share button starts file transfer to Windows computers, or connects to a variety of compatible printers, including those that understand the PictBridge protocol. The button glows blue when ready to print or transfer images, and flashes blue when printing or transferring images.
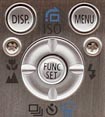
Multi-Controller / Function/Set Button (see image above): On the back panel, below the Menu and Display buttons and above the Zoom Lever, this control performs a variety of functions.
In any settings menu, the joystick navigates through menu selections when toggled left, right, up, or down. In Record mode, pressing the joystick up lets you change the ISO settings by cycling through ISO speeds from Auto to Auto High, 80, 100, 200, 400, 800, or 1,600 equivalents in Manual mode. In Auto mode, only Auto and Hi ISO work. Shifting down allows you to switch drive mode from single, continuous, continuous in Auto Focus, and the different times of the Self-timer (custom timer also available in Manual mode). Pressing the joystick left allows you to choose between Macro Mode, Normal AF Mode, and Infinity Mode in Manual mode. The right side accesses the camera's flash modes, cycling through Automatic, Forced On, and Forced Off.
In Playback mode, shifting up calls the Jump menu. This menu allows you to choose to skip over different numbers of pictures. Shifting down calls the Delete menu, while the right and left positions scroll through captured images and movie files. When you zoom in on an image, all four directions pan within the view.
Pressing the Function button in brings up the Function menu, whose options are detailed on the Operation tab under Canon TX1 Modes and Menus.
![]()
Display Button: Above and to the left of the Function/Set joystick, this button cycles through the LCD image and information displays. In Playback mode, the Canon TX1 cycles through the image only, information display, and info display with histogram modes.
![]()
Menu Button: To the right of the Display button, this button accesses the LCD menu system in both Record and Playback modes.
 Fujifilm GFX 50S Review
 Fujifilm X-T3 Review
 Olympus E-M5 III Review

Follow Imaging Resource