Canon PowerShot TX1 Operation
Though there's a mode called Manual, the Canon TX1 has no full manual mode. Its exposure is either fully auto or program with some manual choices available. The TX1's dual nature means that the camera can be switched instantly between Still and Movie modes depending on which button your press: the Shutter or Record buttons, respectively. To operate the Canon TX1, you need to select your mode, press the power button, and deploy the swivel screen. Modes are selected via the Mode dial, and include Playback, Auto, Manual, and Scene. Menus are navigated via the Four-Way joystick, and selections are made by pressing in on the joystick. When in Record mode, pressing in on the joystick launches the Function menu for access to common functions like sub-Modes, EV compensation, White Balance, My Colors, Aspect ratio, Movie resolution, and Still Resolution. Though Canon did the best they could with the chosen shape, operating the controls with grace -- especially important in Movie mode -- is very difficult without practice. Actions like zooming and starting and stopping recording are awkward; and reaching for the shutter button is very cumbersome. We recommend that you get a big card and practice, practice, practice if the Canon TX1 is otherwise the best choice for your still and video work.
 Record Mode Display. In Record mode, the Canon TX1's LCD shows either a window with almost no information, or a window with Mode, ISO, Flash, and Capture mode displayed. Across the bottom both the chosen video and still resolution are displayed, as well as the time and number of stills available on the card at those resolutions. Pressing the Display button merely switches between no info and full info. The Display Overlay option in the Menu allows you to set Grid Lines, a 3:2 guide, and both to display on the screen to aid in composing images where straight lines are important, and when you want to frame for 4x6 printing. The Canon TX1's Face Detect mode is the default, which displays a thin box around all faces it detects. If you turn the mode of via the Menu, the Canon TX1 defaults to a center AF point.
 Playback Mode Display. Playback mode is selected by the Mode Dial on the Canon TX1. Pressing the Display button cycles through a Standard info display, which features the frame number, the displayed images place among all other images, the capture resolution, and date and time captured. Pressing the Display button brings up a more complete set of information, including Exposure mode, Metering mode, ISO, Shutter speed, Aperture, EV compensation, White balance, file size, and capture resolution, in addition to the above. A histogram is also displayed at the center. A second press of the display button clears all info, showing only the image. You can zoom out to a nine-thumbnail display, then to a Jump mode, where you can jump nine images at a time. You can also zoom in on the image and use the joystick to navigate around within the image. Pressing the joystick in switches to a "switch image" mode that allows you to stay at the same zoom level and location while switching between images; great for checking focus.
Canon PowerShot TX1 Modes and Menus
![]() Auto Record Mode: Sets the Canon TX1 for automatic still image capture, with compression and image size options available from the Function menu. You can also use the joystick to turn the flash on or off, change the image mode to macro mode, turn on the self timer, and change the ISO to either High or Automatic.
Auto Record Mode: Sets the Canon TX1 for automatic still image capture, with compression and image size options available from the Function menu. You can also use the joystick to turn the flash on or off, change the image mode to macro mode, turn on the self timer, and change the ISO to either High or Automatic.
![]() Manual Record Mode: More of a Programmed Auto shooting mode than a Manual mode (you have no direct control of the shutter or aperture), this mode offers a wide range of exposure and shooting options through the Function menu.
Manual Record Mode: More of a Programmed Auto shooting mode than a Manual mode (you have no direct control of the shutter or aperture), this mode offers a wide range of exposure and shooting options through the Function menu.
![]() Scene Mode: In Scene mode, the Function menu offers Portrait, Night Snapshot, Indoor, Foliage, Snow, Beach, and Aquarium modes.
Scene Mode: In Scene mode, the Function menu offers Portrait, Night Snapshot, Indoor, Foliage, Snow, Beach, and Aquarium modes.
![]() Movie Mode: Records movie clips with stereo sound in several modes. Movie modes include Standard (1,280 x 720, 640 x 480, or 320 x 240) and Fast Frame Rate (320 x 240 at 60 fps). You can record until the card is full if you are using a high-speed card. You can zoom while recording, as well as snap a full-resolution picture.
Movie Mode: Records movie clips with stereo sound in several modes. Movie modes include Standard (1,280 x 720, 640 x 480, or 320 x 240) and Fast Frame Rate (320 x 240 at 60 fps). You can record until the card is full if you are using a high-speed card. You can zoom while recording, as well as snap a full-resolution picture.
![]() Playback Mode: This mode allows you to scroll through captured images and movies, write-protect images, view a nine-image index display, zoom into a captured image, delete unwanted images, rotate images, set up images for printing on DPOF compatible devices, and play and edit movies.
Playback Mode: This mode allows you to scroll through captured images and movies, write-protect images, view a nine-image index display, zoom into a captured image, delete unwanted images, rotate images, set up images for printing on DPOF compatible devices, and play and edit movies.
Function Menu: Activated by pressing the Function/Set Button when in Record mode. The following options are available (not all options are available in all modes):
 Shooting Mode: Selects among the shooting options available in the Record mode selected on the Mode dial. Auto offers fewer options than Manual. Manual offers Manual, Super Macro, Color Accent, Color Swap, Stitch Assist Right, and Stitch Assist Left. Scene offers Portrait, Night Snapshot, Indoor, Foliage, Snow, Beach, and Aquarium.
- Exposure Compensation: Increases, or decreases the exposure from -2 to +2 exposure equivalents in one-third-step increments. Pressing the menu button brings up the long shutter mode,
- White Balance: Controls the color balance of images. Options are Auto, Daylight, Cloudy, Tungsten, Fluorescent, Fluorescent H, and Custom (manual setting).
- My Colors: Enables Vivid Color (high color saturation), Neutral Color (low color saturation), Sepia, Black-and-White, Positive Film, Lighter Skin Tone, Darker Skin Tone, Vivid Blue, Vivid Green, Vivid Red, Custom Color, or turns My Colors off.
- Aspect Ratio: Changes the aspect Ratio from 4:3 to 16:9.
- Recording Pixels/Frame Rates (Movie): Here you can choose the number of frames recorded within each second. There are different options depending on which aspect ratio the TX1 is set in. In 4:3, the options are 640 x 480 (30 fps), 640 x 480 (30fps) LP, 320 x 240 (60 fps), and 320 x 240 (30 fps). When the aspect ration is set to 16:9, the options include 1280 x 720 (30 fps) and 1280 x 720 (30 fps) LP.
- Recording Pixels/Compression (Still): Specifies the image resolution and compression. Resolutions are 3,072 x 2,304, 2,592 x 1,944, 2,048 x 1,536, 1,600 x 1,200, and 640 x 480 pixels. When you press the Menu button while on this display, the Resolution switches to Compression (Still) which sets the JPEG compression to Superfine, Fine, or Normal. A Widescreen mode shoots in 16:9 format at 3,072 x 1,728. This mode is for playback on widescreen televisions or printing on wide paper.
Record Menu: Accessed by pressing the Menu button in any record mode (some options are not available in all modes), three menu tabs appear, one each for Record, Setup, and My Camera sub-menus. The main Record menu options are as follows:
 Face Detect AF: Sets the Auto Focus/Face Detect system to on or off. This mode attempts to focus on faces, and if switched off, the camera bases autofocus on the center of the frame. Uses data to set focus and exposure in Evaluative mode.
- Digital Zoom: Sets the Digital Zoom to Off, 1.5x, 1.9x, or Standard. Standard is the digital zoom we're all familiar with; the other two set the camera to a full-time zoom of 1.5x or 1.9x greater than the standard setting, cutting the actual resolution down.
- Slow-Synchro: Lets you shoot with the flash at low shutter speeds.
- Red-Eye: Sets red-eye reduction for flash on or off.
- Self-Timer: Sets the Custom Timer time (not available in all modes). The custom timer can have a delay of 0-10, 15, 20, or 30 seconds, and allows multiple shots (from one to 10 in total) to be captured. If the camera is set to capture multiple shots, these are captured with an interval of about one second between shots, enough time for the flash to recharge if required. Focus and exposure are locked from the first shot. (A very handy feature for getting good shots of groups, as someone invariably blinks right as the shutter goes off.)
- Light Metering: Lets you choose between three different metering methods: Evaluative, Center Weighted Average, and Spot.
- Auto ISO Shift: Turns the Auto ISO Shift on or off. This feature makes it possible to shift the ISO speed with only the touch the Print/Share button. When the warning appears that there might be camera shake, the Print/Share button flashes. Pressing the button raises the ISO for a faster shutter speed.
- AF Mode: Choose between single and continuous Auto Focus Mode. Single will only focus when the shutter button is pressed halfway. Continuous will keep the camera continuously focusing even when the button is not pressed.
 AF Assist Beam: Turns the Canon TX1’s AF assist light on or off. If on, the bright orange LED on the camera's front automatically illuminates in low lighting.
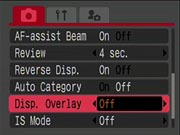
- Review: Turns the instant review function on or off, sets the amount of time that the captured image is displayed on the screen from two to 10 seconds, or allows a "Hold" mode where the image remains on the screen until the shutter button is half-pressed. The instant review function applies to still images only.
- Reverse Display: Turns the Reverse Display on and off. This option allows you to view yourself in a mirror image while shooting with the LCD flipped toward the front of the camera.
- Auto Category: Tags images with the category you select.
- Display Overlay: Activates additional LCD display modes, which include Gridlines, 3:2 Guide, Both, or Off. (Movie options only include Off or Gridlines).
 IS Mode: Disables or enables Image Stabilization in Shoot Only, Panning, or Continuous modes.
- Set Print/Share Button: Let’s you choose a shortcut function for the Print/Share button. Choose between not assigned, +/- Exposure, White Balance, Custom White Balance, Digital Tele-converter, Display Overlay, Display off, and Play Sound Effect.
Setup Menu:
 Mute: Turns the Canon TX1’s beep sounds on and off. (warning sound cannot be muted).
- Volume: Individually sets Startup, Operation, Self Timer, Shutter, and Playback volumes. Five steps are available for each item, or the sound for each item can be disabled individually.
- Audio: Gives you options for the microphone level (automatic or manual) and to turn the Wind Filter on and off.
- LCD Brightness: Adjusts the brightness of the LCD backlight, with 15 steps of control available.
- Power Saving: Toggles the camera's automatic shutoff function, which turns off the camera after a length of inactivity. Also sets display shutdown time to10, 20, or 30 seconds, or to 1, 2, or 3 minutes.
 Time Zone: Sets both a Home and World (away) time zone, so you can simply select one or the other to record date and time settings for that location. Setting a time zone displays a world map with scrollable time zones and major city names for each zone, making it easy to select a location.
- Date/Time: Sets the camera's internal calendar and clock, as well as the format for dates (mm/dd/yy, dd/mm/yy, or yy/mm/dd).
- Clock Display: Controls the Canon TX1’s clock display option, which shows the current time (but not the date; for the date, the camera must be turned to vertical) for a period of 0-10, 20, or 30 seconds or for 1, 2, or 3 minutes when the Function key is pressed and held for two seconds. (Handy if you forgot your wristwatch, I guess.) If set to zero, the clock is displayed only while the Function button is held in.
- Format: Formats the SD card, erasing all files (even those marked for write-protection). An option is available to low-level format the card, for memory cards whose writing speed has slowed.
- File Numbering: Resets file numbering with each new SD card when set to Auto Reset. If set to Continuous, the camera continues numbering in sequence, regardless of memory card.
 Create Folder: Immediately creates a new folder on the memory card to store images or creates the folder at the day and time you specify.
- Auto Rotate: Toggles the Auto Rotate feature on and off. The camera can detect when the camera is held approximately level, or when it is rotated left or right beyond approximately 45 degrees. If you aim the camera vertically up or down, it will remember the orientation before you did so -- hence letting you control which orientation an image is tagged with even for shots where the camera is tilted enough vertically to prevent the sensor working.
- Auto Rotate: Turns Auto Rotate on and off. When the camera is held vertically to shoot, the Intelligent Orientation sensors judge which way is up and which way is down. It then regulates all the settings for vertical shooting.
- Distance Units: Changes the measuring mode from meters/centimeters to feet/inches.
- Lens Retract: Sets the timing of the lens retraction when you switch from the shooting to the playback mode to either one minute or zero second.
- Language: Sets the camera's menu language to one of a whopping 25 choices. English is the default setting.
- Video System: Sets the camera's video-out signal to conform to NTSC or PAL timing.
 Print Method: Lets you change the printer connection method from Auto to PictBridge mode.
- Reset All: Resets all non-custom camera settings to their default values. Some settings will not be reset, including: the Shooting mode, the Time, Date, Language, and Video settings from within the Setup menu, White balance, Colors, and any newly added Camera Settings.
My Camera Menu:
 Theme: Selects a common theme for each My Camera menu settings item. Four options are available, the first one being Off. When a theme is selected, all of the following settings automatically adjust to that theme. Users can also select and upload their own sounds to the camera.
- Start-Up Image: Sets the startup image when you turn on the camera to: Black screen, Canon logo, Canon logo with sunset, and nature scene. You can also apply your own image using the Canon software.
- Start-Up Sound: Sets the startup sound when you turn on the camera to: No sound, Musical tone (1), Musical tone (2), or Birds chirping. You can also apply your own sounds using the Canon software.
- Operation Sound: Sets the sound when any control or switch is use (except the Shutter button). Options include no sound, Beep, Musical tone, and Chirp.
- Self-Timer Sound: Sets the sound that signals you when the shutter release is two seconds away. Options include no sound, Fast beeps, Telephone ring, and Howling.
- Shutter Sound: Sets the shutter sound that you hear when you depress the Shutter button (there is no shutter sound in Movie mode). Options include no sound, Shutter sound, Musical Tone, and Bark.
Playback Menu: Accessed by rotating the Mode Dial, the Playback menu also has subject tabs for the Print, Setup, and My Camera menus.
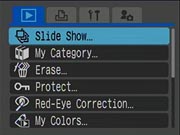 Slide Show: Automatically plays all captured images in a slide show, with the chance to set a number of options first. Transitions and various image selections are among the options.
- My Category: Allows you to tag images with People, Scenery, Events, Category 1-3, or To Do.
- Erase: Erases individually selected files, all files on a specific date, all files in a particular category, all files in a folder, or all files on the memory card, except protected ones.
- Protect: Marks the current image for write-protection, or removes write-protection. Protects individually selected files, all files on a specific date, all files in a particular category, all files in a folder, or all files on the memory card. Protected images cannot be deleted or manipulated, except through card formatting, which erases all files.
- Red-Eye Correction: Corrects red eyes in recorded images. Doesn't necessarily work in all images.
- My Colors: Adds My Colors effects to your pictures and movies including Vivid, Neutral, Sepia, B/W, Positive Film, Lighter Skin Tone, Darker Skin Tone, Vivid Blue, Vivid Green, or Vivid Red.
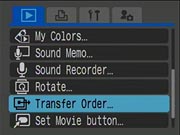 Sound Memo: Records a short sound clip to accompany a captured image for up to one minute.
- Sound Recorder: Records sound only, with no images, for up to two hours at a time.
- Rotate: Rotates the current image. The first press gives a 90 degree clockwise rotation; the second press rotates the image 90 degrees counterclockwise from the original position. On the third press, the image returns to its original orientation. The image data is not actually rotated; the camera actually sets a tag in the EXIF header, hence your software must recognize this tag to be able to recognize the orientation set in-camera.
- Transfer Order: Select images for downloading to your computer.
- Set Movie Button: Allows you to change to function of the movie button by changing the shortcut to either Sound Recorder or Sound Memo.
 Transition: Set the transition used by Playback (rather than Slideshow) to No transition, a quick Fade, or a Slide matching forward or backward sequencing.
Print Menu: This menu is available in Playback mode, simply by pressing the Menu button and selecting the Print tab. The bottom line of the display shows how many images are selected for printing and the print method that is active.
 Print: Sends images tagged for printing to the printer.
- Select Images & Quantity: Allows you select images for printing and set the number of prints for each image selected.
- Select By Date: Selects images corresponding to a specific date.
- Select by Category: Selects all images tagged with a particular category for printing.
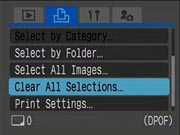 Select by Folder: Selects all images in a particular folder for printing.
- Select All Images: Selects all images on the memory card for printing
- Clear All Selections: Clears all print selections.
 Print Settings: Brings up a menu of these options:
- Print Type: You can specify whether to print one image per page, an index of the images, or both.
- Date: Set printing of the date and time on or off.
- File No.: Set printing of the file number on or off.
- Clear DPOF data: Set the option to clear the DPOF tag on or off after printing.
 Fujifilm GFX 50S Review
 Fujifilm X-T3 Review
 Olympus E-M5 III Review

Follow Imaging Resource