Back
to Full Sony Cyber-shot DSC-V1 Review
Back
to Full Sony Cyber-shot DSC-V1 ReviewGo to Sony Cyber-shot DSC-V1 Data Sheet
Go to Sony Cyber-shot DSC-V1 Pictures Page
Up to Imaging Resource Cameras Page
Use your browser's "Back" button to return to the previous page, or the links at the top and bottom of this page to navigate to related information. If you have difficulty fitting the text on this page onto your printer output, simply resize your browser window to a narrower width and print again.
Remember us when it's time to buy!
Dave here: Have our reviews been helpful to you? (Is this article you're reading right now useful?) Preparing this level of information on as many products as we do is incredibly hard work, not to mention expensive. Things on the Internet may look like they're free, but they're not. (As a lot of big dot.com companies are finding out these days.) Somewhere, somebody has to pay to produce worthwhile content. YOU can help us though, by remembering us when it comes time to make your purchase. Would you consider coming back to our site and clicking-through to one of our advertisers to make your purchase? Every dollar you spend with one of our advertisers helps us directly (in affiliate fees) or indirectly (the advertiser will keep renewing their ad contract with us). To make it easy for you to support us, here's a URL you can visit, to see all our current advertisers, with links to click on that will register your visit to them as having come from our site. It's up to you where you buy, but Mike, Mike, Kim, Yazmin, Marti and I would be really grateful if you'd help us out by choosing one of our advertisers to purchase from.
Thank you for your support!
Dave Etchells, Founder & Publisher
Visit our "Buy Now" Page:
https://www.imaging-resource.com/buynow.htm
Back
to Full Sony Cyber-shot DSC-V1 Review
Go to Sony Cyber-shot DSC-V1
Data Sheet
Go to Sony Cyber-shot DSC-V1
Pictures Page
Up to Imaging Resource Cameras
Page
Sony Cyber-shot DSC-V1A no-excuses "enthusiast" camera from Sony: 5 megapixels, 4x zoom, fast AF, and features galore Review First Posted: 04/18/2003, Updated: 7/1/2003 |
|
|
|
Manufacturer Overview
Sony Electronics Inc. has long held a dominant position in the digicam marketplace,
delivering a wide range of models that enjoy enormous popularity with consumers.
Currently, they offer what's arguably the broadest line of digicams in the industry,
with multiple models in several distinct product lines. Last year, they made
waves with the DSC-F717, an impressive update to the F707 model. This year,
Sony brings many of the ground breaking features offered by the F717 to a (much)
more compact form factor, with the stylish new DSC-V1.
The new V1 model is boxy and compact, shaped like a familiar 35mm rangefinder models of years past. The V1's 5.0-megapixel CCD captures high resolution images, and its full complement of exposure modes provides as little or as much control as you might want. Looking at the "compact rangefinder" form factor, Sony decided that the market need a camera that size with both a 4x zoom lens and a 5-megapixel CCD, and the V1 was born, a compelling combination. But what's most impressive about the V1 is its inclusion of Sony's NightShot, NightFraming, and Hologram AF technologies, which greatly add to the camera's flexibility and usefulness in low-light shooting conditions. An expanded Scene exposure mode also now offers Snow and Beach settings, increasing preset options beyond the standard Twilight, Portrait, and Landscape offerings. Finally, the V1 also offers Sony's new "Smart Zoom" technology, for better image quality with digital zoom, as well as their new MPEGMovie VX format, allowing movie and sound recording at VGA quality, to the capacity of the memory card. Finally, the V1 features true Through-The-Lens (TTL) flash metering.
Taken as a package, the DSC-V1 offers one of the most compelling feature sets of any camera on the market, expanding the definition of what a true "enthusiast" camera can offer, while still maintaining a very competitive price and trim form factor. If they'll just take the time to look at it objectively, I think the V1 could really open the eyes of the enthusiast crowd, showing Sony's true capability as a camera company.
High Points
Executive Overview
Sony's Cyber-shot line of digicams includes a wide range of sizes and body styles,
from the "lens-centric" design of the DSC-F717 to the slim, trim dimensions
of the "Compact P" series. The newest addition to the Cyber-shot line,
the DSC-V1, presents yet another design style, this time based on a more traditional
35mm rangefinder aesthetic. While the earlier S75 and S85 models arguably fit
this mold as well, the boxy shape of the new V1 is much more reminiscent of
the film-based rangefinders of yesteryear. The V1's rectangular shape and compact
size will be comfortable and familiar for many newcomers to digital, and add
to the camera's portability as well. While a little chubby for a standard shirt
pocket, the V1 fits larger coat pockets and purses well, and the built-in protective
lens shutter makes it easy and safe to simply slip it into a pocket as you're
heading out the door. Best of all, the V1 offers a truly exceptional array of
features, from full manual exposure control to a selection of preset Scene modes
to Sony's unique NightShot technology.
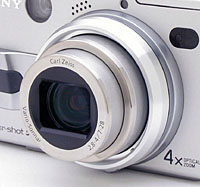
The DSC-V1 is somewhat unique at this point in the market, being the first camera to combine a 5-megapixel CCD with a 4x optical zoom lens. (There are five-megapixel cameras with 3x zooms, and four-megapixel models with 4x zooms, but the V1 will be the first 5MP/4x design that's hit the shelves.) As with other high-end Sony digicams, the V1 features a high-quality, Carl Zeiss lens for capturing sharp details. The 4x, 7-28mm lens offers a maximum aperture of f/2.8 - f/4.0, depending on the zoom position. In addition to optical zoom, the V1 offers Sony's new "Smart Zoom" digital zooming technology, designed to preserve image quality when digitally enlarging images. (Smart Zoom avoids loss of image quality by limiting the digital zoom range to only that which can be achieved without interpolation, based on the currently selected resolution setting.) While Sony has coined the term "Smart Zoom" for this feature, the V1 is hardly the first camera to employ this approach. (This is how digital zoom works on many of Fuji's consumer digicams.) Still, I heartily support this approach to digital zoom, as it seems a little less deceptive, and in any event will avoid interpolation artifacts.) With Smart Zoom enabled, the V1 can digitally enlarge images up to 4x, depending on the resolution. (The highest digital magnification is only available at the camera's lowest, VGA resolution setting. Larger image sizes result in proportionately lower digital zoom ratios.) The V1 offers manual focus in 14 distance presets and an autofocus whose target can be widened or narrowed and moved around to five different positions within the frame. Focus mode options include Single, Continuous (continuously adjusts focus), and Monitor. (This last mode appears to be something between normal on-demand autofocus and fully continuous AF, "monitoring" the focus status to permit slightly faster shutter response, perhaps with less battery drain than full continuous AF.) There's also a Macro mode for shooting close-up subjects. A unique, Sony-only feature the V1 shares with the F717 that went before it is Hologram AF, which uses a laser diode and a holographic diffraction grating to produce a crosshatched autofocus-assist pattern of bright red lines on the subject. This projected pattern stays more or less "in focus" almost irrespective of subject distance, so there's always a sharp pattern for the camera to focus on. Hologram AF isn't just for low light. You'll see the pattern projected in fairly normal lighting when there's not enough contrast in the subject for the contrast-detection AF system to focus effectively.
Sony again included their trademark NightShot and NightFraming modes, which
are infinitely useful in composing photos under low- (or no-) lighting situations.
NightShot mode physically removes the infrared (IR) filter from the front of
the CCD and projects IR beams from two small LEDs on the front of the camera.
The resulting image is monochromatic, similar to the view through night vision
goggles, but the camera can literally "see in the dark." NightFraming
mode uses the same technique, allowing you to frame dark subjects using the
IR beams, but once focus is determined, the camera replaces the IR filter and
makes the exposure with normal flash.
For composing images, the V1 features both a real-image optical viewfinder and
a 1.5-inch color LCD monitor on the back panel. A detailed information display
on the LCD monitor reports battery power, Memory Stick capacity, flash status,
focus mode, and the number of images taken, plus various exposure settings,
such as aperture, shutter speed, exposure compensation, image size, and quality.
The LCD display also features an optional histogram, viewable in all record
modes as well as in Playback mode.
The V1 offers a full range of exposure modes, and a nice complement of creative
options besides. Aperture is adjustable from f/2.8 to f/8, and shutter speeds
range from 1/1,000 to 30 seconds. The Mode dial on top of the camera offers
Manual, Aperture Priority, Shutter Priority, Program AE, Full Auto, and Scene
exposure modes. Aperture Priority lets you select the lens aperture, while the
camera chooses the best shutter speed. Alternatively, Shutter Priority lets
you select the shutter speed, while the camera determines the appropriate aperture.
Program AE places the camera in control of both aperture and shutter speed,
while you control the remaining exposure parameters, and Full Auto mode places
the camera in charge of everything (except for resolution, flash, zoom, and
Record mode). The Scene exposure mode provides six preset shooting modes --
Twilight, Twilight Portrait, Landscape, Portrait, Beach, and Snow -- designed
to obtain the best exposure for specific shooting situations. New to the V1
is a variable-program capability, which means that the camera will determine
the exposure, but you can choose from among different, equivalent combinations
of aperture and shutter speed. - This accomplishes much the same thing as Aperture
or Shutter Priority modes, but gives the camera more latitude in determining
the correct exposure. (Very handy.)
Multi-Pattern, Center-Weighted, and Spot Metering options are available in all
shooting modes except Full Auto, selectable via the Record menu. (A crosshair
target appears in the center of the LCD monitor in Spot metering mode). White
Balance options include: One Push (manual setting, using a white card), Daylight,
Cloudy, Fluorescent, Incandescent, Flash, and Auto. Exposure Compensation is
adjustable from -2 to +2 exposure values (EV) in one-third-step increments,
and the camera's ISO value can be set to Auto or to 100, 200, 400, or 800 equivalents,
increasing performance in low-light shooting situations. The V1's built-in flash
features Auto, Red-Eye Reduction, Forced, and Suppressed operating modes, with
a variable flash intensity adjustment and true TTL metering . As an added bonus,
the V1 offers an external flash connection and hot shoe mount, which let you
connect more powerful flash units (like the recently-announced Sony HVL-F32X)
to the camera.
The V1 also provides an MPEG Movie VX mode with sound recording, which permits
movies to be recorded at VGA resolution. A Clip Motion option, available through
the Setup menu, works like an animation camera, allowing you to capture a series
of up to 10 still images, which the camera records as an animated GIF file for
sequential frame playback. Multi-Burst mode captures 16 images in rapid sequence
and saves them as a single image, which plays back as a slow-motion sequence.
A Picture Effects menu captures images in Solarized, Sepia, and Negative Art
tones, and Sharpness, Contrast, and Saturation adjustments are also available.
The Record menu options include a TIFF mode for saving uncompressed images;
a Voice mode for adding sound clips up to 40 seconds long to accompany captured
images (great for "labeling" or annotating your shots); and an E-Mail
mode that saves a 320 x 240-pixel image small enough to transmit by email in
addition to your normal-sized image. An Exposure Bracketing mode captures three
images at three different exposures, so you can choose the best overall exposure
after the fact, while the Burst 3 mode captures three images in rapid succession
with one press of the Shutter button (shot-to-shot frame rates vary with the
pixel resolution and the amount of image information being recorded). Finally,
there is a Normal setting for standard JPEG compressed images.
Images are stored as uncompressed TIFFs, JPEGs, MPEGs, or GIFs (depending on
the Record mode) on Sony Memory Sticks, supporting the new Memory Stick Pro
format. (Cards are currently available in capacities as large as 1GB.) The V1's
expanded Memory Stick capabilities also let you create and manage individual
image folders on one card. A video cable is also provided with the camera for
connecting to a television set. (You can choose between NTSC or PAL video standards
via the Setup menu.) For downloading images, a USB cable provides high-speed
connection to PC or Macintosh computers. Software supplied with the V1 includes
Pixela ImageMixer for Windows (98, 98SE, Me, 2000, XP) and Macintosh (OS 8.5-9.2)
systems, as well as any necessary USB drivers for these operating systems.
The V1 uses an NP-FC11 InfoLITHIUM battery pack and comes with an AC adapter
that doubles as a battery charger. I like the InfoLITHIUM batteries because
they communicate with the camera, which in turn tells you how much operating
time remains, via a small readout on the LCD screen. This is really valuable
in avoiding lost shots because your batteries die unexpectedly. (I have to say
though, that I'm less enthusiastic about the tiny InfoLITHIUM pack that
the V1 uses: I'd have greatly preferred a larger pack, and a slightly larger
camera as a result, in exchange for longer run times.)
Sony continues to impress me with their innovative camera designs and attention
to the needs of the marketplace and feedback from current users. Thus far, they've
had a hard time convincing the "enthusiast" crowd to take their cameras
seriously, but the DSC-V1 could very well change that. It's a serious, no-excuses
photographic instrument with more useful features than anything else currently
on the market. Anyone looking for a full-capability "prosumer" digicam
should definitely give the DSC-V1 serious consideration.
Design
Stepping out on the digicam scene with a new, boxy body style, the DSC-V1
resembles more traditional 35mm rangefinders in its looks. With its rectangular
body, the V1 has a more angular appearance than its more streamlined Cyber-shot
cousins. Still, the V1 is compact and portable, and maximizes its external real
estate with a healthy number of external controls. Just about the right size
for larger coat pockets and purses, the V1 is handy for travel and comes with
an extra wide wrist strap.
The large lens barrel dominates the front panel of the V1. When powered on, the lens extends from the barrel five-eighths of an inch into its operating position. A shutter-like lens cover automatically slides open and closed, eliminating the need for a separate lens cap. Filter threads inside the lip of the lens barrel accommodate an adapter that makes available a range of Sony accessory lenses, which extend the camera's zoom capabilities at each end of its focal length range. Aside from the lens, the optical viewfinder window, microphone, and self-timer/IR LEDs are on the front of the camera. A finger grip protrudes from the camera front as well, providing a firm hold for your right hand as it grasps the camera.
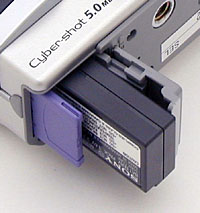
The right panel of the V1 (as viewed from the rear) features only one of the eyelets used for attaching a neck or wrist strap. At the bottom of the right panel, the edge of the Memory Stick / battery compartment door is visible.
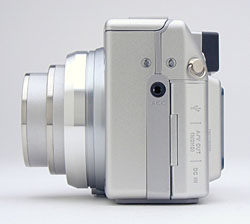
The V1's left panel features the other strap attachment eyelet, as well as the "ACC" Sony accessory connection jack, and the connector compartment. A hinged, rigid plastic door covers the connector compartment, where the USB, A/V Out, and DC In connector jacks are located.
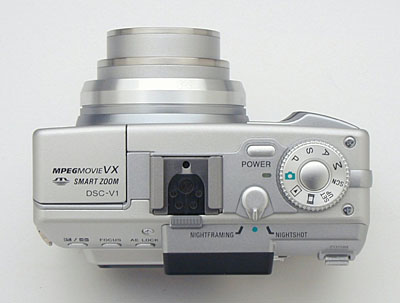
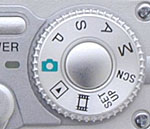
The camera's top panel would be flat except for the protruding Mode dial, NightShot / NightFraming switch, and external flash hot shoe. A matte-silver Shutter button is located in the center of the Mode dial, and a small Power button sits just to the left. A small green LED to the left of the Mode dial and below the Power button indicates both the Power status and the Mode selection. The camera's pop-up flash closes flush with the top panel, and is automatically released depending on the flash mode you've chosen. (You have to manually close the flash, however.)
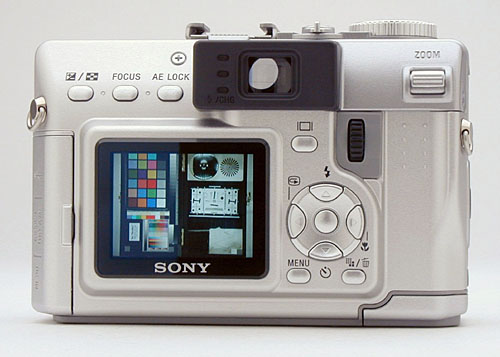
The remaining camera controls are located on the V1's rear panel, along with the LCD monitor and optical viewfinder eyepiece. Three LEDs are aligned along the left side of the eyepiece, and light or blink to indicate camera status (such as autofocus trouble, charging flash, memory card access, etc.) On the left side of the eyepiece are the AE Lock, Focus, and Exposure Compensation / Index buttons, just above the LCD monitor. A Zoom rocker button is in the top right corner. The Display button is beneath the lower right corner of the eyepiece, adjacent to the Command dial that adjusts several exposure settings. Below these is the Four Way Arrow pad and OK button, the arrow keys of which perform multiple functions. Finally, the Menu and Image Size / Erase buttons are at the bottom of the panel.
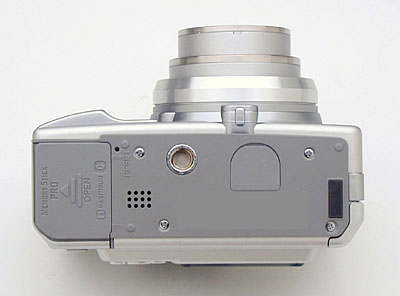
The bottom panel of the V1 is nice and flat, with an all-metal tripod mount just off-center, the camera's speaker, and the Memory Stick / battery compartment on the far right. A hinged, plastic door covers the compartment, and slides out before opening. One of my few complaints about the V1 is that the Memory Stick / battery compartment is too close to the tripod mount to allow quick changes without dismounting the camera. (I always notice this, given the amount of studio work I do, and find it particularly important with feature-laden cameras like this one.)
 |
 |
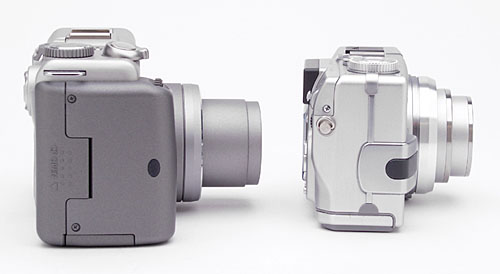 |
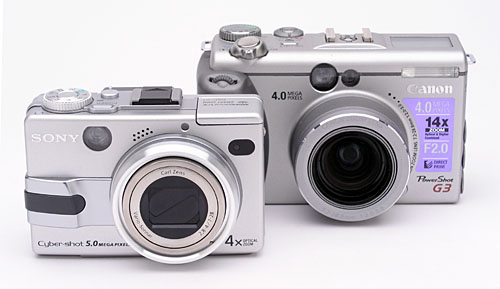
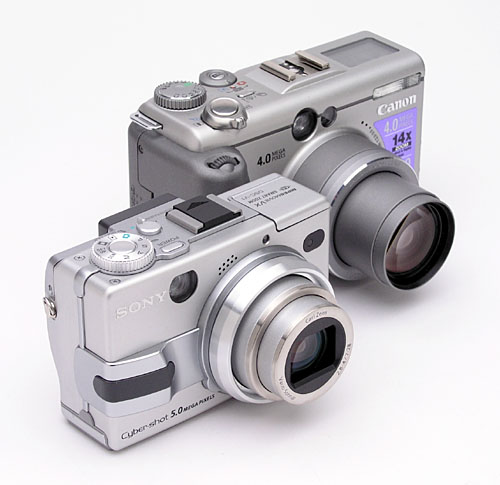
An obvious comparison to make with the DSC-V1 is Canon's very popular PowerShot G3. Since I happened to have a G3 on hand as I was writing this review, I thought readers would find the comparison photos above interesting. The V1 is clearly the smaller of the two by a good bit, a fact somewhat offset by the more flexible tilt/swivel LCD and longer battery life of the G3.
Viewfinder
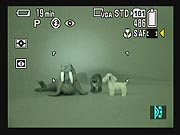
The V1 offers both a real-image optical viewfinder and 1.5-inch, color LCD monitor.
Three tiny LEDs line the left side of the optical viewfinder, and indicate the
status of camera functions by blinking or lighting solid. For example, the middle
LED lights green when focus is set, and the bottom blinks orange when the flash
is charging. The top LED lights red to indicate that the camera is accessing
the card, or that there is an error with the camera (an explanation of which
appears on the LCD monitor).
 The
Display button on the back panel controls the LCD monitor's detailed information
display, with a choice of full or partial readings in Record mode. The basic
information display reports Flash mode, metering mode, exposure settings (aperture
and shutter speed), and Focus mode. The detailed display also shows the remaining
battery power and image quality and resolution. A third mode includes a live
histogram display, which graphs the tonal distribution of the scene (useful
in determining under- or overexposure before snapping the shot). You can also
shut the display off entirely. An adjustable brightness function offers Dark,
Normal, and Bright settings, and the Backlight setting
is particularly helpful when shooting in bright, sunlit conditions.
The
Display button on the back panel controls the LCD monitor's detailed information
display, with a choice of full or partial readings in Record mode. The basic
information display reports Flash mode, metering mode, exposure settings (aperture
and shutter speed), and Focus mode. The detailed display also shows the remaining
battery power and image quality and resolution. A third mode includes a live
histogram display, which graphs the tonal distribution of the scene (useful
in determining under- or overexposure before snapping the shot). You can also
shut the display off entirely. An adjustable brightness function offers Dark,
Normal, and Bright settings, and the Backlight setting
is particularly helpful when shooting in bright, sunlit conditions.
 In
Playback mode, the histogram is also available, as well as an Index Display
mode that shows as many as nine thumbnail images at a time. Pressing the Index
button a second time displays exposure information about the selected thumbnail,
including aperture, shutter speed, exposure compensation, ISO, metering mode,
flash, and white balance (in two screens). The Zoom control on the rear panel
controls the playback zoom, enlarging captured images as much as 5x.
In
Playback mode, the histogram is also available, as well as an Index Display
mode that shows as many as nine thumbnail images at a time. Pressing the Index
button a second time displays exposure information about the selected thumbnail,
including aperture, shutter speed, exposure compensation, ISO, metering mode,
flash, and white balance (in two screens). The Zoom control on the rear panel
controls the playback zoom, enlarging captured images as much as 5x.
 The
V1's LCD monitor offers NightShot and NightFraming modes, controlled by a switch
on the camera's top panel. Both modes take advantage of the CCD's sensitivity
to infrared (IR) light, which is normally filtered out because it tends to skew
color rendering in bright sunlit scenes. Sony's NightShot technology uses a
movable IR filter that lets the camera takes advantage of IR sensitivity in
low-light situations while blocking it out at other times.
The
V1's LCD monitor offers NightShot and NightFraming modes, controlled by a switch
on the camera's top panel. Both modes take advantage of the CCD's sensitivity
to infrared (IR) light, which is normally filtered out because it tends to skew
color rendering in bright sunlit scenes. Sony's NightShot technology uses a
movable IR filter that lets the camera takes advantage of IR sensitivity in
low-light situations while blocking it out at other times.
In NightShot mode, the camera flips the IR filter out of the way for both framing
and exposure. Any natural IR light in the scene is augmented by two powerful
infrared LEDs on the front of the camera, which project IR beams onto the subject.
The built-in illuminator lamps let you shoot in total darkness, but the pictures
you capture will be monochromatic, with the majority of light areas of the subject
showing a green cast (as is typical with Night Vision goggles). Some colors
will render as different shades of gray than they would in a normal black-and-white
photo. This is because the reflectance of objects is often different in IR than
in visible light, so a "dark" color in daylight may actually appear
quite bright in IR. (Note that when shooting reflective surfaces close-up, you'll
be able to see the glow of the camera's IR lamps in the center of the image.)
In NightFraming mode, the camera also flips the IR filter out of the way and
turns on the illuminator lamps, but only while you're framing your shots. As
soon as you half-press the Shutter button, the IR filter flips back down, and
the camera takes a normal visible-light photo, using the built-in flash. This
is particularly handy for nighttime flash shooting, when you couldn't otherwise
see (or focus on) the subject.
 Trimming
This isn't really a "Viewfinder" function, but I didn't know where
else to mention it. Since it at least uses the LCD display, I figured
I'd go ahead and talk about it here.
One of the best things most amateur photographers could do to improve their
photos would be to simply crop them a little, cutting out distracting objects,
and filling more of the frame with their primary subject. It turns out that
virtually all Sony digicams let you do this right on the camera! (No computer
required.) Zoom in on an image in playback mode, and use the Four Way Arrow
pad to adjust the framing to your preference. Then hit the Menu button, and
you'll see options labeled Return and Trimming. Select Trimming, and you'll
see further options to select an image size. (Keep in mind that blowing the
image back up to full size after cropping it down only softens the detail, since
no detail is added to the photo.) Select a size option, and the camera will
save the image as zoomed/cropped on the LCD display into a separate file on
the Memory Stick. Very slick!
Optics
| Free Photo Lessons | |
|
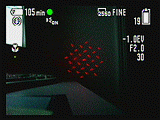 One of the truly unique Sony features on the V1 is the "Hologram AF"
system for low-light focusing. This is basically an AF-assist illuminator system
on steroids, using a laser diode and tiny holographic diffraction grating to project
a crosshatched pattern of bright red lines on the subject. The nifty thing about
the hologram is that the projected pattern stays more or less "in focus"
almost irrespective of subject distance, so there's always a sharp pattern for
the camera to focus on. Hologram AF isn't only for low light, you'll see the camera
use it in fairly normal lighting as well, if there's not enough contrast in the
subject to use the normal contrast-detect AF system. Try pointing the camera at
a blank wall in normal home / office lighting, and you'll see the pattern. The
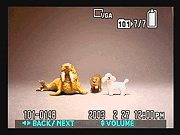
screen shot at right shows a camera's eye view of the Hologram AF pattern, as
the lens zooms from wide to telephoto. (This shot duplicated from my F717 review
- Astute readers will note minor differences in the onscreen information display,
but the Hologram AF function works identically.)
One of the truly unique Sony features on the V1 is the "Hologram AF"
system for low-light focusing. This is basically an AF-assist illuminator system
on steroids, using a laser diode and tiny holographic diffraction grating to project
a crosshatched pattern of bright red lines on the subject. The nifty thing about
the hologram is that the projected pattern stays more or less "in focus"
almost irrespective of subject distance, so there's always a sharp pattern for
the camera to focus on. Hologram AF isn't only for low light, you'll see the camera
use it in fairly normal lighting as well, if there's not enough contrast in the
subject to use the normal contrast-detect AF system. Try pointing the camera at
a blank wall in normal home / office lighting, and you'll see the pattern. The
screen shot at right shows a camera's eye view of the Hologram AF pattern, as
the lens zooms from wide to telephoto. (This shot duplicated from my F717 review
- Astute readers will note minor differences in the onscreen information display,
but the Hologram AF function works identically.)Exposure
| Free Photo Lessons | |
|
ISO can be adjusted to 100, 200, 400, or 800 sensitivity equivalents, or set to Auto, letting the camera adjust it to match the shooting conditions. The V1's White Balance adjustment offers seven settings: Auto, Daylight, Cloudy, Fluorescent, Incandescent, Flash, and One-Push (manual). The One-Push reading is set by placing a white card in front of the lens and pressing the up arrow to set the reading. Through the Record menu, the V1 also lets you adjust sharpness, saturation, and contrast, offering low/normal/high options for each. (Kudos to Sony for including these features: Now, I'd like to see them go a step further, and offer both a wider range of adjustment and more/smaller steps for contrast and saturation. I've found fine-grained contrast and saturation adjustments on some other cameras highly useful in "customizing" the camera's basic response to suit my personal preferences.) A versatile Picture Effects menu offers three creative options: Negative Art, Sepia, and Solarize. Negative Art reverses the color and brightness of the image. Sepia translates the image into brown, monochromatic tones. The Solarize option is really more of a level-slicing or posterizing function, dividing the image into areas of fairly "flat" color. (It's not really a "solarization" effect as old-line film types would understand the term.) These effects are "live" in Record mode, so you get a preview of the effect on the LCD monitor before you record the image.
The Self-Timer mode is activated by pressing the Down arrow button on the Four Way Arrow pad. Once in Self-Timer mode, a full press of the Shutter button starts the timer, which counts down 10 seconds before firing the shutter. The camera beeps and flashes a front-panel LED to mark the countdown interval. After recording an image, the Quick Review function provides instant playback of the picture if you don't release the Shutter button. Pressing the left arrow button also activates the Quick Review mode, giving you the option of deleting the most recently recorded image.
Flash
The pop-up flash on the V1 operates in Auto (no icon displayed on LCD screen), Forced, Suppressed, and Slow Sync modes, with a Red-Eye Reduction mode enabled through the Setup menu. Auto mode lets the camera decide when to fire the flash, based on existing lighting conditions. Forced means that the flash always fires, regardless of light, and Suppressed simply means that the flash never fires. The Slow Sync setting combines the flash with a longer exposure, recording more ambient light to balance out light from the flash. Red-Eye Reduction mode tells the camera to fire a small pre-flash before firing the full flash to reduce the effect of red-eye. Once enabled through the Setup menu, the Red-Eye Reduction flash fires in both Auto and Forced modes. Flash intensity can be manually controlled via the Record menu with choices of High, Normal, and Low (except in Full Auto mode). If required, the flash pops up on its own once the Shutter button is halfway pressed in all flash modes except Suppressed. - But you have to snap it shut manually.
The V1 also features a true hot-shoe external flash connection on top of the camera. This greatly increases the options for connecting an external flash. Additionally, an ACC Sony accessory flash input socket is on the camera's left side, but is proprietary to the Sony HVL-F1000 external flash unit. (The new HVL-F32X flash unit is a much better match for the V1's capabilities though.)
All flash exposures -- whether from the built-in flash or a TTL-compatible
external flash -- are metered through the V1's lens, providing true TTL metering.
Sony's new HVL-F32X external flash unit, for example, is one external unit that
takes advantage of the camera's TTL metering system. (Note that the earlier
HVL-F1000 external flash unit does not provide TTL metering.) The addition
of TTL metering (using the camera's pre-flash to precisely establish exposure)
is particularly useful when the subject is significantly brighter or darker
than its background and the lens is set to the telephoto end of its focal length
range. TTL metering determines exposure from just the part of the subject that
appears in the camera's field of view, ignoring foreground or background objects
outside the frame. The F32X also does an excellent job of throttling down for
macro shots, something many external flash units have difficulty doing.
New (optional) External Flash!
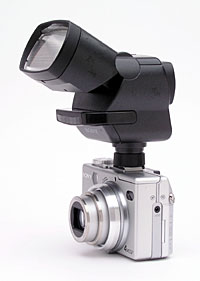 Astute
readers will have noted the hot shoe atop the DSC-V1, and particularly its multiple
contacts. This new shoe is set up to work with a brand-new external flash, announced
by Sony at the same time as the V1. The HVL-F32X flash unit is an optional accessory
for the DSC-V1, but should be on the short list of accessories to add for any
photographers seriously interested in flash photography.
Astute
readers will have noted the hot shoe atop the DSC-V1, and particularly its multiple
contacts. This new shoe is set up to work with a brand-new external flash, announced
by Sony at the same time as the V1. The HVL-F32X flash unit is an optional accessory
for the DSC-V1, but should be on the short list of accessories to add for any
photographers seriously interested in flash photography.
The new HVL-F32X flash has a host of new features relative to the earlier HVL-F1000, not the least of which is the support for true TTL (through the lens) flash metering when used with the DSC-V1. This is a huge benefit whenever you're taking telephoto shots of subjects that are significantly brighter or darker than the background. With a typical area-metered flash, the background will dominate the exposure, with the subject coming out either over- or underexposed, depending on whether the background was darker or lighter than it. With true TTL metering, only the part of the scene that's visible to the camera's CCD will affect the ultimate exposure. Also worth mentioning is that the F32X does an excellent job of throttling down for macro shots, something that many external flash units have difficulty doing.
Here's a list of features of the new HVL-F32X flash unit:
I haven't worked extensively with the HVL-F32X yet, but first impressions (from a very rough prototype) were very good. The TTL capability worked great, and the powerful AF illuminator was great for photographing more distant subjects in total darkness. I don't yet have a projected selling price for the US, but if it's at all reasonable, I expect Sony to sell a lot of these. (For a little more detail on the unit, as well as a few more product photos, see our news article on it from the Spring 2003 PMA show.)
Special Recording Modes
Like many Sony digicams, the V1 offers a number of special recording modes, including TIFF, Voice, E-Mail, Exposure Bracketing, and Burst 3. The TIFF option saves a 2,560 x 1,920-pixel uncompressed TIFF version of each image, in addition to the standard JPEG version, at whatever image size you've selected. Voice mode lets you record a five-second sound clip to accompany a still image, with the audio recording starting immediately after the image capture. The E-Mail option records a still image at the 320 x 240-pixel JPEG size for easy e-mail transmission, again in addition to a full-resolution file, at whatever image size you've selected in the menu system. This lets you capture full-resolution images for storage and printing, while at the same time recording smaller versions that you can just drop into an e-mail to share with others. Exposure Bracketing captures three images with one press of the Shutter button (one at the normal exposure, one underexposed, and one overexposed). The variation between exposures is adjustable through the Setup menu, with options of 0.3, 0.7, and 1.0 EV steps. "Burst 3" mode captures a rapid series of three images, at approximately two frames per second. (The the number of images in the series may be limited by available Memory Stick space, and the actual frame rate may vary somewhat, depending on the resolution and quality settings.)
Movie Mode
The Movie mode is accessed by selecting the film frame icon on the Mode dial on top of the camera. You can record moving images with sound at either 640 x 480 (VGA) or 160 x 112 (Mail) pixels. Sony's new MPEGMovie VX mode lets you record full VGA resolution movies for as long as the Memory Stick has space. (The amount of available recording time varies with the quality setting and resolution.) Recording begins with a single press of the Shutter button, and ends with a second press. A timer appears in the LCD monitor to let you know how long you've been recording and approximately how much recording time is available.
The V1 also provides limited movie editing capabilities right in the camera. While most digicam users don't expect to find full A/B roll video editing in their cameras, I've often wanted to trim off material from the beginning or end of a video I've recorded, or extract an interesting bit of action from the middle of a much longer clip. The V1 let you do just that via the Divide option on the Playback menu. As its name suggests, Divide works by splitting movies into two segments. Do this once to trim away spurious material at the front of the clip you're interested in, and do it a second time to remove unwanted footage at the end. Once you've split the movie into parts like this, you can throw away the segments you don't need.
After enabling the Divide function through the Playback menu, the V1 starts to play the movie. You simply press the OK button on the Four Way Arrow pad to stop the playback where you want to make an edit. From there, you can scroll backward or forward frame-by-frame until you find the point where you'd like to divide the movie. You can then either delete the unwanted portion of the movie or keep it on the Memory Stick. As noted, the Divide function is great for "editing" the part of a movie file you want to save, given that you can make an unlimited number of divides. You just can't put the pieces back together again in the camera. For that, you'll have to use MPEG editing software on a computer.
Clip Motion
Through the Setup menu, you can set the movie recording format to "Clip Motion," which turns the V1 into an animation camera, recording up to 10 frames of still images to be played back in succession as an animated GIF. Frames can be captured at any interval, with successive actuations of the Shutter button. When you've captured as many photos as you need, you just press the center of the Four Way Arrow pad to tell the camera to finish the sequence by assembling the images into a single animate GIF file. Available image sizes are Normal (160 x 120 pixels) and Mobile (120 x 108 pixels). The number of captured frames may vary with image size and available Memory Stick space. (You have a maximum of 10, but could be constrained to fewer if your memory is nearly full.) Files are saved in the GIF format, and are played back with approximately 0.5-second intervals between frames. Unlike Movie mode, the flash is available with Clip Motion.
Multi-Burst
Also accessed through the Movie option under the Setup menu, the V1 features a Multi-Burst mode, which captures a very rapid burst of 16 images arranged in rows and columns in a single file. Once captured, the images may be played back in sequence on the camera. Because image capture is so fast, the effect is of a slow-motion sequence. Three frame interval rates are available through the Record menu, 1/7.5, 1/15, and 1/30.
Shutter Lag/Cycle Times
When you press the shutter release on a digital camera, there's usually a lag
or delay before the shutter actually fires. This represents the time required
for the autofocus and autoexposure mechanisms to do their work and can amount
to a significant delay in some situations. Since this number is rarely reported
by manufacturers or reviewers, and can significantly affect the picture-taking
experience, I routinely measure these times with a proprietary electronic test
system I designed and built for the purpose. (Timing is crystal-controlled,
and accurate to 1/1000 of a second.) Here are the times I measured for the DSC-V1:
NOTE: My qualitative characterizations of camera performance below (that is, "reasonably fast," "about average," etc.) are meant to be relative to other cameras of similar price and general capabilities. Thus, the same shutter lag that's "very fast" for a low-end consumer camera might be characterized as "quite slow" if I encountered it on a professional model. The comments are also intended as only a quick reference: If performance specs are critical for you, rely on the absolute numbers to compare cameras, rather than my purely qualitative comments.
|
|
||
|
|
|
|
| Power On -> First shot | 3.15 |
Time from power-up to first shot. About average for a camera with a telescoping lens.
|
| Shutdown | 3.04 |
Time to finish writing average large/fine file to the Memory Stick. About average.
|
| Play to Record, first shot | 0.75 |
Time until first shot is captured. Very fast.
|
| Record to play | 1.18/0.83 |
First time is for immediate switch after pressing shutter, second is time to display image from quiescent state in capture mode. Very fast.
|
| Shutter lag, full autofocus | 0.423/0.781 | Shorter time is for wide angle, longer time is for telephoto. Much faster than average (!), particularly the wide angle number. |
| Shutter lag, manual focus | 0.293 | Faster than average. (Average is about 0.5 seconds.) |
| Shutter lag, prefocus | 0.123 | Faster than average. (Average is closer to 0.3 seconds, although recent digicam models are generally getting faster.) |
| Cycle time, max/min resolution | 1.39/1.71 |
Very fast. In large/fine mode, the V1 can capture up to 12 frames before having to pause for ~16 seconds to wait for the buffer memory to dump to the Memory Stick. In small/basic mode, the camera appears to write to the card continuously as the shots are taken, with no apparent limit due to buffer constraints. |
| Cycle time, TIFF mode | 43-49 seconds | Rather slow, but not unusually so for 5-megapixel TIFF files. (Roughly 15 megabytes of data have to be written to the card.) Relatively little benefit to supposedly faster Memory Stick "Pro" cards. - 49 seconds with standard MS cards, 43 seconds with Pro versions. |
| Cycle time, continuous mode ("Burst 3" mode) |
0.50/0.50 (2.0 fps) |
Pretty fast, but limited to three frames at a time. Speed is the same, regardless of image size/quality setting. After burst of 3 frames, you have to wait 9.4 seconds in large/fine mode or 4.3 seconds in small/basic mode before shooting the next burst of 3 shots. |
| Frame rate, MultiBurst mode | 7.5, 15, 30 frames/second | Multi-burst frame rates match the stated values pretty exactly. |
Overall, the DSC-V1 is a surprisingly speedy camera. In particular, its autofocus
speed/shutter lag is much better than average, especially with the lens set
to its wide-angle position. (This is one of the biggest source of user complaints
with digital cameras, so big kudos to Sony for addressing it so effectively
in the design of the V1. - I'd still like to see telephoto AF speed match
that of wide-angle AF on the V1, but this is clearly one of the fastest-focusing
digicams on the market, particularly in the "enthusiast" space.)
Cycle times are very good, particularly given the very large buffer memory,
which can hold up to ~12 shots at maximum resolution and JPEG quality. Continuous-mode
speed is good, at 2 frames/second, but the 3-frame buffer in "Burst 3"
mode is rather limiting. (As an aside, why did Sony limit the continuous-mode
shooting to only 3 frames, when the camera has a 12-frame buffer? They crippled
an otherwise exceptionally capable camera, apparently simply so they could
have a feature named consistently across their product line. Shortsighted
in the extreme, if I may say so...) MultiBurst mode offers incredibly fast
frame rates for motion capture and analysis, albeit at greatly reduced resolution
and a fixed run length of 16 frames.
As one of the first Sony digicams to support the new "Memory Stick PRO"
format, I was interested to see what difference there might be between "standard"
Memory Sticks and the new "PRO" units. I was expecting the Pro models
to be a good bit faster, since they're based on a parallel data path, rather
than the serial one of the standard units. As it turns out though, the V1
(along with the F717 before it) don't yet have the internal architecture necessary
to take full advantage of the increased speed of the Memory Stick PRO format.
In my tests with a 512 MB Memory Stick PRO and a 64 MB conventional unit,
I found that the V1 could write to the PRO card slightly faster than the conventional
one, but the difference was fairly slight: 43 vs 49 seconds to write a TIFF
file. I'm told that future cameras with different internal electronics will
indeed be a good bit faster writing to Memory Stick PRO cards, but for now
the primary advantage is that the PRO format breaks the 128MB barrier. (Quite
emphatically too, as Memory Stick PRO cards are currently available in sizes
as large as 1 GB.)
Operation and User Interface
The V1's user interface is similar to previous Cyber-shot designs, most
closely resembling the control structure of the DSC-F717, with a range of multi-functional
external controls and an on-screen LCD menu overlay. I always appreciate having
as much external control as possible, as it saves having to scroll through menu
items for common settings, and the V1 definitely provides that. The Mode dial
on top of the camera controls the main exposure mode, while things like Flash
mode, Macro mode, Exposure Compensation, etc. are all controlled via small buttons
on the rear panel. The Command dial, located on the right side of the rear panel,
lets you quickly adjust aperture and/or shutter speed without accessing a menu
system. Overall camera operation is smooth and efficient, with an easy-to-navigate
LCD menu system and a user interface that doesn't require a long learning curve.
You may spend a few minutes reading through the manual, but once you get the
hang of things, the user interface is quite intuitive.
Control Enumeration
Shutter Button: Located on the right side of the top panel, in the center
of the Mode dial, this button sets focus and exposure when pressed halfway.
Fully depressing the button fires the shutter. When the Self-timer is enabled,
fully depressing the Shutter button begins a 10-second countdown before the
shutter fires.
Mode Dial: Surrounding the Shutter button, this knurled dial controls the camera's operating mode. Choices are Full Auto (green camera icon), Program AE, Shutter Priority, Aperture Priority, Manual, Scene, Setup, Movie, and Playback modes.

Power Button: To the left of the Mode dial on top of the camera, this
button turns the camera on or off.
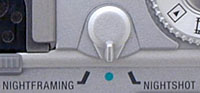
NightShot / NightFraming Switch: Located between the Mode dial and hot
shoe on the top panel, this switch activates either the NightShot or NightFraming
modes, for low-light and no-light shooting and framing. The center position
returns the camera to normal operation.

Zoom Rocker Button: Situated in the top right corner of the rear
panel, this two-way rocker button controls the optical and digital zoom in
Record mode. In Playback mode, this button digitally enlarges the captured
image as much as 5x.

Exposure Compensation / Index Button: Adjacent to the Focus button, this
button highlights the exposure compensation adjustment on the LCD screen.
Once highlighted, the exposure compensation is adjusted by turning the Command
dial. A second press of the button removes the highlight.
In Playback mode, this button activates the nine-image index display mode. Pressing the button a second time activates an information display for the thumbnail image selected, reporting the primary exposure information for the currently selected image. A third press returns to the normal, single-image display.

Focus Button: To the right of the Exposure Compensation / Index button,
this button switches between Manual and Auto focus modes. In Manual focus
mode, turning the Command dial adjusts the focus setting from 0.1 meters to
infinity.

AE Lock Button: Adjacent to the Focus button, this button locks the exposure
reading until it's pressed again, or until the Shutter button is fully pressed.
Command Dial: Just below and to the right of the viewfinder eyepiece,
this black, ribbed dial controls various exposure settings in any Record mode.
In Aperture Priority, Shutter Priority, and Manual exposure modes, it controls
aperture and/or shutter speed settings. Turning the dial scrolls through the
available settings, while a quick press of the dial selects the setting for
adjustment (highlighting it in yellow on the LCD screen). Once the setting
is selected, it can be adjusted by turning the dial forward or backward. The
dial also controls the AF area selection mode, when selected.

Display Button: Located to the right of the viewfinder eyepiece, this
button controls the LCD image and information display in all camera modes
except Setup mode. It also enables the histogram display. Repeated presses
cycle through detailed information, detailed information with histogram display,
limited information, and no display.
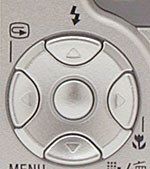
Four Way Arrow Pad: Located to the right of the LCD monitor on the rear
panel, this five-key pad has four arrows, one pointing in each direction (up,
down, left, right), and a center "OK" button. In any record mode
(except Movie), the Up arrow controls the Flash mode, cycling between Auto,
Forced, Suppressed, and Slow Sync (when available). The Left arrow controls
the Quick Review function, which provides a quick playback of the most recently
captured image. The Right arrow activates the Macro shooting mode, and the
Down arrow activates the Self-Timer mode.
In Playback mode, the Right and Left arrows scroll through captured images.
The Up and Down arrows control the playback volume. When an image has been
digitally enlarged, all four arrows pan the view.
In all camera modes, the arrow keys navigate through settings menus, highlighting
menu options. Pressing the center button confirms menu selections.

Menu Button: Beneath the Four Way Arrow pad is the Menu button, which
activates and deactivates the settings menus in all camera modes (except for
Setup mode, which automatically displays the menu upon entering the mode).

Image Size / Erase Button: To the right of the Menu button, this
button pulls up the Image Size menu in any record mode. For still images,
choices are 5.0M (2,560 x 1,920 pixels), 4.5M (2,560 3:2 aspect), 3.2M (2,048
x 1,536 pixels), 1.2M (1,280 x 960 pixels), and VGA (640 x 480 pixels). Movie
choices are 640 VGA and 160 Mail. Clip Motion options are Normal and Mobile.
In Playback mode, this button lets you erase the currently-displayed image. During index display, pressing this button gives the option of deleting all images on the Memory Stick, with the exception of any write-protected images.
Camera Modes and Menus
![]()
Full Auto: Indicated on the Mode dial by a green camera icon, this mode
puts the camera in control of everything except flash, zoom, resolution, and
Record mode. (Think of this as a quick way to get back to the camera's default
settings, without disturbing all the settings you've made in various menus.)
![]()
Program AE (P): This mode puts the camera in control of aperture and shutter
speed, while you control all remaining exposure decisions.
![]()
Shutter Priority (S): Shutter Priority mode lets you control the shutter
speed, from 1/1,000 to 30 seconds, while the camera selects the best corresponding
aperture setting. You retain control over all other exposure variables.
![]()
Aperture Priority (A): As the opposite of Shutter Priority mode, Aperture
Priority mode lets you adjust the aperture setting, from f/2.8 to f/8, while
the camera chooses the best shutter speed. All other exposure controls are
under your control.
![]()
Manual Exposure Mode (M): This mode provides total control over the exposure,
as you're able to select both aperture and shutter speed independently of
each other, as well as control all other exposure variables.
![]()
Scene (SCN): Scene mode offers six preset shooting modes to choose from
(Twilight, Twilight Portrait, Landscape, Portrait, Snow, and Beach) which
set the camera's exposure controls for photographing each specific subject.
The available exposure settings depend on the scene selected. Twilight and
Twilight Portrait both adjust exposure settings to optimize for after-dark
photography. Twilight mode disables the flash, while Twilight Portrait enables
it. Landscape mode sets the exposure system to prefer smaller apertures, for
greater depth of field. Portrait mode is the opposite, setting a bias toward
larger apertures, for less depth of field. Snow and Beach modes optimize the
camera for better color in extremely bright situations.
![]()
Movie Mode: Marked on the Mode dial with a film strip icon, this mode
lets you capture moving images with sound. If enabled through the Setup menu,
this mode also provides access to Clip Motion and Multi-Burst modes.
Record Menu: In each of the above recording modes, pressing the Menu
button calls up the following menu selections. Some options are not available
in all modes.
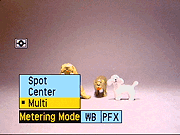
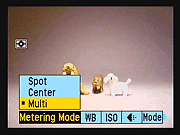 Metering
Mode: Sets the exposure metering mode to Multi, Center, or Spot.
Metering
Mode: Sets the exposure metering mode to Multi, Center, or Spot.
Movie Mode Menu: The following limited menu is available:
 Metering
Mode: Sets exposure metering to Multi, Center, or Spot modes.
Metering
Mode: Sets exposure metering to Multi, Center, or Spot modes.
Playback Mode: Indicated on the Mode dial with the traditional green arrow Playback symbol, this mode allows you to scroll through captured images on the Memory Stick. Images can be deleted, protected, copied, resized, rotated, or set up for printing on DPOF devices. Movie files and Clip Motion animations can also be played back. Pressing the Menu button displays the following options:
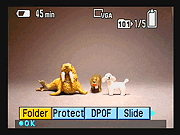 Folder:
Selects which folder is to be used for playback, and displays the number of
files, creation date, and folder name for each.
Folder:
Selects which folder is to be used for playback, and displays the number of
files, creation date, and folder name for each.
Setup Mode: This mode lets you change a variety of camera settings. The Setup menu is displayed immediately upon entering the mode. Five separate screens of options are available, selected via a tabbed interface running down the left hand side of the screen.
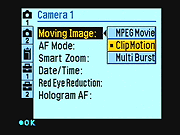 Moving
Image: Sets the type of file that will be recorded in Movie mode.
Options are MPEG movies, Clip Motion animations, or Multi Burst sequences.
Moving
Image: Sets the type of file that will be recorded in Movie mode.
Options are MPEG movies, Clip Motion animations, or Multi Burst sequences.
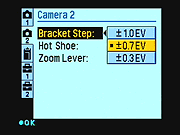 Bracket
Step: Determines the amount of exposure variation in an Exposure Bracketing
series. Choices are +/- 0.3, 0.7, or 1.0 EV steps.
Bracket
Step: Determines the amount of exposure variation in an Exposure Bracketing
series. Choices are +/- 0.3, 0.7, or 1.0 EV steps.
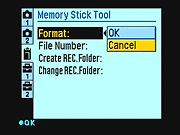 Format:
Formats the Memory Stick, erasing all files (even "protected"
ones).
Format:
Formats the Memory Stick, erasing all files (even "protected"
ones).
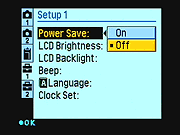 Power
Save: Turns the automatic power save function on or off.
Power
Save: Turns the automatic power save function on or off.
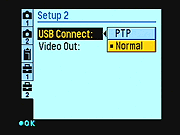 USB
Connect: Sets the USB connection type to PTP or Normal. (PTP requires
no host driver software, and is supported by Windows XP and Mac OS X.)
USB
Connect: Sets the USB connection type to PTP or Normal. (PTP requires
no host driver software, and is supported by Windows XP and Mac OS X.)
Image Storage and Interface
 The
V1 uses the proprietary Sony Memory Stick format for image storage. I'm not
sure what size Memory Stick will actually ship with the camera, given the prototype
status of my evaluation model. Memory Sticks are currently available up to 1GB,
and I would advise picking up at least a 32 or 64-megabyte card, given the high
resolution of the DSC-V1. Individual images can be write-protected from accidental
erasure (except through card formatting) via the Protect option under the Playback
settings menu. Individual write-protection also prevents the image from being
rotated, but does permit resizing and trimming, since those operations don't
disturb the original image, but rather make a new copy. The entire Memory Stick
can be write-protected by sliding the lock switch on the stick into the locked
position, which also guards against the stick being reformatted.
The
V1 uses the proprietary Sony Memory Stick format for image storage. I'm not
sure what size Memory Stick will actually ship with the camera, given the prototype
status of my evaluation model. Memory Sticks are currently available up to 1GB,
and I would advise picking up at least a 32 or 64-megabyte card, given the high
resolution of the DSC-V1. Individual images can be write-protected from accidental
erasure (except through card formatting) via the Protect option under the Playback
settings menu. Individual write-protection also prevents the image from being
rotated, but does permit resizing and trimming, since those operations don't
disturb the original image, but rather make a new copy. The entire Memory Stick
can be write-protected by sliding the lock switch on the stick into the locked
position, which also guards against the stick being reformatted.
The V1 lets you set up individual folders on the Memory Stick, so you can manage
images by folder and choose where images will be recorded. This could be handy
if you wanted to organize your photos by events, date, etc.
The LCD monitor reports storage information in the detailed information display,
including the current number of images captured, how many additional images
can be stored (based on current image resolution and quality settings), while
a small graphic shows you approximately how much space is left on the Memory
Stick. (In Movie mode, the camera reports the available recording time remaining.)
Through the Setup menu, you can designate whether the camera numbers each image
sequentially (from one Memory Stick to the next), or restarts file numbering
with each new Memory Stick inserted. The Playback menu offers a Resize option,
as well as a Rotate tool. The camera's Digital Print Option Format (DPOF) compatibility
allows you to mark specific images for printing on a DPOF-compatible printer.
Through the Setup menu, you can decide whether or not to print the date and
/ or time on the image as well.
Image Size options include 2,560 x 1,920; 2,560 (3:2); 2,048 x 1,536; 1,280
x 960; 640 x 480; and 320 x 240 pixels (E-Mail recording option). Movie file
sizes are 640 x 480 and 160 x 112 pixels for MPEG Movies. In addition to the
uncompressed TIFF file format, the V1 offers both Fine and Standard JPEG compression
levels, and a GIF option for the Clip Motion recording mode.
The table below shows the approximate still image capacities and compression
ratios for a 32MB Memory Stick (main resolution options):
|
Resolution/Quality |
|
|
|
|
| Highest Resolution 2,592 x 1,944 |
Images (Size) |
12 2.56 MB |
1.33 MB |
|
| Approx. Compression |
6:1 |
|
14.7 MB |
|
| High Resolution 2,048 x 1,536 |
Images (Size) |
1.56 MB |
865 KB |
|
| Approx. Compression |
|
|
|
|
|
1,280 x 960 |
Images (Size) |
634 KB |
342 KB |
|
| Approx. Compression |
|
|
|
|
|
Resolution 640 x 480 |
Images (Size) |
162 KB |
65 KB |
|
| Approx. Compression |
|
|
|
|
A USB cable accompanies the camera for quick connection to a PC or Macintosh computer, as well as a software CD containing interface software and USB drivers. Thanks in part to its USB 2.0 computer interface, the DSC-V1 is capable of very fast downloads. I clocked it at 1369 KB/second on my Sony VAIO desktop machine, which has a 2.4 GHz Pentium IV CPU running Windows XP. (This high a download speed is dependent on having a computer with a USB 2.0 connection. Computers with older USB version 1.1 connections will probably see download speeds closer to 600 KB/second.)
Lost Images? - Download this image-recovery program so you'll have it when you need it... Video Out
The V1 comes equipped with an Audio / Video cable for connection to a television
set. (Through the Setup menu, you can select NTSC signal format for U.S. and
Japanese systems and PAL for European systems.) Once connected to the TV, you
can review images and movies or record them to videotape. Viewfinder displays
are also visible via the video output, letting you use a video monitor as an
extra-large "remote viewfinder."
Power
The
V1 is powered by an NP-FC11 InfoLITHIUM battery pack and comes with an AC adapter
which doubles as an in-camera battery charger. InfoLITHIUM battery packs contain
a chip that exchanges information with the camera, allowing the camera to report
approximately how many minutes of battery life are left at the current drain
level. This information is displayed on the LCD monitor and the electronic viewfinder
with a small battery graphic. The AC adapter plugs into a small socket on the
camera's left side. It can run the camera without a battery inserted, or charge
the battery when the camera isn't in use.
The Li-Ion battery packs used in Sony cameras prevent me from making my usual
direct power measurements, but the good news is that the InfoLITHIUM system
reports projected camera runtime while the battery is being used in the camera.
Despite the excellent feedback provided by the InfoLITHIUM system, I still recommend
you purchase and pack along a second battery, though. (Another advantage of
the Li-Ion technology used in the InfoLITHIUM batteries is that they don't "self-discharge"
like conventional NiMH rechargeable cells do, and so can hold their charge for
months on the shelf or in your camera bag.)
|
|
|
| Capture Mode, w/LCD |
|
| Capture Mode, w/o LCD |
|
| Image Playback |
|
Relative to other high-end Cyber-shot models that I've tested in the past, the DSC-V1 has somewhat shorter battery life. While a worst-case run time of 84 minutes isn't terrible, you'll definitely want to purchase a second NP-FC11 battery pack to bring along on extended outings. (NOTE - For maximum battery life, be sure to get the NP-FC11 pack, not the lower-capacity NP-FC10 that's sold with the compact P-series Cyber-Shots. - That pack will work fine in the DSC-V1, but has about 15% less capacity.)
Included Software
Like most Sony Cyber-shot digicams these days, the V1 comes packaged with a
CD-ROM containing Pixela ImageMixer software and USB drivers. Pixela ImageMixer
is compatible with both Windows and Macintosh platforms, and offers minor image
editing tools.
In the Box
Production models of the V1 will ship in the US with the following items:
Test Results
While my original "First Look" review of the V1 was based on a late-model prototype, I've now had the opportunity to test a production model of the V1. You'll find sample photos shot with it on the sample pictures page, but here's a condensed synopsis of my findings:
Conclusion
| Free Photo Lessons | |
|
Related Links
More Information on this camera from...
DCViews:
Sony DSC-V1 review
Reader Comments!
Questions, comments or controversy on this product? Click
this link to see what other Imaging Resource readers have had to say about
the Sony Cyber-shot DSC-V1, or add comments of your own!