Back
to Full Konica Minolta DiMAGE Z5 Review
Back
to Full Konica Minolta DiMAGE Z5 ReviewGo to Konica Minolta DiMAGE Z5 Data Sheet
Go to Konica Minolta DiMAGE Z5 Pictures Page
Up to Imaging Resource Cameras Page
Use your browser's "Back" button to return to the previous page, or the links at the top and bottom of this page to navigate to related information. If you have difficulty fitting the text on this page onto your printer output, simply resize your browser window to a narrower width and print again.
Remember us when it's time to buy!
Dave here: Have our reviews been helpful to you? (Is this article you're reading right now useful?) Preparing this level of information on as many products as we do is incredibly hard work, not to mention expensive. Things on the Internet may look like they're free, but they're not. (As a lot of big dot.com companies are finding out these days.) Somewhere, somebody has to pay to produce worthwhile content. YOU can help us though, by remembering us when it comes time to make your purchase. Would you consider coming back to our site and clicking-through to one of our advertisers to make your purchase? Every dollar you spend with one of our advertisers helps us directly (in affiliate fees) or indirectly (the advertiser will keep renewing their ad contract with us). To make it easy for you to support us, here's a URL you can visit, to see all our current advertisers, with links to click on that will register your visit to them as having come from our site. It's up to you where you buy, but Mike, Mike, Kim, Yazmin, Marti and I would be really grateful if you'd help us out by choosing one of our advertisers to purchase from.
Thank you for your support!
Dave Etchells, Founder & Publisher
Visit our "Buy Now" Page:
https://www.imaging-resource.com/buynow.htm
Back
to Full Konica Minolta DiMAGE Z5 Review
Go to Konica Minolta DiMAGE Z5
Data Sheet
Go to Konica Minolta DiMAGE Z5
Pictures Page
Up to Imaging Resource Cameras
Page
Konica Minolta DiMAGE Z5Konica Minolta existing Z3 model gets an updated sensor, larger LCD and slightly updated control layout. Review First Posted: 03/28/2005 |
|
 |
|
5.0-megapixel CCD delivers uninterpolated
images as large as 2,560 x 1,920 pixels. |
| |
Powerful 12x optical zoom lens covers a
35-420mm equivalent focus range. |
|
| * | Integrated anti-shake system greatly extends usefulness of long zoom lens in lower light. | |
| |
Large 2.0" LCD monitor
makes it easier to share just-captured photos, or confirm fine details. |
Introduction - The Konica Minolta DiMAGE Z5
The Konica Minolta DiMAGE Z5 digital camera is the latest in a long line of Konica Minolta digital cameras featuring uncommon innovation, aggressive pricing, and superior optics. The original Minolta Z1 (before their merger with Konica) was their first long-zoom (10x) digital camera aimed squarely at the consumer market, and was one of the most popular cameras on the Imaging Resource site after its introduction. The Minolta Z2 also proved to be a popular model, with a higher-resolution 4.0 megapixel sensor, and expanded movie capabilities. The new Konica Minolta Z5 continues the series with a higher resolution five megapixel CCD imager, larger and higher resolution LCD display, a slightly higher resolution electronic viewfinder (although with significantly shorter eye relief, meaning your eye must be closer to the viewfinder to see the entire image). A number of other changes likely relate to the higher resolution imager; noise reduction cannot be disabled, the longest shutter speed is reduced from 15 to four seconds, the 30 second bulb mode has been removed, and the maximum ISO sensitivity has been reduced from 400 to 320.
Like its predecessors, the Konica Minolta Z5 offers a combination of ease of use, features, and retail price that are squarely aimed at the bulk of "point & shoot" users. At the same time though, the Z5 offers optional advanced exposure modes (including full-manual operation and a flash hot shoe) that appeal to more advanced users. As such, it makes a great camera for situations where users of widely varying experience levels need to share the same camera. It's also a great choice for novices who want a camera with features that they can "grow into" as their photographic abilities mature. The most important feature though, is its anti-shake technology. Long-zoom cameras are currently one of the most popular categories of digicams, but few people realize just how hard it is to hold a 12x zoom lens steady on a distant subject. Unless you're shooting in very bright light, or have the camera mounted on a solid tripod, it can be very difficult to avoid blurring caused by camera shake. By contrast, with its advanced anti-shake technology, the Konica Minolta Z5 is able to compensate for a surprising amount of jiggling, delivering sharp photos across a much wider range of conditions than would be possible otherwise. All in all, the new Konica Minolta DiMAGE Z5 delivers an amazing amount of technology in a very approachable package, at a very attractive price. Read on for all the details!
Konica Minolta Z5 Highlights
Comparison with previous DiMAGE cameras
Many of our readers will be familiar with the previous DiMAGE Z1, Z2 and Z3 models, so I put together the following major feature comparison between the DiMAGE Z1, Z2, Z3, and the Konica Minolta DiMAGE Z5:
| Feature | DiMAGE Z5 | DiMAGE Z3 | DiMAGE Z2 | DiMAGE Z1 |
| Branding | Konica Minolta | Minolta | ||
| Sensor Size | 1/2.5" | 1/2.7" | ||
| Sensor Resolution (total pixels) | 5.2 megapixel | 4.2 megapixel | 3.3 megapixel | |
| Sensor Resolution (effective) | 5.0 megapixel | 4.0 megapixel | 3.2 megapixel | |
| Maximum Image Size | 2,560 x 1,920 pixels | 2,272 x 1,704 pixels | 2,048 x 1,536 pixels | |
| Other Image Sizes | 2,048 x 1,536; 1,600 x 1,200; 640 x 480 pixels | 1,600 x 1,200; 1,280 x 960; 640 x 480 pixels | ||
| ISO Sensitivity | Auto, 50, 100, 200, 320 | Auto, 50, 100, 200, 400 | ||
| Noise Reduction | Automatic | User-selectable | ||
| Shutter Speed Max | 4 sec | 2 sec (auto / scene); 4 sec (program AE / aperture priority); 15 sec (shutter priority / manual) | ||
| Shutter Speed Min | 1/1000 sec | 1/1000 sec | ||
| Bulb Mode | No | Yes (30 sec max.) | ||
| Focal Length | 5.83 - 69.9mm 35-420mm effective (12x) |
6.3 - 63mm 38-380mm effective (10x) |
5.8 - 58mm 38-380mm effective (10x) |
|
| Maximum Aperture | f/2.8 (wide) f/4.5 (tele) |
f/2.8 (wide) f/3.7 (tele) |
f/2.8 (wide) f/3.5 (tele) |
|
| Lens Branding | APO GT Lens | None | ||
| Lens Construction | 13 elements in 10 groups | 11 elements in seven groups | 10 elements in seven groups | |
| Anti-Shake Feature | Major feature! Yes, activated through Setup menu. Functions either during exposure only, or exposure itself as well as any time shutter button is half pressed. | No | ||
| LCD / Viewfinder Type | Separate; 2.0 in LCD (114k pixels), 0.33 in EVF (114k pixels) | Separate; 1.5 in LCD (78k pixels), 0.3 in EVF (118k pixels) | Shared; Switch-finder system, 1.5 in LCD (113k pixels) | |
| LCD / Viewfinder Coverage | LCD: 100%; Viewfinder: 100% (manufacturer spec) | LCD: 100%; Viewfinder: 98% (manufacturer spec) | ||
| Viewfinder Eye Relief | 16.9 mm | 20.8 mm | 18.8 mm | |
| Focus Modes | Single, Continuous with Predictive Focus, and Manual, Five-Point Adjustable AF Area | Single, Continuous, and Manual, Three-Point Adjustable AF Area | Auto, Manual | |
| Focus Lock Signal | Can be changed to one of two sounds or disabled | Can be changed to one of two sounds or disabled | Fixed | |
| Minimum Focusing Distance (Standard) | Wide: 2.0 ft / 0.6 m; Tele: 5.2 ft / 1.6 m | Wide: 1.6 ft / 0.5 m; Tele: 6.6 ft / 2.0 m | ||
| Minimum Focusing Distance (Macro) | Wide: 3.9 in / 10 cm; Tele: 47.2 in / 120 cm | Wide: 2.6 in / 7 cm; Tele: 39.3 in / 100 cm | Wide: 3.9 in / 10 cm; Tele: 47.2 in / 120 cm | |
| Minimum Focusing Distance (Super Macro) | 0.4 in / 1 cm at 10.45mm focal length only | 1.2 in / 3 cm at 11.1mm focal length only | 1.6 in / 4 cm at 9.7mm focal length only | |
| Maximum Magnification | 0.20x (35mm equivalent: 1.2x) | 0.15x (35mm equivalent: 0.90x) | 0.12x (35mm equivalent: 0.79x) | |
| Area Covered at Maximum Magnification | 1.2 x 0.9 in / 3.1 x 2.3 cm | 1.5 x 1.1 in / 3.9 x 2.8 cm | 1.73 x 1.3 in / 4.4 x 3.3 cm | |
| Flash Range | Wide: 0.7 - 11.8 ft / 0.2 - 3.6 m; Tele: 3.9 - 7.2 ft / 1.2 - 2.2 m | Wide: 0.7 - 13.1 ft / 0.2 - 4.0 m; Tele: 3.9 - 8.2 ft / 1.2 - 2.5 m | Wide: 0.5 - 20 ft / 0.16 - 6.0 m; Tele: 3.9 - 15 ft / 1.2 - 4.5 m | Wide: 0.5 - 20 ft / 0.16 - 6.0 m; Tele: 3.6 - 15.4 ft / 1.1 - 4.7 m |
| Flash Recycle Time | 7 sec | 5 sec | 7 sec | |
| Max. Resolution Continuous Mode Speed / Depth | 2.0 fps for 3 frames | 2.5 fps for 2 frames | 1.5 fps for 5 frames | |
| UHS Continuous Mode Resolution | 1024 x 768 | 1280 x 960 | ||
| UHS Continuous Mode Speed / Depth | 10 fps for 20 frames (manufacturer spec) | 10 fps for 15 frames (manufacturer spec) | 10 fps for 10 frames (manufacturer spec) | |
| Progressive Capture Mode | 1024 x 768: 10 fps for 20 frames (manufacturer spec) | 1280 x 960: 10 fps for 15 frames; 2272 x 1704 Standard: 2.5 fps for 5 frames (manufacturer spec) | 1280 x 960: 10 fps for 12 frames; 2272 x 1704 Standard: 2.5 fps for 5 frames (manufacturer spec) | 1280 x 960: 10 fps for 10 frames; Standard: 6 frames (speed / resolution unstated) (manufacturer spec) |
| Exposure Bracketing | 3 frames in 0.5 or 0.3 EV steps | 3 frames in 1.0, 0.5 or 0.3 EV steps | ||
| Self-Timer Duration | Two or 10 Seconds | 10 Seconds | 10 Seconds | |
| Digital Zoom | Record: 4x in 0.2x steps; Playback: Up to 4x | Record: 4x in 0.2x steps; Playback: Up to 6x | Record: 4x in 0.1x steps; Playback: Up to 6x | |
| Maximum Movie Size | 640 x 480 pixels (two quality levels) | 800 x 600 pixels | 640 x 480 pixels | |
| Other Movie Sizes | 320 x 240 | 640 x 480; 320 x 240; 160 x 120 | 320 x 240; 160 x 120 | |
| Movie Clip Length | Limited only by card space, given a fast enough memory card (A 32x Lexar card worked fine for me) | 30 seconds at 640 x 480, 30fps (other resolutions vary) | ||
| Movie Optical Zoom | Always enabled | Can be enabled through menu | No | |
| Movie Digital Zoom | Available at all resolutions | Available at 320 x 240 pixels or lower only | ||
| Movie Audio | On at all times | Can be disabled via menu | ||
| Movie Editing | Yes, can crop start and end of movie, and save as new file, or capture frame as new file | No, but can save a single frame as a new file | Yes, can crop start and end of movie, and save as new file, or capture frame as new file | No, but can save a single frame as a new file |
| Email Mode | 640 x 480 | 640 x 480 or 160 x 120 | ||
| DPOF Date Printing | Yes | No | ||
| PictBridge support | Yes | No | ||
| Print Image Matching Version | PIM III | PIM II | ||
| DCF Version | 2.0 | 1.0 | ||
| EXIF Version | 2.2 | 2.21 | 2.2 | |
| Battery Life (CIPA standard) | Record: 240 frames; Playback: 240 min. (manufacturer spec) | Record: 170 frames; Playback: 220 min. (manufacturer spec) | Record: 250 frames; Playback: 180 min. (manufacturer spec) | Unknown |
| Dimensions | 4.3 x 3.1 x 3.3 in (109 x 80 x 84 mm) | 4.31 x 3.05 x 3.15 in (110 x 78 x 80 mm) | ||
| Weight (body only) | 12.0 oz. (340 g) | 11.8 oz. (335 g) | 10.8 oz. (305 g) | |
| Other | Larger LCD occupies more of the rear panel. On/Off button no longer in center of Mode dial. Mode dial is smaller, and Mode dial icons are now silk-screened above it. Exposure Mode dial now has brushed metal finish on top surface. Access lamp added at bottom right of rear panel, just inside hand grip. Four-way controller has a slightly different design with easier-to-feel bumps indicating the directional arrows. |
Solid black body with blue Konica Minolta logo and silver wording on front of flash housing. DC In port moved to USB compartment, and SD card slot moved to bottom panel. Oblong shutter button with decorative raised element extending down front of handgrip. | Grey panel with silver Konica Minolta wording on front of flash housing. Konica Minolta logo on top of pop-up flash. DC In port has silk-screened graphic showing connector polarity next to it. | Silver panel with Minolta logo on front of flash housing. DC In port has silk-screened "DC IN" text next to it. |
Camera Overview / Field Test
By Michael Tomkins
Konica Minolta DiMAGE Z5 marks the latest in a progression of Z-series DiMAGE cameras that have offered great ease-of-use with unabashedly futuristic designs. The initial DiMAGE Z1 bore a marked resemblance to Minolta's Electro Zoom X model, with a very clear differentiation between the lens and handgrip portions of the camera, joined by a slim body. As the line progressed to the Z3, the styling was refined and now looks rather more traditional, but still with a very distinct style. In terms of specifications, the most important features for most users will be the very powerful 12x optical zoom lens and the image stabilization system which we've seen on a number of past DiMAGE cameras. Long-zoom cameras are becoming increasingly more popular with users - perhaps because they offer some of the versatility of true SLR cameras (the ability to cover a wide range of focal lengths) while keeping size and weight down, and removing the need to carry a bag full of lenses everywhere you go.
Many of the long-zoom models we've seen have suffered somewhat from the fact that they've been difficult to get good results from at the longer focal lengths, due to image shake. Good body design goes some way to defeating the problem by making it easier to hold the camera steadily, and practice does help somewhat as well. For the best results though, a good image stabilization system really can't be beat. For most cameras, this is achieved with a rotation sensor and moving elements inside the lens itself that work to counter lens movement. Konica Minolta takes a different approach, using what's known as a Sensor Shift system that moves the image sensor itself both horizontally and vertically.
In shooting with the DiMAGE Z5, I found that the combination of the powerful zoom lens and anti-shake really freed my creativity. It can honestly be rather challenging trying to find interesting photos for our galleries, given that we only have access to the cameras for a certain amount of time. Gallery shots are generally taken fairly near to home, and often in less than ideal weather conditions. That can make it rather difficult to find interesting shots that readers haven't already seen a dozen times - but the strength of the zoom (and the fact that I could use it in comparatively low light) gave me new shooting opportunities I might otherwise have passed up. Amongst our gallery shots, you'll see two photos in particular that simply couldn't have been captured with a lesser lens, or without the anti-shake.
Wandering around downtown Knoxville, my eye was caught by a fairly simple sight; a fluffy white dandelion seed head standing out against the rather bright green background of an unruly lawn. Several feet away from me on the wrong side of a garden fence, I simply wouldn't have been able to take the photo without using the full 12x optical zoom. Likewise, as I made my way across Knoxville's Henley Street Bridge, I saw a relatively common sight - dozens of birds clustered on a lamp post jostling for space. Of course, I couldn't get anywhere near my subject, but I liked the way the lamp cast an eerie dim glow, and the way the birds were silhouetted against the overcast sky. Neither photo is likely to win any awards, but that probably comes down to the photographer's skills. They're both interesting to me, though, and hopefully I've made my point. You may not feel like you're missing photo opportunities with the 3x or 4x zooms on most point-and-shoot cameras, but when you've had a chance to walk around with a really powerful stabilized lens in hand, you won't want to go back to a lesser camera. You simply find photos you never knew you were missing, everywhere you turn.
There are two or three other features of the Z5 that I found myself liking in my short time with the camera. In particular, it was nice to be able to manually select the focus point, or set the focus completely manually. The focus point selection allowed me to frame the dandelion photo how I wanted it, and as the light started to fail me I found several other photos simply necessitated manual focusing. (All in all, I felt the Z5's auto focus was fairly fast and reliable, but I'd still like to see it function better in low light). I also found it rather nice being able to decide whether the anti-shake should function during exposure only, or during image framing as well. Most of the time I was able to save battery life by disabling anti-shake during framing, but when I found myself in a situation where I just couldn't hold the camera steady enough, a moment in the menu was enough to give me a stable image in the electronic viewfinder.
Only one thing stood out that I personally didn't like - and it really isn't even specific to the Z5, but bears thinking about regardless. For the most part I am simply not a fan of electronic viewfinders. Having used film SLRs for many years (I've never really owned a point-and-shoot film camera), perhaps I've just been spoiled. Even with a fairly high resolution electronic viewfinder such as that in the Z5 though, I find myself having difficulty deciding when the focusing is perfect, and the images invariably look a bit pale and wishy-washy to me. Some people seem to love EVFs for their ability to display exposure information right on the picture (and if you're talking about the live histogram function, I'd agree it can be a valuable tool). Still, in my mind EVFs still have a long way to go before I'll be completely happy with them - the resolution just isn't high enough, and they somehow feel flat compared to a true optical viewfinder in an SLR camera.
Feel
The DiMAGE Z5 feels perhaps a little lighter than it looks, but for a plastic camera it still feels remarkably sturdy in your hands. Konica Minolta have done an excellent job with fit and finish for this camera. The body panels line up so perfectly that you can hardly feel the seams, and there is really no flex or creak to speak of anywhere on the body (even the pop-up flash makes no untoward noises and hardly moves side to side when you press on it). The Z5's body felt very comfortable in my hands, with the large handgrip giving a fairly solid purchase. I'd like to see a little lip added at the top of the handgrip though, as the camera can have a tendency to slide downwards slightly when shooting single-handed unless you curl your little finger under the bottom of the hand-grip. One concern I'd had before seeing the camera in person was that the ridge that runs down the front of the handgrip might be uncomfortable. This concern turned out to be completely unwarranted - the ridge actually sits quite nicely against your fingers, giving a little extra purchase to your grip on the camera. The large rubberized panels on both sides of the camera helped in this respect, as well. All in all, a camera that feels "right" in your hands, and easily accommodates either a single-handed or double-handed shooting style.
The shutter button looks rather unusual, being a long oval shape and placed at a steep angle on the front of the camera. I'm happy to report that in use it is a delight, however - easy to feel and press, and with a subtle but clear tactile cue to let you know when you're half-clicking or fully-clicking the button. I was rather less enthusiastic about the placement of the macro and flash buttons, though. They're simply too close to far back on the handgrip / too close to the mode dial to be comfortably pressed without taking the camera away from your eye, and have very little movement or feel to them when pressed. With that notable exception, the rest of the controls seem well laid-out, easy to reach, and quick to learn. The only other thing I found on the camera body that was in any way awkward or uncomfortable was the accessory shoe cap, which is so tight to remove from the flash hot shoe that I felt I was going break a finger in the effort! (OK, I exaggerate somewhat - but anybody with long fingernails might be concerned about breaking a fingernail on the cap - and I simply couldn't get it to come off without using my fingernails).
One thing I'd like to see Konica Minolta change in future models is their rather unusual method of selecting the operating mode and where the image should be viewed. A mode dial on the rear of the camera allows you to select Playback mode on the LCD, and Record mode on either the LCD or electronic viewfinder. It doesn't allow you to select Playback mode on the EVF though, and to access this you use the quick view button instead. This recalls the last image captured on either the LCD or EVF, after which you can browse through your other images and movie clips. I think quite a few people are not going to realize this, though, and believe they have to view their images on the power-hungry LCD. Also, it means that there's no way to view the Playback menu on the EVF if you're trying to save battery power, since pressing the Menu button from quick view mode will return you to Record mode. Either a fourth option - Playback on the LCD - should be added, or Konica Minolta should consider adopting the more common system where you select the operating mode with the dial, and the LCD / EVF with a separate button, regardless of operating mode.
The Z5's menu system - particularly if you've used other recent Konica Minolta cameras - is very quick and easy to use. There are only a few pages of options, and they're arranged with a good eye towards common sense. My only reservation was that I felt I was simply spending too much time in the menu system. I'd like to see a couple of the commonly used options - perhaps white balance, metering, and sensitivity - moved to their own buttons on the camera. There's some empty space on the left side of the camera body, that would be ideal for this, and if the microphone / speaker were moved to the top of the camera between the handgrip and pop-up flash, another button or two would fit nicely on the handgrip as well.
Overall, these are relatively minor quibbles though. My end feeling after shooting with the Z5 for a while was that I really quite liked the camera. It felt right in my hands, and it has two things that you'll quickly find you don't want to live without in a world of 3x and 4x-zoom digicams - a 12x optical zoom lens, and Konica Minolta's Anti-Shake technology.
Design
 Konica Minolta's DiMAGE brand name carries with it a tradition of quality and technological innovation, covering an array of digital cameras designed to suit a wide range of experience levels and price points. The newest addition to the pack is Konica Minolta's DiMAGE Z5. Like the Z1, Z2, and Z3 models before it, the Z5 offers a strong feature set, pared down only moderately from those of Konica Minolta's higher-end models like the A2, but still offering a full range of exposure control and a long-ratio 12x zoom lens, with an easy to learn user interface, all at an affordable price. Compared to the DiMAGE Z3, changes in the Z5 include a higher resolution five megapixel CCD image sensor, larger and higher resolution LCD display, and the return of the movie editing feature found on the earlier DiMAGE Z1 and Z2 models. There are also a handful of minor design tweaks, mostly related to the higher resolution imager, such as a reduction in the longest shutter speed and maximum ISO sensitivity.
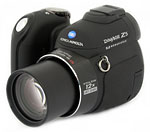
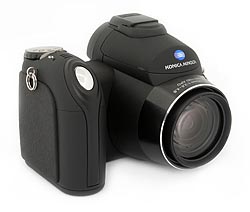
Shaped much like a miniaturized 35mm SLR, the Z5's body is very similar to that of its predecessor, though with the rear panel controls rearranged slightly to accommodate the larger LCD display. Other design changes include a new SD card access lamp at the bottom of the rear panel, and a new brushed metal finish for the top of the Exposure Mode dial. Made up mostly of the lens and a tall, stylized hand grip, the plastic body is understated and sophisticated, and sports only a few external controls. Measuring 4.3 x 3.1 x 3.3 inches (109 x 80 x 84 millimeters), the DiMAGE Z5 is a little too bulky for shirt pockets, but should slip into larger coat pockets and purses without trouble. The camera's plastic body helps keep the weight down, despite the large 12x zoom lens, weighing in at 16.2 ounces (460 grams) with the batteries and SD memory card - ever so slightly more than the Z3, likely due to the larger LCD display. A neck strap accompanies the camera for easy toting, but I'd recommend picking up a small camera case to protect the matte finish of the plastic body panels when traveling.
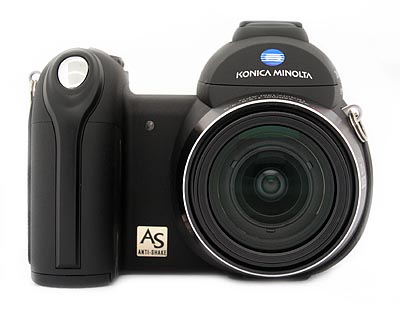
The front of the Z5 is dominated by the large lens and handgrip. When powered on, the lens extends just under 1.25 inches from the camera front. A plastic lens cap clamps onto the lens for protection, and tethers to the camera body with a small strap. A set of filter threads around the inside lip of the lens barrel on the body of the camera accommodates Konica Minolta's accessory lenses via an accessory adapter. Konica Minolta's optional accessory lenses extend both the camera's wide angle and telephoto capabilities. Also on the front panel are the Self-Timer LED lamp and the sloping, oblong Shutter button which angles down from the top of the handgrip. A substantial handgrip provides a firm hold on the camera, with plenty of room for your fingers to curve around the grip. While it offers plenty to grab onto, the handgrip is also small enough to be comfortable for users with smaller hands.

The right side of the Z5 (as viewed from the rear) is blank apart from one of the neck strap attachment eyelets and a rubbery textured panel that wraps from the rear of the camera.

The opposite side of the camera is curved to echo the shape of the lens barrel, and features the second neck strap eyelet. The camera's USB/AV and DC-In connector terminals are located on this side of the camera, in a compartment protected by a rubbery, flexible flap that remains tethered to the camera.
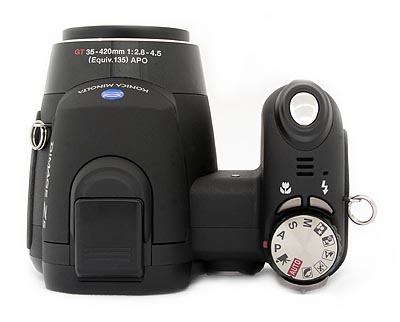
On the Konica Minolta DiMAGE Z5's top panel is the pop-up flash compartment and external flash hot shoe, as well as the Shutter, Macro, and Flash buttons. The pop-up flash does not have a release mechanism. Instead, you simply pull up the flash from both sides (which automatically places the flash into Auto mode). A three-hole speaker grille and tiny microphone are side-by-side behind the Shutter button, which slopes downward toward the front panel. The camera's Exposure Mode dial is also located on top of the camera, and features a new brushed metal finish on its top surface.

Most of the changes from the Z3 are found on the rear panel, which contains the remaining camera controls along with the electronic optical viewfinder (EVF) eyepiece and 2.0-inch color LCD monitor, somewhat larger and higher resolution than in the past model. Directly to the right of the LCD monitor are the Four-Way Arrow pad and Menu, Quick View/Erase, and Information buttons. The Power button and Mode dial are just beneath the LCD monitor, and are now located side by side, rather than the design of the Z3 which featured a Power button centrally located in the Mode dial. At the very top of the right side is the Zoom lever. The EVF - which is also slightly higher resolution than in the previous model - is centered above the LCD, and has a diopter correction wheel to the right. It has a noticeably shorter eye relief of 16.9mm (the Z3 had a 20.8mm eye relief), meaning that your eye must be closer to the image to see the whole image. In my own case, I found that I had to really press the lenses of my glasses up against the viewfinder bezel to be able to see the whole viewfinder frame. Finally, a new addition is located at the very bottom right of the camera just inside the protrusion at the rear of the handgrip - the Access lamp, which lights when the SD card is being accessed.
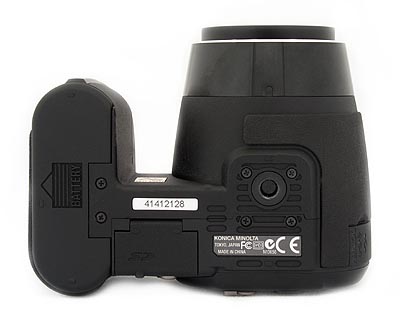
The Z5's bottom panel is fairly flat, with a plastic threaded tripod mount centered under the lens (a good position for people interested in panoramic photography), a battery compartment at the base of the handgrip, and an SD card compartment between the two. The SD compartment door could be made a little more secure than the current spring loaded design (with no latch), but it works well enough. The tripod mount is just far enough away from the battery compartment to allow quick battery changes while working on a tripod, but is too close to the SD card compartment to allow a card change. While I am glad that the battery slot is accessible while working on a tripod, I would like to maintain access to the SD card slot as well, as I change memory cards more frequently than batteries while working in the studio. The previous Z2 model had this capability, so I'm at a loss as to why the camera's designers would have moved the SD slot from its previous location on the left side panel to the new location of the Z3 and Z5.
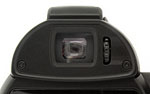 The Konica Minolta Z5 features an electronic viewfinder (EVF) which offers a true, through-the-lens (TTL) display, courtesy of a 1/3-inch LCD display with 114,000 pixels. A dioptric adjustment dial accommodates eyeglass wearers, letting them adjust the viewfinder optics across a range of -3.0 - 1.0 diopters. As noted earlier, at 16.9mm, the viewfinder eyepiece has a noticeably lower eye relief (the distance from which the entire viewfinder image can be seen) than the DiMAGE Z3's 20.8mm. In my own use of the camera, this meant that I had to press the lens of my eyeglasses right up against the body of the camera to be able to see the full frame without moving my eye around.
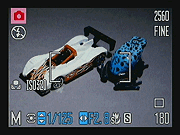
 The electronic viewfinder has the exact same resolution as the camera's main LCD display, and for the most part can show the same menus and information overlays as the LCD can. The information which can be shown in Record mode includes camera mode, exposure mode, flash status, exposure compensation (if a compensation adjustment has been made), white balance setting (if something other than "Auto" is selected), image size and quality setting, drive mode (single, continuous, movie, etc), and number of shots remaining on the memory card. If the information overlay is enabled, aperture and shutter speed are reported when the Shutter button is halfway pressed. The current battery level also appears on-screen, with a graphic to indicate the amount of charge. An optional live histogram overlay can be enabled with an additional press on the Info button. In Auto mode, a set of icons appears across the top of the screen, to indicate that automatic scene mode selection is active.
 While the Konica Minolta DiMAGE Z5's Mode dial only offers a Record mode option for the electronic viewfinder, it is in fact possible to use almost all Playback mode features on the EVF, with the sole exception of the Playback menu. Instead of switching the Mode dial to Playback, you must instead press the Quick View button to call up the most recent image. The camera is now actually operating in Playback mode, and you can use the normal controls to browse through all captured images and movies, zoom and pan around in images, or play and edit movies. Half-pressing the Shutter button, or pressing the Menu button, returns you to record mode (and hence, you cannot access the Playback menu on the EVF).
I must confess, I'm not exactly sure why Konica Minolta has chosen to implement playback in this way. It would seem to make more sense to either add another option to the Mode dial to allow playback on the electronic viewfinder, or to simply offer two options (Record and Playback) on the Mode dial, and then select the output device (viewfinder or LCD) with a separate button. With that said, once you're used to this design quirk it likely won't bother you much in day-to-day use - it just seems to me that some users will never actually realize that they can access playback mode on the EVF.
| Free Photo Lessons | |
|
 Equipped with a 5.83-69.9mm glass lens with two aspheric elements, the Konica Minolta DiMAGE Z5's lens is equivalent to a 35-420mm lens on a 35mm camera (the lens barrel proudly reports these equivalency numbers, a nice touch, to my way of thinking). The 35mm wide angle setting equates to a moderately wide angle, and is pretty much the standard amongst similar long-zoom cameras. The 420mm tele setting is likewise almost a standard amongst 12x zoom digital cameras, and offers a very useful telephoto length that will let you tightly crop the image to your subject when you can't get close in person. It's almost certainly longer than most folks can comfortably hand-hold without image stabilization, but thankfully Konica Minolta's Anti-Shake feature helps greatly on that score. Like most digital cameras, the lens zoom operates courtesy of a rocker switch controlled motor - allowing single-handed operation, but with less precision than you might be used to if you're coming from a film SLR camera.
The lens consists of 13 elements in 10 groups, including two AD (anomalous dispersion) glass elements and two aspheric elements. All that dispersion/aspheric mumbo-jumbo is by way of explaining that this is a very high quality lens: In my testing, the camera showed good corner to corner sharpness at all focal lengths, and low levels of chromatic aberration at wide to normal focal lengths (though this did increase to a rather high level by the time I got to maximum telephoto.) Aperture control can be either manual or automatic, with a maximum aperture of f/2.8 at wide angle and f/4.5 at telephoto. Focus ranges from 2.0 feet (0.6 meters) to infinity in normal mode. Activated by a small button on the top of the handgrip, a Macro focusing mode focuses in on objects as close as about 3.9 inches (10 centimeters) to the lens surface at wide angle, and 47.2 inches (120cm) from the lens surface in telephoto mode. A Super Macro mode, which locks the lens at a focal length of 10.45mm (equivalent to approximately 62.8mm on a 35mm camera), offers focusing as close as just 0.4 inches (1cm) from the lens surface - very close indeed, although it will require care to ensure the lens itself doesn't cast a shadow on your subject matter. In my tests, the Z5 captured a very tiny minimum area of just 1.15 x 0.86 inches (29 x 22 millimeters) in Super Macro mode, with very little of the softness in the corners of its images that I've come to expect from digital camera macro modes. A plastic lens cap
with a spring-loaded catch holds onto the front of the lens barrel, protecting
it from dirt and scratches. The lens cap has an eyelet for attaching an included
strap, to prevent it from being accidentally lost.
The Konica Minolta DiMAGE Z5 provides both manual and automatic focus control. The camera's specification sheet describes the autofocus system as a "Video AF system," but it isn't clear whether it uses phase-detection focusing technology as did the Z3, or the much more common contrast-detection system. I'm suspecting that it in fact uses phase detection because it's so fast focusing, and the focusing time doesn't vary much at all as you move from wide to telephoto focal lengths. (The Z5 had full-autofocus shutter lag numbers ranging from 0.60 - 0.62 second in my tests.)
 The
Konica Minolta DiMAGE Z5's autofocus system offers both Single-Shot and Continuous
AF settings, with a Full-Time AF option, as well as a Manual focus setting -
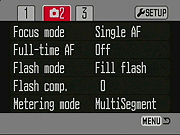
all selected through the camera's menu system. In Single-Shot AF, the camera
only sets the focus when the Shutter button is halfway depressed. In Continuous
AF mode, it adjusts focus at all times while the shutter button is half-pressed,
continuously keeping the frame in focus. When Full-Time AF is set, the camera
continuously adjusts focus when powered on. Full-Time AF is automatically disabled
when the battery warning icon is illuminated.
The
Konica Minolta DiMAGE Z5's autofocus system offers both Single-Shot and Continuous
AF settings, with a Full-Time AF option, as well as a Manual focus setting -
all selected through the camera's menu system. In Single-Shot AF, the camera
only sets the focus when the Shutter button is halfway depressed. In Continuous
AF mode, it adjusts focus at all times while the shutter button is half-pressed,
continuously keeping the frame in focus. When Full-Time AF is set, the camera
continuously adjusts focus when powered on. Full-Time AF is automatically disabled
when the battery warning icon is illuminated.
The DiMAGE Z5 lets you determine the area of the image the camera uses to set
the focus from, by selecting one of two autofocus options: Wide Focus Area,
or Spot Focus. The default option is Wide Focus area, indicated by a set of
two widely-spaced brackets in the viewfinder image. By pressing and holding
down the center of the Four-way Arrow controller pad, you can switch between
Wide Area and Spot Point autofocusing modes (the latter indicated by five horizontally
overlapping squares in the viewfinder). Wide Area AF bases its focus on the
most prominent subject detail in the portion of the image that falls within
the AF brackets, and in Single-Shot AF mode displays the chosen AF area with
a red square. In Continuous Mode AF, the camera is constantly focusing, so no
positive AF indication is given before shutter release. In Spot Point AF a grid
of five AF points is displayed, from which you can select the desired AF point
with the left or right arrow buttons. In the Program, Aperture-Priority, Shutter-Priority
and Manual modes, this AF point remains selected until reset by the user. In
the Auto and Scene modes, the AF point will remain selected for that mode until
the camera is powered off.
In Manual Focus mode, the up/down arrow keys adjust the focal distance
of the lens. Since the Manual Focus keys are the same as those used for Shutter
speed (in Manual exposure mode or Shutter Priority mode) or Aperture (in Aperture
Priority mode), in these modes the center button switches back and forth between
the up/down arrow keys being used to adjust Manual Focus or Shutter speed /
Aperture as relevant. As you focus, a distance readout reports the current focal
distance in meters or feet at the right of the LCD monitor (or EVF), above the
MF icon. The scale runs from either 0.1 to 1 meter, or 1 meter to infinity,
The LCD monitor also shows a magnified view from the center of the image area
that fills the entire screen, so that you can more easily fine-tune focus. The
manual-focus focus-assist magnification disappears after about three seconds
of inactivity, or as soon as you half-press the Shutter button.
In addition to the 12x optical zoom, the DiMAGE Z5 offers a 4x "interpolated" Digital zoom in 0.2x steps. When enabled through the menu system, pressing the Zoom rocker on the top of the back panel will first use the optical zoom, and then (after a brief pause) switch to the digital zoom. Keep in mind that digital zoom simply enlarges the central portion of the CCD image digitally, rather than magnifying it optically and, as a result, image resolution decreases in direct proportion to the magnification achieved.
A set of filter threads around the inside lip of the body around the lens barrel accommodates Konica Minolta's ZCW-300 Kit, which consists of a 0.75x wide conversion lens. A menu option is used to indicate to the camera that the lens is in use. With the lens mounted to the camera, a maximum wide angle equivalent to a 26mm lens on a 35mm camera can be obtained, quite a wide angle indeed.
Anti-Shake System
Originally introduced on the high-end Minolta A1, Konica Minolta's very effective vibration-reduction system made its Z-series debut in the DiMAGE Z3, and appears once again on the Z5. Konica Minolta's anti-shake technology is unusual in that it actually moves the CCD assembly to counteract camera movement, rather than the more common approach of moving an optical element inside the lens. In earlier tests comparing the performance of the DiMAGE Z3's anti-shake (AS) system against that of the Panasonic DMC-FZ15, I found that the Panasonic anti-shake system performed a bit better overall, but that the Konica Minolta approach gave a better viewfinder display without penalizing AS performance, and was also somewhat better at dealing with low-frequency vibrations. (As from your heartbeat, breathing, etc.) The Z5's anti-shake system appears to be just as good; in an informal test, I ran the camera's zoom all the way out to full telephoto, then turned on the focus-assist magnification on the LCD. With Anti-Shake turned off, it was virtually impossible to keep the resulting LCD image stable when holding the camera by hand. When I activated Anti-Shake, the results were immediate and dramatic. The image quieted down by what had to be a factor of four or more.
Anti-Shake does appear to be automatically disabled when battery life
is running low. I couldn't see this mentioned in the manual anywhere, but when
the battery warning icon is illuminated on the LCD, you are still shown the
menu options for anti-shake, but attempting to enable them has no effect. The
manual also mentions that in high ambient temperatures, the Anti-Shake system
is automatically disabled during image framing, and is used only during the
actual exposure. Presumably, the Anti-Shake system itself generates some heat,
and if used for an extended time during image preview in high ambient temperatures,
would adversely affect image quality. The manual also notes that the camera
may also use a lower ISO sensitivity than selected when Anti-Shake is used at
high ambient temperatures. Finally, do note that Konica Minolta recommends that
Anti-Shake is disabled altogether when using the camera on a tripod.
I don't know how much of a premium the Anti-Shake function adds to the cost of the Z5, but it doesn't seem to be a lot, given the camera's affordable retail pricing. Optical stabilization makes a huge difference in usability of longer telephoto focal lengths, but is a feature that has found little support from a price standpoint in the past. (Other cameras incorporating optical stabilization have generally not fared well against cheaper competition lacking the feature.) I'm hopeful though, that the range of sophisticated user that the Z5 is so obviously aimed at will understand and fully appreciate the value of Anti-Shake technology. - It really adds a new dimension to your photography, making possible a whole range of photos that would be impossible otherwise.
| Free Photo Lessons | |
|
In straight Auto mode, the camera controls everything about the exposure, except for flash, zoom, anti-shake and focus point. Program AE mode keeps the camera in charge of the exposure, while you have control over all other exposure options. Aperture Priority mode lets you select the lens aperture setting, from f/2.8 to f/8 depending on the zoom setting, while the camera selects the most appropriate corresponding shutter speed from 4 seconds to 1/1,000. In Shutter Priority mode, the user selects the shutter speed, from 1/1,000 to 4 seconds, while the camera chooses the best corresponding aperture setting. Switching to Manual mode gives you control over both shutter speed and aperture from 4 seconds to 1/1,000. In modes where you have control over the Shutter speed and/or Aperture, this is set using the Four-Way Arrow Pad. Since the Manual Focus keys are the same as those used for Shutter speed (in Manual exposure mode or Shutter Priority mode) or Aperture (in Aperture Priority mode), in these modes the center button switches back and forth between the up/down arrow keys being used to adjust Manual Focus or Shutter speed / Aperture as relevant. With the maximum shutter speed of four seconds, the DiMAGE Z5 is rather more restrictive than its predecessor the Z3, which allowed shutter speeds as long as 30 seconds using its bulb mode. Image noise was likely the reason for reducing the shutter range, perhaps because of the higher-resolution image sensor.
As described above, the Konica Minolta DiMAGE Z5 also offers five preset scene modes (referred to as Digital Subject Programs), accessed via the Exposure Mode dial. Portrait mode produces better-looking people shots by enhancing skin tones and decreasing the depth of field (to create a slightly blurred background). Sports mode provides faster shutter speeds to freeze action, and switches the camera to continuous AF mode. Landscape mode uses a smaller aperture to keep both background and foreground in focus. In Sunset mode, the camera employs slightly slower shutter speeds to let in more of the ambient light, and lets you record the warm colors of the scene without compensating for them in the white balance system. In Night Portrait mode, the camera also uses a slower shutter speed to allow more ambient light into the image, however it also records true black values and preserves the bright colors of artificial lighting.
The Konica Minolta Z5's default metering mode is a 256-segment evaluative system, which takes readings throughout the image to determine exposure, taking into consideration both contrast and brightness. Center-Weighted and Spot metering options are also available. Spot metering is useful for high-contrast subjects, as it bases the exposure reading on the very center of the image, letting you set the exposure based on a small portion of your subject. Center-Weighted metering also bases the exposure on the center of the image, but the camera takes its readings from a much larger area in the middle of the frame.
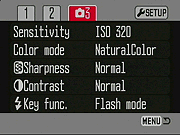
The DiMAGE Z5's light sensitivity can be set to Auto, or to ISO equivalents of 50, 100, 200, or 320. This is unfortunately not quite as high as the ISO 400 maximum of the Z3. While the Z3 offered an optional noise reduction feature, this feature cannot be disabled on the Z5. The camera decides when to apply noise reduction for longer exposures and higher ISO settings, reducing the amount of image noise that would otherwise result, but in the process also reducing fine subject detail somewhat. Exposure compensation is adjustable from -2 to +2 exposure equivalents (EV) in one-third-step increments, and an auto-bracketing option can snap three shots in rapid succession, varying the exposure between each in steps of 0.3 or 0.5 EV units. Exposure compensation is adjusted by pressing the left or right arrows on the Four-way Arrow pad, which displays the Exposure Compensation adjustment scales. The Auto Exposure Bracketing option is enabled through the camera's menu, and you can set the bracketing step size once you've selected Bracketing mode.
The DiMAGE Z5 offers good control over white balance, and some control over tonal range. Its white balance system offers a total of seven options, including Auto, Daylight, Tungsten, Fluorescent, Cloudy, Flash, and Custom, which is the manual setting. The Custom Set mode determines white balance by snapping a picture of a white card. The camera then adjusts its color balance to render the white card with a neutral hue. Contrast is also adjustable in three steps through the camera's menu menu. The Contrast adjustment worked well for me, but I'd really like to see its range extend a bit further in the low-contrast direction. The Color Mode option of the Record menu offers Natural and Vivid color modes, as well as Black and White, and Sepia settings. Vivid color boosts saturation of the image for a snappier look, while the Black and White / Sepia settings offer a little extra creativity, particularly useful for anybody wanting to make prints without using an image editor on a PC first. The record menu also offers a three-step Sharpness adjustment, for controlling the amount of in-camera sharpening applied to an image.
Drive Modes
The Konica Minolta DiMAGE Z5 features several Drive mode settings, again accessed through the menu system. As well as shooting in single-shot mode, you can choose between Standard and UHS (Ultra High Speed) modes, as well as Progressive Capture and Self-Timer modes. In standard Continuous Advance, the DiMAGE Z5 captures a maximum of three frames at approximately two frames per second. UHS mode captures up to 20 1,024 x 768-pixel images at about 10 frames per second. In either continuous mode, focus is locked with the first frame, regardless of the focusing mode.
The Progressive Capture mode operates similarly to the UHS continuous advance mode, but buffers images at ten frames per second for as long as the shutter button is held down. When the shutter button is released, the last twenty images captured are saved to the flash card - essentially allowing you to begin shooting before the action happens, and be sure you don't miss anything. (An incredibly handy mode for those of us with slowing reflexes!)
The Self-Timer fires the shutter either two or ten seconds after the shutter
button is pressed. The shorter delay is very handy when you need to prop the
camera on something to take a photo in dim lighting, and don't want the pressure
of your finger on the Shutter button to jiggle the camera. The ten-second delay
is long enough that you can run around to get into the photo yourself. An LED
lamp on the front of the camera blinks and the camera beeps as the self timer
is counting down, the blink and beeps becoming faster in the last few seconds.
Auto Exposure Bracketing mode captures a series of three images (one at the
metered exposure, one underexposed, and one overexposed). You can set the exposure
variation between exposures to 0.3 or 0.5 EV.
Movie Mode
The Konica Minolta Z5 has a Movie mode that records moving images with sound, with clip length being limited only by available flash card space, and battery life. The amount of recording time appears in the LCD or EVF monitor display, and varies with the resolution and frame rate of the movie, the available Secure Digital card space, and the speed of the memory card. With a fast memory card, (a 32x Lexar SD card worked fine for me), the Z5 can record at any resolution/quality setting for as long as the card has space remaining, with no limitation based on buffer memory, etc. The Z5 is also unusual in that it lets you operate the zoom lens while a movie is being recorded, something most digital cameras that record movies with sound won't allow. Movies are recorded at either 640 x 480 or 320 x 240-pixel resolutions, with frame rates of approximately 15 or 30 frames per second. Through the Record menu, you can set the movie mode to Standard or Night modes. Night mode records black and white movies in low lighting situations, and is far more effective in dim lighting than the vast majority of digicam movie options I've seen.
Another useful feature of the Z5's movie mode is that, when playing back a movie, you can pause it at any time and extract the currently-displayed movie frame as a still image, saved as a separate file on the memory card.
Flash
 The Konica Minolta DiMAGE Z5 features a built-in, pop-up flash, which operates in either Auto, Red-Eye Reduction, Fill Flash or Slow-Sync modes. To release the flash from its compartment, pull on the two small tabs on either side of the casing and lift up the flash head. Close it again by simply pushing the flash head back down. The Flash mode can be changed through the Record menu, or by pressing the Flash Mode button on the top of the camera's handgrip. In Auto mode, the camera decides whether the flash should be fired as the image is metered. In Red-Eye Reduction mode, the camera meters the scene and if flash is necessary, fires a series of small pre-flashes before firing the flash at full power for the exposure itself. This makes your subjects' pupils contract and reduces the occurrence of the Red-Eye effect. In Fill-Flash mode, the flash fires with every exposure, regardless of lighting conditions. Slow-Sync mode times the flash with a slower shutter speed, firing the flash at the beginning of the exposure. The flash is in the Off position when it's closed.
The Konica Minolta Z5 also includes a top-mounted hot shoe for attaching an external flash unit. The shoe design and contact arrangement are set up for Konica Minolta's own dedicated flash units, but I imagine that compatible models are available from the major third-party flash manufacturers (Sunpak et. al.). Konica Minolta's own Program Flash models 2500(D), 3600HS(D), and 5600HS(D) work with the DiMAGE Z5, . Konica Minolta also makes an adapter (part number PCT-100) that takes the proprietary hot shoe contacts to a standard PC-style sync connector, but from all I've heard, this accessory is virtually impossible to find at retail. The hot shoe is protected by an included accessory shoe cap, which on my review camera was actually rather difficult to remove, at least without risking bending a fingernail. Presumably with use, this would become a bit easier - and on the plus side, you're not likely to lose the cap!
When you press the shutter release on a digital camera, there's usually a delay or lag time before the shutter actually fires. This time allows the autofocus and autoexposure mechanisms to do their work and can amount to a significant delay in some situations. Likewise, the delay from shot to shot can vary greatly, and is also important to the picture-taking experience. Since these numbers are rarely reported by manufacturers or reviewers (and even more rarely, reported with accuracy), I routinely measure both shutter lag and cycle times using an electronic test setup I designed and built for the purpose. (Crystal-controlled timing, with a resolution of 0.001 second.) Here are the numbers I collected for the Konica Minolta DiMAGE Z5:
|
|
||
|
|
(secs) |
|
| Power On -> First shot |
|
LCD turns on and lens extends forward. On the slow side of average.
|
| Shutdown |
|
First time is time to retract lens, second time is worst-case buffer-clearing time. A little slower than average.
|
| Play to Record, first shot |
|
Time until first shot is captured. Pretty fast.
|
| Record to play |
|
First time is that required to display a large/fine file immediately after capture, second time is that needed to display a large/fine file that has already been processed and stored on the memory card. About average for its class.
|
| Shutter lag, full autofocus |
|
First time is at full wide-angle, second is full telephoto. Very fast, particularly for a long-zoom model. |
|
Shutter lag, continuous autofocus |
|
Very slow. Unknown impact with a moving subject, but avoid continuous AF for stationary subjects at all costs.
|
| Shutter lag, manual focus |
0.320
|
About average. |
| Shutter lag, prefocus |
0.158
|
Time to capture, after half-pressing shutter button. Fairly fast. |
| Cycle Time, max/min resolution |
1.51 / |
First number is for large/fine files, second number is time for "TV" mode (640x480) images. Times are averages. In both modes, shoots at a very irregular pace, with no more than two shots in the buffer at any given time. The buffer clears within 2 seconds in either mode. Decent speed, but a larger buffer memory would be nice. |
| Cycle Time, continuous mode, max/min resolution | 0.54 / 0.53 (1.88 fps) |
First number is for large/fine files, second number is time for "TV" size images. Times are averages. In large/fine mode, shoots 3 frames this fast, then slows to about 1.5 seconds per shot. In TV mode, maintains this pace indefinitely. Buffer clears in 5 seconds for large/fine images, 2 seconds for lowest resolution. Pretty fast, but limited buffer capacity. |
| Cycle Time, Ultra High Speed mode | 0.10 (10 fps) |
Times are averages. Resolution is set to 1024x768 and frame rate is set to 10 fps. Shoots a maximum of 20 shots and clears the buffer in 6 seconds. Extremely fast, with an impressive buffer depth for the roughly 0.8 megapixel resolution. |
Mixed results, but generally fast for its price point and zoom ratio. The Konica Minolta Z5 is a bit of a mixed bag in the speed category, but the news is generally good. Startup and shutdown are on the leisurely side, but shot to shot speed is fairly good, and full-autofocus shutter response is very good indeed. (Particularly impressive for a long-zoom model, as long zooms tend to focus rather slowly.) Continuous-mode cycle time is good, but buffer capacity is low both there and in single shot mode. A lower-resolution Ultra High Speed mode delivers up to 20 shots at 1024x768, at ten frames/second, an impressive accomplishment. There are faster cameras on the market, but the Z5 does well for a long-zoom model.
With only a handful of external camera controls and a well-organized LCD menu system, the DiMAGE Z5's user interface is straightforward and easy to grasp. The Mode dial on the rear panel controls the camera's main operating mode (as well as whether the LCD display's image is routed to the rear panel or the EVF eyepiece, image playback only being possible on the LCD), while the Exposure Mode dial sets the level of exposure control you have. Though only a few exposure options can be controlled externally, the Z5's efficiently laid out LCD menu system is easy to understand and relatively quick to navigate. Each menu is divided up into pages with tabs at the top of the screen, so you can quickly scan each page without scrolling through a long list of options. Given the camera's straightforward setup and user-friendly design, most users should be able to operate the camera right out of the box, referring to the manual only for more complex operations.
External Controls

Shutter Button: Angled down slightly on the camera's top panel, this button
sets focus and exposure when pressed halfway, and fires the shutter when fully
pressed.

Macro Button: Behind the Shutter button on the top panel, this
button controls the macro focus mode, cycling between normal AF, Macro, and
Super Macro modes.

Flash Button: Alongside the Macro button, this button cycles through the
available flash modes in any Record mode. Options include Auto, Red-Eye Reduction,
Fill Flash, and Slow-Sync. The pop-up flash is disabled altogether by lowering
it against the camera body.

Exposure Mode Dial: Sitting atop the back edge of the handgrip,
this ribbed dial selects the camera's exposure mode with the following options:

Zoom Control: Crowning the top right corner of the rear panel,
just beneath the Exposure Mode dial, this two-way rocker button controls the
optical and digital zoom in Record mode. In Playback mode, this button controls
the playback zoom setting, digitally enlarging the image as much as 4x.
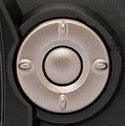
Four-Way Arrow Pad and OK Button: Roughly centered on the camera's rear
panel, this multi-directional rocker button and center fixed button serve
as the camera's main navigational tool. The multi-directional rocker button
navigates through settings menus, moving the selection up, down, left, or
right. The center button acts as the "OK" button, to confirm any
changes. In Manual exposure mode, the right and left keys adjust the aperture
setting, while the up and down keys change the shutter speed. In Aperture
and Shutter Priority modes, the up and down keys adjust the available exposure
variable, while the right and left keys adjust Exposure Compensation. In Program
AE mode, the right and left keys adjust the Exposure Compensation as well.
In Manual Focus mode, the up/down arrow keys adjust the focal distance of
the lens. Since the Manual Focus keys are the same as those used for Shutter
speed (in Manual exposure mode or Shutter Priority mode) or Aperture (in Aperture
Priority mode), in these modes the center button switches back and forth between
the up/down arrow keys being used to adjust Manual Focus or Shutter speed
/ Aperture as relevant.
In Playback mode, the right and left arrow keys scroll through captured images. The up arrow key calls up or dismisses a display screen showing a histogram of brightness values within the image, as well as detailed exposure information. The down arrow rotates the image, with the first press rotating it 90-degrees counter-clockwise, the second press rotating it 90-degrees clockwise, and the third press returning it to the original orientation. The rotation works courtesy of an orientation tag in the EXIF header of the image, so the actual image data remains unchanged and there is no potential degradation of the image quality - but only software that understands the tag will actually show the image in the orientation set by the camera. When an image has been enlarged, all four keys pan the view. When reviewing a movie file, pressing the center button begins movie playback, displaying a short menu across the bottom of the screen. During playback, the left arrow rewinds, the right arrow fast-forwards, the center button pauses playback, and the menu returns to Playback mode. When the movie is paused, the up arrow lets you capture a still frame to save as a separate image file, with resolution being identical to that of the movie.

Menu Button: Directly below the down arrow key and the first in a series
curving around the LCD monitor, this button calls up the settings menu in
both Record and Playback modes.

QuickView / Erase: Below the Menu button, this button activates
the QuickView image display in Record mode, which switches the camera temporarily
to playback mode - allowing you to quickly view the most recent image (all
playback functions except the Playback menu can be used, including browsing
through images, deleting them, etc.) Half-pressing the shutter button near-instantly
returns the camera to Record mode.
In Playback mode, this button displays the Single Image Erase menu, which lets you erase the currently displayed image.

Display (i+) Button: The final button in the series curving around the
LCD monitor, this button controls the LCD display. In Record mode, pressing
this button toggles the image information display on and off, and activates
a live histogram overlay.
In Playback mode, pressing the Display button displays or dismisses a limited information display. A third press switches to an index display of thumbnail images for rapidly reviewing photos in the camera, while a fourth press returns to the normal display.

Power Button: Located at the bottom left of the camera's rear beneath
the LCD monitor, this button turns the camera on and off.

Mode Dial: To the right of the Power button on the rear panel, this dial
sets the camera's operating mode and viewfinder display location. Options
are Record EVF, Record LCD, and Playback LCD.
![]()
Diopter Adjustment Control: Tucked on the side of the viewfinder
eyepiece, this tiny, notched dial adjusts the viewfinder display to accommodate
near- or farsighted users.
Camera Modes and Menus
Record Mode: In Record mode, the camera can capture still images, with a range of options available through the settings menu. The Exposure Mode dial sets the exposure control mode, while the LCD menu provides the following exposure options (some options are not available in all modes):
 Drive
Mode: Sets drive mode to Single, Self-Timer, Continuous, Progressive,
or Bracketing. The Continuous option calls up a display where you can
select either Continuous Advance (indicated by three large overlaid squares)
or UHS (Ultra-High Speed) Continuous Advance (indicated by five small
overlaid squares).
Drive
Mode: Sets drive mode to Single, Self-Timer, Continuous, Progressive,
or Bracketing. The Continuous option calls up a display where you can
select either Continuous Advance (indicated by three large overlaid squares)
or UHS (Ultra-High Speed) Continuous Advance (indicated by five small
overlaid squares).
 (Program, Aperture Priority, Shutter Priority, Manual and Movie modes only)
 Record 3 (Program, Aperture Priority, Shutter Priority, and Manual modes only)
 Playback Mode: This mode allows you to review captured images on the memory card, erase them, protect them, set them up for printing, etc. Pressing the Menu button displays the following options:
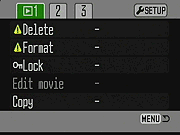 Delete:
Erases the current frame, all frames, or marked frames from the memory
card.
Delete:
Erases the current frame, all frames, or marked frames from the memory
card.
 Slide
Show: Launches an automated slide show of all the images saved on
the memory card.
Slide
Show: Launches an automated slide show of all the images saved on
the memory card. DPOF
Set: Allows you to set up images for subsequent printing on a DPOF (Digital
Print Order Format)-compliant output device. You can select individual images,
marked images, or all images on the card for printing. You can also cancel
print settings.
DPOF
Set: Allows you to set up images for subsequent printing on a DPOF (Digital
Print Order Format)-compliant output device. You can select individual images,
marked images, or all images on the card for printing. You can also cancel
print settings.
Setup Mode: The following Setup menu options are accessible through both the Record and Playback menu screens, as a separate tab on the far right:
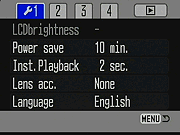 LCD
Brightness: Adjusts the brightness of the LCD display, with 11 steps
of brightness adjustment possible.
LCD
Brightness: Adjusts the brightness of the LCD display, with 11 steps
of brightness adjustment possible.
 File
# Memory: Specifies whether file numbering starts over when a card
is reformatted, or a new card is inserted, or whether the numbering continues
sequentially regardless of card status.
File
# Memory: Specifies whether file numbering starts over when a card
is reformatted, or a new card is inserted, or whether the numbering continues
sequentially regardless of card status.
 Reset
Default: Resets all camera settings to their defaults.
Reset
Default: Resets all camera settings to their defaults.
 Video
Output: Selects the video signal timing as either NTSC or PAL.
Video
Output: Selects the video signal timing as either NTSC or PAL. The
DiMAGE Z5 uses Secure Digital or MultiMediaCard memory cards for image storage,
and ships with a 16MB memory card - enough to test the camera works when it
arrives, but essentially useless after that first test (since it only fits four
images at the highest resolution / quality). Third-party SD cards are available
separately in memory capacities as high as two gigabytes, and I'd recommend
purchasing at least a 128MB card to accompany the camera. The SD slot is on
the bottom of the camera, covered by a hinged plastic door that opens easily
and snaps shut crisply. The card inserts with the connector edge going in first,
and the front of the card facing the back of the camera. As is always the case
with SD card slots, the card is removed by gently pressing on it - a spring-loaded
mechanism will pop it out far enough to pull from the camera with your fingertips.
One oversight that I noted in my review of the DiMAGE Z3 remains in this camera.
The SD card door has no latch on it to prevent it accidentally opening. While
you're unlikely to lose the SD card from the slot, since it is slightly recessed
into the bottom of the camera, I'm concerned that the door itself could catch
on clothing or some other object, and perhaps be damaged. The card door is also
too close to the tripod mount to allow memory cards to be changed with the camera
on a tripod - something I'm particularly quick to notice, given the number of
tripod-mounted sample images we take for an Imaging Resource review!
The
DiMAGE Z5 uses Secure Digital or MultiMediaCard memory cards for image storage,
and ships with a 16MB memory card - enough to test the camera works when it
arrives, but essentially useless after that first test (since it only fits four
images at the highest resolution / quality). Third-party SD cards are available
separately in memory capacities as high as two gigabytes, and I'd recommend
purchasing at least a 128MB card to accompany the camera. The SD slot is on
the bottom of the camera, covered by a hinged plastic door that opens easily
and snaps shut crisply. The card inserts with the connector edge going in first,
and the front of the card facing the back of the camera. As is always the case
with SD card slots, the card is removed by gently pressing on it - a spring-loaded
mechanism will pop it out far enough to pull from the camera with your fingertips.
One oversight that I noted in my review of the DiMAGE Z3 remains in this camera.
The SD card door has no latch on it to prevent it accidentally opening. While
you're unlikely to lose the SD card from the slot, since it is slightly recessed
into the bottom of the camera, I'm concerned that the door itself could catch
on clothing or some other object, and perhaps be damaged. The card door is also
too close to the tripod mount to allow memory cards to be changed with the camera
on a tripod - something I'm particularly quick to notice, given the number of
tripod-mounted sample images we take for an Imaging Resource review!
In addition to the switch found on SD cards which allows them to be write-protected or locked against erasure or manipulation, the DiMAGE Z5 lets you lock individual images or groups of images through the Playback menu. Once protected, images cannot be erased or manipulated in any way, except through card formatting. The Playback menu also lets you delete images shown in the LCD display, view an index display, create a custom slide show, set images up for printing on DPOF compliant printers, and copy images via camera memory to a new SD card.
Four image resolution settings are available: 2,560 x 1,920; 2,048 x 1,536;
1,600 x 1,200; and 640 x 480 pixels. Files may be saved in any one of three
JPEG compression levels. The number of remaining images that can be stored on
the memory card appears in the lower right corner of the LCD or Electronic Viewfinder,
in addition to the selected Resolution and Compression settings.
The table below summarizes the compression ratios and number of images that
can be stored on a 128MB memory card, with each Resolution / Quality (JPEG Compression)
combination. (No card is provided with the camera, but 128MB is a common card
size that's probably about the minimum you should consider for use with the
Z5.)
|
Resolution/Quality 16 MB Memory Card |
Fine | Normal |
|
|
| 2560 x 1920 |
Images (Avg size) |
6 2.7 MB |
11 1.4 MB |
20 768 KB |
| Approx. Compression |
6:1 | 11:1 | 20:1 | |
| 2048 x 1536 |
Images (Avg size) |
9 1.7 MB |
16 943 KB |
29 542 KB |
| Approx. Compression |
5:1 | 10:1 | 17:1 | |
| 1600 x 1200 |
Images (Avg size) |
14 1.1 MB |
25 634 KB |
41
389 KB |
| Approx. Compression |
5:1 | 9:1 |
15:1
|
|
|
|
Images (Avg size) |
74 215 KB |
111 143 KB |
102 KB |
| Approx. Compression |
4:1 | 7:1 |
|
|
A USB 2.0 "Full Speed" (the slow version of USB 2.0) cable and interface software accompany the DiMAGE Z5 for quick connection and image downloading to a PC or Macintosh computer. It appears as a "storage class" USB device, meaning that no driver software is needed for Mac OS versions 8.6 or later or for Windows Me, 2000, and XP. Downloading files to my Sony desktop running Windows XP (Pentium IV, 2.4 GHz), I clocked it at 792 KBytes/second, a good but not remarkable rate. (Cameras with slow USB interfaces run as low as 300 KB/s, cameras with fast v1.1 interfaces run as high as 600 KB/s. Cameras with USB v2.0 interfaces run as fast as several megabytes/second.)
When its USB interface is set to PTP mode, the Konica Minolta DiMAGE Z5 supports direct printing (no computer required) to PictBridge compatible photo printers. The extent of PictBridge support varies greatly between cameras, and the Z5's support is more robust than many. Provide that it's connected to a printer that offers an equivalent level of support and control, you can select paper size, bordered or borderless, print quality, and date imprint options directly from the camera's menu system. (Very slick.)
Recommended Software: Rescue your Photos!
Since we're talking about connectivity and memory cards, this would be a good
place to mention recovering images from damaged memory cards: Just as important
as an extra memory card is a tool to rescue your images when one of your cards
fails at some point in the future. I get a lot of email from readers who've
lost photos due to a corrupted memory card. Memory card corruption can happen
with any card type and any camera manufacturer, nobody's immune. A surprising
number of "lost" images can be recovered with an inexpensive, easy
to use piece of software though. Given the amount of email I've gotten on the
topic, I now include this paragraph in all my digicam reviews. The program you
need is called PhotoRescue, by DataRescue SA. Read our review
of it if you'd like, but download the program now, so you'll have it.
It doesn't cost a penny until you need it, and even then it's only $29, with
a money back guarantee. So download PhotoRescue
for Windows or PhotoRescue
for Mac while you're thinking of it. (While you're at it, download the
PDF manual
and quickstart
guide as well.) Stash the file in a safe place and it'll be there when you need
it. Trust me, needing this is not a matter of if, but when... PhotoRescue
is about the best and easiest tool for recovering digital photos I've seen. (Disclosure: IR gets a small commission from sales of the product, but I'd highly recommend the program even if we didn't.) OK, now back to our regularly
scheduled review...
The Konica Minolta Z5 provides a video output jack with an accompanying video cable. The signal timing can be set to NTSC or PAL via the Setup menu. The Video output duplicates the contents of the LCD in all modes, permitting it to be used as an auxiliary viewfinder.
Power
The
Konica Minolta DiMAGE Z5 uses four AA batteries for power. Following are projected
run times with "standard" 1600 mAh cells. (Note that modern NiMH cells
have true capacities as high as 2100-2200 mAh, so your run times could easily
be 30% longer than shown in the table below.)
|
|
(@6 volts on the external power terminal) |
(four 1600 mA cells) |
| Capture Mode, w/LCD |
|
|
| Capture Mode, w/EVF |
|
|
| Half-pressed shutter w/LCD |
|
|
| Half-pressed w/EVF |
|
|
| Memory Write (transient) |
|
|
| Flash Recharge (transient) |
|
|
| Image Playback |
|
|
Really excellent battery life. I still recommend purchasing a couple of sets of high-capacity NiMH batteries and a good-quality charger, but the Konica Minolta Z5's battery life is much better than average, at over three hours of continuous use in record mode with the "standard" 1600 mAh battery capacity I've settled on for the sake of comparison of digicam battery life across multiple generations of cameras. - With modern 2000+ mAh batteries, usable battery life should come close to 4 hours, a very impressive figure indeed.
About Batteries
Over the years, I've gotten so many emails about power issues for digicams, that I now insert a standard notice in my reviews of AA-powered cameras: Don't even *think* about using alkaline AA batteries in a digicam! Despite their being packed in the box with many cameras, they simply don't have the juice to handle typical digicam demands. Spend the $35-40 or so it takes to get a set (or two) of high-capacity NiMH rechargeable batteries and a good charger! The few dollars up front will save you literally hundreds of dollars in the long run, not to mention the hassle of wimpy batteries running out in the middle of the action. Buy two sets of batteries too, so one can always be in the charger, ready to go, and so have two sets available for longer excursions. See my Battery Shootout page for test results from a variety of batteries, and read my review of the Maha C-204W to see why it's my new favorite AA-cell charger.
In the Box
Packaged with the DiMAGE Z5 are the following items:
Test Results
In keeping with my standard test policy, the comments given here summarize only my key findings. For a full commentary on each of the test images, see the Konica Minolta Z5's "pictures" page.
As with all Imaging Resource product tests, I encourage you to let your own eyes be the judge of how well the camera performed. Explore the images on the pictures page or in our Z5 Photo Gallery, to see how the Z5's images compare to other cameras you may be considering.
Not sure which camera to buy? Let your eyes be the ultimate judge! Visit our Comparometer(tm) to compare images from the A95 with those from other cameras you may be considering. The proof is in the pictures, so let your own eyes decide which you like best!
The Konica Minolta Z-series of long zoom digital cameras have consistently led the market in features and value in the long-zoom category. While the market has become more crowded, Konica Minolta has maintained their place, and the DiMAGE Z5's only real competitors currently are Panasonic's FZ5 and FZ20 models. (They being the only long-zoom cameras equipped with anti-shake technology anywhere near the Konica Minolta Z5's price point.) The Z5 handles well, its anti-shake greatly extends the utility of its long zoom lens, and it's just plain fun to use. (Surely a critical factor in any camera purchase decision.) It produces good-looking prints up to about 11x14 in size, and you can extract a fair bit more detail from its images if you're willing to shoot with the in-camera sharpening set to "low" and then do some unsharp masking in Adobe Photoshop(tm) or a similar image-processing application. As noted in the review, the Z5's color saturation is lower than that of many consumer cameras. While technically more accurate than consumer cams with pumped-up color, and therefore perhaps more pleasing to advanced shooters, some consumers may find its images a little dull in comparison. Image noise is also an issue, with the camera trading away significant subject detail at ISOs of 200 and above. It's important to take into consideration how you intend to enjoy your pictures: While the image noise is glaringly obvious when viewed on a CRT pixel-for-pixel, at print sizes of 5x7 and below, the noise is quite acceptable, and at 4x6 print sizes, it entirely ceases to be an issue. All in all, the Konica Minolta DiMAGE Z5 offers a tremendous amount of "bang for the buck," packing a long zoom lens, fast shutter response, anti-shake technology, and a host of "enthusiast" features into a compact package at an affordable price point. If you're in the market for a long-zoom digital camera with a wealth of features, the Konica Minolta Z5 should be on your short list of candidates.
In keeping with my standard test policy, the comments given here summarize only my key findings. For a full commentary on each of the test images, see the Konica Minolta Z5's "pictures" page.
As with all Imaging Resource product tests, I encourage you to let your own eyes be the judge of how well the camera performed. Explore the images on the pictures page or in our Z5 Photo Gallery, to see how the Z5's images compare to other cameras you may be considering.
Not sure which camera to buy? Let your eyes be the ultimate judge! Visit our Comparometer(tm) to compare images from the Z5 with those from other cameras you may be considering. The proof is in the pictures, so let your own eyes decide which you like best!
| Free Photo Lessons | |
|
Reader Comments!
Questions, comments or controversy on this product? Click
this link to see what other Imaging Resource readers have had to say about
the Konica Minolta DiMAGE Z5, or add comments of your own!