A NEW PRO WORKFLOW
Aperture Diary
 By MIKE PASINI
Editor
The Imaging Resource Digital Photography Newsletter
"Will there be ever any word from you gentlemen regarding Aperture?" Skip McLaughlin emailed us just last week. "I realize without real, official Curves you may have quickly concluded that only flat-earthers would consider it, but even so, your wisdom applied to this new stranger would be enlightening and enjoyable."
|
|
New stranger, indeed. Aperture represents a different approach to the various professional digital photo workflows that have developed over the years. And we've decided to take a different approach to reviewing it, expanding the diary format we used for the equally ground-breaking Kodak EasyShare One.
"Blog" may be more suitable a tag for this format, though. The One Diary reflected that product's intimate but social nature. Here we expect to publish not only our experience grabbling with this new approach, but your own experiences and reflections as well. Use this link to join in.
DECEMBER 19 | Back to Contents
We had been pestering Apple to send a copy of Aperture as soon as we found out about it. But it wasn't until Skip had emailed us and we had threatened to buy it, that Apple FedExed us a review copy. By then, of course, we were well prepared.
Our review systems (but not our production systems) tend to be stock with no added RAM, bigger hard drives, accelerators or any other after-market goodies. That keeps the big players in the amateur buyer honest.
But it was inappropriate for a tool that advertises itself for professionals. We looked at our fastest test system and decided to upgrade it.
Technical Specifications. The first step was running Apple's Aperture compatibility checker. It told us we didn't have enough RAM. At 512-MB, it was right. Aperture needs 1-GB.
In fact, the minimum system requirements exceed what you need to run even Photoshop CS2 and the entire Adobe Creative Suite. Here are the basics:
- At least a G5 with a 1.8-GHz processor, a 15- or 17-inch PowerBook G4 with a 1.25-GHz processor or an iMac G5 with a 1.8-GHZ processor.
- Mac OS X version 10.4.3 "Tiger"
- 1-GB RAM
- ATI Radeon x600 Pro/XT, X800 XT Mac, X850 XT, 9800 XT/Pro, 9700 Pro, 9600/XT/Pro, 9650, Mobility Radeon 9700/9600; NVIDIA GeForce 6600 LE/6600, 6800 Ultra DDL/GT DDL, 7800 GT, Quadro FX 4500
- 5-GB free hard disk space
- A DVD drive for installation
Even more impressive are the recommended specifications:
- A 2-GHz Power Mac G5
- 2-GB RAM
- Only the ATI Radeon X800 XT Mac, 9800 XT/Pro; NVIDIA GeForce 6600 LE/6600, 6800 Ultra DDL/GT DDL, 7800 GT, Quadro FX 4500
While there are workarounds (essentially editing the info.plist for the application), we don't recommend flying in the face of technical specifications.
We also don't recommend relying solely on this version one release of Aperture to do your business. That's not an evaluation, just a precaution. With something as new as this, it's only wise to run it in parallel with what you're already doing.
The Hardware Upgrade. We had a 1.5-GHz 15-inch PowerBook G4 with the stock 512-MB RAM. So we ordered a 2-GB RAM kit from Ramjet.
While like Ramjet for the ease with which they made it possible for us to identify exactly which kind of memory we needed for our machine, we also chose them for their lifetime warranty and competitive prices. Their post-sale support was excellent as well, emailing confirmation of our order and a tracking code. We'd have liked a confirmation page, showing the final price (including shipping) before placing our order, but other than that, the process was smooth.
There isn't much help, however, for actually installing the modules. For that, we snuck over to Other World Computing, where there's a collection of videos showing exactly how to do whatever you need to do on your particular hardware. Highly recommended (as are their hard drive upgrades).
Aperture Arrives. Our memory upgrade order arrived the same day as Aperture. And, prepped by our video training, we were able to install 2-GB RAM uneventfully -- which is just the way we like it. The only hitch was the very small screws the RAM compartment cover uses, but we'd bought an electronics screw driver set from Radio Shack to handle an OWC hard disk upgrade a while ago and it had just the right miniature Philips bit.
The Aperture box contains a fairly hefty manual (for an Apple product) of 224 pages in a 7.5x9-inch format (not the small format of the iLife programs) and two DVDs, the Install DVD and the Tutorial DVD.
We popped the Install DVD in our PowerBook and in a few minutes we had Aperture running -- and registered.
A Second Monitor. With so much to do around here, we optimize our time with any product by, uh, reading the manual. And right away, we found an interesting suggestion in Chapter 2, "Setting Up an Aperture System." After discussing how to configure a basic system for use with Aperture (pretty much a description of your average setup), there was a section on using two displays.
We just happened to have a blank monitor staring us in the face, so we dug up the ADC-to-DVI adapter that came with the PowerBook to convert the Digital Video interface to analog pins and, with the computer turned off, connected the cables. When we restarted, both monitors came alive.
A quick trip to the System Preferences application let us set up the Displays using the Arrangement tab. We identified which monitor we wanted to host the Menu Bar and how the two displays should be arranged. In our case, we left the Menu Bar where we have always found it, on the laptop screen, and arranged the second monitor to the left of that screen. So scrolling off the left side of the laptop monitor took the cursor to the second monitor.
It was so easy to do, we kicked ourselves for not doing it sooner. Now we don't have to shuffle around in Expose to find quite as many things.
Calibrate & Profile. Of course, we had to calibrate and profile our second monitor before we could trust it (it certainly didn't match our main monitor). So we hauled out our Pantone ColorVision Spyder and launched OptiCAL.
By dragging the target window to the right monitor, we were able to point OptiCAL to the device we wanted to calibrate, not the monitor that was already calibrated. We let it walk through its tests and create a profile for the new monitor, then we did it for our main display, too. A fresh profile wouldn't hurt.
After telling the operating system to use the new profiles, the two displays resemble each other.
Disk Space. The Aperture specs talk about having 5-GB free but that's before you start storing images within Aperture. The manual suggests adding external FireWire drives to accommodate large libraries, the collection of data Aperture uses to manage your images (which themselves are part of the library). You can write the libraries there and backup them up to even more of the hot-pluggable drives. And you can pull a drive off the chain after a backup to store it off site.
There isn't a provision in Aperture for burning DVD backups (but you can always use Roxio Toast to span multiple DVDs to backup your Aperture files, although that strikes us as the hard way). But Aperture does monitor the status of the backups it creates. So the next time you plug your off-site backup into your FireWire chain, Aperture will note it's out of sync and offer to update it for you. That's a nice touch.
For the review, we decided to host the library on our internal drive, using our external for a backup of the review library. Were we using Aperture to handle commercial work, we'd set up a chain of external FireWire drives for the original data, the backup and an offsite backup. A system failure on our startup drive would only require us to plug the chain into our backup system to get work done.
The only issue with this is that over the last few system updates, external FireWire drives have suffered some corruption when mounted during the update. We haven't ourselves experienced this because, as backups, we usually run with the drives off. And that's the recommended update situation (actually, unplugging them is the recommendation). We don't feel this is a liability, but it can be a problem if you don't happen to follow the recommended procedure.
*Hardware Summary". So, in short, moving to Aperture may mean changing your hardware setup. If you're using the Creative Suite now, you may already have profited from increasing your RAM. But you may not have invested very heavily in external FireWire drives. Peter Krogh's The DAM Book on digital asset management, which we recently reviewed in the newsletter, suggests this is not at all extravagant. Oddly enough, we're finding the two monitor setup isn't an extravagance, either. It's made us a good deal more productive.
OK, back to the manual. And then we'll take a peek at the DVD Tutorial, too.
DECEMBER 21 | Back to Contents
The 224-page Aperture manual is well organized and clearly written. It functions more as a user's guide, though, than technical documentation. Take, for example, the first sentence:
"Aperture is a nondestructive image processing and database application that lets you efficiently acquire digital images, perform photo edits, adjust and retouch images, publish images on the Web or in print, export images and back up your images for safekeeping."
There is not an aspect of that description that has not been challenged by one photographer or another in the many online discussions about Aperture. But it is a concise description of just what the program does. Having gone through the manual and the DVD tutorial, revisiting that opening sentence brings it all back.
A "nondestructive image processing application" treats your camera originals -- whether they are JPEGs or Raw -- as the sacred one-of-a-kind things they are. They are never altered. Alterations, instead, are written to disk as new versions of the image.
As a "database application," Aperture does the paperwork for tracking all those versions, makes organizing images into projects trivial and enables easy retrieval of image needles in haystacks of shoots.
Letting you "efficiently acquire digital images" starts with displaying thumbnails of what's on your card before you transfer anything, but also includes grouping or stacking images by a user adjustable interval between shots or similar composition. You can import images from your hard disk and iPhoto library, as well -- in the background. No need to wait for Aperture to finish importing.
That you can "perform photo edits, adjust and retouch images" is a capability most cataloging software avoids and the ones that don't probably should. But Aperture differs because it taps into Mac OS 10.4's Core Image library to offer this. All that horsepower developed to handle the Mac's sophisticated screen display is harnessed by Aperture to plow through your images. Raw formats are understood by Aperture to the extent Mac OS X can parse them. A simple Software Update is all it takes to extend Aperture's compatibility.
iPhoto made the ability to "publish images on the Web or in print" a reality and it's no surprise Aperture can do that dance, too. One would expect to be able to customize output a bit more in Aperture, given the audience, and that ability is there.
Aperture can indeed "export images," as you might expect, but not the way you might expect. It doesn't let you into the china shop. You tell it what you want, it gets it for you and sends you on your way. That maintains the integrity of the Aperture database. If you could sneak into a folder and move an image, even by mistake, you could easily disrupt things.
And kudos to Aperture for highlighting its ability to "back up your images." It has a sophisticated scheme for protecting its database and your images that makes a lot of sense to us.
That's just the first sentence? Yep. We don't recommend reading the whole thing that carefully. In fact, we don't suggest you study the manual. Just look over the contents to get an idea of what's in the book. So when you get into a jam, you'll know if the book is the place to go for help. There are certainly sections you'll want to spend some time with, but on the first read through, treat it like a reference book.
In that spirit, let's quickly skim the contents.
Manual Contents. After introducing Aperture in the Preface, Chapter 1 presents "An Overview of the Aperture Workflow." Right away the concept of a customizable workflow is presented and with it, the building blocks of Aperture itself. Those include concepts like Digital Master Files like your camera originals, Versions like the edits of those images, Projects which contain versions with their masters organized into albums, Albums which organize versions in a variety of ways, Folders to organize projects and albums within projects, the Library which is all your data, and Vaults which hold your backed-up images in a copy of your library.
In our Pictures directory, there's one file called Aperture Library, the sample installed with the program. But it's 792-MB of data organized as an OS X package (like most applications) so it appears like one file to the user. When we Show Package Contents, we can see individual elements of the package (including more packages). This is how Aperture protects the data from accidental manipulation at the Finder level. It may disturb you at first because you don't see your camera originals or the edited versions when you look for them in the Finder. But we think it's a very wise approach.
Chapter 2 covers "Setting Up an Aperture System," as we mentioned in our first entry. After describing a basic system, the chapter tells you how to set up and use a system with two displays, how to manage disk space and use external drives. As the Compatibility Checker suggests, Aperture is a resource hungry beast. Fast video cards, RAM, hard drive space, external drives are requirements. We can't find fault with this. Someone finally wrote a program for photographers that demands the best hardware rather than the least common denominator and takes advantage of the operating system instead of cross-platforming it to death (usually at the expense of the Macintosh).
In Chapter 3, "Learning About the Aperture Interface," you tour the user interface and learn how to configure it. You're also warned about safe filenaming conventions.
Chapter 4, "Working with Projects," introduces the concept of Projects, how to create them, open and close them, populate them with images and albums of images and delete them.
Chapter 5 discusses "Importing Images" from the various file formats Aperture can handle to using your camera or a card reader, importing files stored on your hard disk (from the desktop or iPhoto, too), transferring projects from another system and backing up.
Chapter 6 is on "Working with Images in the Browser." Viewing, navigating, rearranging and rotating images is covered before discussing how to view metadata, create versions of an image and copy or move images.
In Chapter 7, "Displaying Images in the Viewer," you actually learn a few new tricks like how to use the viewer to compare images, look at images with the Loupe or using multiple displays. Chapter 8 continues the theme with "Viewing Images in Full Screen Mode" before Chapter 9 delves in "Stacking Images and Making Picks." That leads gently into Chapter 10's "Rating Images," all topics which deserve some elucidation these days. Making picks and rating images is not as straight-forward as it may seem.
Chapter 11, "Applying Keywords to Images," and Chapter 12 "Searching for and Displaying Images," introduce the basic database functions of Aperture while Chapter 13 "Grouping Images with Smart Albums," takes that to the next step.
Interestingly, only Chapter 14, "An Overview of Image Adjustments," discusses what kinds of changes you can make to an image (no, you can't flip an image) and how to access an external editor for more complicated edits. This clearly isn't the focus of this release.
Chapter 15, "Creating Slideshow Presentation," and Chapter 16, "Using the Light Table," and Chapter 17, "Printing Your Images," cover familiar tasks using Aperture's efficiencies. Chapter 18, "Exporting Images," and Chapter 19, "Creating Web Journals and Web Galleries," and Chapter 20, "Creating Books," build on those earlier skills to do new tricks.
Chapter 21, "Backing Up Your Images," explains the Vault system of backups. The size of the Library package does not lend itself to CD or DVD backup. But a system of external FireWire drives does the job nicely.
The manual includes a comprehensive index as well.
That's a lot to read, but it's well organized and flows well from one related topic to another, pretty much following the typical workflow.
The DVD. A similar approach is used by the DVD tutorial, a mere 4.11-GB presentation. Sections include Acquiring Images, Browsing & Organizing, Rating & Keywording, Searching the Library, Output to Print & Web and Aperture Training (a set of PDFs and a Web site link). There's also a Topic Index broken down into Photo Management, Image Processing and Output sections.
Where the manual tells you about these things, the tutorial shows you. And it does so in a very polished presentation that's a pleasure to watch. But getting through it in one sitting is asking a lot. We white knuckled it through in two, but that was a grind.
Armed & Dangerous. You'd think all this preparation and training would make us an expert before we actually used the program to do anything. But there's something about launching an application the first time that's just plain disorienting.
How could we not have noticed, we laughed, that there's no Menu bar? Oh, wait -- it's on the second screen!
We knew enough to let the cursor hoover over the icons in the Tool bar. We quickly found the Import panel control and revealed it. Clicking on the Local Files option let us browse our hard disk for images to import into the Library.
That was an interesting tour. For the most part, our JPEGs rendered as we expected in the Browser. But not always. Where we had rotated images in iView MediaPro, we often saw incorrectly oriented previews in Aperture. And in some cases, the aspect ratio was clearly not rendered normally.
We also suffered the indignity of unsupported file formats. While the Konica Minolta 7D's Raw format is supported, the 5D's is not. Oddly enough, the Browser was able to display the unsupported image's thumbnail but once imported into the Library all that was displayed was a gray square.
We found we could import the same image twice. And we consequently found out we could delete it from the Library very easily, too. Fortunately.
Falling in Love. There was nothing very onerous about Browsing our image collection, importing the images, rearranging them into different projects or deleting them. In fact, we liked being able to browse them with some image data available (which is how we knew we were looking at a 5D Raw image and not a 7D Raw image.
 |
| The Import Panel The highlighted image is an unsupported MRW format |
We also appreciated (rather quickly) the new controls we'd learned about. The scroll throttle first of all. And the automatic stacker based on time (which is simply something to die for).
The editable metadata fields made our mouth water. Being able to batch enter copyright and shoot information that easily should be standard on every catalog application.
Even the new concept of stacking images wasn't hard to get used to. Of course, we familiar with stacking things. We stack books to review, old slides to scan on scanners we're reviewing, bills, music CDs, plates in the sink. We're excellent stackers. But seeing Aperture stack things by time was a thrill. That is, after all, how we shot them. Three of these, one of those, six of that. It was as if Aperture had been there with us. Why hasn't anyone else thought of that?
The stacks Aperture builds are really displayed as groups unless you collapse them. The groups are easily identifiable by the inset panel they sit in and the number imposed on the first or pick image. You really don't have to have this explained to you (at least after our indoctrination). Much of Aperture is built on the user interface guidelines already familiar from OS X and iLife.
We found only the import arrow a little unpolished. It's clear enough, but it's a bit much. A transparent arrow hovering over the source and destination would have been more elegant.
The type is a bit small, too, let's be candid. Smaller than any other application. A lot is crammed on even a two-display arrangement, so we can appreciate the problem, but if you are squinting at Photoshop, you'll be looking for a loupe to see Aperture.
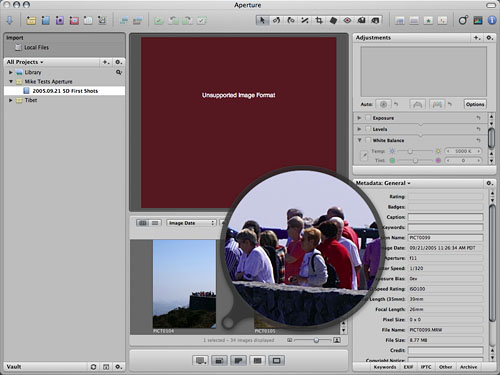 |
| The Loupe Not visible is the cursor on the lookout point of PICT0104 |
Of course, Aperture comes with a loupe. And it's a beauty. Just click on it in the Tool bar and you can inspect your Project files at full resolution. It's a lot more fun than a real loupe, too, because you don't have to be in perfect alignment or even squint. You simply point the cursor to what you want to see enlarged and watch the loupe spin around to a convenient display position and then render the data at 100 percent. Very nicely done.
With our quick study and brief orientation out of the way, all that's left is to do some real work. That's next.