Alien Skin Exposure X3 Review: Look out Lightroom, X3 is a powerful & versatile photo editor
posted Friday, November 3, 2017 at 6:30 AM EDT
For a long time, photographers wanting an all-in-one RAW editor and photo manager solution have looked to Adobe Lightroom, and with good reason. However, Alien Skin, a software company known primarily for their plug-ins and excellent film emulation software, has a Lightroom competitor of their own, Exposure. With the newest version, Exposure X3, Alien Skin has added many new organizational tools and rendering features.
Capable of being used as standalone software or as a plug-in within Lightroom and Photoshop, Alien Skin's Exposure X3 is a one-time purchase software which offers users power, versatility and flexibility all within an intuitive and unified workspace. Let's take a look at what Exposure X3 offers photographers, both in terms of overall functionality and upgrades compared to Exposure X2.
Primary Features
- Alien Skin Exposure X3 can be used as standalone software or as a plug-in within Adobe Lightroom (not Adobe Lightroom CC) and Photoshop
- X3 is a catalog-free complete photo manager
- Ability to send a photo to an external editor and then bring back the edited image
- A single customizable workspace
- Flexible import/export management
- Over 500 presets, including many film emulations
- Localized and non-destructive image editing with layers
- Full-featured assortment of image editing and retouching sliders
- PSD file support
- Non-destructive RAW editing
- Portrait retouching tools including spot healing
- Available for $149 for new users ($119 as an upgrade) on Mac and Windows. Click here for system requirements.
New to Exposure X3
Having used Alien Skin Exposure X2 (and the large X2.5 update which added non-destructive layer editing), I think that the biggest upgrades to Alien Skin Exposure X3 come in the form of usability improvements, particularly when using Alien Skin Exposure X3 as your complete photo manager.
Keywords: This is a big update to Exposure X3. You can now apply descriptive keywords to your images, including during the import process. You can retain or remove the keywords when exporting images and manage your keywords in a dedicated keyword library.
Virtual Copies: Without using up additional disk space, through the use of new virtual copies, you can edit and export multiple variations of a single image.
Collections and quick collections: If you store images across a wide array of locations within Exposure X3, Collections are a good way to keep them organized in a group.
Side-by-side image comparison: I find this feature particularly useful when culling images, but it can also work well when comparing different editing treatments on the same image when used in conjunction with Virtual Copies. You can view 2-4 images side-by-side or in a grid and you can link them all such that when you zoom in on one, the software automatically zooms in on the same area on the other images you're comparing.

Flexible watermarking: I am not a fan of watermarking images, but if you are, Alien Skin Exposure X3 has new watermark features including freeform text, images as watermarks, adjusting the size and location and export watermark settings.
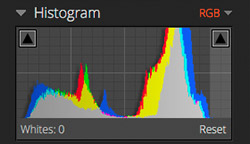
"Blacks" and "Whites" sliders and histogram: Like in Lightroom, Exposure X3 now offers "blacks" and "whites" sliders, which work very well. These can also be adjusted through the two new accompanying regions in the histogram.
Oranges and Purples saturation sliders: Another new slider addition. These are uncommon saturation sliders, but they are very useful in certain situations and a welcome addition.
Vignette Location Tool: In Exposure X2, you couldn't see the center of your vignette, but X3 adds a new Vignette Location Tool which solves this issue.
New overlays: You can now add overlays in a batch during importing and there are new overlay blend modes and effects, including sun and flare lighting effects.
Linear and Radial Gradient Tools: For selective editing, there are new radial, planar and half-planar gradient tools at your disposal, complete with adjustable opacity.
User Interface
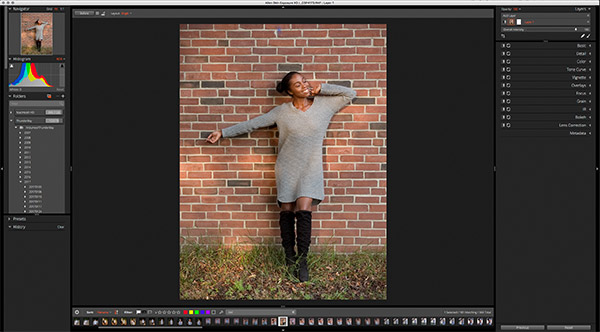
The user interface in Exposure X3 looks quite similar to Exposure X2, but with improvements. The end result is a clean unified user interface that eschews the modules system which is found in Adobe Lightroom Classic. Along the left side of the screen is a navigator, histogram, folders, presets and history.
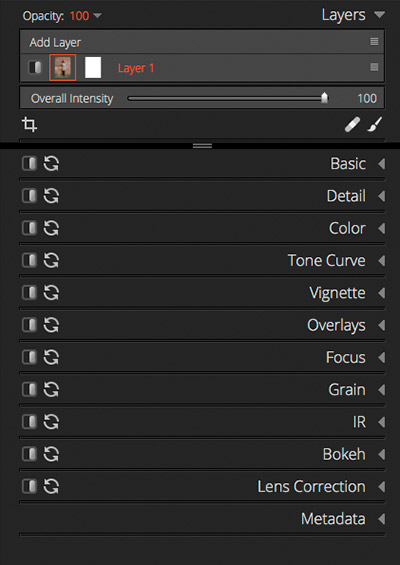
Along the right side is a layers panel and your standard suite of editing sliders, which are divided into Basic, Detail, Color, Tone Curve, Vignette, Overlays, Focus, Grain, IR, Bokeh, Lens Correction and Metadata panes, which are all collapsible.
In the middle is either a grid of images or a specific image that you're working on. When you're working on an image, the rest of the images in that specific folder are along the bottom and all of your filtering options are always on the screen by default. You can resize this bottom grid or any other panes in the user interface.
Overall, I have no issues with the user interface. It's clean, straightforward and functional.
Collections
In Alien Skin Exposure X3, the layout will look familiar to users of previous versions of Exposure, but there are significant changes nonetheless. As we've mentioned, there is a new Folders panel on the left side of the user interface which contains the new Collections organizational feature. Using Collections, you can organize photos from across a range of different sources. For example, you can place images from Dropbox, your internal hard drive and external hard drives in the same Collection. You can also designate a specific Collection as your "Quick Collection," which has its own shortcut you can use to immediately add images to the Quick Collection.
As is the case with many aspects of Exposure, Collection data is stored in file metadata. This means that if you are syncing files across multiple devices or want someone else to have access to a project or folder, it will come with your assigned organizational metadata as well. Collections are very useful, particularly if you are a working photographer who needs to group particular projects together.
Keywords
Another less obvious change is the new keywords functionality. While not everyone uses keywords to help organize their photos, many photographers rely on them for tagging important files. Fortunately, Alien Skin has added this function to their X3 version of Exposure and the implementation is very well done.
You can add keywords to the metadata of individual files and you can fine tune a search for keywords by adding additional search parameters. Are you looking for a "portrait" image shot at 85mm with an aperture of f/1.4 within a certain date range? Easy, you can search for that.
Exposure X3 keeps a list of your recent keywords and you can create larger parent groups of keywords, which is neat. This is a new feature which helps bring Exposure X3 much more in line with Adobe Lightroom in terms of organizational tools.
Comparing Images
This is my favorite change to the user experience in Exposure X3. I regularly capture a lot of similar images, particularly when doing wildlife photography, and need to be able to see which is just a bit sharper or has a slightly better composition. Exposure X3 allows you to compare up to four images side by side and a great feature is that when you zoom in on one, you zoom in on the other compared images in the same way simultaneously. If I zoom to 100% on an eye, assuming the eye is in a similar spot in all four images, the other three images are also zoomed in to 100% on the eye. It's awesome and makes culling much easier.
You can also use the new comparison tool to try out different image editing treatments or presets on the same image when used in conjunction with the new Virtual Copies. This is not something I do regularly, but I can see its value.
Performance
I should preface this section by stating that I have tested Exposure software on a 2013 Mac Pro with the six-core CPU and 6GB of VRAM. I have 64GB of RAM installed in the machine as well. Most software runs very well on my machine, although every so often software is not well-optimized. I think that Exposure X3 sits somewhere in the middle in terms of performance, at least relative to software such as Lightroom and Capture One Pro 10. I've had the best luck with Capture One and Adobe Lightroom has proven to be somewhat sluggish - although that has been alleviated a bit with the latest release.
Importing and browsing through my files is very fast in Exposure X3, but zooming in to see my images at 100% and making edits, particularly when working with large files from cameras like the Nikon D850 and Fujifilm GFX 50S, is slow. Sometimes rendering a file takes 5-15 seconds, which is too slow, especially when I need to cull hundreds of images. With that said, the software is very stable and I've not had any issues with hang-ups or crashes.

Image Editing
Presets
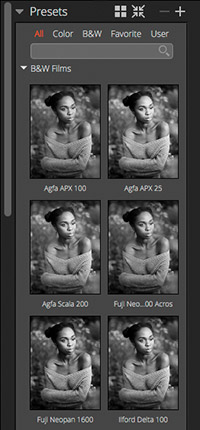
Alien Skin's roots are particularly evident when you look at their Presets. There are over 500 presets available in Exposure X3, which you can peruse here. The company has become well-regarded for its excellent film emulation technology, which is fully intact within Exposure X3. I have never been a big fan of presets and prefer to do the work myself, but I really enjoy a variety of presets within Exposure X3, particularly their black and white presets.
The adjustments which are made each time you view a preset are fully visible via the sliders in the software such that you can tweak presets yourself. You can edit and save your own presets too, which is great.
Sliders
While I showed off the list of editing tools in the "User Interface" section above, I'd like to go into a bit more detail on the image editing sliders available in Exposure X3. Starting with the "Basic" sliders, which include color temperature, exposure, contrast, highlights, shadows, the new "blacks" and "whites" sliders, clarity, vibrance and saturation, an immediately notable omission is the lack of Kelvin white balance temperature sliders. White balance is instead handled via a cool and warm temperature slider that has -100 to +100 values. This is one of the very few issues I have with Exposure X3's editing capabilities. I use Kelvin temperatures frequently for white balance in other photo editing software.
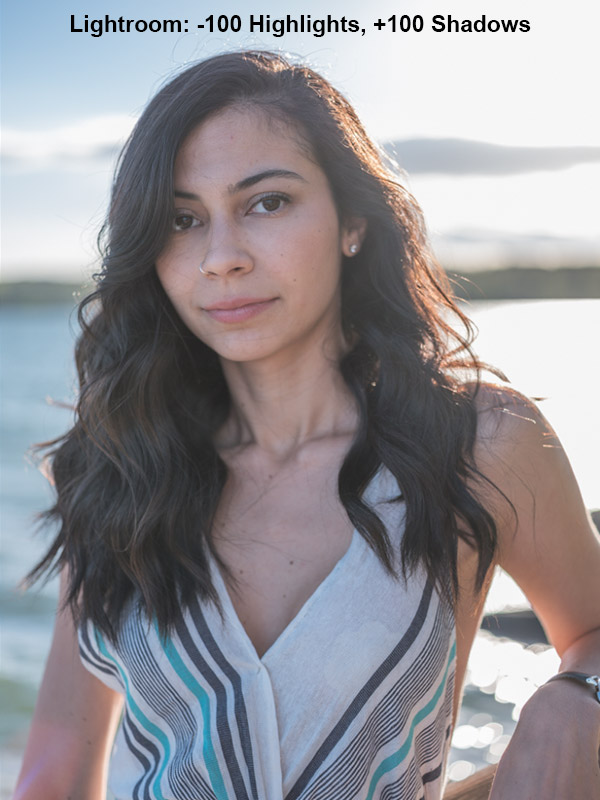
The other issue I have is with the "highlights" and "shadows" sliders. With multiple RAW formats, including files from the Nikon D850 and Fujifilm GFX 50S, the highlights recovery produced unnatural looking results that were noticeably poorer than what I was able to accomplish in Adobe Lightroom. You can see the difference in the screenshots below.

With that said, there are also awesome sliders in Exposure X3 that are not as well implemented - or implemented at all in some cases - in other photo editors I've used. For example, the Overlays editing pane works very well, the Grain pane is neat, the IR pane is unique and the Bokeh pane is very cool. The latter of which allows you to simulate lens bokeh in a user-customizable way and it works quite well.

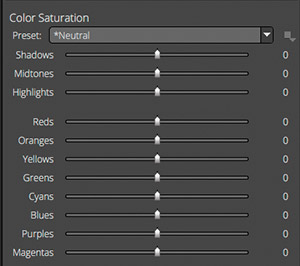
While Exposure X3 does not offer hue/saturation/luminance sliders for color, which is a bit disappointing, it does offer sliders for shadows, midtones and highlights which is great and you can also make luminosity-independent adjustments with a color filter, which also can be used to control the coolness and warmth of an image. In addition to these features, Exposure X3 includes new "oranges" and "purples" color saturation sliders, which are excellent additions.
Overall, basically everything you expect from a photo editor is present in Exposure X3 along with some distinct sliders that are not commonly found in competing software. While I wish that the highlights recovery worked better and that Exposure X3 offered more control over color, the overall photo editing process works well and there are some unique offerings in the software.
Black and White Conversion
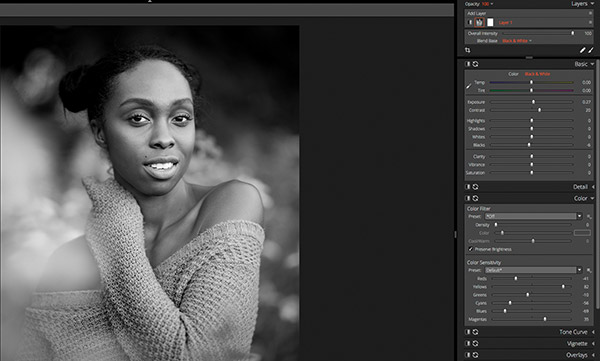
Black and white photo editing in Exposure X3 is very nice. Not only are there are a large variety of black and white presets available, the sliders for Color Sensitivity work well to fine-tune your black and white conversion. You don't have the same "oranges" and "purples" sliders you have when working with a color image, but you have plenty of control. I really like the results I was able to get doing black and white conversions inside of Exposure.
Selective Editing and using Layers

Since Exposure X2.5, the software has offered non-destructive layer-based editing. The layers system works well and allows for a lot of flexibility in your editing workflow. With Exposure X3, the software's selective editing workflow has been further improved thanks to new radial and linear gradients options.
In addition to these gradients, the software continues to offer brushing. You can control the size, feather and flow of the brush and you can edit with a visible mask, which helps when making subtle changes to images. One of my favorite features of the selective editing in Exposure X3 is that you can utilize "A" and "B" brushes. Sometimes I want a big brush for certain edits and a much smaller brush for other edits. In X3, I can quickly switch between two custom-sized brushes rather than have to keep changing the size of a single brush. It's a small thing, but it helps save a lot of time during intensive selective editing.
Using Exposure X3 as a Photoshop plug-in
You can also use Exposure X3 as a Photoshop plug-in rather than standalone software - it can also be used within Lightroom but honestly I don't see the point unless you really love the Lightroom user interface. I like using Exposure X3 within Photoshop to access the presets and the black and white conversions in particular.
Alien Skin Exposure X3 Review Summary
A viable Lightroom competitor with good organizational tools and a strong suite of editing functions
What I like:
- Intuitive user interface and no use of modules as in Adobe Lightroom Classic CC
- Easy to use with cloud services such as Dropbox
- Saturation control over highlights, midtones and shadows
- Layer-based and selective editing works well
- A ton of awesome film emulations and other presets
What I dislike:
- Rendering RAW images, even on my fast computer, proved to be quite slow at times, particularly when working with large files from the Nikon D850 and Fujifilm GFX 50S
- No Kelvin white balance
- No hue/saturation/luminance color control sliders
- Brushing on large files can slow down the software
Alien Skin Exposure X3 is a very good competitor to Adobe Lightroom and distinguishes itself through its expansive collection of excellent film emulations and presets and wide array of editing options. The layer-based editing in particular is very good and despite a few performance issues and some omissions, Exposure X3 is a great photo editor/manager and is well worth a look.
Pricing and Availability
You can download a 30-day trial of Alien Skin Exposure X3 by clicking here. The full version of the software is available for $149 for new users and $99 for owners of previous Exposure software. You can also purchase Exposure X3 in a bundle with Snap Art and Blow Up plug-ins for Lightroom and Photoshop for $199 ($119 as an upgrade). All versions can be purchased here.
Alien Skin provided me a copy of Exposure X3 for the purposes of this review. No other compensation was received.