Chasing moonbows: Tips on working with extraordinary light from landscape photographer Don Smith

If you’ve ever watched a dull, uninspiring landscape gently warm to life during the golden hour, you know what a difference a change in the light can make to your photographs. Finding the right light, understanding how to work with it, and knowing which tools and settings to use are skills that landscape photographers develop with years of experience capturing the natural world.
And then, just when you think you’ve got a handle on working with light, nature throws you a moonbow. Or a bolt of lightning. Or a sunrise double rainbow in the mist.
We asked landscape photographer and educator Don Smith to tell us how he creates his stunning fine art landscape photographs by using natural light of all kinds—from gentle sunsets to lightning and moonlight. He talked with us about the tools, techniques, and inspiration that helps him create extraordinary images.
Aimee Baldridge: If you were giving advice to somebody just getting into landscape photography, and they wanted to know where a great place to start would be, what would you tell them?
Don Smith: First, just look around the area where you live. That’s the area you’re going to be most familiar with, so look there before you start traveling. It’s something you can return to, so if you show up at one time of day and it’s not right, you can come back at sunrise. Beyond that, we have so many national parks in this country. The parks that would be at the top of my list would be Yosemite, Grand Teton, Arches and Canyonlands, Zion, and Bryce Canyon.
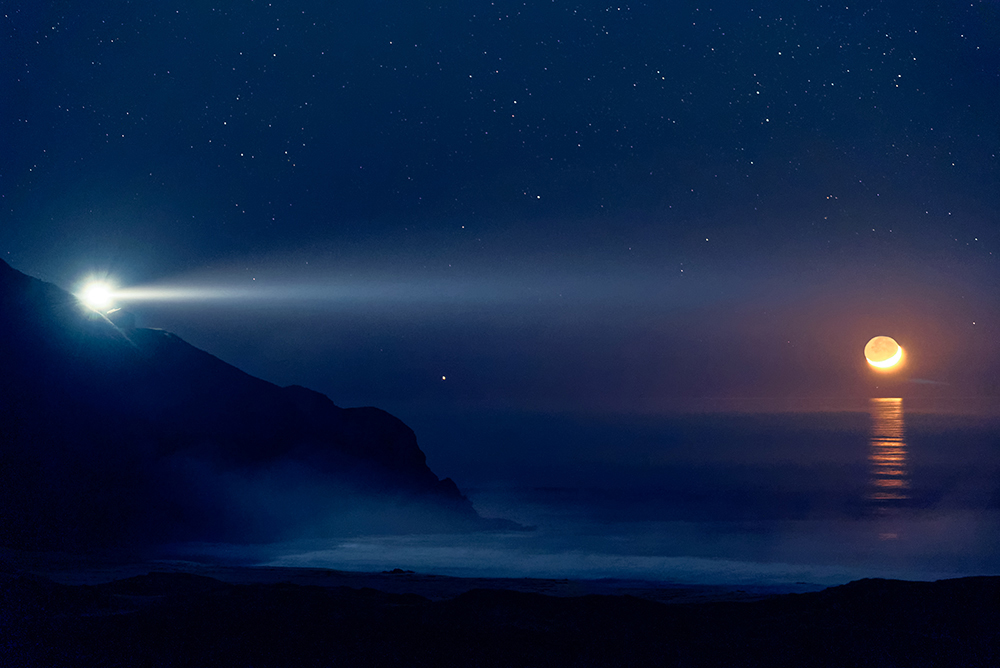
Pt. Sur Lightstation and a setting crescent moon, Big Sur Coast, California, USA. Photographed with a Sony a7S and Sony FE 70-200mm f/4 OSS lens at ISO 10,000 with an f/4.0 aperture and 5 second shutter speed. Photo © Don Smith.
AB: Where do you live?
Don Smith: I grew up in a town called Hollister, California, and we actually live there now, my family and I. We’re smack in the middle of the San Jose/Monterey area. It’s a really pretty area for a landscape photographer. Tonight I’m going out to Pinnacles National Park, about a half-hour away from me, and there’s going to be a moon rising up over the high peaks. Thanks to doing some software and a lot of homework calculations, I figured out that tonight is going to be a great night to photograph the moon rising at sunset.
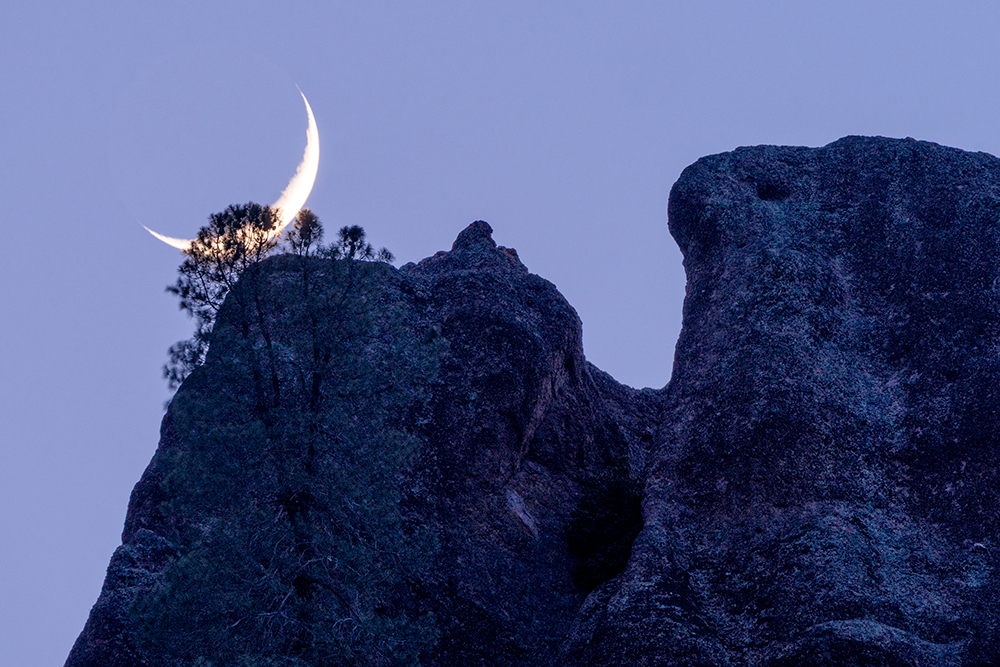
Crescent moonset over high peaks, Pinnacles National Park, California, USA. Photographed with a Sony a7R and Tamron SP 150-600mm f/5-6.3 Di VC USD SP lens with Sony LA-EA4 adapter at ISO 400 with an f/11 aperture and 2 second shutter speed. Photo © Don Smith.
AB: What are the tools you use to plan for that kind of moonrise shoot?
Don Smith: The main piece of software that I use to plot the moon is The Photographer’s Ephemeris. It works in conjunction with Google Maps. I actually have a little five-minute video that I did when I plotted a moon recently. You can see how I put this software into use. I do use other apps. One is called PhotoPills, and I like that one when I get on location. So I start with The Photographer’s Ephemeris, and then I fine-tune it on location with PhotoPills. Those two together are pretty much an unbeatable combination.
I teach so many photographers, and they’re always out shooting sunsets. But boy, the minute that sun hits below the horizon, they’re packing and they’re going back to their cars, and they’re out of there. Serious photographers know to wait a good half-hour or 40 minutes past sunset. Same thing with sunrise. I always try to make sure I have my workshop participants out on location, if we’re in the mountains, 45 minutes to an hour prior to sunrise. At beaches, I’ll try to have them there no later than a half-hour prior to sunrise.
Our cameras can record lights and photons our eyes cannot see. I think that’s where digital cameras really, really shine—in the low-light situations. When to our eyes, basically we’re seeing shapes in black and white, these cameras are recording beautiful color images.
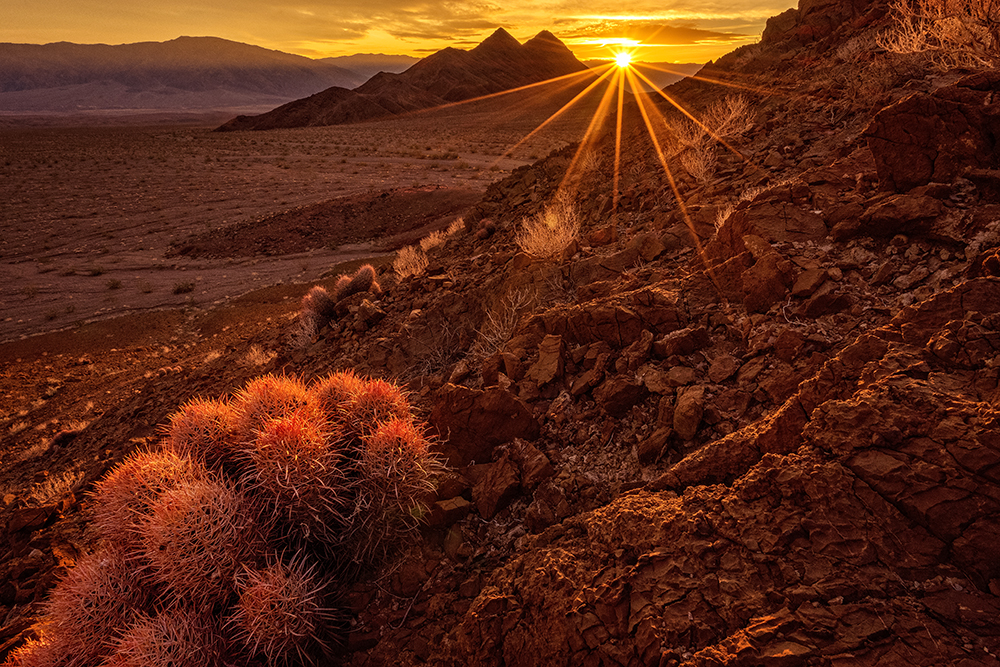
Hell’s Gate and setting sun with barrel cacti, Death Valley National Park, California, USA. Photographed with a Sony a7R and Sony FE 16-35mm f/4.0 ZA OSS Zeiss Vario-Tessar T* lens at ISO 100 with an f/22 aperture and 1/20 second shutter speed. Photo © Don Smith.
AB: What are you shooting with these days?
Don Smith: My whole landscape bag is Sony. My main landscape camera has been the a7R and now the a7R II. For my night photography, I’m using the Sony a7S. That’s a really high ISO camera. Then if I need a little bit of extra pull, I’ll use the a6000, and that has an APS-C sensor, so I can get a 1.5x crop. I’ll be using that camera tonight to shoot the moonrise, and I’ll connect it with a Metabones adapter. I have a Canon 400mm f/2.8 lens that I’ve owned for quite a while, plus a Canon 2x converter. I’ll put the Sony on there, and I will have an effective reach of 1200mm to shoot those high peaks and the moon.
In my base bag I have three lenses, and they’re all Zeiss lenses made for Sony, the 16–35mm, 24–70mm, and 70–200mm. When I’m doing workshops, I have a lens that Tamron puts out, and it has a 150–600mm range. I put that a6000 on, and now I’ve got a range all the way out to 900mm.
A 97% moon rises over high peaks in front of gray pines at Pinnacles National Park, California, USA. Photographed with a Sony a6000 and Canon EF 400mm f/2.8L IS II USM lens with a 2x converter Metabones IV adapter at ISO 200 with an f/10 aperture and 1/15 second shutter speed. Photo © Don Smith.
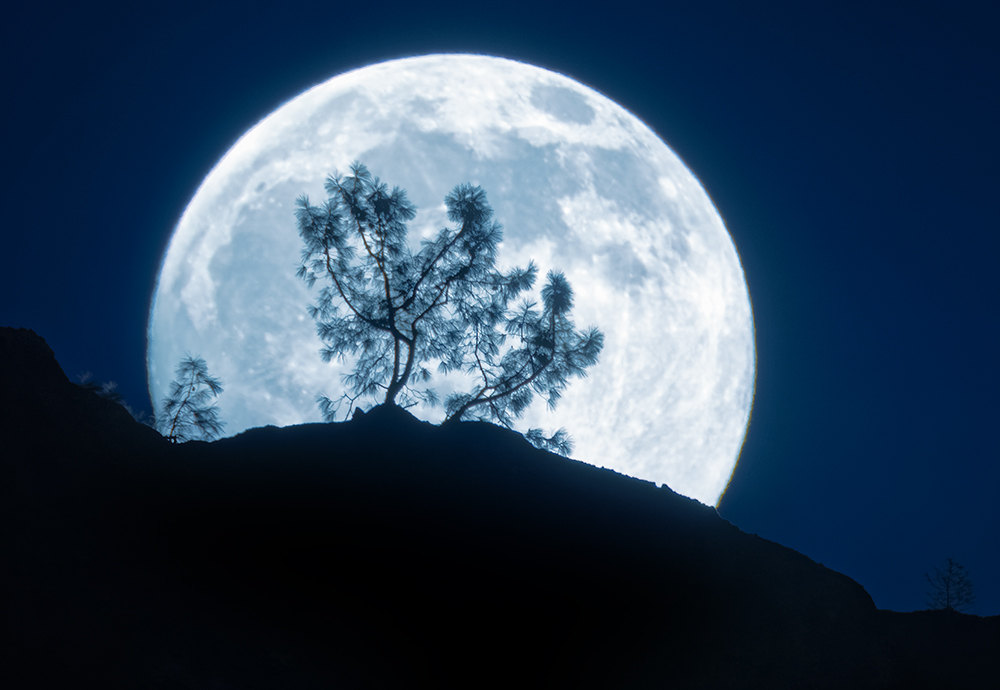
AB: Why do you use that 1200mm focal length to photograph the moon?
Don Smith: The tighter I can get on the moon, the bigger the moon is going to look in the terrain. When I put a telephoto lens on it, I can compress that moon with a peak or some gray pines that are growing out of some of these peaks. If it’s behind one of those gray pines, it just looks huge. It’s an illusion called the “Ponzo illusion.”
I can remember getting a very young education in this, when I was about 11 years old. My family had a cabin in the Sierra Mountains, and we were up there in the summer. They were filming a movie called Day of the Animals nearby.
In the final scene of the movie, Leslie Nielsen is supposed to be fighting this bear. It was actually on a leash, and the trainer got the bear up on its hind legs, and had it swinging its arms, and Leslie Nielsen was a good 50 or 60 feet away from this bear, and he’s flailing his arms out like he’s fighting the bear. The camera was set up probably 100 yards behind the bear, with a super telephoto lens.
I didn’t get it when I was watching them film it, but when I went to the movie and actually saw it played, I went, “Oh my gosh. That bear is right on top of him!” That was my first introduction to the power of compression with super telephoto lenses. It’s really no different than what I’m doing with the moon.
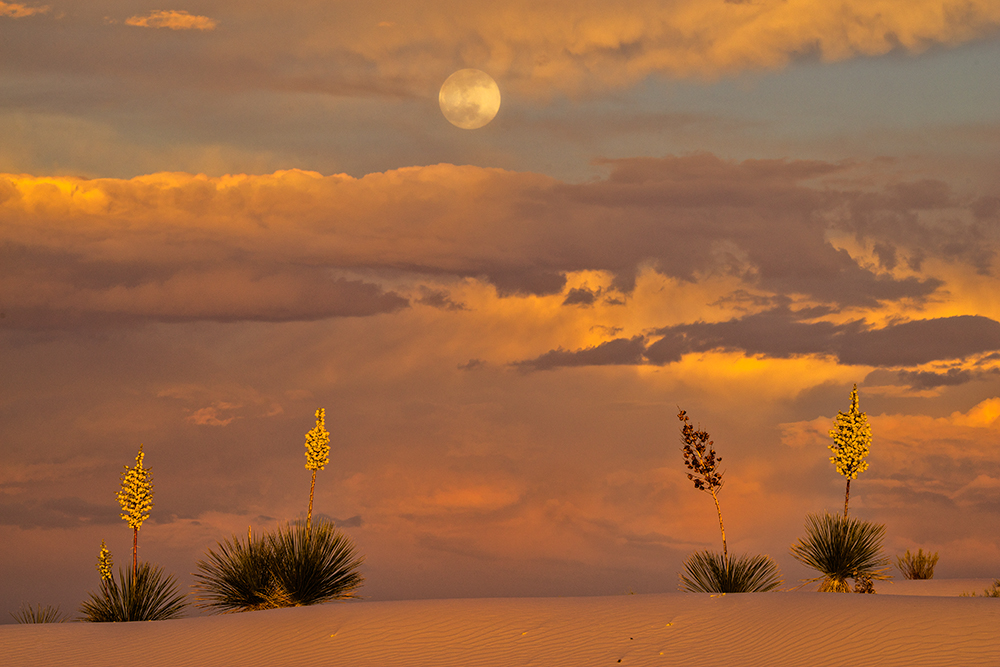
Moonrise and yuccas at White Sands National Monument, New Mexico, USA. Photographed with a Sony a7R and Sony FE 70-200mm f/4.0 OSS lens at ISO 100 with an f/16 aperture and 1/8 second shutter speed. Photo © Don Smith.
AB: Is there a particular window of time that gives you the best color and light throughout the whole landscape when you’re shooting in moonlight?
Don Smith: Yeah, it only happens once a month. It’s usually at moonrise the day prior to the full moon, and on moonset the day of the full moon. Typically, especially in the summer, you have a good 15-minute window. So it’s short: 15, maybe 18 minutes at the longest. In the winter when twilight is shorter, you may only have about a 7 to 8 minute window to capture it. Right around winter solstice, you may have only 4 to 5 minutes.
My guideline is if you’re photographing a full moon, you’ve got to see detail on that moon. So the exposure has to be based on the moon, and then the landscape is just filled in by the ambient light. Once that sun lowers below the horizon, that ambient light can go lower and lower, plus your landscape’s going to get darker and darker, and you’ll be out of contrast range. You’ll be out of what your sensor can capture—we call this dynamic range.
Fortunately, the Sony a7R sensor, which I think is the best sensor on the market in terms of dynamic range, can extend my window two to four minutes more than a standard sensor on, let’s say, a Canon camera. I’m not trying to knock Canon; it’s just their sensor technology is nowhere in the ballpark of Sony’s sensor technology. So I’ll get a little bit of an extension, just because I’m using what I consider the best sensor on the market.

Upper Antelope Canyon, Navajo Nation, USA. Photographed with a Sony a7R and Sony FE 70-200mm f/4 OSS lens at ISO 400 with an f/16 aperture and 1/2 second shutter speed. Photo © Don Smith.
AB: You also do a lot of lightning photography. What kinds of cameras and other gear do photographers need to capture it well?
Don Smith: Lightning triggers are number one. The one we recommend is actually called the Lightning Trigger. It will fit on the hot shoe of your camera, and then you run a cord out of it, into the remote socket of your camera.
The second part of the equation is checking your camera and making sure that your shutter lag time is 60 milliseconds or less. There are a lot of cameras, even pro models, that will fall far outside that. With mirrorless, it’s really good because you’ve eliminated the mirror having to flip up and get out of the way. Milliseconds count.
You want a very short lag time, obviously, when lightning bolts are hitting. The bolt that we actually see is not the down-shaft. The lightning is the return bolt. So the down shaft is what triggers the trigger. It sends the signal through the remote cord, fires the camera, and as the up bolt goes back up, that’s what’s visible and that’s what the camera is catching.
How do people know what their shutter lag is? They can go on Imaging Resource, look up their camera, and when they find their camera, see a tab that will say Performance. When they click on that, they scroll down and see shutter lag. The number they want to look at is what’s called “prefocused shutter lag.” As long as it’s 60 milliseconds or less, their camera’s going to be a good lightning camera.
If you look at the Sony cameras, the a6000 and a7S, will spec out at 22 and 24 milliseconds. It makes them both excellent cameras for lightning, probably two of the best on the market.
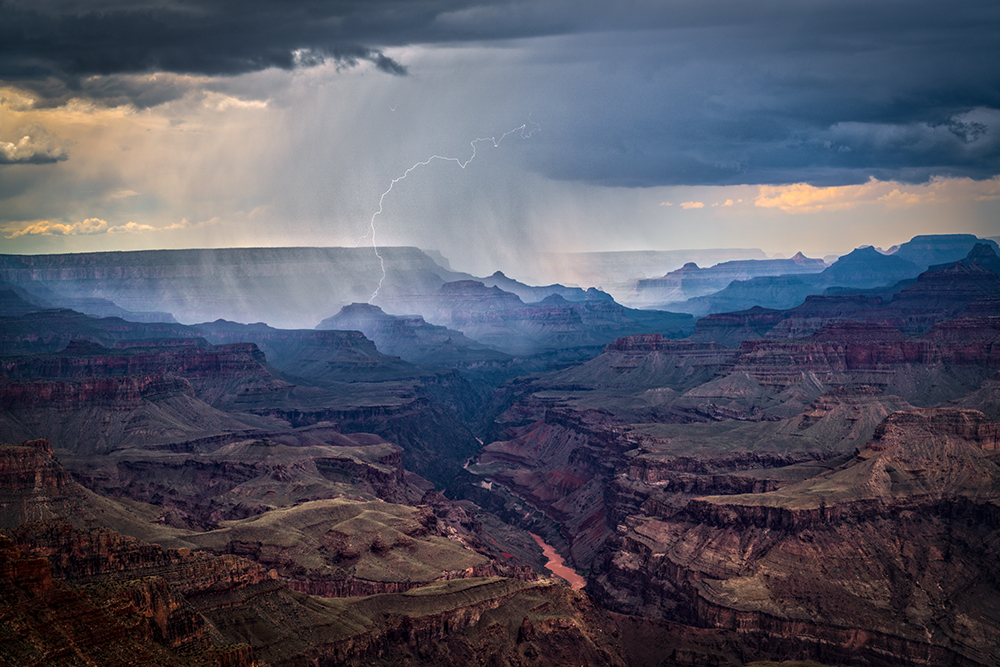
Afternoon monsoon lightning, Grand Canyon National Park, Arizona, USA. Photographed with a Sony a7R II and Sony FE 70-200mm f/4 OSS lens at ISO 50 with an f/13 aperture and 1/10 second shutter speed. Photo © Don Smith.
AB: What role does color play in your approach to composition?
Don Smith: Oh, that’s everything. And it starts with the light. I’m not going to steal this line; I’m going to credit it to somebody who was a real influence on me, a gentleman named Galen Rowell. He passed away in 2002. He was probably, at the time, the premier color landscape photographer, and he did everything with 35mm.
It was back in the time when people really wouldn’t respect you as a landscape photographer unless you were working with a 4x5 or an 8x10 camera, but he was a climber. To him it was all about being lightweight, and getting into these very remote places where he couldn’t lug a big view camera. And he was doing it all in color.
He always said, “When I go out to photograph, my first thought is always about light.” In other words, he didn’t really go out looking for a specific subject to photograph. He would chase the light, and he would try to figure out where the best light, at the edges of the day, was going to come to him. That’s what he would start to point his camera at, and I think he was so right.
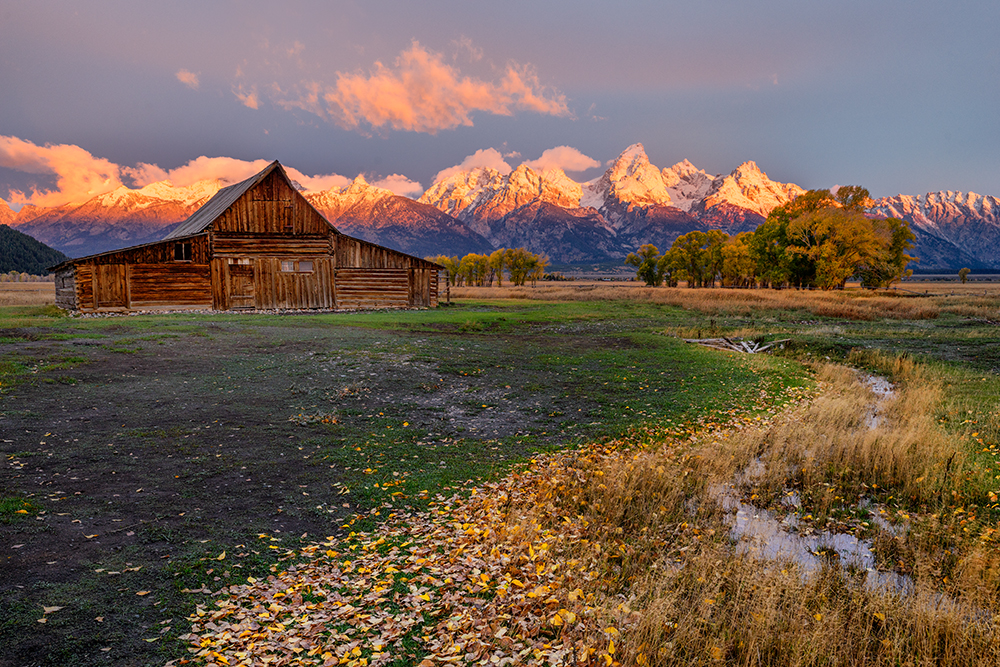
Fresh snow on T.A. Moulton Barns at sunrise, Grand Teton National Park, Wyoming, USA. Photographed with a Sony a7R and Sony FE 16-35mm f/4.0 ZA OSS Zeiss Vario-Tessar T* lens with a Singh-Ray neutral polarizer at ISO 200 with an f/11 aperture and 1/6 second shutter speed. Photo © Don Smith.
AB: So with your current mirrorless kit you’re following in the footsteps of Galen Rowell, by using a very small camera for landscape photography.
Don Smith: I am, yeah. I think three years ago, when the mirrorless cameras really started to become common, people just said, “OK, it’s just a lightweight camera but I can still produce a big file.” Yes, that’s the byproduct—you do have a lighter system now to hike around with. But I think that going forward, I’m hearing some incredible things they’re going to be able to do with these sensors now. So for my landscape photography, I’m committed fully to mirrorless cameras. I’m not even looking back.
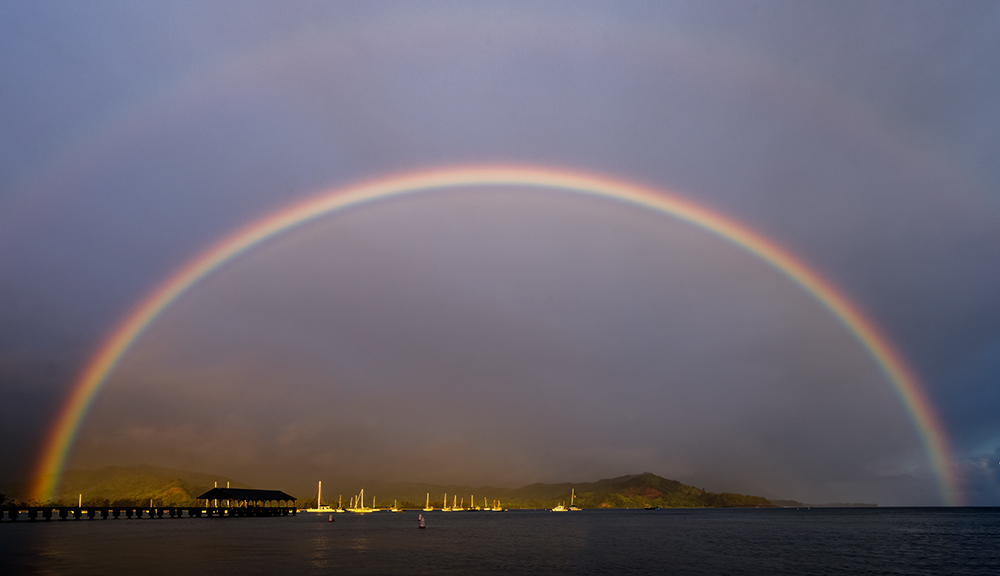
Double rainbow over Hanalei Bay at sunrise, Kaua'i, Hawaii, USA. Photographed with a Sony a7R and Sony FE 16-35mm f/4.0 ZA OSS Zeiss Vario-Tessar T* lens with a Singh-Ray neutral polarizer at ISO 100 with an f/18 aperture and 1/4 second shutter speed. Photo © Don Smith.
AB: Tell me about moonbows.
Don Smith: Moonbows are really just a rainbow. They’re called a lunar mistbow. With a rainbow, you have to have the sun behind your back, obviously. You look down your shadow line, and once you’re looking at the area that you want to photograph, you draw a line out to where the sun is sitting. If that intersection point is 42 degrees or less, you’ll start to see a rainbow.
That’s why it has to be early or late in the day, because the sun angle is low. Then you have to have some rain or moisture for that sun to hit and cause a refraction, and then you get your rainbow. Fast-forward to a moonbow: it’s the same thing. Your light is no longer the sun; it’s the full moon rising.
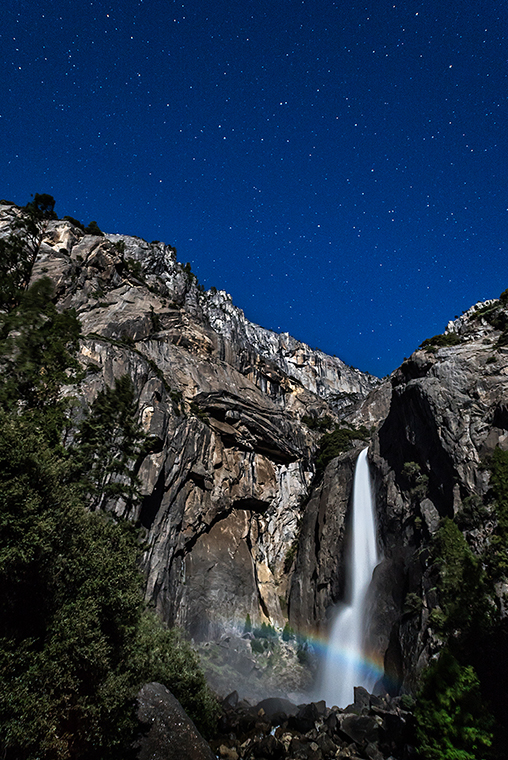
Moonbow over Lower Yosemite Falls, Yosemite National Park, California, USA. Sony a7S and Nikon 14-24mm f/2.8G IF-ED AF-S Nikkor lens with a Metabones adapter at ISO 1600 with an f/2.8 aperture and a 5 second shutter speed. Photo © Don Smith.
AB: What is the best way to capture a moonbow scene?
Don Smith: To the human eye, you probably won’t see the color in the mistbow. You’ll just see a grayish bow. We can see the bow form in black and white, and we can make a composition of it. But the camera is just strictly recording photons, so it’s recording through the array that’s sitting on the color sensor, and it’s picking up the color.
I’ll shoot it with anything from 70mm to 200mm, depending on the scene. Sometimes I’ve gone even to a 16–35mm if I want to include a river or a creek that’s running away from the falls, just based on my composition.
People cannot believe it when we’re out there shooting.
They’ll go, “What are you shooting?” I’ll say, “Well, the moonbow there.”
They’ll say, “That shade thing?” Then I’ll say, “Look at the picture,” and they come up and see this colorful bow and go, “How did you do that?”
They think you’re a genius. You’re really not—you just understand what makes a rainbow.
This interview was made possible by support from Sony's Artisans of Imagery program. For more about Don Smith, visit his website or find him on Sony's Alpha Universe site.
Want to read more interviews like this one? Check out our other Sony Artisans of Imagery interviews below:
Beat wedding-shoot anxiety: Wedding photography tips from world-class pro Scott Robert Lim
Fast, far, and wide: Tips for intrepid photographers from adventure sports shooter Gabe Rogel
Background first; the subject can wait: Unusual advice from Nat Geo pro Ira Block
No truth in photography? Photojournalist Ben Lowy on making (not taking) images