5 tips for shooting at night with a superzoom
posted Friday, December 28, 2012 at 1:19 PM EDT

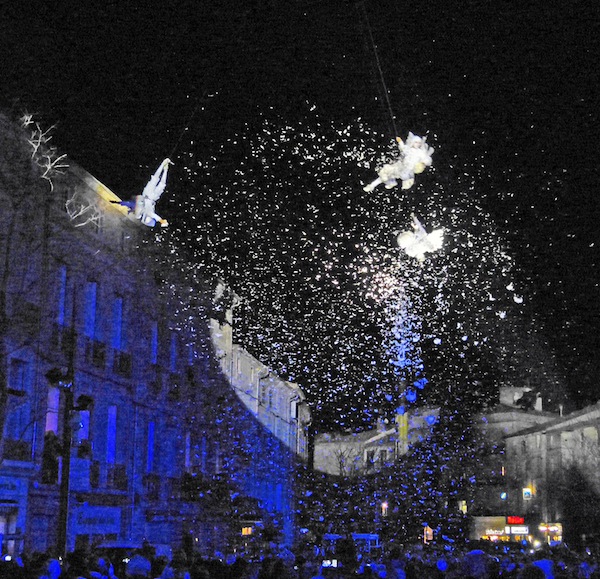
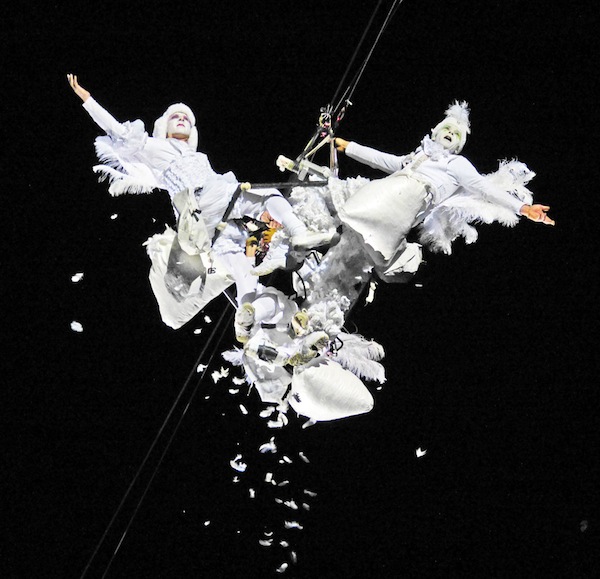
Photography is about solving problems, and the other night I faced a slew of them. I live next door to Pézenas, France, which was planning to celebrate the completion of redevelopment work on its historic center with a live performance by a circus aerial act. At the end of the show, the troupe of fearless performers were to hurl themselves down long cables strung above the street and then drop five tons of feathers on the audience below.
Now I love the circus and have photographed aerial acts before, but usually under the confines of the Big Top. With the distance to the performers and the available light both likely to be constantly changing, I knew shooting outside at night with a digital camera was going to present a big challenge.
Tip 1: Preparing in Advance
Faced with shooting an event like this, especially one with a large crowd, I always scout out the location beforehand to find the best place from which to shoot. For days prior to the show, riggers had been stringing cables from the top of a 300-foot crane to a high platform about 400 feet away. I knew that long cables sag and I was hoping to find the spot where they sagged lowest. This point would allow me as close to the aerialists as possible. About 250 feet from the tower, the cables dangled just 60 feet over the street. This is the place I wanted to be.
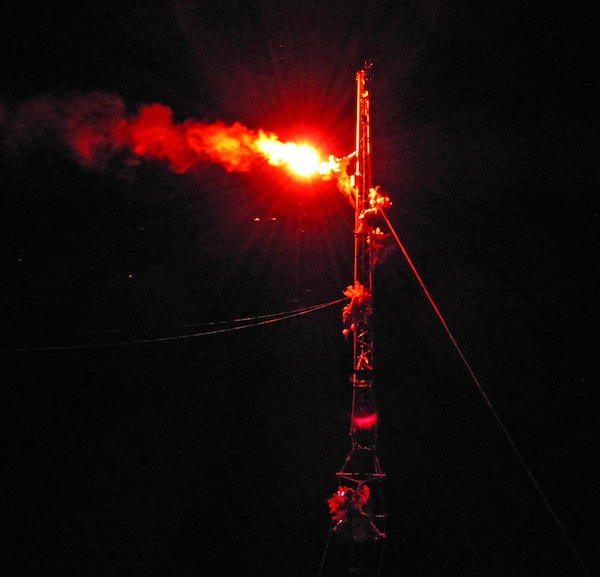
Tip 2: Selecting Camera and Lenses
Having found a location my next task was to choose my camera and lenses. Because the action would begin more than two hundred feet away from my vantage point, I needed a long lens -- a very long lens -- to get good images. Then when the performers were over my head and closer, I would need a mid-range lens. And after that, as they passed by me, I wanted a wide-angle lens for an expansive photo of the entire scene.
The spanner in the works was the crowd. Standing in the center of a mass of people, it is not a good idea to have a couple of cameras hanging around your neck. Neither is trying to change lenses in the dark when you are elbow-to-elbow with folks. Also, since everyone would be looking up at the sky, it was not the place to have a tempting, open camera bag either. Pondering these concerns, I settled on going light and chose a superzoom camera.
My superzoom of choice is a 12-megapixel Panasonic Lumix FZ200, with a 24-600mm-equivalent f/2.8 lens that perfectly matched my needs. However, as you probably already know, there are some downsides to using a bridge camera. While the images may be great at ISO 800, at ISO 1600 and above they begin to get soft. My DSLRs, of course fare better at high ISOs, but their long lenses are not as long, and they're much slower. I believed using the superzoom was my best alternative.
Tip 3: Rethinking ISO
The night of the event, I arrived early to claim my spot. Waiting for the show to begin, I kept an eye on the darkening sky and thought about exposure issues. Camera meters try to make the world 18-percent gray and you can see this for yourself. Just photograph something white and then something black and you get nothing but murky gray pictures. With the black night sky, I knew that the meter would try to make it gray. No matter whether set to average, spot or anything else, it would ruin my images. To get around this I set the exposure compensation control to -1.3, underexposing the picture by a stop and a third. Underexposure, I hoped, would produce a black sky, counteracting the meter’s tendency towards gray.
Tip 4: Checking Your Pictures Early and Often -- and Don’t Panic
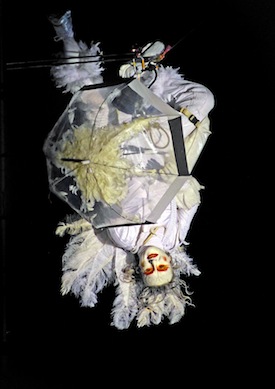
When the show began, the aerialists appeared and I was shocked. They were wearing white costumes! White costumes, lit up by spotlights, and framed against a black sky! It made me wonder what I had done to offend the photo gods.
Shooting a quick frame, checking my monitor I saw that it was worse than I had expected. The sky was indeed black, but the spot-lit white costumes had flummoxed the metering. The performers were just small blobs of white and completely burnt out. And, to top it off, the crazy lighting even threw the camera’s autofocus off.
Trying to stay calm, I searched for a solution. First thing I did was to reset the exposure compensation to its maximum of -3 stops. I hoped this would get me some detail in the white costumes. Then, I turned off the autofocus, switched to manual and, racking the zoom out to its longest focal length, set the focus to infinity. This way when the performers were a hundred feet away I would get sharp focus and when they got closer, I could switch back to auto-focus.
Another test shot showed me that I was on the right track. So far, so good.

Tip 5: Steadying as You Go
Image stabilization is great but even it sometimes needs support. With the performers lit up by bright spotlights, I was getting shutter speeds of 1/30- and 1/60-second. This was good, but at 600mm I had trouble getting the aerialists in the frame.
To solve this problem I fell back on an old photographer's trick. Rather than holding the camera at arm's length and framing pictures on the monitor, I used the electronic viewfinder instead. Bracing my arms against my body, the camera pressed to my forehead, I turned myself into a "Steve-o-pod." This added the smidgen of steadiness I needed to keep the aerialists in the frame.
Were the results worth the effort? I think so. Not only did I get some great photos, but the local tourism office liked them, too. They asked me if they could use the shots on their website and in travel promotions. And that made this shoot a pretty good night’s work for me.

All photos by Steve Meltzer, Copyright 2012
Want some more digital photography tips? Check out these other how-to articles by IR contributor and professional photographer Steve Meltzer:
How to: Shoot into the light to create dramatic, backlit images
How to: Improve your rainy day photos
How to: Turn off the auto flash and use ambient lighting