| Back To News |
Cross-lighting tips and tricks: Try a new angle for taking better pictures
posted Tuesday, September 24, 2013 at 11:38 PM EDT

Cross-lighting is a simple and easy way to add punch to your photos and takes them out of the ordinary. It's useful for portraiture and product photography, and it gets a lot of use in movies. Still, photographers should take more advantage of it in everyday shooting.
Normally, when taking pictures we want our subjects to be front lit. Shooting outdoors most of us will unconsciously arrange ourselves so the sun is over our shoulders so it will act as a front light. This ensures bright faces and well-lit objects. Shadows are filled by the reflected light bounced off of various surfaces -- sidewalks, buildings or simply the blue sky.
In the studio we try to replicate this lighting by placing a light to either side of the camera in front of the subject. One light is usually brighter (or just nearer the subject) and is called the main light. The other -- either dimmer or a bit further away from the subject -- serves as the fill light.
Backlighting, of course, is the opposite of front lighting. Though most of us know it well from our failed attempts to take pictures of friends and loved ones with the sun setting behind them, backlighting can often be used for dramatic effect, creating halos of light around our subjects and creating separation between the subject and the background.
Cross-lighting basics
Which brings us to cross-lighting, which uses elements of both front and backlighting -- with a couple of twists -- to take advantage of their desirous effects. When cross-lighting a subject, two light sources -- natural or artificial -- are placed in a diagonal line across from each other.
Typically, a bigger, brighter light is placed behind the subject to one side, while a smaller light is placed in front of the subject. Angling these lights so they face each other along a line approximately 45-degrees off center from the subject is ideal. The smaller light in front acts as the main light and the bigger light to the back acts as an "uber-fill" light. Backgrounds play a role in cross-lighting, too, because we set the lights up so as little light as possible falls on the background, further helping to separate the subject from the background.
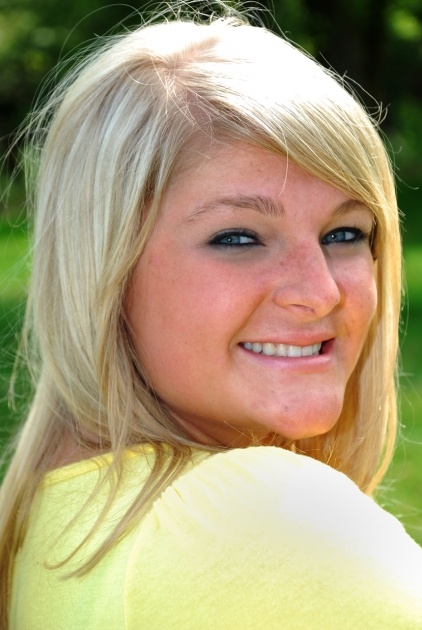
A study in yellow
The photograph of the model in yellow illustrates cross-lighting in an outdoor setting. Naturally, the sun was the biggest light source, so I positioned the model so it was behind her and to the right. I framed her so that the shadowed trees were behind her, and held a portable automatic flash on a long cord with a bounce card in my left hand to be the front light. I could have used the camera flash, but the long cord let me use the flash at a wider angle.
I turned the model so her body faced away from the camera and then had her glance over her shoulder and look at the camera. The overall exposure for the scene, that is the open field with the dark clump of trees in the background, was f/5.6 at 1/160s at ISO 200. A test frame with the model showed that without the flash this exposure was underexposing her face because of the extreme brightness of her top. Setting the flash to F/5.6, I took another test shot. Now the bounced light softly lit up her face, creating faint shadows that gave it shape. As a bonus, it put catchlights in her eyes, which are important because they are a subtle cue that the subject is alive.
The bright areas of the image did wash out, which can be the downside to cross-lighting. But these "hot" areas are an essential element of cross-lighting, providing both strong separation between model and background, as well as adding to the sense of the brightness of the light. This shot was made years ago with an older DSLR; today's cameras with their extended dynamic ranges, including HDR, handle high contrast better.
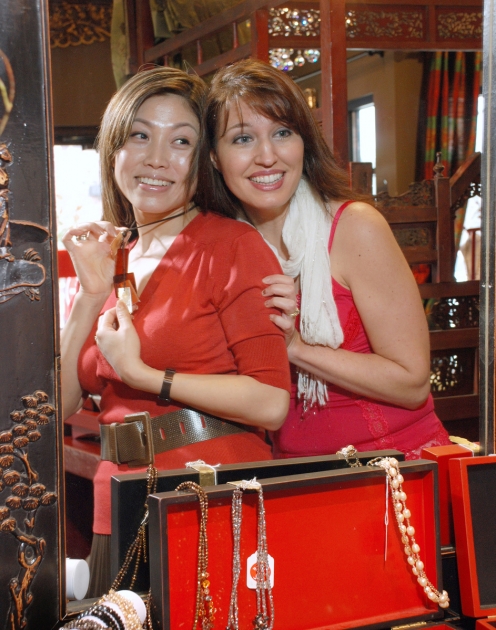
Going commercial
In another example of cross-lighting, shooting indoors at a shopping mall for a commercial client, I created this cleverly framed shot. If you look closely, you'll see that the two models are actually looking at themselves in a mirror. On the left side of the image you can see the edge of the mirror frame.
For the cross-lighting, I placed the big rear light to the right of the women and stood between the models and the mirror. The second light was on a stand to my left, and I turned away from the models and shot the mirror. Also by showing a little of the store window in the background, I gave the image the feeling that it was shot with natural light.

You can create cross-lighting to use with almost any subject. This still life of a plate of nachos was shot for a Florida lifestyle magazine. When the chef brought the dish out. it was obvious that the key to the photo was the intertwined fried noodles and that cross-lighting was the best way to make them the focus of the image. As you can see the cross-lighting did its job.
Tips and tricks
Here are some cross-lighting ideas to get you started:
- Create diagonal lighting setups where the brighter light -- by at least 1 to 2 stops -- is the rear light.
- Set the camera for the correct exposure produced by the front light.
- Place subjects so the background will be as dark as possible in the shot.
- Take test shots and adjust the subject's position and lighting as necessary, taking particular note of where the highlight areas fall.
Even with all this manipulation, cross-lighting should give you a picture that looks natural -- often more natural than photos lit straight on. It's a simple and handy technique that should be in every photographer's toolbox.