A detailed look into the post-processing options for downscaling 4K video
posted Tuesday, August 4, 2015 at 9:25 PM EDT
Almost a decade ago, I became very interested in cameras and pictures as my first child was born. Naturally, I wanted to capture all the moments of my son’s life in both still images and video. Unfortunately, at that time, capturing pictures and videos of the same event meant carrying around a camera and separate camcorder, which I did grudgingly for a number of years.
In 2008, Canon and Nikon began adding video recording capabilities to their DSLR line up which seemed like a promising solution to my problem of carrying two separate devices. So I bought a Canon and was optimistic that I could now do it all with one device. My optimism quickly faded when I realized that continuous autofocus was not yet a feature and that I would have to focus manually during video. I upgraded over the years to newer models with autofocus and more features. For the most part, I was pleased with the results I was getting, but realized I wanted more from my hybrid device.
Then, I switched over to mirrorless cameras, which advanced things even further, by allowing one to record video and snap still images at the same time. The drawback here was that the images I was getting during video were the same resolution as the video (1920 x 1080) and often contained motion blur due to the slower shutter speeds used during video recording.
Fast forward to the present and 4k video, where one can now record very high resolution video and then simply extract 8MP still images of any moment you like, directly from the footage. This is extremely convenient for me, as I can now record my children’s events and not have to decide beforehand whether I want to take video or stills.
Unfortunately, 4k is not exactly mainstream yet and most homes (including mine) don’t have any 4k TVs. So having the best of both worlds means downsampling my 4K video to 1080p so that I can still enjoy all my home videos on my TV.
I have sampled a few free programs that can downscale 4k to 1080p and provide a summary of my thoughts on ease of use, efficiency and output quality. I used a single 4k video file (3,840 x 2,160 @ 30fps and ISO 125, 355MB) and converted it to 1080p and compared that to a native 1080p video from the same camera (1,920 x 1,080 @ 30 fps and ISO 125, 75.6MB).
ClipToolz Convert V2 (Windows)
Installation was simple and the website provides an ample amount of direction, although it would have been helpful to have more of a step-by-step user guide than the one provided.
The interface is fairly clean with a large window for adding your media files. There are a few drop down menus and some cells for manual data input. I selected “30fps” in the first drop down menu and “4k Downscale” in the second drop down. I also pressed the toggle button “ProRes” which changes to DNxHD once you do, this action changes the bit colour from 4:4:4 to 4:2:2.
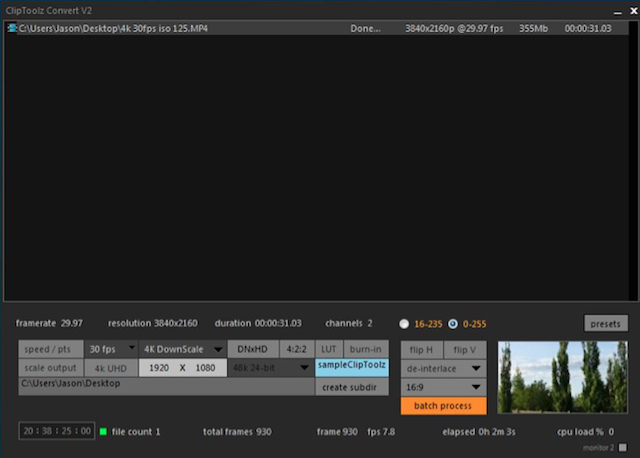
Under “4k Downscale” cell is an area where you enter the output size you want, so I entered 1920 x 1080 here. Be sure to do this part after you have selected DNxHD as you will have to re-enter if you don’t. I also changed the Luminance Level to “0–255” to match the settings on my camera.
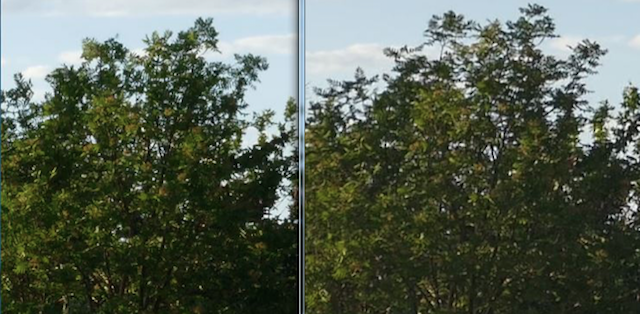
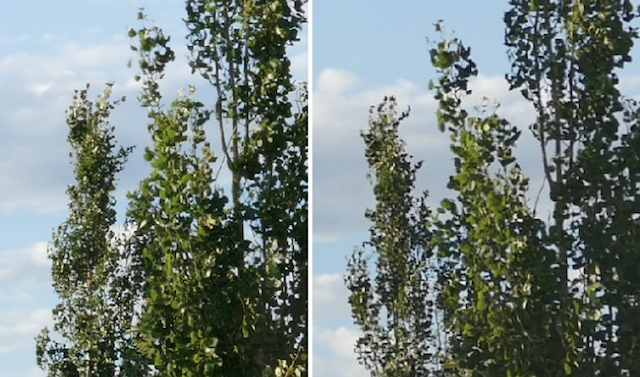
My 4k sample file of 31 seconds (930 frames) took a total of 2m 03sec to downsample to a .MOV file. While that is a fairly quick transcode, the resulting 1080p file created was a whopping 814MB, more than twice the size of the original 4k file. The quality of the conversion was excellent to my eyes on the computer screen, however as it was in a .MOV file, I was unable to compare on my big screen TV (none of my media players, TV player, Roku 3, PS3 or Sony Blu Ray player were able to play the file). The following is a 1:1 zoom from my computer screen of the downsample compared to 1080p.
Since I want to be able to watch these home videos on my TV and get smaller file sizes, I decided to change some settings in ClipToolz and see what I get. For the next transcode, I changed from “4k Downscale” to “H.264” in the drop down menu. This also removes a number of the other settings, so you only have to input your scale of 1920 x 1080 and you are done.
The transcode here took a little longer at 3m 33 sec, however the resulting .m2ts file was much smaller at 386MB. Unfortunately, once again I could not get the resulting file to play on any of my media servers, which is odd as that file extension is supported by the PS3. So ClipToolz is not for me since I can’t seem to get a useable file for media streaming, but if you are using VLC Media Player to view your files, you will be fine with this program and likely very impressed with the quality.
Photon by Brightland Studios (Windows)
Their website provides nice step-by-step installation instructions, however you need to be sure you get the separate FFMPEG exe. file stored in the correct directory or else the program won’t work.
The site continues on with a number of sample transcoding scenarios and helpful directions. I followed the Transcoding GH4 4K to 1080p ProRes instructions as this seemed the closest to what I was looking to achieve. The only catch was this method would create a .MOV file which I already know doesn’t play nice with my media streamers.
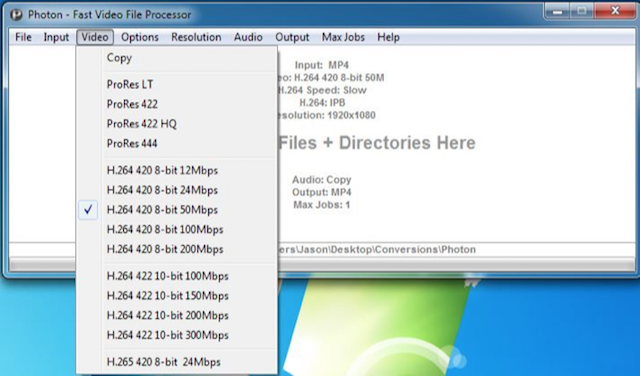
All of the settings are along the toolbar on the top. You just go through each one and select the settings you desire, it is really simple and straight-forward. Conversion choices are many, including ProRes, H.264 and even H.265 for those early adopters already using that codec. For my inputs, I chose MP4 (Input), H.264 420 8-bit 50Mbps (Video), ProRes Mode 1 and H.264 Speed Slow (Options), 1920x1080 (Resolution), Copy (Audio) and MP4 (Output).
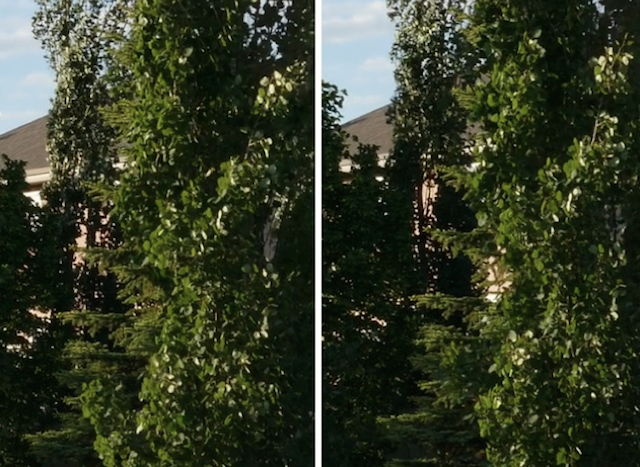
My test file took 2m 45 sec to complete and registered a size of 157MB. In a role reversal of the ClipToolz conversion, this file did play on one of my media streamers (Roku) but would not play on VLC or Quicktime, go figure. It would show the image but the playback was slow and choppy and would usually freeze completely before finishing. I assume the 50Mbps I chose must be the problem. Despite this, I was still able to get a comparison screenshot and you can see that once again, the 4K downscale shows a bit more detail.
So I then compared the finished conversion against the native 1080p file of similar footage on my TV. I honestly could not tell the difference at a viewing distance of about 12 feet, they both looked superb, great colors, sharp detail and smooth motion. So Photon produces a great downscale and manages to cut the file size in half while still maintaining an excellent amount of detail, with my only drawback being that I couldn’t figure out how to generate a file that plays on my PS3.
For the record, dropping the bitrate to 24Mbps creates a file that will play on VLC but still manages to give Quicktime fits.
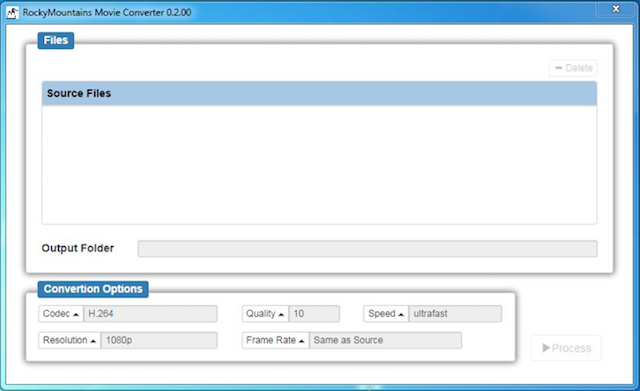
RockyMountains Movie Converter (Windows & Mac)
After downloading and unzipping the file, you are able to run the .exe file and open the interface. It is clean and fairly intuitive. You drag your video file into the window and also drag an output folder to the window as well. Conversion options are simple and the designer suggests the preset settings are an excellent combination of quality versus file size (from their Wiki page). I chose Slow for transcoding speed to be consistent with the other programs I used.
The conversion took 3m 07sec and created a 372MB MP4 file. Unfortunately I couldn’t get anything to play the resulting file, none of my media streamers or VLC and Quicktime. I was able to get a screen shot for comparison purposes as you can see below. The common thread here is the detail advantage over native 1080p, although subtle in some areas, it is there throughout.
Decreasing the Quality setting to 14 (from 10) creates a smaller file of 258MB in about the same amount of time. This proved beneficial as the resulting file played fine on my Roku and my TV media player. Unfortunately the PS3 still cannot handle this bitrate (around 70Mbps according to the PS3), but then it could not play the Photon transcode either which was only 42Mbps.
The output video quality is outstanding and to my eyes looks equivalent to the Photon transcode. Sampling other quality settings, I discovered thatQuality level 20 generates a file of 141MB and a bitrate of around 38Mbps. This file plays wonderfully on my Roku, my TV media player and my PS3, which definitely makes RockyMountains a front runner for my purposes.
Conclusion
For free programs, you can’t really go wrong with any of them as they all have their strengths. Since streaming the transcoded files to different media players in my house is my first priority, the choice for me is between Photon and RockyMountains. They both produce excellent quality files and have a lot of features. Photon seems to provide a bit more codec support as well as the ability to really customize your output.
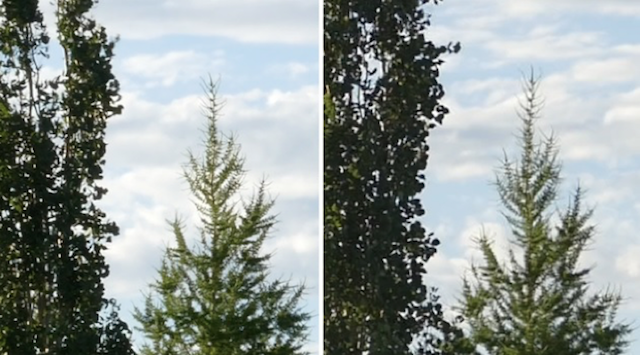
RockyMountains is a much simpler interface and removes a lot of the guess work for file conversions, making it ideal for those of us that don’t want to fiddle around with advanced settings. It also seems to provide a lot more flexibility for me as the output files work well across different streamers. With respect to quality, I provide the screenshot below comparing the 4k downscales of each program using similar output file sizes.
I don’t see much difference if any, and certainly not when viewed on TV. So your choice will depend on your needs. If you want simple or need cross platform support, go with RockyMountains, if you want more control then you can’t go wrong with Photon.
The quality from all of these programs is outstanding when you consider these are free software. Being able to downscale 4k effectively is a handy tool and helps alleviate some of the barriers of moving to 4k video.