Waterproofing your camera: What you need to know about underwater sealing
posted Monday, December 7, 2015 at 10:48 PM EDT
By IR Reader Mihajlo Filipovic
Most photographing devices are created for use in the air. All optical, mechanical and electrical components must have air around them to work properly. So we encase a normal camera in an artificial “air bubble” to make sure it will operate in water. All underwater housings and also bodies of amphibious cameras are just that: artificial air bubbles wherein our everyday mechanisms work safely.
There are ways and ways to construct photo cameras to make these impervious to water, and depth pressure influence. For instance, their cases may contain clear, electrically non-conductive fluid instead of air. This will cancel out the pressure difference, but it requires that all the optical, electronic and mechanical elements be adapted to the new operating medium. Such devices can withstand almost all reachable depths, have excellent heat dissipation, but are impractical to dry-land usage. Its price keeps it in the special group of its own, too.
We normally distinguish between two underwater camera types, and both are becoming ever cheaper through standardization and mass production.
Amphibious cameras can be used in the air and in the water, which seems to be the most practical. For now, such “amphibians” are somewhat depth-limited. For SCUBA divers which normally go deeper, or for people who do not photograph underwater very often, the housings for their specific cameras may present a better solution. Whatever kind of a camera has been chosen, it’s “air bubble” has to remain dependably safe, in other words, it has to be properly and securely sealed watertight. Depending upon various factors, some underwater housings may sometimes be a quite a lot more expensive than the camera they shield from the ambient.
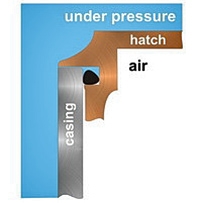
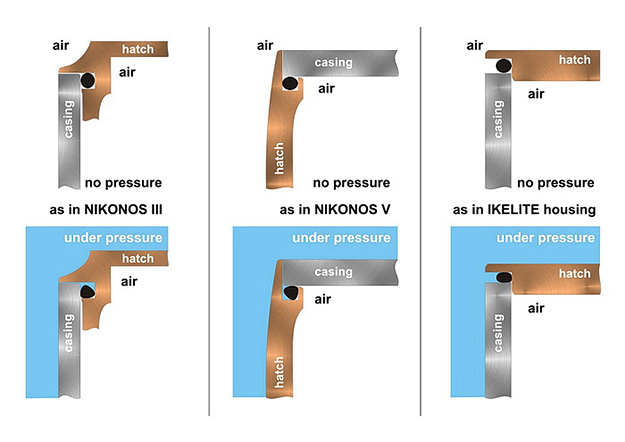
It is clear that watertighting is the most important feature of underwater cameras and housings. So it is important to know what a watertighting system does, and how it should be kept in proper working order. The schematic drawings of several principles in use show how it works. Since all cameras and u/w casings have to be opened to access batteries, contacts or memory cards, their covers and hatches must be made to open and close many times, without compromising the ability to properly re-seal the opening.
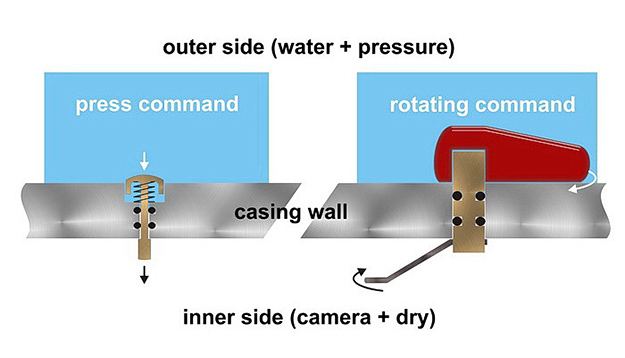
Manufacturers are trying to construct these accessing points as simple as possible for the user to operate, but some of those solutions are not as safe as can be! The extremely flimsy and specially formed, needlessly unique gaskets only make sure that every manufacturer sells their own spare parts. But those scratch-sensitive ridges and rubber covers are easily damaged – and then our camera floods and drowns, together with the joy of underwater picture-taking! Also, any water ingress is never covered in the camera Warranty, which always makes it user’s fault, although the blame should be rightly placed with implementation of the wrong sealing principle.
Among all the watertighting means known, the O-ring principle works the best, every time. To this date, however, no amphibious camera employs this principle, as if the manufacturers stubbornly refuse to make their product safer. As to why they do so is anybody’s guess. Manufacturers employing O-ring sealings delegate some of the maintenance to the user, but also offer more safety to the cameras, and everybody can learn how to keep the O-ring seal in perfect working condition. No simplicity of use should be more important than that!
An O-ring is a self explaining name. It is made of perbunane, neoprene or silicon compound material. It is round in shape and also in cross-cut. The drawings here show it as a fat black dot. To work properly, an O-ring has to lie in a groove which is square in cross-cut. Such groove is usually provided either in the casing body, or in the cover that seals it. Usually the three sides of groove square belong to one part, while the second part adds the remaining fourth.
The exception is seen in the Ikelite watertight box crosscut, where the cover and the box form the three sides of the O-ring square seat, while the fourth is open to the water and ambiental pressure. And while all the other sealing types shown provide fixed closure where only O-ring will move to adjust itself under water pressure, the Ikelite type uses water pressure to progressively push the lid down onto the O-ring, thus forming even more solid seal. This type of sealing does its work equally well as the other O-ring principles shown, but the better part is in the ease of Ikelite’s O-ring replaceability, removal and maintenance.
The other types shown are better where precise relation between sealed parts (such as lens-to-body or hatch-to-casing) have to be mantained for mechanical or optical reasons. O-rings are moved and deformed by water pressure difference. They will tend to wedge themselves into the corner open to the inner, lesser pressure. Thus, the greater the pressure difference, the better the seal.
O-ring and its groove must be lightly greased so it can move and adapt. A proper grease must be used, depending upon O-ring material – observe manufacturer’s suggestion! The grease adds nothing to actual watertighting. It only makes it slippery. Many people tend to overgrease, thinking “the more the better”, which is dangerously wrong. Surplus grease collects sand, hair and salt crystals, which may effectively break the sealing and let the water where it doesn’t belong. Most often, a quality silicone grease will be used, as it is not easily washed away in the water.
A properly greased O-ring is just grease-shiny – nothing more. To remove it for cleaning and greasing purposes, the easiest way is to slide the O-ring with two fingers along its groove toward one side until it pops out. After cleaning it first, lightly grease a q-tip and run it along the groove. Nothing but a thin film of grease should remain. Grease the O-ring by pulling it trough greasy fingers. Carefully put the O-ring back into the groove – and that’s all the maintenance it requires! The process does not require any tools.
If you won’t use your camera (or casing) for longer time, remove the maintenance-accessible O-rings and save them separately. The casing should be kept closed, sans o-rings. This way O-rings will retain their form. Prior to the next use, just clean and re-grease as described.
As to the amphibious cameras… For as long as manufacturers do not decide to employ the O-rings with their constructs, the only thing to do is strictly follow the instructions contained in the User’s Manual. If you take care of your camera or a casing and its sealing elements, these will serve you long and well.
[See more from Mihajlo Filipovic by clicking here!]
• • •
Want more articles on underwater photography?
Going under with the Sony A7R II + 90mm f/2.8 macro!
Shooting the depths of Key Largo with Olympus underwater housings
• • •
How about you?
Do you have a special image you'd like to share with us, or an instance
where a specific piece of gear helped you to to capture something unique?
Please click here to learn more about submitting your entry!

Reader Stories is a new column on our site, a platform for our readers
to share images and ideas with our community. It's a great way to share your creativity and passion with your fellow photographers out there! If you'd like to submit a story of your own, please visit this news story for more information on how to submit an entry. We look forward to hearing from you!


(25 seconds / f/2.8 / 16mm / ISO 250 / manual exposure)