A COMPACT SPECTROPHOTOMETER
ColorMunki Photo
-- All-in-One Profiling
By MIKE PASINI
Editor
The Imaging Resource Digital Photography Newsletter
Review Date: February 2009
X-Rite's ColorMunki Photo is a $499 spectrophotometer calibration device that actually does do all your device profiling in a compact, self-contained unit.
The company also offers the ColorMunki Design aimed at graphic designers and a less expensive ColorMunki Create that is not the same device as the Photo and Design models (see comparison table), which are nearly equivalent except for printer profile enhancement options and the inclusion of DigitalPouch in the Photo version. Just be glad you're a photographer.
So what do we mean when we say the ColorMunki Photo can do it all?
We mean ColorMunki Photo can not only profile your monitors (compensating for ambient light) but it can build ICC profiles for printer/paper/ink combinations and profile projectors. And it can calibrate itself without resorting to any external references.
But that's not all. It has a few other tricks up its sleeve, including fine tuning display profiles for a preferred gamut, automatically configuring applications to use a specific printer profile, extracting color from an image, capturing any color from any surface and previewing a PrintSafe color palette.
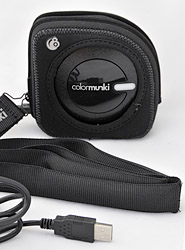
ColorMunki. Wrapped in its protective case, the rotary mode dial remains accessible. Just in front is the sandbag weight and the USB connection.
Profiling a monitor using a hardware device has gotten a lot easier, with software getting smarter and smarter, not to mention more and more helpful.
Building a printer profile -- which is really a profile of a printer's inks and a particular paper -- is not quite as easy. There are a lot of pitfalls that can invalidate the profile. But X-Rite provides a helping hand with video links on almost every page of the software, a call center to answer any questions you might have and an interactive, Flash-based, training video (available in six languages).
And the rest is just gravy. Delicious, satisfying, lip-smacking gravy.
THE MEAT OF THE MATTER | Back to Contents
Building ICC profiles (ColorSync profiles on the Mac or Image Color Management profiles in Windows) is what this game is all about. Profiles describe what colors your device can display. On a monitor that involves the ambient light, the contrast and brightness, as well as the innate display properties of the LCD or CRT itself. For a printer, it involves the paper and ink combination as well as other print settings like resolution.
While the process of creating a monitor profile (the chief use of these things) is similar for the Pantone hueyPRO, Datacolor Spyder3 and X-Rite ColorMunki, the ColorMunki is a different beast than the other two. It's a spectrophotometer. They are colorimeters.

Front. Note the USB cable connected to the device and the small button on the side at that corner to release the spot measurement target.
What's the difference?
A colorimeter measures luminous energy in the visible spectrum using three (or more) filters, much like the sensor on a digital camera. A spectrophotometer measures luminous energy throughout the spectrum. You zero or calibrate a spectrophotometer so it can report the percentage of wavelength absorbed compared to white.
In addition to its colorimeter Spyder3 monitor calibration device, Datacolor sells a separate Spyder3 Print package with a spectrocolorimeter that uses a number of differently-colored LEDs as light sources to provide a number of different looks at the color its viewing. But X-Rite's ColorMunki uses a spectrophotometer to do both tasks (as well as profile projectors) in one small package.
While it's a bit more expensive than a colorimeter (which can not create printer profiles), compared to the Datacolor combination colorimeter/spectrophotometer it's actually a less expensive solution.
The ColorMunki spectrophotometer, interestingly, has one of the smallest sensors we've seen. The two colorimeters -- the diminutive hueyPRO and the Spyder3 -- read a much larger area of your screen.

Bottom. Two nylon skids let the ColorMunki glide over printed targets. We've released the spot measurement target in this shot, too.
So while the hueyPRO might be an affordable solution for calibrating that computer in the den that you use for slideshows from the family digicam, and the Spyder3 a reliable tool for monitor profiling, the ColorMunki is an all-in-one solution for professionals who need to profile their monitors and build printer profiles for papers for which no profile is supplied by the manufacturer.
THE SKIN ON THE MEAT | Back to Contents
There's no substitute for hardware calibration, as we've said before, even though system and free utilities are available to calibrate your monitor by eye. Anything is better than nothing and any hardware calibration is better than doing it by eye.
But using a hardware device doesn't mean software isn't important. In fact, over the years, we've seen the software you use to operate these hardware devices improve dramatically. And, fortunately, it's the one part of the system that can be improved tomorrow with an upgrade.
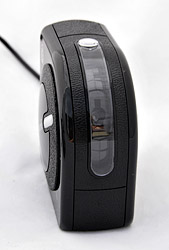
Top. The sensor has been rotated into the window provided for projector profiling.
We liked the hueyPRO software when we reviewed it, then we fell in love with the Spyder3 software and -- true to form -- we're head over heels with the ColorMunki software.
One thing we particularly like about it is that it's browser-based, certainly the trend in Help systems. Instead of inhabiting a few megabytes of disk space, the application can draw on the whole Web.
We found this particularly helpful for background information like the Basics of Managing Color option that goes to the X-Rite site to explain profiles, color management, display profiling, printer profiling and Creative Suite color settings.
But that facility works in reverse, too, with local copies of QuickTime video tutorials so we didn't have to wait for a long download. Very nicely done.
SYSTEM REQUIREMENTS | Back to Contents
X-Rite publishes various system requirements. We were able to run the software on systems that were at least four years old.
The most generous published requirements claim a 300 MHz CPU with 128-MB RAM and a USB port. Windows XP/2000 or higher and Mac OS X 10.3 or higher.
The unit requires five volts and 500 mA from the USB port, so it won't work on a non-powered USB hub (unless it's the only device) or from a keyboard USB port. It does need exclusive or powered access to a 500 mA port. We ran it directly from a laptop Hi-Speed 2.0 USB port as well as a powered hub connected to that same port (with about eight other things dangling off it).

The Box. But grab the latest software online.
The box includes:
- The ColorMunki device
- The monitor and protection bag
- A USB cable
- The Quick Start Guide
- A software CD
X-Rite provides an unlimited seat license for the software and a one-year limited warranty.
The licensing policy has been revised effective Feb. 25, up from three seats. According to the company, "All existing ColorMunki customers are immediately covered under this new-unlimited policy and can obtain an updated license agreement by going to http:www.colormunki.com/photo and clicking on support."
INSTALLATION | Back to Contents
The first step is to install the ColorMunki software. As with any software installation, we recommend visiting the manufacturer's Web site for the latest version rather than rely on the CD. In fact, you have to do that with this installer -- it's only function is to download the latest version. So if you don't have an Internet connection, you can't install it. Which may be overdoing a good thing.
With the software installed, you can attach the ColorMunki to your computer via the USB port and launch any of the supported applications. The functions available from the ColorMunki Photo Tray, which launches at boot, include:
- Launch ColorMunki Photo
- Create a Digital Pouch
- Create a Color Palette
It can also be used with some monitors that do hardware calibration. With its DDC auto detct control, the ColorMunki can determine if your monitor is compliant and if so, perform all the advanced calibrations automatically.
And while it can read ambient light when creating an advanced monitor profile, it does not monitor it during the day like the Spyder3.
A TOUR OF THE HARDWARE | Back to Contents
The ColorMunki itself is a compact unit even covered in its protective bag, where it measures 4.5 inches long, 4.25 inches tall and 2.0 inches wide.

Rotary Mode Dial. Note the white markings at noon, six, 7:30 and nine. The throbber aligns to the current selection. (Oh, the case says, 'Swiss Engineered by X-Rite.')
The bag has a zipper that outlines the ColorMunki. When closed, the zipper pull itself bumps into the attached USB cable. The zipper pull also has an eyelet to attach the weighted strap.
Laying the strap over the top of your monitor will position the bottom of the ColorMunki against the screen. But take a look at the bottom first. You'll see a shutter in the bag that must be slid open to do the readings.
Take the ColorMunki out of its bag and you'll see a small button on either side of it in the corner nearest the USB port. Slide the button in to the other side (where it pops out so you can slide it back) to release the Target Flag, a small plastic finger that helps align the ColorMunki to read any particular spot whose color you want to read.
A Rotary Mode Dial accessible on either side of the ColorMunki determines how the device will function. We found it easiest to use our thumb on the right dial and our forefinger on the left dial, moving the dial with two fingers on either side of the ColorMunki rather than trying to spin just one side or the other. Spinning one side invariably meant we were restricting the dial's movement on the other side as we tried to support the ColorMunki.
The dial's mode options are:
- At the noon position: read the ambient light
- From nine to noon: projector measurement mode
- At eight thirty: instrument calibration mode
- At six: monitor, chart scanning and spot measurement mode.
Inside the dial is a half-circle hollow that is actually a button to trigger measurements.
CALIBRATING THE COLORMUNKI | Back to Contents
Because the white reference point is inside the ColorMunki, you can easily calibrate it at any time. And when you profile a display or printer, the process always includes calibrating the ColorMunki.
Make sure you've plugged the ColorMunki into a USB port. Not that the light bar on the Rotary Dial will throb when the device has power.
Just turn the Rotary Dial to the eight thirty position and press the trigger button. While calibrating, the light bar remains dark. When the device finishes calibrating itself, the light bar will throb again.
It's so convenient to calibrate the device, you won't mind doing it on the fly when you plug it in or when the profiling software asks you to calibrate as part of its profiling process.
CALIBRATING A DISPLAY | Back to Contents
Launch ColorMunki Photo and follow the directions. Each step of the process is explained in a window, often with a link to video instructions. The videos are animated illustrations that clarify the text instructions. We really didn't find them necessary, but when we watched them, they were very clear.
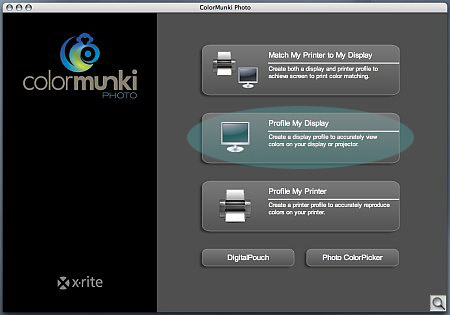
Display Profiling. We've highlighted the Display profiling button. Click the screen shot to see the slide show.
After selecting the monitor to profile on multiple monitor systems, we were asked to identify the kind of monitor it is: LCD, Laptop or Projector. We didn't have a CRT attached but we didn't have a projector, either.
You are then asked to pick between two options for display calibration: Easy or Advanced. With Advanced, you are prompted for three additional procedures:
- Optimize the brightness and contrast settings of the display
- Optimize the luminance level of the display based on current ambient light conditions
- Set a target White Point of Native, D65 (default) or D50.
If you can't set Contrast or Brightness, you might as well use the Easy method. We tried both methods and achieved good results with both.
A large orange outline indicates where on the screen to lay the ColorMunki in its protective bag (whose soft material also protects your screen from scratches).
Then a series of color patches are displayed on the screen for the device to read. A profile is created at the conclusion of the measurements and activated immediately. A Before/After window lets you examine the difference.
The whole process is over in just a couple of minutes, among the fastest profiling procedures we've seen, although the Spyder3 can do a very quick profile, too.
PHOTO COLORPICKER | Back to Contents
With the monitor calibrated, it was time to play with color a bit. X-Rite provides a color application called Photo ColorPicker which loads color libraries including Munsell Glossy and Color Groups. The Pantone libraries shown in our screen shots will not be available in the next release shipping in April, X-Rite told us.
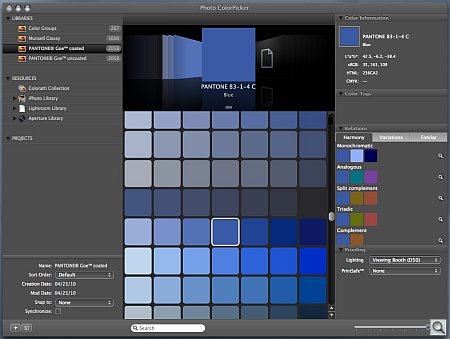
ColorPicker. We enjoyed playing around in ColorPicker. Click the screen shot to see what it can do.
It can display color patches for those libraries, take spot measurements with the ColorMunki and build color palettes with color harmonies based on a dominant color.
Harmonies, Variations and Similar patches are displayed when you select a patch in the main panel. An Info panel describes the Lab, sRG, HTML and CMYK values of the patch as well.
Soft proofing options include Lighting and PrintSafe settings.
Among the resources available when you launch ColorPicker is an example set from X-Rite's Coloratti Collection. The Coloratti are a group of designers and photographers who use X-Rite products and, in this case, provide a sample palette.
It takes a while to load, but it's a lot of fun to use. And once you've built a palette of colors you want to use in a project, you can easily add it to your other software applications.
DIGITALPOUCH | Back to Contents
The other tool you can use right after profiling your monitor is DigitalPouch, which can attach a profile to an image and bundle any number of images for view on another system. It's a "lightweight, color-managed viewing application."
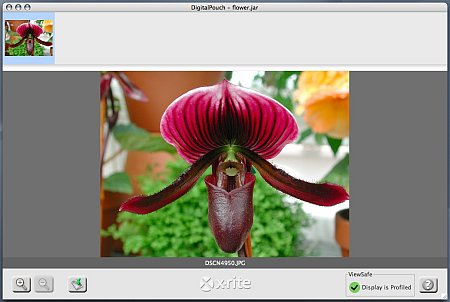
DigitalPouch. When you launch a .jar file, you see a row the included images (top), the current image and some controls. Controls lets you zoom and save the image. The green check mark indicates the custom profile is current and can be trusted.
Using DigitalPouch is so easy it's a bit unnerving. You just drag the images you want to send onto the main window.
If an image doesn't have a profile, DigitalPouch asks you to select one.
Once you have all the images added and profiles attached for them, you can save the collection as a .jar Java archive file. The archive, which is based on the Zip format, contains a Java viewer application, the original full-resolution image and a monitor and an image profile as well.
The Java application (screenshot above) includes a window with normal navigation aids to display the profiled image as well as buttons to zoom in and out of the image and to save any of the included images. Our model's 680K image file was encapsulated as a 3.1-MB .jar file.
When someone runs the application on a different computer (sharing the image, in effect), the program will indicate if they have a current monitor profile. An out-of-date or non-existent profile can explain a lot of things in color matching.
We wish the distributed application included an Exif viewer, which should also report the copyright information contained there as each image is displayed. You know, just in case some intern is under the impression that getting a DigitalPouch gives you the copyright to all its images. You can never be too careful.
These archives are meant to be shared, so we're sharing our 3.1-MB DigitalPouch with you. You may not care for the image, but at least you'll find out if your monitor profile is current.
CREATING A PRINTER PROFILE | Back to Contents
Printer profiling is actually creating a profile for your printer/ink/paper combination. When you click on this option in the ColorMunki software, you are first asked to select a printer and to name the paper you will be using.
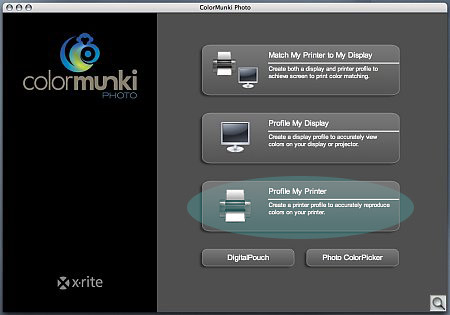
Printer Profiling. We've highlighted the Printer Profiling button. Click the screen shot to see the slide show.
Inks aren't an option, but if you do use different inksets in your printer, you can simply create a profile for a different printer to represent the different inkset. With inkjet printers today, the inks are consistent enough that they do not require reprofiling every time you change a cartridge -- as long as you don't change brands.
The next window explains that two test charts will be printed. When you print the first one ColorMunki explains that you should disable any color correction function in the printer driver itself.
This tends to confuse people. Just walking through the printer driver settings itself confuses people. So finding the place where color correction is enabled can be an adventure.
But it's an essential step. The software can only point you in the right direction. It can't do it for you. But if you have any question about it, call X-Rite. They'll step you through your printer driver settings.
Disabling any color correction is important because you want to profile the printer not the correction. Correcting a correction won't work. You'll get hideous prints. So don't close your eyes here. Disable color correction.
You must, of course, also set the driver for the correct type of paper you are using and give it any feed directions it requires. Setting the paper type is just as important as disabling color correction. It tells the printer how much ink to lay down and even how far the printhead should be from the sheet.
You should print the charts on letter-sized paper (which isn't mentioned anywhere). And after all that, it's a bright idea to save the configuration. You'll use it again.
After printing the first target, you simply check a box that tells the program you've done that and continue. The target is labeled '1st Test Chart.'
On our system, checking that box also skipped the warning to wait 10 minutes for the print to dry. If you look at the left panel in our slide show you'll see the "Allow Test Chart to Dry" step (the third step) disappears, replaced by "ColorMunki Status," after we visit the print dialog to actually print.
Why wait 10 minutes? So the colors in the print set. X-Rite's theory here is that inkjets are printing on swellable papers that need to encapsulate the dyes. Some swellable papers require 24 hours, of course, but for this process, 10 minutes will do.
If you are using pigments on a porous paper, this does not apply so you can skip the drying timer with that check box.
Next you connect the ColorMunki and calibrate it before taking it out of its fabric case and reading the first test chart. There are a couple of nylon skids on the bottom of the device to help the ColorMunki glide over the paper.
But before you scan your first chart, consider your ambient light. During the day here in the bunker, we enjoy diffused sunlight (either from our shades or the fog). That's ideal for viewing prints. But if you're confined to an area illuminated by incandescent or fluorescent light bulbs, that's not so ideal and can skew what you see. The ColorMunki doesn't allow much light under it, so your profile won't be affected, but your judgment will.
Scanning the five rows of color patches on the test chart requires you to start and end on the white paper, holding down the ColorMunki button as you go. The ColorMunki software will let you know how you are doing. It will advance to the next row with a yellow marquee if the scan was successful, otherwise it will flash red to indicate you should scan the row again.
We watched the video to get an idea of the process before trying it. Our first attempts got the flashing red marquee because we started with the sensor a bit off the paper. We had positioned the ColorMunki itself off the first row. But all you have to do is start the sensor (look for the little hole in the bottom -- it's actually right at the six o'clock position of the ColorMunki dial) on the white paper, which does put the leading edge of the device over the first patch. The trick is just to use the throbbing lightbar as a guide. Start and end on the white paper.
We moved the device over each strip of 10 color patches fairly quickly. We didn't slowly drag it or zip over the strip. Just a smooth drag. And were five-for-five after figuring it out. It's a good deal easier than pecking at a number of patches, too.
The software then generates color patches for the second chart. And it takes a while (give it five minutes). When it's done, you are taken to another screen that prompts you to print the chart. The software reminds you to use the same printer settings you previously used.
After the second chart is printed, we again received a warning to wait 10 minutes before scanning it so the colors would set.
Once the sheet has normalized, you scan it just the way you did for the first chart. We were five-for-five again. It's pretty simply once you get the idea.
Then the software builds a profile. That takes a few minutes, too. So with the two 10 minute drying times and two five minute calculation times, you need about 30 minutes to create a profile.
Of course, the point of this exercise is not just to build profiles but to get color accurate prints. And to really finish the process, you have to enable the profile in your printing applications.
MAKING A PRINT | Back to Contents
Building a printer profile is nearly foolproof (as we ourselves have humbly demonstrated) as long as you know how to disable any other color correction operation when printing the test charts. But actually using the profile when it comes time to print can be tricky.
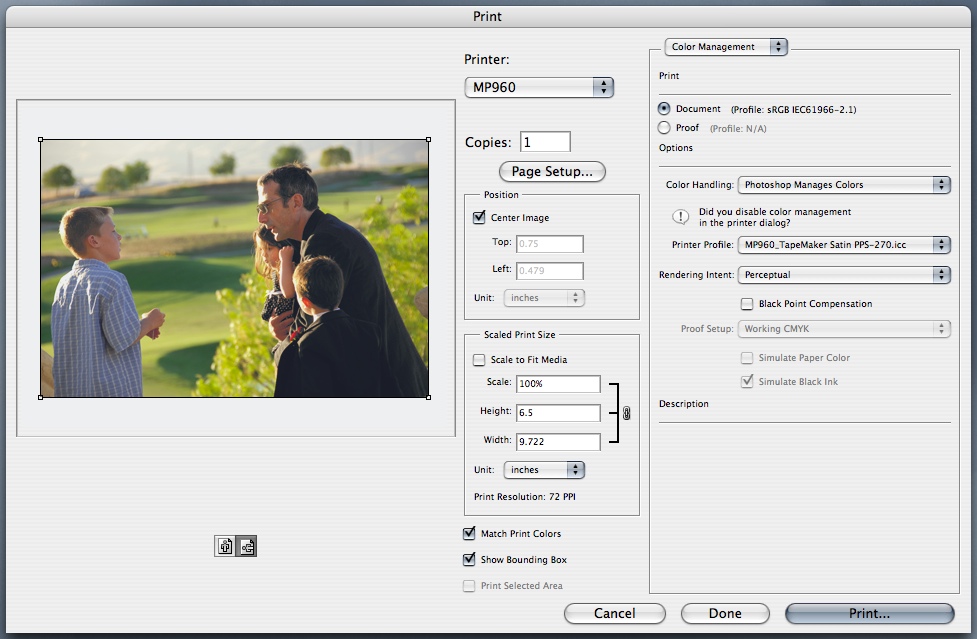
Photoshop Print Dialog. Business as usual on our PowerPC system. Select the profile in the Printer Profile popup, set Rendering Intent to Perceptual and you can soft proof. Here we proof a satin paper.
First, remember to disable any color management or correction done in the printer. You did this to print the test charts and, if you're smart, you saved that configuration for an occasion just like this.
With the printer relieved of color management, your application can handle the job in its Print dialog. You can either set the values manually or use X-Rite's AppSet, installed with ColorMunki Photo and accessible from the ColorMunki Photo Tray, to set the values automatically.
Let's walk through these two options in Photoshop CS3's Print dialog.
AppSet. AppSet's job is to set the printer profile (and a few other things) in select applications. In Photoshop it automatically enables Photoshop to manage color, picks the ICC profile selected in Photo Tray and sets the rendering intent to perceptual.
It does all this by means of a plug-in installed with ColorMunki Photo. During installation, X-Rite optionally installs a plug-in for each supported application, including the whole Creative Suite and QuarkXPress.

ICC Profile. ColorMunki built this profile, viewed in ColorSync Utility.
We asked X-Rite what the Color Management settings in CS3 should look like with AppSet enabling the color profile. Here's what Steve Rankin told us:
"AppSet will only automatically configure the print dialog so that the correct ICC profile is applied when making a print. AppSet automatically does the following: (1) enables Photoshop to manage colors when printing (which means Photoshop will convert the image from the working color space to the print space, (2) chooses the correct ICC printer profile in the Photoshop print dialog, and (3) sets the rendering intent to perceptual.
"Then, it's up to the user to make sure the correct paper type is actually in the printer and make sure that the printer/operating system dialog box is configured with the same settings used when printing out the ColorMunki test charts."
There are a few things to keep in mind regarding AppSet, it turns out:
- Don't rename your profiles at the system level. AppSet keeps track of the names in several places and they all have to match. If you change the names, they won't.
- AppSet does not function on a PowerPC chip, only on Intel chips.
- If you're using Creative Suite 4, you'll have to wait for the April update to ColorMunki Photo. The current version is only compatible with Creative Suite 3 applications.
- AppSet loads the values only when you open the Print dialog. Changing the ICC profile in AppSet with the Print dialog open does not update the Print dialog values.
Manual Method. You don't need to use AppSet, however. You can live life the way you're used to by simply setting AppSet to use no ICC profile, setting the Photoshop Print dialog to let Photoshop manage color, picking the ICC profile ColorMunki created and, yes, setting rendering intent to perceptual.
We used the manual method to print with and without the profile on two unusual papers we had not previously profiled.
It was clear from our tests that the profile produced the best results on both papers. No contest.
Fine Tuning the Profile. ColorMunki Photo also lets you fine tune the printer profile it has built by returning to the printer profiling option and using the Optimize option. That will load an image of your choice from which ColorMunki will build a new color chart. Print the chart, measure it and save the refined profile (under a new name, just to be safe).
You might want to do that to build a profile specifically for portrait skin tones or a landscape palette.
MATCHING A PRINTER TO A DISPLAY | Back to Contents
This option merely combines the monitor profiling and printer profiling processes into one option. Or, to put it another way, it makes sure you profile both your monitor and your printer.
That, after all, is how you get them to match. But don't expect perfect fidelity. The best match you can make is really an approximate one. Color is generated quite differently on the two devices.
READING A REAL COLOR | Back to Contents
Taking spot measurements can be addictive. You've been warned.
Launch Photo ColorPicker. It should detect the ColorMunki, assuming you've got it plugged in and set to Spot mode at the six o'clock position. You'll see it listed in the Resources section of the left panel. Click there to open the main panel for the ColorMunki.
Using the popup menu, you can set Spot for Scanning mode. There are links to videos just below but to build a palette of Spot readings, just click the View Measurements button and start taking readings.
To take readings, push in the small button in the corner of the ColorMunki closest to the USB port. That will release a small plastic target on the button so you can align the ColorMunki to the color you want to measure.
Once aligned, simply drop the ColorMunki flat on the color surface and press the button. Instantly the color will be read, transferred to Photo ColorPicker and displayed in the Measurements window.
Again, you don't have to worry about having enough light for the ColorMunki to read your color because it handles that problem itself.
We jumped around our desk taking readings of all our work surfaces and built a palette called Work Surfaces. It was fun to see the various Harmonies and Variations the program devised, too. We were nearly tempted to paint the room, but quickly got over the threat.
AMBIENT LIGHT | Back to Contents
The lack of ambient light monitoring is the one thing about the ColorMunki that disappointed us. We've gotten quite used to it with both the hueyPRO and the Spyder3.
But we're also a big offender of the first rule of color management: consistency. We work in a bunker that enjoys diffused sunlight during the day and when we work at night, it's moonlight or no light.
In a proper environment, the room lighting remains constant. So measuring and adapting to inconstant ambient light should not be an issue.
The more we used the ColorMunki, the more we liked it. And the more we liked it, the more we used it. Which, when it comes to profiling devices, is more than half the battle. You want something you enjoy using because the more you use it, the more repeatable your results will be.
So we found ourselves profiling our monitors much more frequently than we do with other devices, primarily because our oldest LCD is failing. But it's so easy to profile a monitor, we didn't mind reprofiling any of them.
And we found it strangely liberating to be able to create printer profiles with ease. Just two easily scannable charts, taking half an hour of our time and the mysteries of printing on an odd paper were eliminated.
You may not print on odd papers, but it's a nice way for the professional to distinguish themself. An odd paper is nothing other than a paper by any manufacturer that does not have a printer profile for your printer. So if you have a stack of swellable Epson glossy paper, you can profile it on your Canon MP with dyes. What you should not bother doing is profiling a porous paper for use with dye inks simple because it's the least stable print you can make. But matching swellable sheets with dye inks and porous sheets with pigments, you can mix and match brands to your heart's delight with a ColorMunki profile.
Beyond those basic functions, which are conveniently wrapped into one compact spectrophotometer and a single software application, we were impressed with Photo ColorPicker. It was a great way to experiment with color and color combinations. And it was made all the more useful by the ColorMunki's ability to read a color in the real world. You can start with a product and riff from there.
So, if you need to go beyond monitor profiling, the ColorMunki will get you there at an affordable price with easy-to-use software. Highly recommended.