Wacom's Intuos2
 By MIKE PASINI
Editor
The Imaging Resource Digital Photography Newsletter
Review Date: January 2002
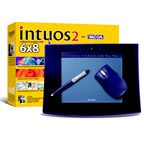
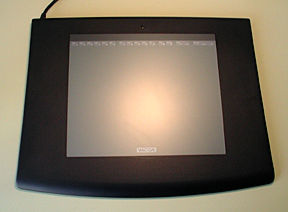
Wacom (wok'-um, if you've ever wondered) recently reinvented its popular pressure-sensitive graphics tablet, revealing the Intuos2 at Seybold San Francisco last September. We've had a chance to get intimately acquainted with the newest 6x8 tablet recently.
|
C O N T E N T S |
BACKGROUND | Back to Contents
We've used a 4x5 ArtPad Wacom tablet for many years. It's never failed us (despite a few falls) and provides a wonderful alternative input device (particularly welcome during long sessions surfing the Web). But even more importantly, the tablet provides pressure sensitive drawing impossible with a mouse (see below). This can approximate the effects if not the feeling of traditional artist tools, adding important image retouching capabilities.
The new Intuos2 is a few generations beyond our old ArtPad.
The pen includes an eraser on the opposite end of the drawing point, standard in models following the ArtPad. And it includes a soft grip on a redesigned and enlarged pen, which identifies itself to the pad so you can customize your pen's behavior without affecting anyone else's settings.
In addition to the pen, the tablet now includes a mouse (a wonderful alternative, since pens do not stand up when you let go of them).
Most importantly, the sensitivity of the tablet, which sports a number of soft buttons, has been refined yet again.
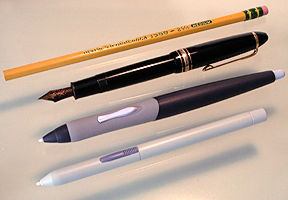 |
| A Pencil, a Mont Blanc, the Intuos2 and the ArtPad Pen |
Wacom claims the Intuos2's two-time oversampling provides significantly improved "data quality" over previous models. It also makes the pens and tablets incompatible with previous devices.
Except for that, all of these developments are welcome. A larger pen barrel is an ergonomic secret of fountain pen designers we've long enjoyed. The inclusion of a mouse is a brilliant solution for laptop users desperate to avoid trackpads. And the increased sensitivity simply makes the pen seem more natural.
REQUIREMENTS | Back to Contents
The new tablets require a computer that supports USB peripherals running either Windows 98/ME/2000/XP or Mac OS 8.6+/10.1.
Wacom has always worked very hard to keep its drivers up-to-date with operating system revisions (note the XP/OS X compatibility). There's often a beta available for download on the site. In all the years we've been using the ArtPad, we've never had to pay for a driver update.
HARDWARE | Back to Contents
Wacom offers the Intuos2 in several models: the $188 4x5, the $350 6x8, the $430 9x12, the $500 12x12 and the $700 12x18.
Inside the box for the 6x8 model you'll find:
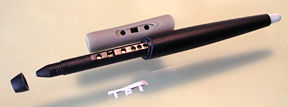 |
| Exploded Pen You can get rid of the switch |
- One cordless Intuos2 Grip Pen with an alternate rubberized grip (for those who prefer not to use the built-in and removable DuoSwitch on the pen) and five extra plastic nibs
- A pen stand
- The cordless mouse with two buttons separated by a scroll wheel (larger models include a four-button mouse)
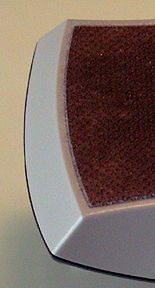
- A soft plastic strip (the "incline bar") to attach under tablets that will spend their life on a tabletop to provide an incline
- The tablet with a row of soft buttons along the top
- A CD with the Wacom driver and another CD with Wacom's power tools
- A quick start booklet (but the primary documentation is an Acrobat PDF document on the driver CD) and a flyer illustrating accessories.
As a USB-powered device, no power brick is necessary.
Roughly the size of a manila folder, the 6x8 tablet is quite a bit larger than the 4x5 (which itself is inconspicuous enough to travel with). The smaller-sized tablets may provide less tablet real-estate but we've never found that much of a disadvantage.
INSTALLATION | Back to Contents
There are two steps to installing the tablet.
Hardware installation is the first. For a USB device, you simply plug the tablet into any powered USB port. That's either your computer's USB port or a hub that uses an adapter. Success is yours if the small orange LED on the tablet lights up.
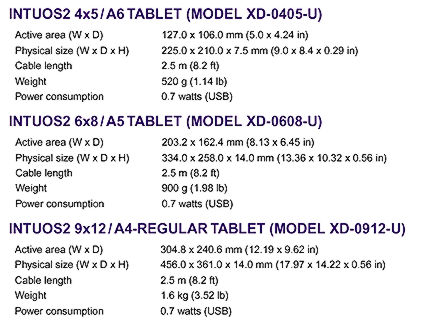 |
| The Specs |
We're particularly happy to report that Wacom supplies an 8.2-foot cord with their tablets. No need to run down to the Warehouse Super Store for an extravagantly expensive USB extension cable.
Once connected, the tablet automatically registers as a USB device. Windows 98 users will additionally have to go through the Add New Hardware Wizard to complete hardware installation.
You can use the mouse right away. OS X and Windows XP drivers are supplied, but the mouse will function during startup without a driver installed. So the tablet can indeed serve as your primary pointing input device.
 |
| The Installer Tutorial, Manual and Notes, too |
But to take full advantage of the capabilities built into the tablet, you have to install the driver, which can be configured via a Control Panel. Just pop in the CD, select the Install option and after a restart you're in business.
You may also want to install the plug-ins on the PowerSuite CD. Eraser support and Pen Tools are among them. But these don't require a restart.
The PowerSuite CD also includes a copy of Photoshop Elements and Painter Classic -- in case you need a little more convincing.
REAL LIFE | Back to Contents
We don't get along well with many installers. If they have any weaknesses, our House of Cards operating system will find them. In this case, we confused things with our old tablet running a slightly older version of the driver.
We might have tried to open our existing driver to add the new tablet, but we doubted the older driver could handle the new tablet. And the installer wasn't bright enough to remove the old driver before installing the new one.
So on restart, trying to load both drivers failed with an "internal error" that sent us back to the PDF manual. Step by step we confirmed hardware installation was correct and the software was loaded. But the manual didn't foresee our conflict.
 |
| The PDF Manual Nicely indexed |
So we did the smart thing, removing the old driver and reinstalling the new one. After a reboot we were in business. And the new driver recognized both tablets. But only the first can be pressure sensitive.
Installation is typically simpler than that, though. The manual confirms you did it right, but you can also avail yourself of the excellent Wacom Web site (http://www.wacom.com) or your-dime phone support from 7:30 a.m to 5 p.m. Pacific.
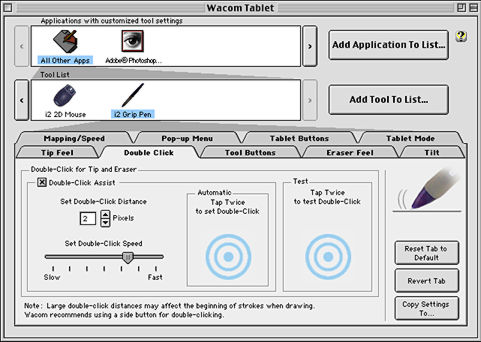
CUSTOM SETTINGS | Back to Contents
Lurking in the driver are more power tools than you'll find at Home Depot. You enjoy default settings for many of them but you really should spend some time in the Control Panel to make this baton really twirl.
We already mentioned that the driver can detect and maintain settings for multiple tablets. And it can do the same for multiple pointing devices (your pen, your co-worker's pen, your kid's mouse).
 |
| The Control Panel |
But it can do that for each program you own, too. So behavior can be redefined by whose device it is and what program they're using.
This is more useful than it may sound.
For example, when navigating our desktop, we like the pen's DuoSwitch to do a double-click when we press its lower end. That's easier than double-clicking by tapping the pen point to the tablet twice (an Olympic event). But when we drop into our image editor, we want it to Undo whatever edit we just tried out. That makes us a lot more productive.
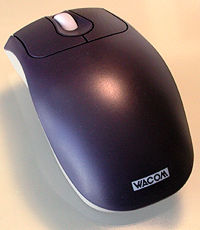 |
| The Mouse |
On the pen, you can define the behavior of four controls: the tip, the upper slide switch, the lower slide switch and the eraser. And one of your options is to assign a pop-up menu, which itself can easily be defined to list a number of other options.
 |
| ... Underbelly Cordless, but not optical, it's very smooth |
The mouse's left and right buttons can be reassigned as well as the fingerwheel. The fingerwheel alone can be set to page up or down or move a specific number of lines per click (fabulous in browser windows). And even the direction can be reversed.
There's no need, in short, to feel as awkward with these tools as you did when you first tried to do anything with, well, a mouse. Just redefine them to work the way you want them to work.
We, for example, have a hard time controlling accelerated mice, usually flinging our cursor out of the room. The Wacom Control Panel lets us completely disable the feature or set it to one of three different speeds (hope springs eternal).
Similarly, how the tablet is mapped to the screen can be customized. And, again, that behavior can change with your application. If you want to trace artwork in a drawing program, you can set Positioning Mode to Pen Mode where each point on the tablet maps to a corresponding point on the screen. But if you want to zoom around your desktop with your pen, you can set it for Mouse Mode.
That's just for starters. You can also use your tablet in either landscape or portrait orientation -- and flipped, too (as if you are drawing on the bottom of the tablet). And you can map just a bit of the tablet to cover your whole screen -- or split large tablets into independent areas using QuickPoint Mode to navigate your screen quickly in one small area and draw in the other.
You can also customize the Aspect setting to define the two-dimensional relationship of your tablet to the screen. One-to-one enables accurate tracing, Proportional maintains proportion but can enlarge or reduce what you trace and To Fit maintains neither proportion nor scale.
There's even an interactive Advanced Mapping option with three ways of letting you you show the system where the corners of the screen should be mapped to the tablet.
SENSITIVITY | Back to Contents
Among the more essential customizations to perform, though, is adjusting the sensitivity of the pen to behave as you'd expect. Some people write with a heavier hand than others and some double-click slower than others. The Intuos2 accommodates both by letting each adjust the tip feel, double-click timing, eraser feel and tilt sensitivity.
These are primarily ways to configure the pen's pressure sensitivity. Tilt sensitivity, like pressure sensitivity, is a way to control brush characteristics.
SOFT BUTTONS | Back to Contents
There are, additionally, 13 soft buttons plus a button to switch between pen and mouse mode and one to switch pressure sensitivity from soft to medium to hard. Since these buttons are on the tablet itself, they don't change definitions when you use a different pointing device but they do recognize different settings for different applications.
You can easily redefine any of the 13 soft buttons using the Control Panel to mimic any keystroke or chord meaningful to your application. On all but the 4x5 model, you can remove the label strip from the tablet and write your definitions in pencil for each button.
Accessing the buttons is no problem with a pen but what happens when you're using the mouse? While we prefer a right-button popup menu duplicating our favorite soft buttons, you can use the mouse with the soft buttons. As you scroll over the button, the screen cursor changes to a small box with the button number on it.
And if you don't like that, you can turn it off. There's very little that can't be changed to suit.
GETTING COMFORTABLE | Back to Contents
You'll want to at least set the pressure sensitivity of the pen before you get too far along, but it can take a while to decide just how you want to configure everything. In fact, you may find your customization evolving continually, like the configuration of your system in general, adding things and removing others.
 |
| Mousing Around vs. Penmanship |
Fortunately, the Control Panel makes all that a snap.
The real trick is remembering you have options. We forget we can flip the pen over to erase something or that we can adjust tool behavior with a tilt. But it won't be very long before you start expecting it to solve those aggravating little navigation problems we all suffer. Double clicking and undoing especially.
 |
| Pressure Sensitivity Width, color and opacity varied by pressure |
The one thing we did not do was attach the incline bar to the bottom of the tablet. We like to use it on our lap when we surf the Web and didn't want to restrict our blood flow any more than usual. But we found we could leave the bar on our keyboard table and just set the tablet on it. Worked fine.
Mastering the pen and mouse takes a little brain and muscle training time. Used to one-button mice, we strained ourselves keeping our fingers off the buttons of the Intuos2 mouse.
But we're getting better.
CONCLUSION | Back to Contents
Graphic tablets are not just for Rembrandts. You don't need to be able to draw well to use one (although if you do draw well, you are tying your good hand behind your back without one).
 |
| Launch Pad |
In digital imaging they are indispensable for many tasks, not the least of which are subtle dodging and burning. You can vary the intensity of the dodge or burn just by varying the pressure with which you stroke the pen. So you can lighten up where the image is fine and bear down where it needs to come up more.
And if you don't like the effect, just click to Undo and try again!
Although the increasingly common optical mouse avoids the slack inherent in the once standard mechanical mouse, nothing is more precise than a pressure-sensitive pen. You can actually work above the tablet, floating the mouse or the pen like some sort of Hovercraft and with a click of the button even manage to double-click.
But more importantly, many tools in modern image editors are built for pressure sensitive devices. So you simply aren't getting everything out of your image editor without one.
By providing both a mouse and pen, Wacom has made a compelling argument particularly for those trying to avoid built-in trackpads. They're a first-class company with a top drawer product. And no self-respecting dabbler should be seen without one.