FIXING FRONT/BACK FOCUSING
LensAlign Lite --
Fine-Tuning Autofocus Inexpensively
By MIKE PASINI
Editor
The Imaging Resource Digital Photography Newsletter
If Michael Tapes had been an ancient he might have gazed at his sun dial one day and thought, "Man, this thing needs a calendar function." And in a few weeks he would have invented and started shipping the moon dial. Using real ships, too.
Instead, as a modern, Tapes wondered why there wasn't a simple way to measure back and front focusing. And before you know it, he had developed two solutions: the LensAlign Pro and LensAlign Lite (http://www.rawworkflow.com/lensalign).
The $139.95 LensAlign Pro (reviewed last December) is a focusing target with three planes that you can mount to a tripod. The $79.95 Lite model -- which ships Friday, Jan. 30 -- uses just two planes and requires assembly. Both are designed to make it very easy to align the sensor plane parallel to the upright focusing targets and to indicate, on a ruler, the amount of back or front focusing your camera/lens combination suffers.
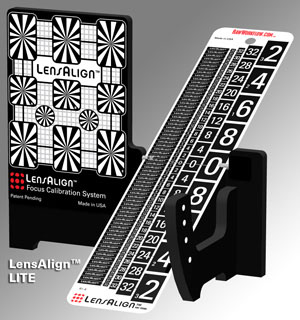
LensAlign Lite
This week we got our hands on the Lite model and after using it for a few days, we have to wonder if it's more Lite or more Version 2. But before we answer that question, let's take a look at the problem LensAlign addresses.
THE PROBLEM | Back to Contents
What, in short is back or front focusing?
Back focusing occurs when autofocus locks at a distance further away than what you want the lens to focus on.
Front focusing occurs when autofocus locks at a distance closer than the focus target.
While the difference may be minuscule, it tends to shift the field of focus off (cheating it back or forward). And in precise focusing especially wide open, it's a killer.
Detecting the problem is often more difficult than it may seem. You may confirm the autofocus point in the viewfinder or using software than can display the focus point on your image (typically supplied by the manufacturer) and notice that actual focus was either in front of or behind that point. In short, you have to look for it.
But it can be measured with a variety of targets, including the LensAlign. In fact, that's the job the LensAlign was designed to do. Canon's Director of Media and Customer Relations Chuck Westfall published a manual procedure in the Dec. 2008 Tech Tips column (http://digitaljournalist.org/issue0812/tech-tips.html) of The Digital Journalist.
The cause of the problem may be in the camera body itself or in a particular lens. Recent Canon and Nikon cameras provide a microadjustment for autofocus with two modes: a default that can be applied regardless of the lens mounted and another for just the particular lens mounted.
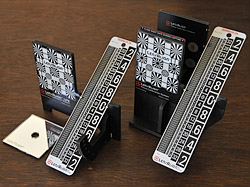
Lite, Pro. Our verticals are converging, but you get the idea.
The number of lens corrections the camera can remember varies. Nikon stores 12 in the D300 and D700 but 20 in the D3/D3X. Canon stores 20 in the 1Ds Mark III, 1D Mark III, 5D Mark II and 50D. The Sony A900 stores 30.
How do you tell the difference? If every microadjustment is back or front, you can find the common amount and subtract that from every adjustment. So if you have lenses that require an 18, 14, 7 and 4 adjustment, you can use a 4 adjustment for the body itself to limit the specific lens adjustments to 14, 10 and 3.
Both the body and a lens can be adjusted to correct for either issue. Until recently, you had to send your gear to the manufacturer's service department to find out which one was the culprit and to make the adjustment.
But since the inclusion of microadjustments in recent dSLR bodies, homebrew solutions are legion -- primarily because there has been no other way to attack this problem. But they have their own drawbacks.
One step focus adjustments can be made on a scale of +/-20 units for most cameras. These units represent compensations made by the autofocus system in the camera and do not mechanically alter the lens. The adjustment is also proportional to the maximum aperture of the lens, with the maximum amount applied at the maximum aperture where depth of focus is smaller.
Some homebrew solutions advise you to focus on a tape measure running away from you on the floor, the camera held at a 45 degree angle. But as Westfall points out, "doing so will degrade the consistency of the camera's focusing measurement." Trying to autofocus on a single line on the tape measure, the autofocusing system (which is just multiple pairs of linear pixel arrays) only a few pixels from each active pixel array be able to see the target. "Ideally," he recommends, "the contrast in the reference target should cover the entire area of the camera's center focusing point, and the reference target should be perfectly parallel to the camera's focal plane."
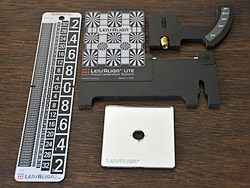
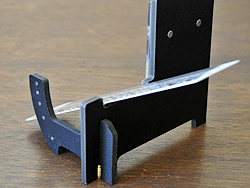
Parts. Ruler, focus target, stand, mirror. That's it!
THE PRODUCT | Back to Contents
That, in a nutshell is what either LensAlign does. It provides a reference target you can easily align parallel to the sensor plane of your camera with a "tape measure" along side that reports the actual deviation. Tapes has hired two guys to do the job of William Tell's son: one to be the target and the other to say, "Ouch!"
The black LensAlign panels and base are made of extruded PVC like Tapes' WhiBal card (but much thicker). It's seems quite solid, flexing only a very little and probably warp free (not absorbent).
Unlike the Pro version, the Lite arrives in four pieces, ready for assembly. It's so simple we managed without reading any instructions.
The four pieces are:
- the metal ruler
- the focus target (with pins to mount the ruler)
- the stand (which includes five stops for the ruler and a brass tripod mount) and
- the mirror
You simply slip the stand into the larger focus target, mating the slots provided, and drop the ruler onto the target's pins. When you've removed the protective paper from the mirror (pull hard), you're done.

Mirror. Peel off the protective paper.
What you can assemble, you can take apart. And that's one of the virtues of the Lite version, which can be stored flat when not in use. And, frankly, this is not a product that gets everyday use. You'll need it when you get a new dSLR body or a new lens, but the rest of the time it only looks as useful as a sun dial.
USING THE LITE | Back to Contents
The concept is deceptively simple. You align the Lite with your sensor plane, let the camera find focus on the target, fire a shot and evaluate the image of the ruler to see if you are suffering front or back focusing.
There are really several aspects to doing this right. The first is the general setup, the second is taking the shot, the third is evaluating the results and the fourth is adjusting the camera.

Lite With Mirror. Ready for action (sans tripod).
Setup. Aligning the target to your camera's sensor plane is where the mirror comes in. But first, we popped the Lite to a tabletop tripod and mounted our camera on a tripod about six feet away. Dueling distance, we call it.
The mirror has a magnetic bar on the back which holds it on the front of the target. A hole in the middle of the mirror reveals one of the focus targets on the target panel, which has a couple of magnetic pins embedded in it to hold the mirror.
With the mirror attached, you simply align the camera to the Lite by framing the camera in the mirror. When you see the lens looking right back at you, you're aligned.
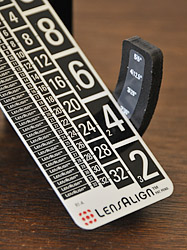
Ruler. There are five settings for the ruler angle.
The Pro, in contrast, offers rear sighting (along with the mirror option), which is perhaps a bit quicker (if you have room to stand behind it). But let's not quibble. Both work well.
At the camera, turn off an image stabilization and set the camera to fire on either a remote release or using the self-timer. We also set the camera's autofocus to single point mode and the focusing mode to single (not continuous).
We racked the lens out to telephoto and set the aperture to wide open using Aperture Priority mode. You want to control the aperture for this test. Wide open gives you the shallowest depth of field.
Shooting. Once that's done, shooting is the easy part.
First, we manually set focus to infinity, as both Westfall and Tapes recommend for accuracy of the autofocus operation.
Then we half pressed the shutter button to set focus automatically and looked through the viewfinder to confirm the camera was focusing on the right target. Because we were using the center focus spot in the camera and had aligned the center focus target there, we didn't have to move the focus spot.
Then we started the self-timer by snapping the shutter.
Magnets. Five magnets on the stand set ruler position and two on the focus target hold the mirror. Note the brass tripod mount.
We found it useful to flatten the ruler where the depth of field was deep. The magnetic pins in the front of the stand made it easy to quickly change the angle.
Evaluating. You can evaluate the captured image in your camera, magnifying the view of the ruler to 100 percent to see which number on the ruler is sharpest. If you have trouble telling, open the image in Photoshop and use the Find Edges filter (under Stylize) to make it more obvious.
You are front focusing if a number in front of the zero is sharpest and back focusing if a number behind the zero is sharpest.
Adjustment. If you need to make an adjustment, enter a value using your camera's Autofocus Microadjustment option.
Because the values on the ruler do not correspond to the +/-20 units in your camera's adjustment, you simply have to work by trial and error. Positive values move the focal point away from the camera while negative ones move it closer.
Front/Back Focusing on Ruler |
||
 |
 |
 |
| Significant Back Focus | Proper Focus | Slight Front Focus |
|
We shot the images above with a Canon 1D Mark III in our studio, using our Canon 100mm f/2.8 macro lens from a distance of a couple of feet. The aperture was set at f/2.8, to get the shallowest depth of field, so we could better discern where the actual focus point was. The Lens Align Pro's ruler was at the #2 angle setting, which we've found to provide a good balance between being able to quickly see gross focus errors and making fine focus determinations. It turned out that this combination of lens and camera was front-focusing slightly when the focus microadjustment was turned off. The first crop on the left was taken with the micro focus adjustment set to +20, the middle one with it set to -9, and the left one with a setting of -20. The differences in the focus position are pretty obvious when shooting with a wide-aperture lens at a fairly close distance like this |
||
So is the Lite model really Version 2 of the LensAlign?
After using both, we confess to a slight preference for the Pro's back-sighting method of alignment. But a few minutes using either model is all it takes to get comfortable and start actually measuring back and front focusing.
The Lite has a few advantages, though. Flat storage and price. The Pro's more elaborate construction may also be an advantage in busy photo departments and the stability to handle the Long Ruler Kit that Tapes is developing for the LensAlign. But it's very hard to otherwise distinguish between them. They both get the job done.
The real question is how significant setting microfocus adjustment is. One camera manual mysteriously claims it "isn't recommended for most situations; use only when required." It's required, one would presume, when you notice the image isn't focused where the camera said it was. And this is something you'd most likely notice when depth of focus was narrow, as in low light photography or macro photography.
Dave notes, "If precise focus is critical for you, you need one of these. It's been our experience in the lab that most dSLRs are at least slightly off and that the focus error can vary quite a lot, depending on the lens in use. I really think that most serious photographers are going to want one of these."
There is nothing like precision in our fog-banked existence and either LensAlign is a measuring tool that can cut through the vagaries of focus to help you fine tune the autofocus accuracy of your gear. Pretty sharp, we say again.