LOUDEN DOES IT AGAIN
Zenon MagneFlashCT MIDI Pro
 By MIKE PASINI
Editor
The Imaging Resource Digital Photography Newsletter
Review Date: March 2006
When we recently reviewed a book on camera hardware hacks, we bemoaned the lack of those photographer-engineered solutions that always fascinate us when we visit one or another pro in his studio. Peter Louden has engineered some one-of-a-kind solutions that are not far from that fun, but he also sells them to other photographers.
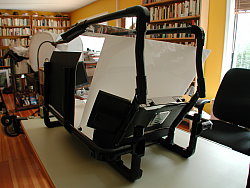
We reviewed his unique MagneFlash strobe panel (http://www.imaging-resource.com/ACCS/ZMF/ZMF.HTM) a while ago and recently he sent us his latest wonder, a copy table that uses MagneFlash technology. He makes three sizes and we tried the mid-sized one, which fits on a typing table and illuminates objects less than a square foot in size.
FIT & FINISH | Back to Contents
We grumbled about the fit and finish of the MagneFlash strobe (which has since been refined) and we grumbled as we inspected the parts of the unassembled MidiCT (which also has been improved). There's a hand-made aspect to Peter's products that may disturb the more effete among us. We knew from our experience with the strobe not to let that spoil the fun. And we're glad we didn't.
To take product shots in the bunker (in contrast to the more elaborate setups Dave and Shawn use in the metropolis of Atlanta), we use a soft box from Photoflex that casts its glow over a large white sheet of paper that curls up to make an endless horizon with a simple foam board reflector on one side. That does really nice work. And you can get away without the soft box if you hang a shower curtain liner over your window instead (to diffuse the light). That's not a pretty sight, either. But it works.
Our soft box has the advantage of letting us arrange the light in real time so we can adjust for shadows and reflections. And we can easily meter the scene, too. But a diffused 500 watt light source is just barely enough light to hand hold the camera.
A STROBE SOLUTION | Back to Contents
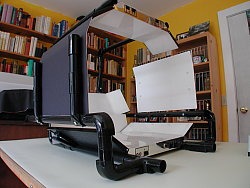
The MidiCT packs a much more powerful punch. It includes three 5600-degree Kelvin flash panels, a large one that forms the base of the unit, a smaller one to illuminate the back of the scene and another small one for overhead illumination. Each has its own power switch so you don't have to use all three on any shot. Each also has a Full/Half power switch and a Table/Boost switch. Those switches set the light output to either half, full or a stop over.
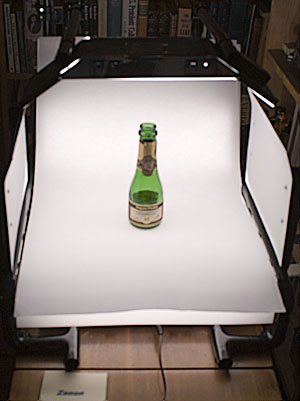 |
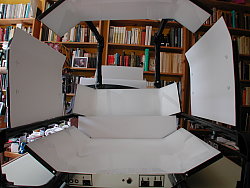
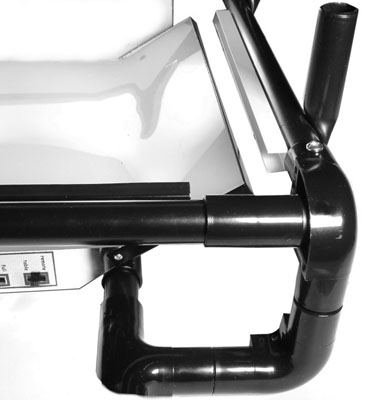
| The MidiCT at Work. We've added a sheet of white uncoated paper to eliminate reflections, otherwise this is the review unit in action. The side panels are reflecting light from a large panel below the subject and two smaller ones: one behind and one visibile on top. It's all held together with PVC pipe. Note the evenness of the illumination. |
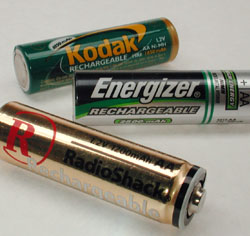
The flash panels enjoy the same efficient electrical engineering of the Zenon MagneFlash, requiring only one AA battery for the small units and two for the mid-sized unit and no more than four for the largest unit. You can recharge all the batteries for the mid-sized unit in a typical four-cell recharger.
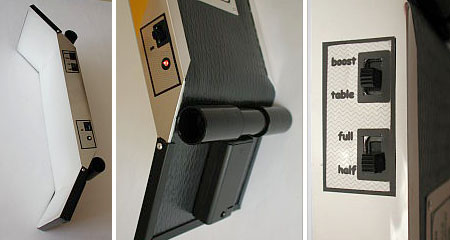 |
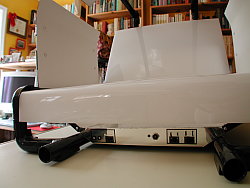
| Anatomy of a Panel. The top panel (l), like the other two panels, has a winged shape to angle the light toward the subject. It attaches to the PVC frame with PVC tubing (c). Note the battery compartment adjacent to the tubing and the Power On light (c). Three stops of light output can be selected from the two switches (r) at the other end of the front piece. |
The unique light panels also enjoy a similar efficiency in light diffusion. We asked Peter to explain just what they're doing. "The Copy Table panels each use two panels, the top one, which is opal acrylic, allows about half of the light to pass through it giving a small amount of diffusion," he said. "The underneath panel transmits light along its thickness (similar to fiber-optic)."
On the bottom panel, "a pattern is imposed. Where the transmitted light hits the pattern, light is thrown forward into the top acrylic." The majority of the light output is actually spread by the pattern rather than by simply diffusing it, as in most other systems."
What Peter has done is spread the flash output evenly over even the large flat panel. "The existing panel flash systems like the 57 and 68 use a similar system," he explained, "but I have been able to apply the principal over a much larger area in the Copy Table panels. In fact, there is no reason why this cannot be applied to very large, thin panels, particularly when the use of two panels in this way can form a rigid structure with a relatively low weight."
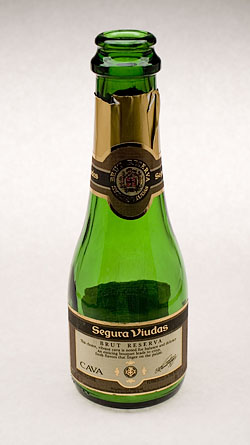 |
| Results Nice treatment of glass, reflections, foil, background |
The trick, he said, "is combining the choice of materials, the transmitting patterns and the efficient low voltage electronics, while keeping control of the color temperature of the output light. The nature of the light coming out is kept relatively pure."
But these aren't flat panels, actually. Each of them is winged or bent toward the subject. And that required special treatment to ensure even light distribution over the whole panel, Peter told us.
The panels are all triggered several ways:
- They can function as slave flashes to your on-camera flash, which can be masked with exposed slide film to avoid adding the flash light to the scene or just set at a lower power for fill flash if you don't want full flash.
- They can be triggered by cabling from them directly to the PC sync connector or hot shoe on your camera (an extension cable and connector cables are included).
- They can be triggered by any external flash, including the MagneFlash 57Plus or 68Plus.
We tried every combination and had no trouble triggering the unit no matter where we were standing when we hit the shutter button.
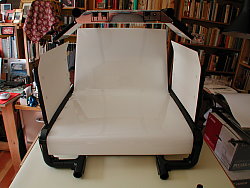
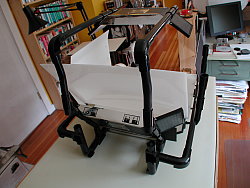
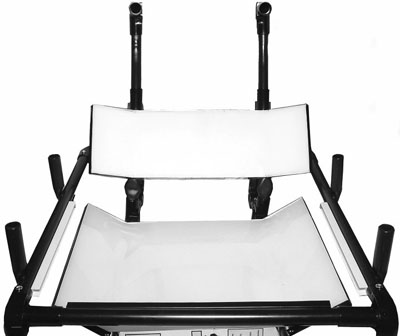
The three light panels are held in position by a set of black PVC tubes that you push fit together. There is an additional acrylic panel to hold your subject, which sits between the back light and the bottom table light. Two larger side reflectors can also be positioned to bounce light on the front of the object just by mounting them in different PVC posts.
The unit can deliver about 200 shots per charge at maximum power from the four included NiMH rechargeable batteries with a three second recycle time and a color temperature of 5600 degrees Kelvin. We didn't have to wait between shots or have to stop shooting to recharge or replace batteries.
The instructions were terse and the illustrations meager, but a careful reading of each step did illuminate the process. We managed to make one mistake, putting the left side bar on the right side and the right on the left, but that was easily corrected. The new design makes that mistake harder to make.
 |
 |
|
| View: Front 3/4 PVC construction |
View: Front Acrylic bed |
|
 |
 |
|
| View: Rear 3/4 PVC construction |
View: Front Lower panel controls |
|
 |
 |
|
| View: Rear 3/4 Side reflector |
View: Inside Small white card between panels |
|
The top panel on our unit was a bit heavy for the PVC tubing and tended to wobble a bit but this has no effect on performance. This is more rigid on the new design.
A white acrylic plastic sheet, molded into a vanishing horizon bend, sits on top of the rear and bottom panels, forming a seamless and reflective stage. In the new design, a thinner, more flexible and clear acrylic sheet slips into rails in the side bars. The flexible design reduces shipping costs.
We had a little trouble seating the batteries in the battery compartments, particularly since they are under the light panels. The newer units use a larger battery compartment to accommodate the slightly fatter NiMH cells.
And we had trouble when it came time to recharge the batteries, something you want to do before any prolonged use. Getting to the three compartments in our tight quarters meant partly dissembling the unit. We'd have very much liked an AC adapter alternative. The batteries are great for using the unit on location (although tear-down isn't convenient), but more typically, you'll use this in one spot, no doubt near an electrical outlet and having a plug would be a lot smarter than popping batteries out of hard-to-reach locations.
It is, however, easy enough to tear down and store. We think of it as somewhat less troublesome than setting up a bathroom darkroom.
FIRST SHOTS | Back to Contents
We really had no idea how to set the camera after we turned all the lamps on and put an object on the table. Our first thought was to use fill flash to fire the MidiCT.
 |
| Our First Shot Easier than it looks |
That worked. And it worked very well. After all, at 1/1000 second, the strobes are making the exposure, not the camera settings.
Then we got brave, switched to a PC sync chord and Manual mode on the camera. We picked a ridiculous f-stop/shutter speed combination (more suitable to full sunlight) and still got great results. This was a depth of field we simply weren't used to from our soft box shots. And we were hand holding the camera at this shutter speed, too. So we had an unusual amount of freedom.
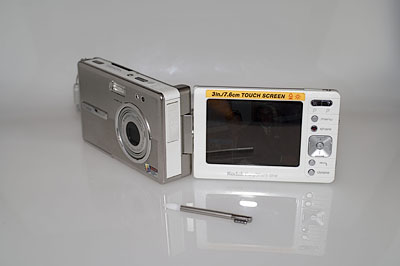
Peter modestly observed that the quality of the Zenon light captures metallic surfaces like digicam bodies more accurately than the diffused lighting of a nylon tent (whether using strobes or flood lamps). We had the chance to test the Zenon against an incandescent tent configuration and he's right. The metal objects actually look like metal, rather than plastic. It's a noticeable difference, preserving texture and a specular highlight rather than dampening them.
 |
 |
|
| Zenon Shot |
Tent Shot |
|
One of the advantages of MidiCT is that each of the panels functions as a slave flash unit. In addition to using them on the Copy Table, you can set them up independently of the table to illuminate more complex setups or in place of a reflector. If you do that, remember to take advantage of the off-table boost switch to double the output.
Alternately, however, as a fill, the half-power setting works well. The panels are shaped much like face-flatter reflectors, designed to add catch light to the eyes and soften facial features. Just set it to half power and pose your model over it. Modesty forbids showing you samples of our self portraits. But it works.
USING THE TABLE | Back to Contents
We learned a few tricks shooting with the table:
- Firing at about 1/1000 second, you don't have to use a tripod. If you elect to use slower shutter speeds, you will capture more of the ambient light, but if your scene is contained within the copy table, there's no reason to do that. Shoot as fast as your camera can sync and stop down your lens for maximum depth of field. Use the boost switch if you can't get enough depth of field.
- The white acrylic sheet itself reflects objects placed on it, so we draped a large sheet of white, uncoated paper over the acrylic to give us the same setting as our soft box setup. Newer models handle this a bit better.
- One problem we had with the PVC framing was that when we put a heavy object on the Copy Table, the side bars would slip, twisting inward as the table dropped and pulling the side reflectors in. Reseating the side bars helped. They expand and contract with the temperature, which can unseat them. Again, newer models resolve this design problem.
- We gave up on the battery compartment covers. We just left them off.
- The side reflectors can be positioned to bounce light off the front of the object by mounting them in the foremost tubes and angling them toward the object.
SAMPLE SHOTS | Back to Contents
 |
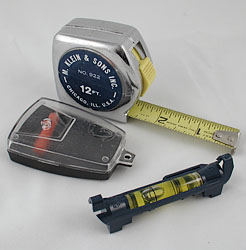
| Batteries Note the depth of field |
We're posting a gallery of images (http://www.imaging-resource.com/ACCS/ZCT/ZCTTHMB.HTM) taken with the Copy Table. All of these shots were taken with a Nikon Coolpix 990 using Auto white balance. Manual exposure mode was used with the shutter set to 1/1000 second and the aperture stopped all the way down to f7.9, usually. We varied the aperture only and only to f7.1. All shots were hand-held (and not very steadily, either).
The Copy Table itself was set to Full exposure on the bottom and back panels and half exposure on the top panel (except for the second light bulb shot). We angled the side reflector to the front of the subject for the Mini Cooper shots.
Exposure was triggered from the Nikon's flash, but the flash was masked by slide film so it didn't factor into the exposure. While we did shoot some tests with the MagneFlash (which can trigger the Copy Table, too), we didn't include those tests here.
The verdict? Excellent color balance and capture. Note the metallic surfaces, the perlite surface on the Kodak Picture Viewer, the red flower, the hacky sack leather. Also, note the unusual depth of field on the shot of the batteries and the eye glasses. Both were shot in Macro mode with a wide angle converter.
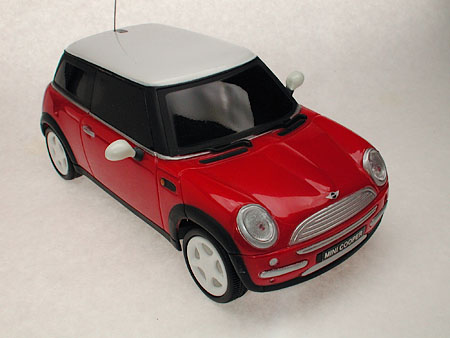 |
| Mini Mini Cooper Reflector moved to front is visible in windscreen |
For the sake of comparison, we've also posted a gallery of shots lit by Photoflex's First Product Kit (http://www.imaging-resource.com/ACCS/FPK/FPKTHMB.HTM), a nylon tent illuminated by two 250 watt incandescent lamps. It, too, does an excellent job, but the comparison is interesting. We had to open up the lens and slow down the shutter a good deal, but we could meter our scene. The diffusion provided by the tent helped some shots (like the Panasonic recorder's LCD screen) but hurt others (the Viewer and camera textures). We did color balance the images (all shot on Auto), but really should have shot with an incandescent white balance setting.
NB: Both sets of thumbnails appear a good deal darker than the original, full-sized images. The sample shots in the body of this review are much more representative of the in-camera results, although they have been resized for the Web, of course. The thumbnails do, however, show how the effect of the different illumination on the same objects, although we really didn't fiddle with the tent configuration as much as we might have.
We discussed our Copy Table problems with Peter by email and he gave us an update on some design changes he's made to the unit. We also chatted with him at PMA in Orlando, Fla. before filing this review.
Regarding the side bar slipping, he said, "The twisting of the side bars is inconsistent. Some assemblies are more prone to it than others when heavier subjects are placed on the Copy Table. This aspect has already been altered and the main acrylic is now supported by a crossbar. Additionally, two screws are used to prevent any twisting of the side-bars."
 |
| The New Crossbar Image courtesy of Peter Louden |
The white acrylic plastic sheet has been updated, too. "The acrylic sheet is now clear with our diffuser cloth (included in the new assemblies) optionally placed on top -- no reflections when the cloth is used, good reflections when not." In fact, the unit now ships in a flat box because the acrylic sheet is thin enough to be shipped flat and shaped by the channels in the frame that it slides into. Our unit had a thicker, rigid acrylic sheet that was already shaped for the table.
 |
| The New Frame Image courtesy of Peter Louden |
And the wobbling top section got a redesign, too. "The top of the acrylic sheet now hooks into a slot on the top bracket that holds the overhead lighting panel -- the result is a much steadier top section," Peter explained.
The battery boxes on our unit have been replaced as well. Rechargeable NiMH AAs are slightly bulkier than their alkaline cousins. Fortunately, Peter was able to find a roomier battery compartment to accommodate them. He also appreciated our suggestion for adding an AC adapter to use an outlet and is working on a recharger/adapter solution.
PRICING & AVAILABILITY | Back to Contents
The Copy Table comes in three sizes:
Mini ($225): Photo area of 7.8 inches wide x 6.7 inches deep horizontally and 6.7 x 4.7 vertically.
Midi ($530 as reviewed): Photo area of 15.7 x 13.8 horizontally and 15.7 x 10.2 vertically.
Maxi ($890): Photo area of 22.8 x 16.9 horizontally and 22.8 x 16.9 vertically.
All kits include lightweight acrylic lighting panels, variable power with short flash duration (1/1000 sec.), push-fit PVC framing, AA rechargeable power, power boost switch on each panel for off-table use. Peter offers a 30-day money back guarantee if not completely satisfied.
All product is shipped from Ipswich, England, using DHL. In the U.S., you can order from Bill Stocks' eBay store (http://stores.ebay.com/MagneFlash). "With Peter's great shipping performance and customer support," Bill noted, "I have been able to achieve a 100 percent positive�feedback from all my eBay customers."
In the U.K., the Zenon product line can be found Beckham Digital (http://www.beckhamdigital.co.uk).
We continue to be impressed with Zenon's unique product line. And, at the same time, impressed with how responsive Peter has been to our quibbles. Those quibbles have no doubt delayed the review, but the product shipping today is better than the one we tested.
What he can't fix, however, is the sort of issues that really require a higher production volume. That will no doubt bother some.
But as we walked the floor at PMA 2006 recently, we found no other product that does what the Zenon Copy Table does. The trick is the very efficient MagneFlash strobe panels that provide the power of strobe lighting but diffuse it evenly and efficiently thanks to their unique engineering.
Peter claims to be more an electrical engineer than a photographer, but his products solve artificial lighting problems in unique and compelling ways. Had we built this ourselves, you'd kill to get one of your own with not the slightest regret the frame was made of PVC tubing instead of carbon fiber. Because it does the job like nothing else.