Tough/Waterproof Cameras: Care, Feeding, and Exposure
Tips for getting the most from your underwater/tough cameraBy Dave Etchells
Date Posted: 07/16/09
Waterproof/rugged digital cameras as a category have really come into their own in just the last year or so, with four different manufacturers offering a range of models. (See our Waterproof/Rugged Camera Roundup for details on all the most recent models, as of July, 2009.) In the past, the very idea of taking a camera along to the beach, on a kayak or canoe trip, backpacking, mountain biking, skiing or other outdoor sporting activity was enough to make most camera-lovers shudder with dread: The chance of the camera dying a painful death was just too high. Even in less severe environments, actually carrying a pocket-sized digital camera in your pocket is an invitation to disaster; bump a table or chair, or just sit down the wrong way, and you'd be rewarded with a cracked screen or damaged lens mechanism. Even taking photos on a rainy day risked camera failure if a stray raindrop found its way inside the case.
The current crop of waterproof/rugged cameras are a different breed, able to stand up to amazing punishment, and even take photos underwater at varying depths. They're not indestructible, though, so we've come up with some tips on their care, feeding, and usage that our readers might find helpful. We've also thrown in a few tips on exposure and other settings, to help you bring back the best photos possible. Read on for all the details:
Care and Feeding
Clean the lens!
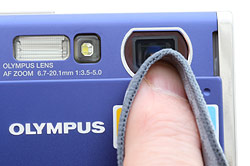 Most waterproof/rugged cameras have a protective cover glass over their internal lens, and in many, the cover glass is always exposed. This means it's prone to picking up all manner of fingerprints, smudges, pocket lint, and other cruft.
Bring a microfiber lens cloth with you, and get in the habit of checking the cover glass frequently. Beware of grit, though, when you wipe off the glass: Grit on the glass or your cloth could produce scratches if you press too hard.
Check the lens: Bubbles (and droplets) can be trouble!
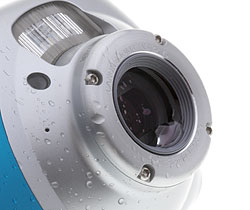 It's a good idea to give the camera a good shake whenever you first submerge, and again right after coming back up for air. When you dunk your camera in the water, it's not uncommon for a bubble or two to lodge around the lens opening. You probably won't notice the blur caused by the bubble until you're back home at the computer, at which point it'll obviously be too late to do anything about it. A good shake when you first go underwater will usually dislodge any bubbles, saving your subsequent photos.
The same holds true when you come back to the surface: Water droplets left on the lens cover glass can also cause severe blurring in your photos. Knock the camera gently against your palm to shake any remaining drops loose. Or, blot them dry with a clean cloth. (Beware using a corner of your beach towel for this, you're likely to just trade sand grains for the water.)
Wash it off!
 After your camera has been in a stream or lake, or especially the ocean, you should wash it off in fresh water before opening it or putting it away. If you open it and drop of clean freshwater gets inside, it's not a catastrophe, but salt water or freshwater that's high in minerals is another story altogether. Clean freshwater leaves little or no residue when it dries, but saltwater or mineral-laden freshwater leaves behind corrosive and/or conductive residues that can short out your camera's internal circuitry. The best rule is to never open the camera when it's wet, and to always give it a freshwater bath after it's been in the ocean.
On the outside of the camera, saltwater will leave salt crystals behind when it dries, and water from lakes and streams contains minerals that turn into tough-to-remove water spots when the water evaporates. So it's a good idea to give the camera a freshwater rinse and dry it with a towel before putting it away.
Check the Gaskets!
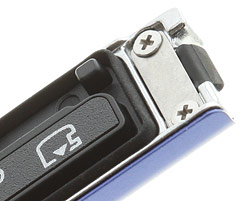 Waterproof cameras rely on soft rubber or plastic gaskets to keep the water out. The seal is made by the gasket pressing against a smooth mating surface. If a piece of dirt, grit, or fiber gets between the gasket and the surface it mates with, the seal will no longer be watertight. It's a good idea to get in the habit of running your (clean) finger over the seal each time you close the compartment door, to make sure there's no dirt on it that could cause a leak. Take care to not scratch any surface that the seal presses against, as a scratch can have the same effect as a piece of dirt: Your waterproof camera could become a lot less so.
NOTE: Be particularly careful with seals that make sliding contact with the camera body! Some gaskets simply press against a mating surface on the digicam's body. Others, though, press and slide to their final position. An errant piece of grit could be particularly dangerous with a sliding-type seal, as the seal itself could press and drag the grit against the mating surface, creating a scratch that could lead to a leak. Some sliding-type seals may not immediately appear so. At least one digicam on the market has a door that appears to just hinge down to meet the body, but the seal is an O-ring on a projection that fits into a recess as the door is shut - Creating just the type of sliding action we're talking about. It's always important to check and make sure your seals are clean any time you close the hatch on a waterproof camera, but it's especialIy critical of the seal is a sliding-type design.
Seals and Warrantees: Warrantee issues haven't been well-tested yet with waterproof cameras, and some manufacturers and warrantee providers require annual replacement of a camera's seals for any extended warrantee to remain in force. While the seals themselves are a minor component, replacing them may be subject to the same (high) flat-rate charge associated with major malfunction or damage. So check the language of any extended warrantee for a waterproof camera, to see whether seal replacement is required for coverage to remain in force, and whether such replacement is covered by the warrantee itself.
Tough, not Indestructible!
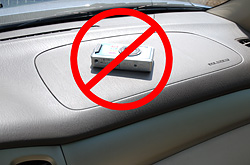 Just because a camera caries a "tough" rating doesn't mean it's impervious to harm. A "tough" camera left on a car dashboard in the sun can cook just as quickly as a more conventional digicam. Likewise, while some cameras carry anti-crush ratings, they can still be damaged if you bump against something with the camera in your pants pocket. Crush ratings are based on evenly-applied pressure: Even what feels like a gentle bump against the hard corner of a table or chair can still crack the LCD's cover glass if the impact comes in the wrong place.
Cameras Don't Float!
 Just because a camera is waterproof doesn't mean it will float on top of the water. To the contrary, most waterproof cameras are quite a bit heavier than water (particularly "tough" models, with their extra metal and bracing to withstand abuse), so they'll sink like rocks if dropped overboard. If you're going to be actively using the camera in or near deep or murky water, it's a really good idea to attach some kind of float to its wrist strap eyelet. Don't think you're safe just because the water is shallow, either: You can easily lose a camera in water only a foot or two deep, if it's murky from mud or waves stirring up sand. And, before you trust your several hundred dollar camera to any given float, give it a quick test first in your bathtub. A small float of the type shown works well enough for lightweight cameras, but more rugged models need more flotation. (Believe us, we speak from painful personal experience on this one!)
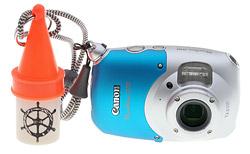
Get a Good Strap!
 This is related to the tip above: Don't rely on the svelte wrist strap provided by your camera's manufacturer, get something sturdy enough to keep you and the camera together, through whatever you might be doing. There are a lot of accessory straps on the market, and most any will be more sturdy than the one that came with your camera. We particularly like the straps made by Op/Tech, and they're widely available in camera stores and online. (That's their "Cam Strap" in the photo at right.)
Shooting Tips
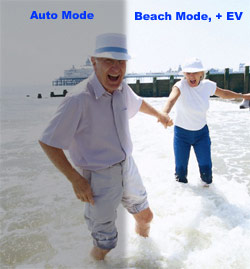
Beach or Snow: Boost the Exposure, Use Beach/Snow Mode
Most camera's exposure systems assume that they're looking at an "average" scene, and set their exposure accordingly. When you look around you, you'll see bright areas and dark areas. Average it all together, and an "average" scene comes out to a dull grey. This is the brightness your camera's exposure system aims for. The approach works fine, but if you're someplace where there's a lot more bright stuff than dark stuff (white sand at a beach, white snow in the winter time), the camera's average-aimed exposure will render the scene a lot darker than you remember it being.
The solution is to give the camera a little help, when you know that a scene is a lot brighter than the camera might be expecting. Every digicam has an exposure compensation adjustment somewhere on it, accessible directly via a button, or indirectly via the menu system. When you're shooting photos at the beach (or in snow under bright sun, at the other end of the year), boost the exposure by 2/3 or 1 EV unit. (EV stands for Exposure Value, and is the unit used on your camera's exposure compensation scale.)
If you'd rather have the camera figure out your exposure for you, but do a better job than full-auto mode, look for a Scene Mode for beach or snow shooting. Most cameras will have a Scene Mode of this sort, and in many cases, it will also tweak color balance as well as exposure, to make your photos look their best.
With either exposure compensation or Scene Modes, don't forget to set your camera back to its normal exposure settings when you're done for the day. If you don't, your shots taken later under normal conditions will look washed-out.
Underwater: Underwater or Auto Mode?
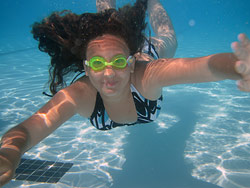 We often recommend scene modes for neophytes, and even experienced users can benefit from the white balance adjustments made by some camera's Underwater scene modes. Check to see how photos shot with your camera's underwater mode look, though. Some camera's underwater modes work well, toning down the blue-green hues and increasing contrast just enough to give pleasing color, without making the photos look like they were shot on dry land. In our opinion, some others go too far, losing the feeling of being under water. It's all a matter of personal preference, so shoot some photos both ways, to see what best suits your personal taste.
A danger with any scene mode, though, is that it's sometimes easy to forget that you set your camera that way, and then end up with a lot of subsequent shots badly exposed or with the wrong color. Our personal preference for underwater shooting is to leave the camera in Auto mode and then just tweak the color on the computer after the fact. We find that easier than dealing with a large batch of orange-tinted photos when we (inevitably, eventually) forget to switch back to Auto or Program mode after an underwater photo session.
Read our "Fun in the Sun" roundup of all Waterproof/Tough Cameras on the market, as of July, 2009!

Follow Imaging Resource: