Konica Minolta DiMAGE A2Konica Minolta updates their top-end electronic SLR with a higher resolution sensor, much-improved electronic viewfinder, a faster 3D autofocusing system, and high-speed USB 2.0 connectivity, among other improvements.<<Shutter Lag & Cycle Time Tests :(Previous) | (Next): Camera Modes & Menus>> Page 8:Operation & User InterfaceReview First Posted: 07/13/2004 |
Operation & User Interface
The DiMAGE A2's user interface is much more sophisticated than most digital
cameras on the market, as it provides significant external control over commonly
used settings. As a result, the DiMAGE A2 should be more intuitive for film-based
photographers who are accustomed to the "tactile" interface of the
traditional 35mm SLR. The difference is immediately apparent in the mechanically-coupled
zoom lens control, which provides much more direct control than the motorized
rocker switch zooms used by most other digital cameras. The rubber collar
grip surrounding the lens barrel is clearly marked with corresponding focal
lengths, so you know immediately the zoom setting at which you're operating.
Manual focus is more of a "fly by the wire" adjustment, in which
a ribbed focus ring at the base of the lens is used to control the internal
motor that actually makes the adjustment. In my opinion, the zoom control
is more important, however, given that the majority of users will spend more
time in Auto Focus rather than Manual Focus mode.
You can control almost all of the essential camera functions without having
to resort to the on-screen LCD menu system, although a couple of them are
accessed via the Custom option of the Function dial - meaning you must choose
the setting that's most important to you for quick access without entering
the menu system. Most of the camera adjustments are made by rotating a dial,
pressing a button, and turning one of the control dials. This may sound like
a lot of steps, but in practice I've always found external mechanical controls
like these much faster to navigate than LCD menu options. In addition to the
Mode switch and Exposure Mode dial, the major interface elements include a
pair of function dials on the left side of the camera, Front and Rear Control
dials, and the top-panel LED data readout (or, you can refer to the LCD or
electronic viewfinder displays.) Initially, I found it a little awkward to
have to view the left side of the camera to select specific parameters, but
after a few hours of using the camera, I found myself simply counting the
clicks on the dials there to select the options I wanted. Bottom line, while
they're rather unusual in the digicam world, the DiMAGE A2's controls lend
themselves to quick, sure operation for experienced users in the heat of concentrated
shooting sessions.
Control Enumeration
![]()
Shutter Button: Located on the top right-hand side of the camera, this
button sets exposure and focus (in autofocus mode) when half-pressed, and
trips the shutter when fully pressed.

Front Control Dial: This ridged wheel sits just behind the Shutter button,
conveniently under your index finger. All of the most commonly used camera
settings are adjusted by using this wheel in conjunction with one of the function
dials on the left side of the camera. It also controls aperture and shutter
speed in Aperture Priority and Shutter Priority exposure modes and shutter
speed in full-manual mode.

Exposure Mode Dial: In the right rear corner of the top panel, this dial
selects the camera's exposure mode. Options are Manual, Shutter Priority,
Aperture Priority, Program AE, Auto, Memory Recall, Portrait, Sports, Sunset,
and Night Portrait modes.
![]()
Information Button: Angled down from the top panel, just off the lower
left corner of the status display panel, this button controls the amount of
information displayed on the EVF and LCD screens while in Record and Playback
modes, and it activates the Index display in Playback mode.
![]()
Magnify Button: To the right of the Information button, this button can
be configured (via an LCD menu option) to either toggle the 2x digital zoom
in Record mode, or to magnify the center of the image by 3.3x for manual focusing.
In Playback mode, this button initially magnifies the image 2x, after which
the up/down arrows on the Four-Way Controller increase or decrease magnification
in steps of 0.2x, up to a maximum of 10.2x (depending on the image resolution).
![]()
Rear Control Dial: Below the Exposure Mode dial on the camera's
rear panel, this dial controls a variety of exposure settings when turned
while pressing a control button or turning a function dial.

AE Lock Button: On the back of the camera, just below the Rear Control
dial, this button locks exposure and/or focus, depending on how you've set
it up. An LCD menu option configures the button to match your shooting style.
The button can be programmed to either toggle the lock on or off, or only
hold the settings while depressed. It can also be configured to tie the AE
Lock area to the spot metering point.

Mode Switch: Just to the right of the EVF on the rear panel,
this switch sets the camera's main operating mode to Record, Playback, or
Movie.
Power Button: Located in the center of the Mode switch, this button turns the camera on and off.

Exposure /Flash Compensation Button: Directly below the Mode
switch, this button lets you adjust the overall exposure from -2 to +2 exposure
equivalents (EV) in one-third-step increments when pressed while turning the
Front Control dial. Located right under your right thumb as you grip the camera,
it's very easy to press this at the same time as turning the Control dial.
(Much easier than I'd have expected, a very quick, intuitive adjustment.)
This button also adjusts the flash exposure compensation, when pressed while
turning the Rear Control dial. Adjusting the flash exposure is unfortunately
a two-handed operation, but it's still nice not to have to enter the LCD menu
system to make the setting change. If the flash control has been set to Manual,
this adjustment controls the flash output directly, setting it to 1/16, 1/8,
1/4, 1/2 or full power. (Overall, a very nice implementation of combined
ambient/flash exposure adjustment.)

Display Mode Switch: Below the Exposure Compensation button and tucked
into the corner next to the LCD monitor, this switch controls the operation
of the rear-panel LCD and the EVF displays. The top position enables the EVF
only, while the bottom position enables only the LCD monitor. In the center
Auto position, marked as "A," the camera decides which screen to
activate, using a set of infrared sensors next to the EVF that tell when your
eye is near the EVF.
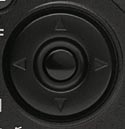
Four-Way Controller and OK Button: In the center of the rear panel, this
rocker control steps through selections within the LCD menu system and interacts
with various status messages or requests for confirmation that appear on the
LCD screen. You navigate the menus by pressing one of the four arrows around
the control's periphery, and confirm selections by pressing the OK button
in the center of the control. In Playback mode, the right and left arrows
scroll through captured images on the memory card, while the up arrow activates
a histogram display. In Record mode, pressing and holding the center of the
control switches the camera between Wide and Spot autofocus modes. Once in
Spot AF, rocking the control moves the Spot crosshair around the frame, implementing
Konica Minolta's Flex Focus Point mode.

QV/Delete Button: Below the Four-Way Controller, the QuickView button
lets you quickly switch from Record to a Quick View mode to view just-captured
images. When viewing an image, pressing this button prompts the camera to
ask if you want to delete it.

Menu Button: While the DiMAGE A2 does make considerable use of external
controls, it also has an extensive LCD menu system, with four screens of menus
in both Record and Playback modes, with access to the Setup menus as well.
Pressing the Menu button calls up the menu system, pressing it a second time
dismisses it when you're done.

Anti-Shake Button: To the right of the Menu button, this button
toggles the camera's Anti-Shake System on and off. The button glows green
when activated, and a blue "shaking hand" icon appears in the lower
left corner of the LCD or EVF screen.

Function Dial: Located at the top of the camera's left side panel, this
dial is the primary interface for controlling the most frequently used camera
settings. You change a setting by rotating the dial to the appropriate position,
and then pressing the central button while rotating one of the ridged Control
dials. When you press the center button, the corresponding camera option is
displayed in isolation on either the LCD or EVF (whichever is in use), so
you can see its current value as you rotate the Control dial. In some modes,
rotating the front control dial selects the primary mode, while rotating the
rear control dial selects a secondary or sub-mode. (An example would be the
Drive Mode option, where the front dial selects between single shot, bracketing,
continuous, interval, and self-timer modes. In most cases, the rear dial selects
between sub-options, such as 2- or 10-second self-timer, etc.) Options here
include the following:
- MSET: Memorize complete camera setups for rapid recall of multiple exposure parameter settings with a single menu choice. A total of five different setups can be recorded.
- CUST: Depending on the value of the "Custom Set" menu option, allows quick access to the DiMAGE A2's Image Size, Image Quality, Flash Mode, Flash Control, Color Mode or Depth-of-Field Preview functions.
- Metering Pattern: Choices are Multi-Segment (default), Center Weighted, and Spot.
- DRIVE: Select the camera's drive mode. Options include Single-frame, Bracketing, Continuous, High-speed Continuous, Ultra High Speed Continuous, Interval, Interval and Time-lapse Movie (combined), and Self Timer
- WB: White Balance select. Options are Auto, Daylight, Incandescent, Fluorescent, Cloudy, Shade, Flash, and Custom. (Three custom white balance registers are available, to record three separate custom white balance settings. The custom white balance registers are selected via the Rear Control Dial.)
- ISO: Set the camera's light sensitivity, in ISO units. Options are Auto, 64, 100, 200, 400, 800.

Digital Effects Controller: Below the Function Dial is the Digital Effects
Controller, labeled "EFFECT." Its operation is very similar to that
of the Function Dial, in that changes are made by rotating the dial to select
a function, pressing the central button, and scrolling the Control dial. Options
here include Contrast, Color Saturation, and Filter (a hue adjustment). Adjustments
are very fine-grained yet cover a wide range, permitting subtle customization
of the camera to your personal tastes or the needs of a particular subject.

Focus Switch: Just below the Digital Effects Controller, this sliding
switch controls the focus mode, selecting either Single AF, Continuous AF,
or Manual modes.

Custom White Balance Button: To the left of the Focus switch,
this button sets the manual white balance when pressed in Custom white balance
mode.

Manual Focus Ring: Surrounding the base of the lens barrel, this ribbed
ring controls focus when the camera is in Manual focus mode. This is a "fly
by wire" control, in that it isn't directly (mechanically) connected
to the optics, but rather commands an internal motor to move the lens elements.
In "Direct Manual Focus" mode, the camera initially focuses automatically,
then turns control over to the Focus Ring so you can fine-tune the focus manually.
![]()
Zoom Control Ring: A rubberized ring around the middle of the lens barrel,
this controls the optical zoom, moving the lens from wide angle to telephoto
positions. Unlike the zoom controls on most digicams I've tested, this collar
on the DiMAGE A2 is directly connected to the lens elements, providing very
precise, sure-footed all-mechanical control.

Macro Focus Switch: Located on the left side of the lens barrel, this
control engages the macro focusing option. Macro focus may be enabled at either
the wide-angle or at a short range of telephoto focal length settings of the
zoom lens.

Diopter Control Dial: Practically hidden on the left side of the optical
viewfinder, this tiny dial adjusts the viewfinder display to accommodate eyeglass
wearers. It varies the eyepiece diopter setting over an broader-than-average
range, albeit not nearly as broad as the control on the A1's EVF did.

Battery Compartment Latch: Located in the center of the battery compartment
door on the bottom of the camera, this latch unlocks and opens the battery
compartment cover.

Follow Imaging Resource: