 Back
to Full Canon PowerShot A20 Review
Back
to Full Canon PowerShot A20 ReviewGo to Canon PowerShot A20 Data Sheet
Go to Canon PowerShot A20 Pictures Page
Up to Imaging Resource Cameras Page
Use your browser's "Back" button to return to the previous page, or the links at the top and bottom of this page to navigate to related information. If you have difficulty fitting the text on this page onto your printer output, simply resize your browser window to a narrower width and print again.
Remember us when it's time to buy!
Dave here: Have our reviews been helpful to you? (Is this article you're reading right now useful?) Preparing this level of information on as many products as we do is incredibly hard work, not to mention expensive. Things on the Internet may look like they're free, but they're not. (As a lot of big dot.com companies are finding out these days.) Somewhere, somebody has to pay to produce worthwhile content. YOU can help us though, by remembering us when it comes time to make your purchase. Would you consider coming back to our site and clicking-through to one of our advertisers to make your purchase? Every dollar you spend with one of our advertisers helps us directly (in affiliate fees) or indirectly (the advertiser will keep renewing their ad contract with us). To make it easy for you to support us, here's a URL you can visit, to see all our current advertisers, with links to click on that will register your visit to them as having come from our site. It's up to you where you buy, but Mike, Mike, Kim, Yazmin, Marti and I would be really grateful if you'd help us out by choosing one of our advertisers to purchase from.
Thank you for your support!
Dave Etchells, Founder & Publisher
Visit our "Buy Now" Page:
https://www.imaging-resource.com/buynow.htm
Back
to Full Canon PowerShot A20 Review
Go to Canon PowerShot A20
Data Sheet
Go to Canon PowerShot A20
Pictures Page
Up to Imaging Resource Cameras
Page
Canon PowerShot A20Canon's "value priced" 2 megapixel camera has 3x zoom, takes great pictures! Review First Posted: 5/10/2001 |
|
 |
|
2.1 megapixel CCD for 1600x1200 images |
|
|
3x optical zoom lens |
|
|
|
Excellent color! |
|
|
|
Uses standard AA batteries (Use NiMH) |
Executive Overview
The Canon PowerShot A20 features a compact body design, easy-to-use menu interface, and a 2.11-megapixel CCD that delivers clear, sharp, colorful images. Although slightly larger than Canon's Digital ELPH models, the PowerShot A20 is very portable, measuring just 4.3 x 2.8 x 1.5 inches (110.3 x 71.0 x 37.6 mm), which is small enough to fit into a large shirt or coat pocket or average size purse. The slightly larger camera size provides a more substantial hand grip and a longer lens extension than the PowerShot S100 or S300. The built-in, retractable lens cover slides quickly out of the way when the camera is powered on in Shooting (Record) mode, and the telescoping lens extends approximately one inch. The lens remains inside the body when the camera is powered off or when reviewing images in Playback mode.
A real-image optical viewfinder and 1.5-inch, color TFT LCD monitor are provided for composing images. The LCD monitor features a detailed information display that operates independently of the image display (meaning that the information display appears whenever a control button is pushed, even if the LCD monitor is not in use). The A20 is equipped with a 3x, 5.4-16.2mm lens (equivalent to a 35-105mm lens on a 35mm camera) with maximum aperture settings of f/2.8-f/4.8 depending on the zoom setting. Focus is automatically controlled, with Normal, Macro, or Infinity focus modes available by pressing the right arrow button on the back panel. (Infinity is only available in Manual mode.) There's also an Autofocus Assist light (an orange light emitted by the flash) to aid focusing in dark situations. The 2.5x Digital Zoom is enabled by zooming past the 3x optical zoom range whenever the LCD monitor is activated, though it visibly reduces image quality as it enlarges only the central portion of the image.
Exposure is automatically controlled at all times, with three separate Shooting modes available on the Mode dial: Automatic, Manual, and Stitch-Assist. In Automatic mode, the user has control over Resolution, Compression, Flash, Self-Timer, and Normal or Macro focus modes. Manual mode expands the user controls to include Exposure Compensation, White Balance, Infinity focus, and Continuous Shooting. Stitch-Assist is Canon's panoramic mode, allowing you to take a series of up to 26 images to be "stitched" together on a computer into a panoramic image.
The A20 uses an evaluative metering system to determine exposure, which is linked to the focus area (a large portion of the center of the image). Shutter speeds range from 1/1,500 to one second, with an automatic noise reduction system for exposures slower than 1/6 second (which works quite well). The camera's light sensitivity is rated at ISO 100, though it increases to ISO 150 at low light levels. Exposure is adjustable from -2 to +2 exposure equivalents (EV) in one-third-step increments, allowing you to lighten or darken the exposure as needed. White balance options include Auto, Daylight, Cloudy, Incandescent, and Fluorescent settings, accommodating most light sources. The Drive button on the back of the camera accesses the Continuous Shooting and Self-Timer modes. Continuous Shooting, which is only available in Manual mode, captures a rapid series of images as fast as 2.5 frames per second. The Self-Timer features a 10-second countdown, triggered by a full press of the Shutter button. The A20's built-in flash operates in Auto, Red-Eye Reduction, On, Off, and Slow Synchro modes, controlled by an external Flash button.
Images are stored as compressed JPEGs on CompactFlash Type I memory cards (an 8MB card is supplied with the camera). Resolution options include 1,600 x 1,200, 1,024 x 768, and 640 x 480 pixels, with selectable compression levels of Superfine, Fine, and Normal. You can download images directly from the camera to a computer via the included USB cable and Canon's Digital Camera Solution Disk software (Version 4.0), which is supplied on the accompanying software CD. The Solution Disk provides image organization and correction tools; the PhotoStitch software is for piecing together panoramic images; and a Remote Capture utility enables you to remotely operate the camera from a computer.
Four AA batteries power the camera (alkaline or NiMH), and an external AC adapter is available as an accessory. An NTSC video cable also accompanies the camera (PAL for European models), enabling you to review or compose images on a television.
Its compact size and 3x zoom lens make the Canon A20 a worthy traveling companion, slipping into a pocket, purse, or backpack with ease. Though exposure is automatically controlled, the A20 does offer a nice range of features with which to experiment, as well as the freedom to leave the camera in control of all operations. The 2.11-megapixel CCD captures sharp images with good color and resolution, making the A20 an excellent option for those consumers who want a high-quality digicam with the convenience of automatic exposure control and portable size.
Design
The Canon PowerShot A20 is a very portable 2.11-megapixel digicam, measuring 4.3 x 2.8 x 1.5 inches (110.3 x 71 x 37.6 millimeters) and weighing approximate 9 ounces (250 grams) without batteries. The molded plastic body has an attractive metallic champagne color on the front panel and a light gray finish on the back. It's compact and durable enough to travel just about anywhere, with a retractable lens cover that protects the 3x zoom while not in use, and eliminates the need for a separate lens cap. When the camera is powered on, the shutter-like cover slides open and the lens telescopes from the body into its operating position. This telescoping design keeps the 1-inch lens from protruding beyond the front surface of the camera when it's not in use, and makes it a little easier to slip into a pocket or purse. The A20's user interface is sensibly laid out, with well-marked external controls that are well within reach of the user's thumbs, and most suitable for two-handed control.
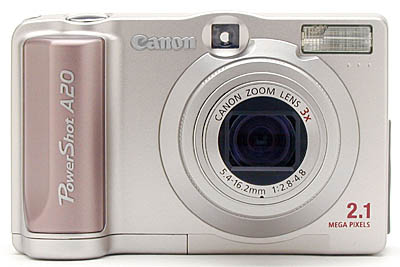
The front of the camera houses the telescoping lens, built-in flash, and optical viewfinder window. When the camera is powered on in one of the three Shooting modes, the lens is uncovered and projects about an inch from the body. A large, sculpted hand grip runs the along the right side of the camera, giving your fingers a significant hold on the body. The flash also serves as an AF Assist light, emitting a soft orange light that helps the camera judge focus in low-light situations. The orange light also blinks during the Self-Timer countdown -- slowly for the first 8 seconds and more quickly for the last two seconds. Canon has designed an ingenious method of attaching auxiliary lenses to the A20's telescoping zoom. A notched ring at the base of the lens barrel is loosened by the dust cap on the Canon LA-DC52 lens adapter, enabling you to attach the adapter in its place. The full adapter covers the lens mechanism when extended, and provides a set of 52mm filter threads to accommodate Canon's wide-angle and close-up lens converters.
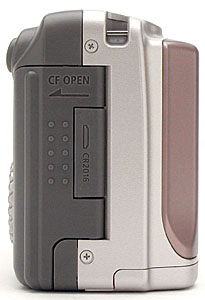
The right side of the camera holds the CompactFlash slot, CR2016 battery compartment, and a wrist strap attachment eyelet. The memory card slot is covered by a hinged plastic door that slides forward before opening outward. We found the door a little difficult to maneuver, as the grip pad on the front of the door was difficult to push with just one finger. We had to hold the camera with both hands, even on a tripod, and use a thumb to slide the door open. (A vertical, raised bar grip may be more effective on this door design. It's a minor gripe, but one we felt worth mentioning.) The CR2016 battery slot can only be opened when the CompactFlash slot door is open, and is most easily removed by sliding a coin or knife under the cover and flipping it upward. The battery casing slides right out with the battery inside. (The CR2016 battery powers the camera's internal clock and calendar, so that information is not lost when the AA batteries die.)
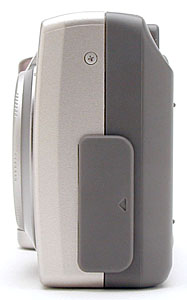
The left side of the camera houses the jack connector compartment. Protected by a soft rubber door, which is held in place by two rubber hinges, the door flips open to reveal the Digital (USB), Video Out, and DC In connector jacks.
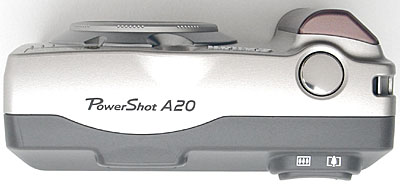
A large, silver Shutter button is the only control on the camera's top panel, located right next to the wrist strap attachment eyelet.
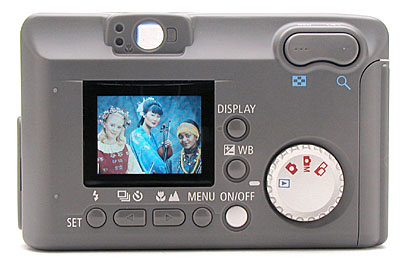
The remaining camera controls are on the back panel, along with the LCD monitor and optical viewfinder eyepiece. Controls lined up along the bottom and right sides of the LCD monitor include the Flash / Set, Drive / Self-Timer, Macro / Infinity Focus, Menu, and On / Off buttons (along the bottom), and Exposure Compensation / White Balance, and Display buttons (on the right). A large Mode dial in the lower right corner controls the camera's operating mode, and a Zoom lever in the upper right corner sets the optical and digital zoom. On the left side of the optical viewfinder eyepiece are two LED lamps that report camera status. The top LED lamp glows green when the focus and exposure are set, or when the camera is ready to communicate with your computer, and flashes green when the camera is processing an image. If the top LED lamp glows orange, the flash is charged. A flashing orange LED lamp indicates a low-light shooting situation and the potential for a blurred photograph from camera movement (this also brings up the shaking hand icon on the LCD monitor). The bottom LED lamp lights yellow when the Macro mode is enabled and the Shutter button is halfway pressed (also noted by a small macro symbol next to the LED lamp).
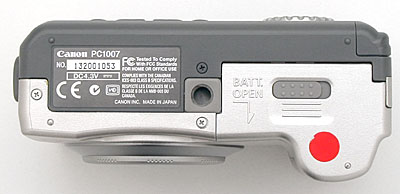
The A20 offers a reasonably flat bottom panel, though there are a few minor ridges and indentations. The plastic, threaded tripod mount is too close to the battery compartment to allow quick battery changes while mounted on a tripod, though the side access of the DC-In slot ensures that you can connect the accessory AC adapter in the studio. The battery compartment door slides forward before opening outward, with a sliding lever in the center of the door that unlocks the door before it can be opened.
 Viewfinder
The A20 sports a real-image optical viewfinder as well as a color LCD monitor for composing images. The optical viewfinder window features a set of autofocus target marks in the center of the finder, which define the autofocus and exposure area. Though the optical viewfinder does not offer a diopter adjustment, it does have a fairly high eyepoint, which should accommodate most eyeglass wearers. Two LED lamps on the left side of the viewfinder eyepiece report a range of camera information. The bottom LED glows yellow when the camera is in the Macro focus mode and the Shutter button is halfway pressed. The top LED lamp lights green when focus and exposure are set, and flashes green when the camera is processing. If the top LED lamp glows orange, the flash is charged. A flashing orange LED lamp indicates a low-light shooting situation and the potential for image blurring from camera movement (using a flash or tripod is recommended).

The 1.5-inch, color LCD monitor features a low-temperature, polycrystalline silicon, TFT display with roughly 120,000 pixels. A Display button adjacent to the LCD monitor controls the image display, turning it on and off. An information display operates independently of the Display button. The information readout pops onto the screen whenever the LCD monitor is activated or a control button is pressed, even when the LCD image display is turned off. The information display reports the current camera settings, including Shooting mode, Exposure Compensation, White Balance, and Resolution and Compression, as well as Flash, Drive, Macro / Infinity modes, and the number of images remaining. After a few seconds, the display disappears, and is called up again with the next press of a control button.

In Playback mode, the Display button cycles through various levels of information display. The first page shows no information. The second reports the file number, date and time of exposure, quality setting, and the number of images on the card. A third page shows select exposure information, such as Shooting mode, Macro, Drive, Flash, Exposure Compensation, and White Balance. Also in Playback mode, the LCD monitor offers a nine-image index display and a playback zoom, which enlarges images for closer inspection. Once an image is enlarged, you can use the arrow keys to scroll around and check on framing or other details.
 Optics
The PowerShot A20 features a high-quality Canon 3x, 5.4-16.2mm zoom lens that is equivalent to a 35-105mm lens on a 35mm camera. The maximum aperture setting is f/2.8 at the wide-angle setting and f/4.8 at the maximum telephoto range. Aperture settings and shutter speeds are automatically controlled, with no settings reported on the LCD display. Focus ranges from 2.5 feet (76 cm) to infinity in normal mode. In Macro mode, focus extends from 6.3 inches to 2.5 feet (16 to 76 cm) with the lens at wide angle, and from 10.2 inches to 2.5 feet (26 to 76 cm) with the lens at telephoto. Focus is automatically determined via a through-the-lens, three-point AiAF (Artificial Intelligence Auto Focus) system, which gauges focus from three areas in the center of the frame. The Macro / Infinity button on the back of the camera not only places the camera in Macro or Normal focus modes, but also accesses an Infinity focus mode in Manual mode, which is good for shooting fast-moving subjects from a distance. This setting decreases shooting time, as you don't have to wait for the camera to set focus.
The A20's built-in flash doubles as an autofocus (AF) assist light, which is automatically activated whenever the camera is focusing in low-light situations (though we sometimes noticed it operating in fairly well-lit shooting situations). The AF assist light emits a dull, orange light that falls on the central portion of the subject, providing additional light for more accurate focusing. We found that the AF assist worked very well, as we obtained clearly focused images in our low-light testing, even at the lowest light level. The A20 doesn't offer an adjustable focus lock, but you can manually lock focus for a specific area of the image by simply framing the portion of the subject you want in focus in the center of the frame, halfway pressing the Shutter button, recomposing the shot while holding down the Shutter button halfway, and firing the shutter.
Though the A20 lens does not feature filter threads for attaching accessory lenses, Canon does offer a wide-angle and close-up lens converter kit, which attaches to the camera via a small adapter. The adapter connects to the inside of a small ring at the base of the lens. The ring features a series of small grip notches, which allow it to be loosened and removed by the Lens Adapter Dust Cap, creating a space for the adapter to attach. The adapter supplies a set of 52mm threads to attach filters or lenses.
In addition to the 3x optical zoom, the A20 also offers a 7.5x digital telephoto (combined optical and digital), which is not available in Stitch-Assist mode. Digital zoom is automatically enabled by zooming past the optical zoom range whenever the LCD monitor is active. The amount of digital zoom is reported on the LCD display, in blue numbers on the right side of the screen. Keep in mind that digital zoom decreases image resolution, and often increases noise levels. In our testing, we noticed that the A20's digital telephoto did a fairly good job of maintaining detail. Resolution was decreased and details softened somewhat, but the A20's digital zoom performed better than many we've seen.
Optical distortion on the A20 is moderate at the wide-angle end, as we measured a 0.57 percent barrel distortion. The telephoto end fared much better, as we couldn't even find one pixel of pincushion distortion. (We actually noticed about a half-pixel of barrel distortion, which is fairly insignificant.) Chromatic aberration is also very low, showing only a half-pixel of coloration on either side of the black target lines. (This distortion is visible as a very slight colored fringe around the objects at the edges of the field of view on the resolution target.)
Exposure
The A20 offers a relatively uncomplicated user interface, and a control layout that is very similar to other Canon PowerShot cameras. The numerous external controls decrease reliance on the camera's menu system, though the LCD's information display is automatically activated whenever a control button is pressed. This still saves on battery power, however, because the information display automatically turns itself off after a few seconds, shutting down the LCD monitor in the process (as long as it was previously inactive).
The Mode dial on the camera's back panel controls the operating mode, placing the A20 into Playback mode, or Automatic, Manual, and Stitch Assist Shooting modes. Exposure is automatically controlled at all times, with only limited user controls depending on the Shooting mode. For example, Automatic mode provides control over Flash, Focus, Drive, Resolution, and Compression settings, while Manual mode gives the user control over White Balance and Exposure Compensation, in addition to the settings available in Auto mode. Stitch Assist mode provides all of the available controls except for Auto Flash, Red-Eye Reduction, Digital Zoom, and Continuous Shooting. Basic exposure decisions, such as shutter speed and aperture setting, remain under automatic control in all three Shooting modes.
An Instant Review function displays the captured image on the LCD screen for two or 10 seconds, which is adjustable through the Setup menu. The Instant Review screen gives you the option of deleting an image, without recording it to the CompactFlash card, simply by pressing the Exposure Compensation / White Balance button. This pulls up the Erase screen, with an option to cancel the action. You can also turn the Instant Review function off, which should save on battery usage.
Shutter speeds range from 1/1,500 to one second, and lens apertures from f/2.8 to f/4.8 (depending on the telephoto setting), although neither setting is reported on the LCD information display. To determine exposure, the camera uses an evaluative metering system linked to the focus area, or center of the image. One notable feature of the PowerShot A20 is its automatic noise reduction for exposures longer than 1/6 second. We found this to be quite an effective in our low-light test shots, which showed very low noise levels.
Light sensitivity is rated at an ISO 100 equivalency, and is automatically raised to ISO 150 in low-light situations. This boost wasn't enough to impact our low-light test shots, however, as we were only able to obtain bright, usable images at eight foot-candles or 88 lux (common street lighting at night equates to about one foot-candle, or 11 lux).

The A20's White Balance settings include Auto, Daylight, Cloudy, Tungsten, and Fluorescent options, accommodating most common light sources. Pressing the Exposure Compensation / White Balance button twice displays the White Balance menu, navigable with the right and left arrow buttons under the LCD monitor. A single press of the same button displays the Exposure Compensation adjustment, which allows you to lighten or darken the image from +2 to -2 exposure equivalents (EV) in one-third-step increments. A 10-second self-timer is accessible by pressing the Drive button twice. Once in Self-Timer mode, a half-press of the Shutter button locks focus and exposure, while a full press triggers the countdown. The Self-Timer lamp (an orange light emitted by the flash) blinks every second for the first 8 seconds of the countdown and blinks more rapidly for the last two seconds. A timer also beeps audibly in sequence with the orange light.
 Flash
Flash
The A20's built-in flash has a working range of 2.5 to 13.8 feet (0.76 to 4.2 meters) at the wide-angle setting, and from 2.5 to 8.2 feet (26 to 76 cm) at telephoto. In Macro mode, Canon reports that the flash is effective for the telephoto shooting range, which is 10.2 inches to 2.5 feet (26 to 76 cm), but that the flash may be too bright for the closer shots allowed by the wide-angle lens setting, 10.2 inches to 2.5 feet (26 to 76 cm). In our testing, however, we found the flash very effective at the wide-angle Macro setting.
The flash has five operating modes, controlled by the Flash button on the camera's back panel: Auto, Red-Eye Reduction, On, Off, and Slow Synchro. The Automatic flash fires the flash in low-light situations or when a subject is backlit. Red-Eye Reduction mode works in the same manner, although it fires a small pre-flash before the full flash to reduce the occurrence of red-eye effect (a red reflection from the flash in the subject's pupils). The On and Off flash modes are self-explanatory. Slow Synchro mode works with a slower shutter speeds (usually one-second), which allows more ambient light into an image.
In our testing, we found the A20's flash brightest at 8 feet from the target, with decreased (though still fairly bright intensity) as far as 10 feet. Flash intensity continued to decrease in brightness from 11 to 15 feet, though the flash was weakly effective at the 15-foot distance.
The A20's flash also serves as an autofocus (AF) Assist light and Self-Timer lamp, emitting a soft, orange light from the flash window. When used as an AF Assist light, the orange light shines on the central portion of the subject, helping the camera determine focus in low-light situations. In Self-Timer mode, the orange light blinks during the 10-second countdown until the shutter is released.
Stitch-Assist Mode (Panorama)
The A20 features Canon's popular Stitch-Assist mode, which allows you to create panoramic images by shooting a series of images and then "stitching" them together on a computer. As many as 26 consecutive images can make up a panoramic series, all captured using framing guidelines provided on the LCD monitor (to help line up each shot correctly). A shot confirmation after each image allows you to reshoot an image if necessary. Auto and Red-Eye Reduction flash modes, as well as the Digital Zoom, are not available in Stitch-Assist mode. Canon also notes that a television cannot be used as a viewfinder when shooting in Stitch-Assist mode. PhotoStitch software is included on the software CD accompanying the camera.
Continuous Shooting Mode
Accessed via the Drive / Self-Timer button on the camera's back panel, the Continuous Shooting mode allows you to capture a series of images at approximately 2.5 frames per second. The camera snaps images continuously for as long as the Shutter button is held down, or until the CompactFlash card is full. Images are immediately recorded to the camera's buffer memory. Once the buffer memory is full, images are recorded to the CompactFlash card. The series will resume if you continue to hold down the Shutter button, but only after the buffer has been cleared. Shot-to-shot cycle times vary depending on the image size and quality settings, whether or not the LCD monitor is enabled, and the amount of image information to be recorded. The flash is available in this mode, but decreases the shot-to-shot cycle time to allow the flash time to recharge. Continuous Shooting is available in Manual mode only.
Shutter Lag/Cycle Times
When you press the shutter release on a camera, there's usually a lag time before the shutter actually fires. This time is to allow the autofocus and autoexposure mechanisms time to do their work, and can amount to a fairly long delay in some situations. Since this number is almost never reported on, and can significantly affect the picture taking experience, we now routinely measure it using an Imaging Resource proprietary test system.
|
|
||
|
|
|
|
| Power On -> First shot |
|
Faster than average for cameras with telescoping lenses.
|
| Shutdown |
|
Shorter time is for lens retraction, longer is for max time after a shot until you can remove the card. Faster than average overall.
|
| Play to Record, first shot |
|
A bit faster than average.
|
| Record to play (max/min res) |
|
About average.
|
| Shutter lag, full autofocus |
|
Faster than many low end cameras, a bit slower than most higher-end models. |
| Shutter lag, prefocus |
|
Amazingly (!) fast.
|
| Cycle Time, max/min resolution |
|
First 6 shots at max res at intervals of 1.74 seconds, 2.83 after that, due to full buffer. Min res 1.30 seconds all the time (we shot 12 frames, buffer never filled). (NO benefit from high-speed CF cards though.) |
The PowerShot A20 was a surprisingly fast little camera, with good shutter lag in full autofocus mode, and absolutely astonishing speed when prefocused by half-pressing and holding the shutter button before the exposure. Cycle times are very good as well, as the camera apparently has about 5-6 frames of buffer memory, providing cycle times of less than two seconds for that many shots at the highest resolution/quality setting. Startup and shutdown times are both faster than average. Overall, a surprisingly nimble camera, particularly for its price point.
Operation and User Interface
The A20 features a straightforward user interface similar to that of other Canon PowerShot digicams. Though it is somewhat reliant on its LCD display for confirming mode changes and menu settings, the LCD works very efficiently to minimize power drain. Even when the image display is turned off, simply pressing a control button activates the information display, allowing you to change the setting without turning on the image display. Once you've made the change, the information display automatically disappears and shuts off the LCD monitor after a few seconds.
We liked the fact that Exposure Compensation and White Balance are both controlled by an external button (as opposed to sifting through pages of menu options). The Mode dial also simplifies operation by allowing you to quickly change the Shooting mode without having to enter an on-screen menu. Overall, the A20's user interface is very intuitive and quick to learn, although the limited number of arrow buttons (left and right only) makes menu navigation a little quirky. (You have to scroll to the menu item you want to change, press the Set button, and then continue to scroll through the choices available in that menu item, and press the Set button again until you've navigated through all of the submenus and are able to confirm your selection.)
Control Enumeration

Shutter Button: Located on top of the camera, this large, silver button sets focus and exposure when halfway depressed, and releases the shutter when fully depressed.

Zoom Lever: Positioned in the top right corner of the camera's back panel, this lever controls the optical zoom in any Shooting (Record) mode. When the LCD monitor is active in either Automatic or Manual mode, this lever also controls the 2.5x Digital Zoom.
In Playback mode, the wide-angle (left) end of the lever activates the nine-image Index Display mode, allowing you to scroll through the thumbnails with the left and right arrow buttons. A second press of the wide-angle end allows you to scroll page by page through the index display with the arrow buttons. Pressing the telephoto (right) end of the lever returns you to the normal nine-image index display page, a second press enlarges the selected thumbnail to full-screen display, and a third press activates the playback zoom function, which enlarges the captured image by 2x.

Mode Dial: Dominating the lower right corner of the back panel, this notched dial controls the camera's operating mode, offering the following options (clockwise): Playback, Automatic, Manual, and Stitch-Assist.

Display Button: The top button of a set of two located on the right side of the LCD monitor, Display controls the image display in any Record mode, turning it on or off.
In Playback mode, the Display button cycles through three image information display screens: 1) no information; 2) basic image information, including the file name, image number, resolution and compression setting, and date and time it was recorded, and 3) the full information display, including shooting mode, macro or infinity focus, drive, self-timer, flash, exposure compensation, and white balance (in addition to the information in #2).

Exposure Compensation (EV) / White Balance Button: Just below the Display button, the EV / WB button controls the Exposure Compensation and White Balance adjustment menus in Manual and Stitch-Assist shooting modes. The first press displays the Exposure Compensation bar, which is adjustable from -2 to +2 exposure equivalents (EV) in one-third-step increments. A second press pulls up the White Balance page, with options for Auto, Daylight, Cloudy, Tungsten, Fluorescent, and Black-and-White settings. A third press returns to normal display.
In Playback mode, pressing this button allows you to delete the currently selected image (using the Set button), with an option to cancel.

Power Button: Located diagonally from the lower left corner of the LCD, this button turns the camera on and off.

Menu Button: To the left of the Power button, pressing Menu pulls up the settings menu in each camera mode, and turns it off again when you've completed your menu selections.

Focus / Right Arrow Button: To the left of the Menu button, the right arrow button controls the Focus mode in any Record mode. Pressed once, it places the camera in Macro mode. In Manual mode, a second press places the camera in Infinity focus mode, while a third press returns to the Normal focus mode. This button is also marked with a right-pointing arrow, which allows the user to navigate through menu settings or captured images.
In Playback mode, when the Playback Zoom is enabled, this button scrolls to the right within an enlarged image. Also in Playback Zoom, pressing this button while holding down the Set button allows you to scroll down within the enlarged image.

Drive / Left Arrow Button: On the left side of the Focus button, this controls the camera's Drive mode when in Automatic or Manual modes. In Automatic mode, the default setting is Single Capture and pressing the button once activates the Self-Timer mode. In Manual mode, the settings go from Single Capture, to Continuous Shooting, to Self-Timer. Also marked with a left-pointing arrow, this button allows the user to scroll through menu options and captured images.
In Playback mode, with Playback Zoom enabled, this button scrolls to the left within an enlarged image. Also in Playback Zoom, pressing this button while holding down the Set button allows you to scroll up within the enlarged image.

Set / Flash Button: Directly below the lower left corner of the LCD monitor, this button controls the flash mode in Automatic, Manual, and Stitch-Assist modes. The button cycles through Auto, Red-Eye Reduction, On, Off, and Slow Synchro modes (except in Stitch-Assist mode, where it cycles through On, Off, and Slow Synchro only). When a settings menu is displayed, this button is used to access and confirm menu selections.
In Playback mode, when Playback Zoom is enabled, holding down the Set / Flash button, while simultaneously pressing the right or left arrow keys, allows you to move up and down within an enlarged image.
Camera Modes and Menus
![]() Stitch-Assist Mode: Marked on the Mode dial with the dual frame, panorama symbol, this mode allows you to capture as many as 26 sequential images to be "stitched" together into a panoramic image on a computer. All of the exposure features are available, with the exception of the Auto and Red-Eye Reduction flash modes, Digital Zoom, Continuous Shooting, and the Self-Timer.
Stitch-Assist Mode: Marked on the Mode dial with the dual frame, panorama symbol, this mode allows you to capture as many as 26 sequential images to be "stitched" together into a panoramic image on a computer. All of the exposure features are available, with the exception of the Auto and Red-Eye Reduction flash modes, Digital Zoom, Continuous Shooting, and the Self-Timer.
![]() Manual Mode: Labeled on the Mode dial with a red camera symbol and an "M" next to it, Manual mode increases the user's exposure control to include White Balance and Exposure Compensation settings, as well as the Continuous Shooting drive mode.
Manual Mode: Labeled on the Mode dial with a red camera symbol and an "M" next to it, Manual mode increases the user's exposure control to include White Balance and Exposure Compensation settings, as well as the Continuous Shooting drive mode.
![]() Automatic Mode: The first Shooting mode on the Mode dial, labeled with only a red camera symbol, Automatic places the camera in complete control over exposure settings. The user maintains control over the flash, focus, self-timer, image resolution and compression, and zoom.
Automatic Mode: The first Shooting mode on the Mode dial, labeled with only a red camera symbol, Automatic places the camera in complete control over exposure settings. The user maintains control over the flash, focus, self-timer, image resolution and compression, and zoom.
![]() Playback Mode: Indicated by the traditional playback symbol on the Mode dial, Playback mode allows you to scroll through captured images, delete them, protect them, set them up for printing on a DPOF device, rotate them, enlarge them to inspect details, or view images in an automatic slide show.
Playback Mode: Indicated by the traditional playback symbol on the Mode dial, Playback mode allows you to scroll through captured images, delete them, protect them, set them up for printing on a DPOF device, rotate them, enlarge them to inspect details, or view images in an automatic slide show.
Record Menu: The following menu options are available by pressing the Menu button in any Record mode:
 Resolution: Sets the image Resolution to Large (1,600 x 1,200 pixels), Medium (1,024 x 768 pixels), or Small (640 x 480 pixels).
Playback Menu: This settings menu is displayed by pressing the Menu button in Playback mode:
 Single Erase: Erases the currently displayed image, or the currently selected image in the index display.
 Image Storage and Interface
The A20 uses CompactFlash Type I memory cards for image storage; an 8MB card comes standard with the camera. Upgrades are available separately to memory capacities as high as 128MB. The CompactFlash slot is on the right side of the camera, and is covered by a sliding plastic door that we found difficult to open at times. The card inserts with the electrodes going in first, and the front of the card (indicated by an arrow) facing the back of the camera. A small button beside the slot ejects the card by popping it up slightly, allowing you to pull the card the rest of the way out.
Although individual CompactFlash cards cannot be write-protected or locked against erasure or manipulation, the A20 allows you to protect individual images through the Playback menu. Once protected, images cannot be erased or manipulated in any way, except through card formatting. The Playback menu also allows you to rotate images in the LCD display, play them back in an automated slide show, erase them, and set them up for printing on DPOF compliant printers.
Three image resolution settings are available: 1,600 x 1,200, 1,024 x 768, and 640 x 480 pixels. Three JPEG compression levels are also available, including Superfine, Fine, and Normal. Both settings are changed through any Record settings menu. The number of available images is reported on the LCD's information display, in addition to the selected Resolution and Compression settings.
The table below summarizes the compression ratios and number of images that can be stored on the included 8MB memory card with each Resolution / Quality (JPEG Compression) combination.
|
Resolution/Quality 8MB Memory Card |
|
|
|
|
| Large Resolution 1600x1200 | Images | 7 |
|
|
| Approx. Compression |
5:1 |
|
|
|
| Medium Resolution 1024x768 | Images |
|
|
|
| Approx. Compression |
|
|
|
|
|
|
Images |
|
|
|
| Approx. Compression |
|
|
|
|
A USB cable and interface software accompany the A20 for quick connection and
image downloading to a PC or Macintosh computer.
![]() One
of the first things any new digicam owner will need is a larger memory card
for their camera: The cards shipped with the units by the manufacturers should
really be considered only "starter" cards, you'll definitely want a higher capacity
card immediately. - Probably at least a 32 megabyte card for a 1.3 or 2 megapixel
camera, 64 megabytes or more for a 3, 4, or 5 megapixel one. (The nice thing
about memory cards is you'll be able to use whatever you buy now with your next
camera too, whenever you upgrade.) To help you shop for a good deal on memory
cards that fit the A20, we've put together a little memory locater, with links
to our price-comparison engine: Just click on the "Memory Wizard" button above
to go to the Canon memory finder, select your camera model , and click the shopping
cart icon next to the card size you're interested in. You'll see a list of matching
entries from the price-comparison database. Pick a vendor & order away! (Pretty
cool, huh?)
One
of the first things any new digicam owner will need is a larger memory card
for their camera: The cards shipped with the units by the manufacturers should
really be considered only "starter" cards, you'll definitely want a higher capacity
card immediately. - Probably at least a 32 megabyte card for a 1.3 or 2 megapixel
camera, 64 megabytes or more for a 3, 4, or 5 megapixel one. (The nice thing
about memory cards is you'll be able to use whatever you buy now with your next
camera too, whenever you upgrade.) To help you shop for a good deal on memory
cards that fit the A20, we've put together a little memory locater, with links
to our price-comparison engine: Just click on the "Memory Wizard" button above
to go to the Canon memory finder, select your camera model , and click the shopping
cart icon next to the card size you're interested in. You'll see a list of matching
entries from the price-comparison database. Pick a vendor & order away! (Pretty
cool, huh?)
 Video Out
The Video Out signal is adjustable to PAL or NTSC through the Setup menu. US
and Japanese models are packaged with an NTSC video cable and European models
come with the appropriate PAL cable, for connection to a television. Once connected,
the A20 uses the television as an enlarged LCD monitor, allowing you to compose
and playback images. The only exception is the Stitch-Assist mode, which does
not work with the video display.
 Power
Power
The PowerShot A20 is powered by four AA batteries, either alkaline or rechargeable
NiMH. Canon recommends using only the Canon CBK100 charger and rechargeable
NiMH batteries (available as an option), or standard alkaline batteries. According
to the literature, any other type of battery may overheat the camera or cause
explosions or leaks. (We used other NiMH brands with no noticeable problems.)
Four AA alkaline batteries accompany the camera, but we highly recommend picking
up a couple of sets of rechargeable NiMH batteries and keeping a spare set freshly
charged at all times. Canon estimates that a freshly charged set of Canon NB-1AH
AA NiMH batteries should record roughly 350 shots with the LCD monitor on, or
1,000 shots with the LCD off (or provide 240 minutes of playback time). Canon's
runtime numbers were well supported by the power consumption we measured. (See
below.) A red battery icon flashes in the LCD display whenever the batteries
are getting low.
Because the A20 offers an optical viewfinder as well as an LCD monitor, you
can operate the camera more efficiently without the LCD monitor in use. While
an information display automatically appears on the LCD screen whenever a control
button is pressed (even when the LCD monitor is turned off), the display quickly
disappears a few seconds after the adjustment is made. There's also an Auto
Power Down feature, enabled through the Setup menu, which turns off the camera
after a few minutes of inactivity. Canon offers an optional AC Adapter Kit for
connection to the camera's DC In jack and a standard electrical power supply.
This is highly recommended for time-consuming tasks such as downloading images
to a computer.
The A20 also uses a CR2016 lithium battery to power its internal clock. If the
LCD monitor displays the Set Date/Time menu when the camera is powered on, the
CR2016 battery is running low.
|
|
|
| Capture Mode, w/LCD |
|
| Capture Mode, no LCD |
|
| Half-pressed shutter w/LCD |
|
| Half-pressed w/o LCD |
|
| Memory Write (transient) |
|
| Flash Recharge (transient) |
|
| Image Playback |
|
The PowerShot A20 used a bit less power than average among 2 megapixel cameras we've tested. With a high-capacity set of AA NiMH rechargeable batteries, we'd estimate nearly three hours of runtime in capture mode with the LCD on, and easily four hours in playback mode. This is excellent battery life, but we (as always) still suggest always packing along a second set of batteries.
 About Batteries
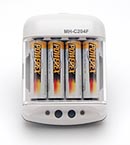
We've gotten so many emails about power issues for digicams, that we're now inserting this standard notice in the reviews of all AA-powered cameras on our site: Don't even *think* about using alkaline AA batteries in a digicam! Despite their being packed in the box with many cameras, they simply don't have the juice to handle typical digicam demands. (Even the "high power" ones the battery manufacturers say are designed for devices like digital cameras.) Spend the $35-40 or so it takes to get a set (or two) of high-capacity NiMH rechargeable batteries and a good charger! The few dollars up front will save you literally hundreds of dollars in the long run, not to mention the hassle of wimpy batteries running out in the middle of the action. We suggest you buy two sets of batteries, so one can always be in the charger, ready to go, and so have two sets available for longer excursions. Good brands of batteries include Maha (our favorite), GP, Kodak, and Nexcell. Also, buy the highest capacity AAs the manufacturer makes, the few extra dollars for the extra capacity is usually well worth it. Getting a good charger is critical though, almost more so than buying good batteries. We recommend the Maha C-204F (see the photo at right), the charger we use the most in our own studio. - Read our review of it for all the details. Or, just click here to buy one, you won't regret it.
Included Software
Packaged with the A20 is a software CD containing Canon's Digital Camera Solution Disk Version 4.0, which is compatible with Windows 95/98/98SE/2000/Me/NT 4.0 and Macintosh OS 8.1 or higher. The Solution Disk software provides an image browser tool that handles image downloading, manages files (displays, moves, copies, etc.), sets up images for printing, and allows you to set up images for e-mail. The included PhotoStitch software allows you to connect panoramic sequence images by automatically arranging them in the correct order. The software also assists with cropping and alignment. A Remote Capture utility allows you to operate the camera from the computer and control various exposure features remotely. Remote Capture also offers a time-lapse function, which takes a series of still images at specified intervals.
In the Box
Packaged with the PowerShot A20 are the following items:
<<PowerShot A20 Test Images | Additional Resources and Other Links>>
Reader Comments!
Questions, comments or controversy on this product? Click
this link to see what other Imaging Resource readers have had to say about
the Canon PowerShot A20, or add comments of your own!
