This page has been formatted for our content partners.
To facilitate porting this material to other sites, links to other parts of the IR web site have been removed from the central portion of this review...
The Imaging Resource
Quick Review
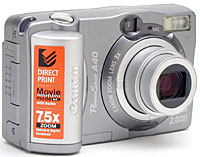
Canon PowerShot A40 Digital Camera
 |
Camera QuickLook |
|
User Level
|
Novice to Experienced
|
|
Product Uses
|
Family / Travel / Special Events
|
|
Digicam Design
|
Point-and-Shoot or Manual control
|
|
Picture Quality
|
Good, 2.0-megapixel CCD |
|
Print Sizes
|
4x6, 5x7, 8x10 inches |
|
Availability
|
April, 2002 |
|
Suggested Retail Price
|
$TBA
|
Introduction
Ask a photographer, be they professional or amateur, to name the first couple of camera manufacturers that they can think of, and chances are that one of those would be Canon. In the digital arena, Canon's continued their history of innovation, with a broad line of products ranging from entry-level models all the way to no-holds-barred digital SLRs for professional photographers. In the consumer arena, their products are distinguished by superb design, sharp lenses, and excellent color.
Canon doesn't play in the very low end of the consumer market, having decided instead to focus on providing very capable, feature-rich products even in their entry level models. The A40 is one such, a nice little two megapixel camera that's easy to use, has a nice set of features, and takes great pictures. You'll find cheaper models on the market, but it's hard to find any at the same price point that take better photos. Read on for all the details...
Camera Overview
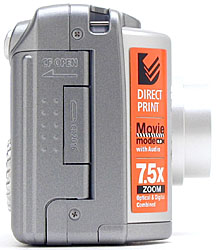
The A40 (and its slightly lower-end cousin the A30) are a continuation of the A20 and A10 introduced in 2001. Nearly identical in appearance to the earlier designs, PowerShot A40 offers the same great compact body with a few minor design changes and feature enhancements. The all-plastic body is stylishly accented with silver and silver-gray accents, giving the A40 a more serious look than the playful A30 model. While the A40 probably won't fit into a standard shirt pocket, it's small enough for larger coat pockets and purses, and the wrist strap adds a feeling of security. Like many Canon digicams, the A40 features a shutter-like lens cover and a retracting lens that keeps the camera front fairly smooth when the camera is powered off. With no lens cap to keep track of (or worry about losing), the A40 is quick on the draw - You just have to wait a couple of seconds for the lens to extend forward before you can shoot. The A40's 2.0-megapixel CCD produces good quality images, suitable for printing as large as 8x10-inches. You can also print snapshot-size images of 4x6- and 5x7-inches, or use its lowest resolution for photos to use as email attachments.
Equipped with a 5.4-16.2mm lens, the A40 offers a 3x optical zoom range equivalent to 35-105mm on a 35mm camera. (This is a pretty standard range for digicams, running from a moderate wide angle to a moderate telephoto.) Maximum aperture ranges from f/2.8 at full wide angle to f/4.8 at full telephoto, and can be manually adjusted or left under automatic control. The A40 uses Canon's AiAF (Artificial Intelligence Auto Focus) system, which judges focus based on a three-point area in the center of the frame. Whatever portion of the subject is closest to the camera and aligned with one of the AF points determines the overall focus. If you like though, you can also choose to base focus on the center of the frame only. Three fixed-focus modes set focus for specific distance ranges, including Macro (as close as 16 centimeters), Snapshot (from 4.9 to 8.2 feet or 1.5 to 2.5 meters), and Infinity modes. An AF Assist light on the front panel helps the camera focus in dark conditions, but can be deactivated if you want. (For instance, if you don't want to "blow your cover" when snapping candid shots.) In addition to the optical zoom lens, the A40 also offers as much as 2.5x of digital zoom. However, I always remind readers that digital zoom decreases the overall image quality because it simply enlarges the center pixels of the CCD image.
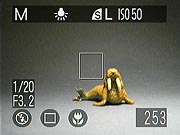 The A40 has both a real-image optical viewfinder and 1.5-inch LCD monitor for composing images. (In my testing, the optical viewfinder was rather "tight" - You'll need to resort to the LCD monitor for precise framing.) The LCD monitor's information display includes detailed exposure information, including shutter speed and aperture settings in Manual shooting mode.
The A40 offers a variety of exposure options, including a full manual exposure mode for total control. A Mode dial on the camera's back panel accesses Auto, Program AE, Manual, Stitch-Assist, and Movie capture modes, as well as Playback mode. The Auto exposure mode is perfect for snapshots, family events, and vacation photos, as the camera makes all exposure decisions except for flash mode. Under Program AE mode, the camera maintains control over shutter speed and aperture, but lets you decide about color balance, exposure compensation, metering, etc.
It's quite unusual to find a manual exposure option on an entry-level camera like the A40, but I highly approve of its inclusion: There are times when an auto exposure system just can't cut it (in very low light, for instance), or when you want to try for a particular exposure effect. In such situations, there's no substitute for manual exposure control. Beginners may be intimidated by it, but (a) it's an option, so you can entirely ignore it if you want, and (b) since you're not paying film costs every time you snap the shutter, there's no penalty for blown exposures: Experiment to your heart's content!
In Manual capture mode, you can set the shutter speed and aperture settings independently of each other. (Although there's only two options for the aperture, f/2.8 and f/8.0.) The LCD monitor reflects approximately what the exposure will look like, giving you a pretty good idea of the result of your settings. Stitch-Assist is the A40's panorama shooting mode, which can capture as many as 26 images to be "stitched" together on the computer with Canon's provided software as a single panoramic image. Panoramas can be vertically or horizontally oriented, or can be pieced together as a larger square. In Movie mode, the A40 captures moving images with sound, at 320 x 240 or 160 x 120 pixels, for a maximum of 30 seconds (depending on the resolution set and available memory card space).
Canon makes good use of the A40's external camera controls, giving individual buttons multiple functions. Some settings still require delving into the menu system, but the majority of camera operations rely on the external controls. Exposure Compensation, White Balance, aperture and shutter speed (Manual mode only), Effects, flash mode, drive mode, and fixed-focus mode options are all accessed externally, while the Record menu offers image size, quality, ISO, Metering, AF mode, and more. The White Balance setting adjusts color balance, with settings for Auto, Daylight, Cloudy, Incandescent, Fluorescent, and Fluorescent H (for daylight fluorescent lighting). Exposure Compensation lightens or darkens the overall exposure, from -2 to +2 exposure equivalents (EV) in one-third-step increments. An ISO adjustment offers 50, 100, 200, and 400 ISO equivalents, as well as an Auto setting. By default, the A40 uses an Evaluative metering mode, which links the metering area to the area the camera has chosen for focusing (when AiAF is activated). Also available is a Spot Metering option, which bases the exposure on the center of the subject, essential for dealing with backlit subjects. The A40's flash operates in either Auto, Red-Eye Reduction Auto, Forced, Suppressed, Red-Eye Reduction Forced, or Slow Synchro modes.
A creative and fun Effects menu lets you play around with image color, offering Vivid and Neutral color settings, as well as Sepia and Black and White options. A Low Sharpening option turns off the in-camera image sharpening, good if you plan extensive image modifications and cloning on the computer. Continuous Shooting mode works like a motor drive on a 35mm camera, capturing a rapid burst of images for as long as the Shutter button is held down (or until the memory card runs out of space). Actual frame rates will vary depending on the image size and quality selected, but range from about 1.2 to 1.5 frames per second. The A40 also features a 10-second self-timer, which delays the shutter for about 10 seconds after the Shutter button is pressed, letting you zip around and jump into the shot. (You can also set the delay interval to two seconds. This lets you trip the shutter without your hand on the camera, handy for low-light shots, with the camera on a tripod, propped on a table, etc.)
The A40 stores images on CompactFlash memory cards, and comes with an 8MB card. I highly recommend purchasing a larger-capacity CompactFlash card right away, as large cards are available separately for very affordable prices these days. (Buy at least a 32 MB card, or better yet a 64MB one.) The camera utilizes four AA-sized batteries for power, either alkaline or NiMH type. The camera was accompanied by four alkaline batteries, but I advise picking up a set or two of rechargeable batteries and a charger, and keeping a spare set freshly charged at all times. The optional AC adapter is useful for preserving battery power when reviewing and downloading images, and plugs straight into a DC In jack on the side of the camera. The A40 features a USB jack for downloading images to a computer, and comes with two software CDs, one loaded with Canon Digital Camera Solution Disk version 8.0 and the other loaded with ArcSoft PhotoImpression and VideoImpression (compatible with Macintosh and Windows systems). Additionally, a Video Out jack and the included video cable lets you connect the camera to a television set. The A40 is DPOF (Digital Print Order Format) compatible, with a range of print settings available through the Playback menu.
 About Batteries
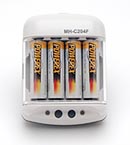
Time for my standard battery tirade: I've gotten so many emails about power issues for digicams, that I now insert this standard notice in all my reviews of AA-powered cameras: Don't even *think* about using alkaline AA batteries in a digicam! Despite their being packed in the box with many cameras, they simply don't have the juice to handle typical digicam demands. (Even the "high power" ones the battery manufacturers say are designed for devices like digital cameras.) Spend the $35-40 or so it takes to get a set (or two) of high-capacity NiMH rechargeable batteries and a good charger! The few dollars up front will save you literally hundreds of dollars in the long run, not to mention the hassle of wimpy batteries running out in the middle of the action. I suggest you buy two sets of batteries, so one can always be in the charger, ready to go, and so have two sets available for longer excursions. Good brands of batteries include Maha (my favorite), GP, Kodak, and Nexcell. Also, buy the highest capacity AAs the manufacturer makes, the few extra dollars for the extra capacity is usually well worth it. (Check my battery review for the latest scoop on which batteries last the longest.) Getting a good charger is critical though, almost more so than buying good batteries. I recommend the Maha C-204F (see the photo at right), the charger we use the most in our own studio. - Read my review of it for all the details. Or, just click here to buy one, you won't regret it.
Basic Features
- 2.0-megapixel (effective) CCD.
- 1.5-inch color LCD monitor.
- Real-image optical viewfinder.
- Glass, 3x 5.4-16.2mm lens (equivalent to 35-105mm zoom on a 35mm camera).
- 2.5x digital zoom.
- AiAF autofocus and three fixed-focus modes.
- AF Assist light for low-light focusing.
- Automatic and manual exposure control.
- Maximum aperture of f/2.8 to f/4.8, depending on lens zoom position.
- Shutter speed range from 1/1,500 to 15 seconds.
- Built-in flash with six operating modes.
- CompactFlash memory storage.
- Power supplied by four AA batteries or optional AC adapter.
Special Features
- Movie mode (with sound).
- Stitch-Assist mode for panoramic shots.
- Continuous Shooting and 10-second Self-Timer modes.
- Creative Effects menu.
- White balance (color) adjustment with six modes.
- ISO adjustment with four ISO equivalents and an Auto setting.
- Low Sharpness option.
- Evaluative and Spot metering options.
- DPOF (Digital Print Order Format) compatibility.
- USB cable for connection to a computer (driver software included).
Recommendation
With a range of auto and manual exposure controls, the A40 is perfect for novice users and experienced amateurs alike. The full automatic controls let novices keep it simple, while offering the opportunity to learn more. A 2.0-megapixel CCD captures good quality images, quite suitable for printing as large as 8x10-inches. The A40's compact design makes it a good candidate for travel, as the camera should fit well into a larger coat pocket or purse. And, the unique lens design protects it when closed, while keeping the camera body smooth and low-profile. In addition to the range of exposure controls, a menu of creative effects makes the A40 fun too. The A40 is a great option for consumers new to digital photography who don't want to limit their exposure options or compromise image quality. For more experienced users, the option for manual exposure control allows more creative control than you'd normally find with an inexpensive camera.
Design
The A40's compact body has a solid feel, despite its all-plastic shell. Measuring 4.3 x 2.8 x 1.5 inches (110.3 x 71.0 x 37.6 millimeters), the A40 probably won't fit into your shirt pocket, but should find its way into larger coat pockets, purses, and hip packs, making it a likely travel companion. The A40 is solid, at 8.8-ounces (250-gram) without batteries or CompactFlash card, but isn't uncomfortable to carry. The range of silver tones on the A40's body lend a look of sophistication, while the curved edges soften its features.

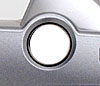
With the exception of the slightly bulky handgrip, the A40's front panel has very few protrusions with the lens retracted. Once the camera is powered on, the lens extends forward about an inch from the camera body. A shutter-like lens cover automatically retracts when the lens extends forward, eliminating the need for a separate lens cap. The thin ring around the lens barrel (identifiable by two raised squares on its circumference intended to serve as grips) can be removed to make room for Canon's accessory lens adapter kits. A small button beneath the lens releases the ring, and a slight counterclockwise turn unlocks the ring so that it can be removed, exposing the mounting flange for the accessory lenses. The handgrip dominates the left side of the A40's front panel (as viewed from the front), and helps you get a firm hold on the camera. Also on the camera's front panel is the optical viewfinder window, microphone, and flash. A notch cut out of the top part of the lens barrel makes room for the viewfinder window and microphone, and prevents the lens barrel from blocking the flash. The AF Assist light is hidden inside the flash unit, and illuminates the subject in dark shooting conditions.
On the right side of the camera (as viewed from the back) is the memory card compartment, just beside the coin cell battery compartment. A sliding plastic door covers the memory card compartment, and features a series of raised bumps for good finger traction. Inside the compartment, a button releases the CompactFlash card from the slot. The CR2016 battery holder pulls out from the camera body, cradling the small CR2016 lithium battery that powers the camera's internal memory (keeping the clock and calendar settings, as well as current exposure settings, if the main AA batteries fail). Also on this side of the camera is an eyelet for attaching the wrist strap.

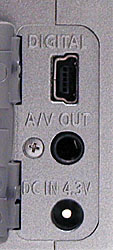
On the opposite side of the camera is the connector compartment, covered by a flexible, rubbery plastic flap that snaps in and out of place. The flap remains connected to the camera body, but can be folded out of the way to accommodate cables. Inside the compartment are the Digital (USB), A/V Out, and DC In jacks.
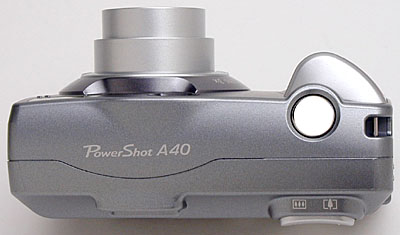
The A40’s slightly curved top panel features simply the shiny Shutter button, which angles downward toward the front of the camera.
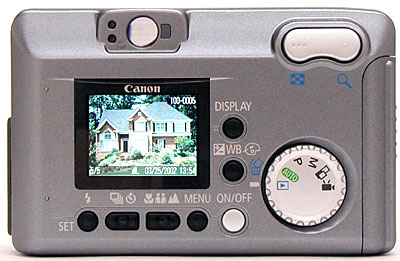
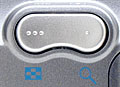
All of the remaining camera controls share the A40's back panel with the LCD monitor and optical viewfinder eyepiece. A two-way rocker button controls both optical and digital zoom, in the top right corner. Directly below that is the Mode dial, which sets the camera's operating mode. A series of controls line the bottom and right sides of the LCD monitor, controlling a variety of exposure functions. In the lower right corner of the LCD monitor is the Power button, which turns the camera on and off. Two buttons below the LCD monitor also have arrows on them, and navigate through settings options, in addition to other functions. The optical viewfinder eyepiece does not feature any diopter adjustment, though it does have a fairly high eyepoint and should accommodate most eyeglass lenses. Two LED lamps on the left side of the eyepiece report camera status, such as when focus is set, the flash is charging, etc. The lower lamp is adjacent to a macro symbol, and lights solid yellow to indicate if Macro, Snapshot, or Infinity focus modes are enabled.
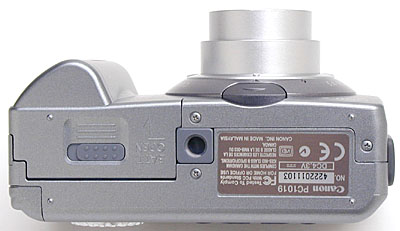
The bottom panel of the A40 reveals the plastic, threaded tripod mount, centered on the camera body, and the battery compartment. A sliding latch releases the compartment door, which is unfortunately too close to the tripod mount to allow quick battery changes when shooting on a tripod. (Something I pay attention to because I do so much studio shooting when testing cameras, but that admittedly will be of little concern for most users of this camera.)
Camera Operation
While the A40’s user interface seems slightly cryptic at first, it's actually pretty efficient. Most camera functions are controlled externally, and most of the external control buttons serve multiple functions. When you do need to enter the LCD menu system, navigation is very straightforward with only two pages of options to navigate through. That said, the majority of external controls require the LCD display to be turned on, so they don't cut down on LCD usage any. Still the arrangement of the A40's external controls does minimize the amount of time spent searching menu screens. Combined with the instruction manual, the A40's user interface shouldn't take more than an hour for the average user to get comfortable with.
External Controls
Shutter Button: Practically flush with the camera's top panel as it slopes downward in the front, this button sets focus and exposure when halfway pressed, and fires the shutter when fully pressed.
Zoom Rocker Button: Located in the top right corner of the back panel, this two-way rocker button controls the optical and digital zoom while in Record mode.
In Playback mode, the "W" side displays a nine-image index display of all images on the memory card. Alternatively, pressing the "T" side enlarges the currently displayed image, so that you can check on fine details.
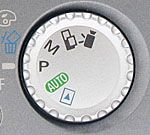
Mode Dial: Directly below the Zoom rocker button, this large, notched dial places the camera in Playback, Auto, Program AE, Manual, Stitch-Assist, or Movie operating modes.

Display Button: The top button in a series lining the right side of the LCD monitor, this button controls the information and image display modes in Record and Playback modes.

Exposure / White Balance / Effects / Erase Button: Beneath the Display button, this button serves multiple functions. In any record mode, the button accesses the Exposure, White Balance, and Effects menus. Exposure refers to the Exposure Compensation adjustment in all exposure modes except Manual, in which case it accesses the aperture and shutter speed settings. The White Balance setting pulls up an adjustment screen, offering Auto, Daylight, Cloudy, Incandescent, Fluorescent, and Fluorescent H settings. Finally, the Effects setting displays a range of creative options, including Vivid Color, Neutral Color, Low Sharpening, Sepia, and Black-and-White modes.
In Playback mode, this button pulls up the single-image Erase option, for deleting the current image on the screen.

Power Button: Diagonally down from the lower right corner of the LCD monitor, this button turns the camera on and off.

Menu Button: To the left of the Power button, this button calls up the settings menu in Record and Playback modes. It also dismisses the menu screen and backs out of menu selections.

Macro / Snapshot / Infinity / Right Arrow Button: Next to the Menu button, on the left side, this button controls the camera's focus mode in Record mode, cycling between the Macro, Snapshot, and Infinity focus options. The button also serves as the right arrow key, making adjustments in settings menus and navigating through menu options.
In Playback mode, this button (the left arrow beside it), scrolls through captured images.

Drive Mode / Left Arrow Button: Adjacent to the right arrow button, on the left, this button controls the camera's drive mode in Auto, Manual, and Program AE capture modes. The first press activates the Continuous Shooting mode, while the second press activates the Self-Timer mode. In any settings menu, this button serves as the left arrow key, navigating through options.
In Playback mode, this button (and the right arrow key) scrolls through captured images.

Flash / Set Button: Directly below the lower left corner of the LCD monitor, this button cycles through the available flash modes (Auto, Red-Eye Reduction Auto, Forced, Suppressed, Red-Eye Reduction Forced, and Slow Synchro). In any settings menu, this button confirms menu selections.
Battery Compartment Switch: Nestled in the center of the battery compartment door, this sliding switch unlocks the door, so that it can slide forward and open.
Lens Ring Release Button: Tucked under the lens on the camera's front panel, this button releases the lens ring. Once unlocked, the lens ring can then be turned and removed to accommodate accessory lens kits.
Camera Modes and Menus
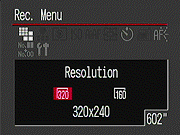 Movie Mode: As the first position on the Mode dial, this mode sets up the camera for capturing moving images with sound. You can set White Balance, Exposure Compensation, focus mode, and the self-timer. Pressing the Menu button displays the Record menu, with only a few options available:
- Resolution: Sets the resolution to 320 x 240 or 160 x 120 pixels.
- Self-Timer: Specifies the Self-Timer's countdown period, either two or 10 seconds.
- AF Assist Beam: Turns the AF Assist light on or off. If on, the light automatically illuminates in dark shooting conditions.
- File Number Reset: Designates whether the camera continuously numbers images across CompactFlash cards, or resets numbering with each new card.
- Set Up: Activates the Setup menu, described further on.
Stitch-Assist Mode: This mode captures a series of as many as 26 images to be "stitched" together as one panoramic shot. The LCD menu automatically displays framing guidelines when entering the mode. The settings menu in this mode offers the following options (Sorry, no screen shot here, refer to the shots for Program Mode below to see what the icons look like.):
- Resolution: Sets the resolution to 1,600 x 1,200, 1,024 x 768, or 640 x 480 pixels.
- Compression: Sets the JPEG compression level to Superfine, Fine, or Normal.
- Self-Timer: Specifies the Self-Timer's countdown period, either two or 10 seconds.
- Review: Turns the instant image review function on or off, with available image display times of two or 10 seconds.
- AF Assist Beam: Turns the AF Assist light on or off. If on, the light automatically illuminates in dark shooting conditions.
- File Number Reset: Designates whether the camera continuously numbers images across CompactFlash cards, or resets numbering with each new card.
- Set Up: Activates the Setup menu, described further on.
Manual Mode: This mode captures still images, with the user in charge of all exposure variables, including aperture and shutter speed. The settings menu offers the following options (Sorry, no screen shot here, refer to the shots for Program Mode below to see what the icons look like.):
- Resolution: Sets the resolution to 1,600 x 1,200, 1,024 x 768, or 640 x 480 pixels.
- Compression: Sets the JPEG compression level to Superfine, Fine, or Normal.
- ISO Speed: Determines the camera's sensitivity to light. Choices are Auto, or 50, 100, 200, and 400 ISO equivalents.
- AiAF: Turns the AiAF system on or off. If on, the camera judges focus based on the subject's proximity to three focus areas in the center of the image. If off, the camera bases focus on the very center of the frame.
- Digital Zoom: Turns the 2.5x digital zoom on or off.
- Self-Timer: Specifies the Self-Timer's countdown period, either two or 10 seconds.
- Review: Turns the instant image review function on or off, with available image display times of two or 10 seconds.
- AF Assist Beam: Turns the AF Assist light on or off. If on, the light automatically illuminates in dark shooting conditions.
- File Number Reset: Designates whether the camera continuously numbers images across CompactFlash cards, or resets numbering with each new card.
- Set Up: Activates the Setup menu, described further on.
 Program Mode: This mode also captures still images, although in this mode the camera controls aperture and shutter speed. The user maintains control over all other variables. The Record menu offers the following choices:
- Resolution: Sets the resolution to 1,600 x 1,200, 1,024 x 768, or 640 x 480 pixels.
- Compression: Sets the JPEG compression level to Superfine, Fine, or Normal.
- Metering: Changes the camera's metering system to Evaluative (default) or Spot.
- ISO Speed: Determines the camera's sensitivity to light. Choices are Auto, or 50, 100, 200, and 400 ISO equivalents.
- AiAF: Turns the AiAF system on or off. If on, the camera judges focus based on the subject's proximity to three focus areas in the center of the image. If off, the camera bases focus on the very center of the frame.
- Digital Zoom: Turns the 2.5x digital zoom on or off.
- Self-Timer: Specifies the Self-Timer's countdown period, either two or 10 seconds.
- Review: Turns the instant image review function on or off, with available image display times of two or 10 seconds.
- AF Assist Beam: Turns the AF Assist light on or off. If on, the light automatically illuminates in dark shooting conditions.
- File Number Reset: Designates whether the camera continuously numbers images across CompactFlash cards, or resets numbering with each new card.
- Set Up: Activates the Setup menu, described further on.
Auto Mode: In this mode, the user resigns all exposure control to the camera. However, the user can still select flash mode, drive mode, and access the Macro shooting mode (Snapshot and Infinity focus modes are unavailable, and flash modes are limited to Auto, Suppressed, and Red-Eye Reduction Auto). The following settings are available through the Record menu (Sorry, no screen shot here, refer to the shots for Program Mode above to see what the icons look like.):
- Resolution: Sets the resolution to 1,600 x 1,200, 1,024 x 768, or 640 x 480 pixels.
- Compression: Sets the JPEG compression level to Superfine, Fine, or Normal.
- Digital Zoom: Turns the 2.5x digital zoom on or off.
- Self-Timer: Specifies the Self-Timer's countdown period, either two or 10 seconds.
- Review: Turns the instant image review function on or off, with available image display times of two or 10 seconds.
- AF Assist Beam: Turns the AF Assist light on or off. If on, the light automatically illuminates in dark shooting conditions.
- File Number Reset: Designates whether the camera continuously numbers images regardless of CompactFlash cards, or resets numbering with each new card.
- Set Up: Activates the Setup menu, described further on.
 Setup Menu: (All exposure modes.)
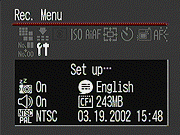
- Beep: Turns the camera's beep sounds on and off.
- Auto Power Down: Controls the camera's automatic shutoff function, which turns off the camera after a period of inactivity.
- Date/Time: Sets the camera's internal calendar and clock.
- Format: Formats the CompactFlash card, erasing all files (even those marked for write-protection).
- Language: Sets the camera's menu language to one of 11 choices. English is the default setting.
- Video System: Designates the camera's video-out signal as NTSC or PAL.
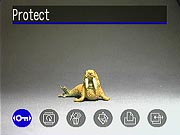 Playback Mode: This mode lets you review captured images and movies on the memory card, as well as erase them, protect them, or set them up for printing. Pressing the Menu button displays the following options:
- Protect: Marks the current image for write-protection, or removes write-protection. Protected images cannot be deleted or manipulated, except through card formatting, which erases all files.
- Rotate: Rotates the current image 90 degrees clockwise.
- Erase All: Erases all files on the memory card, except protected ones.
- Auto Play: Automatically plays all captured images in a slide show.
- Print Order: Determines how many copies of the current image will be printed, with options for creating an index print, imprinting the date and time, and imprinting the file number.
- Protect: Activates the index display, so that individual images can be marked for protection.
- Transfer Order: Marks images with their Print Order settings, so that image files can be printed on a DPOF device.
Sample Pictures
See our sample pictures and detailed analysis here. The thumbnails below show a subset of our test images. Click on a thumbnail to see the full-size photo.
Specifications
See the specifications sheet here.
Picky Details
Information on shooting speed, battery life, etc. can be found here.
Test Results
- Color: Overall, the A40 produced great, accurate color when shooting outdoors and under the studio lighting, without any strong color casts from either of the white balance settings. Both the Auto and Daylight settings produced good results in most shots. The Incandescent white balance setting did an excellent job under standard incandescent household lighting, but you'll need to remember to switch to the incandescent setting when shooting indoors, as the auto white balance doesn't handle that type of light well at all. Indoor flash exposures showed a noticeable orange cast from the incandescent background lighting. All in all though, the A40 produced unusually appealing color.
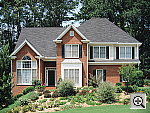
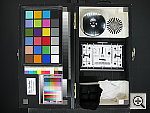
- Exposure: The A40 did a great job with exposure, capturing great midtones in the studio and in my outdoor test shots. The harsh sunlight in the outdoor house shot tricked the camera into losing highlight details, though shadow detail was very good. The A40 also picked up the subtle tonal variations of the Davebox well, a difficult area for many digicams. Bottom line, the A40's exposure system worked very well, but did show a tendency to lose highlight detail in very contrasty lighting conditions.
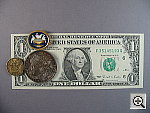
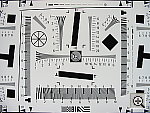
- Sharpness: Image sharpness was good for a two-megapixel camera, with crisp details throughout the frame. Optical distortion was a bit better than average at the wide-angle lens setting, and chromatic aberration in the corners of the image was low. - It looks like the A40 has a pretty good lens on it.
- Closeups: The A40 came in a bit below average in the macro category, capturing a rather large minimum area of 6.56 x 4.92 inches (166.69 x 125.02 millimeters). Color, detail, and resolution were all great, however. The flash managed to light the macro area, but lost intensity in the corners of the frame.
- Night Shots: The A40 did unusually well for an entry-level camera in my low light shooting tests. It captured usable images as low as 1/16 foot-candle (0.067 lux) with good color and focus, at all four ISO settings. (This is about 1/16 of the light level you'd find on a city street at night, under typical streetlights.) Some of the lower light level shots had slightly soft focus, but results were good overall. The camera's noise reduction system did a reasonably good job of eliminating image noise, but noise levels were moderately high at the ISO 400 setting at the lower light levels.
- Battery Life: Battery life on the A40 is very good. In its worst-case power consumption mode (capture mode with the LCD screen turned on), it should run about 3 1/2 hours on a freshly-charged set of high-capacity NiMH AA batteries. With the LCD screen off, it can run for over 20 hours straight. Playback mode run time should be about 5-6 hours. This is really excellent, but my recommendation to purchase a couple of sets of rechargeable batteries still holds.
In the Box
The PowerShot A40 arrives with the following items:
- Wrist strap.
- Four AA-type alkaline batteries.
- USB cable.
- NTSC video cable (US and Japanese models).
- 8MB CompactFlash card.
- Two software CDs.
- Instruction manual, software guide, and registration kit.
Recommended Accessories
- Larger capacity CompactFlash card.
- Rechargeable batteries and charger.
- AC adapter kit.
- Soft case.
- Lens accessory kits.
Conclusion
The A40 is another in Canon's line of nicely-designed, stylish, functional cameras that take great pictures. The A40 has a nice sharp lens, and excellent color rendition, with a host of features that extend to include (optional) full manual exposure control. Novice photographers can start out in fully automatic mode and gradually increase the level of control they assume over their photos, while more experienced users will enjoy the freedom of the A40's manual options. The Movie capture mode makes the A40 great for recording short clips of special events, while the Stitch-Assist mode lets you capture expansive panoramic shots. Creative color adjustments add to the camera's versatility as well. The 2.0-megapixel CCD produces good image quality, with enough detail to print images as large as 8x10 inches. If you're looking for a good entry-level camera with a range of options and excellent picture quality, you need look no further than the A40. Highly recommended.
This document copyright © 2001, The Imaging Resource, all rights reserved. Visitors to this site may download this document for local, private, non-commercial use. Individuals who have themselves downloaded this page may print a copy on their personal printers for convenience of reading and reference. Other than this explicit usage, it may not be published, reproduced, or distributed in print or electronic and/or digital media without the express written consent of The Imaging Resource.