Canon PowerShot A560 Operation
The Canon A560's user interface is quite efficient once you learn it, and learning it doesn't take long. Those already familiar with Canon cameras will feel right at home. Most camera functions are controlled externally, and a few of the external control buttons serve multiple functions depending on the mode you're in. When you do need to enter the LCD menu system, navigation is straightforward with only two main pages of options. The majority of external controls do require the LCD display to be active, but as I mentioned, I generally use the LCD for framing my shots, so I had it turned on most of the time anyway. The A560's external controls cut down on the amount of time spent searching menu screens, and I particularly like the Function menu which gives quick access to commonly used controls. Combined with the instruction manual (regrettably split into two separate parts), the Canon A560's user interface shouldn't take more than an hour to get comfortable with.
 Record Mode LCD Display: In Record mode, the Canon A560's LCD reports various exposure settings, including camera modes, the resolution and quality settings, number of available images, ISO, drive mode, and metering mode. Half-pressing the Shutter button reports the aperture and shutter speed settings, in all modes except Movie. Pressing the Display button cycles through the available display modes, including image only, image with information, and no display at all (LCD off).
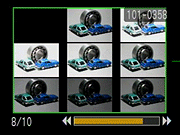 Playback Mode LCD Display: In Playback mode, the Canon A560's LCD reports the image series number, resolution and quality setting, file number, and the date and time of image capture. Pressing the Display button once calls up an enhanced information display with a histogram for checking the exposure. A second press cancels the information overlay entirely. The telephoto side of the zoom toggle lets you zoom in on a portion of the image, while the wide-angle side backs you out again, and lets you step out to an index view of captured images, displayed as nine thumbnails at a time. Zooming out one step past the point at which the Canon A560's index display appears adds a "jump" bar to the bottom of the screen, letting you jump forward or back nine images at a time, rather than scrolling from each image to the next individually.
Canon PowerShot A560 Modes and Menus
Record Mode: Marked on the rear panel Mode button with the red camera icon, this mode sets up the Canon A560 for capturing still and moving images. The following exposure modes are available through the Mode Dial on the top of the camera:
- Manual (M): Provides only a little more control over options and settings. Unlike some of the higher-end A-series cameras, the A560 does not have a true manual exposure mode.
- Auto: The camera controls everything about the exposure, except for Flash and Macro modes, and image size and quality settings.
- Portrait: Uses a large aperture setting to blur the background and keep the primary subject in sharp focus.
- Landscape: Employs a small aperture setting to keep both the background and foreground in focus.
- Night Snapshot: Combines boosted ISO (higher light sensitivity) and use of the flash to expose both foreground subjects and background night scenes, while minimizing blurring due to camera movement.
- Kids&Pets: Offers a faster shutter speed for capturing fast moving little ones.
- Indoor: Prevents camera shake blur and adjusts white balance to preserve the subject's true color when working under tungsten or fluorescent lighting.
- Scene: Accesses the remaining preset Scene modes, including Night Scene, Foliage, Snow, Beach, Fireworks and Aquarium.
- Movie: Records 640 x 480 at 30 or 15 frames per second, 320 x 240 pixels at 60, 30 or 15 fps, and 160 x 120 at 15fps. Maximum movie clip is 1GB file size or one hour, whichever comes first. Fast Frame 320 x 240 60 fps movies limited to one minute. 160 x 120 movies limited to three minutes.
Record Menu: Pressing the Canon A560's Menu button in Record mode pulls up the following options (not all options are available in all modes):
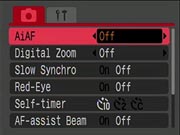 AiAF: Turns the AiAF autofocus system on or off. If on, the camera judges focus based on the subject's proximity to nine focus areas arrayed in the center of the image. If off, the camera bases focus on whatever is in the very center of the frame. The third option is Face Detect, which tells the camera to search for faces in the photo, and focus on the most prominent one. If no faces are found, the normal 9-area AiAF is used.
- Digital Zoom: Sets standard digital zoom (which kicks in once you reach the maximum optical zoom setting), no zoom, or a zoom that's fixed at 1.5x or 1.9x, even when you're at wide angle. (This gives you a wider aperture for any given level of magnification, letting you use faster shutter speeds, but at some loss of overall sharpness in the images.)
- Slow Synchro: The flash timing is adjusted to use slower shutter speeds. This helps prevent jet-black backgrounds on flash exposures.
- Red-Eye Reduction: Turns the Red-Eye Reduction pre-flash on or off, affecting all flash modes.
- Self-timer: Sets the self-timer to a 10- or 2-second delay, or sets Custom mode, where you can set up to a 30 second delay, and between 1 and 10 shots per cycle.
- AF Assist Beam: Turns the AF Assist light on or off. If on, the light automatically illuminates in dark shooting conditions, to help the camera focus properly.
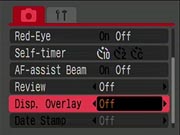 Review: Turns the instant image review function on or off, with available image display times from two to 10 seconds in one second steps, or Hold to keep the image displayed until you press the shutter button or turn the camera off.
- Display Overlay: Toggles between a display of grid lines, a 3:2 aspect ratio mask (for framing 4x6 images), none, or both.
- Date Stamp: Only available in Postcard mode (selected via the Function menu), allows recording of Date or Date and Time directly in your photos, as a set of yellow digits in the lower right-hand corner of the images.
Playback Mode: This mode lets you review captured images and movies on the memory card, as well as erase them, protect them, or tag them for printing and transfer. The traditional green Playback symbol denotes this mode on the rear-panel Mode button. Pressing the Canon A560's Menu button displays the following options:
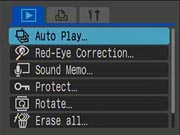 Auto Play: Automatically plays all captured images in a slide show. (Pressing the Menu or Shutter button stops the slide show.)
- Red Eye Correction: Allows you to remove red eyes from subjects on images already stored in the camera. This takes you to a screen where you set frames in the image around any eyes that need fixing, then tell the camera to start. A few seconds later, the red eyes will be gone.
- Sound Memo: Records a short sound clip to accompany a captured image.
- Protect: Marks the current image for write-protection, or removes write-protection. Protected images cannot be deleted or manipulated, except through card formatting, which erases all files, protected or not.
- Rotate: Rotates the current image 90 or 270 degrees clockwise.
- Erase All: Erases all files on the memory card, except protected ones.
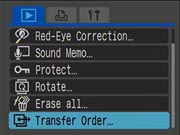 Transfer Order: Marks images to be transferred to a computer later, using Canon's software.
Print Menu: This menu is available in the Canon A560's Playback mode, simply by pressing the Menu button and selecting the Print tab. The bottom line of the display shows how many images are selected for printing and the print method that is active.
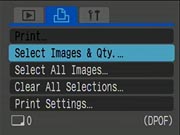 Print: Sends images tagged for printing to the printer. (Option is only enabled if the camera is connected to a PictBridge-compatible printer.)
- Select Images & Quantity: Allows you select individual images for printing and set the number of prints for each image selected.
- Select All Images: Selects all images on the memory card for printing.
- Clear All Selections: Clears all print selections.
- Print Settings: Brings up a menu of these options:
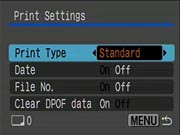 Print Type: You can specify whether to print one image per page, a thumbnail index of the images, or both.
- Date: Set printing of the date and time on or off. (Note that this is separate from the Date Stamp function in the Record Menu. The dates here only appear on the printed output, no change is made to the file itself.)
- File No.: Set printing of the file number on or off.
- Clear DPOF data: Clear all Print Order settings after the images have been printed.
Setup Menu: This menu is available in all exposure modes, simply by pressing the Canon A560's Menu button and selecting the Setup tab.
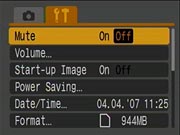 Mute: Turns the camera's start-up, operation, self-timer, shutter and playback sounds on and off.
- Volume: Displays separate volume settings for the camera's start-up, operation, self-timer, shutter, and playback sounds.
- Startup image: Turns startup image display on or off.
- Power Saving: Accesses the camera's Auto Power Down and Display Off settings. Power Down can be enabled or disabled, and Display Off can be set to 10 / 20 / 30 seconds, or 1 / 2 / 3 minutes.
- Date/Time: Sets the camera's internal calendar and clock.
- Format: Formats the SD/MMC card, erasing all files (even those marked for write-protection).
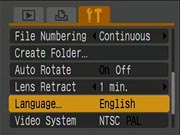 File Numbering: Specifies whether to reset file numbering with each new SDHC/SD/MMC card (or whenever the current card is reformatted) or continue numbering in sequence, regardless of memory card.
- Create Folder: Specifies whether to create a new folder on the memory card to hold new images immediately, or to automatically create new folders Daily or on a specific day of every week, at a specific time.
- Auto Rotate: If enabled, images being played back will always appear in the LCD with the same orientation as they had when captured, regardless of whether the camera was held vertically or horizontally at capture or during playback.
- Lens Retract: Selects how long camera waits to retract lens after switching from Record to Playback mode (immediately or after one minute).
- Language: Sets the camera's menu language to one of 25 choices. English is the default setting for cameras sold in the US.
- Video System: Sets the camera's video-out signal to use either NTSC or PAL timing.
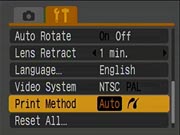 Print Method: Specify either Auto or PictBridge as the print method. (PictBridge automatically accommodates printing wide-format images on certain Canon printers.)
- Reset All: Restores factory default settings.
 Fujifilm GFX 50S Review
 Fujifilm X-T3 Review
 Olympus E-M5 III Review

Follow Imaging Resource