Sony A200 Operation
The Sony A200's user interface is among the simplest on the market, which makes it easy to recommend to most beginners. Anyone familiar with the A100 will notice a few changes. The Function Dial is now a Function button and menu screen, and a few of the camera's previous menu options have been moved around.
The Sony A200's external dials and buttons access essentially all of the main camera settings, reserving the LCD menu system for less commonly-used functions. The Control dial accesses shutter speed and aperture settings, in addition to a wide range of functions when used with other control buttons. In Manual mode, pressing and holding the EV compensation button on the camera's back shifts the Control dial to adjusting the Aperture value. Most of the camera adjustments are made by pressing a button, and turning the Control dial. Menus are navigated with the eight-way Controller on the back of the A200, and all nine AF points can be selected when in Local AF selection mode.
Sony A200 Record Mode Displays
 The Sony A200's rear-panel, 2.7-inch, TFT color LCD monitor is for image review, status display, and menu display. Unlike the higher-end Sony A300 and A350 DSLRs, the Alpha A200 doesn't offer a live view mode, so the LCD can't be used to frame shots.
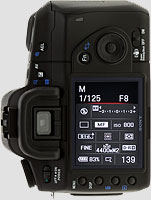
Since the A200 does not have a top status LCD panel, the color LCD is put to good use to display various camera settings. While the Sony A200's battery life is quite good, using the LCD as a Status LCD can drain the battery more quickly than expected. But it does lower the cost, and the display offers a good array of information. Pressing the DISP button adds even more information to the display.
|
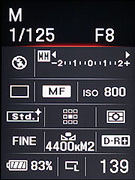
Sony A200 LCD Display Screen Info
|
|
|---|---|
 |
|
|
1 - Shutter Speed |
11 - Aperture Value |
Display Rotation
Here's a nice ergonomic touch, carried over from the A100: The Sony A200 has an orientation sensor inside, and uses it to keep the display oriented in the right direction so the information will appear right-side up when viewed by the photographer, whether shooting horizontally, or in either vertical orientation. (For those who might be wondering though: No, it won't turn completely upside-down.)
 |
 |
 |
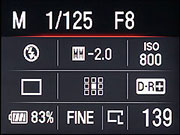
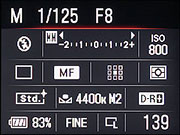
Large- and Small-Type Options
Sometimes you don't need to see every last detail about the camera's operation, but rather prefer to concentrate on just the most important settings. The Sony A200 has two different display options, that apply to both the horizontal and vertical formatted data screens. The large-type/low-density option drops the details on metering mode, AF mode, Creative Style, Flash mode, and Contrast, Saturation, and Brightness settings.
 |
 |
 |
 |
Sony A200 Playback Mode Displays
 In Playback mode, the LCD monitor's default mode shows the most recently captured image, with a limited information overlay reporting the resolution and quality, date and time, folder, file number, frame number, the total number of images, and a small selection of other exposure settings. Pressing the Display enables a histogram display, which also shows expanded exposure information for the image. Just above the information is a thumbnail of the image that alternately flashes any under and overexposed areas in the frame. (This function can sometimes be more helpful than the histogram, in that you can directly see what parts of the image are too dark or light.) Four histograms line the right side of the frame, one each for the red, green, and blue channels, and one representing the luminance of the image as a whole. Pressing the Display button again pulls up a type of index display, with a series of thumbnails of the other images on the card lining the top of the display. You can use the left and right arrows to change the main image display while keeping the thumbnails at the top of the frame. A fourth press of the Display button brings the image full-screen, with no information.
Pressing the Function/Rotate button lets you rotate the image. You can zoom in on captured images in Playback mode, by pressing the AE Lock button with the magnifying-glass icon. When zoomed in, the Front Control dial cycles through the other images on the card at the same enlargement, and pressing the center button of the multi-controller toggles between the magnified view and a full-frame view with the current magnified area outlined in yellow. The Exposure Compensation button zooms back out to the normal display. Once in normal display mode, another press of the Exposure Compensation button pulls up the index display mode.
 Fujifilm GFX 50S Review
 Fujifilm X-T3 Review
 Olympus E-M5 III Review

Follow Imaging Resource