Sony A200 Modes and Menus
Capture Modes: When powered on, the camera is automatically placed into Record mode. The Exposure Mode dial on top of the camera sets the main shooting mode, with the following options:
 Full Auto: This mode places the camera entirely in control of the exposure, though the user can adjust the exposure compensation and all options in the Function menu, including Flash, Autofocus, White Balance, Metering, AF Area, and D-Range Optimizer modes.
 Program AE (with Shift): This mode places the camera in control over both aperture and shutter speed, while the user has access to all other menu functions. Turning the Control dial with or without shifting the Exposure Compensation button cycles through a range of equivalent exposure settings, enabling the Program Shift mode.
 Aperture Priority: This mode puts the user in control of the aperture setting while the camera selects the best shutter speed. (The aperture range varies with the lens in use.)
 Shutter Priority: Allows the user to set the shutter speed, from 1/4,000 to 30 seconds, while the camera selects the most appropriate aperture setting.
 Manual: Provides complete user control over the exposure, including both aperture and shutter speed settings. A Bulb shutter setting also becomes available in this mode, allowing variable length exposures for as long as you hold down the shutter button.
 Night Portrait/View: Night portrait uses flash to expose your subject in the foreground, while leaving the shutter open a little longer to allow the background lighting to burn in. Night View exposes illuminated night scenes properly while maintaining a dark background.
  Sunset: Optimizes settings to capture rich, warm sunsets.
 Sports Action: Enables continuous AF and continuous drive modes while favoring faster shutter speeds to capture moving subjects.
 Macro: This mode is for close-up pictures of small objects, enhancing color in flowers, etc.
 Landscape: Optimizes settings to produce sharp, colorful landscapes.
 Portrait: Optimizes camera settings to reproduce warm, soft skin tones against a slightly blurred background.
 Flash Off: Disables the flash for shooting in a location where flash photography is prohibited or undesirable, while leaving the camera in Automatic mode.
Sony A200 Menus
Pressing the Menu button provides access to the camera's full menu system. The following options are available in most camera modes as menu tabs at the top of the display:

| Record Menu 1 Options | ||
|
Top-Level
Selection |
Second-Level
|
Notes
|
|
Image Size
|
3:2 aspect mode:
- L:10M 16:9 aspect mode: - L:8.4M |
Sets the pixel dimensions of captured still images. L=(3,872 x 2,592) L=(3,872 x 2,176) |
|
Aspect Ratio
|
- 3:2 |
Select normal or HDTV wide screen aspect ratios for images.
|
|
Quality
|
- RAW
- RAW & JPEG - Fine - Standard |
Specifies the compression level and file type of images. JPEG is Fine when saved with RAW.
|
|
Creative Style
|
- Standard
- Vivid - Portrait - Landscape - Night View - Sunset - B/W - AdobeRGB |
Color mode. All are preset styles with adjustable contrast, saturation, sharpness. (B/W style excludes a saturation adjustment).
|
|
Flash control
|
- ADI Flash
- Pre-flash TTL |
Selects the flash metering method. ADI uses pre-flash, but includes distance info provided by lens. Pre-flash TTL uses exposure calculated with pre-flash only.
|
|
Flash compens.
|
- +/-2 EV scale
|
Sets the flash exposure compensation level in EV.
|

| Record Menu 2 Options | ||
|
Top-Level
Selection |
Second-Level
|
Notes
|
|
Priority setup
|
- AF
- Release |
The AF option will not release the shutter unless focus is set, while the Release setting trips the shutter even if AF is not established.
|
|
AF illuminator
|
- Auto
- Off |
Enables the AF illuminator, (flash strobe) for use in very dark shooting conditions.
|
|
Long exp.NR
|
- On
- Off |
Enables dark frame subtraction noise reduction for exposures longer than one second.
|
|
High ISO NR
|
- On
- Off |
Noise reduction levels at high (>=1,600) ISO.
|
|
Rec mode reset
|
- OK
- Cancel |
Resets record mode settings to factory defaults.
|

| Custom Menu 1 Options | ||
|
Top-Level
Selection |
Second-Level
|
Notes
|
|
Eye-Start AF
|
- On |
Enables AF when you look into the viewfinder. |
|
AEL button
|
- AEL hold |
Changes the behavior of the AE Lock button. |
|
Ctrl dial setup
|
- Shutter speed |
Adjust the shutter speed or the aperture with the control dial.
|
|
Red eye reduc.
|
- On |
Enables red-eye reduction flash mode. |
|
Auto review
|
- 10 sec |
Amount of time newly captured image is displayed on LCD.
|
|
Auto off w/ VF
|
- On |
When On, turns LCD off when eye is detected at viewfinder.
|

| Playback Menu 1 Options | ||
|
Top-Level
Selection |
Second-Level
|
Notes
|
|
Delete
|
- Marked images
- All images |
Lets you delete all photos on the card, or only marked photos.
|
|
Format
|
- OK
- Cancel |
Formats the selected memory card, erasing all files (even protected ones).
|
|
Protect
|
- Marked images
- All images - Cancel all |
Write protects images, or removes protection.
|
|
DPOF setup
|
- Marked images
- All images - Cancel all |
Sets up photos for DPOF (Digital Print Order Format) printing on a compatible standalone printer.
|
|
Date imprint
|
- On
- Off |
Chooses whether or not to print the date on all photos in your DPOF order.
|
|
Index print
|
- Create index
- Delete index |
Chooses whether to create or delete an index print of all photos in your DPOF order.
|

| Playback Menu 2 Options | ||
|
Top-Level
Selection |
Second-Level
|
Notes
|
|
PlaybackDisplay
|
- Auto rotate
- Manual rotate |
Sets whether the camera automatically rotates vertically-shot images in Playback mode.
|
|
Slide show
|
Press center of multi-selector to start/stop slide show.
|
Display slide show of captured images.
|
|
Interval
|
- 30 sec
- 10 sec - 5 sec - 3 sec - 1 sec |
Sets the slide show interval.
|

| Setup Menu 1 Options | ||
|
Top-Level
Selection |
Second-Level
|
Notes
|
|
LCD brightness
|
Select level (-2 to +2) |
Adjust LCD brightness. |
|
Info.disp.time
|
- 1 min |
Length of time record information is displayed on LCD in record mode.
|
|
Power save
|
- 30 min
- 10 min - 5 min - 3 min - 1 min |
Determines the amount of inactivity time that will cause camera to enter a low power mode. Pressing shutter button half-way exits power save mode.
|
|
Video output
|
- NTSC |
Selects composite video out standard.
|
|
Language
|
- English
- French - Spanish - Italian - Japanese - Chinese |
Menu language setup.
|
|
Date/Time setup
|
Fields for:
- Date - Time - Date format |
Set the cameras internal clock and calendar.
|

| Setup Menu 2 Options | ||
|
Top-Level
Selection |
Second-Level
|
Notes
|
|
File number
|
- Series |
Set whether filename continues to increment from last image, regardless of whether folder or card has changed, or the card has been formatted.
|
|
Folder name
|
- Standard form
- Date form |
Select standard folder names (i.e., 100MSDCF), or include the date in the folder name (i.e., 10170101).
|
|
Select folder
|
- 100MSDCF (initial folder) |
Selects current folder.
|
|
New folder
|
- OK |
Create a new folder with a number starting from the largest previous number.
|
|
USB connection
|
- Mass Storage
- PTP |
Sets USB mode.
|
|
Audio signals
|
- On
- Off |
Enables sound during self-timer countdown, etc.
|
| Setup Menu 3 Options | ||
|
Top-Level
Selection |
Second-Level
|
Notes
|
|
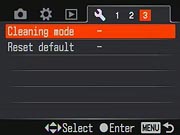
Cleaning mode
|
After cleaning, turn camera off. Continue? |
Enables sensor cleaning mode, which vibrates the sensor, then flips the mirror up and opens the shutter for access with a blower or swab. Can be performed only when battery is at least 3/4 charged.
|
|
Reset default
|
- OK |
Restore factory defaults.
|
 Fujifilm GFX 50S Review
 Fujifilm X-T3 Review
 Olympus E-M5 III Review

Follow Imaging Resource