Sony A700 Exposure
The Sony A700 offers excellent exposure control, with fine-grained adjustment of image attributes like sharpness, contrast, and color saturation, as well as extensive White Balance offerings. The Exposure Mode dial on the top panel selects the main shooting mode, offering Manual, Shutter Priority, Aperture Priority, Program AE (Program Shift), Full Auto, and six Scene settings.
New to the A700, a Memory Recall (MR on the dial) mode lets you store and then quickly recall up to three different camera setups. This could come in handy for situations where you needed to switch rapidly between two or three different environments. For instance, consider a wedding, where you'd want separate setups for outdoor, indoor available light, and indoor flash shots. With the A700's MR mode, you could configure the camera for each setup independently, and then quickly switch between them.
Exposure Modes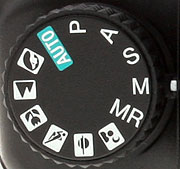 In straight Auto mode, the camera controls everything about the exposure, except for flash, zoom, and focus. Program AE mode lets the camera control the exposure,while you have control over all other exposure options. While in Program AE mode, any time the metering system is active (just half-press the shutter button any time, to make the metering system "wake up"), you can choose between a range of equivalent exposure settings by rotating either the front or rear control dials. The front control dial selects different shutter speeds, while the camera adjusts the aperture to match. The rear control dial selects different apertures, with the camera adjusting the shutter speed as needed. Thus, you can bias your exposure toward a faster shutter speed or greater depth of field as circumstances dictate.
Aperture Priority mode lets you select the lens aperture setting, while the camera selects the most appropriate corresponding shutter speed. In Shutter Priority mode, the user selects the shutter speed, from 1/8,000 to 30 seconds, while the camera chooses the best corresponding aperture setting. Switching to Manual mode gives you control over both shutter speed and aperture, with a Bulb setting available for longer exposures. Exposure time in Bulb mode is determined by how long you hold down the Shutter button. There doesn't appear to be any limit to the duration of Bulb exposures, and the A700 appears to have surpassed the A100's 30-second limit for dark-frame subtraction (long-exposure noise reduction): I was able to shoot 1-minute bulb exposures with the dark-frame processing working properly. (I strongly recommend use of the optional wired remote in Bulb mode though, as the pressure of your finger on the Shutter button is bound to jiggle the camera somewhat, blurring the image.)
Scene Modes & DOF Preview
The six Scene modes include Portrait, Landscape, Macro, Sports Action, Sunset, and Night Portrait. Each optimizes the camera's exposure, white balance, and image processing systems for the particular program.
Portrait biases toward wider apertures to defocus the background while capturing warm, soft skin tones. Landscape produces sharp, colorful shots of outdoor scenery. The Macro setting boosts color in smaller subjects. (Note that Macro mode has no effect on the lens' minimum focusing distance, it only adjusts sharpening and color saturation.) Sports Action maximizes shutter speeds and automatically activates Continuous Autofocus and Continuous Advance Drive modes. Sunset sets the camera's white balance and saturation adjustments to enhance the rich warm palettes of sunsets. Finally, Night View/Night Portrait adjusts exposure parameters to produce good shots after dark. When the flash is used in Night Portrait mode, the camera balances ambient light with the flash, so background elements are visible along with your subject.
A Depth of Field Preview button on the front of the camera, on the right side of the lens mounting flange lets you look through the viewfinder with the aperture stopped down, previewing the depth of field before actually capturing the image.
Metering Modes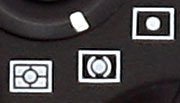 The Sony A700 offers three metering modes accessible via a Metering Mode dial on the rear panel: Multi-segment, Center-Weighted, and Spot. The default Multi-segment metering mode takes readings throughout the image to determine exposure, using a 40-segment honeycomb pattern. The active AF sensor is taken into account by the exposure metering system. Center-Weighted gives precedence to the center of the image while reading the whole frame. The spot metering option is useful for high-contrast subjects, basing the exposure reading on the very center of the image, letting you set the exposure based on a small portion of your subject. (Very handy for subjects with strong backlighting.) You can also lock an exposure reading by pressing the Auto Exposure Lock (AEL) button on the back panel. Halfway pressing the Shutter button also locks exposure and focus, but only when the autofocus system is active: In Manual Focus mode, only the AEL button locks the exposure. Metering range is 0 EV to +20 EV for Multi-segment and Center-Weighted, and +2 EV to +20 EV for Spot.
ISO Range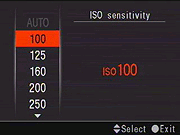 The A700's light sensitivity can be set to ISO equivalents ranging from 100 to 6,400 in steps of 0.3 or 0.5 EV, or it can be left in Auto mode for the camera to adjust as it sees fit. The camera's "official" ISO range is from 100 to 3,200; settings above 3,200 are considered to be in an extended range, with degraded image quality likely. ISO settings in the extended range are marked with bars above and below the value on the camera's LCD. There's also some evidence that the A700 sensor's "native" ISO is actually 200, rather than 100: Dynamic range is quite a bit better at ISO 200 than 100, and the auto ISO range bottoms out at 200. (Credit to DP Review for first noticing this.)
As just mentioned, the A700 also has an Auto ISO option, in which the camera automatically selects the best ISO setting when operating in Auto, Program, Aperture-priority or Shutter-priority exposure modes. You can choose different options for the maximum and minimum ISO settings in Auto ISO mode, via options on Record Menu 2. The minimum ISO can be either 200 or 400, while the maximum ISO can be 400, 800, or 1,600. Unfortunately, there is no selection of the minium shutter speed for Auto ISO to be activated.
Noise Reduction & "Cooked RAW"
Noise Reduction options are available for longer exposures and higher ISO settings, reducing the amount of image noise that would otherwise result. As always, high-ISO noise reduction always occurs at the expense of subtle subject detail, so you may want to experiment with that setting to decide what value suits your shooting style and personal preferences best.
Sony has come under some fire (from us and many Sony enthusiasts as well) for applying noise reduction processing to data in the A700's "RAW" files. Some have taken to calling the result "cooked RAW." In our view, the application of any processing to RAW files is a serious problem, defeating fundamental purpose of the format: To provide an unadulterated record of exactly what the sensor saw at the moment of exposure. Regardless of how good a given company's noise-reduction processing may be, hard-wiring it into the RAW data eliminates any possibility of achieving better results in the future through the use of more advanced algorithms. Image noise is also a highly subjective area, and different photographers will have very different approaches to dealing with it. (In fact, the same photographer may choose very different approaches to noise reduction, depending on the subject matter. It's very likely you'd want to use a different approach on candid portraits than on images shot for journalistic use.)
In our view, the A700's application of noise reduction processing to its RAW files is a serious flaw in an otherwise excellent camera. While the A700's high-ISO noise processing is in fact pretty decent, the loss of any ability to go in and process its RAW files with more advanced noise-reduction software after the fact is a real limitation. Of course, it must be said that it's entirely possible you'll be happy with the A700's high-ISO noise handling and the particular choices it makes between image noise and subtle subject detail. If you plan on doing much high-ISO photography though, you should examine our high-ISO image samples carefully to determine whether they meet your needs or not: What you see is all you'll get, regardless of what RAW file conversion software you happen to use.
Update: It seems the Sony has listened. Version 4 of Sony A700 firmware adds an Off setting to High ISO Noise Reduction menu, which allows RAW files to be truly RAW, with no noise reduction applied.
Exposure Compensation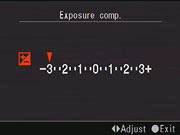 Exposure compensation is adjustable from -3 to +3 exposure equivalents (EV) in 0.3 or 0.5 EV increments by pressing the Multi-Selector left or right while pressing the Exposure Compensation button. The value is displayed on a scale on the LCD monitor, as well as in the viewfinder (oddly, the viewfinder Exposure Compensation scale only has a +/- 2 EV range). The +/- 3 EV range is an upgrade from the earlier A100, which offered +/-2 EV. An Auto Exposure Bracketing option can snap three or five shots in rapid succession if you hold down the shutter, varying the exposure between each in steps of 0.3, 0.5, or 0.7 EV units. (Another upgrade over the A100, which could only take 3 shots in steps of 0.3 or 0.7 EV each.) You can also bracket the exposures using the flash: Bracketing shifts from ambient to flash exposure when you raise the flash head. The A700's Drive mode menu offers Auto Exposure Bracketing for either Single Advance or Continuous Advance drive settings.
White Balance Options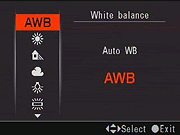 The A700 offers convenient control over white balance, color rendition, and tonal range. You adjust white balance by pressing the WB button on the camera's top panel, and then using either the control dials or the rear-panel joystick to select between the settings. Options include Auto, Daylight, Shade, Cloudy, Tungsten, Fluorescent, Flash, Color Temperature, and up to three Custom settings. Each of the preset white balance options let you tweak the color balance by +/- 3 units (on an arbitrary scale), to make the images warmer or cooler than the default setting. The Fluorescent option offers an adjustment scale of -2 to +4, to better accommodate the much cooler tones of "cool white" tubes.
The Color Temperature setting lets you select a specific color temperature in degrees Kelvin, between 2,500 and 9,900K. Rather than the arbitrary +/- 3 unit adjustment range, adjustments are expressed as Color Filter options of "G1" through "G9" or "M1" through "M9". The G settings are equivalent to adding a green filter of varying strength, while the M settings correspond to magenta filters. When you consider that the basic Color Temperature adjustment itself works along the yellow-blue axis, you can see that this ability to also adjust along the magenta-green axis gives you near total control over the A700's color balance. In one form or another, this two-dimensional color control has found its way into many current DSLRs, but the approach chosen by Sony expresses it in terms of color filters, which may be more intuitive to many old-school photographers.
Finally, the Custom option lets you set the white balance by pointing the camera at a neutral white or grey card and snapping the shutter. In an interesting wrinkle, the A700 translates the Custom white balance setting in a value in degrees Kelvin. It strikes us that this could be very handy if you had to color-balance disparate light sources to each other, letting the camera stand duty as a color-temperature meter. (Usually an extra, pricey accessory.) A total of three different Custom white balance settings can be stored in the camera for rapid recall, another convenient touch.
Creative Styles & Adjustments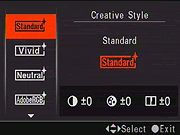 The Sony A700 replaces the A100's Digital Effects Control with the ability to adjust contrast, saturation and sharpness parameters for each of its "Creative Styles" independently. Creative Styles are accessible via the rear-panel shooting display, or the first screen of the Record menu. By default, the Custom button on the camera's rear panel also brings up the Creative Styles menu.
The Sony A700's Creative Style options include both "Switchable" and "Unswitchable" options. The Unswitchable options are Standard (the camera's default), Vivid, Neutral and Adobe RGB. In addition to these, three Switchable styles are available. These default to Portrait (optimized skin tones), Landscape (higher saturation, contrast, and sharpness for landscapes), and Black/White, but you can swap out any of these in favor of Sunset (optimized landscapes at dusk or dawn), Night view (optimized for nighttime scenery without flash), Autumn Leaves (increased saturation for yellows, reds, and oranges), Sepia, Clear (reduced saturation in highlight colors, good for capturing radiant light), Deep (slightly higher contrast, saturation of already highly-saturated colors boosted), and Light (a little hard to describe, looks like the tone curve is shifted a bit to brighten 3/4 tones and highlights somewhat).
As noted above, all of the options on the Creative Styles menu let you adjust contrast, saturation, and sharpness parameters in seven steps, from -3 to +3 arbitrary units. These adjustments can be made for each of the Styles independently of the others, providing a great deal of customization ability. The Switchable options also offer Brightness and "Zone Matching" settings as well. Brightness does pretty much what you'd expect, adjusting overall brightness over a -3 to +3 range. Zone Matching is a little different, apparently intended to be used the way exposure compensation normally is when shooting scenes that are either bright or dark overall. A setting of -1 keeps shots of high-key (mostly light or white) scenes from being underexposed, while settings of +1 or +2 keep low-key shots (those that are dark overall) from being overexposed. If Zone Matching is set to anything other than zero, the Contrast adjustment is disabled.
Interestingly, any of the Unswitchable options can be loaded into the Switchable slots in the Creative Style menu as well. This lets you have one or more variations of the Standard, Vivid, Neutral, or Adobe RGB settings available for rapid selection while shooting. It also lets you apply Brightness and Zone Matching adjustments to the Unswitchable options, bringing them the same flexibility as is found in the Switchable options.
Dynamic Range Optimization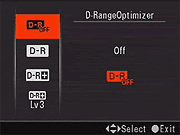 Sony's D-Range Optimization system analyzes the range of brightness of each image, and adjusts the camera's image processing parameters accordingly, to make the best use of the available dynamic range. Four options are available on the Sony A700: DRO Off, Standard DRO, DRO?Advanced Auto and DRO Advanced with strength levels selectable from 1 to 5. Standard DRO looks at the entire image and effectively adjusts contrast and brightness across the entire image for best effect. Advanced DRO modes analyze everything, but makes local adjustments to bring out shadow detail and preserve highlights.
Overall, the Sony A700 offers a tremendous amount of control over its image rendering, more than most (any?) other DSLRs on the market.
Drive Modes
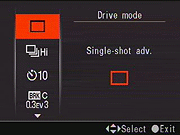 The A700's Drive Mode button on the top panel accesses a range of shooting modes, including Single Frame Advance, Continuous Advance (either high or low-speed), 10-second and Two-second Self-timer modes, Continuous Advance Bracketing, Single Frame Bracketing, White Balance Bracketing, DRO bracketing, and Remote Commander mode. The first two bracketing modes access the camera's Auto Exposure Bracketing system, with options to shoot either 3 or 5 frames, with exposure steps of 0.3, 0.5, or 0.7 EV. In Continuous Advance mode, the A700 captures a rapid series of images, with a maximum frame rate of five frames per second in high speed mode, or 3 frames/second with the low speed setting. Actual frame rates may vary, depending on the image size and quality settings, as will the total number of images in the series, due to the amount of memory card space. White Balance Bracketing lets you capture a series of images as well, though with bracketed white balance values instead of exposures. Two settings (Hi 3 or Lo 3) let you select white balance adjustment step sizes of 10 or 20 mireds. (A mired is a measure of color shift commonly used to calculate adjustments made by color filters.)
The DRO Advanced bracketing option essentially lets the camera automatically vary the amount of DRO+ dynamic range optimization that's applied. As with White Balance bracketing, DRO bracketing offers two step sizes, although the manual doesn't say how these step sizes translate to the 5-step scale for DRO+ available through the menu.
The two Self-Timer modes lock the mirror up, then fire the shutter a short delay after the Shutter button is pressed. The shorter, two-second delay is very handy when you need to prop the camera on something to take a photo in dim lighting, and don't want the pressure of your finger on the shutter button to jiggle the camera. The 10-second delay is long enough that you can run around to get into the photo yourself. An LED lamp on the front of the A700 blinks and the camera beeps as the 10-second Self-Timer is counting down, the blink and beeps becoming faster in the last few seconds.
The images above were taken from our standardized test shots. For a collection of more pictorial photos, see our Sony Alpha DSLR-A700 Photo Gallery .
Not sure which camera to buy? Let your eyes be the ultimate judge! Visit our Comparometer(tm) to compare images from the Sony Alpha DSLR-A700 with those from other cameras you may be considering. The proof is in the pictures, so let your own eyes decide which you like best!
 Fujifilm GFX 50S Review
 Fujifilm X-T3 Review
 Olympus E-M5 III Review

Follow Imaging Resource