Sony A700 Imaging Characteristics
(Updated with crops using V2 or V3 firmware)
(V2 firmware introduced changes to noise reduction processing that may affect detail in low-contrast subject content. Firmware v3 resolved minor operational issues, image processing should be identical to that of v2.)
Image and file quality are the ultimate bottom line for digital cameras, and the Sony A700 generally does well in this area, but we were surprised to see how much more image detail is contained in its RAW files than ever make it out through the in-camera JPEG processing. It's a camera with very different personalities, detail-wise, depending on whether you're looking at in-camera JPEGs or the results of careful RAW processing. See the sections below to understand what we mean by this.
Resolution and Detail
Resolution
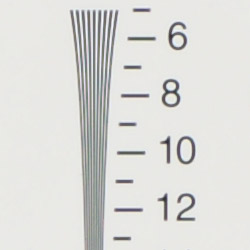
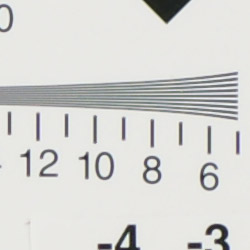
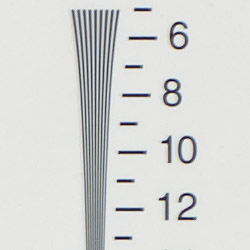
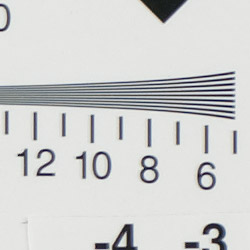
High resolution, 1,650 ~ 1,700 lines of strong detail from in-camera jpegs, 1,850 ~ 1,900 lines from raw.
 |
 |
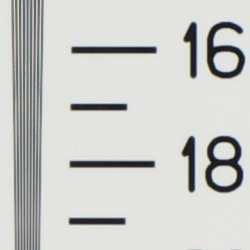
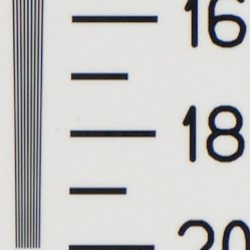
| Strong detail to ~1,650 lines horizontal (w/some artifacts), in-camera JPEG |
Strong detail to ~1,700 lines vertical, in-camera JPEG |
 |
 |
| Strong detail to ~1,850 lines horizontal, ACR processed ARW (RAW) |
Strong detail to ~1,900 lines vertical, ACR processed ARW (RAW) |
| 2X Res Chart: Resolution numbers are 2x those indicated | |
 |
 |
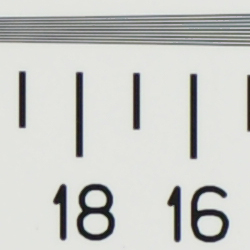
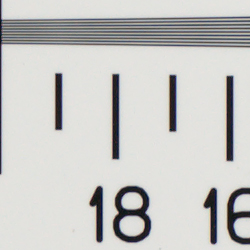
| Strong detail to ~1,650 lines horizontal (w/some artifacts), in-camera JPEG |
Strong detail to ~1,700 lines vertical (w/some artifacts), in-camera JPEG |
 |
 |
| Strong detail to ~1,850 lines horizontal, ACR processed ARW (RAW) |
Strong detail to ~1,900 lines vertical, ACR processed ARW (RAW) |
Our laboratory resolution chart revealed sharp, distinct line patterns down to about 1,650 lines per picture height horizontally and 1,700 vertically from in-camera JPEGs, but we got much better results using Adobe Camera Raw to process the raw file - about 1,850 lines horizontal, 1,900 vertical. (Images were extracted from ARW files with ACR's sharpening turned off. Unsharp masking was then applied in Photoshop to deliver the best results.) Extinction of the pattern didn't occur until 2,200 - 2,400 lines per picture height. Use these numbers to compare with other cameras of similar resolution, or use them to see just what higher resolution can mean in terms of potential detail.
Sharpness & Detail
Two very different personalities: Very noticeable detail loss in in-camera JPEGs, incredible detail in properly-processed RAW images.
 |
 |
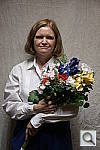
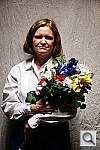
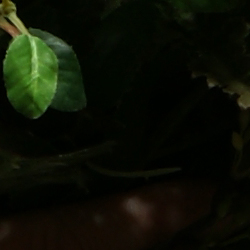
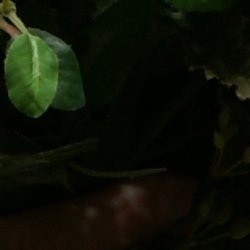
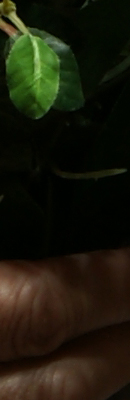
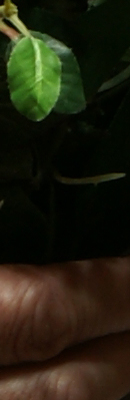
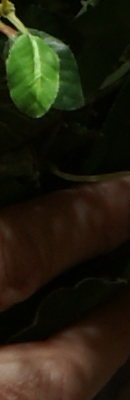
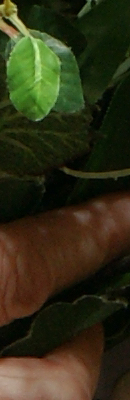
| Good definition of high-contrast elements, with only slight edge enhancement visible. Significant low-contrast detail is lost in the in-camera JPEGs though, as seen in the foliage above. |
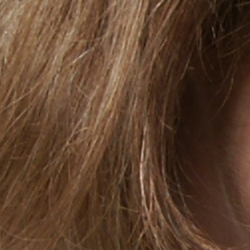
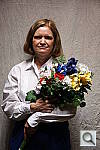
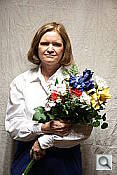
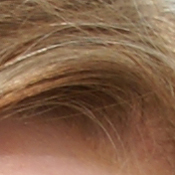
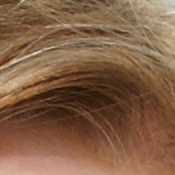
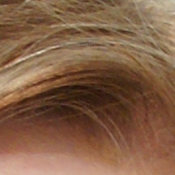
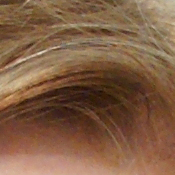
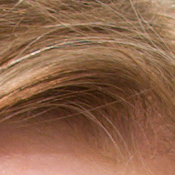
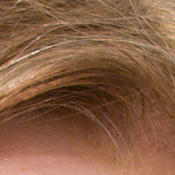
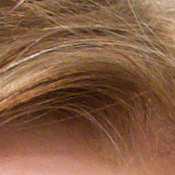
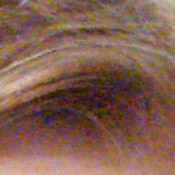
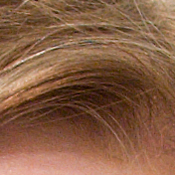
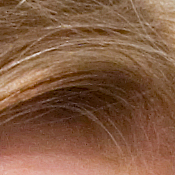
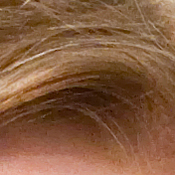
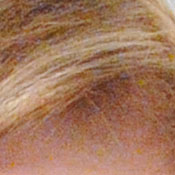
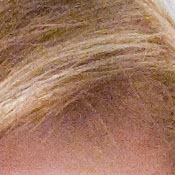
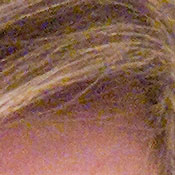
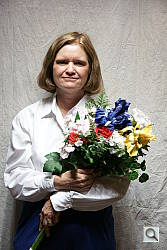
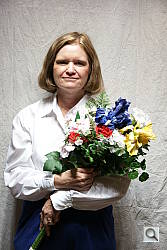
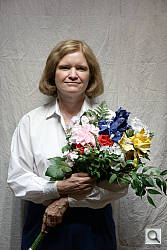
Subtle detail: Hair Noise suppression tends to blur detail in areas of subtle contrast, as in the darker parts of Marti's hair here. The A700 does this quite a bit, but this shot doesn't show as much of the effect as is seen in the foliage in the crop to the left. |
Sharpness. The Sony Alpha A700 captures reasonably sharp images, with good detail. Some minor edge enhancement artifacts are visible on high-contrast subjects such as the crop above left, but results are still quite good. Edge enhancement creates the illusion of sharpness by enhancing colors and tones right at the edge of a rapid transition in color or tone.
Detail. This is an area where the Sony A700 either suffers somewhat or does incredibly well, depending on the image file format you use. In-camera JPEGs (even in Extra-Fine mode) lose significant detail, particularly in areas of subtle contrast. It's a guess, but our thought is that this is likely due to over-aggressive noise suppression processing, even at low ISO settings. The standard crops above show this somewhat in Marti's hair, more so in the lack of texture and detail in the pine needles of the crop from the far-field image on the left. We'll take a look at the differences between RAW and JPEG files in the next section below. Noise-suppression systems in digital cameras tend to flatten-out detail in areas of subtle contrast. The effects can often be seen in shots of human hair, where the individual strands are lost and an almost "watercolor" look appears.
RAW vs In-Camera JPEGs
As noted above, the Sony A700 has two distinct personalities when it comes to image quality. It's a completely different camera, depending on whether you look at its in-camera JPEGs or RAW files. Take a look below, to see what we mean:

In the table above, mousing over a link at the bottom will load the corresponding crop in the area above. Examples include in-camera Extra-Fine JPEG, RAW file processed through Sony's Image Data Converter SR version 2 software, and RAW file processed through Adobe Camera Raw version 4.3.1, then sharpened in Photoshop. (I've found that sharpening results in ACR are inferior to those obtained with the Unsharp Masking tool in Photoshop itself. For the Sony A700's images, I found best results with no sharpening at all in ACR and then 250% unsharp masking with an 0.3 pixel radius.)
Note: ACR renders colors somewhat differently than either the A700 or the Sony software, so the greens in the trees are rather different. There's no mistaking the increase in detail though, regardless of changes in color or tone.
The images themselves tell the story: Even in its Extra-Fine JPEGs, the Sony A700 loses noticeable image detail, although firmware version 2 made worthwhile improvements in this area. (As some readers have pointed out to me, fairness demands mentioning that it's not alone in this; Many current cameras give up a lot of subtle detail in forming their JPEGs. I'll be investigating this more going forward, hopefully will be able to share some comparisons with our readers at some point in the future.)
In the case of the Sony A700, careful processing of its RAW files delivers really exceptional detail and tonal nuance. It's very, very worthwhile spending the time to process the A700's RAW images, rather than working with its JPEGs. You'll certainly get acceptable images from the JPEGs, but the RAW image quality is really of an entirely different level. Sony's included Image Data Converter SR version 2 produces a useful increase in detail over the camera's internal JPEG conversion, and offers some forms of sharpening control not provided in Photoshop (namely undershoot and overshoot of the luminance curve near edges), but is missing the critical ability to control the radius of the sharpening operator. As a result, output from IDC version 2 doesn't reveal as much really fine detail as does that from Adobe Camera Raw/Photoshop. Still, it's a worthwhile product, and provides more control than many manufacturer-provided RAW converters.
Here's another look, at samples from the "Sunlit" Portrait shot:
 |
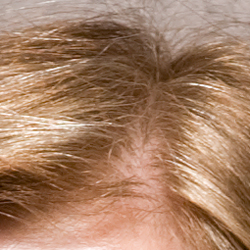 |
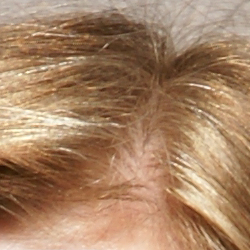
| Extra-Fine JPEG from the camera, 16-80mm f/3.5-4.5 Carl Zeiss lens, shot at f/7.1. You can pick out some hairs where they contrast strongly with their background, but there's a good bit of softness, probably from noise-reduction processing. | Image from RAW, through Adobe Camera Raw v4.3.1, shot a few minutes later with the same settings as the image at left. (Focus was also set to manual, so zero focus difference between shots.) Exceptional fine detail, and relatively low noise. (Luminance noise reduction was set to 20, chroma noise reduction to 30 in ACR.) Unsharp masking of 250% at 0.3 pixel radius was applied in Photoshop after the image was imported. |
These images aren't from the same shot, as the Sony A700 only saves fine-mode images when shooting RAW + JPEG. The lighting and focus should be identical though, as the lab lighting and Marti's position were both constant, and I was using manual focus at this point: You can see that even minor details of Marti's hair are the same between the two images. I was also shooting with a fairly small aperture (f/7.1) to give me good depth of field. Bottom line, it's not 100% guaranteed that the two images have precisely the same focus, but it would have to be within a fraction of an inch, so I don't think the in-camera JPEG image is at all out of focus. Once again, the improvement with the RAW file is pretty dramatic, although Sony did make some worthwhile changes in this area when they came out with firmware version 2. (Results from firmware version 2 are what's shown above.)
Color
Saturation & Hue Accuracy
Very good color overall, with accurate saturation and very good hue accuracy.
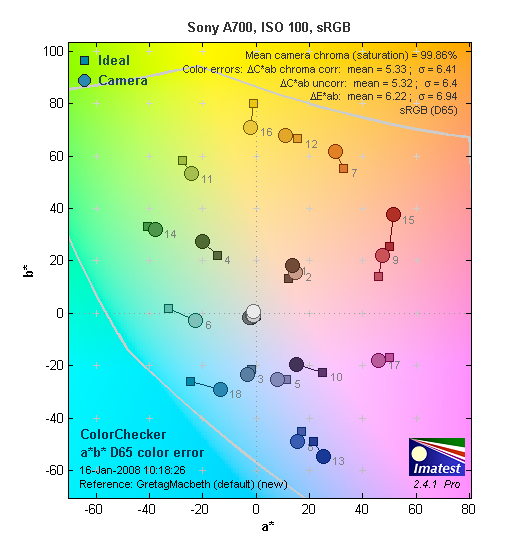 |
| In the diagram above, the squares show the original color, and the circles show the color that the camera captured. More saturated colors are located towards the periphery of the graph. Hue changes as you travel around the center. Thus, hue-accurate, highly saturated colors appear as lines radiating from the center. |
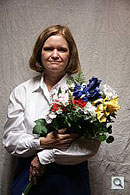
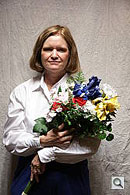
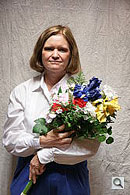
Saturation. The Sony Alpha A700 produced extremely accurate color in our testing. Saturation was very close to neutral (only 0.14% undersaturated), with some reds and blues slightly oversaturated, while some yellows, greens and purples were undersaturated slightly. Its accurate default color saturation may endear it to some users but leave those preferring brighter, more pumped color cold. The good news for everyone is that the A700's color saturation adjustment lets you choose from a wide range of color saturation settings, in relatively small steps. (See the table of Sunlit Portrait shots below for an example of how changes in its color saturation setting affect a natural image. Most consumer digital cameras produce color that's more highly saturated (more intense) than found in the original subjects. This is simply because most people like their color a bit brighter than life.
Skin tones. Here, the A700 did very well, producing natural-looking skin tones that were neither over- nor under-saturated, with very natural hues. Where oversaturation is most problematic is on Caucasian skin tones, as it's very easy for these "memory colors" to be seen as too bright, too pink, too yellow, etc.
Hue. The A700 did introduce several small hue shifts, moving red towards orange, cyan towards blue slightly, and purples back toward blue slightly as well. Reds went very slightly to orange, but the overall hue accuracy was quite good, with an average delta-C (formerly known as delta-E*ab) of only 5.33 after correction for luminance and saturation. The other important part of color rendition is hue accuracy. Hue is "what color" the color is.
Saturation Adjustment
As mentioned above, the Sony A700 has a saturation adjustment, available via the Creative Style submenu off the first Record-mode menu. A total of 7 settings are available, three above and three below the default saturation. This covers a pretty wide range of saturation levels, about as wide a range as you're likely to find photographically relevant, apart from special effects that are arguably better achieved in software. The fine steps between settings mean you can program the camera to just the level of saturation you prefer.
| Saturation Adjustment Examples | ||||
 |
 |
 |
 |
 |
| -3 | -1 | 0 | +1 | +3 |
The table above shows results with several saturation settings, see the Thumbnails index page for more (look for the files named A700OUTSAT0x.JPG). Click on any thumbnail above to see the full-sized image.
 |
 |
 |
Sensor
Exposure and White Balance
Indoors, incandescent lighting
Warm cast with Auto white balance setting, but very good results from the Incandescent, 2,800 Kelvin, and Manual settings. About average positive exposure compensation required.
 |
 |
| Auto WB +1.0 EV | Incandescent WB +1.0 EV |
 |
 |
| Manual WB +1.0 EV | 2,700 Kelvin WB +1.0 EV |
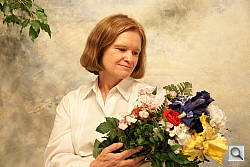
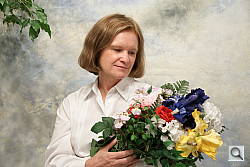
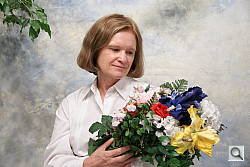
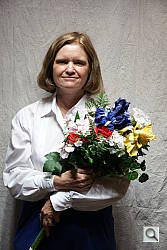
The Sony A700's Auto white balance setting resulted in a very strong warm color cast indoors under household incandescent lighting. (Surprisingly, this isn't at all uncommon, even on high-end DSLRs.) The Incandescent setting cleaned things up quite a bit, but left a slight warm cast as well. (It's worth noting though, that many people would prefer this to an entirely neutral rendering, feeling that the slight tinge more faithfully conveys the mood of the original scene.) The Manual white balance produced the most pleasing overall color (IMHO), though the 2,700 Kelvin setting produced a very similar result. The camera required a +1.0 EV exposure compensation boost for a bright exposure (about average for this shot) with all white balance settings. Overall color looks good, though a little dark, the blue flowers in particular looking dark and purplish. (Many digital cameras reproduce these flowers with a dark, purplish tint, so the A700's performance here wasn't at all unusual.) Our test lighting for this shot is a mixture of 60 and 100 watt household incandescent bulbs, a pretty yellow light source, but a very common one in typical home settings here in the U.S.
Outdoors, daylight
Good color and exposure, though slightly high default contrast. Lots of options for dealing with high-contrast subjects & lighting though.
| Default Contrast, normal D-R setting | |
 |
 |
| 4900K White Balance, +0.3 EV (Default Contrast) |
Auto White Balance, Auto Exposure |
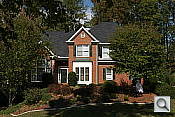
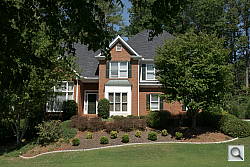
Outdoors, the Sony Alpha A700 performed pretty well, with just a very slight overexposure in the outdoor far-field house shot. The Sony A700 required less than the average amount of positive exposure compensation on the "Sunlit" portrait. Default contrast is on the high side, but fortunately, there's an effective contrast adjustment to help compensate. Even at its default contrast setting, it does an excellent job of holding onto highlight detail: Even though the shirt looks blown out in the thumbnail above, there's actually full detail in it. - More on this below, in the "Extremes" section.
ISO & Noise Performance
Low to moderate noise below ISO 1,600, higher levels at 3,200 and 6,400 equivalents, but also significant loss of fine detail.
| Results from in-camera JPEGs | ||
 |
 |
 |
| ISO 100 | ISO 200 | ISO 400 |
 |
 |
 |
| ISO 800 | ISO 1,600 | ISO 3,200 |
|
||
| ISO 6,400 | ||
In its in-camera JPEGs, the Sony A700 produced very low noise levels at low ISO settings, but as noted above, at the cost of considerable loss of fine detail in areas of subtle contrast (where anti-noise processing takes its toll). Images stayed pretty clean as high as ISO 800, but with a progressive and noticeable loss of subtle detail as the ISO increased.. At ISO 1,600, we start to see some blotchiness in the shadows, but detail is still quite good. At ISO 3,200 the grain pattern and chroma noise become quite prominent in the darker areas, and at ISO 6,400, chroma noise and the effects of heavy noise reduction obliterate much of the finer details.
| Results from RAW via Adobe Camera Raw v4.3.1 | ||
 |
 |
 |
| ISO 100 | ISO 200 | ISO 400 |
 |
 |
 |
| ISO 800 | ISO 1,600 | ISO 3,200 |
 |
 |
 |
| ISO 6,400 | ISO 6,400, No NR | ISO 6,400 Sony IDC, No NR |
| Settings: ACR 4.3.1 used, unsharp masking 250%, radius=0.3. ISO 800 and above, both NR sliders at 25, except for last crop where they were both 0. |
||
I have to admit that the results above were a bit of a shock. At low ISOs, Adobe Camera Raw delivers substantially more detail than do the in-camera JPEGs, but at high ISOs, it's really the other way around. Thinking that I was just getting too aggressive with the noise reduction controls in ACR, I processed the ISO 6400 file with both luminance and chroma noise sliders set to zero. As you can see from the results, the detail loss is still pretty dramatic.
| Results from RAW via Adobe Camera Raw v3.7 | ||
 |
 |
 |
| ISO 100 | ISO 200 | ISO 400 |
 |
 |
 |
| ISO 800 | ISO 1,600 | ISO 3,200 |
 |
 |
|
| ISO 6,400 | ISO 6,400 - No NR | ISO 6,400 Sony IDC, No NR |
| Settings: ACR 3.7 used, unsharp masking 250%, radius=0.4. ISO 800-6,400, both NR sliders at 25, except for last crop, where they were both 0, and no USM. |
||
Some readers have reported that problems with high-ISO images are a known behavior of ACR4.x with CMOS sensors, so went one extra step and made the second set of crops above by converting the Sony ARW files to DNG with Adobe's converter (which supposedly leaves the image data itself untouched), and then converted the images to JPEGs using ACR 3.7. I haven't studied the issue to know whether the CMOS issue is true or a photographic urban legend, but it's apparent from both sets of crops above that there's some pretty extensive noise processing going on somewhere in ACR, outside the control of its noise reduction sliders.
At the time of its announcement, Sony touted the fact that the A700 was doing noise reduction on the raw image data, before it was written to the RAW format. I initially had hoped that what we saw above was simply a matter of not being able to fully disable the anti-noise processing in ACR, and not a result of NR that's being done in-camera prior to the RAW file being written. Unfortunately, after examining the A700's high-ISO RAW files with several RAW converters it's clear that Sony is in fact "cooking" their RAW files. This is really a shame, as it largely defeats the purpose of a RAW file, and means that the detail traded away by the in-camera "cooking" is forever lost to post-processing.
There's always a question of what's really in a RAW file, as there always has to be at least some processing done to convert it for viewing on an RGB display. In an attempt to get at least one more data point for what's going on in the A700's RAW files at high ISO, I converted a file in Sony's own Image Data Converter, with the noise-reduction processing option turned off. The results can be seen in the bottom right crop in the table above, and again seem to support the idea that the noise reduction (and detail loss) is indeed present in the RAW files themselves.
More on Noise Reduction in RAW files
After posting all the above images, a reader asked the (should have been obvious) question of what setting of the High-ISO Noise Reduction option they were shot with. - And whether that setting would affect the RAW files as well. The images above were shot with the camera's default NR setting, and to see whether that would affect the RAW files, we shot yet another series, this time of the Still Life target, at ISO settings between 1,600 and 6,400, and with all three high-ISO NR settings (low, medium, and high). (We're beginning to feel that there's no end to testing the A700!) Crops from these shots are shown below (also now all updated to show results from version 2 firmware).
| High-ISO NR examples (all crops at ISO 3,200) | ||||
| Camera JPEG |
 |
 |
 |
|
| High-ISO NR Value |
High | Medium | Low | |
| From RAW (All via Sony IDC, except far right via ACR) |
 |
 |
 |
|
| High-ISO NR Value |
Auto | Low | Low, via ACR | |
As you can see from the examples, the High-ISO Noise Reduction menu option clearly affects the contents of the RAW files pretty drastically. Given the amount of time we've spent on the A700 already though, it unfortunately wasn't feasible to reshoot the Indoor Portrait test shots yet again with the High-ISO NR set to low.
A quick comparison with some other cameras:
There's been a lot of interest in our forums and elsewhere in comparing how the A700's detail and noise levels at high ISO stack up against those of some other mid- to high-end DSLRs currently on the market. To inject some reality into these discussions, here are some crops comparing images from the A700 with those from other cameras. All shots were captured under identical lighting, and with overall exposure as close as could reasonably be matched. (Tone curve differences between cameras mean that the particular part of the images compared may be brighter or darker with any given camera.)
| High-ISO NR examples (all crops at ISO 3,200) | |||
| Sony A700 | |
 |
|
| In-camera JPEG Default noise reduction |
Adobe Camera RAW No NR, USM=250/0.3 |
Adobe Camera RAW NR=25, USM=250/0.3 |
|
| Nikon D300 | 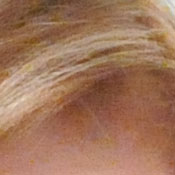 |
 |
 |
| In-camera JPEG Default noise reduction |
In-camera JPEG, Noise reduction off |
Adobe Camera RAW NR=25, USM=200/0.3 |
|
| Canon 40D |  |
Sorry, no NR variations available for 40D |
Sorry, high-ISO RAWs not available for 40D for this shot. |
| In-camera JPEG Default NR settings |
|||
| Olympus E3 |  |
Sorry, no NR variations available for E3 |
 |
| In-camera JPEG Default NR settings |
Adobe Camera RAW NR=25, USM=200/0.3 |
||
| Nikon D3 | 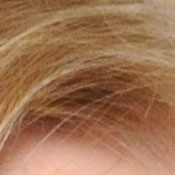 |
 |
 |
| In-camera JPEG Default NR settings (lens slightly front-focused) |
In-camera JPEG Noise Reduction Off (!) |
Adobe Camera RAW No NR, USM=200/0.4 |
|
| Note: Noise performance can vary quite a bit with color temperature. These shots were captured under incandescent lighting, at a color temperature of about 2,800K. All the cameras will perform somewhat better under daylight-balanced (5,500K) lighting. |
|||
We didn't have shots showing differences in in-camera noise reduction settings for all of the cameras represented above, and in fact had no RAW file at ISO 3,200 for the Canon 40D. The crops nonetheless do give a clearer apples-to-apples comparison between the four cameras than has been available to this point. The A700's default in-camera noise reduction is a bit more heavy-handed than that in some of its competition, and (at the risk of belaboring the point), much of the noise reduction is actually applied in the RAW files, precluding effective post-processing with third-party RAW-development software. That said, The A700 generally acquits itself very well against the competition at ISO 3,200. The Nikon D300 arguably leaves a bit more fine detail in its images in areas of subtle contrast, but in more contrasty regions, the A700 carries the day with lower noise and good edge sharpness. At the end of the day, prints made from A700 shots captured at ISO 3,200 can look quite decent, even as large as 8x10 inches.
Color Saturation at High ISO
What doesn't come out in the small crops above is how well the A700 holds color accuracy at very high ISOs. Many cameras drop the color saturation of their images quite drastically at very high ISOs, partly in an attempt to reduce image noise. The Sony A700 does this less than we've seen in many cameras in the past. By the same token though, so do most of its current competitors, perhaps even more so than the A700. Some A700 enthusiasts have claimed that the A700 has significantly better color at high ISOs than do the Nikon D300 or Canon 40D, but our tests under controlled conditions seem to show that all three cameras maintain color saturation quite well at extreme ISOs. Differences can be seen between the three in the samples shown below, but they're small, so it would be hard to say that any of the three has a dramatic advantage in high-ISO color rendering over any of the others. (Note too though, that these images were shot under daylight-balanced lighting. It's possible that the cameras involved may show different saturation characteristics under light sources with different color balances.)
| Color Saturation vs ISO |
||
| Sony A700 |  |
 |
| ISO 200 | ISO 3,200 | |
| Nikon D300 |  |
 |
| ISO 200 | ISO 3,200 | |
| Canon 40D |  |
 |
| ISO 200 | ISO 3,200 | |
Extremes: Sunlit and low light tests
High resolution with good overall detail, but slightly high default contrast. Good low-light performance, but with some exposure variation.
|
 |
 |
| Default Exposure | +0.3 EV | +0.7 EV |
Sunlight:
The Sony Alpha A700 performed quite well under the deliberately harsh lighting of this test, though contrast was a little high at its default setting. As mentioned previously however, the camera's contrast adjustment did a better than average job of handling the harsh lighting, and even at the default contrast setting, detail was preserved quite well in the white shirt. Though the shirt looks blown at +0.3 EV at default contrast, there's actually good detail there, a welcome change from many cameras' handling of this test. - And see below for the results with Sony's Dynamic-Range Optimization (DRO) technology. (In "real life", of course, be sure to use fill flash in situations like the one shown above; it's better to shoot in the shade when possible.)
Contrast Adjustment
We really like it when a camera gives us the ability to adjust contrast and saturation to our liking. It's even better when those adjustments cover a useful range, in steps small enough to allow for precise tweaks. Just as with its saturation adjustment, the Sony A700's contrast setting meets both challenges.
| Minimum Contrast, normal D-R setting | |
 |
 |
| Contrast set to lowest, +0.3 EV |
Contrast set to lowest, Auto Exposure |
At its lowest contrast setting, the A700 did an excellent job of preserving highlight detail, maintaining natural-looking skin tones, and holding nice detail in the shadows. The A700 captures good color outdoors, though just slightly on the warm side. Overall, very good results here, especially when the contrast setting is tweaked.
| Contrast Adjustment Examples | ||||
 |
 |
 |
 |
 |
| -3 | -1 | 0 | +1 | +3 |
The series of shots above shows results with several different contrast adjustment settings, showing the minimum step size above and below the default setting, as well as both extremes. While you can see the extremes, it's hard to really evaluate contrast on small thumbnails like these, click on any thumbnail to go to the full-size image.
One very nice feature of Sony's contrast adjustment is that it has very little effect on color saturation. Contrast and saturation are actually fairly closely coupled in image processing; it's a good trick to be able to vary one with out the other changing as well. Sony did a good job here.
| Highlight Detail vs Contrast, normal D-R setting | |
 |
 |
| Default Contrast | Default Contrast Gamma=0.25 (same image as at left) |
 |
 |
| Lowest Contrast | Lowest Contrast Gamma=0.25 (same image as at left) |
As I mentioned above, even the default contrast and D-R settings (more on D-R shortly), the Sony A700 held perfect highlight detail in Marti's shirt, even though it looked blown out. To better show this, the above show unaltered images on the left, and ones processed in Photoshop to stretch the highlights to cover most of the tonal scale. (I boosted the midtone slider in Photoshop's Levels control to a gamma setting of 0.25.) The first pair of crops show results with the camera's default contrast setting, the second shows highlight results with the lowest contrast setting.
Interestingly, after the extreme gamma shift above, the image shot with the lowest contrast setting actually shows more contrast in the highlights. What's up with that? The reason for this is that the low contrast setting has pulled the entire highlight end of the tone curve closer to the midtones, so there's more room to record variations between subtle highlight tones, hence the greater apparent contrast there after the gamma adjustment.
| Shadow Detail vs Contrast Setting | |
 |
 |
| Default Contrast | Lowest Contrast (Different image, very slight subject differences) |
The impact of the contrast adjustment was even more evident at the shadow end of the tone scale, the lowest contrast setting did quite a bit to brighten the dark shadows. The two crops above are from two separate frames, one shot at the default, the other at the lowest contrast setting. The two photos unfortunately aren't exactly identical, Marti's hand position is a bit different between the two. (One of the downsides of a live model, I've tried to get Marti to wear a straightjacket, but she just refuses. ;-) The areas of the crop are quite equivalent in terms of light levels though. (Note that you'll need a well-calibrated monitor and a rather dark viewing environment to be able to see the deep shadow detail in the images above.)
Sony's DRO (Dynamic Range Optimization)
While the Sony A700's contrast adjustment feature works very well, their Dynamic Range Optimization system is a critical part of it. This system analyzes the range of brightness of each image, and adjusts the camera's image processing parameters accordingly, to make the best use of the available dynamic range. Four options are available, DRO Off, Standard D-R, D-R+, and D-R Advanced, which lets you choose between 5 levels of strength for the D-R Plus effect. Standard D-R looks at the entire image and effectively adjusts contrast and brightness across the entire image for best effect. D-R+ analyzes everything, but makes local adjustments to bring out shadow detail and preserve highlights.
We saw DRO in the Sony A100 last year, and found that it worked fairly well, but we really wished there was an option to adjust the strength of the effect in D-R+ mode. It seems the Sony engineers were listening, because that's exactly what they gave us this time around.
| DRO Examples | |||
 |
 |
 |
 |
| DRO Off | DRO Standard (D-R) |
DRO Plus (D-R+) |
DRO Advanced +5 (D-R ADV+5) |
 |
 |
 |
 |
The crops above show the results of four DRO settings. They were shot in rapid succession, but you'll notice that minor movements by Marti mean that the shots aren't absolutely identical. The cropped areas are very closely equivalent in terms of light level though. As you can see, the bulk of the difference between different levels of DRO is found in the shadow areas. By default, the A700 shoots with DRO set to the Standard (D-R) level. Interestingly, there's a pretty pronounced difference between DRO Standard and Off, in terms of exposure. I confirmed that the shots above were all captured with the same aperture and shutter speed settings, but the DRO Standard version is a good 2/3 of a stop or so lighter than the shot with DRO turned off entirely.
As noted, we felt that DRO in the A100 had some limitations, but the technology seems to have matured very nicely in the intervening time since that model was introduced. It works well enough and with little enough impact on normally-lit subjects that I'd be entirely comfortable leaving it in Standard mode all the time. (Sony obviously felt so too (since it's on by default), but it's unusual that I personally would be comfortable leaving an image-tweaking option enabled by default.) And it's nice that Sony listened to our plea to make DRO adjustable. The Advanced option gives 5 gradations, giving you a very nice range of control over its application.
| DRO Advanced Mode Adjustment Examples | ||||
|
|
|
|
|
| 1 | 2 | 3 | 4 | 5 |
Note: Because digital cameras are more like slide film than negative film (in that they tend to have a more limited tonal range), we test them in the harshest situations to see how they handle scenes with bright highlights and dark shadows, as well as what kind of sensitivity they have in low light. The shot above is designed to mimic the very harsh, contrasty effect of direct noonday sunlight, a very tough challenge for most digital cameras. (You can read details of this test here.)
| 1 fc 11 lux |
1/2 fc 5.5 lux |
1/4 fc 2.7 lux |
1/8 fc 1.3 lux |
1/16 fc 0.67 lux |
1/16fc No NR |
|
|---|---|---|---|---|---|---|
| ISO 100 |
2 sec f3.5 |
4 sec f3.5 |
6 sec f3.5 |
13 sec f3.5 |
20 sec f3.5 |
20 sec f3.5 |
| ISO 200 |
1 sec f3.5 |
2 sec f3.5 |
4 sec f3.5 |
6 sec f3.5 |
10 sec f3.5 |
10 sec f3.5 |
| ISO 400 |
0.5 sec f3.5 |
1 sec f3.5 |
1.6 sec f3.5 |
3.2 sec f3.5 |
5 sec f3.5 |
5 sec f3.5 |
| ISO 800 |
1/4 sec f3.5 |
0.5 sec f3.5 |
1 sec f3.5 |
1.6 sec f3.5 |
2.5 sec f3.5 |
2.5 sec f3.5 |
| ISO 1600 |
1/8 sec f3.5 |
1/4 sec f3.5 |
0.5 sec f3.5 |
0.8 sec f3.5 |
1.3 sec f3.5 |
1.3 sec f3.5 |
| ISO 3200 |
1/15 sec f3.5 |
1/8 sec f3.5 |
1/4 sec f3.5 |
0.4 sec f3.5 |
0.6 sec f3.5 |
0.6 sec f3.5 |
| ISO 6400 |
1/30 sec f3.5 |
1/15 sec f3.5 |
1/10 sec f3.5 |
1/5 sec f3.5 |
0.3 sec f3.5 |
0.3 sec f3.5 |
Low light: The Sony A700 did fairly well in our low light test, but at the very lowest light levels, its meter underexposed the shot slightly at all ISO settings. ISO 1600 shots were pretty clean across the board, ISO 3200 was noticeably noisy but probably usable for many applications, and ISO 6400 was noisy to the point that we'd probably not use it except for 4x6 inch prints.
Interestingly, noise didn't increase much at all as the exposure time was increased, with noise levels in the darkest shots not being far different from the noise in much shorter exposures. We also found little difference at the exposure times we used here with the long-exposure noise reduction on or off. Playing around with the camera later, we were surprised by how little noise was present in even 5-minute exposures. When we went to 10 minutes at ISO 100, noise became pretty high when the long-exposure noise reduction was turned off, but with it on, the images were surprisingly clean. (Note that the Sony A700 uses a dark-frame subtraction method for long-exposure noise reduction, so a 10-minute exposure with NR enabled means your camera will be tied up for a total of 20 minutes before you'll be able to see the captured image.)
The Sony A700 focused quite well (of not a little slowly) in dim lighting as well, its AF system operating down to a bit under 1/8 foot-candle with the AF-assist light turned off, and in total darkness with it enabled.
How bright is this? The one foot-candle light level that this test begins at roughly corresponds to the brightness of typical city street-lighting at night. Cameras performing well at that should be able to snap good-looking photos of street-lit scenes.
NOTE: This low light test is conducted with a stationary subject, and the camera mounted on a sturdy tripod. Most digital cameras will fail miserably when faced with a moving subject in dim lighting. (For example, a child's ballet recital or a holiday pageant in a gymnasium.) For such applications, you may have better luck with a digital SLR camera like the Sony A700, but even there, you'll likely need to set the focus manually.
Output Quality
Print Quality
Good print quality, accurate color, good 13x19 inch prints from in-camera JPEGs, excellent ones from carefully-processed RAW files. RAW images capable of making good-looking 20x30 inch prints with little trouble. In-camera JPEGs are sharp at 8x10 inches to ISO 1,600.
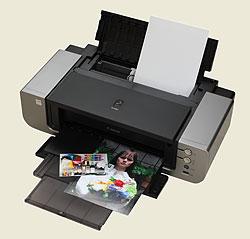 Testing hundreds of digital cameras, we've found that you can only tell just so much about a camera's image quality by viewing its images on-screen. Ultimately, there's no substitute for printing a lot of images and examining them closely. For this reason, we now routinely print sample images from the cameras we test on our Canon PRO9000 studio printer, and on the Canon iP5200 here in the office. (See the Canon PRO9000 review for details on that model.)
PictBridge Printing
When its USB interface is set to PTP mode, the Sony A700 supports direct printing (no computer required) to PictBridge compatible photo printers. The extent of PictBridge support varies greatly between cameras, and the Sony A700's support is better than many, but not quite as robust as we remember from the A100. Provided that it's connected to a printer that offers an equivalent level of support and control, you can select batch printing either singly or in 1-up, 2-up, or 4-up layouts or an index print, paper size, bordered or borderless prints, and time/date imprint options directly from the camera's menu system. (Pretty slick.) Printing via PictBridge to our Canon PRO9000 studio printer , we found it to be a little slow in formatting and preparing the data to send to the printer, but significantly better than the A100. (It took 1 minute and 30 seconds to print a 4x6 photo at best quality, pretty slow but still more than twice as fast as the A100.)
Output Quality
The Sony A700 certainly has plenty of resolution to make great-looking enlargements straight from the camera: 13x19 inch prints looked good in areas of high contrast, but regions of subtle contrast looked a bit mushy and soft. The version 2 firmware improved the handling of low-contrast areas, but subtle details still tended to get flattened more than we'd prefer. Images we processed from its RAW files (via Photoshop and Adobe Camera Raw version 4.3.1, the best RAW converter we had that would read the A700's files at the time of this writing) showed incredible detail, holding together exceptionally well even at 20x30 inches.
As always, the biggest challenge was at high ISO, and there the A700 faltered slightly, but once again did better than the A100. Noise and softening from the anti-noise processing are well-balanced, but there's more of both than we'd like to see at the highest ISOs. Shots at ISO 1600 look fine up to 8x10 inches (a full stop improvement over the earlier A100's images), but ISO 3200 images are softer but probably acceptable for most uses, and at ISO 6400, image noise was pretty obtrusive. On a positive note though, as we commented on earlier, color held up quite well even at ISO 6400. In the past, many cameras tended to decrease their color saturation at high ISO settings, in part as a trade-off to control image noise, but the A700 and its modern competition (Canon 40D and Nikon D300) do much better in this regard.
While the shots at ISO 6400 were quite noisy, many users will be satisfied with 5x7 inch prints for display on wall or table, and 4x6 inch prints are likely to be acceptable to most.
Color-wise, the Sony A700 did very well, in that its photos were generally hue-accurate and very accurately saturated. They were perhaps slightly brighter overall than the A100's images, something we think will help the A700 appeal to a broader audience, although its default color rendering tends more toward the accuracy of professional gear than the higher saturation levels of products aimed at consumers. Perhaps the best news is that the A700's saturation adjustment has nice fine steps on it, so you can easily tweak the camera's color up or down to match your personal preferences. All in all, a very good performance. -- But serious shooters will find their greatest reward in the A700's RAW files.
 Fujifilm GFX 50S Review
 Fujifilm X-T3 Review
 Olympus E-M5 III Review

Follow Imaging Resource