Sony Alpha A77 Exposure Options
The Sony A77 offers all the same exposure options you'd expect in a mid-range SLR camera, plus a few Sony-specific options. Available exposure modes include Program AE, Aperture Priority, Shutter Priority, and Manual modes, with shutter speeds from 1/8,000 to 30 seconds, as well as a Bulb setting available in Manual mode only, for longer exposures. The x-sync speed for flash photography is 1/250 second. A fully automatic mode places the camera in control of almost all functions, to try to deliver optimum results under a wide range of conditions. Another mode called Auto+ is similar to standard Auto, but has scene recognition that allows it to automatically select one of a dozen different scene types, some of which can't be directly accessed from the Scene mode. Basic options such as exposure compensation aren't available to the photographer in either of the Auto modes, but the A77 will still allow you to select from a subset of drive modes and flash modes, lock exposure with the AEL button, focus manually or automatically, and enable or disable the face detection and smile shutter functions.
The Sony A77's Mode dial also includes a Scene position, offering access to including Portrait, Sports Action, Macro, Landscape, Sunset, Night Scene, Hand-held Twilight, and Night Portrait. There's also a separate Sweep Panorama mode that captures and stitches a multi-image panorama with a single press of the shutter button, and merits its own position on the dial. So does a 3D Sweep Panorama mode, which operates similarly, but simulates a 3D effect with some clever maths. A Continuous Advance Priority AE mode locks the lens aperture at either F3.5, or the maximum aperture of the lens, whichever is smaller, removing the delay required to set and reset the aperture to allow focusing between shots. This enables the camera's fastest burst-shooting performance of 11.6 frames per second, according to our in-house testing. Finally, there's both a Movie mode that enables capture of videos with manual control over exposure variables, and a Memory Recall mode that allows three different groups of camera settings to be saved for later recall.
The Sony A77 offers an optional live histogram function in all operating modes. Located near the bottom right corner of the LCD panel or electronic viewfinder display, it's rather small, and offers only a luminance readout rather than a full RGBY histogram, but it's still very useful for ensuring your exposures are correct. Another feature that's rather more common, but still very welcome, is the exposure display when the camera is in Manual exposure mode. This shows the amount the camera thinks an image will be over- or underexposed within a range of +/-2.0EV, based on the settings you have selected, to help you find the best exposure for the subject. (Beyond the 2.0EV range, arrows on either end of the scale blink in the viewfinder, and the value blinks on the rear-panel LCD, to emphasise that the metering system's limit has been reached.) Together, the live histogram and exposure display make it relatively easy to get suitable exposures even when shooting manually.
Sony A77 Face Detection / Recognition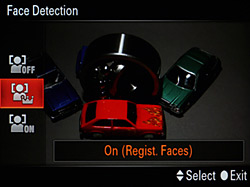 The Sony A77 includes Face Detection capability, capable of locating up to eight faces in the scene simultaneously. This information is taken into account when determining several exposure variables -- focus, exposure, flash and white balance. The A77 goes a step further than some competing models, and can also be programmed to recognize up to eight specific individuals, who are then prioritized over other detected faces when they're detected in the scene. It also offers another related feature that is now commonplace in point-and-shoot cameras, but still relatively unknown in large-sensor cameras. Dubbed "Smile Shutter", this allows the A77 to automatically trigger the shutter, capturing photographs by itself when a smiling face is detected within the image frame. The A77's implementation is perhaps best suited to portraits of individuals, since the shutter is tripped when only one face within a group is smiling. There's a three-step control over the degree to which a subject must smile before the shutter is tripped. and when Smile Shutter is enabled, the A77 also provides a graph at the left of the screen that indicates how close a particular expression has come to passing the required threshold for the shutter to be tripped. It doesn't, however, offer the blink detection function that's equally common in compact cameras.
Sony A77 ISO Range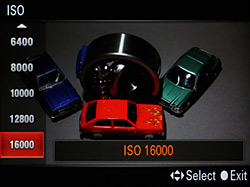 ISO sensitivity ranges from 50 to 16,000, which would have been considered a very wide range just a couple of years ago, but now lags some competitors noticeably at the upper end. The ISO sensitivity is adjusted in Program, Priority, and Manual modes by pressing the dedicated ISO button on the A77's top panel, or through the ISO option in the Function menu, and adjustments can be made in third-stop increments.
In Program and Priority modes, but not in Manual mode, an Auto ISO mode is available, and in Auto, Auto+, Scene, and Sweep Panorama modes, it's the only option. The upper and lower limits for the function can be manually set within a range of ISO 100 to 12,800 in all modes except Movie (which has an upper limit of ISO 1,600), and those that require Auto ISO (which leave the range in the camera's control).
In addition, the Sony A77 offers a Multi-Frame NR function, which combines multiple shots into a single output image, in a similar manner to the Hand-held Twilight scene mode. The difference between the two functions is that Multi-Frame NR allows direct control over ISO sensitivity. Multi-Frame NR is available only in the Program, Priority, and Manual modes, and is accessed from the ISO sensitivity dialog. When using Multi-Frame NR, the maximum ISO sensitivity limit is expanded to ISO 25,600 equivalent.
Sony A77 Noise Reduction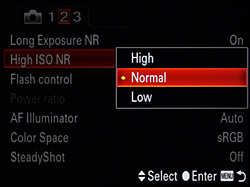 The Sony A77 gives you only three choices for High ISO noise reduction, none of which allows the function to be completely disabled. The default is to leave High ISO NR entirely in the camera's control, but if the maximum image detail is desired (or you prefer to do your noise filtering in post processing), a "Low" option is also available in Program, Priority, and Manual modes. There's also a "High" option if you don't want to post-process and prefer lower noise levels.
A separate Long Shutter noise reduction On / Off setting is available in Program, Priority, and Manual modes, for dark frame subtraction when shooting exposures of one second or longer. If enabled, this approximately doubles the exposure time for each shot, allowing the second dark frame exposure to be captured with the shutter closed.
Sony A77 White Balance Options White balance modes on the Sony A77 include Auto, Daylight, Shade, Cloudy, Incandescent, Fluorescent (Warm White, Cool White, Day White, or Daylight), and Flash. A direct Kelvin temperature setting is also available, ranging from 2,500K to 9,900K, as are three Custom white balance settings, for setting white balance from a white or grey card. The A77's popup flash strobe can be used when determining a custom white balance, and unusually, the camera also provides a Kelvin readout of the measured color temperature -- a great feature which lets you subsequently dial the temperature in directly if you're shooting in familiar conditions. The effect of changes in white balance settings is shown in real-time on the LCD monitor and EVF.
In all of the preset white balance modes, you can fine-tune the color by pressing the left / right arrow keys on the four-way controller while in the White Balance menu. Blue / red adjustment is possible within a range of -3 to +3 arbitrary units for all but the fluorescent mode, which offers only a -1 to +2 unit range. In Kelvin white balance mode, there's also a color filter function which offers a magenta - green filter within a fairly wide range of -9 to +9 arbitrary units.
Custom white balance is set by selecting Custom Setup from the white balance menu, and pointing the camera at a neutral white or grey card under the lighting you'll be shooting in, filling a frame in the center of the display with the reference target, then pressing the Shutter button.
In addition, the Sony A77 can bracket white balance using the White Balance Bracketing (BRK WB) option in the Drive Mode menu. For each shutter release, the A77 records three separate image files, varying only the white balance between each image. Two step sizes are available -- 10 mireds when using the BRK WB Lo setting, and 20 mired steps with the BRK WB Hi setting.
Sony A77 Metering Options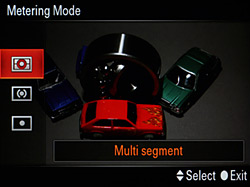 The Sony Alpha A77 offers three metering modes, selected via the Metering Mode option in the Function menu: Multi-segment, Center-weighted, and Spot. All three modes operate on data from the camera's CMOS image sensor. The default Multi-segment metering mode divides the image into a very fine-grained 1,200 segments. Center-Weighted gives precedence to the center of the image while reading the whole frame. Spot metering is useful for high-contrast subjects, as it bases the exposure reading on the very center of the image, letting you set the exposure based on a small portion of your subject. When the camera is operating in Auto, Auto+, or Scene modes, the metering mode is fixed to Multi-pattern, and cannot be changed.
By default, you can lock an exposure reading separately from autofocus lock by pressing and holding the AEL button. Alternatively, the AEL button behaviour can be changed so that pressing and releasing the button will set and release the autoexposure lock on subsequent presses.
Sony A77 Exposure Compensation & Bracketing
The Sony A77's Exposure Compensation adjustment increases or reduces the overall exposure from -5 to +5 exposure values (EV) in one-third stop increments, and like White Balance, the effect of Exposure Compensation is simulated on the preview image if possible. In addition, the A77 offers -3 to +3 EV of flash exposure compensation, in 1/3 EV increments, set through the Function menu. A Continuous Bracketing feature captures multiple shots with different exposures. See the Drive Mode section on Continuous Bracketing below for more details.
Sony A77 DRO / HDR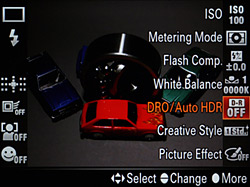 The Sony A77 offers two different functions aimed at handling high-contrast scenes, each functioning in a rather different manner. The Dynamic Range Optimization (DRO) function adjusts the tone curve of captured images, bringing out shadow detail without adversely affecting highlights. As well as an Auto DRO mode, there are also five different levels of DRO available. Alternatively, Sony has included a high dynamic range (HDR) mode, which captures three separate images with varied exposures, and then combines the images in-camera, creating a single image with significantly increased dynamic range. The A77 can either automatically select the exposure variation, or a value can be selected manually in 1EV steps within a range of 1EV to 6EV.
The DRO and HDR modes can't be used together, and each brings its own set of advantages and disadvantages. Since DRO only works from a single shot, it must operate entirely within the dynamic range available from the image sensor, where the HDR mode is able to capture a significantly greater dynamic range than is possible in one shot. Since DRO is effectively amplifying the signal in shadow areas of the image, it also brings increased noise (or increased noise reduction) in the shadows. HDR mode, meanwhile, is suitable only for relatively static subjects, given that it requires multiple exposures. Thanks to microalignment capability, Sony's HDR mode is at least able to deal with the slight changes in framing caused by shooting handheld, but subject motion or camera shake will likely cause unacceptable artifacts in HDR images.
Both DRO and HDR can be disabled altogether if desired, although the default on the A77 is for DRO Auto mode to be left enabled.
Sony A77 Hand-held Twilight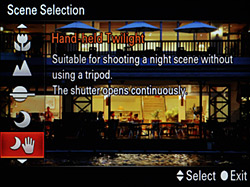 Another function which the Sony A77 has inherited from the company's point-and-shoot camera line is its Hand-held Twilight mode, which is accessed from the Scene (SCN) position on the Mode dial. Hand-held Twilight mode shoots a burst of six images with a single press of the shutter button, using as high sensitivity as is necessary to offer hand-holdable shutter speeds. The A77 then combines all six source images into one image with reduced noise in static areas, as compared to a single shot taken with the same exposure settings. Cleverly, Hand-held Twilight mode is able to deal with moving subjects, by making the assumption that the first frame includes your intended subject. Areas of subsequent images which match up with the first image are factored into the final result, but areas that don't match -- either due to subject or camera motion -- aren't used in creating the final image. This does, however, mean that the moving subject doesn't benefit from the same degree of noise reduction as the rest of the image.
The Sony A77's implementation of Hand-held Twilight does have one important difference from the similar mode found on its point-and-shoot siblings. Where the existing cameras have been able to use an electronic shutter to capture the source images, the A77 must instead rely on its physical shutter. The A77's mirror slap isn't the quietest we've heard, and with six frames captured in a rapid burst, its Hand-held Twilight mode can have bystanders turning around in expectation of seeing a paparazzo in their midst. ;-)
Sony A77 Sweep Panorama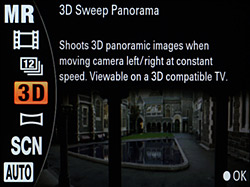 The final mode inherited from Sony's Cyber-shot point-and-shoot lineup is the A77's Sweep Panorama function, with which it can automatically capture a burst of images, and stitch them into a single panoramic image in-camera. Both 2D and 3D modes are offered, with the latter cleverly comparing the relative positions of subjects as they pass the left and right sides of the lens, and using this information to create a 3D image consisting of separate 2D views, stored in a Multi Picture Object file.
Again, since there's no electronic shutter to rely on, the mirror slap noise means you won't be catching anybody by surprise, That said, the feature functions pretty well if you've a reasonably steady hand, and your subject matter isn't too close to the camera. If your subject matter is too close to the camera, or your panning isn't smooth and straight, the seams between separate images can become fairly noticeable. Focus and exposure are locked from the first frame of the panorama, so you'll want to pick your starting point carefully. From there, you can pan left, right, up, or down, simply sweeping the camera across your subject matter after pressing the shutter button.
Two panorama sizes are available -- standard, or wide. Standard horizontal panoramas are limited to 15 megapixels, and vertical panoramas to 8.4 megapixels. In Wide mode, horizontal panoramas are 23 megapixels, and vertical panoramas are 12 megapixels. For 3D mode, only horizontal panoramas are possible, with the standard size providing 5.3 megapixel resolution, and the wide size offering 7.7 megapixels. There's also a 1,920 x 1,080 pixel mode designed to match the resolution of a Full HD display, available only for 3D panoramas.
A darkened mask over the left third of the LCD display shows an area of the frame that won't be included in the final output image, and an on-screen message warns you if the Alpha A77 wasn't able to track your panning, prompting you to recapture the panorama. (Depending on how much was captured, the A77 sometimes retains a partial panorama with the uncaptured portion of the image left as a flat grey.)
Sony A77 Drive Modes
The Sony A77 offers a variety of shooting modes, accessed via a dedicated Drive Mode button on the camera's top deck, or through the Drive Mode option under the Function menu. Options vary depending on the shooting mode, but include Single Shot Advance, two Continuous Advance modes, two Self Timer modes, Continuous Bracket, Single Bracket, White Balance Bracket, DRO Bracket, and Remote Commander. Single-shot, as you'd expect, captures a single image with each press of the shutter button. Continuous Advance captures images at either eight frames per second in Hi mode, or three frames per second in Lo mode, while the shutter button is held down. As many as 13-15 shots can be captured in a burst depending upon file type, adjusting focus and exposure between shots as necessary.
The Self-timer modes offers a choice of either two or ten second timers. The Bracket modes let you take a sequence of three or five shots with either 0.3, 0.5, or 0.7 EV exposure variation steps, or three shots with 2.0 or 3.0 EV steps. The sequence order is to shoot the metered exposure first, followed by the underexposed and overexposed frames. The difference between the two modes is that Continuous Bracket will capture all the necessary frames as fast as possible while the shutter button is held down, while Single Bracket requires you to full press the shutter button once per frame. White Balance Bracket captures three images with varied white balance settings, as described in the white balance section of this page. DRO Bracket offers two choices: Low captures three images at DRO levels 1 to 3, and High at levels 1, 3, and 5. Finally, Remote Commander mode configures the A77 to capture images as directed by the optional RMT-DSLR1 wireless remote control, which communicates with the camera via an infrared receiver hidden behind a shiny plastic trim piece in the top of the hand grip's front surface.
Finally, Continuous Advance Priority AE mode is accessed via a dedicated Mode dial position, and locks the lens aperture at either F3.5 or the maximum aperture of the lens, whichever is smaller, removing the delay required to set and reset the aperture to allow focusing between shots. This enables the camera's fastest burst-shooting performance of 11.6 frames per second, according to our in-house testing.
Sony A77 Creative Styles
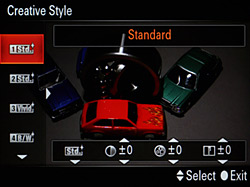 Finally, the Creative Style option on the Function menu allows photographers to set the A77's color mode. Six preset options are available -- Standard, Vivid, Neutral, Portrait, Landscape, and B/W. For all six choices, Contrast and Sharpness levels may be adjusted in seven steps. In addition, all but the black and white mode offer seven-step control over saturation. A separate Color Space option under Screen 3 of the Record menu lets you choose between sRGB and AdobeRGB color spaces, with sRGB being best for viewing images on a computer, and Adobe RGB the best choice for printing images.
Sony A77 Geotagging
Finally, the Sony A77 allows geotagging of images and movies at the time of capture. This allows them to be tagged with information regarding capture location, including latitude, longitude, altitude, receiver speed and direction, and the GPS time stamp. Movies are only tagged with information regarding the location at the start of the clip. Accuracy will vary depending on the number of satellites in view at a particular time and location. The initial GPS lock can take several minutes to achieve, if the camera hasn't been used recently, although again this can depend on environmental conditions, as well as the number and position of satellites in view. It's possible to reduce this time by uploading GPS-assist data to the A77 body using Sony's provided Picture Motion Browser software, which can greatly reduce the length of time required to obtain a GPS lock. This process has to be repeated roughly once per month, as the assist data is only good for so long. You can also set the A77 to automatically update its clock based on the time provided by GPS satellites.
The images above were taken from our standardized test shots. For a collection of more pictorial photos, see our Sony Alpha SLT-A77 Photo Gallery .
Not sure which camera to buy? Let your eyes be the ultimate judge! Visit our Comparometer(tm) to compare images from the Sony Alpha SLT-A77 with those from other cameras you may be considering. The proof is in the pictures, so let your own eyes decide which you like best!
 Fujifilm GFX 50S Review
 Fujifilm X-T3 Review
 Olympus E-M5 III Review

Follow Imaging Resource