Nikon Coolpix 5400A solid update to Nikon's upper-midrange Coolpix. 5 megapixels, 4x zoom, tons of features!<<Shutter Lag & Cycle Time Tests :(Previous) | (Next): Camera Modes & Menus>> Page 8:Operation & User InterfaceReview First Posted: 07/12/2003 |
Operation and User Interface
The Coolpix 5400 features a similar, straightforward user interface to other Nikon Coolpix models, although the wealth of options and depth of the LCD menu system can be intimidating for new users. (Novices needn't fear though, the 5400 in full auto mode is as easy to use as the most basic point & shoot, and the 15 different scene modes make even tricky shooting conditions easy to master. Only when you venture into its more advanced features do things get complicated.) Usability is enhanced by a user interface employing external buttons for many commonly-accessed camera functions, and a command wheel for rapidly adjusting settings. As a result, you'll only need to enter the menu system infrequently for typical shooting. The inclusion of a programmable Function key adds flexibility, allowing you to customize the camera to your specific shooting needs by assigning frequently-used settings to the top-panel button. Exposure compensation, exposure mode, ISO value, white balance, image quality and size, as well as focus controls can all be adjusted externally, and the large Mode dial provides access to a variety of exposure modes as well as the White Balance, ISO, and Image Quality/Size settings. (I missed the small, black and white LCD status panel used on earlier high-end Coolpix models for making faster changes without the LCD monitor activated, though.) The LCD menu system is easy to navigate via the Arrow-pad rocker control, but the plethora of available options means that some choices are buried 2 or 3 levels deep in the menus. This is probably unavoidable though, as the alternative would have been a menu system with a dozen screens to it.
In its still-image record modes, the 5400 presents an abbreviated "My Menu" whenever you press the menu button. You can set any of the handful of options shown there, or select the "Full Menus" option to see the complete set of menu choices. The My Menu display is almost 100% configurable, as you can move any of the record-mode menu options onto it via the setup menu. In practice, I found the My Menu display to be a decidedly mixed blessing. On the one hand, it was great whenever the function I needed was located on it, and it was quite easy to change which options were displayed there. On the other hand, I frequently found myself annoyed when I need to access a menu option that was buried on one of the main menu screens. This may have been more of an issue for me than for the typical user, given the extent to which I need to dig into all the options offered by each digicam I test. - Normal users will quite possibly find that the few options available on the My Menu are all they need. Still, I'd like to suggest two possible changes to Nikon: 1) Include an option on the Setup menu to disable the My Menu display, letting users drop directly into the main menu system if they so prefer. 2) Make the "more menus" option the first entry on the My Menu screen, to permit a quicker exit to the full system when necessary.
As noted above, the 5400 offers an incredible range of features and functions. While novices will be able to just pick it up and shoot with it in full auto mode, really learning its capabilities will take the average user at least a couple of hours with the manual and camera in hand.
Control Enumeration

Shutter Button: Located on top of the camera (on the sloping front) and
encircled by the Power switch, this button sets focus and exposure when halfway
pressed and fires the shutter when fully pressed.
Power Switch: Surrounding the Shutter button on the camera's top panel, this rotating lever turns the camera on or off.

+/- / Audio Button: Behind the Shutter button on the top panel,
this button lets you adjust the exposure compensation from -2 to +2 exposure
equivalents (EV) in one-third step increments, when pressed and held down while
turning the Command wheel.
In Playback mode, pressing and holding this button lets you record a short sound clip to accompany a captured image. Once the clip has been recorded, pressing this button again plays it back.

Flash Button: Directly to the left of the +/- button, this button cycles
through the available flash modes. Choices are Auto, Flash Cancel, Anytime Flash,
Red-Eye Reduction, Slow-Sync, and Rear Curtain Sync.

Func. Button: To the left of the Flash button,
this button can be programmed to control one of several functions. Through the
Setup menu, you can set the Function button to control User
setting, White balance, Quality/Size, Sensitivity, or Continuous modes.

Command Wheel: Located in the top rear, right hand corner of the camera,
this rotary control is used in conjunction with many of the other buttons on
the camera to change camera settings. Pressing and holding the appropriate button
while rotating this wheel one way or the other steps through the options available
for the option in question. In programmed exposure mode, rotating this wheel
at any time (e.g., with no button pressed) varies the exposure program, biasing
it toward larger or smaller aperture settings. (A very handy way to control
depth of field in your photos, without having to bother with the aperture priority
exposure mode.)
In Playback mode, turning this dial cycles through six different pages of information about the currently-displayed image.
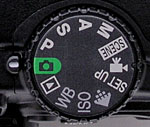
Mode Dial: Directly to the left of the Command wheel, this dial
selects the camera's main operating mode, and accesses a few exposure options
as well. Choices are:
 Auto
Exposure: Gives the camera complete control of the exposure, with
only limited options available to the user (such as image size and quality,
flash mode, zoom, etc.).
Auto
Exposure: Gives the camera complete control of the exposure, with
only limited options available to the user (such as image size and quality,
flash mode, zoom, etc.).
 Program
AE Mode: The camera still controls aperture and shutter speed, but
the user now can adjust any of the available exposure parameters. Turning
the Command wheel in this mode accesses Flexible Program AE mode, which lets
you select from a range of equivalent exposure settings. (Very handy, for
biasing the exposure toward larger or smaller apertures, higher or lower shutter
speeds, without giving up the ease of automatic exposure determination.)
Program
AE Mode: The camera still controls aperture and shutter speed, but
the user now can adjust any of the available exposure parameters. Turning
the Command wheel in this mode accesses Flexible Program AE mode, which lets
you select from a range of equivalent exposure settings. (Very handy, for
biasing the exposure toward larger or smaller apertures, higher or lower shutter
speeds, without giving up the ease of automatic exposure determination.)
 Shutter
Priority Mode: This mode lets you select the shutter speed, while
the camera selects the best corresponding aperture setting. All other exposure
options are available.
Shutter
Priority Mode: This mode lets you select the shutter speed, while
the camera selects the best corresponding aperture setting. All other exposure
options are available.
 Aperture
Priority Mode: The opposite of Shutter Priority mode, this mode lets you
adjust the camera's aperture setting while the camera selects the shutter
speed.
Aperture
Priority Mode: The opposite of Shutter Priority mode, this mode lets you
adjust the camera's aperture setting while the camera selects the shutter
speed.
 Manual
Mode: This mode offers total user control over the exposure, and
increases the shutter speed range to include a bulb setting for exposure times
as long as 10 minutes.
Manual
Mode: This mode offers total user control over the exposure, and
increases the shutter speed range to include a bulb setting for exposure times
as long as 10 minutes.
 Scene:
This mode offers a total of 16 preset "scenes" for shooting under
common, but sometimes challenging, exposure conditions. Each scene mode configures
multiple exposure parameters (exposure compensation, white balance, saturation,
etc) to produce the optimal results for a particular type of subject. Available
scenes are Portrait, Party/Indoor, Night Portrait, Beach/Snow, Landscape,
Sunset, Night Landscape, Museum, Fireworks Show, Close Up, Copy, Back Light,
Sports, Panorama Assist, and Dusk/Dawn.
Scene:
This mode offers a total of 16 preset "scenes" for shooting under
common, but sometimes challenging, exposure conditions. Each scene mode configures
multiple exposure parameters (exposure compensation, white balance, saturation,
etc) to produce the optimal results for a particular type of subject. Available
scenes are Portrait, Party/Indoor, Night Portrait, Beach/Snow, Landscape,
Sunset, Night Landscape, Museum, Fireworks Show, Close Up, Copy, Back Light,
Sports, Panorama Assist, and Dusk/Dawn.
 Movie
Mode: Records moving images with sound, for as long as the memory
card has available space.
Movie
Mode: Records moving images with sound, for as long as the memory
card has available space.
 Setup:
Enables the camera's Setup menu, the options on which will be detailed later.
Setup:
Enables the camera's Setup menu, the options on which will be detailed later.
 Image
Size and Quality: Allows you to set the image resolution and quality.
Resolution choices are 5M (2,592 x 1,944 pixels), 2M (1,600 x 1,200 pixels),
1M (1,280 x 960 pixels), PC (1,024 x 768 pixels), TV (640 x 480 pixels) and
3:2 (2,592 x 1,728 pixels). Quality choices include Hi
(TIFF), and Fine, Normal, and Basic JPEG compression levels.
Image
Size and Quality: Allows you to set the image resolution and quality.
Resolution choices are 5M (2,592 x 1,944 pixels), 2M (1,600 x 1,200 pixels),
1M (1,280 x 960 pixels), PC (1,024 x 768 pixels), TV (640 x 480 pixels) and
3:2 (2,592 x 1,728 pixels). Quality choices include Hi
(TIFF), and Fine, Normal, and Basic JPEG compression levels.
 ISO:
This setting adjusts the overall sensitivity of the camera. ISO equivalents
of 50, 100, 200, or 400, and an Auto setting are available.
ISO:
This setting adjusts the overall sensitivity of the camera. ISO equivalents
of 50, 100, 200, or 400, and an Auto setting are available.
 White
Balance: Sets the overall color balance
of the image. An Auto setting is available, as well as Daylight, Cloudy, Incandescent,
Fluorescent, Speedlight, Shady, and Manual settings.
White
Balance: Sets the overall color balance
of the image. An Auto setting is available, as well as Daylight, Cloudy, Incandescent,
Fluorescent, Speedlight, Shady, and Manual settings.
 Playback:
Lets you scroll through captured images on the memory card. You can also manage
images by erasing unwanted files, setting up files for printing, enlarging
images, or creating an audio caption.
Playback:
Lets you scroll through captured images on the memory card. You can also manage
images by erasing unwanted files, setting up files for printing, enlarging
images, or creating an audio caption.
![]()
Diopter Adjustment Dial: Tucked away on the right side of the optical viewfinder
eyepiece, this small, black dial adjusts the viewfinder to accommodate eyeglass
wearers. (The 5400 is unusually eyeglass-friendly, with a very high eyepoint
and plenty of diopter adjustment.)

AE/AF Lock Button: Located on the rear panel, to the right of the
viewfinder eyepiece, this button locks focus and/or exposure (depending how
it's programmed through the Setup menu) whenever pressed. The setting is then
saved until the Shutter button is pressed or the AE/AF Lock button is pressed
a second time.
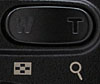
Zoom Rocker Button: Directly to the right of the AE/AF Lock button,
this two-way rocker button controls the optical and digital zoom in any record
mode.
In Playback mode, this button enables the nine-image index display when pressed on the "W" side. Pressing the "T" side enlarges the captured image to a maximum of 6x.
![]()
Menu Button: The top button in a series lining the right side of the LCD
monitor, this button brings up the settings menu in all capture modes as well
as in Playback mode. Pressing it a second time exits the menu system.
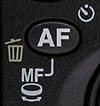
AF/MF/Self-Timer/Erase Button: Directly below the Menu button, this button
controls a variety of settings. In record mode, pressing this button steps you
through the various programmed focus modes (normal autofocus, infinity focus,
macro mode, and self-timer). Pressing and holding this button while rotating
the Command wheel switches you to manual focus mode and sets the focus distance.
In playback mode, this is the "trash" button, which calls up a confirmation dialog, asking if you really want to delete the current image.

Quick Review/Resize Button: Directly beneath the AF button, the Quick Review
button calls up a thumbnail sized display of the most recently captured image
while in either record mode, appearing in the upper left-hand corner. The left
and right arrow keys scroll through the rest of the captured images on the memory
card. Pressed a second time, it expands the thumbnail view to a full-screen
display of the captured images on the card, complete with an image information
overlay. The Quick Review mode is canceled by pressing the button a third time,
or by pressing or half-pressing the Shutter button.
In Playback mode, this button makes a lower-resolution copy of the currently displayed image. (The original image is left undisturbed.)
![]()
Display Button: The final button in the series lining the LCD monitor, this
button recalls or cancels the color LCD screen information display and viewfinder
display. Pressing the button multiple times steps you through a normal LCD display
(with information overlay), a display of the image alone, with no overlay, or
no display, with the LCD display turned off.
In Playback mode, pressing this button merely turns the information overlay on or off.
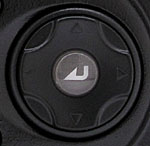
Four-Way Multicontroller and OK Button: Situated on the far right of the
rear panel, this control features four arrows that allow the user to navigate
through the LCD menu system and make selections in Record, Playback, and Setup
modes. Different menu items are selected via the up/down arrows. Pressing the
right arrow selects the item, generally taking you into a sub-menu. Pressing
the left arrow takes you back out again. In the center of the multicontroller
is an OK button, which confirms menu selections.
In Playback mode, the left and right arrows navigate through captured images on the memory card. (The up and down arrows also move forward and backward through captured files.) The OK button triggers a movie file to begin playing, as well as pauses audio caption playback.

Follow Imaging Resource: