Olympus C-7070 Wide ZoomThe Olympus C-7070 offers a nice range of "enthusiast" features in a capable and affordable 7-megapixel camera.<<Intro, Highlights & User Report :(Previous) | (Next): Viewfinder>> Page 2:DesignReview First Posted: 03/01/2005, Updated: 04/27/2005 |
Design
 Keeping to a similar look and feel that distinguished previous Olympus digital cameras, the Olympus C7070 Wide Zoom has a fairly compact body hosting a generous allotment of external controls and a multi-angle LCD monitor that tilts and swivels. The C7070's all-black body is something of a cross between the styling of a traditional SLR body and that of a rangefinder camera, with a tallish profile 4.6 x 3.4 x 2.6 inches (116 x 87 x 66 millimeters) and weighing a solid 17.7 ounces (502 grams) with battery, CF, and xD-Picture card loaded.
The C7070 Wide Zoom looks and feels quite similar to a small film-based SLR camera, and is substantial enough for a good hold, though I prefer a far deeper cut on the inside of the handgrip than the C7070 offers. It is probably too large to slide into a purse or coat pocket when you're done shooting, so you'll likely want to purchase a small camera bag - although the included neckstrap lets you keep the camera at the ready for those spur-of-the-moment photo opportunities. The C7070 has a very pleasing heft to it - not too heavy, but conveying an impression of solidity and ruggedness (there's no noticeable "give" or flexing to any of its body panels).
The lens extends about one inch (26mm) from the front bezel, depending on the zoom position, when the camera is powered on in either Still Shooting (Record) or Movie capture modes. The front lens element is protected by a plastic lens cap that gently press-fits onto the front of the lens, and attaches to the camera with the supplied tether strap.
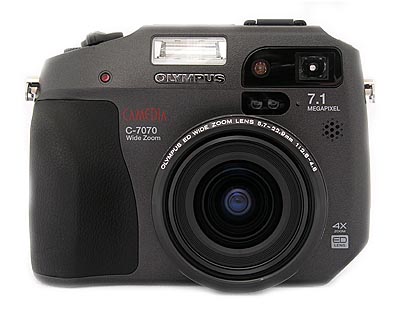
From the front of the camera, the edge of the zoom lever (upper left corner) is visible, as well as the self-timer / remote control lamp, AF illuminator, AF sensor, flash, microphone, and the remote control receiver. The inside lip of the lens barrel has a set of threads that accepts an optional lens adapter tube for attaching auxiliary lenses to the camera. (Wide angle, telephoto, and macro auxiliary lenses are available.)
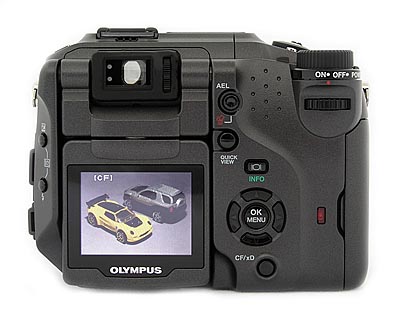
The camera's rear panel layout, while being rather packed with controls and features, is logically designed. Most of the control buttons are positioned within easy reach while holding the camera with a stable grip. A 1.8-inch LCD color monitor dominates the rear of the camera, and lifts up from rear panel 180 degrees. Once pulled out from the body 45 degrees, the LCD panel can swivel another 270 degrees on a horizontal pivot. Thus, you can swivel the panel around and close it facing the rear panel, to protect it from incidental scratches. The Five-Way Arrow Pad is right of the display, with the OK button in the center. Below it is the CF / xD button, for selecting the memory card being used. The Display / Info button is directly above, with the Quick View and AE Lock / Erase buttons above and to the left. A small Command dial is at the top of the right side, for making changes in conjunction with the external control buttons, while the edges of the Mode and Power dials can be seen directly above. On the left side of the LCD monitor, on a beveled body facet, are the Flash Mode and Exposure Compensation buttons. (Pressing both simultaneously adjusts the flash exposure.) A red LED adjacent to the memory card door lets you know when the camera is writing to one of the memory cards. A diopter adjustment for the optical viewfinder is on the right of the eyepiece.
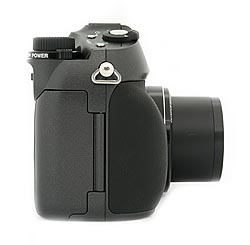
The large black hand grip, which houses both the battery and memory card compartments, makes up the right side of the camera. It is sculpted to fit comfortably in your hand, with a slightly concave finger hold on the rubberized, textured front and a smoothly contoured thumb grip on the back. The hinged, plastic door of the memory card compartment opens from the back. Inside the compartment are two slots, one that accommodates Compact Flash Type I and II cards, and another that holds xD-Picture Cards. Right above the compartment door is one of two neck strap eyelets, with the second one counterbalancing it on the left side of the camera.
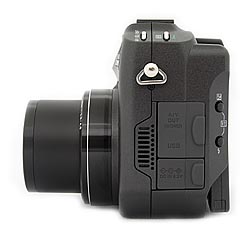
On the left side of the camera are the second neckstrap eyelet, speaker, and connector compartments. The top compartment holds the A/V Out and USB jacks, while the lower compartment holds the DC-In port. Both compartments are covered by thick, flexible, rubbery flaps that remain tethered to the camera body when opened. Also visible on a beveled body facet, are the Flash Mode and Exposure Compensation buttons which were described previously.

At the far left on the top of the camera are the AF / Macro / MF and Metering Mode / Protect buttons, which angle down toward the neck strap eyelet. To the right is the external flash hot shoe, which is compatible with either generic "dumb" flash units, or Olympus' own dedicated strobes. The remaining controls, clustered on the right hand side of the camera's top, are the Shutter button, Zoom lever, Self-Timer / Remote Control / Rotate button, Custom / DPOF button, and the Mode and Power dials. The top panel also features a small status display panel.

The bottom of the camera holds the battery compartment cover and a metal screw-mount tripod socket that's too close to the battery compartment to make battery changes easy when mounted on a tripod. One way around this is to use the optional AC adapter, handy for time-consuming projects, such as working in the studio or downloading images to the computer. Fortunately, the location of the flash card door on the right hand rear of the camera means that if you're on AC power, the camera needn't be removed from the tripod to offload images when your flash card is full. The good news about the tripod socket is that it's metal, and located about as close to the camera's center of gravity as possible. Both factors make for long life. The downside of the tripod socket location is that it's not particularly close to the optical center of the lens, as needed when shooting multiple images to be assembled into a panorama. (This probably isn't too big an issue though, as the optical center of the lens is actually near the end of the body-mounted lens collar anyway. This means you'd need to use a panorama head with the camera even if the tripod socket were directly centered under the lens cylinder.)

Follow Imaging Resource: