 Back
to Full Nikon CoolPix 995 Review
Back
to Full Nikon CoolPix 995 ReviewGo to Nikon CoolPix 995 Data Sheet
Go to Nikon CoolPix 995 Pictures Page
Up to Imaging Resource Cameras Page
Use your browser's "Back" button to return to the previous page, or the links at the top and bottom of this page to navigate to related information. If you have difficulty fitting the text on this page onto your printer output, simply resize your browser window to a narrower width and print again.
Remember us when it's time to buy!
Dave here: Have our reviews been helpful to you? (Is this article you're reading right now useful?) Preparing this level of information on as many products as we do is incredibly hard work, not to mention expensive. Things on the Internet may look like they're free, but they're not. (As a lot of big dot.com companies are finding out these days.) Somewhere, somebody has to pay to produce worthwhile content. YOU can help us though, by remembering us when it comes time to make your purchase. Would you consider coming back to our site and clicking-through to one of our advertisers to make your purchase? Every dollar you spend with one of our advertisers helps us directly (in affiliate fees) or indirectly (the advertiser will keep renewing their ad contract with us). To make it easy for you to support us, here's a URL you can visit, to see all our current advertisers, with links to click on that will register your visit to them as having come from our site. It's up to you where you buy, but Mike, Mike, Kim, Yazmin, Marti and I would be really grateful if you'd help us out by choosing one of our advertisers to purchase from.
Thank you for your support!
Dave Etchells, Founder & Publisher
Visit our "Buy Now" Page:
https://www.imaging-resource.com/buynow.htm
Back
to Full Nikon CoolPix 995 Review
Go to Nikon CoolPix 995
Data Sheet
Go to Nikon CoolPix 995
Pictures Page
Up to Imaging Resource Cameras
Page
Nikon CoolPix 995Nikon updates the hugely successful Coolpix 990, adding a pop-up flash and Type II CF support! Review First Posted: 4/25/2001 |
|
 |
|
Full 3.34 megapixel sensor delivers 2048x1536 images |
|
|
Exceptionally well-designed user interface & controls |
|
|
|
32 Megabyte SDRAM buffer for 2 second cycle time |
|
|
|
Enormous creative control and flexibility |
|
|
|
Excellent color and tonality |
What's New
Since many of our readers are already familiar with the previous Coolpix 990 model, we thought we'd include a list of the new features Nikon has included on the 995. Here's what we noticed as new to the 995:
Executive Overview
The new Coolpix 995 combines the advanced features we loved from the previous 990 model with a host of new ones that make the new camera even more appealing. Additions like the 4x zoom lens, pop-up flash, and expanded ISO range give the camera even greater flexibility than its already capable forebear. The swivel-lens design has always been a favorite of ours, as it greatly enhances the camera's optical flexibility, easing tricky low- or high-angle shots. The control layout stayed essentially the same, but now includes a Quick Review button for fast playback of captured images. The camera provides both a real-image optical viewfinder and an LCD monitor display for image composition, and the LCD offers a very extensive information display that reports a variety of exposure information, including aperture and shutter speed settings. The 995's user interface has the same features we liked so well in the 950 and 990 before it, in that the combination of external buttons, the command dial, and the top-panel LCD data readout let you control almost every important exposure parameter without having to resort to the LCD menu system. This makes for very quick control of the camera's functions, although the resulting user interface has a longer learning curve than more purely menu-based control systems. In Playback mode, the LCD gives an equally informative readout on captured images and also offers an index display of thumbnails and a playback zoom option.
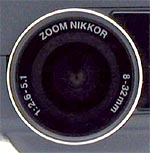
Optically, the Coolpix 995 is equipped with an 8-32mm, 4x zoom lens (equivalent to a 38-152mm lens on a 35mm camera), made up of ten elements in eight groups (all made from environmentally friendly glass, we might add). The seven blade iris diaphragm design greatly extends aperture control by providing an essentially continuous range of adjustment, a nice carryover from the 990. Zoom is easily controlled via the W and T buttons on the back panel and the settings menu even allows you to select the Fixed Aperture feature, which keeps the aperture constant while the lens zooms, a handy feature for flash photography. The zoom control is also very nice in that the lens operates smoothly, with none of the fixed steps in focal length adjustment that we're accustomed to seeing in digicam zoom lenses. A 4x digital zoom can be turned on and off through the settings menu and offers a "stepless" incremental zoom range from 1.1x to 4.0x. The 995 also offers the same variety of focusing options, including Continuous and Single autofocus modes as well as a manual control. Under the autofocus setting, you can set the desired focus area, or let the camera decide on its own (which displays a complex target series on the LCD panel and bases focus on the object closest to the lens).
Exposure-wise, we greatly enjoyed the flexible options under the Manual Record setting. When you turn the camera on, you have the option of a completely Automatic or Manual capture mode, in addition to the Playback mode. Under the Automatic capture mode, the camera handles everything, from the shutter speed to the white balance (perfect for novices), but when you switch to Manual, your options increase exponentially. Within the Manual capture mode, you can select either Program, Flexible Program, Aperture Priority, Shutter Priority, or Manual exposure modes. Program does exactly as it sounds and selects the aperture and shutter speed, but you now have absolute control over white balance, exposure compensation, etc. Flexible Program does the same but instead lets the user select from a variety of aperture and shutter speed combinations. Aperture Priority and Shutter Speed Priority are also pretty self-explanatory, letting the user select one value while the camera selects the other. Finally, Manual gives you total control over everything, a feature we really like. Shutter speeds are adjustable from eight to 1/2,300 seconds (with a Bulb setting for longer exposures) and the maximum aperture ranges from f/2.6 to f/5.1, depending on the zoom setting.
Nikon has been an innovator in developing special shooting modes for its high end consumer cameras, and the Coolpix 995 continues in this vein. The still-unique Best Shot Select is a great aid for getting sharp photos when you have no choice but to hand hold the camera under dim lighting conditions. The Auto Bracketing feature now includes a White Balance Bracketing function, while a new Noise Reduction mode decreases the noise caused by higher ISO settings in low-light/long exposure shooting situations. We were also pleased with the return of the extensive white balance menu from the 990 (Auto, Preset, Fine, Cloudy, Incandescent, Fluorescent, and Speedlight) and the variety of metering options (the famous 256-element Matrix mode, Center-Weighted, Spot, and Spot AF). Also, under the settings menu, we enjoyed the ability to alter the in-camera sharpening as well as increase or decrease the contrast or turn the image into monochrome black and white. And of course, you have the ability to connect an external flash for use with or without the built-in flash.
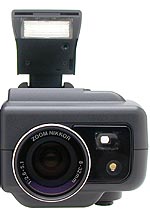
Speaking of the internal flash, the Coolpix 995 now sports a popup flash design that extends a good three inches or so above the lens axis. This should dramatically reduce the problems with redeye that have dogged the Coolpix cameras since the original model 900 swivel design. When working without a flash, the 995's low light capability is about the most impressive we've seen from a camera selling for under $1,000: Automatically-timed exposures can range as long as 8 seconds, but a "bulb" exposure mode will keep the shutter open for up to 60 seconds (!), as long as you hold down the shutter button. The new noise reduction option (borrowed from Nikon's high-end SLR designs) works quite well, actually making 30 second or longer exposures useful.
Answering a frequent request from previous Coolpix owners, the Coolpix 995 includes a Type II CompactFlash slot, and supports the IBM Microdrive for image storage. (Note though, that only the more recent 512 MB and 1 GB models are supported.) For power, the camera runs from either a 2CR5 lithium battery, or a single rechargeable lithium-ion battery pack. This provides good battery life, and the good news is that Nikon's including both the battery and charger in the box with the camera. The camera supports USB for quick connection to a PC or Mac, and is packed with a software CD containing Nikon View Version 4, ArcSoft PhotoStudio 2000, iView Multimedia Pro (Mac only), and Canto Cumulus 5.0 Demo. There's also an NTSC video cable (European models ship with PAL) for connecting to a television set.
There are a few changes relative to the 990 that we're less than excited about though, including the increased cost of carrying a spare battery, occasioned by the switch to a proprietary LiIon pack. In another apparent move to reduce costs, the body material is now a mix of magnesium alloy and high-impact polycarbonate. We have no reason to suspect that the 995 is any less rugged than its predecessors (polycarbonate being legendary for its toughness), but personally liked the feel of the metal bodies better than the new hybrid design. Finally, the new lens design seems to zoom more slowly than that on the earlier models, contributing to long startup times if you choose to have the camera remember the last-used zoom setting. (A very useful feature though, so perhaps we shouldn't bellyache too much about it.)
What can we say? We were already enamored with the Coolpix 990, and the 995's increased flexibility is even more impressive. Increased zoom range, higher ISO settings, and a bevy of improved features make this camera perfect for any shooting situation. It offers a completely automatic mode for novices, with the convenience of variable exposure control for learning. As your skills improve, the 995 offers more exposure options than perhaps any other camera on the market. Building on the legacy of the Coolpix 950 and 990 designs, we predict that the Coolpix 995 will continue to be a leader in the high-end "prosumer" market. If you're looking for the ultimate in control over your picture-taking, the Coolpix 995 is the camera to own!
Design
From the outside, the Coolpix 995 looks very much like its predecessor, the Coolpix 990. Nikon continues the same swivel-lens design that characterizes the Coolpix line, allowing the lens to swivel just shy of 360 degrees. The lens can point back towards the user, straight ahead, or straight down to the ground, while keeping the LCD screen oriented for easy viewing. The camera body is compact and light weight, measuring approximately 5.4 x 3.2 x 1.6 inches (13.72 x 8.12 x 4.06 cm) with the lens stowed in its upright position. One immediate difference we noticed between the 990 and 995 models is that the 995's body is a mix of the magnesium alloy used in the 950 and 990, and high-impact polycarbonate plastic. This doesn't save much on overall weight (the 990 weighed about 13.1 ounces, or 371.4 grams, and the 995 weighs about 13.8 ounces, or 391.22 grams, both without the battery). The plastic portion of the body (the lens side) still seems quite sturdy, and should be able to withstand most average wear and tear, but we still sorely miss the unquestioned ruggedness of the all-metal bodies of the 950 and 990. (We suppose though, that if polycarbonate works in motorcycle helmets, it should be able to handle the knocks and bruises of even fairly careless digicam use.)
With the lens facing forward, the design of the front of the camera is pretty sparsely populated. The lens itself doesn't protrude much from its barrel, and is protected by a tiny, spring-loaded lens cap, which tethers to the camera body to prevent it from being accidentally lost. The Self-Timer/Red-Eye lamp and front side of the optical viewfinder fit snugly beside lens. Beneath the lens barrel are the external flash sync socket (covered by a tiny, and easily lost, plastic cap) and the diopter adjustment dial for the optical viewfinder. A completely new (and welcome) feature to the Coolpix line is the 995's pop-up flash, found on the top side of the lens barrel along with the Flash Release lever. On the very inside of the hand grip (just above the Coolpix logo) is the DC power input jack, covered by a soft rubber flap.
Looking at the top of the camera body, there's a small status display panel (very helpful for conserving batteries by not using the LCD monitor), the Power/Mode dial, Shutter button, a couple of function buttons, and a small Command dial for changing various camera settings. The Mode and +/- buttons on the top panel also double as Function buttons, programmable through the Setup menu in Manual exposure mode to access various exposure options. This was designed specifically to allow one handed camera operation, as you can hold down one of the buttons with your index finger and scroll through the chosen options with the Command dial. The normal functions for these buttons are to change the camera's exposure mode or the exposure compensation. Other functions which can be assigned to them include landscape/macro/self-timer mode, flash mode, and white balance setting, and metering (matrix, center weighted, or spot).
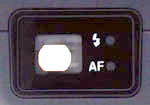
The majority of the controls are located on the back panel of the camera, along with the LCD monitor. The layout of the controls is nearly identical to the preceding Coolpix 990, with the exception of a new Quick Review button. The Monitor, Menu, and zoom control buttons line the top of the LCD panel, with the "arrow pad" rocker button off to the right side. Beneath the LCD are several controls for macro, manual focus, flash, quality, size, and a few others. When the lens is rotated to point forward, the optical viewfinder is visible from the back panel. Two LEDs located directly beside the viewfinder report the status of the autofocus and flash. The two shoulder strap attachments are also on the back panel, one at the bottom right corner and the other side-mounted along the top right edge.
We like the bulky hand grip (a little slimmer than that on the 990, see below) on the right side of the camera, which provides a firm, secure hold. The soft rubber surface fits directly under your fingers, providing additional friction for a good grip. Located inside the hand grip are the serial and USB I/O jack, the video output jack, and the CompactFlash compartment. The digital and video inputs are covered by a soft, flexible rubber flap that quickly and securely presses into place. The placement of the CompactFlash slot makes it easy to change cards when mounted to a tripod and the plastic door simply flips open and shut. There is no access light to let you know when the camera is accessing the card, so you'll have to pay attention to the LCD monitor or the small status display to know when it's OK to change cards. (It's important to never remove a memory card while the camera is writing to it, lest you corrupt your images or even damage the card.)
Finally, the flat bottom of the camera holds the battery compartment and a metal tripod mount that are unfortunately too close together to allow battery changes while on a tripod. (A necessary consequence of the swivel design.) The battery compartment has a sliding latch that keeps the door tightly shut. A sliding lock next to the tripod mount controls the amount of lens swivel. When slid towards the lens, the switch allows the lens to rotate through its full range of roughly 280 degrees. Sliding the switch towards the tripod mount limits the lens rotation to 180 degrees, from the front to the back.
This is probably as good a time as any to talk about how the shape of the 995 compares to the previous Coolpix 990: As you can see from the animation above, the 995 is just a little shorter and squatter, with more bulk around the lens barrel (largely due to the popup flash), and a little thinner around the hand grip, due to the trimmer form factor of the LiIon battery pack as compared to the 990's four AA cells. The ridge on the back of the camera that acts as a thumb grip is also a bit more pronounced. Overall, the camera is very easy to grip and comfortable to hold. We didn't have a 990 to play with side by side with the 995, but can say that the case design is evolutionary rather than revolutionary. The larger thumb grip did feel good in the hand, but we felt that the 990 was pretty comfortable to begin with.
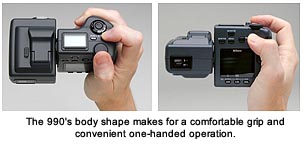
The controls on the 995 are laid out to facilitate one-handed operation, with key exposure controls accessible via the function buttons on top of the camera, used in conjunction with the command dial. Used alone, the command dial selects shutter or aperture settings, depending on the exposure mode selected. On the camera's back, the zoom toggle is comfortably under your thumb when holding the camera normally. Less common (but still frequently used) options like ISO, image size/quality, and flash modes require two hands to set using the rear-panel buttons, but don't require using the LCD menu system. (A big plus in our opinion, making for quick operation.)
 Viewfinder
The Coolpix 995 offers both an optical viewfinder and a color LCD display screen for composing images. The real-image optical viewfinder zooms along with the lens, but doesn't reflect any digital enlargement from the digital zoom option (which requires the LCD monitor). The viewfinder display features a center focus target for lining up shots, and a set of cropping outlines that show the alignment change required for close up focusing. Two LEDs beside the viewfinder indicate the status of the flash and autofocus systems, each labeled accordingly. The flash LED lights red when the flash is fully charged, and flashes when the flash is still charging. The AF LED glows green when focus is set, and flashes when the camera is having trouble setting focus. A dioptric adjustment dial (-2 to +1 diopter adjustment) is tucked away on the underside of the lens barrel, and adjusts the viewfinder for eyeglass wearers. The Coolpix 995's optical viewfinder has a fairly high eyepoint as well, which should accommodate most lens thicknesses.
 The 1.8 inch, 110,000 dot, low temperature, polysilicon TFT, color LCD monitor on the back panel operates both as a viewfinder and information display while in any capture mode. As we noticed on the Coolpix 990, the LCD on the 995 has a very high refresh rate, so images of moving objects usually appear sharp and clear. A series of autofocus targets can be continually displayed on the LCD, to tell you where the camera is judging focus from. The Monitor button controls the LCD monitor's display, cycling through no display, image and information, and image only. The information display reports a nice selection of camera settings, including aperture and shutter speed (when in Manual capture mode).
 A unique feature of the 995 (borrowed from Nikon's high-end film cameras, and a carryover from the 990) is it's powerful zone-based autofocus system. The camera can automatically choose between five different autofocus zones, or you can lock it in on any one of them manually. Either way, the viewfinder displays all five zones, and highlights the currently active one in red. Very slick!
 A particularly nice feature that's new on the Coolpix 995 is the "quick review" function, which lets you quickly check the last exposure while still in record mode, simply by pressing the Quick Review button. This isn't an uncommon feature on digicams, but what's absolutely unique on the 995 is its "picture in picture" review mode (shown here), which opens a playback window in the upper left-hand corner of the display screen, keeping the viewfinder image live on the remaining LCD area. Note too, that this image isn't restricted to the most recently captured photo: You can scroll through all the images on the memory card by pressing the rocker button arrows. The first press of the Quick button activates the picture in picture review mode, a second press enables full-screen playback, and a third press returns you to full capture mode. At any point, pressing the shutter button returns you to capture mode and snaps a picture. Very slick!
We found the LCD screen to be bright, enough to be seen fairly well in sunny shooting conditions, but it wasn't the most visible we've encountered. (Sunlight and LCDs are always a problematic combination.) Through the Setup menu, the 995 offers a series of LCD adjustments, including hue and brightness adjustments in all camera modes. Brightness adjustments are pretty common on digicams, but the ability to tweak the color on the 995's LCD is a decided plus. In Manual capture mode, the 995 also offers a Display Mode setting, with options of Display on, Review Only, Preview Only, and Monitor Off.
 In Playback mode, the LCD offers a wealth of information via several display pages. In total, no fewer than five information screens are available, accessed by turning the Command wheel. The first display is the standard Playback information readout, which reports the date and time of the shot, file name, quality setting, and the image number on the card. The next two screens report a long listing of camera and exposure settings, including the firmware version, focal length, shutter speed, ISO, etc. A fourth information page shows a histogram view of the image, illustrating the distribution of brightness values in the image, with the left edge corresponding to pure black, and the right edge to pure white. Once you learn how to read it, a histogram is phenomenally useful in determining whether you've managed to capture a good exposure or not. Ideally, a well-exposed image would produce a histogram curve that just filled the graph from left to right, indicating that it contained a full range of tonal values. The final information screen shows lens, shutter, and focus settings, and indicates (by the green brackets) what the autofocus system had locked onto when the picture was taken. Histogram displays won't always show you if only a small portion of your image is blown-out: To address this need, the 995 blinks those parts of the image that are overexposed, letting you see exactly where you're losing highlight detail. Very slick!
 Also in Playback mode, the LCD offers a thumbnail index display, showing either four or nine images to a page depending on the setting. You can cycle between single-image, four, or nine image views by pressing the Flash/Index button beneath the LCD display. A playback zoom feature enlarges captured images up to 3x, letting you get a reasonably good idea of how well-focused the image is, check the framing, and examine details to see if you got the shot you wanted.
 Optics
A Nikkor 4x zoom, 8-32mm lens is built into the Coolpix 995 (the equivalent of a 38-152mm lens on a 35mm camera), with ten elements in eight groups (all made up of environmentally friendly glass). Maximum apertures range from f/2.6 to f/5.1, depending on the zoom setting. (The larger effective aperture corresponds to the wide angle focal length.) Nikon has continued the seven blade iris diaphragm first seen in the 990, which gives very fine-grained aperture control, useful for controlling depth of field, but more so for working with external flash and precisely controlling the balance between flash and ambient exposure. The contrast-detect TTL autofocus features a 7,123-step autofocus mechanism with a working range from 0.8 inches (20.32 millimeters) to infinity (this includes the macro range). When shooting in the Auto capture mode, the autofocus remains in the Continuous setting while using the LCD monitor but reverts to the Single autofocus mode when the LCD is off (which means you must halfway press the Shutter button to set focus). However, the Manual capture mode gives you the freedom to choose between Continuous or Single autofocus, regardless of LCD status. The Continuous focus mode results in the lens continually "hunting" for the best focus as you move the camera around, settling down when the camera and/or subject stops moving. Autofocus tracking speed isn't terribly high (mentioned in case you were expecting AF tracking as on Nikon's F5 pro film camera), but the Continuous AF option definitely helps with moving subjects. The downside is that it burns more battery power than Single AF mode.
The manual focus option is controlled through the settings menu and, once enabled, is activated by pressing the Manual Focus button (lower left of the LCD monitor) and simultaneously turning the Command dial to adjust the focus in 50 steps. The focus distance is reported in the top right corner of the LCD display.
The 995's autofocus mechanism employs the same sophisticated zone-sensitive system that we were so enamored with on the 990 model, featuring several operating modes. It has five possible focus zones (center, top, bottom, left, right), which can be very useful for achieving accurate focus on off-center subjects. The Focus option under the settings menu allows you to choose modes in which the camera chooses the focus zone, or in which you can explicitly set the location of the focus area (a nice feature that works well when combined with the spot metering mode, which can likewise be directed to determine exposure from the same 5 zones). In the "Auto" option for focus area selection, the camera chooses the area corresponding to the object closest to the camera. When the area focus option is set to Off, the camera bases focus on the central area. (One Playback mode information screen displays a focus area overlay, and shows which focus area was chosen for each image, by highlighting the appropriate set of marks in green.)
The lens itself has the same 28mm filter threads as the preceding Coolpix models, which accommodate the full range of Nikkor accessory lenses for wide-angle, telephoto, macro, and fisheye focal lengths, as well as a slide copying adapter. Once an accessory lens is attached, you'll need to select the corresponding lens type in the lens settings menu. (The camera adjusts its operation for different lens types by restricting the zoom range to avoid vignetting, switching to center-weighted metering for the fisheye adapter, etc.) New on the 995 model is the Slide Copy Adapter option, presumably intended for making digital copies of film slides as opposed to scanning them.
The 995's digital telephoto feature is enabled through the Zoom option under the Setup menu, and enlarges images up to 4x. An indicator on the LCD monitor displays the range of digital zoom at each step (from 1.1x to 4.0x). Keep in mind that digital telephoto only enlarges the center of the image, resulting in reduced resolution and more artifacts as more digital zoom is used. The camera automatically switches to center-weighted metering and a center autofocus target when digital zoom is active. Also under the Zoom option, you can set the startup position of the lens (either wide or telephoto) and activate the Fixed Aperture function, which keeps the aperture fixed as the lens zooms.
The Coolpix 995's lens seems to be of similar optical quality to that on the 990: It produces very crisp images, but shows fairly high geometric distortion at the ends of its zoom range: Roughly 0.98 percent barrel distortion at wide angle, and 0.64 percent pincushion at telephoto. Corner sharpness is quite good, while chromatic aberration is about average, with three to four pixels of color showing around the target elements in the corners of our resolution target shots.
Exposure
Like most of Nikon's cameras, both digital and film-based, the Coolpix 995 offers very flexible, extensive exposure control. A range of exposure modes are available, including Program, Flexible Program, Aperture Priority, Shutter Priority, and full Manual modes, when the camera is set to the Manual capture mode on the Power/Mode dial. Thanks to a user interface design that makes extensive use of external buttons and a Command Dial, changing the 995's modes and exposure settings is very fast, and you very rarely will need to delve into the LCD menu system under normal shooting conditions.
Nomenclature with the 995 gets a little confusing, as there's both a "Manual" capture mode on the Power/Mode dial, and a "Manual" exposure mode accessible via the "Mode" button/Command Dial combination. Just to be thoroughly confusing, you can only access "Manual" exposure mode when you're in "Manual" capture mode. The main difference between the Auto and Manual operating mode options on the Power/Mode dial is the availability of certain functions: In Auto capture mode, the camera completely controls the exposure, from shutter speed to white balance. In Manual operating mode, the camera allows access to the full range of exposure options, giving you as much or as little control as you need. Within Manual capture mode, a total of five exposure modes are available: Program mode, Flexible Program mode, Aperture Priority, Shutter Priority, and Full Manual mode.
Program mode places the camera in control over shutter speed and aperture, while you set the white balance, exposure compensation, etc. The Flexible Program option goes a step further by letting you select from a range of shutter speed and aperture combinations, simply by rotating the Command Dial while in Program exposure mode. The camera determines the required exposure, but you can choose whether it achieves that exposure with a shorter shutter speed and wider aperture, or a longer shutter speed and smaller aperture. (Simply turn the Command Dial on its own while in Program mode, and an asterisk appears next to the "P" in the LCD display. Further rotation of the Command Dial will cycle through the available combinations of shutter speed and aperture.) Shutter Priority lets you select shutter speeds from 1/2,300 to eight seconds, while the camera selects the appropriate corresponding aperture. Likewise, under Aperture Priority, you can select the lens aperture while the camera selects the best shutter speed. Manual mode gives you control over both aperture and shutter speed, but increases the shutter options to include a Bulb setting for longer exposures (up to 60 seconds). In any mode, if the camera's metering system disagrees with your exposure choices, the shutter and aperture values will flash in the display to indicate that this may not be the best exposure option. Important note: The 1/2,300 shutter speed is only available in Shutter Priority and Full Manual exposure modes: Maximum shutter speed in Aperture Priority and Program modes is 1/1,000.
Basic Exposure Adjustments
Exposure compensation is adjustable from -2 to +2 exposure equivalents (EV) in one-third increments by pressing the +/- button and turning the Command dial. Additionally, under the Image Adjustment option on the settings menu, you can increase or decrease contrast, as well as lighten or darken the entire image. An interesting feature about these tonal adjustments is that the 995's "lighten" and "darken" options allow you to adjust the midtone values of the image without affecting the white and black values. (That is, "lighten" will brighten the middle brightness values in the image, without blowing-out white areas, or lightening black ones.) We also noticed a new Color menu option, which provides a black and white mode, as well as an extensive number of saturation adjustments.
ISO Options
The Coolpix 995 offers a full range of sensitivity settings, including an Auto adjustment, as well as ISO equivalents of 100, 200, 400, and 800 (activated by pressing the ISO button and rotating the Command dial). We were pleased to see the addition of the 400 and 800 ISO equivalents, which greatly extend the camera's low-light shooting range. In-camera sharpening is adjustable to Auto, High, Normal, Low or Off under the Sharpening option of the settings menu.
Noise Reduction!
We mentioned earlier that the Coolpix 995 has a "bulb" exposure mode that allows exposures as long as 60 seconds. This is an exceptionally long exposure time, but would normally be almost useless due to the amount of CCD noise that can accumulate in that interval. Borrowing a page from their latest high-end digital SLRs, Nikon's implemented a noise reduction mode in the 995 that actually makes exposures this long practical. Details were sketchy as we were writing this review, but it appears that the noise reduction technology in the 995 uses a form of "dark frame subtraction", whereby a second exposure is snapped immediately after the first, but with the shutter closed. The pattern of noise in this "dark frame" is then subtracted from the image itself, resulting in a drastic reduction in apparent noise levels. (We suspect that the actual algorithm is more complex than simple subtraction though, involving data substitution to prevent black pixels where the noise current saturated the CCD photosite.) By its nature, this sort of noise reduction only comes into play on very long exposures, but the results are pretty dramatic, and we can speak from personal experience that 30 second exposures from the 995 are very usable indeed.
White Balance Options
White balance options include a matrix-based Auto setting (meaning it uses color information from multiple points across the frame to gauge color balance) as well as Fine (Outdoors), Incandescent, Fluorescent, Cloudy, Speedlight (flash balanced), and Preset (or Manual). The Preset option lets you set the camera's white balance to almost any lighting condition, simply by pointing the camera at a white object and saying (in effect) "make this white". We found the Preset white balance option worked by far the best under household incandescent lighting. A nice touch, carried forward from the 990, is that you can also adjust the fixed white balance settings (all modes except Auto and Preset) from -3 to +3 in arbitrary units, to increase the warm or cool tones in the image. This is very handy, as we often find that the programmed white balance options on cameras end up a bit too warm or cool for our liking. The color balance adjustment lets you tweak the color to exactly what suits you. A new feature on the 995 is the White Balance Bracketing option, which sets up the camera for a series of three images at different white balance settings. After the first image is taken at the regular white balance value, the camera alters the white balance with a reddish tint, and then a bluish tint. (Each adjustment is enabled by the subsequent press of the Shutter button, until the series of three images has been taken.) This strikes us as handy for situations when you're in a hurry and can't be bothered with going into the menu system to tweak the white balance manually for each shot, but still want to get a range of variations to choose from when you get back to the computer.
Metering Patterns
By default, the Coolpix 995 employs a 256-segment Matrix metering system, which divides the image into 256 segments and balances the exposure based on readings from each segment. Through the Record menu, you can change the metering system to Center-Weighted, Spot, or Spot AF Area. Center-Weighted metering bases the exposure on a large area at the center of the image, while Spot metering takes a reading from the very center, good for high contrast subjects. The Spot AF Area mode works with the autofocus target system, basing the exposure reading on the same target location that you've assigned the AF area to (through the Focus Options sub-menu).
 Flash
Flash
The Coolpix 995 features a popup flash design, new to the Coolpix line. Five flash modes are available, including Auto, On, Off, Red-Eye Reduction, and Slow-Sync. Through the settings menu, flash power is adjustable from -2 to +2 exposure equivalents (EV). The Slow-Sync option is useful when shooting subjects with dark backgrounds (such as night scenes) because the camera actually leaves the shutter open longer and then fires the flash before the shutter closes. This allows more ambient light into the image and can provide a nice motion blur effect. Red-Eye Reduction mode fires a pre-flash before the main exposure, to reduce the reflection from the subject's pupils. The 995's pop-up flash gives it an advantage in the Red-Eye category, as it provides enough space between the flash and the lens to largely avoid Red-Eye. On the previous 990 and the 950 models, the flash tube was much too close to the lens, and Red-Eye was a real problem with those cameras. Keep in mind that the flash is automatically switched off when shooting in the Infinity focus mode; the Continuous, 16 Shots or VGA Sequence modes; when using the Best Shot Selector; using a lens converter; or when the AE Lock option is on.
An external sync socket means you can connect a more powerful external flash, and the camera allows both external and internal flashes to work together. (The socket connects to Nikon Speedlight models SB-28, 28DX, 26, 25, 24, and 22, using the proprietary three-prong Nikon sync connector.) The external sync connection provides a "quench" signal to the flash, allowing the 995 to control the total light delivered by the external strobe unit. Note though, that there are limitations here when compared to the flash capabilities of Nikon's film cameras. First, the flash metering is not TTL (through the lens): The flash exposure sensor is located in a tiny window immediately below the internal flash head. Second, since the external sync connector only transmits a quench signal to the remote strobe, no distance-feedback information can be passed, limiting the capabilities of Nikon's high-end speedlights. - If you're planning on buying a high-end Nikon SLR at some point in the future, go ahead and get the SB-28DX speedlight. Otherwise, there's relatively little advantage to buying anything but the least expensive speedlight available.
Continuous Shooting
The Coolpix 995 offers several "motor drive" rapid-exposure modes for capturing quick sequences of images. Five modes (Continuous, Multi-Shot 16, Ultra High-Speed Continuous, VGA Sequence, and Movie) are selectable under the Continuous option of the settings menu. The Continuous mode captures frames very quickly, at whatever resolution and image quality the user has selected. Multi-Shot 16 mode subdivided the image area into 16 sections and captured a "mini-movie" of small images (400 x 300 resolution), which filled-in a 4x4 array within a single high-resolution image as the shooting progressed. The VGA Sequence captures a sequence of VGA-resolution frames, stored as separate files on the memory card, also at a very rapid rate. (Maximum sequence length and capture speed are dependent on image information and available memory card space.) Ultra High-Speed Continuous mode captures approximately 30 frames per second, up to about 80 QVGA-sized images (320x240 pixels). Finally, the Movie mode captures up to 40 seconds of moving images without sound at approximately 15 frames per second (QVGA size).
Other Features
We liked the fact that you can save up to three sets of user settings for focus, exposure, and other camera options, for rapid recall via the setup menu. This can be a real time saver in rapidly switching between widely different sets of shooting conditions. (Switching between the stadium and locker room for sports coverage? Indoor and outdoors at a family party? - You get the idea...) We also greatly appreciated the programmable Function buttons, which can really facilitate one-handed operation of the camera. (These normally control exposure mode and exposure compensation, but can be reprogrammed to control macro/manual focus, flash settings, white balance, or metering options.) The Auto Bracketing feature brackets five or three steps around the set exposure value while the Best Shot Select (BSS) takes several images and allows the camera to choose only the sharpest (least blurred) to be saved. Best Shot Select makes it feasible to handhold the camera for surprisingly long exposures. You can also check your own work immediately as the camera gives you a quick preview of the captured image (when shooting with the LCD monitor) and gives you an option to delete or save the image (this function can be turned off through the Setup menu, under Monitor Options). The 995's Self-Timer offers a three or 10-second countdown before firing the shutter, allowing you compose images and then jump into the exposure.
Shutter Lag/Cycle Times
When you press the shutter release on a camera, there's usually a lag time before the shutter actually fires. This time is to allow the autofocus and autoexposure mechanisms time to do their work, and can amount to a fairly long delay in some situations. Since this number is almost never reported on, and can significantly affect the picture taking experience, we now routinely measure it.
In the case of the Coolpix 995, we've gone a bit further with our timing measurements, as users of this camera are likely to be ones who'll push it to the limit in terms of shooting speed, cycle times, and memory capacity. Over time, we've received many emails asking about camera performance with the "high speed" cards marketed by several companies, most notably Lexar Media. In the past, there's been a limited number of cameras able to take advantage of the increased speed of these memory cards, but that's changing, and the 995 appears to be one of the cameras that can in fact accommodate the higher-speed cards. Accordingly, in this test, we measured several key performance parameters with both a generic 16 MB card and a high-speed "12x" card from Lexar. The results are in the table below:
|
|
|||
|
|
Normal Card |
Lexar 12x |
|
| Power On -> First shot |
|
|
Variable, depending on zoom startup setting, 5.5 seconds is about typical. A bit longer than average, the 995's zoom is a little slow racking out.
|
| Shutdown |
|
|
"Shutdown" can be zero if card isn't writing, as no external lens retraction to wait for. Longest time shown is when camera is writing a TIFF file, until card can be removed.
|
| Play to Record, first shot |
|
|
Shortest time is from quick review to first capture. Next time is for quick review/full screen to first capture. Longest time is from normal playback mode to first capture. All are quite fast.
|
| Record to play (max/min res) |
|
|
Longest time is for TIFF file format, shorter times are for max/min res JPEG formats. Note dramatic difference with fast CF card. JPEG times are quite fast overall.
|
| Shutter lag, full autofocus |
|
|
A bit slower than average. (Average is about 0.75) |
| Shutter lag, continuous autofocus |
|
|
The same as Manual focus mode. |
| Shutter lag, manual focus |
|
|
A bit slower than average. (Average is about 0.50) |
| Shutter lag, prefocus |
|
|
Quite a bit faster than average. (Average is about 0.3) |
| Cycle time, large/fine files |
|
|
Shorter time is for first two shots, then need to wait for the buffer to clear before taking next two shots. Note nearly 2x faster buffer clearing with 12x card. |
| Cycle time, small/basic files |
|
|
Somewhat variable times, all quite fast. No advantage to 12x card in this mode. |
| Cycle time, TIFF files |
|
|
TIFF mode files are huge, take a long time to write. 12x card cuts time more than in half. |
| Continuous mode, large files |
|
|
First time is for first tree shots, then wait for buffer to clear. 55% speed advantage for faster card. |
| Continuous mode, small files |
|
|
No buffer problems past at least 16 exposures (as far as we tested). |
| VGA Sequence |
|
|
|
| Ultra High Speed |
(30 frames/sec) |
(30 frames/sec) |
|
Overall, the Coolpix 995 is a fairly fast-shooting camera, but its buffer memory limits it to only two rapid-fire shots in a row when you're shooting in the highest resolution/quality mode. Buffer recovery takes 11 seconds with a generic memory card, but drops to 6 seconds with a high-speed ("12x") CompactFlash memory card. Run length increases as image sizes decrease. TIFF files take very long to write, but again the 995 is well able to take advantage of high-speed memory cards.
Shutter lag is a bit longer than average in all conditions except when the camera is prefocused by half-pressing the shutter button, at which point it drops to only 0.17 seconds, quite a bit faster than the 0.3 second average we've found among cameras we've tested.
Operation and User Interface
The Coolpix 995 continues the straightforward and powerful user interface of the earlier 990 and 950 models. The LCD menu system is available for novices, or for less commonly used controls, but experienced users will find they can make virtually all of the necessary adjustments for routine shooting without resorting to the LCD screen. Once you learn where the functions are, operation is quick and intuitive, thanks to the multiple control buttons and the excellent use Nikon makes of the black/white LCD readout and the Command dial. The inclusion of programmable Function keys adds flexibility, allowing you to customize the camera to your specific shooting needs by moving frequently-used settings up to the two top-panel function buttons. Exposure compensation, exposure mode, ISO value, image quality and size, as well as focus controls (manual focus setting, macro, and infinity focus), and flash mode, can all be adjusted without the LCD. The small topside status display panel provides clear feedback for all these settings as well. When you do have to delve into the (very extensive!) LCD menu system, navigation via the Arrow rocker button is intuitive and quick. In Record mode, the menu system is split into 3 pages of options, and a nice touch is the tabbed interface, by which you can jump between pages with only a few clicks of the rocker button, rather than scrolling through every option on each screen. In normal operation, most of the camera's functions are controlled by a combination of hitting a button and turning the Command dial, which makes it very fast and efficient to change settings without eating up battery power for the large LCD or wasting time scrolling through endless menu screens. Control layout is also very logical, allowing one-handed operation for commonly changed functions, requiring a two-handed approach only for manual focus setting, ISO, flash mode, and size/quality adjustment.
Control Enumeration

Shutter Button: Located on top of the camera and encircled by the Power/Mode dial, this button sets focus and exposure when halfway pressed and fires the shutter when fully pressed.
Power/Mode Dial: Surrounding the shutter button on the camera's top panel, this dial selects between Off, Auto Record, Manual Record, and Playback modes.

Mode/Func.1 Button: Just below the Power/Mode dial on the top panel, this button selects the exposure system mode (Program, Shutter Priority, Aperture Priority, and Manual) when held down while turning the Command dial with the camera in Manual capture mode. In Manual exposure mode (meaning manual control over both aperture and shutter speed settings), a quick press of this button selects either the aperture or shutter speed setting, allowing you to change it by turning the Command dial. A second press selects the other exposure parameter. This button can also be programmed through the Setup menu to access various exposure functions with a single button actuation. (Exposure mode, landscape/macro/self timer, flash mode, white balance, exposure compensation, metering pattern.)

+/- / Func.2 Button: Directly to the right of the Mode button, this button adjusts the amount of exposure compensation (from -2 to +2 exposure equivalents (EV) in one-third step increments) when held down while turning the Command dial. This button can also be programmed through the Setup menu to access various exposure functions, the same as the Func. 1 button.

Command Dial: Protruding slightly from the top right corner of the camera, this dial is used in conjunction with other buttons in Record mode to adjust exposure options. By itself, it will adjust the aperture or shutter speed settings in Aperture and Shutter Priority exposure modes. In Playback mode, the dial cycles through the five information pages associated with each captured image, giving the user an unparalleled amount of information about the exposure (image information page, camera firmware page, image adjustment page, exposure histogram, and focus confirmation).

Quick Review Button: As the topmost button on the camera's back panel, this button calls up a thumbnail sized display of the most recently captured image while in either record mode, appearing in the upper left-hand corner. The left and right arrow keys scroll through the remaining captured images on the memory card. Pressed a second time, this button pulls up a full-screen display of the captured images on the card, complete with an image information overlay. The Quick Review mode is canceled by pressing the button a third time, or by pressing the shutter button.

Monitor Button: Diagonally to the left below the Quick Review button, this button recalls or cancels the color LCD screen information display and viewfinder display.

Menu Button: Located directly to the right of the Monitor button, this button brings up the settings menu in all capture modes as well as in Playback mode. Pressing it again cancels the menu.

W and T Buttons: Positioned on the right of the Menu button, these buttons control the optical zoom in all capture modes. Likewise, when the digital telephoto option is enabled, these buttons control the amount of digital zoom (from 1.1x to 4.0x). In single-image playback mode, pressing the "T" button repeatedly zooms in on the image (you can scroll around in the zoomed image by using the Arrow Rocker control). Pressing the "W" button cancels zoomed playback.
Arrow Rocker Button: Situated on the right side of the LCD monitor, this button features four arrows that allow the user to navigate through the LCD menu system and make selections in Record and Playback modes. Different menu items are selected via the up/down arrows. Pressing the right arrow selects the item, generally taking you into a sub-menu. Pressing the left arrow takes you back out again. Once in a sub-menu, the up/down arrows again step between items, while a right-arrow selects. This process continues until you arrive at the final point of selection, upon which another right-arrow actuation makes that selection and returns you to the main menu. (This is a nice implementation, with no need to switch to another button to make the selection itself: The Arrow Rocker both navigates and selects.) We were also pleased to see that we could left-arrow from the initial screen, to go to a set of tabs that let you quickly jump from menu screen one to two, or to the setup screen very quickly, without scrolling through all the menu entries first.
In Playback mode, the right and left buttons scroll through captured images one at a time. In zoomed playback mode, this control lets you scroll around within the enlarged image to check on framing or any details.

Manual Focus/Macro Button: The first button in a series directly beneath the LCD display, this button has several functions. When held down while turning the Command dial, this button controls the manual focus option in Record mode. Also in Record mode, pressing this button alone cycles through Infinity focus, Macro, and Self-Timer modes. (Note that there's a Macro/Self Timer, which is the only mode in which the self timer can be accessed. This isn't a problem, since the camera can focus all the way to infinity when in "macro" mode. - Macro mode simply allows the lens to traverse a greater range when focusing.) In Playback mode, this button acts as the Delete command for the currently displayed image (designated by the trash can symbol).

Flash/ISO Button: Centered under the LCD panel, this button cycles through the flash modes (Auto, On, Off, Red-Eye Reduction, and Slow-Sync). In Manual Record mode, holding this button while turning the Command Dial cycles through the variable ISO settings (Auto, 100, 200, 400, and 800). In Playback mode, this button brings up a four or nine image index display of all captured images.

Quality/Size Button: Located directly to the right of the Flash button, this button cycles between image quality options (Basic, Normal, Fine, and Hi) in all record modes. In any record mode, holding this button down while rotating the Command Dial cycles through the image size settings [2,048 x 1,536, (UXGA)1,600 x 1,200, (SXGA) 1,280 x 960, (XGA) 1,024 x 768, (VGA) 640 x 480, (3:2) 2,048 x 1,360]. In Playback mode, if the currently selected picture is a movie sequence, this button initiates playback of it.

Popup Flash Release Latch: Aligned with the left side of the pop-up flash compartment, this sliding latch releases the flash into its operating position.

Diopter Adjustment Dial: Located directly beneath the optical viewfinder (on the underside of the lens half of the case), this small, black dial adjusts the viewfinder to accommodate eyeglass wearers.
Camera Modes and Menus
Automatic Capture Mode: Accessed by turning the Power/Mode dial to the "A" setting, this mode puts the camera in charge of exposure and focus, but still leaves settings like flash, exposure compensation, size, quality, and the self-timer under the user's control. Pressing the Menu button in this mode pulls up the following Setup menu:
 Folders: Brings up a sub-menu that allows users to create, delete and rename image storage folders in separate groups (much like the 990). This also allows users to select which folder images will be saved to.
Manual Capture Mode: Accessed by turning the Power/Mode dial to the "M" setting, this mode offers several options for manually controlling exposure (Program, Flexible Program, Aperture Priority, Shutter Priority, and Manual). Program puts the camera in charge of aperture and shutter speed, while the user can control things like white balance, motor drive, etc. Flexible Program allows the user to select from a range of equivalent exposure settings. Aperture and Shutter Priority put the user in charge of either the aperture or shutter speed while the camera controls the other value. And finally, Manual lets the user control both aperture and shutter speed, independent of the camera's exposure system. All of these capture modes are accessible by pressing the Mode button and turning the command dial until the desired mode appears on the status display. (You can also change the exposure mode through the settings menu.) Pressing the Menu button in this mode pulls up the following settings menu screens:
Screen One
 White Balance: Displays a sub-menu with seven white balance options: Auto, White Balance Preset, Fine (Outdoors), Incandescent, Fluorescent, Cloudy, and Speedlight (flash balanced).
Screen Two
 User Setting: Allows the user to save up to three different sets of user settings to be recalled at any given time (useful for quickly switching between groups of settings for different shooting scenarios).
Setup Screen
 Folders: Pulls up a sub-menu that lets users create, delete, and rename image storage folders in separate groups (much like the 990). This also lets users select which folder images will be saved to.
 Zoom Options: Activates digital telephoto, or designates the lens startup position (wide, telephoto, or the last-used position). Also lets you select the Fixed Aperture option, which keeps the aperture fixed as the lens zooms.
Playback Mode: Accessed by turning the Power/Mode dial to the "Play" position, this mode allows users to view captured images and movies. The right and left arrow buttons scroll through images while the Delete and Index Display buttons (beneath the LCD panel) offer quick image deletion and display. Pressing the Menu button in this mode pulls up the Playback settings menu:
Screen One
 Delete: Erases the Selected Image, All Images, Folder, or Print Set. (A "Print Set" refers to the set of images currently marked for printing, using the DPOF (Digital Print Order Format))
Setup Screen
 Monitor Options: Displays a sub-menu that allows users to adjust the brightness and hue of the LCD monitor display.
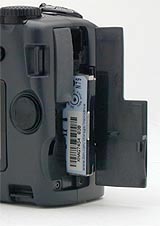 Image Storage and Interface
Like the 990, the Coolpix 995 uses CompactFlash memory cards, shipping with a 16MB card. Larger capacity cards are available up to 128MB from Nikon, and as large as 512MB from third parties. Answering one of the most-voiced requests by 950 and 990 owners, the Coolpix 995 accommodates both Type I and Type II CompactFlash cards, meaning that it can accept IBM Microdrive (512MB and 1GB sizes only), dramatically increasing storage options. (A hearty cheer rises from the ranks of Nikon fans!) The 995 manages files in much the same way as the 990, with several subtle niceties that make life a little easier, including a folder arrangement that helps organize images in the camera, a sequential frame counter option to avoid problems with overwriting files when copying them to your computer, and the ability to either hide or protect (or both) individual images on each card.
A point of clarification on the Coolpix 995's compatibility with MicroDrives:
Nikon's official position is that they're "not supported." We've been
told that the issue is power consumption and the resulting battery life (or lack
thereof). The 995 will work fine with the latest generation of 512MB and 1GB MicroDrives,
but the higher power drain of these devices result in noticeably shorter battery
life. Nikon doesn't feel that the battery life when using a MicroDrive is up to
their standards, so as a consequence don't recommend their use. If you're willing
to tolerate short battery life though, they appear to work fine. If you do decide
to use a MicroDrive in your Coolpix 995 though, you should definitely consider
buying one or two spare EN-EL1 battery packs, or an external power pack such as
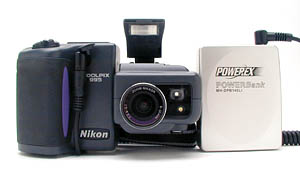
the LiIon version of the Maha PowerBank. (See the Video,
Power, and Software page of this review for more information on the PowerBank.)
A minor point on the design of the 995's CF slot, but one that we want to make, in the hopes that other manufactures will notice and follow suite: For some reason, virtually all CF-equipped digicams have the card oriented so the tiny lip on the edge of the card is oriented toward the front of the camera, meaning you need to squeeze your finger in between the CF compartment door and the card itself in order to snag the lip with a fingernail and thereby extract the card. The Coolpix 995 though, turns the card around, so the little lip faces the rear of the camera, making it easy to hook a fingernail under it and slide it smoothly out. A minor point perhaps but one that we're mightily glad to see, given the number of times we insert & extract memory cards in the course of our testing. (You'll be happy with this minor feature too, over the course of your life with the camera.)
Captured images can be individually write-protected through the Playback menu. Write protected files are only immune to accidental deletion, not card reformatting. File formats include several levels of compressed JPEG files as well as an uncompressed TIFF mode (Hi quality setting). Available image sizes are 2,048 x 1,536, 1,600 x 1,200 (UXGA), 1,280 x 960 (SXGA), 1,024 x 768 (XGA), 640 x 480 (VGA), and 2,048 x 1,360 (3:2 aspect ratio). The table below shows the card capacities and corresponding compression ratios for a few of the available image sizes:
|
Resolution/Quality 16MB Memory Card |
|
|
|
|
|
| Full Resolution 2048x1536 | Images | 1 | 10 |
|
|
| Approx. Compression |
1:1 | 6:1 |
|
|
|
| SXGA Resolution 1280x960 | Images |
|
|
|
|
| Approx. Compression |
|
|
|
|
|
|
|
Images |
|
|
|
|
| Approx. Compression |
|
|
|
|
|
Interface to the host computer is via a USB port. Mac OS and Windows ME &
later users will be happy to hear that the 995 presents itself as a "storage-class"
device. This means that it needs no special software drivers under Mac OS 9
or later, and Windows ME and later. (Older versions of Windows still require
separate driver software.) Storage-class USB connectivity also means high download
speeds: We clocked the 995 at a transfer rate of 497 KBytes/second, well in
the upper echelon of cameras we've tested. (Fast enough that there would be
little speed advantage in going to an external card reader.)
![]() One
of the first things any new digicam owner will need is a larger memory card
for their camera: The cards shipped with the units by the manufacturers should
really be considered only "starter" cards, you'll definitely want a higher capacity
card immediately. - Probably at least a 32 megabyte card for a 1.3 or 2 megapixel
camera, 64 megabytes or more for a 3, 4, or 5 megapixel one. (The nice thing
about memory cards is you'll be able to use whatever you buy now with your next
camera too, whenever you upgrade.) To help you shop for a good deal on memory
cards that fit the C995, we've put together a little memory locater, with links
to our price-comparison engine: Just click on the "Memory Wizard" button above
to go to the Nikon memory finder, select your camera model , and click the shopping
cart icon next to the card size you're interested in. You'll see a list of matching
entries from the price-comparison database. Pick a vendor & order away! (Pretty
cool, huh?)
One
of the first things any new digicam owner will need is a larger memory card
for their camera: The cards shipped with the units by the manufacturers should
really be considered only "starter" cards, you'll definitely want a higher capacity
card immediately. - Probably at least a 32 megabyte card for a 1.3 or 2 megapixel
camera, 64 megabytes or more for a 3, 4, or 5 megapixel one. (The nice thing
about memory cards is you'll be able to use whatever you buy now with your next
camera too, whenever you upgrade.) To help you shop for a good deal on memory
cards that fit the C995, we've put together a little memory locater, with links
to our price-comparison engine: Just click on the "Memory Wizard" button above
to go to the Nikon memory finder, select your camera model , and click the shopping
cart icon next to the card size you're interested in. You'll see a list of matching
entries from the price-comparison database. Pick a vendor & order away! (Pretty
cool, huh?)
 Video Out
US and Japanese versions of the Coolpix 995 include an NTSC video cable for
connecting to a television set. European models will doubtless include PAL-compatible
cabling, given the Video Mode option for PAL timing in the settings menu. All
images that would normally appear on the LCD are routed to the external video
display so that the television screen becomes an enlarged version of the LCD
monitor and can be used both for image playback and composition.
 Power
Power
The Coolpix 995 runs on either a 2CR5 non-rechargeable Lithium battery, or
Nikon's rechargeable EN-EL1 lithium-ion battery pack. Both are housed inside
the hand grip, and the more compact power source (vs the 4 AA cells used in
the 990) contribute to the more compact hand grip dimensions. The 995 can also
operate from an external AC adapter which plugs into the front of the camera.
Although a spare is a good bit more expensive than the standard AA batteries
that powered the Coolpix 990, the lithium-ion battery pack should provide the
same or longer operating times than we saw with the 990 and high-capacity AA
NiMH cells. Nikon estimates that a fully charged battery pack should provide
about 110 minutes of recording time, with the LCD monitor enabled, which agrees
well with our own measurements. Working with the LCD monitor disabled will greatly
increase battery life, and the ability to switch the autofocus mode from Continuous
to Single saves significant battery power as well. The Coolpix 995 also features
an Auto Power Off option which shuts the camera off after 30 seconds, or after
1, 5, or 30 minutes of inactivity.
The table below shows our usual power measurements, taken under various operating
conditions. The 995's power system is a little different than that of typical
digicams we test, so the numbers shown need a little explanation first: We report
current drain in digicams, as measured at the external power terminal. This
voltage is usually higher than the battery voltage, but most digicams use similar
AC power adapters. The 995's 7.4 volt LiIon battery pack has a significantly
higher terminal voltage than does a set of 4 AA cells though (which are nominally
4.8 volts), and this results in proportionately lower current drain figures.
Even allowing for the higher supply voltage though, the 995 appears to be pretty
parsimonious in its use of battery power. In fact, it's overall power consumption,
expressed in watts, is about 30% below that of the 990, an impressive achievement.
So... These observations and disclaimers aside, here are the power consumption
numbers we measured for the 995, at an external power supply voltage of 8.0
volts:
|
|
|
| Capture Mode, w/LCD |
|
| Capture Mode, no LCD |
|
| Half-pressed shutter w/LCD |
|
| Half-pressed w/o LCD |
|
| Capture Mode, Continuous AF |
|
| Memory Write (transient) |
|
| Flash Recharge (transient) |
|
| Image Playback |
|
Given the EN-EL1 LiIon power pack's 650 mAh charge capacity, Nikon's claim of 110 minutes of continuous operating time in capture mode with the LCD active seems quite reasonable. Even better though, note that the power in capture mode is almost nil with the LCD off. This means you can just leave the camera on and in capture mode with the LCD off all day, without worrying about battery drain. (That way, you'll always be ready for the next shot, whenever it happens.)
The benefits of LiIon batteries aside though (higher power density, no self-discharge), we to some degree regret Nikon's decision to move to a proprietary battery technology in the 995. While it does allow for a slightly more compact camera body, the choice adds significant cost for the consumer, should they want to carry a spare with them: The LiIon battery pack runs about 5x the cost of a good set of high-capacity NiMH AAs. Kudos to Nikon though, for bundling a rechargeable battery and charger with the camera!
Another consequence of the LiIon battery technology is that the 995 requires
a higher voltage on its external power jack to operate. This isn't an issue
for studio use, but it does mean that most of the NiMH-based external power
packs out there won't power the 995 in the field. Fortunately, Maha makes a
LiIon external "PowerBank" (shown above) that will power the 995 just
fine. For about $60, this (very nicely packaged) unit will power the 995 for
a total of about 6 1/2 hours in capture mode with the LCD operating, when used
in together with the internal battery. (!) This is a fantastic run time, just
what you'd need for all-day intensive shooting! One note - Maha makes both NiMH
and LiIon versions of the PowerBank, make sure you get the LiIon model for the
995. (Model number MH-DPB140LI.) You can order these online from Thomas-Distributing.
Highly recommended!
Included Software
|
Packaged with the Coolpix 995 is a software CD containing Nikon View Version
4, ArcSoft PhotoStudio 2000, iView Multimedia Pro (Mac only), and Canto Cumulus
5.0 Demo. A USB cable also comes with the camera, for quick connection to a
PC or Macintosh. The Nikon View software allows you to quickly download and
organize images, and works with the camera's Auto Transfer option (in the Playback
menu). When Auto Transfer is turned on, Nikon View will automatically download
images as soon as the camera is connected, saving you a little time. ArcSoft
PhotoStudio 2000 provides image editing and enhancement tools, allowing you
to make minor corrections, as well as apply creative effects. Since we did not
receive a copy of the software CD that accompanies the 995, we assume that iView
Multimedia Pro is an image enhancement tool for Macintosh users. However, we
aren't sure about the Canto Cumulus 5.0 Demo, but will provide the information
as soon as we receive it.
In the Box
Packaged with the Coolpix 995 are the following:
Test Results
I normally present only brief summaries of my findings in this section, but
this time will try including a more complete presentation of the test results,
as an experiment to see how our readers like it. - For really exhaustive analysis
of all our test results, visit the Coolpix 995's
"pictures" page. - As with all Imaging Resource camera tests,
I encourage you to let your own eyes be the judge of how well the cameras performed.
Explore the images on the pictures page, to see how
the 995 does at the type of photos you expect to be taking. - And check the
Comparometer(tm)
to compare images from over a hundred different cameras side by side!
Color Quality & Tonal Range
 Even
the first prototype unit I tests showed very good color, and the production
model was just as good. The outdoor shot (seen in minature at right) looked
quite nice, with good skin tones, and excellent tonality. The always-problematic
blue flowers ended up a bit purple, the 995 falling victim to these very difficult
blues. The rest of the color was very nice though, and the 995's metering system
seemed more accurate than most. (Although still requiring some positive exposure
compensation in the high-key test photo at right. Color accuracy on my Davebox
test looked quite good. (The MacBeth(tm) chart from the Davebox is shown below.)
See the pictures page for links to a whole collection
of subjects, including a full range of exposure settings for the photo at right,
the Davebox, and the Musicians poster.)
Even
the first prototype unit I tests showed very good color, and the production
model was just as good. The outdoor shot (seen in minature at right) looked
quite nice, with good skin tones, and excellent tonality. The always-problematic
blue flowers ended up a bit purple, the 995 falling victim to these very difficult
blues. The rest of the color was very nice though, and the 995's metering system
seemed more accurate than most. (Although still requiring some positive exposure
compensation in the high-key test photo at right. Color accuracy on my Davebox
test looked quite good. (The MacBeth(tm) chart from the Davebox is shown below.)
See the pictures page for links to a whole collection
of subjects, including a full range of exposure settings for the photo at right,
the Davebox, and the Musicians poster.)
The 995's automatic white balance system was quite accurate with light sources
having a color balance close to daylight, but had a hard time with household
incancescent illumination, as in my "Indoor Portrait" test. Fortunately,
the manual ("custom") white balance system worked superbly, producing
excellent shots under this difficult light source. While I'd really like to
see the auto or incandescent white balance settings do a better job, the results
using manual white balance are about as good as you could hope for.
Color Adjustment
I've seen plenty of color saturation-adjustment features on cameras before,
but they very often overdo the effect, with the minimum adjustment steps resulting
in either neon colors or very flat, washed-out looking pictures. The 995's
color adjustments seem to cover a useful range though, more akin to the degree
of variation you'd see between different film emulsions in the analog world.
A very nice implementation...
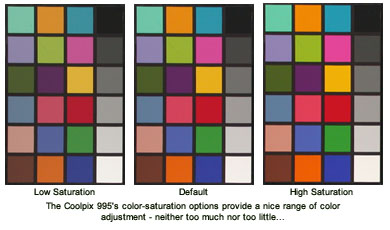
The bright blocks of the MacBeth(tm) target above somewhat obscure the overall impact of the saturation adjustments. Here's an outdoor shot of our "ISO Standard House" <g> that shows the range of adjustment more clearly.
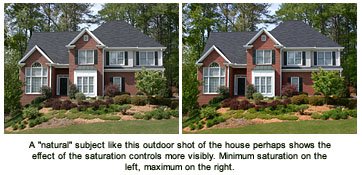
Low Light Capability (!)
The 995's low light performance was very impressive! Thanks to a "bulb"
exposure mode, I got incredibly bright shots all the way down to the 1/16 foot-candle
(0.67 lux) limit of my test, even at ISO 100. The Coolpix 995's noise reduction
function also proved to work very well, removing essentially all the "fixed
pattern" noise in the image, due to "stuck" or "leaky"
pixels. While the noise increased at the higher ISO settings, the noise reduction
algorithms did a very good job of controlling noise all the way out to 8 second
exposures at ISO 800. The noise remaining in the image after the noise reduction
system does its work looks very much like the grain patterns you'd see on high-speed
film emulsions. Overall, the 995's low light performance is among the very best
I've seen to date on a "prosumer" camera.
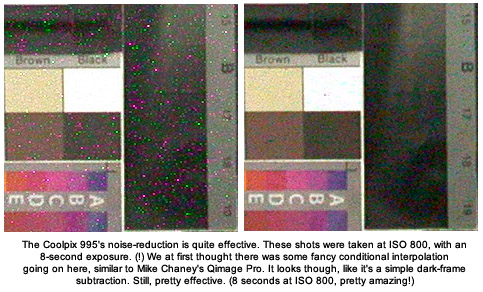
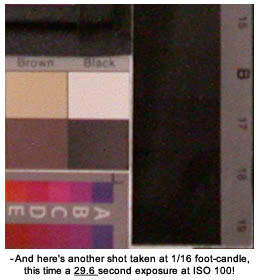 The photos
above were shot at ISO 800, a setting that Nikon apparently cautions against
somewhat, as witness that the 995's ISO indicator in the LCD viewfinder turns
red when 800 is selected. The images are rather noisy, but I've frankly seen
worse from other cameras at ISO 400. Lest my readers go away with the impression
that the 995 is a "noisy" camera though, I thought to include the
photo at right, shot at ISO 100, and an exposure time of 29.6 seconds. (!!)
This is a very long exposure by digital standards, and the resulting
image (with noise reduction enabled) is remarkably clean and free of noise.
The photos
above were shot at ISO 800, a setting that Nikon apparently cautions against
somewhat, as witness that the 995's ISO indicator in the LCD viewfinder turns
red when 800 is selected. The images are rather noisy, but I've frankly seen
worse from other cameras at ISO 400. Lest my readers go away with the impression
that the 995 is a "noisy" camera though, I thought to include the
photo at right, shot at ISO 100, and an exposure time of 29.6 seconds. (!!)
This is a very long exposure by digital standards, and the resulting
image (with noise reduction enabled) is remarkably clean and free of noise.
As we noted earlier, the 995 appears to be doing a fairly simple dark-frame subtraction in the camera to achieve these results, but they're very impressive nonetheless. For the ultimate in image noise processing though, we still recommend Mike Chaney's excellent Qimage Pro software, which uses a more sophisticated conditional interpolation algorithm (suggested by your humble reviewer, Dave Etchells) to eliminate the dark flecks that remain from pixels that have "leaked" charge all the way to saturation. (Check out Mike's Qimage page for a trial download to try it for yourself.)
To put the 995's low-light performance into perspective, an average city night
scene under modern street lighting corresponds to a light level of about one
foot-candle, so the camera should easily handle much darker situations. (The
1/16 foot-candle that marks the bottom end of my testing range is quite dark
indeed: Dark enough that I have to watch my step, walking around the studio!)
 Macro Shooting (!!)
Like its forebears, the Coolpix 995 performs exceptionally well in the macro
category, capturing a very tiny minimum area of just 0.46 x 0.61 inches (11.64
x 15.32 millimeters). This is probably one of the tiniest areas I've seen, and
the detail revealed is literally microscopic. - The tiny fibers of the dollar
bill are completely distinguishable and very sharp. Color balance came out a
little warm, probably thanks to the floodlights we were using to shoot it, but
isn't bad at all. The 995's built-in flash has a lot of trouble throttling down
for this very tiny macro area, barely illuminating it at all. (The flash is
blocked by the lens.) Despite the inability to use the flash this close (no
surprise, really - this is very close!), I'm very pleased with the 995's
macro performance.
Resolution
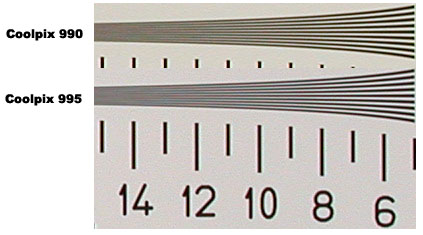 When it comes
to resolution, the Coolpix 995 clearly shows the heritage of its predecessor,
the Coolpix 990. To my eye, both cameras "over sharpen" slightly (note
the halos around the fiducial marks and numbers in the shots at right), but
when you actually print photos from them, this sharpening proves to be just
about right: In my experience, people viewing prints from digicam images (even
execs from other camera companies, in blind comparisons!) tended to single out
the 990's pictures as the sharpest among the 3 megapixel cameras. The 995's
resolution performance seems very similar.
When it comes
to resolution, the Coolpix 995 clearly shows the heritage of its predecessor,
the Coolpix 990. To my eye, both cameras "over sharpen" slightly (note
the halos around the fiducial marks and numbers in the shots at right), but
when you actually print photos from them, this sharpening proves to be just
about right: In my experience, people viewing prints from digicam images (even
execs from other camera companies, in blind comparisons!) tended to single out
the 990's pictures as the sharpest among the 3 megapixel cameras. The 995's
resolution performance seems very similar.
The Coolpix 995 did well in my laboratory resolution test, easily extending
to 800-850 lines per picture height in the horizontal direction, and 800 lines
vertically. Strong detail is visible to beyond 1000 lines. Overall, a good performance,
well in the upper tier of three megapixel cameras we've tested..
Viewfinder Accuracy, Flash Uniformity, and Geometric Distortion
Viewfinder Accuracy/Flash Uniformity Test


The thumbnails in the table at right open to full-resolution shots of the
test target I use for evaluating viewfinder accuracy, flash uniformity, and geometric
distortion of the lens system. These shots are taken in a darkened studio, so
the distribution of light is a good indication of flash uniformity. In the case
of the 995, the telephoto shots were taken at such a distance that the flash wasn't
able to provide full illumination (thanks to the 4x zoom lens), but the resulting
lighting is obviously very even. Flash coverage at wide angle is pretty uniform
as well, quite a bit better than I'm accustomed to seeing in digicams with wide
angle lenses.
Most camera manufacturers seem to aim for about 85% frame coverage with their
optical viewfinders. I disagree with this practice, preferring higher accuracy,
but I'm clearly bucking the rest of the industry on this point. As for the Coolpix
995, its optical viewfinder showed 79.8% of the final frame at wide angle, and
91.4% at telephoto. The telephoto rating is pretty good, but the image was shifted
toward the upper left somewhat, and I'd really like to see less variation between
the accuracy at wide and telephoto settings. A big plus though, is the 98-99%
accuracy of the LCD monitor, close to the 100% I like to see, and better than
the majority of cameras out there.
Geometric distortion is similar to that of the 990, which to say a bit on the
high side. Barrel distortion at wide angle is 0.98%, while pincushion distortion
at telephoto is 0.68%. (Most digicams we test show about 0.8% barrel, and anywhere
from 0 to 0.4% pincushion distortion.)
Summary
Throughout my testing, I was quite pleased with the 995's performance. Nice
color, image quality, and detail, with excellent sharpness. The extraordinary
amount of exposure and color control is a definite plus as well.
Conclusion
The Coolpix 995 is an excellent update to what was already a stellar digicam,
the Coolpix 990. With a longer-ratio, 4x zoom lens, increased ISO sensitivity,
and even more varied shooting options (including a faster, 1/2,000 of a second
shutter speed), the Coolpix 995 has the flexibility and control to handle just
about any shooting situation. The freedom of full automatic exposure is great
for consumers who want to point and shoot, while the variable exposure controls
offer room to learn. With its flexibility and extensive options, the Coolpix 995
should satisfy a wide range of users, from novices to pros. Given the evolutionary
nature of the improvements, I doubt many Coolpix 990 owners will be tempted to
upgrade, but the 995 will compete very strongly against products from other manufacturers,
and many Coolpix 950 owners may decide to take the step up to 3 megapixels.
<<CoolPix 995 Sample Images | Additional Resources and Other Links>>
Reader Comments!
Questions, comments or controversy on this product? Click
this link to see what other Imaging Resource readers have had to say about
the Nikon CoolPix 995, or add comments of your own!
