Back
to Full Nikon Coolpix 8700 Review
Back
to Full Nikon Coolpix 8700 ReviewGo to Nikon Coolpix 8700 Data Sheet
Go to Nikon Coolpix 8700 Pictures Page
Up to Imaging Resource Cameras Page
Use your browser's "Back" button to return to the previous page, or the links at the top and bottom of this page to navigate to related information. If you have difficulty fitting the text on this page onto your printer output, simply resize your browser window to a narrower width and print again.
Remember us when it's time to buy!
Dave here: Have our reviews been helpful to you? (Is this article you're reading right now useful?) Preparing this level of information on as many products as we do is incredibly hard work, not to mention expensive. Things on the Internet may look like they're free, but they're not. (As a lot of big dot.com companies are finding out these days.) Somewhere, somebody has to pay to produce worthwhile content. YOU can help us though, by remembering us when it comes time to make your purchase. Would you consider coming back to our site and clicking-through to one of our advertisers to make your purchase? Every dollar you spend with one of our advertisers helps us directly (in affiliate fees) or indirectly (the advertiser will keep renewing their ad contract with us). To make it easy for you to support us, here's a URL you can visit, to see all our current advertisers, with links to click on that will register your visit to them as having come from our site. It's up to you where you buy, but Mike, Mike, Kim, Yazmin, Marti and I would be really grateful if you'd help us out by choosing one of our advertisers to purchase from.
Thank you for your support!
Dave Etchells, Founder & Publisher
Visit our "Buy Now" Page:
https://www.imaging-resource.com/buynow.htm
Back
to Full Nikon Coolpix 8700 Review
Go to Nikon Coolpix 8700
Data Sheet
Go to Nikon Coolpix 8700
Pictures Page
Up to Imaging Resource Cameras
Page
Nikon Coolpix 8700Nikon moves into 8 megapixel territory with a long zoom, and a new body, but the same legendary Nikon feature set! Review First Posted: 03/22/2004 |
|
 |
|
8.0 (effective) megapixel CCD delivers images up to 3,264 x 2,448 pixels. |
| |
Nikkor lens provides 8x, 35-280mm equivalent zoom range. | |
| |
"Articulated" LCD tilts/swivels 270 degrees. | |
| |
White balance bracketing and noise reduction modes extend capability. | |
| |
Electronic viewfinder for better framing accuracy with long zoom lens. |
Manufacturer Overview
As I say before each of my Nikon reviews, Nikon is one of the
names that literally needs no introduction in the world of photography. Long
a leader in the film world, they now offer cameras for both the serious amateur
and working professional, in both the film and digital worlds. The
new Nikon Coolpix 8700 is the latest in a long line of Nikon digital cameras
that have helped define the state of the art in prosumer cameras from the
early days of the digital revolution. With an 8-megapixel sensor, an 8x zoom
lens with ED glass, and the panoply of advanced features we've come to expect
from the upper end of Nikon's digicam line, the Coolpix 8700 is poised to
compete at the very top of the "prosumer" digital camera market.
At the same time though, optional fully automatic operation and a rich collection
of 12 "scene" modes make it easy for even rank amateurs to use.
All in all, the new Nikon Coolpix 8700 is a powerful package of photographic
technology. - Read on for all the details!
High Points
Executive Overview
(This is a quick digest of the rest of the review. If you plan
on reading the whole review, you can skip this page and continue on with
the Design section that follows.)
The new Coolpix 8700 builds on the earlier Coolpix 5700 with the addition
of an 8 megapixel sensor. In most other ways, the 8700 is very similar to
the 5700. Too big for either shirt pocket of purse, the 8700 really begs
for a camera bag to be transported in, but its neck strap eyelets are well
positioned to let the camera hang level when suspended by them.
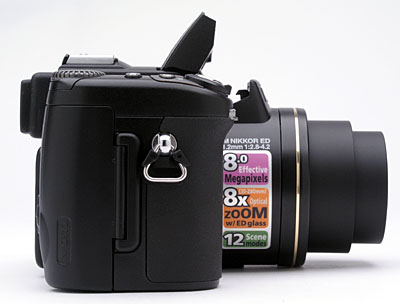
The 8700 keeps the big 8x Nikkor 8.9-71.2mm ED lens from the 5700, which provides a zoom range equivalent to a 35-280mm lens on a 35mm camera. Focus can be automatically or manually controlled, with an adjustable, five-point AF area. In addition to the 8x optical zoom, the Coolpix 8700 also provides up to 4x digital zoom, depending on the image size selected. (Keep in mind that digital zoom compromises image quality because only the central portion of the CCD's image is enlarged, decreasing resolution.) An electronic viewfinder offers a miniaturized version of the LCD monitor for TTL (through the lens) framing, complete with a detailed information display. For a larger view, the 1.8-inch LCD monitor has an articulated design, popping out from the back panel and swiveling around approximately 270 degrees. The LCD can also flip around and fold flat against the back panel, giving it the familiar rear-panel position common to most digicams. Finally, it can be closed (turned with its face against the camera body) when not in use, protecting the monitor from dirt and scratches.
Following the standard of prior high-end Nikon Coolpix models, the Coolpix 8700 offers a very extensive set of exposure controls. Program AE, Flexible Program AE, Aperture Priority, Shutter Priority, and Manual exposure modes are available, each with a wide range of features. Shutter speeds range from as high as 1/4,000 (limited to 1/2,000 in most modes though) to eight seconds, with a Bulb setting for exposures as long as ten minutes. An optional Noise Reduction system decreases the fixed-pattern image noise that would normally be present in long exposures. The maximum aperture ranges from f/2.8 - f/4.2, depending on the zoom setting, and is adjustable in one-third EV steps. Four metering options include 256-Segment Matrix, Center-Weighted, Spot, and AF Spot (which ties the metering spot to the selected AF area). An ISO adjustment provides options that include Auto (which only takes the ISO up to 200), 50, 100, 200, and 400. It is disappointing that the ISO 800 setting was dropped, but it may be due to the overall increase in noise associated with an 8 megapixel sensor. The camera's adjustable White Balance setting offers Auto, Daylight, Incandescent, Fluorescent, Cloudy, Speedlight, or Preset (which allows you to manually adjust the white value by using a white object as a reference). Additionally, all white balance settings other than Preset can be adjusted from -3 to +3 units on an arbitrary scale, letting you fine-tune them to your liking. A White Balance Bracketing mode captures three images with slightly different white balance adjustments, letting you pick the best image when you view the photos on your computer.
Exposure compensation is adjustable from -2 to +2 exposure equivalents (EV) in one-third step increments, and is controllable in all exposure modes but Manual and the Fireworks Scene mode. The Auto Bracketing feature takes three or five shots of the same subject with varying exposure values determined either by the photographer in Manual mode or by the camera in all other modes, with variable exposure steps between shots. Best Shot Select snaps multiple images and then automatically picks the sharpest, making it feasible to handhold the camera for surprisingly long exposures. The "Quick Review" button lets you quickly check the last shot taken without leaving Record mode, going so far as to make most of the Playback mode options available, while permitting a very quick return to shooting. Through the camera's settings menu, you can also adjust the image sharpness and color saturation. An Image Adjustment menu offers Contrast, Lightness, and Monochrome adjustments as well. Additionally, the Coolpix 8700 allows you to save up to three sets of user settings for focus, exposure, and other camera options, for rapid recall via the setup menu. (A very handy feature if you're in a situation where you need to switch rapidly between two radically different shooting environments, as in a reception or party with both outdoor and indoor activities.) A Self-Timer mode offers a three or 10-second countdown before firing the shutter. The camera's built-in flash operates in Auto, Flash Cancel, Anytime Flash, Red-Eye Reduction, and Slow-Sync modes. An external flash hot shoe is also included in the camera's design, and accommodates a more powerful external flash unit.
Like the Coolpix 5700 before it, the Coolpix 8700 offers a wide range of "motor drive" rapid-exposure modes for capturing quick sequences of images. Continuous L, Continuous H, Ultra High Speed Continuous, and Multi-Shot 16 modes are available through the settings menu, and offer a range of sequence shooting speeds. (Multi-Shot 16 mode subdivides the image area into 16 sections and captures a "mini-movie" of small images at 816 x 612-pixel resolution.) Movie mode has gotten more involved as well, with four capture options. "TV movie" captures 30 frames per second at 640 x 480 with vertical interlacing, and a maximum length of 35 seconds. "Small movie" mode takes 320 x 240 movies at 15 frames per second for a maximum of 180 seconds. "Time-lapse movie" takes 640 x 480 stills and joins them to create a 30fps silent movie of up to 35 seconds long, or 1,050 frames.
The 8700 also includes two new modes. First, a 5 shot buffer mode, which shoots at five frames per second until the shutter is released, then saves the last five frames captured--good for action scenes whose peak moment is difficult to predict. (Until you've used a feature like this for shooting live action, it's hard to fully appreciate what a difference it can make.) And then there's Time Lapse, where the user can choose a capture interval from 30 seconds to 60 minutes. The camera will then take pictures until either the shutter is pressed again, the memory card is full, or 1,800 shots have been captured.
The Coolpix 8700 stores images on CompactFlash cards (Type I or II), although none comes with the camera. File formats include several levels of compressed JPEG files as well as an uncompressed TIFF mode (Hi quality setting), and an NEF (RAW data) format. Available image sizes are 3,264 x 2448 (8MP), 3,264 x 2176 (max 3:2 ratio), 2,592 x 1,944 (5MP), 2,048 x 1,536 (3MP), 1,600 x 1,200 (2MP), 1,280 x 960 (SXGA or 1MP), 1,024 x 768 (XGA or PC), and 640 x 480 (VGA or TV) pixels. A Video Out jack connects the camera to a television set or video monitor, for larger screen image review.
A rechargeable EN-EL1 lithium-ion battery pack powers the camera, and an AC adapter is available as a separate accessory. (The battery and charger are included in the box with the Coolpix 8700.) The camera connects to a computer via a USB cable (included), and the accompanying software provides image downloading and organizing capabilities. The Coolpix 8700 downloads its images fairly quickly, as I clocked it at a transfer rate of 752 KB/second. This is faster than any cameras using a USB version 1.1 interface, but on the slow side of the range for USB 2.0-equipped models.
The rotating LCD monitor makes shooting at odd angles a lot more comfortable, and control layout is intuitive. I love the 8X lens, but I'm still not crazy about the EVF monitor, far preferring an optical viewfinder. In a non-SLR, however, it's impossible to provide such dramatic zoom with a rangefinder design without fairly major parallax error, and such long-zoom optics for an optical viewfinder can be prohibitively expensive.
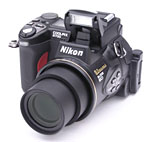
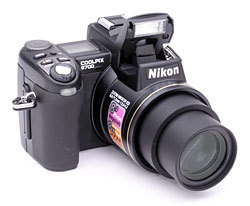
Essentially identical externally to the Coolpix 5700, the Coolpix 8700 is both small and function-rich. Compared to the many newly-emerging EVF designs, the Coolpix 8700 is still relatively compact. Because the camera is so small, and to accommodate its big flip out screen, some of the control buttons were placed on the left of the lens housing. Those used to having most of the controls on the back will have to adjust to having basic functions like resolution and flash control out of sight on the left, but it does give something for the left hand to do while you're working the command dial. There is a risk of pressing these side-mounted buttons accidentally, adjusting the various controls without the photographer's knowledge, so user beware, but I did find that their locations become more intuitive with extended use. The Coolpix 8700 has a "Vari-angle" LCD design that swivels, useful for getting the shot from various angles, including from directly in front of the camera. (Good for self-portraits, or working with a model.) The Coolpix 8700 has an all-black body composed of a mixture of metal and plastic. It's fairly compact at 4.3 x 3.0 x 4.0 inches (108 x 76 x 102 mm). It has a pleasant heft, and the lens is close enough to the grip that there is very little "twist away" as we've seen with heavier EVF cameras. It weights 18.8 ounces (533 grams) with battery and memory card loaded.
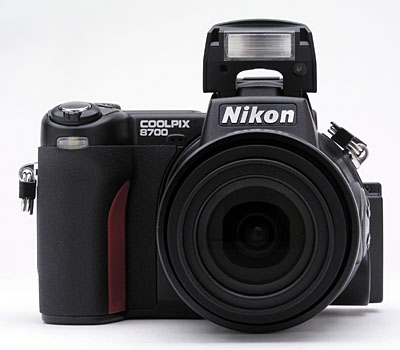
Visible on the front panel are the lens and self-timer lamp, the latter at the top of the handgrip, just below the power switch. The telescoping lens extends as much as two inches when the camera is powered on. (The lens extends two inches when set to its telephoto position, but only a bit over an inch at its wide angle setting.) There are body threads at the base of the lens barrel for mounting an accessory adapter, and wide, telephoto, and fisheye lenses are available for the camera. Adjustment to an auxiliary lens is not automatic; users must tell the camera which add-on lens is mounted. A removable plastic lens cap protects the lens from scratches, and comes with a tiny strap to tether it to the camera body and prevent it from being lost. Instead of popping off if you've left the cap on when starting up the camera, this cap just comes out with the lens, since it actually fits inside the innermost lens assembly. It looks funny, but it's a great solution that keeps the lens well protected. Tucked beneath the Coolpix logo are two small holes for the microphone, used to record audio when in movie mode or Voice Memo mode. A large hand grip, coupled with the deep recess between the grip and the lens barrel, provides a firm hold on the camera, and a rubbery coating provides a good gripping surface for your fingers.
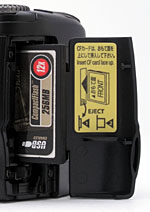
The camera's right side (as viewed from the back) houses the memory card compartment (a Type II Compact Flash slot) and an eyelet for the neck strap. I liked the positive snap-action operation of the memory compartment cover: The spring action is apparently contained in the hinge mechanism, and it feels much better than the usual friction snap-latch I commonly find on the outside edges of these flaps on most cameras I test. The ejection button can be a little confusing if you get out of sync with it though. It's one of those that works like a pen plunger: In order to extend the release so that it can push the card out, you first have to press in to make it pop out. Once it's extended, you can press in again and it releases the card and then stays pressed in, as long as you pressed it back in far enough. When it doesn't stay in, however, you'll find that inserting a new card and closing the door will just cause the card to eject again into the door, crashing the camera. Nikon warns about this in the manual. Those experienced with this method will likely be okay, but novices could get a little frustrated.
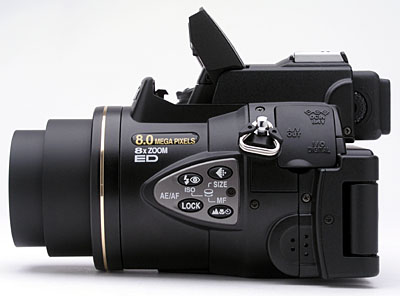
The left side of the camera is rounded to conform to the shape of the lens barrel, and holds several control buttons, the second neck strap eyelet, a connector compartment, and the speaker. The four control buttons (Flash / ISO, Image Quality and Size, AE/AF Lock, and Focus Mode buttons) on the side of the lens serve dual purposes, changing one setting when pressed, and another when pressed and held while turning the Command dial. A rubbery flap covers the connector compartment, which houses the DC In, A/V Out, and Digital I/O jacks. The flap remains fastened to the camera body and folds out of the way easily, using the new, more substantial connector/hinge tab design I saw and approved of on Nikon's D100 SLR. Also visible from this angle is the diopter adjustment dial on the viewfinder eyepiece.
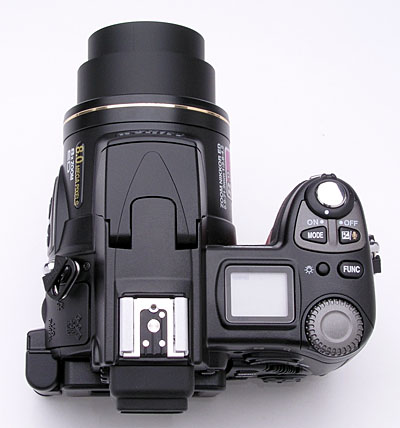
The top of the camera has a handful of controls, a small status display panel, the pop-up flash, and the external flash hot shoe. You can either pull the flash up manually, or the camera will pop it up automatically when needed. It also pops up even if you've used a custom mode to turn flash off. Don't be alarmed or frustrated, as I was initially, it's just that the AF assist light is also located in the flash housing, so the flash head has to be popped up in order for the assist light to function. The hot shoe has the standard five-contact design used by the Nikon Speedlights, but should also host some third-party flash units. (Particularly since the camera doesn't use many of the special Nikon-proprietary contacts on the flash shoe.) The small status display panel reports most camera settings, including battery power, and is very useful for making quick camera adjustments. Top panel controls include the Power dial and Shutter, Mode, Exposure Compensation, Illuminate, and Function buttons. A Command dial on the top panel of the 8700 is used in conjunction with various buttons on the body of the camera to change settings.
A number of the controls and user interface elements for the Coolpix 8700 are on the back of the camera. At top left is the electronic viewfinder (EVF) eyepiece, with a diopter adjustment dial on the left side and a nice rubber guard, important for wearers of glasses. On the right side of the eyepiece is a Monitor Select button, which toggles the viewfinder display back and forth between the EVF and LCD monitor. A rocker button in the top right corner controls optical and digital zoom, as well as playback viewing options. The remaining controls include the Menu and Quick Review buttons, Mode switch, Four-Way Arrow pad, and the Erase and Display buttons. The right edge of the back panel is sculpted, providing a nice indentation and associated ridge that provides just enough of a lip to give your thumb something to hold onto.
The 8700 has a "vari-angle" LCD monitor, which lifts off of the back panel and swings outward. Once out, the monitor swivels 270 degrees. One benefit is that in addition to facing a variety of angles, the LCD can flip around and face the back of the camera when closed, protecting it from any scratches.
The bottom of the Coolpix 8700 is nice and flat, with several slightly raised inserts of resilient plastic that increase the camera's grip on tripod mounting plates. The tripod socket itself is a rugged metal unit. The tripod socket is also roughly centered on the camera body, which is good for mounting stability, but which does put the lens quite a bit off-center from the mount. This isn't an issue for normal shooting, but does mean that a special tripod head will be needed to shoot panoramic images, to compensate for the parallax error introduced by the offset between the lens' optical center and the center of rotation for the tripod mount. Having the tripod socket centered also means that some tripod mounting plates will prevent you from removing the battery while mounted to the plate. (Again, not an issue for most users, but something I'm attuned to given how much I shoot in the studio with cameras I test.) A small plastic plate next to the battery compartment pops out revealing a connector for the power/vertical hand grip accessory. Unfortunately, there is no retaining latch to keep the battery in place when you open the battery door, so be careful when opening. Batteries can become unusable after only one drop depending on where and what and how hard they hit.
 A
feature in the 8700 that came in with the Coolpix 5700 is the electronic viewfinder
(EVF), essentially a miniaturized version of the LCD monitor, complete with information
and menu screens, but sheltered from the sun in a more traditional viewfinder
with an "optical viewfinder" feel. The Monitor Select button on the
right side of the viewfinder switches the view back and forth between the EVF
and LCD monitor displays. Though you can call up the LCD menus in the EVF display,
I found it rather tedious to actually make menu selections that way. It's much
easier to use the larger display of the LCD monitor for menu navigation. Still,
the EVF's informative display reports exposure settings, camera mode settings,
and battery information, all of which are useful during normal operation. The
EVF comes in handy when shooting outside in extremely bright sunlight that washes
out the LCD (although the 8700's LCD is much better in this respect than those
on most digicams), or when nearby reflections just make viewing an otherwise good
outdoor LCD uncomfortable. A diopter adjustment dial, tucked on the left side
of the eyepiece, adjusts the view to accommodate eyeglass wearers, and the micro-LCD
used in the 8700's EVF has higher than average resolution, with 235,000 pixels
(101,000 more than the rear-panel LCD display). Through the Setup menu, you can
specify whether the EVF or LCD monitor automatically activates by default at camera
startup.
A
feature in the 8700 that came in with the Coolpix 5700 is the electronic viewfinder
(EVF), essentially a miniaturized version of the LCD monitor, complete with information
and menu screens, but sheltered from the sun in a more traditional viewfinder
with an "optical viewfinder" feel. The Monitor Select button on the
right side of the viewfinder switches the view back and forth between the EVF
and LCD monitor displays. Though you can call up the LCD menus in the EVF display,
I found it rather tedious to actually make menu selections that way. It's much
easier to use the larger display of the LCD monitor for menu navigation. Still,
the EVF's informative display reports exposure settings, camera mode settings,
and battery information, all of which are useful during normal operation. The
EVF comes in handy when shooting outside in extremely bright sunlight that washes
out the LCD (although the 8700's LCD is much better in this respect than those
on most digicams), or when nearby reflections just make viewing an otherwise good
outdoor LCD uncomfortable. A diopter adjustment dial, tucked on the left side
of the eyepiece, adjusts the view to accommodate eyeglass wearers, and the micro-LCD
used in the 8700's EVF has higher than average resolution, with 235,000 pixels
(101,000 more than the rear-panel LCD display). Through the Setup menu, you can
specify whether the EVF or LCD monitor automatically activates by default at camera
startup.
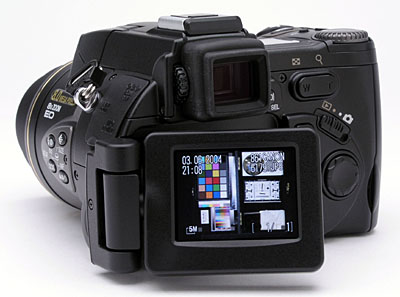
The 1.8-inch, 134,000-dot, low-temperature polysilicon TFT LCD monitor features a swivel design, plus brightness and hue adjustment. The LCD monitor actually lifts up off of the back panel, flipping out toward the left side of the camera. Once opened, the LCD monitor can swivel around to face up or down over about a 270 degree range of rotation. You can also turn the LCD monitor around to face the camera and then close it to protect the monitor from any accidental scratches. I really like swiveling LCD designs, as they greatly increase the camera's shooting flexibility, allowing you to hold the camera at a variety of angles and still clearly see the LCD display. (They're particularly handy for over-the-head shots in crowds, or for ground-level macro shooting.)
A nice touch in the Coolpix 8700's LCD viewfinder implementation is that you
can adjust not only the viewfinder brightness, but its color (hue) as well.
A menu option lets you adjust the viewfinder color towards either the blue
or the red ends of the spectrum, to help match the viewfinder display to
the actual color balance of your captured images. I applaud this, but note
that having control only over blue/red tints is only a partial solution.
(Technically, you need separate controls for red, green, and blue, in order
to be able to completely control the display color. You could get away with
only varying two of these relative to the third, but I suspect that full
control would result in a bewildering user interface. Still, I'd like to
see some attempt to offer more complete color adjustment. Big kudos to Nikon
for providing any sort of LCD hue adjustment though.)
 The Coolpix 8700
again features Nikon's powerful zone-based autofocus system. The camera automatically
chooses between five different autofocus zones, or you can lock it in on
any one of them manually. Either way, the viewfinder displays all five zones,
and highlights the currently active one in red.
The Coolpix 8700
again features Nikon's powerful zone-based autofocus system. The camera automatically
chooses between five different autofocus zones, or you can lock it in on
any one of them manually. Either way, the viewfinder displays all five zones,
and highlights the currently active one in red.
 Beyond the
zone-based AF indication though, the Coolpix 8700's viewfinder offers a number
of display options in capture mode. Pressing the DISP button cycles through
the various options, which include a basic display showing only the AF zones,
a display that includes information on a fair number of camera settings,
a display with a live histogram graph overlaid on the image, and a new mode
that adds a rectangular/diagonal alignment grid. (I really like alignment
grids like this for scenes with prominent horizontal or vertical elements,
but did feel that the grid lines on the 8700's screen were a little too coarse
for my tastes. Finer lines would still give you good alignment references,
without obscuring as much of the subject.)
Beyond the
zone-based AF indication though, the Coolpix 8700's viewfinder offers a number
of display options in capture mode. Pressing the DISP button cycles through
the various options, which include a basic display showing only the AF zones,
a display that includes information on a fair number of camera settings,
a display with a live histogram graph overlaid on the image, and a new mode
that adds a rectangular/diagonal alignment grid. (I really like alignment
grids like this for scenes with prominent horizontal or vertical elements,
but did feel that the grid lines on the 8700's screen were a little too coarse
for my tastes. Finer lines would still give you good alignment references,
without obscuring as much of the subject.)
 A Quick
Review function lets you quickly check the last exposure while still in record
mode, simply by pressing the Quick Review button above the LCD screen. This
isn't an uncommon feature on digicams, but what's absolutely unique on the
Coolpix cameras is the "picture in picture" review mode (shown
here), which opens a playback window in the upper left-hand corner of the
display screen, while keeping the viewfinder image live on the remaining
LCD area. Note too, that this image isn't restricted to the most recently
captured photo. You can scroll through all the images on the memory card
by pressing the rocker button arrows. The first press of the Quick Review
button activates the picture in picture review mode, a second press enables
full-screen playback, and a third press returns you to full capture mode.
At any point, pressing the Shutter button returns you to capture mode and
snaps a picture. (The shot above is "borrowed" from my review of
the Coolpix 5700, the Quick Review function works the same way on the 8700.)
A Quick
Review function lets you quickly check the last exposure while still in record
mode, simply by pressing the Quick Review button above the LCD screen. This
isn't an uncommon feature on digicams, but what's absolutely unique on the
Coolpix cameras is the "picture in picture" review mode (shown
here), which opens a playback window in the upper left-hand corner of the
display screen, while keeping the viewfinder image live on the remaining
LCD area. Note too, that this image isn't restricted to the most recently
captured photo. You can scroll through all the images on the memory card
by pressing the rocker button arrows. The first press of the Quick Review
button activates the picture in picture review mode, a second press enables
full-screen playback, and a third press returns you to full capture mode.
At any point, pressing the Shutter button returns you to capture mode and
snaps a picture. (The shot above is "borrowed" from my review of
the Coolpix 5700, the Quick Review function works the same way on the 8700.)
 In Playback
mode, the LCD offers a wealth of information via several display pages. In
total, no fewer than five information screens are available, accessed by
turning the Command dial in playback mode. The first display is the standard
Playback information readout, which reports the date and time of the shot,
file name, quality setting, and the image number on the card. The next two
screens report a long listing of camera and exposure settings, including
the firmware version, focal length, shutter speed, ISO, etc. A fourth information
page shows a histogram view of the image, illustrating the distribution of
brightness values in the image, with the left edge corresponding to pure
black, and the right edge to pure white. Once you learn how to read it, a
histogram is very useful in determining whether you've managed to capture
a good exposure or not. Ideally, a well-exposed image would produce a histogram
curve that just filled the graph from left to right, indicating that it contained
a full range of tonal values. The final information screen shows lens, shutter,
and focus settings, and indicates (by the red brackets) what the autofocus
system had locked onto when the picture was taken. Histogram displays won't
always show you if only a small portion of your image is blown-out: To address
this need, the 8700 blinks those parts of the image that are overexposed,
letting you see exactly where you're losing highlight detail. Very
nice. (Although I've generally found the 8700's blinking highlights a little
too aggressive in what they choose to warn you about.)
In Playback
mode, the LCD offers a wealth of information via several display pages. In
total, no fewer than five information screens are available, accessed by
turning the Command dial in playback mode. The first display is the standard
Playback information readout, which reports the date and time of the shot,
file name, quality setting, and the image number on the card. The next two
screens report a long listing of camera and exposure settings, including
the firmware version, focal length, shutter speed, ISO, etc. A fourth information
page shows a histogram view of the image, illustrating the distribution of
brightness values in the image, with the left edge corresponding to pure
black, and the right edge to pure white. Once you learn how to read it, a
histogram is very useful in determining whether you've managed to capture
a good exposure or not. Ideally, a well-exposed image would produce a histogram
curve that just filled the graph from left to right, indicating that it contained
a full range of tonal values. The final information screen shows lens, shutter,
and focus settings, and indicates (by the red brackets) what the autofocus
system had locked onto when the picture was taken. Histogram displays won't
always show you if only a small portion of your image is blown-out: To address
this need, the 8700 blinks those parts of the image that are overexposed,
letting you see exactly where you're losing highlight detail. Very
nice. (Although I've generally found the 8700's blinking highlights a little
too aggressive in what they choose to warn you about.)
 Also in Playback
mode, the LCD offers a thumbnail index display, showing either four or nine
images to a page depending on the setting. The Zoom Rocker button controls
the index display, as the wide-angle side of the zoom lever increases the
number of thumbnails displayed (from one to four to nine). The telephoto
side returns to the single image display, and also activates the playback
zoom, which enlarges the displayed image up to 6x in 25 steps. When you're
zoomed in on an image, you can pan around the image with the rocker control.
Pressing the shutter also captures a cropped image of the current LCD display
and saves it as a new file. You can then zoom in on the cropped image even
further. An unexpected plus.
Also in Playback
mode, the LCD offers a thumbnail index display, showing either four or nine
images to a page depending on the setting. The Zoom Rocker button controls
the index display, as the wide-angle side of the zoom lever increases the
number of thumbnails displayed (from one to four to nine). The telephoto
side returns to the single image display, and also activates the playback
zoom, which enlarges the displayed image up to 6x in 25 steps. When you're
zoomed in on an image, you can pan around the image with the rocker control.
Pressing the shutter also captures a cropped image of the current LCD display
and saves it as a new file. You can then zoom in on the cropped image even
further. An unexpected plus.
Why I don't like EVFs
I guess this is where I need to express my concerns over EVFs in general,
and the one on the 8700 as a particular example of the issues. When it comes
to cameras with long-ratio zoom lenses, EVFs prove to be a necessary evil.
There's just no way to manufacture an optical viewfinder with a long zoom
ratio that'll accurately track the field of view of the lens and have acceptable
optical characteristics (brightness, distortion, etc) for an affordable price.
As a result, once you get over about a 5x zoom ratio, you pretty much have
to go with an EVF.
So what's wrong with an EVF, and why do I call it a "necessary evil?" The problem really comes down to light sensitivity. In order to provide a "live" display, the LCD inside the EVF has to be refreshed quite rapidly, certainly no less than 5 times per second or so. This places a severe limit on the amount of light the CCD can gather for each refresh. (If the refresh rate were 5 times per second, the maximum shutter time for each frame would obviously be about 1/5 of a second.) While you can generally tolerate a darker image in the viewfinder than you'd accept in the final photograph, the fact remains that EVF-equipped cameras can almost always capture acceptable photos under much lower light levels than those at which you can actually see anything through the viewfinder. There are tricks the camera engineers can play to help this situation somewhat, but they're limited. Slowing refresh rates in dim lighting is the first trick to use, and that's what the Nikon designers did with the 8700. The 8700's refresh rate gets much slower in dim lighting conditions. Another trick is to crank up the signal amplification between the CCD and LCD, to get a brighter image. You'll get more image noise on the LCD, but most users will accept pretty noisy EVF images if the increased noise at least lets them see their subjects. Nikon appears to have adopted this latter practice as well, but only to a degree.
In playing with the 8700's EVF, I found that it responded pretty directly to the camera's ISO setting: Higher ISOs produced brighter EVF displays under darker conditions. I discovered though, that changes in EVF sensitivity lagged changes in the ISO setting by a few seconds. The viewfinder display was at least somewhat usable down to surprisingly low light levels with the ISO set to 400, but it took a good 6-10 seconds for the display to brighten after changing from a lower ISO setting. If want to shoot at lower ISO settings to minimize image noise (and are patient enough), it's possible to set the ISO up to 400 to frame your shot, then dial it back down to whatever value you want to shoot at. This is feasible, but far from convenient. (Here's a suggestion to the Nikon engineers: How about a firmware option that would boost the effective ISO dramatically only for the viewfinder display? A menu option could turn this on or off, preserving the relationship between viewfinder brightness and ultimate exposure level for normal shooting.) Overall, the EVF in the 8700 does a somewhat better than average job of letting you see under dim lighting, but it's still no match for a true optical viewfinder when it comes to low light shooting.
| Free Photo Lessons | |
|
 The Coolpix 8700 features an 8x Nikkor 8.9-71.2mm ED lens, the equivalent of a 35-280mm lens on a 35mm camera. The maximum aperture varies from f/2.8 to f/4.2, depending on the lens zoom setting, with the largest aperture available when the lens is at its maximum wide angle focal length. Apertures are adjustable in 10 steps with one-third EV increments, and are created by a seven-blade iris diaphragm. (The seven-blade diaphragm is a nice but subtle touch - it will produce less distortion in sharp, specular highlights than apertures made by diaphragms with fewer blades in them, and hence more irregular shapes. The seven-blade iris also provides finer-grained aperture control than simpler designs.)
 Focus on the Coolpix 8700 operates under automatic or manual control, and features Macro and Infinity focus modes as well. The Coolpix 8700's autofocus mechanism employs a contrast-detection method, which determines focus from a five-area multi-pattern or spot AF area. There are five possible focus zones (center, top, bottom, left, right), useful for achieving accurate focus on off-center subjects, although all are clustered rather closely about the center of the frame. (I'd really like to see them extend a bit further out toward the edges, perhaps a third of the distance from their current locations toward the edges of the frame.) The Focus option under the settings menu defaults to AF area selection under automatic control, or lets you explicitly set the location of the focus area. (This last is a nice feature that works well when combined with the spot metering mode, which can likewise be directed to determine exposure from the same five zones.) In the "Auto" option for focus area selection, the camera chooses the area corresponding to the object closest to the camera. When the area focus option is set to Off, the camera bases focus on the central area. (One Playback mode information screen displays a focus area overlay, and shows which focus area was chosen for each image, by highlighting the appropriate set of marks in green.)
Two AF modes are also available: Continuous AF and Single AF. Continuous AF mode means that the camera constantly adjusts the focus, good for moving subjects. In Single AF mode, focus is only determined when the Shutter button is halfway pressed.
The manual focus option is accessed by pressing the Focus Mode button and turning the Command dial. A distance scale in the LCD monitor reports current focusing distance in a very general sense, showing a bar that extends from a macro symbol on one side to an infinity symbol on the other. The minimum focusing range depends strongly on the lens zoom setting, so the focus-distance display turns red if you try to manually focus closer than the lens can support at its current focal length. I have to say that I dislike the 8700's distance readout because it makes it difficult or impossible to know the actual focusing distance you've selected. I've often had occasion to set an approximate manual focus distance in advance of a shot, based on my estimate of the subject's distance. (After-dark candid and wildlife photography are two situations where I've frequently needed to do this.) I would think Nikon could use the combination of lens focal length and focus-motor position to derive the actual focusing distance. - Certainly, I've seen numeric distance readouts on cameras from a variety of other manufacturers, so it's technically possible.
For those situations when you can actually point at your subject long enough to set the focus visually, a "Focus Confirmation" option (available as a menu selection in Record mode) applies a strong "sharpening" operator to the LCD display. The result is that the LCD image very clearly "snaps" into focus when proper focus is achieved, making the LCD display much more useful than it ordinarily would be for manual focusing. Focus Confirmation can be set to be on all the time, off all the time, or only on when the camera is being manually focused. - This is another Nikon trick that I'd like to see more camera manufacturers adopt.
The Coolpix 8700's digital telephoto feature is enabled through the Zoom option under the Setup menu, and enlarges images as much as 4x. An indicator on the LCD monitor displays the current level of digital zoom at each step (from 1.1x to 4.0x). Keep in mind though that digital telephoto only enlarges the center of the image, reducing resolution in direct proportion to the amount of digital zoom used. The 8700 appears to automatically switch to center-weighted metering and a center autofocus target when digital zoom is active. Also under the Zoom menu option, you can set the zoom speed and activate the Fixed Aperture function, which keeps the aperture fixed as the lens zooms. (This last being a very handy option when working with studio strobes or other strobes with fixed output levels and no exposure feedback from the camera.)
There's a set of body threads around the base of the lens barrel for attaching an adaptor barrel for accessory lenses. The 8700 can accept wide, telephoto, and fisheye lenses with the use of an optional adapter.
Autofocus performance under low light on the 8700 seems similar to that on prior Coolpix models, but there is now an AF-assist light nestled next to the flash for better results. In my informal testing, the AF system could focus on sharply-defined, high-contrast objects in total darkness out to about 6 feet or so, but it did considerably better with at least some ambient light, and the focus performance was also very dependent on the contrast level of the subject involved. In incandescent room light where other cameras perform reasonably well, the 8700 can take over 10 seconds, focus right past what is clearly in focus, and settle on a very out of focus setting. You really have to pick your contrasty areas; and even when you do, it can be hit and miss. This seems like an area where the 8700 could use a little more engineering effort.
| Free Photo Lessons | |
|
Adding to the usefulness of the fully-automatic Program AE mode, the Flexible Program AE option lets you select from a range of exposure settings by turning the Command dial. (Simply turn the Command dial on its own while in Program mode, and an asterisk appears next to the "P" in the LCD display. Further rotation of the Command dial cycles through the available combinations of shutter speed and aperture that correspond to the exposure level the camera has selected.) Flexible Program AE lets you choose from several equivalent exposures, allowing you to decide between a faster shutter speed or a smaller lens aperture. Personally, I find this more useful than the more common aperture- or shutter-priority metering options, as it gives the camera more latitude to get the shot you want, while letting you express a "preference" for larger or smaller aperture settings.
The Coolpix 8700 uses the 256-Segment Matrix system by default, but also offers Center-Weighted, Spot, and AF Spot metering options. The 256-Segment Matrix setting determines the exposure based on 256 separate areas in the frame, taking into consideration both overall brightness as well as contrast levels to determine the best overall exposure. Center-Weighted metering measures light from the entire frame but places the greatest emphasis on a circular area in the center. Spot metering is pretty self-explanatory, taking a reading from the dead center of the image (best when using the AE Lock function). With AF Spot, the spot metering actually centers on the specific focus area selected, giving you the option for off-center spot metering. (See the previous Optics section of this review for a discussion of the 8700's AF Area focusing mode.)
An ISO adjustment option offers a range of values, including Auto, 50, 100, 200, and 400, ISO equivalents. The ISO 800 option was included in the earlier 5700, but was likely eliminated in the 8700 because ISO 800 would probably produce even more image noise with the high-resolution 8MP CCD than it did on the older model's 5MP chip. White balance choices include Auto, Daylight, Incandescent, Fluorescent, Cloudy, Speedlight, or Preset (which lets you manually adjust the white value by using a white card or object as a reference point). All white balance settings except Preset can be adjusted from -3 to +3 units on an arbitrary scale. There's also a White Balance Bracketing mode, which captures three images at slightly different white balance adjustments, so you can pick the best image when you get them all back on your computer. I think both of these options are very useful, as I often find myself wanting to tweak one of a camera's preprogrammed white balance values to my liking. White balance "tweak" adjustments like this are becoming more common, but I wish even more manufacturers would adopt them.
Exposure compensation on the Coolpix 8700 is adjustable from -2 to +2 exposure equivalents (EV) in one-third step increments, in all exposure modes. The Auto Bracketing feature takes three or five shots of the same subject with varying exposure values determined either by the photographer in Manual mode or by the camera in all other modes. Exposure settings for bracketing can vary from -2 to +2 EV (values are added to the already chosen exposure compensation value), with step sizes of one-third, one-half, or one EV unit, and the bracketing biased toward either underexposure, overexposure, or centered around the main exposure value.
Another signature Nikon feature is the Image Adjustment menu. This menu offers options to increase or decrease contrast; on the 5700 it allowed users to lighten or darken the entire image, but that has been removed for some reason. Like other recent Coolpix digicams, the 8700 also provides a range of color saturation options, covering a five-step scale plus and Black & White. Additionally, a Sharpness adjustment controls the amount of in-camera sharpening applied to the image, with a three-step range of adjustment, plus Off and Auto.
One of the really unique Nikon digicam features, the Best Shot Selector (BSS), captures several images in rapid succession, and lets the camera choose only the sharpest (least blurred) to be saved. Best Shot Select makes it feasible to handhold the camera for surprisingly long exposures - I've routinely handheld 1/2 second exposures and gotten good results with Coolpix cameras. You can also check your own work immediately as the camera gives you a quick preview of the captured image and gives you an option to delete or save the image. I've really enjoyed the available-light and low-light photos BSS has let me bring home those times when I've taken a Nikon digicam with me on a trip or outing. Since it chooses the sharpest image from among several that it shoots though, it's at its best when you have a fairly static subject. When shooting people-pictures, it tends to miss fleeting expressions. Still, it's a remarkably useful photographic tool, one I'd be happy to see on cameras from other manufacturers. (I seem to end up saying that a lot when talking about unique Nikon features.)
The Coolpix 8700 lets you save two sets of user settings for focus, exposure, and other camera options, for rapid recall via the setup menu. This is a real time saver in rapidly switching between widely different sets of shooting conditions. My one complaint about the implementation of the User Settings on the Coolpix 8700 is the same that I had on the 5700 model: You have to select one of them, or you can't access any of the camera's powerful special features. This is mentioned in the 8700's manual, but really needs to be emphasized, as it can be quite a puzzle to a new user, trying to figure out why all the camera's advanced options don't seem to work.
Finally, a Self-Timer mode provides a short countdown between a full press of the Shutter button and the actual exposure. The Coolpix 8700 lets you select either a three- or 10-second delay. The shorter delay is great for those times when you're talking a long exposure on a tripod, and want to use the self-timer to trip the shutter so you won't jiggle the camera.
| What's up with RAW? | |
|
Flash
 The Coolpix 8700 features a built-in, pop-up flash with five modes available, including Auto, Flash Cancel, Anytime Flash, Red-Eye Reduction, and Slow-Sync. The Slow-Sync option is useful when shooting subjects with darker or dimly-lit backgrounds (such as night scenes) because the camera leaves the shutter open longer, firing the flash before the shutter closes. This allows more ambient light into the image, avoiding the starkly-lit appearance of standard nighttime flash shots. It can also provide a nice motion blur effect. Red-Eye Reduction mode fires a pre-flash before the main exposure, to reduce the reflection from the subject's pupils.
The top-mounted hot shoe accommodates a more powerful external flash, either a Nikon dedicated unit, or a generic third-party one. The shoe connects to Nikon Speedlight models SB-800DX, 80DX, 50 DX, 28DX, 30, 28, 27, 26, 25, 24, 23, and 22s, although I was again surprised to see that the shoe mount didn't make use of the zoom head on an SB-80DX speedlight I had here. The higher-end Nikon speedlights can focus their flash heads to match the angular coverage of the lens you're shooting with. Thus, when shooting with a telephoto lens, the illumination from the speedlight is focused into a relative narrow beam, concentrating its power and providing greatly increased flash range. While you can always manually zoom the head, it's obviously much more convenient if the camera does it for you automatically. It's hard to understand why Nikon didn't implement this functionality on the Coolpix 5700, and hasn't taken the opportunity to implement it on the Coolpix 8700. By not taking advantage of the advanced features of their own speedlights, it seems to me that Nikon is figuratively tying one hand behind its back in the area of flash performance. This was true with the 5700, and remains the case with the 8700.
The other obvious "missing feature" relative to Nikon speedlights is external-flash-based autofocus assist illumination. Several of Nikon's higher-end speedlights incorporate infrared autofocus assist illuminators, which likewise aren't utilized by the Coolpix 8700. (Actually, the IR AF assist light may have fundamental issues, given that the 8700's AF is based on the signal coming from the CCD, and the CCD has an IR filter over it to improve color rendition. Some of Nikon's strobes (like the SB-80DX) do have a normal incandescent AF illuminator though.)
Continuous Shooting Modes
The Coolpix 8700 offers a number "motor drive" rapid-exposure modes for capturing quick sequences of images. Four modes (Continuous L, Continuous H, Ultra High Speed Continuous, and Multi-Shot 16) are selectable under the Continuous option of the settings menu. Continuous L mode captures as many as 12 frames at 1.2 frames per second. Continuous H mode captures as many as five frames at 2.5 frames per second. In Ultra High Speed Continuous mode, the Coolpix 8700 captures as many as 100 frames at 30 frames per second, VGA resolution (640 x 480). Multi-Shot 16 mode subdivides the image area into 16 sections and captures a "mini-movie" of small images (816 x 612 resolution), which fills-in a 4x4 array within a single high-resolution image as the shooting progresses. Frame rates in Multi-Shot 16 are as fast as 1.5 frames per second.
Movie Mode
The Coolpix 8700 also records moving images with sound. In TV Movie mode, new to the series, the camera captures an impressive 30 frames per second at 640 x 480 for a maximum of 35 seconds. Small Movies are recorded at QVGA (320 x 240 pixels) resolution for up to 180 seconds. Time lapse movies are limited to 640 x 480 resolution, and a max of 1050 images, for a maximum playback time of 35 seconds at 30fps. Frame capture intervals in time lapse movie mode can be set to 30 seconds, or 1, 5, 10, 30, or 60 minutes. Another odd mode is Sepia movie mode, which is only five frames per second at 320 x 320, with a max of 180. Many competing cameras currently on the market can record movie segments of arbitrary length, limited only by available memory card capacity. Frankly though, I think that the ability to take lengthy movies is overrated. Most television shows and movies change shots every 10 seconds to one minute, and for good reason: Taking short video snapshots usually results in better videos, capturing just enough of the flavor of an event to get the message across, without leaving your audience bleary-eyed and bored. (Of course, there's also the argument that you'll often want to film a longer clip, and then chop out just the most interesting part of it. In that scenario, longer maximum recording times are indeed helpful.)
| |
||
| |
Normal Card |
|
| Power On -> First shot | |
Time
to capture first shot after powering-up. A little slower
than average, takes a while for the lens to telescope
out and the camera to get ready to shoot. |
| Shutdown | |
It
takes 3.11 seconds for the lens to retract if the camera
is otherwise unoccupied, but could take literally hundreds
of seconds if you've just filled the buffer memory with
a large batch of files. - The lens doesn't retract until
the camera has finished saving data to the memory card. |
| Play to Record, first shot | |
Slightly
slow for a high-end prosumer camera. |
| Record to play | |
A
little on the slow side, no difference between "Quick
Review" mode or actually switching to playback mode. |
| Shutter lag, full autofocus, waiting for camera to finish writing previous image | |
The 8700's shutter response showed very unusual behavior. If I waited for the camera to finish processing the previous image, the shutter response was extremely fast, about the best I've yet seen in a prosumer digicam. |
| Shutter lag, full autofocus, NOT waiting for camera to finish writing previous image, monitor option set to "normal" release. | 0.85 - 0.99 | On the other hand, if had the monitor on and mashed the shutter button down while the camera was still displaying the previous image, the shutter lag was pretty substantial, about average among digicams I've tested, and rather slow for current high-end models. |
| Shutter lag, full autofocus, NOT waiting for camera to finish writing previous image, monitor option set to "Quick Release" | 0.53-0.55 | On the other hand, if I immediately hit the shutter button again, but used the "Quick Release" option on the Monitor setup menu, I found the lag time to be fairly fast once again. - But not nearly as fast as when the camera was all done processing an image. - So, for the best shutter response from the 8700, be patient and wait for the buffer to flush before you grab the next shot. |
| Shutter lag, manual focus | |
Reasonably fast, about average for the current crop of high-end prosumer digicams. |
| Shutter lag, prefocus | |
Quite fast, on a par with other high-end models, albeit not quite up to the 0.009 second performance of the Sony DSC-F828. |
| Cycle time, large/fine files | |
Not terribly fast, but the degradation after the buffer fills is fairly slight too, with a fast memory card. Still, I'd like to see better performance for single-shot cycle times. The good news though, is that the 8700 doesn't penalize you for pressing the shutter button early, but rather just grabs the next shot as soon as it's able. With a fast card, you can snap 25-30 shots before the camera slows, and the buffer clears entirely in about 21 seconds. |
| Cycle time, small/basic files | |
Pretty quick. Basically no limit to the buffer capacity in this mode. |
| Cycle time, NEF files (CCD raw format) |
|
Shooting in Nikon's CCD raw mode (NEF file format), the 8700 showed a cycle time of 11.7 seconds, and a buffer capacity of 4 shots, after which the cycle time stretched to 13.9 seconds. Unfortunately, way too slow for much of anything other than landscape or still life photography. (Or portraits, with a patient model.) |
| Cycle time, TIFF files | |
TIFF files on the 8700 are enormous, and cycle times reflect that fact. There's no buffering at all with TIFFs, and cycle time will be very dependent on card speed. - These times were measured with a 40x memory card. |
| Continuous mode (High Speed), large files | |
1.86 frames per second for 5 frames, then a pause of 7.6 seconds, after which it will grab a shot every 3.76 seconds indefinitely. Buffer clears in about 11 seconds. |
| Continuous mode (Low Speed), large files | |
Snaps up to 12 frames at the roughly 0.9 frame/second rate, then slows dramatically, to 8.07 seconds between frames. |
| Multi-Shot 16 | |
Divides full-sized frame into a 4x4 matrix of sub-pictures. 0.74 seconds between shots (1.36 frames/second) for 16 low-res images |
| Ultra High Speed | |
WOW, this is fast! Great for time/motion studies (golf/tennis swings?), and it looks like Nikon cured the timing "jitter" that the 5700 experienced in this mode. The sot to shot interval seems to be very consistent, at 1/30 second. Captures up to 100 images at 640x480 resolution, "normal" JPEG quality, after which it takes the camera ~40 seconds to recover, assuming a fast memory card. (The 640x480 resolution is also a significant upgrade from the capabilities of the 5700, which could only capture 320x240 images at this speed.) - You can actually capture longer action sequences this way than in the 8700's movie mode, but the action is in individual files. |
| Movie Mode | |
Frame rate and recording time are a function of the particular movie mode selected. TV Movie mode records 640x480 movies at 30 fps for up to 35 seconds at a time, Small Movie mode records at 320x240 and 15 fps for up to 180 seconds, Sepia Movie mode records 320x240 sepia-tinted movies at 5 fps for up to 180 seconds. |
Overall, the 8700 is a fast to very fast camera, with fair shot to shot cycle times, but excellent shutter response (in some modes), and superlative high-speed continuous modes. Its shutter response ranges from the slow side of average, if you're shooting rapidly in single-shot mode, but is *very* fast if you can wait for the camera to finish processing each image before snapping the next. Its various "high speed" modes provide a useful range of options, trading off various parameters against speed in different ways. Its Continuous (High Speed) mode captures bursts of up to five frames, at a rate of 1.86 frames per second, while the Continuous (Low Speed) mode captures up to 12 frames at 0.92 frames per second. (Note that these figures are based on my own measurements: Nikon claims 2.5 and 1.2 frames per second respectively for these modes.) Being the "measurement nut" that I am, I found the "Ultra High Speed" mode the most interesting. - It lets you capture up to 100 frames at full VGA (640x480) resolution, at an incredible 30 frames per second. - This would be great for things like analyzing golf or tennis swings, or possibly monitoring industrial processes, etc.
I found the Coolpix 8700's user interface to be a little difficult to grasp at first. By default it's locked into Program mode only, and it's not at all obvious that you have to switch to one of the custom settings to do something simple like cancel the auto flash. The LCD menu system is available for novices, and for less commonly used controls, and it's good that it's there. Over time, experienced users will find they can make virtually all of the necessary adjustments for routine shooting without resorting to the LCD screen, provided they are in one of the two custom modes. Once you learn where the functions are, you can do most of what you need using the external controls on the camera. I have found the interface for switching resolution and compression modes to be a little slow on the uptake, often taking seconds to register my desire to make a choice. After clicking the dial several times, it zips through settings to catch up, taking me far from what I intended. This doesn't happen every time, but often enough to be worth mentioning.
The inclusion of a programmable Function key adds flexibility, letting you customize the camera to your specific shooting needs by assigning frequently-used settings to the top-panel Function button. Exposure compensation, exposure mode, ISO value, image quality and size, as well as focus controls (manual focus setting, macro, and infinity focus) and flash mode can all be adjusted without the LCD. The top-panel monochrome status display provides clear feedback for all these settings as well. When you do have to delve into the LCD menu system, navigation via the Four-Way arrow rocker button is intuitive and quick. In Record mode, the menu system is split into three pages of options, with a tabbed interface, by which you can jump between pages with only a few clicks of the rocker button (rather than scrolling through every option on each screen). In normal operation, most of the camera's functions are controlled by a combination of hitting a button and turning the Command dial, which usually makes it fast and efficient to change settings. Control layout is also logical, allowing one-handed operation for commonly changed functions, requiring a two-handed approach only for manual focus setting, ISO, flash mode, and size/quality adjustment. These buttons would be better on the back of the unit, but there's no room there; once the user is accustomed to their presence on the lens body, it should be easy to use.
Reading the manual is essential to understanding many of the functions of the Coolpix 8700. Its feature set is rich and deep, and the reward for the extra research is a thorough understanding of a very capable camera.
Control Enumeration

Shutter Button: Located on top of the camera (slightly sloping down in
front) and encircled by the Power switch, this button sets focus and exposure
when halfway pressed and fires the shutter when fully pressed.
Power Switch: Surrounding the Shutter button on the camera's top panel, this dial turns the camera on or off.
![]()
Mode Button: Just behind the Power switch on the top panel, this button
selects the exposure mode (Program, Shutter Priority, Aperture Priority,
or Manual) when held down while turning the Command dial. In Manual exposure
mode (meaning manual control over both aperture and shutter speed settings),
a quick press of this button alternates between the aperture or shutter speed
settings, letting you change either by turning the Command dial. A second
press selects the other exposure parameter for Command dial control.
![]()
Exposure Compensation/Voice Memo Button: Directly to the right of the
Mode button, this button adjusts the amount of exposure compensation (from
-2 to +2 exposure equivalents (EV) in one-third step increments) when held
down while turning the Command dial. When in full-frame Playback mode, voice
memos can be added to photos up to 20 seconds long. Hold the button down
while recording. A music note icon appears onscreen when a voice memo is
attached to a photo, and pressing the Voice Memo button plays the note. The
zoom controls change the volume up and down.
![]()
Function Button: Just behind the Exposure Compensation button, this button
switches between any of four preprogrammed camera setups. You can set up
the camera for three completely different shooting scenarios (or leave it
in "auto" mode), and then switch quickly between them by pressing
this button and rotating the Command dial. Menu items programmable via the
user setups include white balance, metering pattern, continuous-shooting
modes, Best Shot Selector, image adjustment (brightness/contrast), color
saturation control, and adapter lens setting. Also memorized within each
user mode are non-menu items such as exposure mode settings, flash mode settings,
and exposure compensation adjustments. NOTE: As I mentioned earlier, none
of the advanced features of the 8700 are available until you take the camera
out of Auto mode via this button (or the menu system). The function
controlled by the Func. button can be changed by a LCD menu option, to include
user mode, focus setting, flash mode, white balance, or metering pattern.
![]()
Illuminate Button: To the left of the Function button, this button activates
a green backlight behind the status display panel, so you can read the display
in dark conditions.

Command Dial: Located at the rear, righthand corner of the top of the
camera, this rotary control is used in conjunction with many of the other
buttons on the camera to change camera settings. Pressing the appropriate
button and rotating the dial one way or the other steps through the options
available for the setting in question. In programmed exposure mode, rotating
the dial at any time (e.g., with no button pressed) varies the exposure program,
biasing it toward larger or smaller aperture settings. (A very handy way
to control depth of field in your photos, without having to bother with the
aperture priority exposure mode.)

Diopter Adjustment Dial: Hidden on the left side of the viewfinder eyepiece,
this small, black dial adjusts the viewfinder to accommodate eyeglass wearers.

Monitor Select Button: On the right side of the viewfinder eyepiece,
this button toggles the viewfinder display back and forth between the EVF
and LCD monitor. Since there's no optical viewfinder, there's no "off"
setting to disable the electronic viewfinders entirely.

Zoom Control: Located in the upper right corner of the back panel, this
rocker control operates the optical zoom in all capture modes. Likewise,
when digital telephoto is enabled, this button controls the amount of digital
zoom (from 1.1x to 4.0x).
In single-image playback mode, pressing the "T" button repeatedly zooms in on the image, while pressing the "W" side of the control cancels zoomed playback. Pressing the "W" side again switches to four-image thumbnail view, and another press switches to nine-image thumbnail view. Pressing the "T" side of the control steps back through the sequence in the other direction. These buttons also control volume in Voice Memo playback mode.
![]()
Menu Button: Adjacent to the top right corner of the LCD monitor, this
button brings up the settings menu in all capture modes as well as in Playback
mode. Pressing it a second time cancels the menu display.

Quick Review Button: Beneath the Menu button, this button calls up a
thumbnail sized display of the most recently captured image while in either
record mode, appearing in the upper left-hand corner. The left and right
arrow keys scroll through the remaining captured images on the memory card.
Pressed a second time, it expands the thumbnail view to a full-screen display
of the captured images on the card, complete with an image information overlay.
The Quick Review mode is canceled by pressing the button a third time, or
by pressing the Shutter button.
![]()
Erase Button: Just below the Quick Review button, this button calls up
the Erase menu in Playback mode, which lets you delete the displayed image.
There is an option to cancel. If the instant image review function is enabled,
you can press this button to delete the captured image and cancel recording
to the memory card.
![]()
Display Button: Directly below the Erase button, this button controls
the information overlay in Playback and any record mode. Pressing it once
turns off the information display, while a second press recalls it.
Play/Record Switch: Just under the Zoom Rocker control, this switch slides
between Playback and Record modes. (You can also enter playback mode by hitting
the Quick Review button twice.)

Four-Way Arrow Rocker: Situated on the far right of the rear panel, this
control features four arrows that allow the user to navigate through the
LCD menu system and make selections in Record and Playback modes. Different
menu items are selected via the up/down arrows. Pressing the right arrow
selects the item, generally taking you into a sub-menu. Pressing the left
arrow takes you back out again. Once in a sub-menu, the up/down arrows again
step between items, while a right-arrow selects. This process continues until
you arrive at the final point of selection, upon which another right-arrow
actuation makes that selection and returns you to the main menu.
In Playback mode, the left and right arrows scroll through captured images. If an image has been enlarged, all four arrows pan around within the view.
![]()
Flash / ISO: The first button in a series of four on the left side of
the camera, this button controls both flash mode and the ISO setting. Pressing
this button sequentially in Record mode steps you through the various flash
modes available (Auto, Flash Cancel, Anytime Flash, Red-Eye Reduction, and
Slow-Sync). Pressing and holding this button while rotating the Command dial
selects the ISO from among the five available options (Auto, 50, 100, 200,
and 400).

Quality/Size Button: Directly to the right of the Flash / ISO button,
this button cycles between image quality options (Basic, Normal, Fine, Hi,
and RAW) in all record modes. In any record mode, holding this button down
while rotating the Command dial cycles through the image size settings. Choices
are 3,264 x 2448 (8MP), 3,264 x 2176 (max 3:2 ratio), 2,592 x 1,944 (5MP),
2,048 x 1,536 (3MP), 1,600 x 1,200 (2MP), 1,280 x 960 (SXGA or 1MP), 1,024
x 768 (XGA or PC), and 640 x 480 (VGA or TV).

AE / AF Lock Button: Below the Flash / ISO button, this button locks
exposure and/or focus when pressed. A setting in the Record menu assigns
either AE only, AF only, or both to the button.

Focus Mode Button: Directly below the Quality / Size button, this button
controls the focus setting and accesses the self-timer. Pressed sequentially,
the button cycles through Infinity focus, Macro focus, and Self-Timer modes.
Pressed while holding down the Command dial, this accesses and adjusts manual
focus.
My Menu
 This
is a limited menu that can be customized. By default, it shows White Balance,
Metering options, Continuous mode selected (Single is oddly enough a Continuous
mode), BSS (Best Shot Selector) control, User setting selector, Setup, and
Show all menus. Unfortunately, there does not appear to be an option to just
skip My Menu and go directly to all menus all the time. So the fastest route
is to scroll up, which takes you to the bottom of the screen, or Show all
menus. Press right and you've entered the real menu.
This
is a limited menu that can be customized. By default, it shows White Balance,
Metering options, Continuous mode selected (Single is oddly enough a Continuous
mode), BSS (Best Shot Selector) control, User setting selector, Setup, and
Show all menus. Unfortunately, there does not appear to be an option to just
skip My Menu and go directly to all menus all the time. So the fastest route
is to scroll up, which takes you to the bottom of the screen, or Show all
menus. Press right and you've entered the real menu.
Screen One
 White
Balance: Displays a sub-menu with seven white balance options: Auto,
White Balance Preset, Daylight, Incandescent, Fluorescent, Cloudy, and
Speedlight (flash balanced), Shade.
White
Balance: Displays a sub-menu with seven white balance options: Auto,
White Balance Preset, Daylight, Incandescent, Fluorescent, Cloudy, and
Speedlight (flash balanced), Shade.
 Scene
Mode: Also likely to stump those who don't bother with
the manual are the Scene Modes. 12 "scenes" have
been preprogrammed for the situations that most cameras make
mistakes on, as follows:
Scene
Mode: Also likely to stump those who don't bother with
the manual are the Scene Modes. 12 "scenes" have
been preprogrammed for the situations that most cameras make
mistakes on, as follows:
Screen Two
 Image
Sharpening: Adjusts the in-camera sharpening to Auto, High, Normal,
Low, or Off.
Image
Sharpening: Adjusts the in-camera sharpening to Auto, High, Normal,
Low, or Off.
Screen Three
 Noise
Reduction: Activates the Noise Reduction feature for shooting in
low-light situations. Noise reduction processing only applies to exposures
of 1/4 second or longer, but note that leaving it enabled all the time
will significantly reduce the maximum shooting speed in continuous capture
mode.
Noise
Reduction: Activates the Noise Reduction feature for shooting in
low-light situations. Noise reduction processing only applies to exposures
of 1/4 second or longer, but note that leaving it enabled all the time
will significantly reduce the maximum shooting speed in continuous capture
mode.
Setup Screens
Screen 1
 Language:
Changes the menu language to German, English, Spanish, French, Italian,
Dutch, Swedish, Chinese, Japanese, and Korean. It's rather impressive
that the languages are intelligently in the script of their native speakers,
unlike many other products.
Language:
Changes the menu language to German, English, Spanish, French, Italian,
Dutch, Swedish, Chinese, Japanese, and Korean. It's rather impressive
that the languages are intelligently in the script of their native speakers,
unlike many other products.
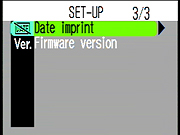
Screen 2
 CF
card format: Another place to format the CF card.
CF
card format: Another place to format the CF card.
 Screen
3
Screen
3
Playback Mode: Accessed by flipping the rear-panel mode switch to
the "Play" position (or by hitting the Quick Review button twice
in rapid succession), this mode lets you view captured images and movies.
The right and left arrow buttons scroll through images while the zoom control
magnifies the image, or lets you view an "index" display of four
or nine images at a time. The Delete button enables quick image deletion.
Pressing the Menu button in this mode calls up the Playback settings menu:
Screen One
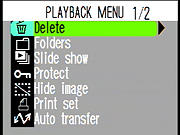 Delete:
Erases the Selected Image, All Images, Print Set, or Transfer marking.
(A "Print Set" refers to the set of images currently marked
for printing, using the DPOF (Digital Print Order Format), while Transfer
refers to images which have been marked for automated upload to your
computer.)
Delete:
Erases the Selected Image, All Images, Print Set, or Transfer marking.
(A "Print Set" refers to the set of images currently marked
for printing, using the DPOF (Digital Print Order Format), while Transfer
refers to images which have been marked for automated upload to your
computer.)
 The
Coolpix 8700 uses standard CompactFlash Type I or II memory cards, but no "starter"
card is included with the camera. Given the size of the camera's images, purchasers
should seriously consider getting at least a 256MB card. Captured images can be
individually write-protected through the Playback menu, but write protected files
are only immune to accidental deletion, not card reformatting. File formats include
several levels of compressed JPEG files as well as an uncompressed TIFF mode (Hi
quality setting) and NEF (RAW) mode. (Both TIFF and RAW settings are only available
at maximum resolution.) Available image sizes are 3,264 x 2448 (8MP), 3,264 x
2176 (max 3:2 ratio), 2,592 x 1,944 (5MP), 2,048 x 1,536 (3MP), 1,600 x 1,200
(2MP), 1,280 x 960 (SXGA or 1MP), 1,024 x 768 (XGA or PC), and 640 x 480 (VGA
or TV). The table below details the Coolpix 8700's approximate file sizes and
compression ratios in all its various image size/quality combinations, with file
capacities shown for the 256 MB card size that I recommend as a minimum for it.
The
Coolpix 8700 uses standard CompactFlash Type I or II memory cards, but no "starter"
card is included with the camera. Given the size of the camera's images, purchasers
should seriously consider getting at least a 256MB card. Captured images can be
individually write-protected through the Playback menu, but write protected files
are only immune to accidental deletion, not card reformatting. File formats include
several levels of compressed JPEG files as well as an uncompressed TIFF mode (Hi
quality setting) and NEF (RAW) mode. (Both TIFF and RAW settings are only available
at maximum resolution.) Available image sizes are 3,264 x 2448 (8MP), 3,264 x
2176 (max 3:2 ratio), 2,592 x 1,944 (5MP), 2,048 x 1,536 (3MP), 1,600 x 1,200
(2MP), 1,280 x 960 (SXGA or 1MP), 1,024 x 768 (XGA or PC), and 640 x 480 (VGA
or TV). The table below details the Coolpix 8700's approximate file sizes and
compression ratios in all its various image size/quality combinations, with file
capacities shown for the 256 MB card size that I recommend as a minimum for it.
| Resolution/Quality 256MB Memory Card |
|
|
|
|
|
|
| Full Resolution 3264x2448 |
Images (Avg size) |
20 12.7 MB |
10 24.0 MB |
62 4.1 MB |
2.1 MB |
1.1 MB |
| Approx. Compression |
2:1 | 1:1 | 6:1 | |
|
|
| 5
MP Resolution 2592x1944 |
Images (Avg size) |
- | - | 97 2.62 MB |
1.35 MB |
0.71 MB |
| Approx. Compression |
- | - | 6:1 | |
|
|
| 3
MP Resolution 2048x1536 |
Images (Avg size) |
- | - | 155 1.65 MB |
0.84 MB |
0.44 MB |
| Approx. Compression |
- | - | 6:1 | |
|
|
| 2
MP Resolution 1600x1200 |
Images (Avg size) |
- | - | 245 1.04 MB |
0.54 MB |
0.30 MB |
| Approx. Compression |
- | - | 6:1 | |
|
|
| 1
MP Resolution 1280x960 |
Images (Avg size) |
|
|
0.67 MB |
0.37 MB |
0.20 MB |
| Approx. Compression |
|
|
|
|
|
|
| Resolution 1024x768 |
Images (Avg size) |
|
|
0.44 MB |
0.27 MB |
0.17 MB |
| Approx. Compression |
|
|
|
|
|
|
| Resolution 640x480 |
Images (Avg size) |
|
|
0.20 MB |
0.13 MB |
0.98 MB |
| Approx. Compression |
|
|
|
|
|
|
Like most modern high-end digicams, the Coolpix 8700 supports the FAT 32 directory standard, and so can make full use of memory cards larger than 2 GB. (I tested this explicitly with a Lexar 4GB card I had on hand. The camera formatted the card properly, and wrote to and read from it without difficulty.)
The Coolpix 8700 uses a USB interface to connect to a host computer for image
downloading. Like many higher-end cameras these days, it's a "storage
class" device, which means that Mac users on OS 8.6 or greater, or Windows
Me, 2000, or XP users can just plug the camera into their computers and have
it appear as a removable hard drive. Data transfer is pretty speedy, as I
clocked it at 753 KBytes/second on my Windows XP machine. This is faster
than any cameras using a USB v1.1 interface, but on the slow end of the range
for cameras using USB v2.0 (as the 8700 is obviously doing).
Lost Images? - Download this image-recovery program so you'll have it
when you need it...
Since we're talking about memory and image storage, this would be a good
time to mention the following: I get a ton of email from readers who've lost
photos due to a corrupted memory card. It's tragic when it happens, there
are few things more precious than photo memories. Corrupted memory cards
can happen with any card type and any camera manufacturer, nobody's immune.
"Stuff happens," as they say. A surprising number of "lost"
images can be recovered with an inexpensive, easy to use piece of software
though. Given the amount of email I've gotten on the topic, I now include
this paragraph in all my digicam reviews. The program you need is called
PhotoRescue, by DataRescue SA. Read our review
of it if you'd like, but download the program now, so you'll have
it. It doesn't cost a penny until you need it, and even then it's only $29,
with a money back guarantee. So download PhotoRescue
for Windows or PhotoRescue
for Mac while you're thinking of it. (While you're at it, download
the PDF manual
and quickstart
guide as well.) Stash the file in a safe place and it'll be there when you
need it. Trust me, needing this is not a matter of if, but when...
PhotoRescue is about the best and easiest tool for recovering digital
photos I've seen. (Disclosure: IR gets a small commission from sales of
the product, but I'd highly recommend the program even if we didn't.)
OK, now back to our regularly scheduled review...
 US
and Japanese versions of the Coolpix 8700 include an NTSC video cable for connecting
to a television set. European models will doubtless support PAL timing and connections,
given the Video Mode option in the settings menu. All images that would normally
appear on the LCD are routed to the external video display so that the television
screen becomes an enlarged version of the LCD monitor and can be used both for
image playback and composition.
US
and Japanese versions of the Coolpix 8700 include an NTSC video cable for connecting
to a television set. European models will doubtless support PAL timing and connections,
given the Video Mode option in the settings menu. All images that would normally
appear on the LCD are routed to the external video display so that the television
screen becomes an enlarged version of the LCD monitor and can be used both for
image playback and composition.
Power
 The
Coolpix 8700 runs on a rechargeable EN-EL1 lithium-ion battery pack, housed
inside the hand grip, or an external AC adapter which plugs into the front
of the camera (available as a separate accessory). The camera can also utilize
one 6V 2CR5/DL245 lithium battery, or six AA batteries via an external Power
Pack (also available as a separate accessory).
The
Coolpix 8700 runs on a rechargeable EN-EL1 lithium-ion battery pack, housed
inside the hand grip, or an external AC adapter which plugs into the front
of the camera (available as a separate accessory). The camera can also utilize
one 6V 2CR5/DL245 lithium battery, or six AA batteries via an external Power
Pack (also available as a separate accessory).
The table below summarizes my power measurements on the Coolpix 8700. Here's
a table with the power-consumption numbers I measured:
| |
(@ 8.4 v) |
(with 680mAh, 7.4v battery pack) EN-EL1) |
| Capture Mode, w/LCD | |
|
| Capture Mode, w/EVF | |
|
| Half-pressed shutter w/LCD | |
|
| Half-pressed w/EVF | |
|
| Memory Write (transient) | |
|
| Flash Recharge (transient) | |
|
| Image Playback, LCD | |
|
Overall, the Coolpix 8700 does a bit better in the battery-life department than did the earlier 5700, as Nikon both reduced its power consumption slightly, and apparently reformulated their EN-EL1 battery to increase its capacity from 650 to 680 mAh. The net is about a 15% improvement in run time in capture mode, and a 36% increase in playback. With a worst-case run time of only about 100 minutes though, and very little savings when running from the EVF vs the rear-panel LCD though, the 8700's battery life still leaves something to be desired relative to other high-end digicams. I'd thus highly recommend that serious shooters either (a) pick up an extra battery or two along with the camera, (b) spring for the optional handgrip/battery pack accessory, or look into a third-party external power pack, like the Maha PowerEx LiIon PowerBank described below.
I mentioned Nikon's external power pack above. Another consequence of the LiIon battery technology used in the 8700's power pack is that the camera requires a higher voltage on its external power jack to operate. This isn't an issue for studio use, but it does mean that most of the NiMH-based external power packs out there won't power the 8700 in the field. Fortunately, Maha Energy makes a LiIon external "PowerBank", sold under the "PowerEx" brand that will power the 8700 just fine. For about $60, this (very nicely packaged) unit will power the 5000 for a total of more than 5 hours in capture mode with the LCD operating, when used in conjunction with the internal battery. (!) This is a really excellent run time, just what you'd need for all-day intensive shooting. One note - Maha makes both NiMH and LiIon versions of the PowerBank, make sure you get the LiIon model for the 8700. (Model number MH-DPB140LI.) Here's a link where you can find them online for a good price. Highly recommended! (For more information, read my review of the PowerBank packs.)
Included Software
The Coolpix 8700 ships with Nikon's own Nikon View, version 6.2, for Mac and
Windows. This is a basic organize/view/print application: You'll still want
some sort of commercial image-editing application (like Adobe Photoshop or Photoshop
Elements) as well.
Not Included: "Brainware"
Every manufacturer includes some level of needed software with their cameras,
but what's missing is the knowledge and experience to know what to do with it.
For lack of a better term, I've called this "Brainware." There's a
lot involved between snapping the shutter, and watching a beautiful, professional-quality
print spool off your printer, and there's sadly very little guidance as to how
to get from point A to point B.
Fortunately, Uwe Steinmueller of OutbackPhoto.com has come up with an excellent series of e-books that detail every step of the process, show actual examples of files moving through the workflow, and the final results. If you want to get the absolute best prints possible from your digital files, you owe it to yourself to purchase one of the Outback Photo Digital Workflow books.
In the Box
The following items are packaged with the Coolpix 8700 :
Not sure which camera to buy? Let your eyes be the ultimate judge! Visit our Comparometer(tm) to compare images from the Coolpix 8700 with those from other cameras you may be considering. The proof is in the pictures, so let your own eyes decide which you like best!
In keeping with my standard test policy, the comments given here summarize only my key findings. For a full commentary on each of the test images, see the Coolpix 8700's "pictures" page.
As with all Imaging Resource product tests, I encourage you to let your own eyes be the judge of how well the camera performed. Explore the images on the pictures page, to see how the Coolpix 8700's images compare to other cameras you may be considering.
Conclusion
| Free Photo Lessons | |
|