Nikon Coolpix P3 Operation
The Nikon Coolpix P3's exposure control lacks only a full Manual mode and a Shutter Priority mode. But the P3 avoids external control buttons, packing frequently used options on either the Mode dial or the Multi-selector and relying on the easy-to-navigate user interface for the others. Flash mode, Self-Timer mode, Macro mode, Zoom, Record mode, Wireless transfer, White balance, ISO, Image quality and size settings, and an Erase function are all accessible via external controls. The Mode dial on the top of the camera selects the main operating mode and sets White Balance, ISO and Image quality and size options, while the multi-directional Arrow pad on the back panel navigates through on-screen menus, in addition to accessing camera features like Macro, Self-Timer, Flash, and Exposure Compensation directly. The LCD menu system is fairly short, with user-friendly icons in Scene mode. Operating the Nikon P3 is straightforward, but the manual is helpful for reference.
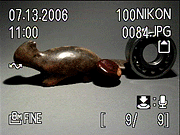
 Record Mode LCD Display: In Record mode, the Coolpix P3's LCD reports limited status information, including camera modes, the resolution/quality setting, number of available images, current aperture and shutter speed, ISO, and status indicators for noise reduction and the various exposure adjustments that are available. (Contrast, Saturation, Sharpening). Half-pressing the Shutter button displays a green dot when focus is achieved, as well as green brackets indicating which focus point has been selected (if focus is not achieved, both the dot and brackets show red). The display mode can be changed from the Setup Menu, letting you choose between a viewfinder display of the subject by itself, with overlaid status information, or with an overlaid grid as an aid to orienting the camera to your subject. The information overlay can also be made to automatically disappear after a few seconds of inactivity. Pressing the +/- control on the 5-way navigator pad brings up a display showing a live histogram, exposure compensation setting, and aperture and/or shutter speed settings, depending on the exposure mode.
 Playback Mode LCD Display: In Playback mode, the Nikon Coolpix P3's LCD reports the image series number, resolution/quality setting, file name and folder it's stored in on the memory card, and the date and time of image capture, among other things. It also displays a transfer icon if the image is one that's been selected for quick download with Nikon's host software, as well as an icon indicating that you can record an audio note to accompany the image. The information overlay obeys the same setting on the setup menu that governs it in Record mode, and a Slide Show option also lets you see the images sequentially, with no information overlay. Pressing the zoom lever toward the wide-angle end progressively zooms out to a 4-, 9-, or 16-image thumbnail view of photos stored on the card. Pressing the zoom control in the telephoto direction zooms in as much as 10x on the subject, handy for checking image details and focus.
Nikon Coolpix P3 Modes and Menus
Auto Record Mode: Activated by turning the Mode dial to the Auto position (green camera icon), this mode places the camera in point-and-shoot mode, controlling both aperture and shutter speed, as well as most other exposure features. Pressing the Menu button only displays a warning that no menu is available.
Shooting Menu: Activated by turning the Nikon Coolpix P3's Mode dial to either the Programed Auto (P) or Aperture Priority (A) mode, the Shooting menu offers the following options on three screens:
 White balance: Choices include Auto, White Balance Preset for custom presetting of white balance, Direct Sunlight, Incandescent, Fluorescent, Cloudy, Shade, and Flash.
- Metering: Allows user to set metering to Matrix, Center-weighted, Spot, or Spot AF modes.
- Continuous: Chooses from Single, Continuous, Multi-Shot 16, Ultra HS (up to 100 shots at 30 fps), 5-shot Buffer (when button is held down, saves last five shots in buffer to better catch action), and Interval Timer Shooting (30 seconds or 1/5/10/30 minutes).
- BSS: Best Shot Selector shoots up to 10 shots and picks the one with the least blur from camera shake or poor focus. Flash is automatically turned off in this mode, since it is intended for capture of natural light photos in low light.
- Auto Bracketing: By default set to Off, this chooses between Auto Bracketing (BKT) or White Balance Bracketing (WB). Each press of the shutter produces three different images with varying exposure or white balance values.
 Image Adjustment: Adjusts contrast from the default Auto to Normal, More Contrast or Less Contrast.
- Image Sharpening: Adjusts sharpening from the default Auto to High, Normal, Low or Off.
- Saturation Control: Adjusts saturation from the default Normal to Maximum, Enhanced, Moderate or Minimum.
- Sensitivity: Adjusts ISO equivalent sensor sensitivity from the default Auto to 50, 100, 200 or 400.
- Image Quality: Sets the JPEG compression to Fine, Normal, or Basic.
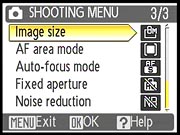 Image Size: Sets the resolution of the image. Choices are 8M (3,264 x 2,448), 5M (2,592 x 1,944), 3M (2,048 x 1,536), PC (1,024 x 768), TV (640 x 480), 3:2 (3,264 x 2,176).
- AF Area Mode: Sets Auto (9-point AF), Manual (user controls focus point), or Center.
- Auto Focus Mode: Selects Single AF (focuses only when shutter button is pressed) or Full-Time AF (camera is always focusing, which uses more battery power and makes some moderate repetitive sound).
- Fixed Aperture: Enables or disables a constant aperture during zoom.
- Noise Reduction: Turns Noise reduction on or off.
- Portrait (Face AF): Intended for waist-up portraits of up to three people, this mode recognizes human faces to set focus, softening the background to lend a sense of depth. Effect 1 brightens skin tones. Effect 2 produces a softer effect overall.
- Portrait: Standard portrait settings with a soft background. Effect 1 brightens skin tones. Effect 2 produces a softer effect overall.
- Party/Indoor: Use to capture background details in situations that require flash. Also good for preserving the look of candlelight or other indoor lighting. Effect 1 reduces blur. Effect 2 also reduces blur but brightens backgrounds.
- Night Portrait: Provides a natural balance between the foreground subject and background in low light. Effect 1 captures the subject and background more vividly. Effect 2 adds radiating point light sources.
- Landscape: Enhances outlines, colors and contrast in skyscapes and forest shots with focus set at infinity. Effect 1 enhances color for more vivid and clear shots. Effect 2 enhances the blue color of the sky.
- Panorama Assist: Lets you capture a series of images to be stitched together later on a computer as one panoramic image. Zoom, Flash, self-timer, focus and exposure modes are all fixed at their values for the first shot in the series. Likewise, exposure and white balance values are determined by the first shot in the series, to help avoid visible boundaries between the component images in the final panorama, after they've been stitched together.
- Night Landscape: Combines longer exposures with the "Landscape" mode. Focus is fixed at infinity, and the flash is disabled in this mode. Noise reduction is enabled for long exposures, and the autofocus-assist illuminator is disabled, even in dim lighting. Effect 1 captures the scene more vividly but a tripod is recommended. Effect 2 also needs a tripod, adding radiating point light sources.
- Beach/Snow: Boosts the exposure to compensate for subjects that are very bright overall.
- Sunset: Preserves the deep colors of sunsets and sunrises. Effect 1 enhances red hues. Effect 2 preserves sunset and sunrise colors.
- Dusk/Dawn: Preserves the colors seen in weak natural light before dawn or after sunset. The flash is disabled, noise reduction is automatically enabled at slow shutter speeds, and the autofocus-assist illuminator is disabled, even in dim lighting. Effect 1 enhances blue hues. Effect 2 preserves sunset and sunrise colors.
- Fireworks Show: Sets high contrast, fixes focus at infinity, disables exposure compensation and AF-assist. Effect 1 is for continuous, simultaneous fireworks. Effect 2 is for large, slow bursts captured with their tail.
- Back Light: For difficult lighting conditions, when the main light is behind your subject, casting their features into shadow.
- Close Up: Adjusts the lens for close-focusing on small objects. Autofocus operates continuously until you half-press the shutter button, helpful in focusing on very close subjects. AF-area mode is active, so you can use the navigator to select the focus point. Effect 1 captures a more vivid and sharper image. Effect 2 softens the background and uses a faster shutter to freeze moving subjects, like wind-blown flowers.
- Museum: Enables longer exposure times and higher sensitivity, for indoor situations where you can't use flash. Automatically turns on the Best Shot Selector to help get a sharp image.
- Copy: Sets the color mode to black and white, boosts contrast, and adjusts exposure to produce sharp images of black text (or line drawings) on white backgrounds.
- Sports: uses fast shutter speeds to stop motion, focusing continuously on the center of the frame and capture 1.8 frames per second.
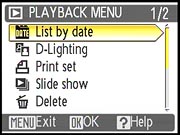 List by Date: Lists images by date of capture.
- D-Lighting: Adjusts the brightness of the shadows of an image and saves the result as a copy.
- Print Set: Selects pictures for printing to a DPOF-compatible device, specifying the number of copies and data to be included on the prints.
- Slide Show: View images on the LCD in an automated slide show. You can repeat the show by checking the loop option.
- Delete: Delete all or selected images.
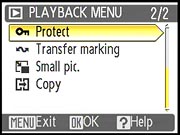 Protect: Protect selected images from deletion, except when reformatting the memory card.
- Transfer Marking: Change the transfer setting of captured images by setting all on, all off, selecting a date or setting individual images on or off.
- Small Pic.: Create a small copy of the current image at your choice of sizes: 640 x 480, 320 x 240 or 160 x 120.
- Copy: Copy images from built-in memory to the memory card or vice versa. Great for images you want to bring along or keep in memory for the startup screen.
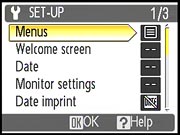 Menus: Sets the menu display mode to Text or Icons.
- Welcome Screen: Chooses the welcome screen that appears at startup, either none, static, or animated, or lets you choose a previously-shot image as the welcome screen.
- Date: Sets the camera's clock to the date, time and time zone.
- Monitor Settings: Sets display options for Photo Info (Show Info, Auto Info, Hide Info, Framing Grid), and brightness of the LCD.
- Date Imprint: Includes the date, or date and time as part of the image. Options are Off, or to imprint Date, Date and Time, or a Date Counter, showing the number of days since a specific date that you've chosen and entered.
 Shot Confirmation: Lights the self-timer lamp after shooting if enabled.
- AF Assist: Disables the AF assist light, or puts it into Auto mode.
- Sound Settings: Toggles the button sound, shutter sound, and startup sound, as well as controls volume.
- Auto Off: Enables the Auto Off feature, which automatically shuts down the camera after a period of inactivity, to save battery life. Times are 30 seconds, or 1, 5, or 30 minutes.
- Format Card: Formats the SD card, erasing all files (even protected ones).
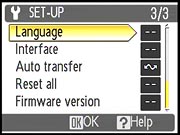 Language: Changes the menu language to any of 20 languages, including German, English, Spanish, French, Italian, Dutch, Russian, Swedish, Japanese, Simplified Chinese, Traditional Chinese, and Korean.
- Interface:
- USB: Sets the USB protocol to Mass Storage or PTP. The PTP option supports automatic processing of camera images under Windows XP and Mac OS X operating systems (unless you want to mount the camera on the desktop), while Mass Storage is best for older operating systems. Mass Storage makes the camera appear as a hard drive to the operating system when plugged in via the USB cable.
- Video Mode: Sets the video output to NTSC or PAL timing.
- Auto Transfer: Turns the Auto Transfer feature on and off, marking new images for transfer automatically.
- Reset All: Resets all camera settings to their defaults.
- Firmware Version: Reports the camera's firmware version and the MAC address (essential for wireless networks that admit only known MAC addresses).
 Fujifilm GFX 50S Review
 Fujifilm X-T3 Review
 Olympus E-M5 III Review

Follow Imaging Resource