The Imaging Resource
Quick Review
Canon PowerShot SD10 Digital ELPH Camera
 |
Camera QuickLook | |
|
Review Date |
|
|
|
User Level |
|
|
|
Product Uses |
|
|
|
Digicam Design |
|
|
|
Picture Quality |
Good, 3.9-megapixel CCD | |
|
Print Sizes |
4x6, 5x7, 8x10 inches | |
|
Availability |
|
|
| Suggested
Retail Price (At introduction) |
|
|
Introduction
|
||||||||||
The Canon PowerShot SD10 is the latest in a long line
of digital cameras from one of the true powerhouses of photography. Canon
in recent years has taken the digital camera market by storm, with a large,
ever-changing array of cameras that covers the market from consumer to professional
with such nuance between models that they're more than likely to have a camera
suited for every kind of user. In the consumer arena, their products are
distinguished by superb design, sharp lenses, and excellent color.
In both the film and digital worlds, the high-style,
diminutive Canon ELPH models have been wildly popular for their small size,
easy portability, fine build, and surprising image quality. Long a popular
brand for APS film cameras, the Canon Digital ELPHs brought the compact size
and styling to the digital world with the original S100. The new Canon PowerShot
SD10 Digital ELPH takes compactness to new extremes with an extremely small,
purse-friendly design.
Camera Overview
Quite a bit smaller than any preceding Canon Digital ELPH model,
the PowerShot SD10 realizes more of the advantage offered by the smaller
SD card format than the ELPH that first entered the SD space, the SD100.
Up until the SD100, all ELPH digital cameras used Compact Flash cards. The
SD10 loses a few of the SD100's features for the sake of size, among them
the optical viewfinder and optical zoom. What it loses in lens it gains back
in resolution though, with a nearly 4.0 megapixel imager (though called 4.0,
it's actually 3,871,488 pixels). With the lens retracted, the Canon SD10's
front panel is flat and pocket friendly, and its all-metal body rugged and
durable. The SD10 captures high quality images, suitable for printing snapshots
as large as 8x10 inches. Smaller image sizes are also available for email
transmission or Web applications, and a movie mode captures short video clips
with sound. Coming in four colors, the SD10 has one more important feature:
Style. It was designed as the ultimate fashion accessory, as its four available
colors attest. There's metallic silver with a variety of finishes (fine bead-blasted,
coarse bead-blasted, polished, and fresnel), polished black, pearl white,
and bronze, which looks great when carried by a red-head.
The Canon SD10 features a 6.4mm fixed focal length lens, equivalent to a 39mm lens on a 35mm camera. Aperture is automatically controlled, f/2.8 wide open. A maximum 5.7x digital zoom option adds zoom to the SD10, but keep in mind that digital zoom decreases the overall image quality, as it simply crops out and enlarges the center pixels of the CCD image. Image details are thus likely to be softer with digital zoom. Focus ranges from 4 inches (10 centimeters) to infinity in normal AF mode, and from 1.2 inches to 4 inches (3 to 10 centimeters) in Macro mode. The SD10 employs a five-point AiAF (Artificial Intelligence Autofocus) system to determine focus, which uses a broad active area in the center of the image to calculate the focal distance (a feature I've been impressed with on many ELPH models and hope to see continued). Through the Record menu, you can turn AiAF off, which defaults the autofocus to the center of the frame. Also built-in to the SD10 is an AF assist light, which aids the focus mechanism in low light. For composing images, the SD10 offers a real-image optical viewfinder, as well as a 1.5-inch color LCD monitor. The LCD reports a fair amount of camera information, but excludes exposure information such as aperture and shutter speed. In Playback mode, users can choose to display a histogram to report the tonal distribution of a captured image, useful in determining any over- or under-exposure.
Because the ELPH line capitalizes on ease of use, exposure control is typically automatic to increase the line's appeal to point-and-shoot users. The SD10 is completely automatic, but there is a Manual mode of sorts. Though it doesn't give you aperture nor shutter information, it does allow you to adjust +/-2 EV in third stop increments, white balance, ISO, and metering method. The adjustments menu is brought up by pressing the Set/Function button while in shooting mode, and stays up as you make changes, coming back after each shot making it easier to reach the setting you desire. Shutter speeds range from 1/1,500 to 15 seconds, with the one- to 15-second end of the range only available in Long Shutter mode (which also automatically invokes a Noise Reduction system to eliminate excess image noise in longer exposures). In straight Auto mode, the camera controls everything about the exposure except for file size, flash, etc. Camera operation is straightforward, as you typically just point and shoot most of the time. Pressing the Shutter button halfway sets focus and exposure, and a small LED next to the LCD viewfinder, along with a confirmation beep and green onscreen focus point let you know when the camera is ready to take the picture, as well as which areas will be in focus. The camera also has a new function called QuickShot. When enabled, QuickShot allows the user to capture a shot more quickly, apparently by setting the lens to its "hyperfocal" distance, in which subjects will be in focus at the broadest possible range of distances. This does limit its use to camera-subject distances of 1.5 foot or greater though. Inside 1.5 feet, according to the manual and our testing, images are most often out of focus and overexposed.
The SD10 uses an Evaluative metering system by default, which means that the camera divides the image area into zones and evaluates each zone to determine the best overall exposure. A Spot metering option ties the exposure to the very center of the frame, and is useful for off-center or high contrast subjects, letting you pinpoint the exact area of the frame to base the exposure on. There's also a Center-Weighted metering option, which bases the exposure on a large area in the center of the frame. Exposure Compensation increases or decreases the overall exposure from -2 to +2 exposure equivalents (EV) in one-third step increments. A White Balance option offers Auto, Daylight, Cloudy, Tungsten, Fluorescent, Fluorescent H, and Custom (manual) settings. The SD10 also offers a creative Photo Effects menu, which include Vivid, Neutral, Low Sharpening, Sepia, and Black and White modes. Sensitivity equivalents include 50, 100, 200, and 400 ISO settings, as well as an Auto adjustment. The SD10's built-in flash operates in Auto, Forced On, Suppressed, Red-Eye Reduction, and Slow-Synchro modes. You can also lock the flash exposure in the same way you can lock normal exposure. Pressing the Shutter button halfway and keeping it pressed initiates the exposure lock, signaled by two beeps.
A two- or 10-second self-timer option counts down by flashing a small LED on the front of the camera before firing the shutter, giving you time to duck around the camera and get into your own shots. Stitch-Assist mode is the SD10's panoramic shooting mode, which lets you shoot as many as 26 consecutive images. The series of images can then be "stitched" together into a single panoramic frame with the accompanying software. The SD10 also has a Movie Record mode, which records moving images with sound for as long as three minutes per clip, depending on the resolution setting and amount of memory card space. (Movies are recorded at either 640 x 480, 320 x 240, or 160 x 120 pixels.) Finally, a Continuous Shooting mode captures a series of consecutive images (much like a motor drive on a traditional camera), at approximately one frame per second, as long as the Shutter button is held down. The actual frame rate varies with the resolution setting, with the total number of images also depending on the amount of memory card space and file size. The SD10 can capture up to four shots in rapid sequence at its largest file size and highest JPEG quality setting, or more than forty shots at the smallest/lowest quality setting.
The My Camera settings menu lets you customize camera settings to a specific theme. Everything from the startup image to operating sounds can be assigned to a theme, either one of the pre-programmed themes or one downloaded from the camera software or stored on the memory card. The SD10 also lets you record short sound clips to accompany captured images, via the Sound Memo option, great for lively captions to vacation photos or party shots.
The SD10 stores images on SD memory cards (hence, the "SD" in its name). A 32MB card accompanies the camera, which is twice the size of the card that came with the SD100, but I still recommend picking up a larger capacity card, at least 64 megabytes, so you don't miss any shots; 128 is even better. The camera utilizes a rechargeable lithium-ion battery pack for power, which accompanies the camera, along with the necessary battery charger, a small brick with flip out power prongs. Because the SD10 does not accommodate AA-type batteries in any form, I strongly advise picking up an additional battery pack and keeping it freshly charged. The optional AC adapter is useful for preserving battery power when reviewing and downloading images, and actually uses a "dummy" battery that inserts into the camera's battery compartment. A USB cable and interface software are also packaged with the camera, for downloading images to a computer and performing minor organization and corrections. Two software CDs provide the necessary drivers and editing software, both compatible with Windows and Macintosh platforms. One CD holds Canon's Digital Camera Solution Disk version 12.0 and the other features ArcSoft's Camera Suite version 1.2. Finally, an A/V cable connects the SD10 to a television set, for reviewing and composing images. The SD10 is Digital Print Order Format (DPOF) compatible, with detailed print settings in the Playback menu. Canon offers a selection of direct-connect printers as well, which simplifies printing even more.
Basic Features
- 3.9-megapixel CCD.
- 1.5-inch color TFT LCD monitor.
- 6.4mm lens, equivalent to a 39mm lens on a 35mm camera.
- Maximum 5.7x digital zoom.
- Automatic exposure control, with Long Shutter mode for longerexposures.
- Shutter speeds from 1/1,500 to 15 seconds.
- Maximum aperture of f/2.8.
- Built-in flash with five modes.
- SD memory card storage, 32MB card included.
- Power supplied by a rechargeable lithium-ion battery pack(charger included) or optional AC adapter.
- ArcSoft Camera Suite 1.2, Canon Digital Camera software, and USBdrivers included for both Windows and Mac platforms.
Special Features
- Movie mode with sound.
- Continuous Shooting mode.
- Stitch-Assist panorama mode.
- Infinity and Macro focus modes.
- Customizable "My Camera" settings.
- Two- or 10-second Self-Timer for delayed shutter release.
- Sound Memo option for recording captions.
- Spot, Center-Weighted, and Evaluative exposure metering.
- White balance (color) adjustment with seven modes, including aCustom setting.
- Photo Effect menu for color adjustment.
- Adjustable ISO setting.
- DPOF (Digital Print Order Format) compatibility.
- USB cable for connection to a computer (driver softwareincluded).
- A/V cable for connection to a television set.
Recommendation
The Canon ELPH series of digicams continues to be a popular option for many consumers, given its tiny size and reputation for great quality. The PowerShot SD10 Digital ELPH shrinks the line even further, taking advantage of that small SD memory card image storage, and sports a near-4-megapixel CCD for high resolution images. Although exposure control is mainly automatic, the availability of exposures up to 15 seconds and adjustable ISO increases the camera's exposure versatility a great deal. The uncomplicated user interface makes novices and more advanced amateurs alike feel at home, with enough variable exposure control to make both happy. - This is a good all-around camera, particularly for style-conscious users. If you can handle a slightly larger package, the larger Canon Digital ELPHs give you a zoom lens, which is much to be desired. For the ultimate in svelte design though, the SD10 wins hands down.
The SD10 takes the ELPH to new levels of portability while maintaining the same sharp metallic look and feel that has given the line such a sense of quality. The compact size is perfect for quickly stashing in a pocket or purse; and even in a case the camera is smaller than any other ELPH. The retracting lens is a smart design that keeps the camera front completely flat when the camera is off, underscoring the camera's pocket friendly design, while an automatic lens cover means you don't have to worry about smudging the lens or losing a lens cap. Measuring 3.56 x 1.85 x 0.73 inches (90.3 x 47 x 18.5 millimeters), the SD10 will easily fit into any pocket a clothing manufacturer is likely to make, including the "fifth pocket" on most jeans. The camera weighs 3.5 ounces (100 grams) without battery or memory card.
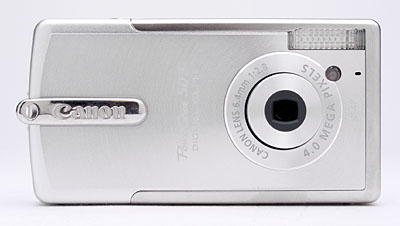
Several distinctive ELPH features identify the front of the SD10, with the lens off-center toward the right and a raised metallic circle around the lens, but one in particular is missing: the viewfinder window. All that remains are the mic, light emitter, and flash just above it. The light emitter serves multiple purposes, including autofocus assist, red-eye reduction, and it flashes during self-timer countdown. The camera's telescoping lens moves into place quickly when the camera is powered on, and retracts fully within the camera to maintain a flat profile. Just beneath the flash is the camera's tiny microphone. The wrist strap is mounted on a piece of metal that tapers up from the front, with a loop and the Canon logo molded deeply into the metal.

The power button, speaker, and shutter release are on top, with only the shutter release protruding slightly from the surface.
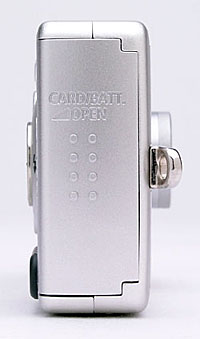
On the right side of the camera (as viewed from the rear) are the wrist strap attachment and the battery/SD access door. This door opens with a pull to the rear, and swings open. The battery is held in place with a latch, and the SD card must be first pressed in, then grabbed with a thumbnail to remove it. The door only swings open to 90 degrees, preventing the card from being grabbed with two fingers until it's all the way out.

The opposite side of the camera has only a single philips screw..

The remaining camera controls are on the rear panel, along with the LCD viewfinder. A mode switch is above the LCD, selecting between playback, movie, and capture modes. To the right of the LCD are the Menu, and Set/Function buttons, with a multi-functional Four-Way Arrow pad just to the right of these. An LED lamp next to the viewfinder reports camera status, lighting to indicate when focus is set or the flash is fully charged; it also flashes until the buffer is clear. To the lower right of this back plate is the rubber door concealing the AV Out and USB ports.

The bottom panel of the SD10 has only the metal tripod mount and the camera's model and serial number. The tripod socket is center-mounted, unlike the SD100, which was off to the side.
The SD10's user interface is straightforward and relatively uncomplicated, with the same menu setup and basic control layout as the rest of the current ELPH series, though some have been shuffled and consolidated to accommodate for the smaller surface area all around. Most of the camera's functions are controlled by buttons on the rear panel, while a handful of settings are controlled through the LCD-based Record menu. A Function menu provides faster access to basic settings like image size, quality, and exposure compensation, without the need to sift through menu screens. The LCD menu system itself is quite efficient, as you view menu items organized in tabs instead of through a series of pages. Additionally, the Setup and My Camera menus are always available, regardless of the camera mode. With the instruction manual in-hand, it shouldn't take more than a half an hour to an hour to get comfortable with the camera.
 Record
Mode Display: In any record mode, the LCD display shows either the
image area with no information or the image with a limited information display.
When the information display is active, it reports resolution and image quality
settings, the number of available images, Record mode, orientation, and a handful
of exposure settings (although not aperture or shutter speed). In either mode,
once the shutter is depressed half way, only the chosen focus area is highlighted
with a green square (sometimes multiple squares can be highlighted). In this
case, a camera shake warning is also active. Pressing and holding the Set/Function
button brings up a date and time screen. The duration of its display can be
set in the menu.
Record
Mode Display: In any record mode, the LCD display shows either the
image area with no information or the image with a limited information display.
When the information display is active, it reports resolution and image quality
settings, the number of available images, Record mode, orientation, and a handful
of exposure settings (although not aperture or shutter speed). In either mode,
once the shutter is depressed half way, only the chosen focus area is highlighted
with a green square (sometimes multiple squares can be highlighted). In this
case, a camera shake warning is also active. Pressing and holding the Set/Function
button brings up a date and time screen. The duration of its display can be
set in the menu.
 Playback
Mode Display: Playback mode also offers three display modes, including
the image only, the image with information, and the image with expanded information
and a histogram. You can also display as many as nine thumbnail images at a
time on-screen with the index display mode, or zoom in on captured images to
check fine details, focus, or framing. To zoom in, you press the top button
on the four-way navigator, and to pan around you press the function button.
Playback
Mode Display: Playback mode also offers three display modes, including
the image only, the image with information, and the image with expanded information
and a histogram. You can also display as many as nine thumbnail images at a
time on-screen with the index display mode, or zoom in on captured images to
check fine details, focus, or framing. To zoom in, you press the top button
on the four-way navigator, and to pan around you press the function button.
External Controls

Shutter Button: Located on the top panel, this button sets focus and exposure
when halfway pressed and fires the shutter when fully pressed. If the Self-Timer
is activated, a full press of the Shutter button triggers the countdown.
![]()
Power Button: To the left of the Shutter button on the camera's top
panel, this button turns the camera on or off.
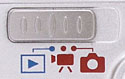
Mode Switch: Just above the right corner of the LCD panel, this
three-position switch controls the camera's operating mode, offering the following
selections:
- Playback Mode: Replays captured images andmovies, with options for image management and printing.
- Movie Mode: Captures moving images with sound, with amaximum recording time of three minutes (depending on theresolution setting and available memory card space).
- Capture Mode: Places the camera in whatever capture mode was chosen in the Function menu, with the last settings made on the camera.
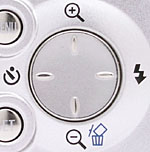
Four-Way Arrow Pad: This four-way rocker button is just right of
the LCD monitor, and serves multiple functions. In any Settings menu, the arrow
keys navigate through menu selections. In Record mode, the top arrow and bottom
arrows control the digital zoom. The left arrow toggles between capture modes;
if the camera is operating in full Auto mode, these are confined to single shot
and self-timer modes. In Manual mode, continuous is included as well. The right
arrow accesses the camera's flash modes, cycling through Automatic, Forced On,
Forced Off, Red-Eye Reduction, and Slow-Sync settings. Finally, the down arrow
key activates the Self-Timer and Continuous Shooting modes, or returns to the
normal exposure mode. Immediately after an image is captured, the down arrow
can also be used to delete the image.
In Playback mode, the right and left arrow keys scroll through captured images and movie files. When you zoom in on an image, all four arrows pan the view, but only after you press the function button.
Zoom Control: Integrated into the four-way navigator, these buttons control the digital zoom in any record mode. In Playback mode, one can zoom in on pictures by pressing the plus icon, and back out by pressing the minus icon. Once you've zoomed all the way out, however, the next press on the zoom out button will ask if you want to erase the picture, so users should be careful.

Function / Set Button: To the left of the arrow pad, beneath the
lower left corner of the LCD display, this control activates the Function menu
in any record mode. The following options are available:
-
 Exposure
Mode: Selects between Auto, Manual, Long Shutter, Macro, Stitch Assist
Right, and Stitch Assist Left.
Exposure
Mode: Selects between Auto, Manual, Long Shutter, Macro, Stitch Assist
Right, and Stitch Assist Left.
- Auto: The camera assumes control over most exposure parameters, making for simpler use, but fewer creative options.
- Manual: The full range of exposure controls and options are available.
- Long Shutter: A range of longer shutter speeds are available for low-light shooting, but they must be explicitly chosen by the user. (That is, exposure becomes fully manual.)
- Macro: The camera's focusing range is shifted to permit capture of very close-up subjects.
- Stitch Assist Right/Left: Enables Stitch Assist mode (the SD10's
panoramic shooting mode), and lets you choose a shooting direction (to
the right or the left). After pressing the Set button to start the sequence
and taking the first shot, blue gridlines appear in the LCD monitor to
help you line up each subsequent shot. Exposure is locked for the sequence
which ends when you press the Menu button. The final series of images
can be stitched together as one image on a computer via the accompanying
software.
-
 Exposure
Compensation: +/- 2EV
Exposure
Compensation: +/- 2EV
- White Balance: Controls the color balance of images. Options are Auto, Daylight, Cloudy, Tungsten, Fluorescent, and Fluorescent H.
- ISO: Sets the camera's sensitivity to Auto, 50, 100, 200, 400
- Photo Effect: Off, Vivid, Neutral, Low Sharpening, Sepia, Black and White
- Light Metering: Evaluative, Center-weighted Average, Spot
- Resolution/Compression: L = 2272 x 1704, M1 = 1600 x 1200, M2 = 1024
x 768, S = 640 x 480. Pressing the Menu button with this menu item selected
allows you to change the compression level for the selected resolution size.
Choices are Superfine, Fine, and Normal.
In Playback mode, this button is primarily used as the SET button, confirming menu selections. In Record mode, holding this button down brings up a clock that takes up the whole screen and displays the date and time in 24 hour format.

Menu Button: Above the Set button and focus confirmation lights,
this button accesses the LCD menu system in both Record and Playback modes.
Camera Modes and Menus
Movie Mode: Records short movie clips with sound, at either 320 x 240, or 160 x 120 pixels. The actual amount of recording time varies with the resolution setting and amount of memory card space, but the longest clip time is three minutes. A handful of exposure controls are available in this mode, although options like flash mode, Continuous Shooting, and digital zoom are disabled.
Manual Exposure Mode: Does not let you control shutter speed or aperture, but it does let you adjust the flash mode, image quality, shooting method (Single, Continuous, or Self-Timer), Macro mode, Infinity Focus mode, Exposure Compensation, White Balance, Photo Effect, Metering, and ISO.
Automatic Exposure Mode: Places the camera in charge of allexposure settings. You can select only the digital zoom option, certainflash modes, the self-timer, and Macro mode.
Playback Mode: Activated with a switch, this mode allows you to scroll through captured images and movies, write-protect images, view a nine-image index display, zoom into a captured image, delete unwanted images, rotate images, and set up images for printing on DPOF compatible devices.
Record Menu: Accessed by pressing theMenu button in Automatic, Manual, Stitch Assist, and Movie modes(some options are not available in all modes). Three menu tabsappear, one for Record, Setup, and My Camera sub-menus.
 Record
Menu
Record
Menu
- Quick Shot: Allows quick capture of image without waiting for focus and exposure confirmation. Images inside the 1.5 foot range will likely be out of focus, since the system relies on the inherent sharpness of a wide angle lens for a more general kind of focus beyond the 1.5 foot range.
- AiAF: Turns on the AiAF focus system. If switched off, the camera bases autofocus on the center of the frame.
- Self-Timer: Sets the Self-Timer countdown to two or 10 seconds.
- AF Assist Beam: Turns the AF assist light on or off. If on, the light automatically activates in low lighting.
- Digital Zoom: Enables the digital zoom function, which is engaged by zooming past the optical zoom range. Also disables digital zoom.
- Review: Turns the instant review function on or off, or sets
the amount of time that the captured image is displayed on the screen
from two or 10 seconds in increments of one second. (Still images only.)
 Setup
Menu
Setup
Menu
- Beep: Designates whether a beep sound plays when the Shutter button is pressed.
- Volume
-
- Shutter Volume: Controls the volume of the shutter noise.
- Playback Volume: Adjusts the volume of playback sounds.
- Startup Volume: Sets the volume for the camera's startup sounds.
- Operation Volume: Controls the volume of operational sounds.
- Self-Timer Volume: Adjusts the volume of the self-timer beep.
- Info Display: Sets whether information is displayed on the screen, including Shooting Info, Review Info, and Replay Info.
- LCD Brightness: Adjusts the brightness of the LCD display.
- Auto Power Down: Turns on the automatic shut down, which turns the camera off after a period of inactivity. Also allows user to set a separate display off time, from 10 seconds to three minutes.
- Date/Time: Sets the camera's internal date and time settings.
- Clock Display: Sets timer for clock display, from one second to three minutes.
- Format: Formats the SD card, erasing all images (even write protected ones).
- File No. Reset: Resets file numbering with each new SD card, if enabled. If disabled, the camera continues file numbering from card to card.
- Language: Changes the menu language to one of 12 languages.
- Video System: Establishes the type of video signal, NTSC or PAL.
 My
Camera Menu
My
Camera Menu
- Theme: Selects a common theme for each My Camera menu settings item. Four options are available, the first one being Off. When a theme is selected, all of the following settings automatically adjust to that theme.
- Start-Up Image: Sets the startup image when you turn on the camera to: Black screen, Canon logo, Canon logo with sunset, and nature scene. You can also apply your own image using the Canon software.
- Start-Up Sound: Sets the startup sound when you turn on the camera to: No sound, Musical tone (1), Musical tone (2), or Birds chirping. You can also apply your own sounds using the Canon software.
- Operation Sound: Sets the sound when any control or switch is use (except the Shutter button). Options include no sound, Beep, Musical tone, and Chirp.
- Self-Timer Sound: Sets the sound that signals you when the shutter release is two seconds away. Options include no sound, Fast beeps, Telephone ring, and Howling.
- Shutter Sound: Sets the shutter sound that you hear when you
depress the Shutter button (there is no shutter sound in Movie mode).
Options include no sound, Shutter sound, Musical Tone, and Bark.
Playback Menu: Accessed by pressing the Menu button in Playback mode, the Playback menu also has subject tabs for the Setup and My Camera menus described above.
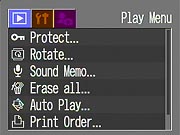 Protect:
Marks the current image for write-protection, or removes write-protection.
Protected images cannot be deleted or manipulated, except through card formatting,
which erases all files.
Protect:
Marks the current image for write-protection, or removes write-protection.
Protected images cannot be deleted or manipulated, except through card formatting,
which erases all files. - Rotate: Rotates the current image 90 degrees clockwise.
- Sound Memo: Records a short sound clip to accompany a captured image.
- Erase All: Erases all files on the memory card, except protected ones.
- Auto Play: Plays a slideshow of all images, 3 seconds each.
- Print Order: Determines how many copies of the current image will be printed, with options for creating an index print, imprinting the date and time, and imprinting the file number.
- Transfer Order: Select images for downloading to your computer.
In the Box
Packaged with the PowerShot SD10 are the following items:
- Wrist strap.
- Video cable.
- USB cable.
- 32MB SD memory card.
- NB-3L lithium-ion battery pack.
- Battery charger.
- ArcSoft and Canon Digital Camera Solution Disk software CDs.
- Operating manual and registration card.
- Large capacity SD memory card.
- Additional NB-3L lithium-ion battery pack.
- Small camera case. Canon offers the Deluxe Leather Case PSC-SD10 in colors that correspond to the four SD10 colors.
See camera specifications here.
Cycle times, shutter lag, battery life, etc. can be found here.
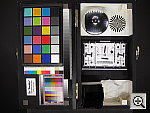
Test Images
See the full set of my sample pictures
and detailed analysis here.
The thumbnails below show a subset of my standard test images. Click on a thumbnail
to see the full-size photo.

|

|

|
| |
|
|
|
|
|
|
| |
|
|
|
|
|
|
| |
|
|


Test Results
In keeping with my standard test policy, the comments given here summarize only my key findings. For a full commentary on each of the test images, see the SD10's "pictures" page.
As with all Imaging Resource product tests, I encourage you to let your own eyes be the judge of how well the camera performed. Explore the images on the pictures page, to see how SD10's images compare to other cameras you may be considering.
Not sure which camera to buy? Let your eyes be the ultimate judge! Visit our Comparometer(tm) to compare images from the SD10 with those from other cameras you may be considering. The proof is in the pictures, so let your own eyes decide which you like best!
- Color: Color accuracy and saturation were very good with
the SD10, as the camera produced pleasing results under essentially all of
my test lighting. Skin tones were pretty good, but just slightly pinkish in
the Outdoor Portrait, and the tricky blue flowers of the bouquet were rendered
almost perfectly indoors and out. The Auto white balance setting typically
did the best job, though the Incandescent setting did much better under incandescent
lighting. The large color blocks of the Davebox target were also just about
right, with good saturation. Overall, a very nice job.
- Exposure: The SD10's exposure system did a good job overall,
producing good exposures with only the usual amount of exposure compensation
required. I did feel that the SD10's tone curve was a little contrasty though,
as it had some trouble holding highlight detail under the harsh lighting of
the high-key Outdoor Portrait test. Indoors, the camera required about average
positive exposure compensation, although it tended to underexpose its flash
shot somewhat. The SD10 had no trouble distinguishing the subtle pastel tones
on the Q60 target of the Davebox, and shadow detail was moderate in most cases.
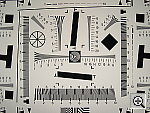
- Resolution/Sharpness: The SD10 performed nicely on the
"laboratory" resolution test chart. It started showing artifacts
in the test patterns at resolutions as low as 850-900 lines per picture height,
in both horizontal and vertical directions. I found "strong detail"
out to at least 1,200 lines, and you could argue for 1250 lines horizontally.
"Extinction" of the target patterns didn't occur until about 1,450
lines. Overall, a good performance for a fairly simple point-and-shoot camera.
- Closeups: The SD10 performed very well in the macro category,
capturing a minimum area of only 2.33 x 1.75 inches (59 x 44 millimeters)
- particularly impressive for a camera with a fixed focal length lens. Resolution
was very high, showing excellent fine detail in the dollar bill and smaller
coin. The larger coin and brooch were soft, most likely due to the shallow
depth of field caused by the very short shooting distance. As is often the
case with digicam macro shots, there was some softness in the corners of the
image here. The SD10's flash had trouble throttling down for the macro area,
and overexposed the shot, so plan on using external light sources for your
macro photos with the SD10.
- Night Shots: (Long exposure option should produce good
results. - This test not shot yet though.)
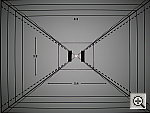
- Viewfinder Accuracy: The SD10 offers only an LCD monitor
for a viewfinder, which shows almost exactly 100 percent frame accuracy. Actually,
the LCD monitor is just a little loose, as the lines I use for measurement
are just cut off at the top and bottom, and on the right side of the frame.
So, you'll need to add a hair of space when tightly framing a subject. Given
that I like LCD monitors to be as close to 100 percent accurate as possible,
the SD10 does very well in this respect.
- Optical Distortion: Optical distortion on the SD10 was
slightly less than average for a camera with a wide-angle lens, as I measured
approximately 0.7 percent barrel distortion. I'd still like to see a little
less than that, however. Chromatic aberration was very low, only two or three
pixels of very slight coloration on either side of the target lines. (This
distortion is visible as a very slight colored fringe around the objects at
the edges of the field of view on the resolution target.) Most of my test
shots showed some softness on the left side of the frame, possibly due to
an improperly seated sensor on the particular unit I reviewed.
- Battery Life: (Generally good battery life for a subcompact, but I don't have the specific run times available yet.)
| Free Photo Lessons | |
|

- More Information on this camera from Megapixel.net:
Canon PowerShot SD10, Canon Digital Cameras, Digital Cameras
- Canon
PowerShot SD10 user reviews on PriceGrabber.com
- Canon PowerShot SD10 user review on PC PhotoREVIEW

Follow Imaging Resource: