Nikon D200 Controls
Control Enumeration, Command Dials
Here's our usual "walk around the camera," this time starting with the two Command Dials, the Main Command Dial and the Sub Command Dial, since they figure prominently in camera operation. Most camera settings are made by pressing and holding the appropriate button while rotating one or the other of these two controls. Functions controlled by these dials are as follows:![]()
Main Command Dial: The Main Command Dial is located on the back of the camera, in the upper right hand corner, directly under your right thumb. Used in conjunction with other buttons, this dial controls ISO, White Balance, Quality, exposure mode, EV compensation, and Flash mode settings when turned while pressing any of those buttons. It also sets the number of frames when used with the BKT button. In Shutter Priority and Manual exposure modes, this dial sets the shutter speed, although it can be made to control the aperture instead, via a Custom Menu setting. In Program exposure mode, turning this dial shifts the program to favor higher or lower speeds/larger or smaller apertures.
![]()
Sub-Command Dial: The Sub Command Dial is located on the front of the handgrip, just under the Shutter button, conveniently placed for your index finger to grip. This dial fine-tunes the white balance across the -3 to +3 range (arbitrary units) when pressing the White Balance button. It sets the image resolution when the Quality button is pressed, and adjusts the Flash Compensation when used with the Flash Mode button. In Manual and Aperture Priority modes, it sets the aperture value, although it can be made to control shutter speed instead, via a Custom Menu setting.
Nikon's combination of Main and Sub-Command Dials makes for very fluid camera operation, as you can quickly adjust two related parameters, one with your thumb, the other with your index finger. Once you're familiar with the camera, the layout of other controls on the camera body and their separation from each other makes it relatively easy to reach and press them without looking. Taken together, the various buttons and the twin Command Dials let you control most important shooting parameters with a minimum of fuss and distraction; in many cases without so much as taking your eye away from the viewfinder.
Control Enumeration, Top Panel Controls, Right
The controls on the right side of the top panel are the primary shooting controls, generally dealing with immediate camera operations.
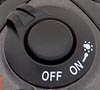
Power Dial: Surrounding the Shutter button on the top right of the camera, this dial turns the camera on and off. A third On position illuminates the small status display for easy viewing in dim lighting.
Shutter Button: In the center of the Power dial, on the top of the camera, this button sets focus (when in autofocus mode) when halfway pressed and fires the shutter when fully pressed. You can choose whether or not the Shutter button also locks exposure, via an option on the Custom Settings menu.
When an image is displayed on the LCD monitor, halfway pressing the Shutter button dismisses the display and immediately switches the camera to shooting mode. (A partial expression of Nikon's "shooting priority" philosophy.)
Exposure Compensation Button: Behind and to the right of the Shutter button on the top of the camera, pressing this button while turning the Main Command dial sets the Exposure Compensation from –5 to +5 exposure equivalents (EV) in one-third step increments. Pressing this button and the Quality button simultaneously resets the camera to its default settings.
Mode Button: Directly beside the Exposure Compensation button, holding this button and rotating the Main Command Dial adjusts the exposure mode. Choices are:
- Program: Puts the camera in charge of aperture and shutter speed, though all remaining camera settings are available. (And you can vary the combination of aperture and shutter speed the camera has selected, by rotating the Main Command Dial.)
- Shutter Priority: The user controls shutter speed, from 1/8,000 to 30 seconds, while the camera sets the aperture value.
- Aperture Priority: The opposite of Shutter Priority mode, this mode lets the user control the aperture, while the camera sets the shutter speed.
- Manual: Gives the user complete control over the exposure (both shutter and aperture settings), and provides access to the camera's Bulb shutter setting for exposures longer than 30 seconds.
Pressing and holding this button and the Delete button on the rear panel simultaneously formats the memory card. (You have to press and hold a few seconds, then press both together again to confirm that you really do want to reformat the card.)
Control Enumeration, Top Panel Controls, Left
The left side of the D200's top panel is dominated by the Function Dial and three buttons.
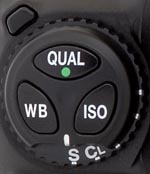
Mode Dial and Lock Button: Beneath a platform holding the Quality, ISO, and WB buttons, this dial sets the camera's drive mode when turned while pressing the small lock button in front of it. The following modes are available:
- Single Frame: Captures a single frame with each press of the Shutter button.
- Continuous Low Speed: Captures a series of images, from one to four frames per second, depending on a setting under the Custom Settings Menu.
- Continuous High Speed: Captures a rapid series of images, at up to five frames per second.
- Mirror Up Mode: The first press of the shutter button raises and locks the mirror, the second press releases the shutter. (Useful for reducing vibration when the camera is on a tripod and a remote trigger is being used.)
ISO Button: The right-most button sitting on top of the Mode dial, this button adjusts the camera's sensitivity setting from 100 to 1,600 (High +0.3, High +0.7, and High +1.0 settings are shown in the LCD data readout as H1, H2, and H3), while turning the Main Command dial.
White Balance (WB) Button: Left of the ISO button, this sets the overall color balance when pressed while turning the Main Command dial. Preset values include Auto, Incandescent, Fluorescent, Direct Sunlight, Flash, Cloudy, and Shade settings. A PRE (Preset) mode is the manual adjustment, and a Color Temperature setting offers a range of Kelvin temperature options. Pressing this button while turning the Sub-Command Dial in any exposure mode but Manual varies the white balance from the default for that setting. This lets you shift the color balance in relatively small increments, a very handy feature.
Quality (QUAL) Button: In front of both the ISO and WB buttons, this button controls the image resolution and quality settings. Turning the Main Command dial while pressing the button sets the compression level (RAW, TIFF, Fine, Normal, and Basic), and turning the Sub-Command dial adjusts the resolution (Large, Medium, and Small). Pressing and holding this button with the Exposure Compensation (+/-) button resets the camera to its default settings. (A nice way to quickly get back to a basic starting point, without having to hunt down myriad custom function settings, etc.)
Control Enumeration, Rear Panel Controls
Most of the camera's remaining controls are located on the rear panel. The controls along the top of the back panel generally relate to shooting settings, while those on either side of the LCD monitor are associated with playback and menu navigation. We'll start our tour at the top left.

Auto Bracketing (BKT) Button: Positioned in the top left corner of the camera's back panel and marked "BKT," pressing this button and rotating the Main Command Dial enables the Auto Bracketing function and cycles through the number of frames from three to nine. Turning the Sub-Command dial instead of the Main Command Dial changes the bracketing step size. (Nine exposure steps via auto bracketing is a nice option: We frequently feel constrained by the 3-step bracket option on most consumer cameras, and even 5-step brackets may not cover a wide enough range in fine enough steps for some critical applications.)

Delete Button: Directly to the right of the BKT button, this button deletes individual images in playback mode, with a confirmation screen to give you the opportunity to change your mind. Pressing and holding this button together with the Mode button formats the memory card. (For safety's sake, you have to press both a second time to confirm the format.)

Diopter Adjustment Dial: Adjacent to the top right side of the viewfinder eyepiece, this dial adjusts the optical viewfinder to accommodate eyeglass wearers. (Range is -2 to +1 diopters.)

AE/AF Lock Button: Located in the center of the Metering Selector, this button locks the exposure and/or focus when pressed. The settings remain locked as long as you hold the button down, regardless of any action of the Shutter button. Several options for this control can be set via the Custom Settings Menu. You can program it to lock either focus or exposure separately, or both together (the default). You can also change its operation so a single press locks and holds the exposure setting. (No need to keep the button pressed down.) Finally, you can set the AE/AF lock button so it alone controls the autofocus system, meaning the autofocus won't actuate when the Shutter button is half-pressed, only when the AE/AF lock button is pressed instead.
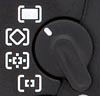
Metering Selector Dial: To the right of the viewfinder eyepiece, this dial surrounds the AE/AF Lock button. Rotating the ring selects between Spot, Center-Weighted, and 3D Color Matrix II metering options.

AF On Button: To the right of the AE/AF Lock button, this button sets the focus without the use of the AE/AF Lock button or Shutter button. (Meaning you can independently lock the exposure with the AE Lock button without having to half-press the Shutter button to lock focus and thereby lose your exposure reading.)
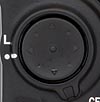
Focus Area Selector and Lock / Four-Way Arrow Rocker Pad: Just off the top right corner of the LCD monitor on the back panel, this rocker button with its associated locking switch (directly below it) controls the autofocus area in Record mode. The switch beneath it unlocks the rocker control and pressing any side of the rocker moves the active AF selection in that direction. (by choosing one of the 11 brackets displayed in the viewfinder).
In Playback mode, the rocker pad's right and left arrows scroll through captured images while the up and down arrow directions cycle through various information displays for each image. When you zoom in on an image in playback mode, the rocker pad lets you scroll around the magnified image
In any settings menu, the arrow directions on this control are used to navigate through the LCD menu system.
AF Area Mode Selector: Beneath the Arrow pad, this selector sets the AF area mode to either Single Area, Dynamic Area, Group Dynamic Area, or Dynamic Area with Closest Subject Priority modes.

CF Door Release Lever: Directly below the AF Area Mode selector, this lever releases the memory card compartment door.

Playback Button: Just off the top left corner of the LCD monitor, this button displays the most recently captured image, putting the camera into Playback mode. Once an image is displayed, the arrow keys navigate through the other images saved on the memory card. This button also dismisses the image display.

Menu Button: Below the Playback button, this button displays or dismisses the LCD menu system.

Thumbnail View Button: Just below the Menu button, this button works together with the Main Command Dial to display either a four or nine-image index view. The chosen display mode remains selected indefinitely, even if the camera is turned off. To return to normal viewing, press the Thumbnail View button again, and rotate the Command Dial in the opposite direction. When a thumbnail view is activated, you can scroll a cursor through the thumbnail images very rapidly with the rocker pad. Pressing the Enter button (see below) magnifies the image that's currently selected. Once an image is magnified, turning the Main Command dial with the Thumbnail button held down changes the level of magnification, while a second press switches you into and out of the zoomed view, showing the current zoomed display area as a red-bounded rectangle. See the previous Viewfinder section of this review for a more complete description of this function.

Protect / Help Button: Next in line below the Thumbnail View button, this button write-protects individual images, protecting them from accidental deletion. (Note though, that even "protected" images will be lost when a card is reformatted.) If an image is already protected, pressing the Protect button removes protection.
In any settings menu, pressing the Protect/Help Button displays an explanation of the current menu selection.

Enter / Magnify Button: Just below the Protect button, this button confirms menu selections. It also activates the playback magnification, when a captured image is displayed in the LCD monitor.
Control Enumeration, Front Controls
There are a handful of controls on the front of the camera body. They are:

Depth of Field Preview Button: On the right side of the body (as viewed from the back), just beneath the AF assist light, this button lets you check the depth of field with the current aperture setting. Pressing the button stops down the lens, so you can get an idea of the depth of field through the viewfinder.

Function Button: Below the Depth of Field Preview, this button is programmable, and can control a range of functions. The Custom Settings menu lets you choose the function, from 10 available options (FV Lock, FV Lock/Lens Data, 1 Step Speed/Aperture, Same as AE-L/AF-L, Flash Off, Bracketing Burst, Matrix Metering, Center-Weighted Metering, Spot Metering, or Focus Area Frame).

Focus Mode Selector Dial/Lever: On the other side of the camera, next to the lens, this control selects between Manual, Single Servo, and Continuous Servo focus modes. Single servo focuses once each time the shutter button is half-pressed. Continuous Servo focuses continuously as long as the shutter button is held down. An important difference between the two options is that Continuous Servo will let you fire the shutter even if the subject isn't in focus. (Release priority.) By contrast, Single Servo won't release the shutter unless the camera thinks the subject is in focus. (Focus priority.)

Lens Release Button: Just above the Focus Mode Selector Dial, this button releases the lens from its mount when pressed.
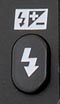
Flash Mode / Flash Compensation Button: Located on the side of pentaprism, this button cycles between the five flash sync modes (Fill, Red-Eye Reduction, Red-Eye Reduction with Slow Sync, Slow Sync, and Rear Curtain Sync) when pressed while turning the Main Command dial. Pressing this button and rotating the Sub Command Dial adjusts the flash intensity over a range of –3 to +1 EV, in 1/3 EV steps.

Flash Release Button: Directly above the Flash Mode button, this button releases the pop-up flash from its compartment.
 Fujifilm GFX 50S Review
 Fujifilm X-T3 Review
 Olympus E-M5 III Review

Follow Imaging Resource