Back
to Full Nikon D2H Review
Back
to Full Nikon D2H ReviewGo to Nikon D2H Data Sheet
Go to Nikon D2H Pictures Page
Up to Imaging Resource Cameras Page
Use your browser's "Back" button to return to the previous page, or the links at the top and bottom of this page to navigate to related information. If you have difficulty fitting the text on this page onto your printer output, simply resize your browser window to a narrower width and print again.
Remember us when it's time to buy!
Dave here: Have our reviews been helpful to you? (Is this article you're reading right now useful?) Preparing this level of information on as many products as we do is incredibly hard work, not to mention expensive. Things on the Internet may look like they're free, but they're not. (As a lot of big dot.com companies are finding out these days.) Somewhere, somebody has to pay to produce worthwhile content. YOU can help us though, by remembering us when it comes time to make your purchase. Would you consider coming back to our site and clicking-through to one of our advertisers to make your purchase? Every dollar you spend with one of our advertisers helps us directly (in affiliate fees) or indirectly (the advertiser will keep renewing their ad contract with us). To make it easy for you to support us, here's a URL you can visit, to see all our current advertisers, with links to click on that will register your visit to them as having come from our site. It's up to you where you buy, but Mike, Mike, Kim, Yazmin, Marti and I would be really grateful if you'd help us out by choosing one of our advertisers to purchase from.
Thank you for your support!
Dave Etchells, Founder & Publisher
Visit our "Buy Now" Page:
https://www.imaging-resource.com/buynow.htm
Back
to Full Nikon D2H Review
Go to Nikon D2H
Data Sheet
Go to Nikon D2H
Pictures Page
Up to Imaging Resource Cameras
Page
Nikon D2HNikon introduces an 8 frame/second speed demon, with WiFi connectivity and an amazing new flash system to boot! Review First Posted: 12/18/2003 |
|
 |
|
True Nikon pro SLR compatible with most Nikon F-mount lenses. |
| |
4.1-megapixel CCD, 2,464 x 1,632-pixel images | |
| |
ISO from 200 to 1,600 ("ISO Boost" to 6,400) | |
| |
Very fast shutter response and cycle times. | |
| |
Wireless image transfer capability with separate transmitter accessory. |
Manufacturer Overview
The new Nikon D2H is the latest addition to one of the world's
most famous series of camera equipment . Nikon is one of the names that literally
needs no introduction in the world of photography. Long a leader in the film
world, they offer cameras for both the serious amateur and working professional.
Back in June 1999, Nikon announced their first all-digital professional SLR,
the D1 - a
camera whose specifications and initial price point (2.7 megapixels and a
list price of $5850 for the body) rocked the pro camera world. In February
2001, they raised the bar with the 5.3 megapixel D1X
and the speedy (5 frames per second) 2.7 megapixel D1H.
Reverting to a mid-year announcement, they've now followed up with the July
2003 of the new 4.1 megapixel, 8 fps Nikon D2H digital SLR, a model that
aims to answer the challenge posed by Canon's 4.1 megapixel, 8 fps EOS-1D
(announced in September 2001, and available around December 2001).
The Nikon D2H breaks new ground on several fronts though, introducing Nikon's
new internally-developed LBCAST sensor technology, enabling a dramatic increase
in shooting speed, while at the same time dramatically lowering image noise
under low-light conditions. While packed with new features and improved specs,
the new camera continues to have the same superlative "cameraness"
(a favorite Nikon term, describing how the device functions as a camera)
of past models, but bears only a passing resemblance to its predecessors
- most of the basic controls are in the same places as before, but almost
every feature of the design has been improved, inside and out. The user interface
ergonomics have been refreshed to provide a camera that is more comfortable
in the hands and easier to control (with quite a few new controls added at
the same time). The electronics inside the camera have also received many
changes resulting in a camera that has 50% more resolution than the D1H,
yet captures images 60% faster. The resolution and speed are approximately
the same as Canon's EOS-1D, but the burst depth (the number of consecutive
frames that can be shot at high speed) is 50-90% greater than that of Canon's
camera, depending on the file format in use. (That's 5 seconds of
continuous shooting at the full 8 fps maximum frame rate in JPEG mode, or
just over 3 seconds in RAW mode.) Overall, the D2H is an impressive advancement
of Nikon's camera technology, bringing not only higher speed but a host of
enhancements throughout the camera system.
Highlights
Executive Overview
The Nikon D2H is the next generation in the line of digital SLR
bodies that have proven so popular among pros and advanced amateurs alike.
The D2H offers a 4.1-megapixel CCD, interchangeable lens system, and a handful
of updated features, in addition to the excellent exposure features enjoyed
on previous models like the D1x and D1h. With the same familiar, F5-inspired
body design, the D2H offers the look and feel that film-based pros are accustomed
to, and is quick to get to know, with an improved user interface as well.
One of the most interesting features on the D2H is its wireless capability.
With the optional wireless transmitter accessory attached, you can send images
directly from the camera to a computer without messing around with cabling
or card readers.
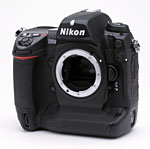
The D2H continues with the standard Nikon F lens mount, which means that you can attach most of Nikon's 35mm lenses with no problem (great for current Nikon 35mm shooters who already have a full kit of lenses). With a weight of 2.5 pounds (1070 grams), the D2H has the heft I've come to associate with professional SLRs, but somehow manages to not feel bulky or awkward in the hand. A pro accustomed to shooting with Nikon's F5 bodies will find the D2H very comfortable and familiar. In exchange for the substantial heft though, the D2H's magnesium-alloy body provides an exceptionally rugged and rigid optical platform capable of absorbing unreasonable abuse without complaint. With both hot shoe and PC-style flash sync connections, the D2H will interface with most any flash equipment, whether in the field or studio.
The D2H's accurate TTL (through the lens) optical viewfinder means that you
have no need for the LCD panel as a viewfinder, a good thing, since the SLR
optics mean that the LCD can't be used as a "live" viewfinder anyway.
(By its nature, barring a "pellicle" mirror or beam splitter optics,
the very design of an SLR precludes a "live" LCD viewfinder.) In
addition to a dioptric adjustment dial and an internal shutter to prevent
stray light from affecting exposures when the camera is used on a tripod,
the viewfinder features a very detailed information display that reports
most of the camera's exposure settings and also shows a set of 11 autofocus
targets. A flexible autofocus system means that you can determine the type
of autofocus (single, continuous, or manual), designate how it's used (single
area, dynamic area, etc.) and even designate the location of the autofocus
target within the frame. A new autofocus mode, Group Dynamic Area, lets you
select a grouping of five AF points for the camera to base the exposure on,
providing slightly more flexibility that a standard spot AF point. Exposure-wise,
there are so many features on this camera that you'll have to read the entire
review to get them all. I'll just mention a few of the primary options here.
To begin, you have the option of working in Program AE, Aperture Priority,
Shutter Priority, or Manual exposure modes. Exposure settings are easily
changed by using a combination of control buttons and command dials, or through
the LCD menu system. The extensive Custom Settings menu provides access to
a huge range of camera settings, including how various elements of the user
interface itself work. For example, you can decide which command dial controls
the shutter speed or aperture, determine the EV step-size of exposure adjustments,
or set the range of ISO options available, among many others. With the D2H,
you have a broad exposure compensation range, with a variable adjustment
from -5 to +5 exposure equivalents (EV) in one-third step increments. (A
custom settings menu option also lets you set the EV compensation step size
to one-half or one EV unit.) The camera's improved white balance system also
has a lot of flexibility, with options for Auto, Incandescent, Fluorescent,
Direct Sunlight, Flash, Overcast, Shade, and Color Temperature (with a full
range of Kelvin temperature settings), all of which are adjustable from -3
to +3 (arbitrary units) in their intensity. A Preset white balance setting
serves as the manual adjustment, and the D2H can store up to five presets.
Three metering modes are available: Spot, Center-Weighted, and a very accurate
Color 3D Matrix metering option. ISO can be set anywhere from 200 to 1,600,
giving you excellent exposure flexibility. (Special "HI" modes
are available that extend the effective ISO to 3,200 or 6,400, albeit at
the cost of significantly increased image noise.) The auto bracketing feature
takes a series of exposures of the same subject at different exposure settings,
with the exposure step between shots being configurable via the settings
menu. (You can also bracket flash exposures and white balance settings.)
The camera's Continuous Shooting mode lets you capture up to 40 consecutive
images as quickly as eight frames per second, and here again, you can select
both the maximum number of shots as well as the frame rate. The camera's
flash sync mode menu lets you select when and how the external flash fires.
Choices include Front-Curtain Sync, Slow-Sync, Rear-Curtain Sync, Red-Eye
Reduction, and Red-Eye Reduction with Slow Sync. Because the D2H accommodates
a variety of Nikon's Speedlights, specific flash power and operation will
vary depending on the particular model you're using. Note that some options
such as red eye reduction are only available with Nikon flash units or others
conforming closely to the flash-interface protocols used by the D2H.
The 4.1-megapixel CCD delivers an image resolution of 2,464 x 1,632 pixels.
Image quality options include the usual Basic, Normal, and Fine but also
TIFF, and both compressed and uncompressed RAW formats. Image storage is
on CompactFlash Type I or II, and the D2H supports Microdrives for huge on-the-go
storage capacity. (Although semiconductor memory cards have now caught up
to the Microdrives in the capacity race.) The D2H utilizes a custom EN-EL4
lithium-ion battery pack for power and a charger is included in the box.
(While I generally strongly recommend purchasing a spare battery pack, the
D2H's battery life is pretty phenomenal: Unless you're a pro who's going
to shoot more than 1500-2000 images at a time, the single battery pack included
with the D2H should provide plenty of power.) A design plus I really appreciate
in a pro camera is that the battery pack and card slot are both accessible
from the sides of the camera, meaning that you don't have to dismount the
camera from the tripod to access either compartment.
Design
With the established reputations of Nikon's D1, D1X, and D1H (not to mention
the prosumer D100) digital cameras resting securely behind it, the D2H continues
the line of Nikon's outstanding, high-performance pro digital SLRs. Offering
the same exceptional exposure control and a range of features embodying the
ultimate in flexibility and control, the D2H maintains the same functional
design as Nikon's film-based pro SLR line. I've mentioned the Nikon-coined
term "cameraness" before, which describes the combination of features,
functionality, and above all, user interface design, that defines how a camera
operates as a photographic tool. Key to Nikon's strategy is that their digital
SLRs embody the same "cameraness" as their film models, so practicing
pros can switch back and forth between film and digital bodies without having
to stop and adjust their shooting style or practices. Like the previous models,
the D2H fulfills this goal admirably, with an operational design that will
be immediately familiar to users of the Nikon F5. Though sophisticated, the
D2H's user interface is clean, straightforward, and quick to navigate, with
a no-frills, four-page menu system that's slightly improved over previous
models. (Actually, to interject a personal note here, I found the D2H overall
to be the most enjoyable camera to shoot with that I've yet had the pleasure
of using. Its user interface is one of the most transparent I've encountered,
and the camera just felt "right" when using it. - This is more
of a subjective comment than I'm usually comfortable making here, but I do
so because the difference between the D2H and other cameras was so dramatic,
even though subtle. - If that's not an oxymoron...)
While the camera bodies may look very similar, the D2H sports a number of new upgrades and features over the previous D1H model. For starters, the D2H has a slightly different control layout, and a couple of new buttons to handle previous menu options. Internally, the D2H offers a 4.1-megapixel JFET LBCAST image sensor for higher resolution images and improved long-exposure image noise. It also has much more sophisticated white balance system, with an ambient-light color sensor and the ability to save as many as five manual presets, a larger LCD monitor for better viewing, a Voice Memo mode, and a new Anti-Dust option (that needs Nikon's optional Capture 4 software to take advantage of), among other slight changes. One of the most interesting capabilities of the D2H is only available via a separate accessory, the wireless transmitter. With it attached (as shown above), you can wirelessly send image files from the camera to a computer, or even out over the internet.

Measuring 6.2 x 5.9 x 3.4 inches (158 x 150 x 86 millimeters), the physical dimensions of the D2H are practically identical to those of the D1, D1X, and D1H models. Weighing in at a hefty two pounds, 12.4 ounces (1,259 grams) excluding the lens and flash unit, but including batteries and memory card, the D2H is a definite handful, but nonetheless falls about the middle of the range for pro digital SLRs. Thanks to a cast-alloy body (see the photo above), the D2H carries forward the "built like a tank" ruggedness of previous Nikon Pro SLRs.
One new addition to the D2H is a much more complete system of environmental seals on the body than we've seen on Nikon cameras before, as shown above. The result is a camera that's by no means waterproof, but one that's at least highly resistant to water and dust.
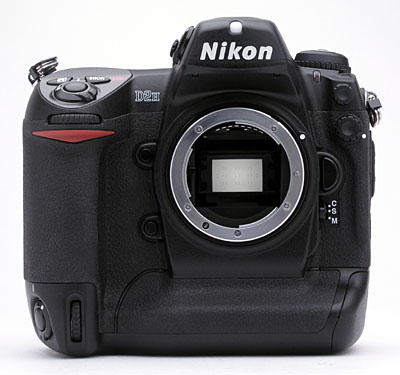
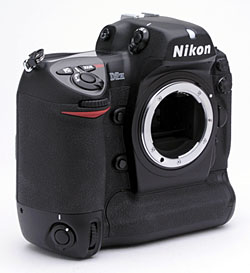
The front of the camera features a standard Nikon F lens mount, complete with AF coupling and AF contacts. As with Nikon's other Digital SLRs, the D2H body contains the necessary contacts to support Nikon's latest AF-S "silent wave" autofocus lenses, and also supports Nikon's designed-for-digital DX-series lenses. There's also a Depth of Field Preview button, Function button, Sub-Command dial, sync terminal for an external flash, 10-pin remote terminal, Lens Release button, Focus Mode Selector dial, ambient light sensor, self-timer lamp, and secondary Sub-Command dial. A substantial hand grip on the right side of the camera features a rubbery covering that provides a very secure finger grip. A thick rib running along the bottom of the body provides a hand grip when the camera is rotated for vertical-format shots, covered with the same textured, rubbery surface.
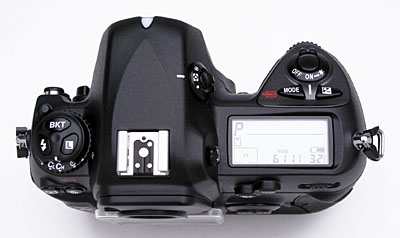
 The
top of the camera features the Power switch, Shutter button, Mode and Exposure
Compensation buttons, and a small status display panel that reports most
of the camera's settings, without forcing you to resort to the rear-panel
LCD screen. The images inset right include a photo of this display panel
as it appears on the camera, as well as a graphic illustration showing all
segments activated simultaneously.
The
top of the camera features the Power switch, Shutter button, Mode and Exposure
Compensation buttons, and a small status display panel that reports most
of the camera's settings, without forcing you to resort to the rear-panel
LCD screen. The images inset right include a photo of this display panel
as it appears on the camera, as well as a graphic illustration showing all
segments activated simultaneously.
 Also
on top is a diopter adjustment dial for the optical viewfinder and Metering
dial (both on right side of the hot-shoe mount, when viewing the camera from
the rear). On the other side of the hot-shoe mount are the Mode dial (with
lock button), as well as the Flash Sync Mode, Bracketing, and Command Lock
buttons. The top hot-shoe accommodates a variety of Nikon Speedlight external
flash units. The hot shoe has the usual trigger terminal in the bottom, as
well as three other contacts for interfacing to Nikon's dedicated speedlights.
Also
on top is a diopter adjustment dial for the optical viewfinder and Metering
dial (both on right side of the hot-shoe mount, when viewing the camera from
the rear). On the other side of the hot-shoe mount are the Mode dial (with
lock button), as well as the Flash Sync Mode, Bracketing, and Command Lock
buttons. The top hot-shoe accommodates a variety of Nikon Speedlight external
flash units. The hot shoe has the usual trigger terminal in the bottom, as
well as three other contacts for interfacing to Nikon's dedicated speedlights.
On the right side of the camera, a second Shutter Release button makes vertical
shooting much easier. A locking dial surrounds the button to prevent accidental
triggering. Also on this side of the camera is one of the eyelets for attaching
the neck strap.
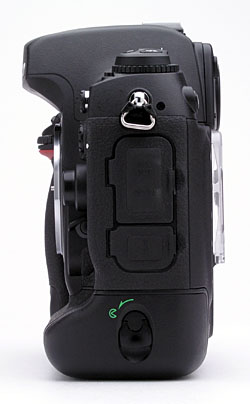
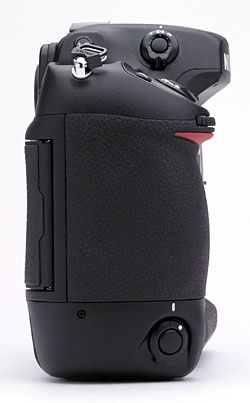
The opposite side of the camera features the battery and connector compartments,
and the second neck strap eyelet. Both connector compartments are covered by
rubbery flaps that remain tethered to the camera when opened, and fit snugly
into place. The top compartment houses the AV Out and DC In jacks, with the
USB 2.0 jack in the compartment below. A rotating latch locks the battery compartment
cover in place. The cover is actually a separate piece from the camera, removing
completely to expose the battery chamber. When a battery is inserted, the compartment
cover locks onto the battery, but can be released by pressing a tiny button just
inside the outer lip.
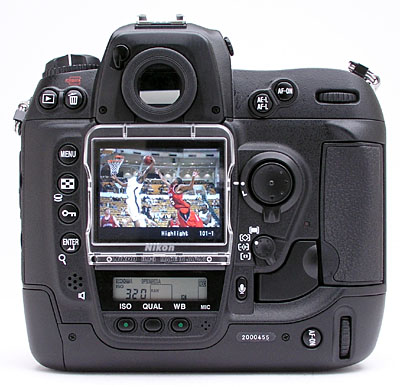
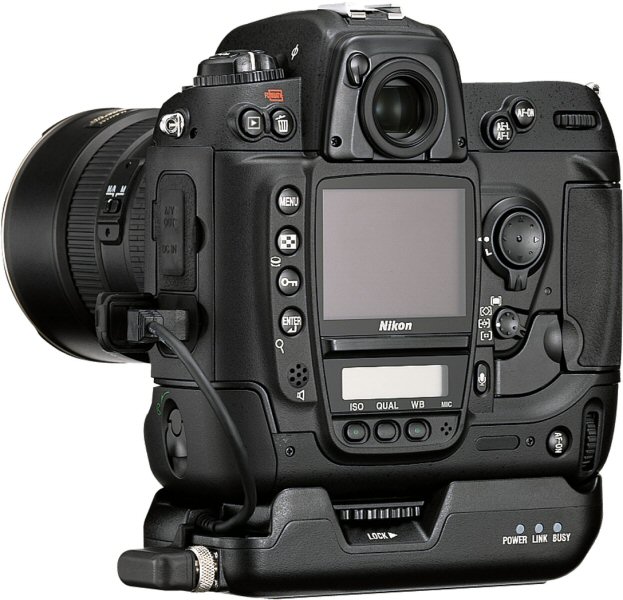
The back panel of the D2H holds the remaining camera controls, which are
extensive. The large, bright 2.5" LCD screen features a removable protective
cover which pops on and off. The protective cover is a nice idea, as the
LCD projects out from the back of the camera further than any other feature,
and so could be subject to abrasion, sliding back and forth across your jacket
or shirt front when the camera is hanging from its neck strap. The protective
cover is transparent, making it possible to see and navigate the LCD menu
system without removing it. A light-tight shutter can be flipped closed across
the viewfinder eyepiece, preventing stray light from affecting exposures
when the camera is used on a tripod. This shutter is opened and closed by
a small lever at the top left of the eyepiece. Across the top are several
command buttons, including the Playback, Delete, AE/AF Lock, and AF-On buttons,
in addition to the main Command dial. The LCD monitor panel rests in the
left center of the back panel, along with a Four-Way Arrow Rocker pad located
inside a focus selector lock dial. A card slot cover release button (beneath
a small, plastic flap) is located to the left of the CompactFlash slot which
supports Type-I and II CompactFlash cards, as well as MicroDrives. Card activity
is indicated courtesy of a small LED just above the release button, and to
the left of the CompactFlash card slot, on the back of the camera. Lining
the left side of the LCD monitor is another set of control buttons, including
the Menu, Thumbnail, Protect, and Enter buttons.
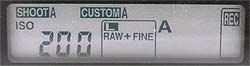 A small rear control panel beneath the LCD monitor works in conjunction with
a series of buttons below it, which include Sensitivity, Quality / Size,
and White Balance buttons. (As before, the images at right show a photo of
this display panel as it appears on the camera, as well as a schematic illustration
with all segments activated.)
A small rear control panel beneath the LCD monitor works in conjunction with
a series of buttons below it, which include Sensitivity, Quality / Size,
and White Balance buttons. (As before, the images at right show a photo of
this display panel as it appears on the camera, as well as a schematic illustration
with all segments activated.)
 The AF Area mode selector and
Voice Memo button are next to the lower right corner of the LCD monitor,
and a secondary AF-On button and Command dial for vertical shooting are in
the lower right corner of the rear panel. Finally, a small speaker just to
the left of the small status display panel plays back voice memos recorded
via the small microphone to the right of the White Balance button.
The AF Area mode selector and
Voice Memo button are next to the lower right corner of the LCD monitor,
and a secondary AF-On button and Command dial for vertical shooting are in
the lower right corner of the rear panel. Finally, a small speaker just to
the left of the small status display panel plays back voice memos recorded
via the small microphone to the right of the White Balance button.
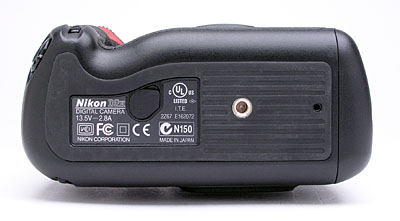
The very flat bottom of the camera reveals only the metal tripod mount and
the connector jack for the optional wireless transmitter accessory. I appreciate
the fact that neither the batteries nor the CompactFlash slot are accessed
from the bottom of the camera, which lets you change the batteries and memory
card without dismounting from a tripod. The large surface area of the camera's
bottom combines with the high-friction rubberized surface to produce a very
stable mounting surface for use with a tripod. The central position of the
tripod mount with respect to the depth of the camera body, and the center-line
of the lens, will help both with mounting stability and to reduce parallax
error when shooting panoramas.
 Viewfinder
The D2H is equipped with an optical viewfinder that works through the lens
(the LCD monitor is for image playback and accessing the menu system only,
and as with other digital SLRs cannot be used for image preview / framing).
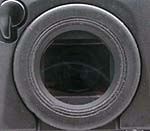
The circular optical viewfinder features a diopter adjustment dial and a
sliding protective shutter manually moved in and out of place by a small
lever. The internal metal shutter helps avoid exposure errors due to light
entering the rear element of the viewfinder during long exposures on a tripod.
Nikon states that the optical viewfinder provides about 100 percent frame
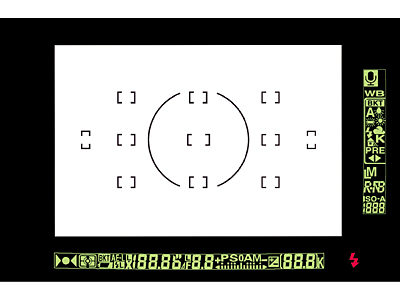
coverage, which agrees quite well with my own measurements. (I measured viewfinder
coverage at almost exactly 100 percent.) The D2H's illuminated display inside
the viewfinder provides a bit more information than the previous D1H, with
a center-weighted metering circle, 11 sets of focus brackets, focus indicator,
metering, bracketing indication, battery level, FV lock, sync indicator,
AE lock, shutter speed, shutter speed lock, aperture, aperture lock, aperture
stop indicator, exposure mode and compensation, frame counter, flash-ready
indicator, electronic analog exposure display, voice memo status, white balance
mode and bracketing, image size and quality, and ISO sensitivity.
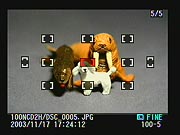
 While the 2.5-inch LCD panel on the D2H isn't usable as a viewfinder, it
does provide a great deal of information about your pictures after you've
shot them. A variety of playback options are available, ranging from a 9-image
thumbnail display, through several full-sized image modes, to a zoomed playback
option with variable magnification. Of these, one of the most interesting
options is the histogram screen, shown at right. Histogram displays are common
on professional digicams, regarded as almost mandatory by many pros for evaluating
exposure levels. A histogram is simply a graph of how many pixels there are
in the image at each brightness level. The brightness is the horizontal axis,
running from black at the left to white at the right. The height of the graph
shows the relative number of pixels having each brightness level. This sort
of display is very handy for determining under- or overexposure. Ideally,
the histogram would stretch across the entire width of the display, using
the full range of brightness values available. An underexposed image will
have a histogram with all the data lumped on the left-hand side, with nothing
reaching all the way to the right. Likewise, an overexposed image will have
all the data lumped on the righthand side.
While the 2.5-inch LCD panel on the D2H isn't usable as a viewfinder, it
does provide a great deal of information about your pictures after you've
shot them. A variety of playback options are available, ranging from a 9-image
thumbnail display, through several full-sized image modes, to a zoomed playback
option with variable magnification. Of these, one of the most interesting
options is the histogram screen, shown at right. Histogram displays are common
on professional digicams, regarded as almost mandatory by many pros for evaluating
exposure levels. A histogram is simply a graph of how many pixels there are
in the image at each brightness level. The brightness is the horizontal axis,
running from black at the left to white at the right. The height of the graph
shows the relative number of pixels having each brightness level. This sort
of display is very handy for determining under- or overexposure. Ideally,
the histogram would stretch across the entire width of the display, using
the full range of brightness values available. An underexposed image will
have a histogram with all the data lumped on the left-hand side, with nothing
reaching all the way to the right. Likewise, an overexposed image will have
all the data lumped on the righthand side.
 The
histogram display is very helpful in telling whether you've got the exposure
right, but to my mind isn't adequate by itself. With digicams, it's very
important not to blow-out the highlights in a picture (rather like slide
film in that respect), since once you hit the maximum brightness, the image
just saturates, and any highlight detail will be lost. A histogram display
does a pretty good job of telling you how the image as a whole is doing,
but what if there are just a few critical areas that you're worried about
for the highlights? If only a small percentage of the total frame is involved,
it won't account for many pixels. That means any peak at the "white"
end of the histogram graph would be pretty small, and easy to miss (or just
plain invisible). What to do? The folks at Nikon recognized this problem,
and provided another special display mode that they simply call "highlights,"
accessible via the Playback settings menu, under "Display Mode."
This mode blinks any highlights that are saturated in any of the color channels.
It does this by taking the pure white areas on the LCD and toggling them
between white and black.
The
histogram display is very helpful in telling whether you've got the exposure
right, but to my mind isn't adequate by itself. With digicams, it's very
important not to blow-out the highlights in a picture (rather like slide
film in that respect), since once you hit the maximum brightness, the image
just saturates, and any highlight detail will be lost. A histogram display
does a pretty good job of telling you how the image as a whole is doing,
but what if there are just a few critical areas that you're worried about
for the highlights? If only a small percentage of the total frame is involved,
it won't account for many pixels. That means any peak at the "white"
end of the histogram graph would be pretty small, and easy to miss (or just
plain invisible). What to do? The folks at Nikon recognized this problem,
and provided another special display mode that they simply call "highlights,"
accessible via the Playback settings menu, under "Display Mode."
This mode blinks any highlights that are saturated in any of the color channels.
It does this by taking the pure white areas on the LCD and toggling them
between white and black.
 In
addition to the histogram, highlights, and information screens, the D2H also
features a focus information screen, which highlights in red the AF area
used for the shot. This can be helpful for checking to see that the camera's
AF system locked onto the portion of the subject you were most interested
in.
In
addition to the histogram, highlights, and information screens, the D2H also
features a focus information screen, which highlights in red the AF area
used for the shot. This can be helpful for checking to see that the camera's
AF system locked onto the portion of the subject you were most interested
in.
 The
previous D1H didn't offer any playback zoom, a problem that has been well-addressed
on the D2H. Pressing the Enter button while an image is displayed enters
Playback Zoom mode. To control zoom, you then hold down the Index button
while turning the Command dial. The ability to magnify an image lets you
see critical details that are indiscernible in the basic LCD image. Also
in Playback mode, the D2H's LCD monitor can display as many as four or nine
thumbnail-sized images at once, when the Index button is held down while
rotating the Sub-Command dial.
The
previous D1H didn't offer any playback zoom, a problem that has been well-addressed
on the D2H. Pressing the Enter button while an image is displayed enters
Playback Zoom mode. To control zoom, you then hold down the Index button
while turning the Command dial. The ability to magnify an image lets you
see critical details that are indiscernible in the basic LCD image. Also
in Playback mode, the D2H's LCD monitor can display as many as four or nine
thumbnail-sized images at once, when the Index button is held down while
rotating the Sub-Command dial.
Learn how to use lens aperture to control depth of field - Visit our free Photo Lessons area!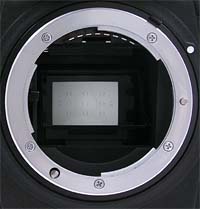 Optics
In this section, I usually discuss the lens characteristics of the camera
I'm describing. In the case of the D2H, you can attach pretty much any lens
you want, as long as it uses the Nikon F mount. The D2H features the standard
F mount, with both mechanical AF coupling for older lenses, and AF electrical
contacts for the latest AF-IF or AF-S Nikkor lenses with internal focus motors.
With very few exceptions, you can use the D2H with any F Mount Nikkor lens ever
made. (Actually, I'm not personally aware of any F-mount lenses that *wouldn't*
work, but do know that some of the really unusual Nikkor lenses from the past
[full-frame fisheyes?] had problems on some camera bodies, requiring mirror
lockup to function properly. This is a vanishingly small percentage of the possible
lenses that could be used with the camera though, so you can safely assume that
most any F mount lens in your camera bag will work just fine with the D2H.)
Free Photo Lessons
Functions and exposure modes available with a given lens will vary with the
type. More recent Nikkors (the D-type and G-type models) include a microchip
that communicates focal-distance information to the camera. Lenses without the
microchip used in the "D" and "G" types won't support the
"3D color matrix metering" mode. Here's a table giving a brief idea
of the functionality available with different Nikkor lens types (abstracted
from the D2H's manual).
| |
|
| Type G or D AF Nikkor
Lenses (except IX models), AF-S and AF-I Nikkor |
|
| PC Micro Nikkor 85mm F/2.8 D | |
| AF-I Teleconverter | |
| Other AF Nikkor Lenses (Excluding F3AF) |
|
| AI-P Lenses | |
| Other Lenses (Non-CPU) | |
Given that the optical characteristics will depend entirely on the lens attached,
I'll instead concentrate here on the focusing options and modes. There's
a lot to talk about here, given the exceptional control and flexibility afforded
by the D2H's autofocus systems. The D2H allows you to take advantage of auto
or manual focus via a small dial on the front of the camera, right next to
the lens. (This dial was redesigned from the D1H model, so that it's less
likely to accidentally change the focus mode while holding the camera with
two hands.) Setting the switch to "M" puts the camera into manual
focus mode, "S" places it in Single Servo AF (focus priority),
and "C" puts it into Continuous Servo AF (release priority). Single
Servo simply means that the camera sets focus only once, when the Shutter
button is first pressed halfway, and is best for still objects. Continuous
Servo means that the camera continuously adjusts the focus, as long as the
Shutter button is halfway pressed, and is best for moving objects.
You also have the freedom of setting the autofocus area on the D2H. A dial
on the camera's rear panel selects between Single Area, Dynamic Area, Group
Dynamic Area, and Dynamic Area with Closest Subject Priority modes. Single
Area AF simply means that the camera judges focus based on one part of the
subject, while Dynamic AF employs all 11 of the autofocus brackets, or areas.
(Both modes allow the user to manually select the main AF area.) The camera
first focuses on the subject in the central focus area. Whenever the subject
moves to a different AF area, the camera also shifts the focus to "follow"
the subject. This is great for irregularly moving subjects. Group Dynamic
AF mode is a new feature on the D2H, and lets you manually select a group
of five AF points in any section of the frame, from which the camera automatically
focuses based on the portion of the subject closest to one of the selected
points. This is good for moving subjects that remain within the same general
area of the frame. Finally, the Dynamic Area with Closest Subject Priority
option means that the camera first focuses on the closest object that falls
into one of the 11 focus areas and then tracks it as it moves. (Note that
no focus area brackets are illuminated in the viewfinder with this mode and
that this mode doesn't work well with telephoto lenses or poorly lit subjects,
according to Nikon). In Single Area and Dynamic Area AF modes, you can change
the main focus area by unlocking the focus area selector (the Four-Way Arrow
pad on the back panel) and then shifting the focus area using the up, down,
right, or left arrow keys. Then, simply lock the focus area selection by
sliding the switch back into place. By default, the
D2H does not "wrap" the focus area selector as you scroll between
focus areas. Through the Custom Settings menu, you can opt for a "Wrap"
function, which hunts for the next area from top to bottom or left to right.
What this means is that if you continue to press the right arrow key when
the right focus area is selected, the selection will jump to the left focus
area next, rather than remaining on the rightmost focus area setting.
There are two methods for using the AF Lock function. The first is to place
the central subject in the selected focus area, halfway press the Shutter
button, then realign the composition and fire the shutter. Alternatively,
when using Single Servo AF, you can press the AF-L/AE-L button to lock focus
(and exposure, unless set for focus only in the Custom Settings menu). Keeping
this button pressed will lock focus and/or exposure, even if the Shutter
button is released. This allows you to recompose the photograph without keeping
your finger on the Shutter button, but on the AE-L/AF-L button instead. (Thereby
resulting in less chance that you'll accidentally fire the shutter when you
don't intend to.) The AF-On buttons on the rear panel set focus without needing
to half-press the Shutter button. The purpose of the AF-On buttons is to
allow you to lock focus independently of exposure, if the AE-L/AF-L button
has been set to lock exposure only. Thus, you can lock the focus for one
section of the frame, and the exposure for another.
Exposure Learn about white balance and simple lighting techniques for dramatic shots in out free Photo Lessons area!
The D2H offers the many of the same (exceptional) exposure controls and
multiple options I liked so much on previous Nikon digital SLRs. First of all,
the D2H gives you a choice between Program AE, Manual, Aperture Priority, and
Shutter Priority exposure modes with shutter speeds from 1/8,000 to 30 seconds
available, as well as a Bulb setting for longer exposures (which doesn't appear
to be time-limited - I took test shots as long as three minutes). A very nice
touch is that, while in Program AE mode, you can rotate the Command dial to
select different combinations of aperture and shutter speed settings than those
normally chosen by the autoexposure system. (That is, if the automatic program
would have chosen 1/125-second and f/5.6, you could instead direct the camera
to use 1/60 at f/8 or 1/30 at f/11, to get greater depth of field.) This feature,
referred to as a "Flexible Program" mode, is a very handy option for
those times when you need some measure of increased control, but still want
the camera to do most of the work for you. You can also set the exposure step
size for adjusting the shutter speed, to one-third, one-half, or one full EV
unit, through the Custom Settings menu.
Free Photo Lessons
An interesting feature when using Manual exposure mode is the electronic analog
exposure display visible in both the optical viewfinder and the top-panel data
readout. This shows the amount an image will be over- or underexposed, based
on the settings you have selected, and helps you find the best exposure for
the subject. I also liked the Command Lock feature (activated by pressing the
Command Lock button on the top panel) which locks the shutter speed and/or aperture
setting so that it is not accidentally changed when using the Command dial for
another purpose. (If you set either the shutter speed or aperture before activating
the Command Lock function, a "lock" icon will appear next to the corresponding
setting in both the viewfinder and data readout displays, and that setting can't
be changed until you change the Command Lock option.)
ISO can be set to a range of values from 200 to 1,600 via the ISO button on
the back panel, and to values of 3,200 or 6,400 by selecting the "Hi-1"
and "Hi-2" settings. Through the Custom Settings menu, you can also
activate an Auto ISO option, which disables the two high sensitivity settings.
The D2H's improved White balance system offers Auto (useful from 3,500K to 8,000K),
Incandescent (set to about 3,000K), Fluorescent (4,200K), Direct Sunlight (5,200K),
Flash (5,400K), Cloudy (6,000K), Shade (8,000K), Color Temperature (manually
selectable from 2,500K to 10,000K), and Preset (which allows you to manually
adjust the white value by using a white card or object as a reference point).
You can store as many as five Presets for instant recall. All white balance
settings can be adjusted from -3 to +3 units on an arbitrary scale by turning
the Sub-Command dial (on the front of the hand grip) while holding down the
White Balance button (with the exception of the Color Temperature and Preset
options, which are not adjustable). Higher values correspond to a decrease in
the camera's white point, in degrees Kelvin (meaning the images become "cooler"
in appearance). This is a very nice feature, as I often wish I could use one
of a camera's standard white-balance settings, though just a bit warmer or cooler.
To be sure, some experimentation would be required to familiarize yourself with
the impact of these tweaked white balance settings, but having them available
is a definite plus. In addition to manually tweaking the white balance, you
can automatically capture a bracketed series of images at different white balance
adjustments with one press of the Shutter button. Rotating the Command dial
while holding down the Bracket button lets you set the number of images in the
series. Pressing the Bracket button while rotating the Sub-Command dial lets
you set the adjustment variable between shots.
As flexible as they are, I found the D2H's white balance options one of the
few areas in which I was dissatisfied with the camera's performance. The much-vaunted
auto white balance system did seem to work pretty well under a variety of circumstances,
and did indeed appear to be less prone to being fooled by subjects dominated
by a particular color. What I can't understand is why Nikon limited the Auto
mode's range of usable color temperatures to a minimum of roughly 3500K. Conventional
incandescent lighting is far more warm-toned than this (household incandescent
lighting is typically in the range of 2400-2500K), so there's a vast range of
lighting environments likely to be encountered by working photographers that
the D2H's Auto white balance option won't be able to handle.
The Kelvin color-temperature white balance option is a powerful one, potentially
highly useful for those photographers equipped with color-temperature meters.
I found that the Kelvin-based white balance system worked well across a range
extending down to about 2800K, but below that, the D2H seemed to over-correct
somewhat, producing rather bluish-tinted images under 2500K lighting when the
2500K white-balance setting was used. It's possible that my aging Minolta color
meter wasn't reading the color correctly, but the meter, the D2H, and a Canon
EOS-1D all seemed to agree pretty well at the 2800K level. (Given that my color
meter is indeed rather old, I don't want to place too much emphasis on this,
but did want to at least mention it so prospective purchasers can be aware of
the potential issue, and check the camera out carefully with their own color
meters.)
The table below shows approximate white point temperatures in degrees Kelvin
for the various adjustments in each of the major white balance settings.
| Camera Display--> | -3 | -2 | -1 | 0 | 1 | 2 | 3 |
| Direct Sunlight | 5,600 | 5,400 | 5,300 | 5,200 | 5,000 | 4,900 | 4,800 |
| Shade | 9,200 | 8,800 | 8,400 | 8,000 | 7,500 | 7,100 | 6,700 |
| Overcast | 6,600 | 6,400 | 6,200 | 6,000 | 5,800 | 5,600 | 5,400 |
| Incandescent | 3,300 | 3,200 | 3,100 | 3,000 | 2,900 | 2,800 | 2,700 |
| Fluorescent | 7,200 | 6,500 | 5,000 | 4,200 | 3,700 | 3,000 | 2,700 |
| Flash | 6,000 | 5,800 | 5,600 | 5,400 | 5,200 | 5,000 | 4,800 |
Three metering options are available on the D2H: 3D Color Matrix, Center-Weighted, and Spot. The 3D Color Matrix setting uses a 1,005-pixel CCD sensor (separate from the main image sensor) to meter exposure based on several areas in the frame (useful when brightly colored or very dark subjects occupy a significant portion of the frame). This is the same 3D Color Matrix metering system used on the Nikon F5 and the previous D1, D1X, and D1H models. Center-Weighted metering measures light from the entire frame but places the greatest emphasis on a circular area in the center. (You can adjust the size of the area through a Custom Settings menu option.) Spot metering is pretty self-explanatory, taking a reading from the dead center of the image (best when using the AE Lock function). The D2H has a nifty trick with spot focus though. With D-type lenses, and in the proper focus-area mode, the spot metering actually centers on the focus area selected, giving you the option for off-center spot metering. You can also link the spot with the center of the Group Dynamic Area setting.
![]() Exposure
compensation on the D2H is adjustable from -5 to +5 exposure equivalents
(EV) in one-third step increments, and is controllable in all exposure modes.
(Through the Custom Settings menu, you can also opt for one-half or one full
step size.) The Auto Bracketing feature takes as many as nine shots of the
same subject with varying exposure values determined by either the photographer
in Manual mode or by the camera in all other modes. Exposure settings for
bracketing can vary from -2 to +2 EV (values are added to the already chosen
exposure compensation value), with step sizes of one-third, one-half, or
one EV unit, and the bracketing biased toward either underexposure, overexposure,
or centered around the main exposure value. Through the Custom Settings menu,
you can designate whether the bracketing sequence adjusts the exposure, the
flash, both flash and exposure, or white balance (described above). For an
exposure series, the camera doesn't automatically snap a series of images
with one press of the Shutter button. Instead, the exposure varies with each
subsequent press of the Shutter button, and an indicator on the top status
display panel reports where you are in the sequence. By pressing the Bracket
button and rotating the Command dial, you can set the number of images you'll
capture in the series. Pressing the Bracket button while turning the Sub-Command
dial sets the exposure increment each shot will vary by.
Exposure
compensation on the D2H is adjustable from -5 to +5 exposure equivalents
(EV) in one-third step increments, and is controllable in all exposure modes.
(Through the Custom Settings menu, you can also opt for one-half or one full
step size.) The Auto Bracketing feature takes as many as nine shots of the
same subject with varying exposure values determined by either the photographer
in Manual mode or by the camera in all other modes. Exposure settings for
bracketing can vary from -2 to +2 EV (values are added to the already chosen
exposure compensation value), with step sizes of one-third, one-half, or
one EV unit, and the bracketing biased toward either underexposure, overexposure,
or centered around the main exposure value. Through the Custom Settings menu,
you can designate whether the bracketing sequence adjusts the exposure, the
flash, both flash and exposure, or white balance (described above). For an
exposure series, the camera doesn't automatically snap a series of images
with one press of the Shutter button. Instead, the exposure varies with each
subsequent press of the Shutter button, and an indicator on the top status
display panel reports where you are in the sequence. By pressing the Bracket
button and rotating the Command dial, you can set the number of images you'll
capture in the series. Pressing the Bracket button while turning the Sub-Command
dial sets the exposure increment each shot will vary by.
![]() On
a more mundane level, the D2H has a self-timer feature that allows you to
set the time interval anywhere from two to 20 seconds, activated by fully
pressing the Shutter button.
On
a more mundane level, the D2H has a self-timer feature that allows you to
set the time interval anywhere from two to 20 seconds, activated by fully
pressing the Shutter button.
An interesting feature is the Mirror-Up Mode (which replaces the Anti-Mirror
Shock mode on the D1H), accessed on the Drive dial. Mirror-Up raises the
mirror with the first press of the Shutter button, then captures the exposure
with a second press. The mirror is lowered automatically after the exposure.
(Obviously meant for times when the camera is on a tripod.) This mode allows
you to take images without worrying about extended shutter delay from an
arbitrary anti-vibration delay or any vibration from the mirror. The D2H
also offers image Sharpness, Tone Compensation (Contrast), Color Mode, and
Hue Adjustment options. The Sharpness setting has been expanded from the
D1H's offerings, and now includes Medium Low and Medium High options in addition
to the standard Auto, Normal, Low, High, and None settings. As with previous
camera models, the Tone Compensation option’s Custom setting allows
you to download a custom tone curve from your computer. (If no curve is downloaded,
the Custom setting defaults to the Normal setting.) The Hue adjustment offers
arbitrary adjustments from -9 to +9 degrees, set in three-degree increments.
Raising the Hue setting in the positive direction results in a stronger yellow
cast in the image, causing blues to shift toward neutral. Alternatively,
lowering the Hue setting to negative values introduces a blue cast, which
consequently shifts a yellow cast toward neutral. The Color Mode option allows
you to capture images in sRGB I or II, or Adobe RGB color. The first sRGB
setting is calibrated for portraits, while the second is better for nature
and landscape shots.
When reviewing images on the LCD monitor, you can pull up a histogram and
a highlight function to give you a complete readout on the exposure. This
is a useful tool to examine your exposure in the camera instead of waiting
to download images and then deciding to reshoot.
Continuous Shooting Mode
The D2H offers Low and High Speed Continuous Shooting modes, for capturing
rapid series of images. In Low Speed Continuous Shooting, the camera records
from approximately one to seven frames per second, for as long as the Shutter
button is held down. The actual frame rate and the number of shots in the
series is determined through the Custom Settings menu. High Speed Continuous
Shooting captures at a much faster rate, approximately eight frames per second.
Once the designated frame limit is reached, the camera won't record any more
photographs until at least one of the images is transferred from the buffer
memory to the memory card. Regardless of the set number of images in the
series, the amount of memory card space will ultimately limit the length
of the series if there's not enough room to store the number selected.
Voice Memo Mode
New on the D2H is a Voice Memo recording option, which lets you record
short sound clips up to 60 seconds to accompany captured images. You can set
the camera to automatically record voice memos after capture, or opt to manually
record memos by pressing and holding the Microphone button on the rear panel.
This can either be done immediately after capturing a photo, or can be done
whilst reviewing images at a later time.
Interval Shooting Mode
Another new feature on the D2H is Interval Shooting mode, which facilitates
time-lapse photography by taking a series of images at preset intervals. You
can set the starting and ending times for the series, as well as the amount
of time between shots and the total number of shots to be captured. This is
a good way to capture a timeline of slower events, such as clouds passing across
the sky, tidal changes, a flower opening, etc.
| What's up with RAW? | |
|
 Flash
Flash 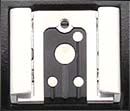 Like most professional SLRs, the D2H doesn't carry a built-in flash, but rather
is designed to work with external strobe systems, or Nikon Speedlights. The
camera features an external flash hot-shoe on its top panel, as well as a secondary
PC Sync socket on the front of the camera. The Flash button on top of the camera
accesses the five sync modes, which include Front Curtain Sync, Slow Sync, Rear
Curtain Sync / Slow Rear Curtain Sync (Aperture Priority and Program modes),
Red-Eye Reduction, and Red-Eye Reduction with Slow Sync. Just as these modes
sound, the camera times the flash exposure with either the opening or closing
of the shutter. Red-Eye Reduction simply means that a small pre-flash fires
before the full-strength flash to eliminate the effects of Red-Eye in portraits.
The Slow Sync setting times the flash with a slower shutter speed, which in
turn allows more ambient light into the frame.
Like most professional SLRs, the D2H doesn't carry a built-in flash, but rather
is designed to work with external strobe systems, or Nikon Speedlights. The
camera features an external flash hot-shoe on its top panel, as well as a secondary
PC Sync socket on the front of the camera. The Flash button on top of the camera
accesses the five sync modes, which include Front Curtain Sync, Slow Sync, Rear
Curtain Sync / Slow Rear Curtain Sync (Aperture Priority and Program modes),
Red-Eye Reduction, and Red-Eye Reduction with Slow Sync. Just as these modes
sound, the camera times the flash exposure with either the opening or closing
of the shutter. Red-Eye Reduction simply means that a small pre-flash fires
before the full-strength flash to eliminate the effects of Red-Eye in portraits.
The Slow Sync setting times the flash with a slower shutter speed, which in
turn allows more ambient light into the frame.The SB-800 Speedlight
Simultaneous with the announcement of the D2H, Nikon also announced an
all-new Speedlight, the new SB-800. By far the most advanced integrated flash
system announced by Nikon (or anyone else, for that matter) to date, the
SB-800 features "i-TTL" wireless through-the-lens flash exposure
control when used with the D2H. - While the SB-800 can be used with other
Nikon cameras, many of its groundbreaking features are only available when
coupled with the D2H. (Although we can expect that this is a new standard
for Nikon Speedlights, so future camera bodies will doubtless also support
the full range of SB-800 features.
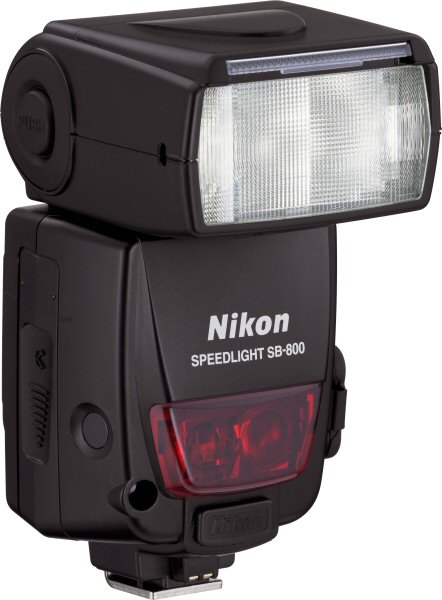
The new SB-800 offers a range of new features, including a new and highly advanced wireless control system by which multiple SB-800 speedlights can be controlled from a single master unit, with full wireless control over relative exposure levels between units, and full "i-TTL" through-the-lens metering. Other new features include a new Auto FP high-speed sync, flash color information communication for improved color accuracy, a flash value ("FV") exposure lock, and a new wide-area AF-assist illuminator that's tailor-made for the D2H's new 11-area Multi-Cam 2000 AF sensor unit.
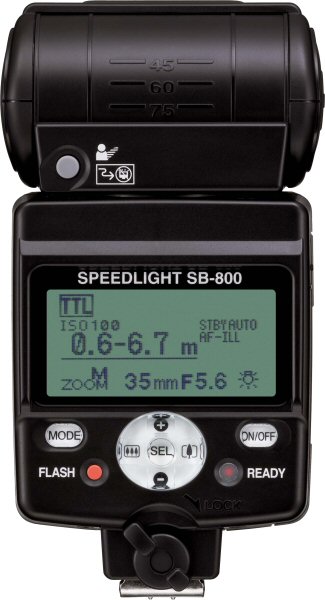
One of the most technologically impressive aspects of the SB-800 is its use of Nikon's new Advanced Data Communication system, which uses rapid pulses of the flash units during the pre-flash metering period to pass setup and exposure information between multiple units. With this system, you can control four independent sets of SB-800 speedlights wirelessly from the camera itself. (No more crawling/climbing around to set exposure levels on remote flash units!) The four groups consist of the speedlight attached to the camera (the master), and three separate sets of remote units, each of which can consist of any number of SB-800 units for the ultimate in lighting flexibility. Settings for each group of speedlights are made via the control panel and large LCD panel on the Master unit attached to the camera. It deserves repeating that all speedlights in all groups can operate in i-TTL mode for completely automatic flash exposures, including relative exposure differences dialed-in for each group from the Master controller. (You can also run different groups in different flash modes if you'd like, setting two groups to i-TTL, and another to Manual mode, for instance.)
When you press the shutter button, the Master fires each group of speedlights in turn, collecting exposure information via the camera's TTL metering system. This exposure information is then integrated, power levels are set for all groups, and the shutter and speedlights are fired for the exposure itself. If it sounds like there's a lot going on, it's because there is, but the whole process takes only as much time as does the normal pre-exposure metering flash from a conventional "smart" strobe unit.
It's hard to overstate how effortless the SB-800 makes multi-flash lashups. If you've ever had to climb up and down a ladder or crawl behind a set a few dozen times to get flash levels set properly, you'll immediately understand the benefit of being able to set the exposure levels for up to 3 groups of remote strobes, without leaving the camera.
Wireless TTL multi-flash functionality is only part of the story though, as the SB-800 offers a range of other new features as well. Here's a list, copied from Nikon's marketing materials:
It's no stretch to say that the SB-800 is by far the most impressive flash system I've seen to date. It makes wireless, TTL-metered, multi-flash photography not only possible but easy. I expect Nikon will sell SB-800DXs by the thousands, and quite likely more than a few D2H bodies as well, simply because the D2H is currently the only Nikon camera that takes full advantage of the SB-800DX's incredible capabilities. (Truth be told, I think that the SB-800DX is a more revolutionary development than the D2H itself, it promises to have a greater impact on photographer's creative capabilities. The D2H does much the same things that previous digital SLRs did, just faster. The SB-800 offers entirely new capabilities that are more than just refinements on those of previous systems.)
Shutter Lag / Cycle Times
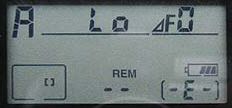
When you press the shutter release on a camera, there's usually a delay or
lag time before the shutter actually fires. This time allows the autofocus
and autoexposure mechanisms time to do their work and can amount to a fairly
long delay in some situations. Since this number is rarely reported on, and
can significantly affect the picture taking experience, I now routinely measure
it, using a custom test system I designed and constructed for the purpose.
|
|
||
| |
|
|
| Power On -> First shot | |
Startup is very fast. Given how the on-switch of the D2H works, it was difficult to insure that I started the timing exactly as the power switch was activated. As a result, the standard deviation of the startup times I measured was fully 22% of the average shown at right. Regardless of this though the D2H is clearly the fastest-starting camera I've tested to date. |
| Shutdown | |
There's no lens to retract as with many consumer-level cameras, so "shutdown" from quiescent state is nothing more than turning the power switch off. Depending on memory card speed, the number of shots in the buffer, and the speed of the memory card though, it could take as long as two minutes for the camera to finish writing to the memory card. |
| Play to Record, first shot | |
The D2H is a "shooting priority" camera, meaning that it's basically always ready to shoot. The time shown at left is the delay between pressing the shutter button when the camera is in playback mode, and it actually capturing the shot. Extremely fast. |
| Record to play (max res) | |
Time for a large/fine image to appear on the rear-panel LCD, after pressing the playback button. Very fast. |
| Shutter lag, full autofocus | |
Shutter lag in full autofocus mode will depend a fair bit on the lens being used. These numbers therefore only indicate a range that you might expect. The shortest time shown was measured with the 12-24mm wide-angle zoom lens set to the 12mm focal length. The longest time shown was measured with the 105mm f/2.8 macro lens attached. (The shortest time here is very, very fast.) |
| Shutter lag, manual focus | |
Very, very fast, the shortest manual-focus shutter lag I've measured to date. (Essentially the same as the extremely fast shutter lag shown below for the prefocused test condition.) |
| Shutter lag, prefocus | |
Very, very fast, the shortest prefocused shutter lag I've measured to date. |
| Cycle time, large/fine files | |
Extremely fast, the camera could capture images about as fast as my finger could press the shutter button. Also, the camera captured a huge number of shots before slowing. (Way more than the 20-40 shot buffer would suggest, as the camera/flash card combination evidently kept up with the shooting rate pretty well.) |
| Cycle time, small/basic files | |
The same as above, my finger wasn't any faster than the camera. |
| Cycle time, TIFF/NEF files | |
Extremely fast, the camera didn't slow to the ~11 second/frame rate until I'd shot 25 images. Buffer clearing times are really long in this mode though, fully 248 seconds with a fast Lexar 40x CF card. |
| High-Speed Continuous mode, all file formats | (8.03 fps) |
No question about it, the D2H is blazingly fast in continuous mode! It achieves this frame rate in all modes and file formats, the only difference being in how long it takes the buffer to clear. Buffer-clear times are 248 seconds with the TIFF file format, 46.7 seconds with uncompressed NEF, 31.8 with compressed NEF, and 27.5 with large/fine JPEG. (All times were measured with a 4 GB, 40x Lexar memory card, slower cards would result in proportionately longer clearing times. |
Any way you slice it, the D2H is a blazingly fast camera. Shutter lag is the fastest I've measured on any camera to date, at an astonishing ~45 milliseconds (0.045 seconds). Cycle times are equally amazing, at roughly 0.25 seconds in single-shot mode, and 0.124 seconds in high-speed continuous mode. The camera also has an unusually deep buffer, with a capacity that ranges from 24 to 40 frames, depending on the file format selected. The camera also takes good advantage of fast memory cards like the 4 gigabyte(!) 40x Lexar card the performance numbers above are based on. (Just for comparison's sake, while the D2H emptied a full buffer of uncompressed NEF files to the 40x Lexar card in 46.7 seconds, it took fully 140 seconds for it to dump a full buffer to an old, slow 1GB card by another manufacturer. - The speedup of the 40x card is clearly nowhere near a full 40x in this case, due to the time required for the camera itself to process the images, but the difference is dramatic enough that you'll certainly want to use seriously fast memory card with the D2H.)
Operation and User Interface
Though some of the control buttons have moved around and a few new ones have
been added, I found the user interface on the D2H surprisingly straightforward
and simple to use, even more so than I did the earlier D1H model. The addition
of a few external control buttons makes it faster to access some of the camera's
settings. The LCD menu is a four-tab system that divides up functions between
Playback, Camera, Custom Settings, and Set-up. Nikon greatly simplified the
Custom Settings menu on the D2H, eliminating the more cryptic numeric designations
and implementing a color coded system that divides the settings between common
themes such as "Metering/Exposure" and "Shooting/Display."
While many of the camera's options can be accessed via the excellent "plain
English" menu system, all the most common shooting controls are available
via the camera's external buttons and knobs. You can also program the operation
of some of the buttons, to configure the camera for your particular shooting
requirements. As I noted earlier, Nikon makes a big deal of their digital
SLR's "cameraness," defined as how well/easily they function as
cameras. The D2H definitely fits this mold, with an intuitive control layout
that's quick to learn, once you get the gist of things, and that's arguably
the fastest and most intuitive I've had the pleasure to use.
Control Enumeration

Depth of Field Preview Button: Located on the front of the camera,
on the top left side (viewed from the front) next to the lens, this button
allows you to check the depth of field for the current aperture setting by
looking through the viewfinder, which provides an approximate idea of the
depth of field. Note that since less light can enter through the smaller
aperture, the viewfinder becomes correspondingly dimmer whilst the Depth
of Field Preview button is pressed.

Function Button: Beneath the Depth of Field Preview button,
this button can be programmed through the Custom Settings menu to control
a variety of exposure options, including Flash Value Lock, Flash Value Lock
/ Lens Data, One Stop Speed / Aperture, AE Lock / AF Lock, Flash Off, Bracketing
Burst, Matrix Metering, Center-Weighted Metering, and Spot Metering.

Lens Release Button: Also on the front of the camera, on the right
side next to the lens, this button releases the lens from its mount when
pressed. This button was enlarged slightly from the D1H model, making it
more comfortable to access.

Focus Mode Selector Switch: Beneath the Lens Release button,
this switch sets the focus mode to Manual, Single Servo AF, or Continuous
Servo AF.
![]()
Sub-Command Dial: Positioned at the top front of the hand grip, just
beneath the Power switch, this dial is used for selecting secondary values
in many operating modes and menus. The dial also adjusts the aperture in
Aperture Priority and Manual exposure modes, and selects from a range of
equivalent exposure settings in Flexible Program mode.
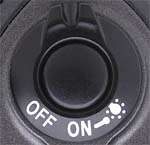
Power Switch: Encircling the Shutter button on the top right of the
camera, this switch turns the camera on and off. By turning it slightly past
the "On" position to the "Light Bulb" icon, it also turns
on the backlights for both status display panels (on top and on the back
panel) when shooting in dark situations. The switch is spring-loaded to return
itself to the "On" position after turning on the backlights, which
will remain on while the exposure meter is active (that is, for a few seconds
after a half-press of the shutter button), or until the shutter is released.
Shutter Button (see image above): In the center of the Power switch,
on the top of the camera, this button sets exposure and focus when halfway
pressed and fires the shutter when fully pressed.
![]()
Exposure Compensation Button: Directly behind the Shutter button on
the top of the camera, this button sets the Exposure Compensation from –5
to +5 exposure equivalents (EV) in one-third, one-half, or one-step increments
when pressed while turning the main Command dial.
![]()
Exposure Mode / Format Button: Just to the left of the Exposure Compensation
button, pressing this button while turning the main Command dial sets the
exposure mode (Program AE, Manual, Aperture Priority, or Shutter Speed Priority).
In any mode, pressing this button simultaneously with the Erase button (also
labeled Format) for two seconds, then releasing both buttons momentarily
and re-pressing them formats the memory card.
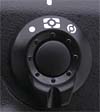
Metering Selector: To the left of the Exposure Mode / Format button
on top of the camera (actually on the side of the bulky flash hot-shoe mount),
this selector ring surrounds a small black button. Pressing the button and
turning the ring allows you to select between Spot, Center-Weighted, and
Color Matrix / 3D Color Matrix metering options.

Diopter Adjustment Knob: Directly behind the metering selector, this
knob adjusts the optical viewfinder to accommodate eyeglass wearers. (Range
is -3 to +1 DP.)
![]()
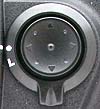
Mode Dial Lock Release: On the top left side of the camera (when looking
at the back), next to the Mode dial, this button releases the Mode dial to
select the camera mode.
Mode Dial: Underneath a set of control buttons on the left side of
the top panel, this notched dial selects between Single Frame, Continuous
Low-Speed Shooting, Continuous High-Speed Shooting, Self-Timer, and Mirror-Up
modes.
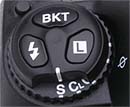
Auto Bracketing Button: (See photo of Mode dial above. The Auto Bracket
button is the one labeled "BKT".) Positioned on the top of the
Mode dial and next to the Flash and Command Lock buttons, this button turns
on the Auto Bracketing function and sets the number of frames when pressed
while turning the main Command dial. Pressing this button and turning the
Sub-Command dial sets the exposure or white balance step size (in EV for
exposure, or Mireds for white balance).
Flash Sync Mode Button: (See photo of Mode dial above. Flash sync
button is the one with a lightning bolt icon on it.) Behind the Auto Bracketing
button, this button cycles between the five flash sync modes (Front-Curtain
Sync, Slow-Sync, Rear-Curtain Sync / Slow Rear Curtain Sync, Red-Eye Reduction,
and Red-Eye Reduction with Slow-Sync) when held down while turning the main
Command dial.
Command Lock Button: (See photo of Mode dial above. Command
Lock is the button with the L inside a white square.) This button locks either
the aperture or shutter speed setting in Aperture Priority and Shutter Priority
exposure modes, when pressed while turning the Sub-Command dial. You can
also lock one value or the other in Manual exposure mode.
![]()
Playback Button: Situated at the top left side of the back panel,
this button activates the LCD monitor and displays the most recently-captured
image.
![]()
Erase / Format Button: To the right of the Playback button, this button
deletes individual images. When pressed in conjunction with the Mode button
for two seconds, then released and both buttons pressed once more, this button
formats the CompactFlash card.

Eyepiece Shutter Lever: Nestled above the left side of the optical
viewfinder, this lever opens and closes the shutter that covers the viewfinder
eyepiece for accurate exposures when using a tripod. (e.g., when your eye
isn't blocking light from entering the rear element of the viewfinder.)

AE/AF Lock Button: Located on the top right side of the back panel,
this button locks the exposure and/or focus when pressed (can be set through
the Custom Settings menu to lock one or the other, or both).
AF-On Button: (see image above) To the right of the AE/AF Lock button,
this button sets the autofocus when pressed (performs the same function as
halfway pressing the Shutter button).
![]()
Main Command Dial: The final control on the top right of the back
panel, this dial is used to select various camera settings when turned in
conjunction with a number of control buttons. In Aperture Priority and Shutter
Speed Priority modes, this dial sets either the aperture or shutter speed
settings. In Manual exposure mode, the dial sets the shutter speed.
Focus Area Selector and Lock / Four-Way Arrow Rocker Pad: Beneath
the Command dial, on the right side of the back panel, this rocker button
with its associated locking switch controls the autofocus area in Record
mode. The switch unlocks the autofocus area and the four arrow buttons let
you decide where to set the main autofocus area (by choosing one of the 11
brackets displayed in the viewfinder). In Playback mode, the rocker toggle
button's up and down arrows scroll through captured images while the right
and left arrow buttons cycle through various information displays for each
image. The arrow buttons also navigate through the LCD menu system.

AF Area Mode Selector: Below the Four-Way Arrow Rocker pad,
this selector sets the AF area mode to Single Area, Dynamic Area, Group Dynamic,
or Dynamic Area AF with Closest Subject Priority.
![]()
 Voice
Memo Button: Below the lower left corner of the LCD monitor, this
button lets you record as many as 60 seconds of sound to accompany a captured
image. The camera records as long as the button is held down.
Voice
Memo Button: Below the lower left corner of the LCD monitor, this
button lets you record as many as 60 seconds of sound to accompany a captured
image. The camera records as long as the button is held down.

Menu Button: The first button in a series lining the left side of
the LCD monitor, this button calls up the LCD menu system.

Thumbnail Button: Below the Menu button, this button pulls up an index display of either four or nine images when pressed while turning the Command dial. When an index display is active, you can move through your images a page at a time by holding the Thumbnail button and turning the Sub-Command dial.

Protect Button: Below the Index button, this button write-protects individual images from accidental deletion (except through card formatting). Pressing this button also removes protection.

Enter / Playback Zoom Button: The final button in the series on the left side of the LCD monitor, this button confirms menu settings in any menu. When a captured image is displayed on the LCD monitor, this button enlarges the image when pressed while turning the Sub-Command dial. Pressing this button while turning the main Command dial shows the full frame with an outline box indicating the area that was enlarged. (You can use the Four-Way Arrow pad to move the selection area and then zoom back in.)

ISO Button: The first button in a series lining the lower side of a smaller status display panel (directly beneath the LCD monitor), this button changes the camera’s sensitivity setting (ISO equivalent) when pressed while turning the Command dial.

Quality Button: To the right of the ISO button, this button
sets the image resolution and quality. Pressing this button and turning the
Command dial adjusts the quality setting, while turning the Sub-Command dial
adjusts the resolution.

White Balance Button: Directly to the right of the Quality button,
this button selects the White Balance setting when pressed while turning
the main Command dial. Options are Auto, Incandescent, Fluorescent, Direct
Sunlight, Flash, Cloudy, Shade, Color Temperature, and Preset (which allows
you to manually adjust the white value by using a white card or object as
a reference point). All white balance settings (except Color Temperature
and Preset) can be adjusted from -3 to +3 by turning the Sub-Command dial
(on the front of the hand grip) while holding down the White Balance button
Card Slot Release Button: Hidden beneath a plastic flap on the back
panel, just below the Four-Way Arrow Rocker pad, this button releases the
CompactFlash card slot cover so that the card can be removed. (Sorry, no
photo of this button.)

Vertical AF-ON Button: Hidden on the bottom right of the back panel,
this button serves the same purpose as the main AF-ON button, but is used
when shooting vertically.
Vertical Command Dial: (see image above) Directly beside the vertical
AF-ON button on the lower right corner of the back panel, this dial serves
the same purpose as the main Command dial but is used when shooting vertically.

Vertical Shutter Release Button and Lock: Located on the bottom of
the right side of the camera (when looking at the back panel), this locking
Shutter button can be used when shooting vertically. The rotating lock ring
keeps it from accidentally firing when shooting normally.
Camera Modes and Menus
Playback Mode: Accessed by pressing the Playback button, this mode
allows you to review captured images, as well as delete or protect them and
set them up for printing.
Record Mode: The camera is automatically in Record mode whenever it's
powered on (when reviewing images, touching the shutter button immediately
readies the camera to shoot a photo). The following exposure modes are available
here (accessed by pressing the Mode button and turning the main Command dial):
LCD Menu System: The following menus are available in any camera mode,
and are called up by pressing the Menu button.
Playback Menu:
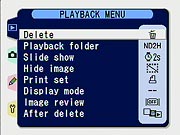 Delete:
Deletes selected images or all images from the memory card.
Delete:
Deletes selected images or all images from the memory card.
Shooting Menu:
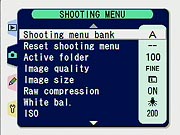 Shooting
Menu Bank: Lets you select from four banks of shooting menu
options, meaning you can create up to four custom user settings. You
can also choose to rename a menu bank for easy identification. Menu
bank names are alphanumeric, allow upper and lower case characters,
and can be up to 20 characters long.
Shooting
Menu Bank: Lets you select from four banks of shooting menu
options, meaning you can create up to four custom user settings. You
can also choose to rename a menu bank for easy identification. Menu
bank names are alphanumeric, allow upper and lower case characters,
and can be up to 20 characters long.
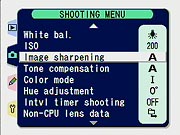 Image
Sharpening: Controls the level of in-camera sharpening applied
to captured images. Options are Auto, Normal, Low, Medium Low, Medium
High, High, and None.
Image
Sharpening: Controls the level of in-camera sharpening applied
to captured images. Options are Auto, Normal, Low, Medium Low, Medium
High, High, and None.
Custom Settings Menu:
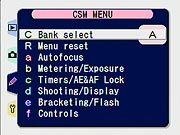 Each option accesses a sub-menu of color-coded and numbered options pertaining
to a specific subject. The initial screen (shown at right) provides an index
into the various groups of sub-menus. Once you're into the second level of
the menu system though, you can scroll smoothly through all the entries,
regardless of what group they belong to. The color-coding seen in the index
screen carries through to the various individual options, making it easy
to know where you are in the menu structure at all times. In the description
of the various functions below, I've inserted a screen shot corresponding
to each of the major menu sections.
Each option accesses a sub-menu of color-coded and numbered options pertaining
to a specific subject. The initial screen (shown at right) provides an index
into the various groups of sub-menus. Once you're into the second level of
the menu system though, you can scroll smoothly through all the entries,
regardless of what group they belong to. The color-coding seen in the index
screen carries through to the various individual options, making it easy
to know where you are in the menu structure at all times. In the description
of the various functions below, I've inserted a screen shot corresponding
to each of the major menu sections.
 Autofocus:
 Metering
/ Exposure:
Metering
/ Exposure:
 Timers
/ AE&AF Lock:
Timers
/ AE&AF Lock:
 Shooting
/ Display:
Shooting
/ Display:
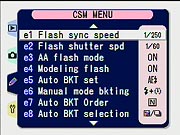 Bracketing
/ Flash:
Bracketing
/ Flash:
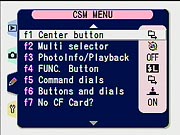 Controls:
Setup Menu:
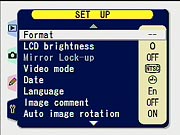 Format:
Formats the memory card, erasing all images on the card, even write-protected
ones.
Format:
Formats the memory card, erasing all images on the card, even write-protected
ones.
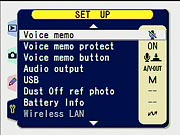 Voice
Memo: Determines whether the Voice Memo option automatically
enables after each image, or only when the Voice Memo button is pressed.
Voice
Memo: Determines whether the Voice Memo option automatically
enables after each image, or only when the Voice Memo button is pressed.
 Audio
Output: Determines whether audio plays through the camera's
speaker, or via an A/V connection to a television set. You can also
turn this function off.
Audio
Output: Determines whether audio plays through the camera's
speaker, or via an A/V connection to a television set. You can also
turn this function off.
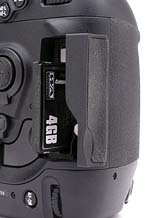 Image
Storage and Interface
Image
Storage and Interface
The D2H uses CompactFlash memory cards for image storage, accommodating Type
I and II sizes, as well as Microdrives. The D2H does not come with a memory
card, so plan on purchasing one (or several) separately. As with the original
D1, D1X, and D1H, I was pleased to find the CompactFlash slot very accessible,
letting me quickly change the card while the camera was mounted on a tripod.
The D2H utilizes a folder arrangement that allows users to organize images
in the camera and a sequential frame counter option to avoid problems with
overwriting files when copying them to the computer. It also supports the
FAT32 file system, and so is not hindered by the 2GB limit of FAT16-based
cameras (a significant point if you want to be able to use the really large
flash cards that are now on the market).
Captured images can be individually write-protected via the Protect button
on the rear panel. Write-protected files are only immune to accidental deletion,
not card reformatting. Images are saved at either 2,464 x 1,632 or 1,840
x 1,224 pixels. File formats include several levels of compressed JPEG files
as well as RGB TIFF and RAW data modes. The "raw" file format stores
the data exactly as it comes from the CCD array, either compressed or uncompressed.
Since the "raw" format is proprietary though, it can only be processed
by programs that specifically support it (unlike JPEG files which almost
any program will accept). Nikon's provides its own Nikon View software which
has basic raw conversion capabilities, and offers the more advanced "Nikon
Capture" software as another option. It is likely that Mike Chaney's
Qimage
or Eric Hyman's Bibble
will also offer support for the D2H in future versions since they currently
support other Nikon cameras. Finally, commercial software like Phase One's
Capture One (C1) and
Adobe's Photoshop
CS that supports other Nikon RAW files may also support the D2H in future
versions. The compressed RAW format is a "lossless" compression,
making it difficult to determine the actual amount of compression being used,
since the actual amount of compression will depend heavily on the characteristics
of each image.
Below are the approximate number of images and their compression ratios for
a 256MB CompactFlash card, that really being about the smallest card size
I can see anyone using with this camera. (Think about it, 100 images is only
about 12 seconds at 8 frames per second.)
| Resolution/Quality vs Image Capacity | |
1,840 x 1,224 Resolution |
||||
|
|
|
Compression |
Images | Approx. File Size |
Approx. Compression |
|
| HI RAW data (Uncompressed) | |
|
(relative to TIFF) |
n/a | n/a | n/a |
| HI RAW data (Compressed) | (Varies) |
(Varies) |
(Varies) |
n/a | n/a | n/a |
| HI RGB TIFF | |
|
|
37 | 6.8 MB | 1:1 |
| Fine Quality | |
|
|
195 | 1.3 MB | 5:1 |
| Normal Quality | |
|
|
356 | 719 KB | 9:1 |
| Basic Quality | |
|
|
653 | 392 KB | 17:1 |
The D2H also offers a RAW + JPEG recording mode, but I haven't shown the sizes
above, as the space used will just be the combination of that required for
the RAW and JPEG files of each corresponding size.
The D2H connects to a host computer via a USB v2.0 port. Connecting the D2H
to my main Windows XP workstation (a Sony VAIO, powered by a 2.4 GHz PIV
chip), I clocked the D2H's download speed at an amazing 2.6 Megabyte/second.
This is very fast, although I should hasten to point out that you'll
need a fast card to get this sort of performance. In the case cited above,
I was using a 4GB/40x speed-rated Lexar card.
 Video Out
The D2H comes with an A/V cable for connection to a television set or VCR,
and the video signal can be set to NTSC or PAL (at a slightly reduced resolution)
through the LCD menu. This allows images to be played back on the TV screen
and recorded to video tape, with all the menu options available.
 Power
Power
The D2H uses an EN-EL4 lithium-ion battery pack that communicates
a variety of information to the camera. Both a battery and charger come with
the camera. You can also purchase an EH-6 AC adapter separately (100-240
V AC) which is useful for saving battery power when working in the studio,
or performing mundane tasks such as reviewing or downloading large numbers
of images. An indicator on the status display panel lets you know approximately
how much battery power is left and if no segments appear in the indicator
at all, the battery is completely exhausted. (You can also view battery details
through the Set-Up menu.)
 The camera can also be run on mains power through a DC IN terminal located
under a rubber cover on the left side of the camera. The battery pack is
held in the camera by a latching cover that's normally attached to the battery
itself, but which can be removed, making the battery fit into an equipment
bag pocket more easily. In addition to the primary battery pack, there's
also a small Lithium coin cell located in the top of the main battery compartment.
(The coin cell apparently does nothing more than provide backup power to
preserve camera settings and date/time data when the main battery is removed,
so it should last more or less indefinitely.)
The camera can also be run on mains power through a DC IN terminal located
under a rubber cover on the left side of the camera. The battery pack is
held in the camera by a latching cover that's normally attached to the battery
itself, but which can be removed, making the battery fit into an equipment
bag pocket more easily. In addition to the primary battery pack, there's
also a small Lithium coin cell located in the top of the main battery compartment.
(The coin cell apparently does nothing more than provide backup power to
preserve camera settings and date/time data when the main battery is removed,
so it should last more or less indefinitely.)
The special connections used between the D2H and EN-EL4 battery pack prevented
me from performing my usual power-consumption measurements on the D2H, so
I can't offer the sort of detailed power data I usually include here. I can
give a general verdict based on my own experience with the camera though,
based on having taken over a thousand shots with a prototype model at Nikon's
"Gravity Games" press event, as well as at least that many shots
captured while testing the prototype. The bottom line was that the D2H's
battery pack still showed more than 50% charge remaining after over a thousand
shots, including fairly heavy use of the rear-panel LCD. Based on this experience,
I'd say that Nikon's claim of 2900 shots per battery charge are entirely
reasonable - definitely what I would refer to as excellent battery life!
While I usually strongly recommend purchasing a spare battery pack anytime
you buy a digital camera, the D2H's battery life is so exceptional that I'll
waive my usual recommendation. (Do note though, that low temperatures can
significantly reduce battery capacity, so you may want to consider buying
a spare battery if you anticipate much cold-weather shooting.)
Included Software
The D2H ships with the "Nikon View" software, which provides basic
manipulation and cataloging capabilities for images captured by the camera,
and which can interpret the raw CCD format "NEF" files. A much
more advanced package called Nikon Capture is available separately, but I
didn't receive a copy of it for testing. Users will also want to check out
the third-party shareware applications Qimage
and Bibble as well as commercial
software like Phase One's Capture
One (C1) and Adobe's Photoshop
CS - all of which may offer support for the D2H in future versions since
they currently support other Nikon cameras.
In the Box
Included in the box with the D2H are the following items:
Test Results: Overview
This is going to be a somewhat more involved "test results"
section. As always, check out the D2H's Sample Pictures
page for a detailed look at the standardized test photos I shot with
the D2H. - And also be sure to check out the Gallery
page for a set of random photos (that is, less boring, non-standardized
ones), including shots captured by pro photographers Gibbs Frazeur and Stanley
Leary at local college sporting events.
Given the furor that was raised over early sample images from the D2H though,
I'm going to look at issues of image noise, color rendition, and resolution
in quite a bit more depth than usual. Regular readers will recall that I
and a number of other journalists had an opportunity to shoot with what were
supposed to be late-model preproduction samples of the D2H. I unfortunately
was the first to post sample photos from that shoot. - I say "unfortunately,"
because Nikon subsequently determined that those cameras had image-quality
problems, particularly in the area of image noise, and therefore asked me
to take down the images I'd posted. (By that time though, something on the
order of 100,000 people had read my preview and downloaded multiple image
files, putting my bandwidth costs through the roof for the month.) Rob Galbraith
later discovered that at least part of the problem appeared to be caused
by the prototype cameras shooting at higher ISO levels than indicated: A
setting of ISO 800 on the preproduction cameras apparently corresponded to
an actual ISO level closer to 1250. (Read Rob's comments on his experience
with the D2H to date here.)
Rob and others attributed the noise levels seen in the preproduction samples
of the D2H to largely be the result of the errant ISO settings, and I'm sure
it was at least a contributing factor.
Upon close examination though, it's now clear that false ISO readings accounted
for only part of the elevated image noise, and in fact, the photos Nikon
had me pull down may actually have been more fairly representative of production-model
noise levels than was supposed. (Rob Galbraith has also come to the conclusion
that the D2H has a noise problem, calling noise levels in the midrange of
ISOs from 400-640 "unacceptable" in an update to his article,
dated 12/9/2003.) Given the level of foment that has come to surround the
D2H's image noise levels, I wanted to take particular pains to be as carefully
analytic in my approach to it as possible, so there'd be no question of the
objective validity of my results. There also appear to be issues with the
D2H's color, particularly when the ISO is cranked up. - So I've likewise
devoted a fair bit of attention to that parameter as well. Finally, in their
presentations to the journalists at the D2H rollout event, Nikon seemed to
make a particular point about the D2H's resolution, suggesting that characteristics
of the LBCAST sensor would translate into greater ability to resolve fine
detail than conventional technologies. I therefore expended a bit more effort
in the resolution/detail area as well. (Happily, there are no negative results
to report in the resolution area, but there also don't seem to be any anomalously
positive ones either: The D2H behaves very much as a 4.1 megapixel camera,
delivering very equivalent resolution to competing models with similar pixel
counts.)
So, on the next few pages, we'll take a closer look at the D2H's noise, color,
and resolution characteristics, followed by a brief summary of other camera
characteristics I commonly comment on.
Test Results: Luminance Noise
(More than anyone probably wanted to know about image
noise in the D2H... ;-)
Thanks to some prototype D2H evaluation units that apparently had improperly set ISO sensitivities, early results seemed to show that the D2H had much higher image noise than expected. (Credit is due to Rob Galbraith of www.robgalbraith.com for discovering and reporting this ISO error.) A good part of the surprise over the noise levels was due to Nikon's claims of exceptionally low noise for the LBCAST sensor, leading all of us who had hands-on with the early units to expect something fairly remarkable from the camera. Since then, the production units (on which this review is based) have had their ISO values adjusted to accurately match standards, and Nikon has subsequently refined their claims for low noise from the LBCAST technology to refer to only long exposure times. (The primary noise-related benefit of the LBCAST sensor design is in the form of significantly reduced "dark current.")
As noted earlier though, it does appear that, apart from the effect of the poor ISO calibration of the preproduction cameras, the images I posted earlier that were shot with one were not that far off the mark relative to noise levels we now see in full production models. Given the level of interest and dismay over the high noise levels of the early units, I took particular pains to examine the noise performance of the D2H relative to it's only real competitor in the marketplace, the Canon EOS-1D.
In the following charts, I was careful to compare shots from the two cameras captured under identical conditions, with exposures matched as closely as possible, subject only to variations in the two cameras tone curves. Given that the biggest benefit of Nikon's LBCAST sensor technology should be in low-light shooting, I compared noise levels at very low light levels, as well as at much brighter ones.
A word about the charts below: There are two ways you can quantify luminance
noise in images, either as absolute variations in brightness units (usually
assuming a scale stretching from 0 to 255), or as the magnitude of those
variations relative to the tonal value of the subject. The latter approach
recognizes that a variation of five brightness units will be much more obvious
when the subject's average brightness is only 60 units than it would be were
the average brightness 250 units. Both methods generally use the standard
deviation of the luminance signal across a uniformly illuminated smooth color
patch as the fundamental measurement of "noise." I've chosen the
latter approach in most of my charts and graphs here, expressing noise as
a percentage of the average luminance of the target swatch being measured.
(In some later charts that plot noise levels vs luminance, I've shown noise
levels in absolute brightness units, because I felt that the resulting graphs
showed the relative performance of the two cameras more clearly, given that
the x-axis was itself using brightness units as the metric.)
Test Conditions
As noted, I shot under two light conditions, the first being a relatively high
level of illumination, producing exposure times of roughly 1/100 second at
f/8 and ISO 200. This corresponds to an EV level of roughly 10.6 at ISO 100.
(EV is a relative expression of light levels, tied to the ISO being used.
While relative, it has become a common way of specifying absolute light levels,
when referenced to ISO 100. Hence my usage above, even though none of the
images in this test were actually shot at ISO 100.) This is nowhere near
the brightness of direct sun, which is typically in the range of EV 15-16,
depending on time of year and weather conditions, but is quite a bit brighter
than the typical indoor sports venue. The second shooting condition was at
a very low light level, of 1/16 foot-candle, requiring an exposure of roughly
20 seconds at f/2.8 and ISO 200. While I'm sure there'll be plenty of times
when a photojournalist will need to shoot under conditions even darker than
this, I think the 1/16 foot-candle condition will prove to be darker than
99% of the conditions most D2H shooters will need to be concerned with.
All of these shots were captured in the studio, at an ambient temperature
of about 70-72 degrees F, and the cameras had been turned off for quite a
while before shooting began. (So internal temperatures thus should have been
quite close to the room ambient.) Shots taken at higher temperatures will
show higher noise levels, while those taken at lower temperatures will show
lower noise levels.
Single Shot vs High Speed
Richard LoPinto of Nikon alerted me to the possibility of variations in noise
performance as function of shooting speed, which given my background in electrical
engineering certainly made sense: With the camera firing continuously at
8fps, it would certainly be reasonable to expect more electrical noise in
the system, what with the shutter and mirror solenoids blasting away, and
the system as a whole cranking along at maximum throughput. Accordingly,
in addition to noise measurements of images captured one at a time, I also
looked at noise levels in images captured at full speed. To allow time for
maximum electronic chaos to develop, I selected the fourth image in a rapid-fire
series, shot under the "daylight" lighting condition. (Obviously,
rapid-fire shooting isn't an option under low-light conditions.) See below
for the results, but I was surprised to find very little difference relative
to the single-shot numbers, and in some cases, even found lower image
noise in the high-speed tests.
Noise as a function of subject color
I've found in the past that some cameras would show reasonably good noise performance with neutral tones (that is, shades of gray), but had more or less difficulty with particular portions of the color spectrum. (The most notable example was the original Sigma SD9, which showed fairly low noise levels on the neutral swatches of the MacBeth (tm) target I use for these tests, but which exhibited very high noise levels in reds.)
Accordingly, I decided to begin with a look at how the noise varied as a function of subject color with the two cameras in question. The chart below shows the luminance noise I measured in the primary color swatches of the MacBeth target, as well as in the "middle" gray patch, adjacent to the yellow block.
I should point out that, while the data here is interesting and does reveal some general tendencies, it doesn't cleanly isolate the variation of noise with color. - The problem is that the overall reflectance of the different color swatches varies quite a bit, with the red and blue swatches in particular being a good bit darker than the others. Given that the noise levels of the two cameras is a fairly strong function of luminance (darker swatches showing higher noise, even in neutrals), the peaks seen below in the red and blue hues may be less real than apparent. The chart isn't entirely useless though, as it does still serve to highlight the differences between the two cameras, since both of them respond more or less similarly to the variations in subject brightness between the various color swatches. In particular, the EOS-1D actually rendered the red swatch quite a bit darker than does the D2H, yet still managed to deliver a lower noise level, both in absolute and relative terms. (In fact, in all cases except the cyan and blue swatches, the 1D is dealing with a lower overall signal level than the D2H, so the results below should generally favor the D2H slightly.)
The overall result is that the 1D shows slightly lower noise overall, and significantly lower noise in some colors. The key to take away from this particular test though, is that the two cameras perform more or less similarly, and that the differences between them more or less reflect their performance on neutral tones. - From this, we can conclude that it's reasonable to focus primarily on noise performance in neutral tones for our subsequent tests, which is what we'll do.
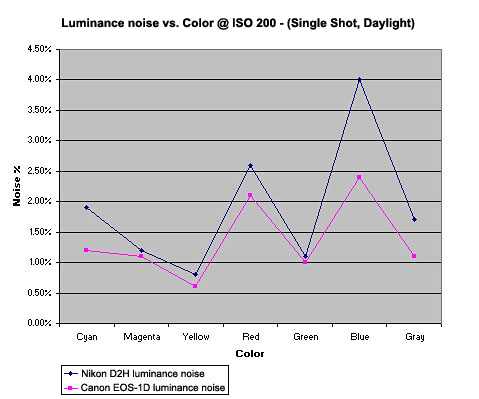
The most obvious basis of noise evaluation (and the only one that's usually
discussed), is how cameras' noise characteristics vary as a function of ISO,
as determined by noise levels in neutral grays. As noted, given that the
noise levels of the two cameras we're considering here more or less track
each other across the spectrum, it seems valid to concentrate primarily on
neutral tones in evaluating their noise performance as a function of ISO
rating.
The chart below shows image noise levels in neutral grays as a function of
ISO, for test images shot under the "daylight" conditions described
above. To avoid problems due to the inherent variation in noise level as
a function of subject luminance, the exposures for the two cameras were adjusted
to produce luminance levels for the middle gray swatch of the MacBeth chart
that were as constant as possible across all samples. I couldn't get them
exactly identical, given that the exposure levels of the two cameras could
only be adjusted in steps of 1/3 EV, but the luminance levels of the specific
gray swatch used are within plus or minus a few percent of each other, close
enough that the second-order dependence of noise on luminance can be ignored
for our purposes.
It's interesting to note here that the D2H starts out at ISO 200 with somewhat
higher noise than the EOS-1D, but the 1D's noise levels climb more rapidly
with increasing ISO. The two curves cross each other at ISO 800, with the
D2H delivering significantly better noise performance at ISO 3200. (Oddly,
the D2H's image noise at ISO 400 shows here as being slightly lower than
it is at ISO 200. This could be a statistical fluke, as I didn't have the
time for the laborious process that would be required to generate error bars
for these charts. Or, it could be a consequence of how Nikon changes their
image processing with increasing ISO. - See my discussion later regarding
color saturation vs ISO level.)
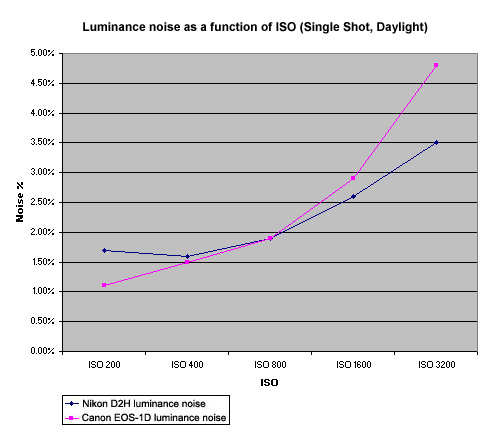
As noted earlier, Nikon themselves pointed out to me that image noise performance
could well be different when a camera was firing at full speed than it was
in single-shot mode. Accordingly, the chart below shows the same noise-vs-ISO
results as above, only this time measured from images captured by both cameras
running at their full 8 frames/second maximum frame rate. As previously discussed,
I chose the fourth image from each full-speed series to analyze, to give
a result that would be truly representative of shots captured as part of
long sequences.
The behavior of the two cameras in this test was similar to that in the single-shot
test, but with the odd result that the EOS-1D showed slightly less image
noise at low ISOs when shooting at high speed. (The D2H also showed slightly
lower image noise at ISO200, but the effect wasn't as pronounced as it was
with the 1D.) I'm not sure of the reason for this, but I checked my measurements
several times, and the effect does appear to be real.

The area in which Nikon's LBCAST sensor technology is supposed to make the
biggest difference is in so-called "dark current", the leakage
of charge into the sensor wells when no light is falling on the chip. This
is by far the dominant noise effect in most cameras when shooting under low
light conditions, so it's there that you'd expect to see the biggest improvement
from the LBCAST sensor in the D2H.
As it turns out, this is emphatically the case, especially at lower ISO levels.
At ISO 200, the chart below shows that the D2H's noise levels were only about
a third of those of the EOS-1D. The two cameras again tracked each other
fairly closely as the ISO was increased, but the relative difference between
the two decreased very slightly as I went to higher ISO settings.
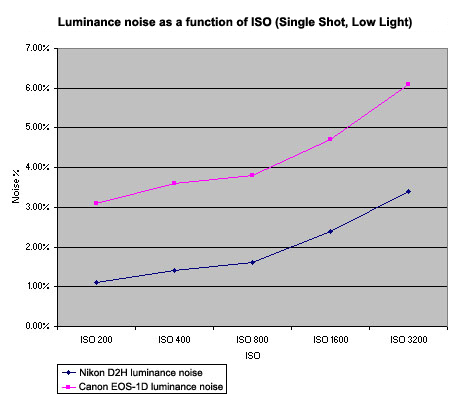
Image Noise: Visual Appearance
Of course, plots of the standard deviation of luminance only tell part
of the story: They say nothing of what the noise looks like in
the images themselves. Noise can be coarse or fine-grained, or can have
a greater or lesser chroma (color) component. In general, most viewers
find noise with a coarser structure or higher color content more objectionable
than noise with the same level of luminance variation, but finer structure
or lower color involvement.
The crops below were taken from the middle gray swatch of the MacBeth
chart (the patch next to the yellow block). Images were captured under
the "daylight" conditions described above. On the left is
the full-color RGB image, followed by the red, green, and blue channels,
shown as greyscale values.
Interesting to note here is that the D2H noise generally seems to have
slightly less color to it, but its "grain pattern" is a good
bit larger than that of the EOS-1D. Overall, not a clear win in terms
of noise structure for either camera, it'll be up to individual photographers
to decide how they feel about the "look" of the noise from
each camera. I suspect though, that the coarser structure of the D2H's
image noise is part of what has caused Rob Galbraith and others to object
as strongly as they do to the D2H's noise levels.
| ISO
200 |
||||
| RGB
Image |
Red Channel |
Green
Channel |
Blue
Channel |
|
| D2H |
 |
 |
 |
 |
| EOS1D |
 |
 |
 |
 |
| ISO
400 |
||||
| RGB
Image |
Red Channel |
Green
Channel |
Blue
Channel |
|
| D2H |
 |
 |
 |
 |
| EOS1D |
 |
 |
 |
 |
| ISO
800 |
||||
| RGB
Image |
Red Channel |
Green
Channel |
Blue
Channel |
|
| D2H |
 |
 |
 |
 |
| EOS1D |
 |
 |
 |
 |
| ISO
1600 |
||||
| RGB
Image |
Red Channel |
Green
Channel |
Blue
Channel |
|
| D2H |
 |
 |
 |
 |
| EOS1D |
 |
 |
 |
 |
| ISO
3200 |
||||
| RGB
Image |
Red Channel |
Green
Channel |
Blue
Channel |
|
| D2H |
 |
 |
 |
 |
| EOS1D |
 |
 |
 |
 |
A "Real World" Noise Example
While I greatly prefer to use carefully standardized test images for performing close analysis of cameras like this, I'll be the first to say that artificial test targets tell only part of the story. I found this to be especially true when examining the noise characteristics of the D2H and EOS-1D. In particular, despite the fact that the two cameras performed very similarly in the tests above at ISO 800, in some "real-life" sample images from a side-by-side shoot at a basketball game, I consistently found that the images from the 1D looked much cleaner than those from the D2H, even though the shooting conditions were identical, and the two cameras were both being used at ISO 800, the point at which the noise levels in the tests above looked more or less identical. Some of this could be due to the somewhat coarser structure of the D2H's noise that I've already commented on, but this didn't seem to explain all of what I was seeing.
The shots and crops below show what I'm talking about. Both images were shot under the same conditions, at an ISO of 800, and with identical shutter speed and aperture settings. The only difference between the two photos was the lenses used, and the focal length they were set at, neither of which would have had any bearing on noise levels. These photos were shot by pro Gibbs Frazeur at a recent Georgia Tech basketball game here in Atlanta. (These photos are copyright Gibbs Frazeur, all rights reserved.) Like most pros I know, Gibbs routinely uses a slight underexposure in his critical digital shots to guard against lost detail in strong highlights, so the original images here are somewhat underexposed relative to what would look good on-screen. In the case of this set of sports shots, it turned out that Gibbs was actually exposing about a third of a stop higher than most of the other pros covering the game, most of whom were using 1/500 at f/2.8 and ISO 800. - All this by way of explaining why the shots below are manipulated slightly, contrary to my usual strict policy against "tweaking" images I display on this site in any way, shape, or form. To keep the comparison between the two cameras valid, I was careful to apply the identical correction in Photoshop to both of the images shown here, using the "levels" control to set the highlight point at 220. The net result was that the D2H's shot came out slightly brighter looking than that of the 1D, as the D2H appears to be about a quarter-stop more sensitive than the EOS-1D when set to a nominal ISO of 800. While it would thus be true to say that the D2H was shooting at a higher ISO than the 1D, the differential is quite slight, and certainly not enough to account for the noise difference in the images.
| EOS-1D ISO 800 1/400 f/2.8 70-200mm @78mm |
D2H ISO 800 1/400 f/2.8 80-200 @130mm |
 |
 |

Adjusted Image |

Adjusted Image |
To my eye, the D2H's image noise is much more apparent here than is that of
the EOS-1D. (And the D2H's color seems a little less bright as well, as shown
by the rim of the basket.) This difference in noise performance was quite
consistent with all the other photos shot at the event: The 1D's images were
consistently smoother looking, had somewhat brighter color, and were overall
quite easy to pick out in "blind" comparisons. (Blind as in that
I had no prior knowledge of which images were shot with which camera.) I
wouldn't consider the results from the D2H here to unacceptable, but that's
going to be very much a personal decision, and I could well imagine others
who are more sensitive to image noise than I am to use that terminology.
(I suspect this is the sort of thing that led Rob Galbraith to term the D2H's
image noise as "unacceptable.")
As noted though, this struck me as very odd, since my "laboratory"
tests of image noise showed the two cameras as having nearly identical noise
levels at ISO 800.
One thing that occurred to me as a possible explanation is that I'd noticed
in my laboratory tests that the noise levels of both cameras got significantly
worse as the luminance level decreased, all other variables being held constant.
That is, there was much more image noise in darker swatches of the MacBeth
chart than there were in the lighter ones. It did seem that I was seeing
more of the image noise in the darker portions of the images above, so could
this account for the difference? Perhaps the two cameras had the same noise
level in the middle gray tone of the MacBeth chart, but the D2H suffered
more in the shadows than did the 1D.
Since I had all the raw data from the MacBeth charts available, it made sense
to go back and look at how the noise-vs-luminance curves behaved for the
two cameras. The results were interesting, offering another view of both
cameras' noise behavior with the laboratory targets, but unfortunately not
really shedding much light on the real-world results above.
Noise vs Luminance
Data for the charts below was extracted from the same set of "Davebox" test shots as were used for the noise graphs above. Exposures as judged by the luminance of the middle gray patch of the MacBeth chart are thus as close to identical as I could make them, within the +/- 1/3 EV exposure step size of the cameras. Because the tone curves of the two cameras are somewhat different, the data points for both cameras do not generally line up directly above each other. This should be fine though, as the noise behavior ought to be linear enough between the data points that the graphs will give a pretty good idea of where the results for each camera will lie, at any point along the range of luminance values spanned by the available data. (As noted earlier, I chose to present the noise figures in these graphs in terms of absolute brightness units, to minimize the nonlinearity of the data between sample points.)
To provide the best view of the data at various ISO values, I made a separate chart for each of the three ISO values I looked at, with the vertical scale on each adjusted to best fit the data for that ISO level.
Without further ado, here are the plots of noise vs luminance:
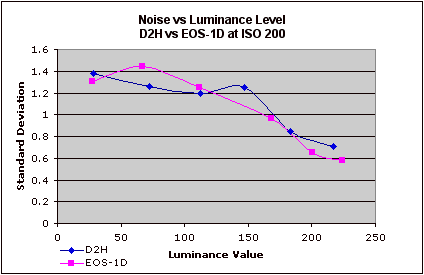
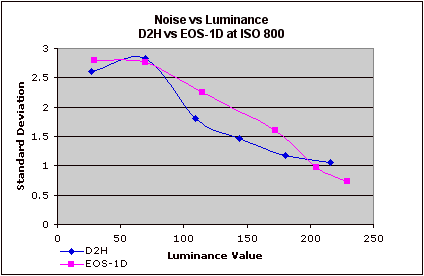
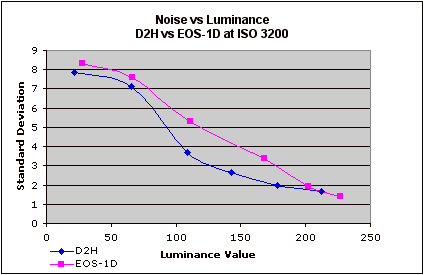
These results are quite interesting. What immediately leaps out is how strongly absolute noise levels are a function of luminance for both cameras. This has important consequences for the common practice of reporting noise levels for competing cameras as part of digital camera reviews. - It's obvious from these results that reported noise values could be significantly in error if the luminance value of the swatches from which they were measured don't match exactly. Reporting single numbers intended to represent "noise level" is thus fraught with possible error. A single "noise" number also clearly tells only part of the story, because it's possible that a camera with relatively good noise performance at higher luminance values may perform much worse with darker subject matter, and cameras could vary quite a bit in this respect.
The second piece of information displayed here is a bit more subtle, namely that the noise performance of the two cameras on uniform gray swatches like this are actually quite equivalent at the two ends of the tonal scale, most of the differences between them being visible in the midtone range. This, incidentally, is exactly where myself and other reviewers reporting on noise performance tend to concentrate. Granted, this is where noise is most likely to be the most visible in the final images, but it does suggest that focusing solely on noise levels in midtone values misses a large part of the story. (Even in the face of this though, I suspect that most reviewers will continue to pay greatest attention to midtone noise values, given the sheer level of effort that's required to generate more exhaustive data of this sort. - I for one, don't have nearly the time to perform this exhaustive an analysis on every camera that I review.)
The Limitations of the Laboratory #1: Numeric vs Visual Results.
What all the experimental noise data above fails to explain though, is the quite obvious visual differences in noise performance between the EOS-1D and D2H, as shown above in the "real world" examples. In the laboratory tests, the D2H consistently shows equal or lower image noise at ISO 800, yet in the real world images, its noise is much more visible than that of the EOS-1D.
I think that some of what's going on here is an issue that I've commented on numerous times in the past: Our eyes seem to be much more sensitive to coarse-grained image noise than to fine-grained. I've sometimes found that certain cameras with higher levels of luminance noise produce images that look much better than other models with lower noise figures. The deciding factor seems to be the granularity of the noise, as the cameras with better looking images invariably show a much tighter pattern to their noise.
In the case of the D2H vs the EOS-1D, this appears to account for a great deal of what's going on. As an illustrative example, the image below is set up as a rollover, and shows color samples cropped from the central squares of each camera's image of the MacBeth target, shot at ISO 3200. Note: To head off comments that I'm focusing on a unrealistically high ISO range in this example, please be aware that I chose images captured at ISO 3200 purely to illustrate the visual-vs-numeric noise effect. The results at lower ISOs are much the same, but the differential between the numbers and the visual appearance is less obvious than it is here.
Overlaid on each color patch is a number showing the luminance noise in screen brightness units (0-255 range). As you roll your cursor back and forth over the image to switch between the samples from the D2H and 1D, there's no question that the noise in the D2H image is much more visible. Yet, in every swatch except the bright red one, the magnitude of the D2H's luminance noise is actually lower than that of the 1D. - Look at the dark purple swatch for the most obvious example of this. (This particular example also shows the reduced color saturation that the D2H produces at very high ISO levels, which I discuss in greater depth in the next section of this review.)
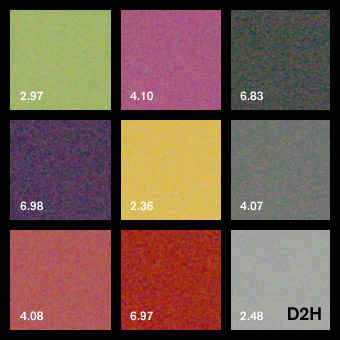
Frankly, having seen this, I'm about to conclude that the simple magnitude of luminance noise is virtually useless as a measure of image quality. - As the example above clearly shows, there's little or no correlation between noise magnitude and perceived image quality.
(And for those who might be wondering, measures of standard deviation of the individual RGB channels, or even the "a" and "b" chrominance channels of Lab color space don't seem to correlate any better with the visual results either. - Spot-checks of these noise measurements varied between the swatches in a fairly arbitrary fashion, sometimes giving the nod to the D2H, while at other times favoring the 1D, but never in a manner that matched the visual characteristics of the images very well.)
The Limitations of the Laboratory #2: Noise-suppression algorithm differences?
Another limitation of lab-based noise tests such as I've discussed above is that they're perforce performed on portions of the image having perfectly uniform color and illumination. As it turns out, this is exactly the sort of subject that camera noise-reduction algorithms love. Every digital camera on the market selling for more than a hundred dollars or so performs some level of noise-suppression image processing. (And in every case that I'm aware of, they perform at least some level of noise-suppression processing even when their "noise reduction" menu options are set to "off.")
Noise-suppression image processing is complex, and constitutes some of the most closely-guarded trade secrets of the various camera companies. It's a unique "secret sauce" that can help distinguish one camera from another. The basics are pretty consistent and well known though, and doubtless apply here. The main idea is for the image processor to look for areas of the image with no detail in them, and to work to suppress luminance and/or color variation in those areas. This makes sense, because it's exactly those areas in which you're most likely to see image noise. - Regions with a lot of high-contrast subject detail will tend to mask noise to a significant extent.
The trick comes in figuring out what areas of the subject should be considered to be "flat" and therefore subject to heavy-handed noise suppression. Generally anti-noise algorithms use some measure of "local contrast" as the determining factor, setting a threshold below which the noise suppression will take place, and above which the image will be left more or less alone. (This is a greatly simplified explanation of what would invariably be much more sophisticated algorithms.) A lot of the difference between different manufacturer's cameras has to do with how the local contrast thresholds are set. A good place to look for the action of noise-suppression algorithms is in hair detail in human subjects: You can often see just where a camera's noise suppression cuts in, based on what parts and how much of the hair looks "smooshed out" (a technical term ;-) in the photos. - My "Outdoor Portrait" test shot is a good one to look for this effect in.
This might be where we can find another explanation for the higher noise from the D2H in "real world" images than in laboratory tests. Real-world environments almost never have areas as uniformly toned and lit as the test swatches on a test target are in the studio. In the case of the shots from the basketball game shown above, there's a fair bit of tonal gradation across the area shown, although there's still relatively little that a viewer would consider "subject detail" to worry about. My guess is that the slowly varying tonal gradation was enough to convince the D2H's image processing that there was subject detail there that needed preserving, with the result that it backed off a lot on the noise-suppression, with the results shown.
Bottom Line Conclusions
From all of the above, it's clear that noise performance in digital cameras is a complex phenomena, and therefore not subject to easy characterization with one or two numbers.
I do think that we can draw some general conclusions about the D2H vs the EOS-1D as follows though:
1) Under laboratory conditions, and with bright lighting, the D2H generally equals or slightly outperforms the EOS-1D in terms of luminance noise levels in flat tints. The D2H pulls ahead somewhat at higher ISOs in midtone values, but both cameras are fairly closely matched in performance at the ends of the tone curve across the ISO range of 200-3200.
2) The numbers miss most of the story: Even though the numeric scores show the D2H handily beating the EOS-1D at very high ISO levels, the eye tells a much different story: The EOS-1D shots at high ISO look much cleaner visually.
3) Based on comparisons of multiple "real-world" image examples from both cameras, the EOS-1D carries a visible edge in its images, producing image noise that is less visually objectionable (regardless of how it might measure quantitatively), particularly in the middle-to-upper ISO range. Again, this holds true for shooting conditions involving moderate to bright lighting.
4) At very low light levels, the D2H figuratively beats the pants off the EOS-1D across the board, producing much lower noise levels both numerically and visually, regardless of ISO or subject tonality.
5) Image noise is in the eye of the beholder. Rob Galbraith labeled the D2H's image noise at middle ISO values "unacceptable." I don't know as I'd personally go that far, but Rob speaks from his extensive experience as a working sports photographer, and adds the observation that "this image quality characteristic seems to be the one giving working news and sports photographers the most difficulty." - So he apparently isn't alone in his evaluation. For my part, I felt that the D2H's images at middle ISO levels were a bit noisy, but quite usable. (By contrast though, Rob said that "higher ISO files continue to look noisy but acceptable", while I feel that it's at high ISOs that the D2H has the most difficulty.) Given this range of reactions between reviewers, all I can suggest for shooters considering the D2H is that they look at sample images shot with it and form their own conclusions.
Overall, it appears that the D2H's image noise is objectionable not so much because of its absolute magnitude, but more because it has a large, loose pattern to it. Whether this is a consequence of the LBCAST sensor technology itself, the particular data-clocking scheme that Nikon is using in the D2H, or simply Nikon's noise-suppression processing isn't clear. I'm hoping for the latter, as it would permit a fix via a firmware upgrade. If the noise pattern is a characteristic of the LBCAST technology, there wouldn't be a fix for the D2H, but we could at least hold out hope for improvements in future cameras, as the technology matures. Only time will tell on these fronts. As for the D2H itself, we'll just have to see if Nikon can make any improvements with firmware tweaks.
Test Results: Color
Color rendering is obviously a key issue for digital cameras, so let's start off with a look at how the D2H performs in this area. I thought it would be most instructive to look at how the color on the D2H compares with the earlier D1H, as well as with its competitor, the Canon EOS-1D.
The first way we'll look at this is with the rollover below, showing actual color swatches (scaled down for screen display) as captured by the D2H and D1H. If you move your cursor over the image, you'll see it switch from a display of the D2H's color values to those of the D1H. (Assuming of course, that your browser supports Javascript and it's enabled.)
Note that in each set of images here, exposure for the two cameras was matched as closely as the +/- 1/3 EV adjustment precision of the cameras would allow. (No adjustment was made in Photoshop or Capture, post-exposure, these are the color values exactly as they came from the camera.) Exposure was matched based on the brightness (luminance) value of the middle gray swatch, adjacent to the yellow block. The D1H shot I had on file was slightly overexposed, as judged by the value of the white block, but I nudged the exposure for the D2H up slightly to match it, so the comparison wouldn't be tainted by different brightness levels. In the comparison against the EOS-1D, the exposure values are slightly lower, since I had both cameras on hand simultaneously, and so could set both of their exposure levels optimally.
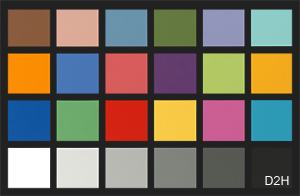
Differences between the color rendering of the D1H and D2H are subtle, but quite apparent nonetheless. The D2H shows slightly higher saturation in the orange block on the left side of the chart, but noticeably lower saturation on a number of the other blocks, particularly the blues, greens, and the magenta swatch. This agrees with what I saw in test shots of natural subjects, in that I felt I was seeing less-saturated greens and blues.
Now, let's take a look at how the D2H fares against the EOS1D:
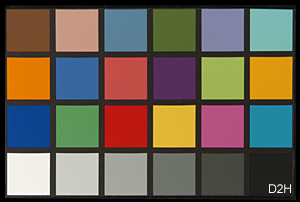
The results here are surprisingly similar to those above, in that the EOS-1D seems to mirror the color rendering of the D1H pretty closely. The 1D's color is a little more saturated overall than the D1H's, so that of the D2H comes off looking a bit less bright in comparison, but the net effect is much the same.
Still, the magnitude of the differences we see here against the EOS-1D don't seem to match what Rob Galbraith seemed to find in practice at a sports shoot, nor do they match what I saw in some comparison images my pro-friend Gibbs Frazeur brought back from a local college basketball game.
The issue seems to be that the D2H's color really takes a hit as you get into the higher reaches of its ISO range. (See Rob's page referenced above, for some exceptionally well-done comparison photos shot "live" with the D2H and EOS-1D side by side.)
We can see this in the final rollover below, which compares the D2H and EOS-1D again, only this time at ISO 3200.
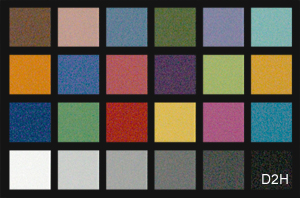
To take another look at this phenomena, the chart below shows how the
color saturation of the red swatch in the MacBeth chart varies as a
function of ISO for both the D2H and the EOS-1D:
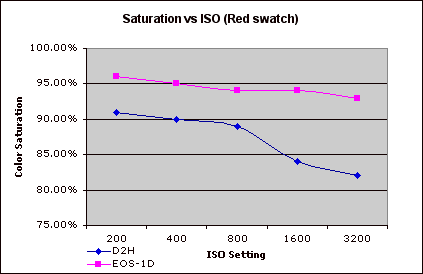
At least in red hues, it appears that the color saturation of the D2H
more or less holds steady until somewhere between ISO 800 and 1600:
By ISO 1600, it has diminished quite significantly, decreasing marginally
beyond that. (I believe that the cameras' behavior with colors other
than red is similar, but I didn't take the time to plot them.)
Turning to more natural subjects, I generally found the D2H's low-ISO
color to be quite good, although it seemed to be a little undersaturated
in reds and greens. Other reviewers have reported that the D2H's color
is more saturated than that of the D1H, but I didn't find this to be
the case. (Although I didn't have a D1H available while writing this
review, to do a side by side A/B comparison with.)
In my shots, Caucasian skin tones turned out quite well, with a nice,
natural tone, at least in the few people-pictures I shot. Here again
though, my experience (or perhaps just my taste) was somewhat different
than Rob Galbraith's, who reported some negative experience with overly-ruddy
skin tones under daylight conditions.
White Balance
The D2H has some pretty fancy technology in the white balance area, including an external ambient-light color sensor, and an anti-flicker filter as well, to help with pulsating light sources, such as fluorescent and various forms of vapor-arc lighting.
I generally found the D2H's white balance to be pretty accurate, but was disappointed by its handling of conventional household incandescent lighting. Its auto white balance system may be very sophisticated, but it's only rated to handle light sources with color temperatures of 3500K and above. Since a lot of residential and office incandescent lighting extend down to 2500K or even lower, the D2H's auto white balance system has great difficulty with it, leaving quite a bit of yellow in its images. What's more, the Kelvin-based white balance option behaved very oddly at the lower range of its settings. In my "indoor portrait" shot, under incandescent lighting of about 2450K, the 2800K setting produced a slightly warm image (as expected), but the 2500K setting produced a pronounced greenish cast. Even the manual white balance system left a very warm cast in the image.
I didn't have the occasion to work with the D2H under flicker-producing lighting, so can't comment on the performance of the white balance system under those conditions. At the risk of over-referencing his excellent article though, I'll point out that Rob Galbraith has worked with the D2H under a wide range of lighting conditions, apparently with somewhat variable results. It did exceptionally well at one venue where he's always had trouble with auto white balance systems in the past, but it apparently offered little or no improvement at two other locations with tricky lighting.
The Bottom Line for Color
The D2H has pretty decent color, particularly at lower ISO settings. Viewed on their own, its images look bright, clean, and appropriately saturated, although even standalone shots show some weakness in blues and greens. It's only when they're viewed in direct comparison with images captured by the earlier D1H of the competing Canon EOS-1D that the D2H's colors appear a little muted.
As you increase the ISO though, the D2H progressively loses color saturation. The effect is noticeable at ISO 1600, particularly in red and orange hues, and is quite pronounced at ISO 3200 and above. In fairness to Nikon though, I must hasten to point out that the ISO ratings of 3200 and 6400 are presented to the user as being outside the "normal" range, precisely because image quality there isn't up to Nikon's standards for full-spec performance. They thus provide the capability for users who must have it, but make it clear that you shouldn't expect "Nikon quality" from the camera at such elevated ISO levels. Still, the loss in color saturation at very high ISO levels is significant, and greater than that suffered by its competition.
At the end of the day, the D2H's color quality is quite good at low ISO settings, and many may actually prefer its slightly less saturated look to that of the earlier D1H or EOS-1D. Color remains pretty good at ISOs as high as 800, but diminishes markedly beyond that. Images shot at ISO 1600 and higher are still very usable, but their quality is lower than that of images shot at ISO 800 and below.
Test Results: Resolution and Sharpness
As I mentioned earlier, at the initial press briefing for the D2H, Nikon seemed to make the claim that the LBCAST sensor technology used in the D2H would lead to sharper images than those from cameras using conventional CCDs. To examine this, I shot the comparison images below with the D2H and EOS-1D, under as nearly identical conditions as possible. I used each manufacturer's ~100mm macro lens for the shots, as these fixed focal length lenses are among the sharpest either maker produces. (On the D2H, I used the Micro-Nikkor 105mm f/2.8, while I used the Canon 100mm f/2.8 EF lens on the EOS-1D.) The slight difference in focal length meant that I had to shift position slightly on the outdoor shots to keep the subject at the same scale between the two cameras. Other than that, all shooting parameters were identical.
ISO-12233 Resolution Target.
The images below were cropped from best-quality JPEGs from each camera. To avoid any visual bias due to differences in brightness, I've adjusted each image slightly in Photoshop, using the Levels control, to insure that the white values were identical across all samples. (As always clicking on the images will take you to the original files for each sample.) Two sets of results are shown for both the D2H and EOS-1D. The first shows the results obtained using the cameras' default sharpening settings, the second shows the best results I could get, working from unsharpened camera images, and applying unsharp masking in Photoshop. The amounts of USM applied were matched to the characteristics of the images, to attempt to wring the maximum sharpness from each camera's images. In the case of the D2H, I found 240% at an 0.3 pixel radius produced the best-looking image with the fewest artifacts, while for the EOS-1D, the best settings were 180% and 0.3 pixels.
|
ISO-12233
Res Target Results |
||
| D2H | EOS-1D | |
| Camera Default Sharpening |  |
 |
 |
 |
|
| No camera sharpening, then Photoshop unsharp masking. |  |
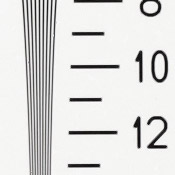 |
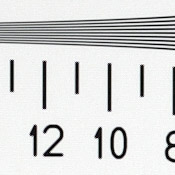 |
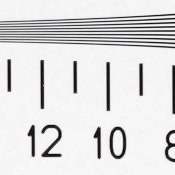 |
|
Overall, these results show that the D2H is able to resolve about 1,100 lines
of "strong detail" horizontally, and perhaps 1,000 vertically.
Performance is thus pretty equivalent between the D2H and the EOS-1D, at
least on an artificial, high-contrast subject like the ISO-12233 resolution
target. (I could possibly convince myself that the D2H has a slight edge
in these shots, but if it does, the difference is awfully subtle.) While
the 1D's default sharpening setting results in slightly softer images, the
ultimate resolving power of the two cameras appears very similar.
Resolution/Sharpness vs ISO
As I alluded to earlier when we were talking about the D2H's noise performance, cameras' noise-suppression algorithms work by throwing away high-frequency image content in areas where the program thinks there isn't any relevant subject detail present. The trick comes in setting the threshold for the noise suppression routine high enough to preserve important subject detail, without allowing too much noise through as well.
As ISO increases, so does image noise, with the result that camera manufacturers generally apply more aggressive noise-suppression at high ISOs. This can lead to a loss of subject detail in high-ISO shots. To determine whether this might be an issue with the D2H or not, I shot the series of images below at a range of ISOs from 200 to 3200, with both the D2H and EOS-1D. Here again, I shot the images with each manufacturer's ~100mm macro lens, both of which were stopped down to the same mid-range aperture (f/8 in this instance). These images were all captured with the cameras' default image-sharpening settings, and are cropped from minimum-compression JPEG files. (The full-res files are linked to the crops below, so you can access any of them by clicking on the images.)
|
Resolution
vs ISO |
||
| D2H | EOS-1D | |
| ISO 200 |  |
 |
 |
 |
|
| ISO 400 |  |
(The 1D shot at ISO 400 was slightly out of focus, so I chose to skip its samples here.) |
 |
||
| ISO 800 |  |
 |
 |
 |
|
| ISO 1600 |  |
 |
 |
 |
|
| ISO 3200 |  |
 |
 |
 |
|
From these shots, it seems that there's a little falloff in the D2H's sharpness at ISO levels starting right at 200, although the decrease is fairly slight until we get all the way out to ISO 3200. These image samples also seem to show a slight edge overall for the EOS-1D's rendering of fine detail, regardless of ISO.
D2H Image Sharpening
A valid question to ask in the above is how good a job the D2H's "auto" sharpening does, as compared to post-exposure tweaking in either Nikon Capture or Photoshop.
Other than the first shot shown (which displays the results of the D2H's default or "auto" sharpening in the camera), the images below were all processed from the same NEF file. All went through Nikon Capture 4.0 with the indicated sharpening setting applied. The Photoshop-sharpened sample was extracted from the NEF file with no sharpening applied, and then unsharp-masked with radius of 0.5 pixels and amount of 200%. (This last representing the combination of settings that seemed to produce the most crisp-looking image for this particular subject, with the least haloing or loss of fine detail.)
|
D2H Sharpening
Processing Comparison |
||
| Camera Default (Auto) |  |
 |
| Capture: No Sharpening, then Photoshop USM (0.5 radius, 200%) |  |
 |
| No Sharpening |  |
 |
| Capture: Low |  |
 |
| Capture: Medium Low |  |
 |
| Capture: Normal |  |
 |
| Capture: Medium High |  |
 |
| Capture:
High |
 |
 |
Overall, the D2H's internal "auto" sharpening does a pretty
good job, although it does coarsen fine detail somewhat. While it loses
a little detail in the process though, I have to admit that the default
in-camera sharpening looks sharper to my eye than does the carefully
tweaked and technically more "correct" sharpening I applied
in Photoshop.
Image-sharpening settings are obviously largely a matter of personal
preference, but the default processing of the D2H does seem to deliver
decent-looking results.
The Bottom Line for Resolution
The D2H seems to deliver appropriate resolution for its 4.1 megapixel sensor. Using the in-camera sharpening, detail is rendered a little more coarsely than it might be, but turning sharpening off and doing your sharpening in Photoshop provides resolution that's pretty equivalent with that of other top-performing four-megapixel models. (Good news, I'd say: It seems to me that Nikon has backed off just a hair on their anti-aliasing filter, with the result that there's a bit more detail, but still without any significant aliasing.) Resolution does diminish somewhat at higher ISO settings though, as the noise-suppression algorithms take their toll.
Other Performance Attributes
With the "big three" of Color, Resolution/Sharpness, and Image Noise out of the way, let's finish up with summaries of the other key performance parameters that I routinely comment on.
Conclusion
| Free Photo Lessons | |
|
Some might question my "very positive" reaction though, given what I and others have discovered about the D2H's image noise performance, particularly in "real world" environments. In that vein (despite the heavy focus on image noise in this review), I should say that I personally tend to place less weight on image noise than other image-quality parameters. In light of that, the differential in image noise between the D2H and the EOS-1D that I found with real-world subjects isn't enough to put me entirely off the D2H. This is very much a personal reaction though and I understand that many other photographers feel differently. Each prospective user will have to decide for themselves how they feel about the D2H's image noise, and spend their camera dollars accordingly.
To my mind, a bigger issue is the D2H's color, specifically the extent to which it loses saturation at very high ISOs. Given that the this camera's primary market is sports shooters and photojournalists, both of whom will often need to push the camera's ISO to the limits, the color falloff at high ISO could be a concern.
- But I still like the D2H, though.
A lot of my feeling has to do with the remarkable fluidity of its user interface that I mentioned above. It also has a lot to do with the system as a whole, though. In the face of its all-around capabilities, at least some of the foregoing focus on image noise and color saturation at high ISOs feels a little overwrought. Looking at the total system, there's nothing else on the market that can touch it in a few key areas. For instance, there's nothing out there that offers such effortless integration of wireless networking, surely a critical competitive advantage for many sports and news photographers. Then there's the amazing SB-800 flash system. I don't use the term "amazing" here lightly. - It literally is exactly that once you've played with it. I can see a lot of photographers buying D2Hs just to have access to the multi-unit remote TTL flash capabilities of the SB-800. And what about its low-light capability? There again, the D2H is at the top the market.
So at the end of the day, we're left with a camera with a number extraordinary capabilities as well as a few evident weaknesses, a not uncommon state of affairs when manufacturers push the envelope as Nikon did with the D2H. The bottom line is that Nikon shooters finally have a highly capable 8 fps speed demon, that includes some pretty dramatic new functionality in the areas mentioned above. If you're a sports shooter with Nikon glass, and can afford the freight, you'll want to add a D2H to your kit sooner rather than later...
<<D2H SAMPLE IMAGES! | Additional Resources and Other Links>>
Reader Comments!
Questions, comments or controversy on this product? Click
this link to see what other Imaging Resource readers have had to say about
the Nikon D2H, or add comments of your own!