Nikon D2Xs Image Overlay
One of the more unique features of the Nikon D2Xs is its "Image Overlay" mode. This mode lets you overlay two NEF (RAW-format) images in the camera, creating a composite image from the two. My initial reaction to this was "so what?" But once I thought just a little, I realized it could be incredibly useful to commercial shooters.
How often have you needed to shoot a photo for use on a magazine cover, or the title page of an article, and needed to leave space around the subject for overlaid text or graphics? This is a very common requirement, and one that can be difficult to deal with. More often than not, you end up leaving much more space around the subject than you need to, wasting pixels and producing a poor composition. Alternately, you may not leave enough space, leading to a chewing-out by the art director and costly retouching work to extend the background. And what do you do if you're faced with an "almost" situation, one in which you're not sure whether there's enough space in the needed areas? Do you take the shot and hope for the best, or keep looking for something else that fits better?
The Image Overlay function in the Nikon D2Xs neatly addresses this problem. You can shoot a template of the desired layout, showing areas that need to be reserved for text and graphics, and then overlay it with shots you take in the field, to see if the subject is positioned properly, and whether you've intruded on any of the "forbidden" areas with critical subject detail or distracting elements.
To illustrate this, I made a simple template for the fictitious publication "Pets of the Rich and Famous," and captured a series of screen shots that step through the process. (Note, the following screen shots were taken from the D2X, but the menus are identical.)
 |
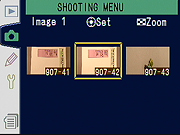 |
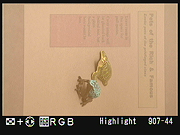
| Here's the first screen of the Overlay function. The first step is to choose a photo for Image 1. (Note that this only works for images stored in the NEF format.) | Choose an image by scrolling back and forth in this screen, and press the center of the multi-controller to select the currently highlighted image. Here, I just shot a printout on a piece of paper, with spaces marked for a headline and left-column pull quotes. |
 |
 |
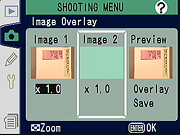
| Here we are back at the main screen, with Image 1 selected, ready to select Image 2.
This leads to an identical image-selection screen to that seen above. |
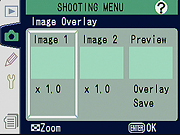
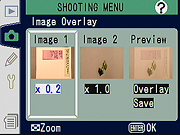
With both images chosen, the Preview image on the right shows the composite image.
This shot also illustrates a handy feature, whereby the "gain" or brightness of the images can be adjusted, to improve legibility. Here, I've reduced the gain of the template to 0.2, to keep it from washing out the subject. |
 |
 |
| Once you like what you see, you can preview the result full-screen by selecting "Overlay" in the right-hand Preview pane shown earlier. The "Save" option writes the result to the memory card as a separate image file.
(One tip: Making the "safe" areas for your subject black on the template will make it easier to see the subject and "forbidden" areas together, as you won't have to dial down the gain on the template as far.) |
Once you've saved the results of an Image Overlay operation to a separate file, you can view it like any other image on the memory card, zooming in to check fine alignment.
If you include the actual words and graphics to be used on the final page, you can check the precise alignment between elements. (Going far beyond simply staying within a designated rectangular "safe" area.) |
 Fujifilm GFX 50S Review
 Fujifilm X-T3 Review
 Olympus E-M5 III Review

Follow Imaging Resource