 Back
to Full Olympus D-490 Zoom Review
Back
to Full Olympus D-490 Zoom ReviewGo to Olympus D-490 Zoom Data Sheet
Go to Olympus D-490 Zoom Pictures Page
Up to Imaging Resource Cameras Page
Use your browser's "Back" button to return to the previous page, or the links at the top and bottom of this page to navigate to related information. If you have difficulty fitting the text on this page onto your printer output, simply resize your browser window to a narrower width and print again.
Remember us when it's time to buy!
Dave here: Have our reviews been helpful to you? (Is this article you're reading right now useful?) Preparing this level of information on as many products as we do is incredibly hard work, not to mention expensive. Things on the Internet may look like they're free, but they're not. (As a lot of big dot.com companies are finding out these days.) Somewhere, somebody has to pay to produce worthwhile content. YOU can help us though, by remembering us when it comes time to make your purchase. Would you consider coming back to our site and clicking-through to one of our advertisers to make your purchase? Every dollar you spend with one of our advertisers helps us directly (in affiliate fees) or indirectly (the advertiser will keep renewing their ad contract with us). To make it easy for you to support us, here's a URL you can visit, to see all our current advertisers, with links to click on that will register your visit to them as having come from our site. It's up to you where you buy, but Mike, Mike, Kim, Yazmin, Marti and I would be really grateful if you'd help us out by choosing one of our advertisers to purchase from.
Thank you for your support!
Dave Etchells, Founder & Publisher
Visit our "Buy Now" Page:
https://www.imaging-resource.com/buynow.htm
Back
to Full Olympus D-490 Zoom Review
Go to Olympus D-490 Zoom
Data Sheet
Go to Olympus D-490 Zoom
Pictures Page
Up to Imaging Resource Cameras
Page
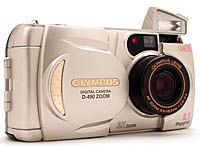
Olympus D-490 ZoomOlympus updates a popular 1.3 megapixel model to 2 megapixels, with improved features. Review First Posted: 10/28/2000 |
|
 |
|
2.1 megapixel resolution for 1,600 x 1,200-pixel images |
|
|
3X optical zoom lens (35-105mm equivalent) with autofocus | |
|
|
Variable ISO, 100 to 400 | |
|
|
Spot metering option for difficult lighting conditions | |
|
|
New QuickTime Movie features |
Design
The D-490 Zoom looks a lot like
preceding D-400 models, with the exception of a black plastic back panel and a
slightly different control layout. The D-490 weighs in at 9.5 ounces (270 grams)
without the batteries, or 13 ounces (370 grams) with a set of 4 AA cells, and
measures 5 x 2.6 x 2.1 inches (127 x 66.5 x 53mm) without the lens extended. Its
small size and relative light weight make it very portable, while its smooth
contours and brushed aluminum appearance make it an attractive accessory that
can slip easily into most pockets. An accompanying wrist strap and recessed grip
design help to provide a secure hold.
Olympus's sliding lens cover design doubles as the main power
mechanism. When the cover slides open, the lens extends into its operating
position, and the top status display panel turns on. To shut the camera off, you
partially close the cover and wait for the lens to retract before sliding it to
its fully closed position. This relatively hassle-free design may prevent
misplaced lens caps, but the pause necessary to wait for the lens to retract is
slightly annoying. Plus, the open lens cover obstructs access to the memory card
compartment, so you must close the lens before switching out SmartMedia cards.
(This is probably a useful precaution against removing the memory card while the
camera is still writing to it - which can damage the card - but it is annoying
none the less.) In addition to the sliding lens cap and flash card cover, the
camera�s front panel also holds the pop-up flash.

The shutter button, zoom control, and status display panel are
located on top of the camera, all cleanly designed with a relatively flat
surface. The smooth shutter button and rocker toggle zoom control just barely
protrude from the surface.

The right side of the camera is quite plain, with only the covered
slot for the SmartMedia card. (While the majority of the card compartment hatch
appears on the front of the camera, you actually access the card from the
side.)

The Video Out, AC, and Computer connectors are all found on the
bottom left side of the camera (looking at the back), beneath a duotone plastic
cover that snaps into place.

The majority of the camera controls are on the back panel, along with
the optical viewfinder, LCD monitor, Arrow Pad, and a recessed thumb grip on the
right side. The three rectangular buttons across the top of the back panel
include (left to right): the Flash/Erase, Self-timer/Print, and Macro/Digital
Zoom controls. (The third button also serves as an image write-protect control.)
The round Arrow Pad next to the LCD monitor helps navigate through Record and
Playback menu options, as well as the Focus Preset functions. Surrounding the
Arrow Pad are three more buttons which control (top to bottom): Monitor On/Off,
Menu Display, and the OK button used to save settings. As with earlier D-400
Zoom models, the D-490 controls are simple to navigate.

The D-490 has a nice, flat bottom, taken up primarily by the battery
compartment cover. One small problem we noticed here is that the tripod mount is
on the far left side of the camera body. This placement causes the mass of the
camera to hang off the edge of the tripod's mounting platform, and places extra
stress on the camera's tripod threads, resulting in a less rigid
attachment.
Viewfinder The
D-490 features both an optical viewfinder and an LCD color monitor for image
composition. The optical viewfinder is on the top left of the back panel and
features a diopter adjustment dial to accommodate eyeglass wearers. Centrally
located crosshairs inside the viewfinder help you line up shots and set the
focus. Green and orange LEDs on the side of the viewfinder let you know the
camera ready status, such as when autofocus is set or when flash is necessary.
The 1.8-inch color LCD monitor is normally inactive when the camera switches on,
but is quickly enabled by pressing the Display button beside it. For the most
part, the monitor has limited information display. It indicates the file number,
flash setting, self-timer, digital zoom, and macro modes, but the remaining
information (image quality, battery power, white balance, etc.) is reported on
the camera's top status display panel. We found the LCD monitor very bright and
easy to see in most situations. It was a little hard to read in very bright
sunlight, but that is a common affliction among LCDs.
The
D-490 features both an optical viewfinder and an LCD color monitor for image
composition. The optical viewfinder is on the top left of the back panel and
features a diopter adjustment dial to accommodate eyeglass wearers. Centrally
located crosshairs inside the viewfinder help you line up shots and set the
focus. Green and orange LEDs on the side of the viewfinder let you know the
camera ready status, such as when autofocus is set or when flash is necessary.
The 1.8-inch color LCD monitor is normally inactive when the camera switches on,
but is quickly enabled by pressing the Display button beside it. For the most
part, the monitor has limited information display. It indicates the file number,
flash setting, self-timer, digital zoom, and macro modes, but the remaining
information (image quality, battery power, white balance, etc.) is reported on
the camera's top status display panel. We found the LCD monitor very bright and
easy to see in most situations. It was a little hard to read in very bright
sunlight, but that is a common affliction among LCDs.
We found the D490's optical
viewfinder a little tight, showing approximately 90 percent of the image area at
wide angle, and about 91.5 percent at telephoto (for both image sizes). We also
noticed that framing with the optical viewfinder resulted in a shifted image.
Our framing test resulted in the target being shifted towards the bottom of the
image, with a slight slant towards the lower left corner. The D490's LCD
viewfinder was much more accurate (a significant improvement from that of the
earlier D-400 series models), showing approximately 98 percent of the final
image area at wide angle, and about 99 percent at telephoto (also at both image
sizes). Since we generally like to see LCD monitors as close to 100 percent
accuracy as possible, the D490's LCD monitor does an excellent job. We also shot
a test with the digital telephoto enabled, but we were unable to measure the
accuracy because of the soft resolution and difficulty in framing.
Optics  The
D-490 comes equipped with a 3X, 5.4-16.2mm zoom lens (equivalent to a 35-105mm
lens on a 35mm camera) with a maximum aperture of f/2.8-f/4.4, depending on the
zoom setting. In normal mode, the lens can focus from 31 inches (80cm) to
infinity and in macro mode, from 8 to 31 inches (20 to 80cm). The TTL (through
the lens) autofocus function uses a contrast detection system which produces
sharp, reliable focus in well-lit conditions, but may have problems in low-light
situations. Low-light shooting is provided for with two preset "Quick Focus"
settings of 8 feet (2.5m) and infinity, selectable by pressing the up and down
arrow buttons on the Arrow Pad during exposure. (These seem to work well enough,
but we'd like to see more Quick Focus steps, or an autofocus-assist light for
better low-light operation, particularly since the camera does so well in dim
light with its variable-ISO capability.) The camera controls the aperture
automatically with settings of f/2.8 and f/8 in wide angle and f/4.4 and f/12.6
in telephoto mode.
The
D-490 comes equipped with a 3X, 5.4-16.2mm zoom lens (equivalent to a 35-105mm
lens on a 35mm camera) with a maximum aperture of f/2.8-f/4.4, depending on the
zoom setting. In normal mode, the lens can focus from 31 inches (80cm) to
infinity and in macro mode, from 8 to 31 inches (20 to 80cm). The TTL (through
the lens) autofocus function uses a contrast detection system which produces
sharp, reliable focus in well-lit conditions, but may have problems in low-light
situations. Low-light shooting is provided for with two preset "Quick Focus"
settings of 8 feet (2.5m) and infinity, selectable by pressing the up and down
arrow buttons on the Arrow Pad during exposure. (These seem to work well enough,
but we'd like to see more Quick Focus steps, or an autofocus-assist light for
better low-light operation, particularly since the camera does so well in dim
light with its variable-ISO capability.) The camera controls the aperture
automatically with settings of f/2.8 and f/8 in wide angle and f/4.4 and f/12.6
in telephoto mode.
> The D-490's 3X optical zoom is controlled by a
rocker toggle on top of the camera and pretty much lets you zoom in any
increment. (The zoom lenses on some cameras have certain "preferred" positions,
a limitation we didn't observe with the D-490.) An additional 2.5X digital
telephoto increases the camera's total zoom to 7.5X, but image quality will
deteriorate in direct proportion to the amount of digital enlargement. There was
moderate optical distortion on the D-490, with the camera showing a 0.8 percent
barrel distortion at the wide angle end, and about a 0.3 percent pincushion
distortion at full telephoto. While it's more than we like to see, 0.8 percent
barrel distortion is fairly typical at wide angle, and 0.3 percent pincushion is
a bit better than average at telephoto. Digital telephoto and Macro modes are
controlled by the same button on the back panel of the camera, meaning that you
can't use the two together. However, the digital telephoto can be enabled at any
zoom setting, not just at maximum optical zoom. This is an uncommon feature on
digital cameras we've reviewed, but one that greatly increases the D-490's
flexibility. Macro performance is quite good, as the camera captures a minimum
area of 3 x 2 inches at the furthest telephoto
setting.
Focus
> Camera focus is very straightforward, just
point the camera at the subject, depress the shutter button halfway to initiate
the autofocus and metering, then press all the way to shoot. The orange and
green LEDs next to the viewfinder let you know when the camera is ready. If the
orange LED blinks after metering, it means that the camera recommends using the
flash due to slow shutter speed. As with most other digicams, the D-490 sets
exposure and focus based on what's roughly centered in the frame, but this can
be changed very easily. Simply center the subject you want to base your exposure
and focus on in the viewfinder, depress the shutter button halfway, and continue
to hold the shutter button halfway until you have repositioned the subject in
the viewfinder to your original composition. When you fully depress the shutter
button, the focus and exposure will remain locked on the area you have
chosen.
Quick Focus
The D-490 also features a Quick Focus
option, which is helpful in low-light situations, where the camera's autofocus
sometimes has trouble. Quick Focus allows you to choose close focusing
(2.5m/8ft), which gives you a depth of field of approximately 2.8 feet to
infinity at wide angle and 5.9-13 feet at telephoto, or far away focusing
(Infinity), which gives you a depth of field of approximately 4.3 feet to
infinity at wide angle and 22 feet to infinity at telephoto. You choose one of
these two options by pressing the up and down arrow buttons on the Arrow Pad on
the back of the camera before depressing the shutter button halfway, and
you must continue to hold down the arrow button while you take the exposure. The
buttons are clearly marked on the camera - the 2.5m/8ft setting is the "down"
arrow button and the Infinity setting is the "up" arrow button. Olympus touts
this as a good feature when quick shooting is required, but you must think in
advance of the exposure to locate the appropriate button before you frame your
shot. We found it helpful to use the LCD monitor to frame the image, because you
are already concentrating your attention on the back of the camera. Make sure
that the appropriate icon shows up on the monitor before depressing the shutter
release.
Macro Mode
Macro mode is accessible through the
Macro/Digital telephoto button on the back panel (indicated with the standard
flower macro symbol). The D490 does a very good job in the macro category,
capturing a minimum area of just 2.86 x 2.14 inches (72.57 x 54.43mm). The LCD
monitor is automatically activated when you enter the Macro mode and the macro
flower icon appears on the display. The mode is just as quickly canceled by
pressing the Macro button again twice.
Digital
Telephoto
Controlled by the same button as the Macro mode, the D-490's
digital telephoto offers up to an additional 2.5X zoom (depressing the
Macro/Digital telephoto button twice enters the mode, and a third press cancels
it). Digital telephoto settings of 1.6x, 2.0x, or 2.5x can be selected by using
the up/down arrow keys on the Arrow Pad. The digital telephoto can be enabled at
any zoom setting, but remember that digital enlargement somewhat compromises
image quality. It simply crops out the central portion of the camera's sensor
array, producing a smaller image. (The D-490 Zoom cannot be used in SHQ-TIFF
mode when you engage the digital telephoto function.)
Exposure
The
D-490 is great for consumers who want the uncomplicated ease of a
point-and-shoot camera. Exposure control is almost entirely automatic, with the
camera taking complete control of shutter speed and aperture. The user has the
option of adjusting exposure by changing exposure compensation, white balance,
metering, ISO setting, image quality, and other settings through the LCD-based
menu system. This more extensive LCD menu system is a bit of a departure from
the early D-400 designs, which had more control buttons to handle these
features.
Exposure Compensation (EV adjustment)
Exposure
compensation is controlled through the Record menu, and is adjustable from -2 to
+2 Exposure Value units (EVs) in half-step increments. (Each full EV unit
corresponds to a doubling or halving of the exposure.) Once you�ve chosen the
appropriate EV value, press the OK button to confirm the selection. You can
cancel the adjustment through the same process or by closing the lens cover to
power down the camera. Olympus warns that this setting may not be as effective
when shooting with the flash. As with recent D-400 models, we'd prefer to see an
EV adjustment that doesn't rely on the LCD menu system. If the setting was shown
on the top status display panel, it could be changed with fewer
steps.
Spot Metering Mode
The D-490 offers two metering
options: Digital ESP and Spot metering. Both are accessible through the Record
menu. The benefit of spot metering is that most metering systems that average
the light reading from the entire picture area are easily fooled by backlit or
high-contrast scenes. EV adjustments can help with these situations, but spot
metering offers a better solution, since it only measures a tiny area in the
center of the viewfinder. You can lock the exposure by holding down the shutter
release button half way once you�ve metered the area you want properly exposed,
then move the camera to reframe the image before you fully depress the
shutter.
White Balance
The D-490's White Balance (WB) system
adjusts an exposure to compensate for differences in color temperatures from
different light sources. The five White Balance options (located in the Record
menu) are: Auto (automatically sets the white balance), Daylight (for sunny,
outdoor scenes), Cloudy (for overcast days), Incandescent (for typical household
lights), and Fluorescent (for offices or large areas that are illuminated by
fluorescent tube lights). Once you�ve made your selection, press the OK button
to confirm the setting, and the designated icon will appear in the status
display panel on top of the camera. You can cancel the setting by reselecting
Auto, or by closing the lens cover. We found the D-490's white balance system
worked quite well under moderate light changes, but had difficulty with the
strong yellowish cast of household incandescent lighting.
Flash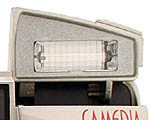 Activating the D-490's flash is simple, just pop
it up with the tab on the front of the camera, and set it to the desired mode
via the flash button on the back panel. The camera will indicate if it thinks a
flash is needed for the exposure by flashing the orange LED next to the optical
viewfinder after the focus has been set. It will also display the flash symbol
on the LCD monitor, if it's activated. You can choose from six flash modes: Auto
(no icon displayed), Redeye Reduction (eyeball icon), Fill-in Flash (lightning
bolt), Off (lightning bolt with a slash), Slow Shutter Synchronization Auto
(lightning bolt with the word "slow" displayed), and Slow Synchronization with
Redeye Reduction (lightning bolt, "slow" and eyeball icons). While Olympus
reports this as six flash modes, the forced Off mode is controlled by merely
closing the flash itself, not through the flash button. Remember that if the
orange LED continues to blink even though the flash is in the "up" position, the
camera is still charging the flash, and isn't ready to fire. Olympus rates the
D-490's flash power as having a maximum range of 8.5 feet (2.6 meters) in
telephoto mode and 13 feet (4 meters) in wide angle mode. In our own tests, we
found the flash highly effective as far away as 14 feet, even in telephoto
mode.
Activating the D-490's flash is simple, just pop
it up with the tab on the front of the camera, and set it to the desired mode
via the flash button on the back panel. The camera will indicate if it thinks a
flash is needed for the exposure by flashing the orange LED next to the optical
viewfinder after the focus has been set. It will also display the flash symbol
on the LCD monitor, if it's activated. You can choose from six flash modes: Auto
(no icon displayed), Redeye Reduction (eyeball icon), Fill-in Flash (lightning
bolt), Off (lightning bolt with a slash), Slow Shutter Synchronization Auto
(lightning bolt with the word "slow" displayed), and Slow Synchronization with
Redeye Reduction (lightning bolt, "slow" and eyeball icons). While Olympus
reports this as six flash modes, the forced Off mode is controlled by merely
closing the flash itself, not through the flash button. Remember that if the
orange LED continues to blink even though the flash is in the "up" position, the
camera is still charging the flash, and isn't ready to fire. Olympus rates the
D-490's flash power as having a maximum range of 8.5 feet (2.6 meters) in
telephoto mode and 13 feet (4 meters) in wide angle mode. In our own tests, we
found the flash highly effective as far away as 14 feet, even in telephoto
mode.
Variable ISO
As with previous D-400 models, the D-490
provides variable ISO settings, a very useful feature on digicams. Through the
Record menu, you can select from Auto, 100, 200 or 400 ISO settings. Similar to
film-based cameras, the ISO refers to the light sensitivity of the capture
medium (film or digital CCD). A higher ISO will enable you to shoot with faster
shutter speeds and/or smaller apertures than would be needed at a lower ISO, but
the resulting image may appear grainy or noisy. While the noise can become
fairly pronounced at the higher ISO settings, this option is particularly
valuable when you have to shoot at low light levels with longer exposure times.
The ability to capture these types of images at all is a tremendous bonus.
Higher ISO settings are also valuable in fast-action photography, where higher
shutter speeds are better at freezing
action.
Self-Timer
Activated by the Self-timer button on the
back panel, the D-490's self-timer gives you a 12-second countdown before firing
the shutter. The operation is pretty much the same as with other digital
cameras. When you engage this mode, the self-timer icon is displayed on the LCD
monitor as well as the small status display panel on top of the camera. Then,
all you do is fully depress the shutter button to trigger the timer and wait (or
run around to the front of the camera to get into the picture). A red LED lights
up on the front of the camera to indicate that it's counting down the time, and
blinks for the last few seconds before the shutter is tripped. (If you have the
beep sounds enabled via the Record menu, the camera also beeps as a warning just
prior to the exposure.)
Sequence Mode
The Sequence mode allows
you to shoot multiple frames of a scene at approximately half-second intervals.
Although Olympus claims that the camera will take as many as 45 sequential
exposures, the actual number will depend on the image quality chosen and storage
space available. Flash is not available in this mode and the shutter speed is
fixed to go no slower than 1/30 second. In Sequence mode, the camera will snap
pictures one after another as long as you hold down the shutter button. (Note
that shot-to-shot speed is a strong function of the image quality, and you'll
only get the two shots per second in "SQ" mode.)
Panorama
The
camera's Function option (available through the Record menu) allows you to take
panoramic images when a standard Olympus memory card is used. This camera
feature is the only one that requires an Olympus brand SmartMedia card, all
other camera features work just fine with third party cards. In Panorama mode,
blue cropping lines appear to help you line up each image of a panorama sequence
and you can take as many exposures as you have room for on the card. All of the
exposure settings are determined by the initial exposure, to make "stitching" on
the computer easier. Panorama mode is canceled by switching it off in the Record
menu. Flash is not available in this mode and Olympus suggests maintaining the
same lens focal length (zoom setting) after shooting the first picture to avoid
problems when you assemble the pictures. The company also recommends shooting in
SQ (standard quality) mode to save SmartMedia space. We just recommend buying a
larger memory card, since you're likely to want one anyway!
QuickTime
Movies
The D-490 Zoom's QuickTime Movie feature is new to the D-400
series of Olympus digital cameras, though it has been available on higher-end
Olympus models for some time. Accessible through the Function option in the
Record menu, the QuickTime Movie feature offers two quality settings:
High-Quality (HQ) resolution is 320 x 240-pixels; Standard Quality (SQ)
resolution is 160 x 120-pixels. In HQ mode, the recording will last
approximately 15 seconds. In SQ mode, it will last approximately 60 seconds, but
the quality will be significantly lower than with HQ. To record a QuickTime
movie, you scroll to the Function Shooting option in the Record menu (identified
by a keystone shape with a star inside). Select the movie camera and press OK. A
movie camera will appear in the upper left corner of the LCD monitor, and a
number will appear in the lower left corner (to count down the seconds), along
with a memory gauge (vertical bar) that fills up as you near the end of the
recording. To record the movie, frame your subject, depress the shutter button
all the way, and hold it down until a beep sounds to signal the end of the
recording. The green LED light in the optical viewfinder will blink as the
recording is loaded onto the SmartMedia card. You can review the movie in
Playback mode. Needless to say, QuickTime Movies take up a lot of space on your
card, but if you manage to get a good movie (sometimes it requires a lot of
retakes), the novelty and memory is worth every megabyte!
Sharpness
Setting
The Sharpness setting was introduced with the previous Olympus
D-460 model. Indicated on the Record menu by a circle with a solid and dotted
edge, the Sharpness setting gives you the option of taking pictures with Normal
or Soft sharpness. Olympus suggests using the "Soft" setting when photographing
subjects that will be heavily manipulated on the computer. (In-camera sharpening
tends to cause problems when working on images in the computer. You're better
off working with an unsharpened image and sharpening it at the end, after you're
through with all your manipulations.) While we appreciate this new feature, we'd
also like to see an in-camera "Sharpen More" feature to take images in the
opposite direction.
Shutter Lag/Cycle Times
When you press the
shutter release on a camera, there's usually a lag time before the shutter
actually fires. This time allows the autofocus and autoexposure mechanisms time
to do their work, and can amount to a fairly long delay in some situations.
Since this number is almost never reported by the manufacturer or by other
reviewers, and because it can significantly affect the picture-taking
experience, Imaging Resource routinely measures it using a proprietary
electronic test setup. The table below shows the times we measured for various
camera operations. Startup, shutdown, and record-to-play times were quite fast,
and shutter lag was very much on a par with other cameras, even some more
expensive ones. Cycle time was slower, but comparable to other cameras in the
D-490 Zoom's price range.
|
| ||
|
|
|
|
| Power On -> First shot |
|
Start with lens retracted. Delay time until first shot is captured. |
| Shutdown |
|
Delay time from when the lens is retracted, to the camera powering down. (No pending image processing.) |
| Play to Record, first shot |
|
Delay time until first shot is captured. Quite fast, thanks to "quick review" mode, no need to switch to playback mode. |
| Record to play (max/min res) |
|
Lag time slower for maximum resolution images. Again, quite fast due to quick review mode. |
| Shutter lag, full autofocus |
|
Slightly slower than average |
| Shutter lag, prefocus |
|
(Prefocus means half-pressed shutter before shot.) About average |
| Cycle Time, low/high/TIFF res |
|
Faster than average |
| Cycle time, continuous mode |
|
(Sequence mode automatically switches to SQ resolution.) |
Overall, the D-490 is a reasonably fast camera: It has a slightly longer than average shutter delay, but at the same time is noticeably faster than average from shot to shot. The camera also tested faster than its 1.3 megapixel predecessory (the D-460) in switching from record to playback modes and back again. Thanks to the ability to enter playback mode directly from record mode, and then return simply by pressing the shutter button, the chances of missing shots while reviewing pictures are greatly reduced. This plus its very good shot to shot speed would lead us to give it a better than average "speed" rating relative to competing models.
Operation & User Interface
We found the
user interface on the D-490 simple to understand and easy to navigate, with most
of the controls located on the back panel of the camera or within a very
straightforward LCD menu system. The camera is quickly activated by sliding open
the lens cover, which puts it into Record mode, and just as quickly deactivated
by closing it. The Playback mode is accessed by closing the lens cover and
depressing the Display button after the camera has shut off, or by pressing it
twice in rapid succession when the camera is in Record mode. The LCD menus are
navigated with the four-way Arrow Pad next to the monitor. You scroll to the
appropriate function with the "Up" and "Down" arrow buttons, access that
function�s menu with the "Right" arrow button, and scroll through the menu
options with the "Up" and "Down" buttons. Press the "OK" button to set a
selection. Separate function buttons are available for Flash/Erase,
Self-timer/Print, Macro/Digital Telephoto, LCD monitor On/Off, Menu On/Off, and
the OK set. The SmartMedia slot is under a hinged plastic door on the right side
of the camera, and the digital, video, and AC jacks are clustered underneath
another plastic door on the left side.
Shutter Button
Located on the top right of the
camera, this button sets focus and exposure when halfway depressed and completes
the exposure when fully depressed.
Zoom Lever
Located directly to the right of
the shutter button, this lever rocks back and forth to control the optical zoom
from wide angle to telephoto when in Record mode.
In Playback mode,
pressing the Zoom lever toward "W," or wide angle, activates the index display,
showing previously captured images in groups of 4, 9, or 16 "thumbnails."
Pressing the lever toward the "T," or telephoto, enables the playback zoom
feature. (Captured images can be enlarged up to 3X on the LCD
screen.)![]()
Diopter
Adjustment Dial
Located to the left of the viewfinder, this sprocketed
dial can be adjusted to visually correct the viewfinder image for eyeglass
wearers.
Flash
Button (Delete Button)
Located to the right of the optical viewfinder,
this button is the first in a row of three rectangular control buttons. In
Record mode, the Flash button allows you to select from the following flash
settings (Off mode is accessed by simply closing the flash):
In Playback mode (when the lens cover is closed), this button deletes the image currently displayed on the screen, with an option to cancel.

Self-Timer
Button (DPOF Button)
Located to the right of the Flash button, this
button activates the camera's Self-Timer in Record mode, counting down 12
seconds before firing the shutter. A red LED glows steadily on the front of the
camera to indicate that it's counting down the time, then blinks for the last
few seconds before the shutter is tripped. (If you have the beep sounds enabled
via the Record menu, the camera also beeps as a warning just prior to the
exposure.)
In Playback mode, this button serves as the Digital Print
Order Format (DPOF) button, which enables you to designate DPOF printing options
for the image displayed. You can specify the number of prints you want made from
each image on the memory card, so a DPOF-compliant printer (with a compatible
memory card slot) can output your print order automatically.
Macro/Digital Telephoto
Button (Write Protect Button)
Located to the right of the Self-Timer
button, this button activates the Macro and 2.5X Digital Telephoto modes when
used in Record mode. One press of the button activates Macro, two presses
activates the Digital Telephoto, and pressing the button a third time puts the
camera back into regular Record mode.
In Playback mode, this button can
be used to "Write Protect" individual images from accidental erasure. The Write
Protect feature can be engaged on a single image display or on an index display
with the image highlighted. Once protected, the images will display a small key
in the upper right corner and cannot be erased unless the card is reformatted
with the Card Reformat function (or the Write-Protect is
disengaged).
Monitor Display Button
Located below the Macro mode
button, the Monitor Display button turns the LCD monitor on and off while in
Record mode. If you quickly press the button twice from the off condition, it
goes directly into Quick Display mode, which displays the last stored image on
the memory card. From there, you can scroll through previous captures with the
Left and Right arrow buttons.
When the LCD button is depressed In
Playback mode, the camera displays the last picture taken. From there, you can
access the Playback menu and scroll through captured images via the arrow
buttons.
Menu
Button
In Record mode, this button accesses the Shooting Menu.
In
Playback mode, the Menu button accesses the Playback Menu.
Up Arrow Button (Infinity Quick Focus
Button)
The Up arrow is on the top of the Arrow Pad on the back panel. In
Capture mode, the Up arrow button allows you to change settings within menus. If
depressed before pressing the shutter button halfway, it serves as the Infinity
Quick Focus button, useful when quick shooting is required.
In Playback
mode, this button also navigates through the Playback menu and through images
enlarged with the Zoom lever.
Down Arrow Button (2.5/8ft Quick Focus Button)
The Down
arrow is on the bottom of the Arrow Pad on the back panel. In Capture mode, the
Down arrow button allows you to change menu settings within menus. If depressed
before pressing the shutter button halfway, it serves as the 2.5/8ft Quick Focus
button, useful when quick shooting is required.
In Playback mode, this
button also navigates through the Playback menu and through images enlarged with
the Zoom lever.
Right and Left Arrow Buttons
In both Record and Playback
modes, these buttons navigate through menu options. In Record mode, when the
digital telephoto is enabled, these buttons zoom in and out of 2.5X digital
enlargement.
In Playback mode, these buttons scroll through captured
images in single display and index display format. All four arrow buttons allow
you to scroll around within an enlarged image when using playback
zoom.
OK
Button
In any mode, the OK button confirms menu selections and
changes.
Camera Modes and Menus
Record
Mode
The Record mode is accessed when the lens cover is opened and sets
up the camera for image capture. All images are automatically metered based on
existing light conditions, with some exposure options available to override the
automatic metering. These include exposure compensation, spot metering, white
balance, ISO, and flash.
While in Record mode, the Zoom lever on top
of the camera controls the optical zoom (up to 3X). Individual buttons on the
back of the camera control Flash mode, Self-timer, and Macro/Digital Telephoto
mode (up to 2.5X). A Monitor Display button activates a real-time LCD display of
the image being recorded through the camera lens. The Menu button calls up the
following Shooting options:
 Exposure Compensation (+/-): Sets the exposure compensation (EV
adjustment) from -2 to +2 EV in half-step increments.
Exposure Compensation (+/-): Sets the exposure compensation (EV
adjustment) from -2 to +2 EV in half-step increments.In Record mode, the Arrow Pad enables you to scroll through Shooting menu options and, when not in menu mode, to select one of two Quick Focus settings: Infinity or 2.5m/8ft. The OK button confirms selections within the Shooting menu.
Playback Mode
Playback Mode is accessible when the lens cover
is closed, or when Quick Review mode has been activated by depressing the
display button twice from the Record mode. The Playback mode allows you to view
saved images, delete unwanted ones, protect images, and access special functions
with a function card. Pressing the Menu button in Playback brings up the
Playback menu with the following options:
 Display Mode: Allows you to view photos in rapid succession (Fast
setting) or one at a time (Slow).
Display Mode: Allows you to view photos in rapid succession (Fast
setting) or one at a time (Slow).
Self-Timer Mode
Self-timer mode is accessed via the Self-timer
button on the camera�s back panel. Once activated by the shutter button, the
self-timer counts down 12 seconds before releasing the shutter. The Self-timer
icon blinks inside the LED panel on top of the camera for the entire 12 seconds.
On the front of the camera, a red LED light glows for the first 10 seconds, then
blinks for the remaining two. If the camera beep sound is enabled, the camera
will beep when the LED flashes, to let you know the exposure is imminent. The
mode is canceled by depressing the Self-timer button a second
time.
Sequence Mode
The Sequence mode allows you to shoot
continuously, at up to two frames per second, while holding down the shutter
button. The number of images recorded will depend on the amount of SmartMedia
space available and the image quality selected. If the quality setting is SHQ or
SHQ-TIFF when Sequence mode is selected, the quality setting will automatically
revert to HQ. Flash is not available when using this mode. A maximum shutter
speed of 1/30 second prevents blurring from camera movement, or slowing of the
sequence due to long shutter times. The Sequence mode is activated and canceled
by selecting the Drive option in the Record
menu.
| Resolution/Quality vs Image Capacity |
|
| ||
|
|
|
|
| |
| Uncompressed Quality |
|
|
|
|
| Fine Quality (SHQ) |
|
|
|
|
| High Quality (HQ) |
|
|
|
|
| Normal Quality (SQ-High) |
|
|
|
|
| Economy Quality (SQ) |
|
|
|
|
SmartMedia should never be removed from the camera while it is in operation
to avoid damaging the media. The card fits into a slot on the side of the
camera, protected by a plastic flap that snaps firmly into place.
The
entire SmartMedia card can be write-protected by placing a write-protection
sticker in the designated area. Write-protection stickers can only be used once
and must be clean to be effective. Write protection keeps the card free from any
alteration, except for card formatting. You can protect individual images while
in Playback mode by depressing the Write-protect button on the back of the
camera. Once depressed, a "lock" symbol appears in the LCD monitor and that
image cannot be erased unless the entire SmartMedia card is reformatted or the
protection is subsequently removed. Individual image protection is not available
when the write-protection sticker has been placed on the SmartMedia
card.
Stored images are assigned file numbers from 0001 to 9999. Through
the Record menu, the File number option allows you to select from Auto File and
Name Reset. Auto File assigns a continuing number from the last file number of
the last card used. This prevents the same file number from being used for
images taken together and saved on multiple cards. Name Reset sets the file
number back to 0001 each time a card is inserted into the camera.
The
Erase button allows you to erase individual images while in Playback mode. To
erase all frames, press the Menu button while in Playback mode and select the
Card setup function, then select Erase all frames. You can also erase the entire
card by selecting Format in the Card setup function. Format will erase even the
write-protected images.
We didn't measure the D-490 Zoom's image transfer
time to the host computer, but it'll be relatively slow since the camera uses
the older RS-232 serial connection protocol, rather than the much faster USB
connector now showing up on many digital cameras. Accordingly, we strongly
recommend an accessory card reader for transferring images to your computer, if
you plan to do any serious picture-taking.
Video Out The D-490 Zoom comes with a
video output connector for viewing images on a television set in the NTSC
format. (European versions of the camera presumably use the PAL timing
standard.) Once the camera is connected to the TV, keep the lens cover closed
and turn on the camera via the LCD Monitor button. All Playback mode menus and
options are available. The LCD monitor will automatically turn off once the
camera is connected to the TV. Olympus warns that a black border may appear
around the image with certain televisions and that this border will print if you
print an image directly from the television setup.
The D-490 Zoom comes with a
video output connector for viewing images on a television set in the NTSC
format. (European versions of the camera presumably use the PAL timing
standard.) Once the camera is connected to the TV, keep the lens cover closed
and turn on the camera via the LCD Monitor button. All Playback mode menus and
options are available. The LCD monitor will automatically turn off once the
camera is connected to the TV. Olympus warns that a black border may appear
around the image with certain televisions and that this border will print if you
print an image directly from the television setup.
Power The D-490 Zoom runs on four rechargeable AA batteries
(either nickel metal hydride, lithium, alkaline, or NiCd), or a pair of the new
high-capacity CR-V3 non-rechargeable lithium cells. The CR-V3 cells are very
high capacity, but rather expensive: Since they don't lose their charge when not
being used, they make a great backup to bring along in case your rechargeables
run out of juice, but really aren't a practical option for routine operation:
Get yourself a couple of sets of high-capacity NiMH AA cells and a good charger,
and stow the included CR-V3 cells in your camera bag.
The D-490 Zoom runs on four rechargeable AA batteries
(either nickel metal hydride, lithium, alkaline, or NiCd), or a pair of the new
high-capacity CR-V3 non-rechargeable lithium cells. The CR-V3 cells are very
high capacity, but rather expensive: Since they don't lose their charge when not
being used, they make a great backup to bring along in case your rechargeables
run out of juice, but really aren't a practical option for routine operation:
Get yourself a couple of sets of high-capacity NiMH AA cells and a good charger,
and stow the included CR-V3 cells in your camera bag.
There's an auto-off
timer that shuts the camera down after a minute or so, if left unattended. In
Record mode, it will wake up again in just a few seconds when you press the
shutter button. Overall power consumption was pretty typical for digicams we've
tested, but (like other Olympus models), is exceptionally low in capture mode
with the LCD turned off. This means that you could comfortably leave the camera
in the "on" position all day without having to worry about draining your
batteries. The table below details power consumption in various operating
modes:
|
|
|
| Capture Mode, w/LCD |
|
| Capture Mode, no LCD |
|
| Half-pressed shutter w/LCD |
|
| Half-pressed, w/o LCD |
|
| Memory Write (transient, LCD/not) |
|
| Flash Recharge (transient) |
|
| Image Playback |
|
The D-490's power consumption is actually slightly lower than that of the
previous 1.3 megapixel D-460. Overall, it shows better than average power
efficiency and, like most Olympus digicams, uses very little power when
the LCD is turned off: With the LCD off, you can easily leave it on all day
without worrying about battery power, a handy feature.
Included Software
A software CD comes
packaged with the D-490, containing Olympus Camedia Master 2.0 and QuickTime 4.0
for Windows 95/98/2000/NT 4.0 and Macintosh OS 7.6.1 and later. Olympus notes
that the iMac is not compatible with this image transfer system because of the
lack of a USB connection on the camera. iMac users will need to purchase a
USB-based card reader to import their photos.
Camedia Master 2.0 allows
you to transfer images from the camera to the computer once connected. You can
also retouch and enhance images, take advantage of greeting card and calendar
templates, produce slide shows, visual presentations, and screen savers. The
software incorporates Olympus' Panorama Stitch program, which joins together the
images taken in Panorama mode, turning them into one complete
image.
Test Results
As always in our
reviews, we strongly encourage you to view the sample
pictures we shot with the D-490 Zoom. If you're shopping for a camera,
there's simply no substitute for looking at and directly comparing images from
various cameras you may be considering. What makes a "good" picture is almost
entirely subjective, and it's ultimately up to each person to decide what makes
them happy. (Kinda like life, that way... ;-) View the pictures on the D-490 Zoom sample photo page, and compare them with ones
shot under similar conditions by other cameras, in the Comparometer(tm).
Download images and print them out on your printer, since appearances on-screen
can be deceiving. Then make your decision, based on what you
see!
A worthy update to its predecessors, the Olympus D-490 Zoom offers a
simple user interface with fewer external buttons, while providing improved
image quality in virtually every area: Colors are brighter and more accurate,
color saturation is more correct in more instances, and the lens seems sharper
as well. Providing 2.1 megapixels of resolution, a true 3X optical zoom lens,
and excellent exposure control, it is a powerful entry into the middle range of
the current (October, 2000) digicam market. Color accuracy is very good, and
images are sharp with excellent contrast. One consequence of the higher contrast
(and snappy-looking pictures) though, is that the D-490 tends to lose detail in
strong highlights and shadows, as you�ll observe in our outdoor portrait test.
However, we felt it offered a noticeable improvement in detail relative to its
immediate predecessor, the D-460. Part of this excellent detail is that the
camera seems to do a just-right job with the in-camera sharpening, making edges
nice and crisp, but showing no evidence of the "halo effect" produced by
over-sharpening.
In our laboratory resolution test, the D490 turned in a
pretty typical performance for a 2 megapixel digicam, showing visual resolution
of about 600 lines per picture height vertically, and 650 horizontally, before
aliasing set in. You can still distinguish the target lines quite a bit beyond
that point though, reaching as far as 750 lines vertically and 850 horizontally.
The in-camera sharpening does produce an odd bluish tint from about 250 to 600
lines though. (This tint could appear in shots of actual subjects if you had
closely spaced parallel lines, as would be the case with a picket fence seen at
a distance. We didn't observe it in any of our normal test subjects
however.
The D490 also did a very good job in the macro category,
capturing a minimum area of just 2.86 x 2.14 inches (72.57 x 54.43mm). Color
balance and detail look great, with just a hint of softness. The D490's built-in
flash does a pretty good job of throttling down for the macro area, though it's
just a little tricked by the shiny coin.
The D490 had a little trouble
with the low-light category, as we were only able to obtain useable images at
light levels as low as one foot candle (11 lux) with the 100 ISO setting. We
could distinguish the target at lower light levels, but the image was extremely
dim. Increasing the ISO to the 200 equivalent extended the shooting range to 1/2
of a foot candle (5.5 lux), and the 400 sensitivity setting produced bright
images as low as 1/4 of a foot candle (2.7 lux). However, increasing the ISO to
200 or 400 sensitivity equivalents also increased the noise level. We also
noticed that the D490 produced images with a rather warm cast as the light level
decreased. To put the D490's low light performance into perspective, an average
city night scene under modern street lighting corresponds to a light level of
about one foot candle. The D490 would work well at that light level at the ISO
400 setting, and with some manipulation of the images in the computer, you could
use it at ISO 100 there also. Thus, we'd rate the D490 as quite usable for
outdoor city night scenes, but not for much darker conditions.
We found
the D490's optical viewfinder a little tight, showing approximately 90 percent
of the image area at wide angle, and about 91.5 percent at telephoto (for both
image sizes). We also noticed that framing with the optical viewfinder resulted
in a shifted image. Our framing test resulted in the target being shifted
towards the bottom of the image, with a slight slant towards the lower left
corner. The D490's LCD viewfinder was much more accurate, showing approximately
98 percent of the final image area at wide angle, and about 99 percent at
telephoto (also at both image sizes). Since we generally like to see LCD
monitors as close to 100 percent accuracy as possible, the D490's LCD monitor
does an excellent job. We also shot a test with the digital telephoto enabled,
but we were unable to measure the accuracy because of the soft resolution and
difficulty in framing.
Optical distortion on the D490 is moderate to high
at the wide angle end, as we measured approximately 0.9 percent barrel
distortion. The telephoto end fared better, showing only about a 0.25 percent
pincushion distortion. Chromatic aberration is relatively low, showing about two
pixels of coloration on each side of the black target lines in the resolution
target image. (This is actually a very typical range among consumer digicams,
even a bit lower distortion than average on the telephoto end. We'd really like
to see less barrel distortion at the wide angle end of the lenses' range, so
have begun to judge cameras a little more harshly in that area. Thus, we report
the D-490 Zoom's barrel distortion as being "moderate to high", even though most
cameras it competes with show about the same amount of distortion. Hopefully our
critical attitude towards this characteristic will encourage manufacturers to
reduce this distortion in their lens designs.) Chromatic aberration ranges from
moderate at wide angle (we caught about two pixels of coloration on each side of
the corner elements in our resolution test target), to quite good at the
telephoto lens setting. (This distortion is visible as a very slight colored
fringe around the objects at the edges of the field of view on the resolution
target). Flash distribution looks good at the wide angle end, with just a little
falloff around the corners and edges. Telephoto flash uniformity is
excellent.
In summary, as we stated at the outset, we were quite
impressed with the D-490 Zoom's image quality, and feel it is a very solid
performer in the midrange digicam category.
Conclusion
Overall, we
found the D-490 Zoom an excellent camera for consumers accustomed to the
point-and-shoot style. There are some manual controls available, but the
majority of the exposure settings are automatically selected. The
straightforward user interface and the uncomplicated LCD menu system mean you
won't spend too much time flipping through the manual. We still find the need to
pause as you shut the camera down annoying, but the resulting smooth,
pocket-friendly contours make up for it. Compact and very portable, the D-490
Zoom's low price, nice assortment of features, and excellent image quality make
it a great solution for those wanting a good digicam that'll go just about
anywhere.
<<D-490 Sample Images | Additional Resources and Other Links>>
Reader Comments!
Questions, comments or controversy on this product? Click
this link to see what other Imaging Resource readers have had to say about
the Olympus D-490 Zoom, or add comments of your own!
