Nikon D70The Nikon D70 is an "entry-level" SLR loaded with features at a sub-$1,000 price.<<Shutter Lag & Cycle Time Tests :(Previous) | (Next): Camera Modes & Menus>> Page 10:Operation & User InterfaceReview First Posted: 04/14/2004 |
Operation and User Interface
The D70 may look a little intimidating to new users at first, but I think Nikon created an excellent transition from the slightly more pro-oriented D100 to the more consumer-oriented D70. The D70's controls are generally straightforward, though they may have a few too many buried functions to grasp at first. Fortunately for the new user, most functions can be performed via the onscreen menu as well.
I really like the overall control layout, which places the main shooting controls on top of the camera and the rest on the back panel. The new Mode dial is now dedicated to the eleven exposure modes and nothing else, keeping it simple for the user. Changing shutter speed, aperture, metering mode, etc. is quick and simple via the Main command and Sub command dials in combination with several buttons on the D70. Once you know where they are and what they do, you'll soon ignore the menu altogether.
The LCD menu itself is well organized and simple to navigate, with four main
tabbed menu pages. When shooting, the detailed information display in the viewfinder
window does a good job of communicating current camera settings. Anyone already
familiar with Nikon's SLRs, whether film or digital, will have no trouble operating
the D100. For less experienced users, an hour or two spent with the manual and
camera together should be enough to get comfortable.
Praise and Complaints
My biggest criticism of the D70 is the focusing indicators on the screen.
They're just not visible in too many lighting conditions. They're either not
lit brightly enough in low light situations, with too much light bleeding from
the active focus point into other inactive ones, or in brighter, more complex
scenes the black LED focus points disappear into the detail. I prefer the bright
red LEDs on cameras like the Digital Rebel. Though the D70's method looks more
futuristic and stylish, it does no good if they're so subtle that the photographer
doesn't know where the camera is focusing.
Also, the camera pretty consistently underexposes shots (generally by anywhere from 0.3 to 0.7 EV, in my experience), most likely to avoid blowing out the highlights. Not a terrible decision on Nikon's part, but still inconvenient. Finally, there's a decidedly cold bias to most indoor shots in situations where most other cameras perform better.
Other than those points, the Nikon D70 is very impressive. More technical details like Flash compensation, Auto White Balance Bracketing, and a smart interface combine with consumer oriented features like Digital Vari-Program modes to make for a camera that's friendly to both amateurs and pros. I particularly like that Nikon took the ISO setting off the main mode dial (where it was located on the D100) and put it on a rear-panel button. On the D100, it was too easy to be in the midst of changing the ISO setting just as the best shot of the day happened in front of you. The camera wouldn't respond to the shutter until you rotated the mode dial back to one of the shooting positions. By contrast, the D70 is always a shooting-priority camera, always responsive to the shutter button regardless of what mode you're in.
Control Enumeration, Command Dials
First are the two Command Dials, the Main Command Dial and the Sub Command Dial. Most camera settings are made by pressing and holding the appropriate button while rotating one or the other of these two controls. Functions controlled by these dials are as follows:
![]()
Main Command Dial: The Main Command Dial is located on the
back of the camera, in the upper right hand corner, right under your right thumb.
Used in conjunction with other buttons, this controls ISO, White Balance, Quality,
and AF Area Mode settings. It also enables or disables the auto-bracketing mode
when used with the BKT button. In Shutter Priority and Manual exposure modes,
this dial sets the shutter speed, although it can be made to control the aperture
instead, via a Custom Menu setting (14). It moves between the continuous capture
modes when the Shooting mode button is pressed, and modifies the Metering mode
and Exposure compensation buttons as well.
![]()
Sub-Command Dial: The Sub Command Dial is located on the front of the handgrip,
just under the shutter button, placed for your index or middle finger to grip.
This dial fine-tunes the white balance across the -3 to +3 range (arbitrary
units) when the White Balance button is pressed. It sets the resolution when
the Quality button is pressed. In Manual and Aperture Priority modes, it sets
the aperture value, although it can be made to control aperture instead, via
a Custom Menu setting. It also controls the White Balance Bracketing when the
BKT button is pressed.
Control Enumeration, Top Panel Controls, Right
The controls on the right side of the top panel are the primary shooting controls, generally dealing with immediate camera operations. Refer to the photo at below to orient yourself for the locations of the individual controls.
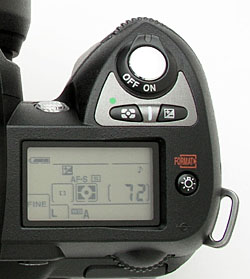

Power Switch: Surrounding the Shutter button on the top right of the camera,
this switch turns the camera on and off. (BIG PLUS: Unlike Nikon's models in
the D1 series, the D70 will delay switching off until it has finished writing
any buffered images to the memory card. This avoids the problem of losing any
buffered images if you shut the camera off too soon.) Camera startup is so rapid,
our testing could not detect any startup time lag. An amazing first in
a camera of this type and price point.
Shutter Button: In the center of the Power switch, on the top of the camera, this button sets focus (when in autofocus mode) when halfway pressed and fires the shutter when fully pressed. Unlike most cameras, you can choose whether or not the shutter button also locks exposure, via an option on the Custom Settings menu, and you can disable AF via the shutter button with another Custom Setting.
When an image is displayed on the LCD monitor, halfway pressing the Shutter button dismisses the display and readies the camera for shooting. (A partial expression of Nikon's "shooting priority" philosophy, a very welcome change relative to the D100's highly "modal" control behavior.)
![]()
Metering selector button: Just behind and left of the shutter release, this
button used in conjunction with the Main command dial switches between Spot,
Center-Weighted, and 3D Color Matrix metering options.
![]()
Exposure Compensation Button: Directly behind and right of the Shutter button
on the top of the camera, pressing this button while turning the main command
dial sets the Exposure Compensation from -5 to +5 exposure equivalents (EV)
in one-third step increments. One-half step increments can be selected instead
via a Custom Setting.

Illuminate Button: Just to the right of the status display panel on top
of the camera, this button illuminates the panel with a green light. Pressing
and holding this button together with the Shooting mode button signals the camera
to format the memory card. (The top-panel LCD data readout flashes "For,"
but doesn't immediately format the card. Press both buttons a second time to
confirm the format operation.) Kudos on this card formatting shortcut!
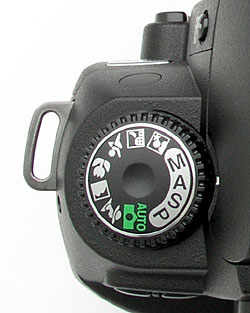
Control Enumeration, Top Panel Controls, Left
The left side of the D70's top panel is dominated by the Mode Dial. Refer to the shot below to orient yourself for the locations of the individual controls.

Flash Popup/Sync Mode Button: Just left of the flash in the front, holding
this button and rotating the Main Command Dial cycles between the five flash
sync modes (Fill, Red-Eye Reduction, Red-Eye Reduction with Slow Sync, Slow
Sync, and Rear Curtain Sync). Pressing and holding this while turning the Sub
command dial chooses flash compensation values. A single press and release on
this button pops up the built in Speedlight.
Mode Dial
Much simplified from the D100, the D70's Mode dial no longer attempts to do double-duty as a Function dial. All the functions have been moved to buttons that work with the Main- and Sub-command dials, better adhering to Nikon's "shooting priority" philosophy. (This was one of my biggest complaints about the D100's control setup, as covered in my D100 review.(
 Program: Puts the camera
in charge of aperture and shutter speed, though all remaining camera settings
are available. (And you can vary the combination of aperture and shutter speed
the camera has selected, by rotating the Main Command Dial.)
Program: Puts the camera
in charge of aperture and shutter speed, though all remaining camera settings
are available. (And you can vary the combination of aperture and shutter speed
the camera has selected, by rotating the Main Command Dial.)
 Shutter Priority:
The user controls shutter speed, from 1/8,000 to 30 seconds, while the camera
sets the aperture value.
Shutter Priority:
The user controls shutter speed, from 1/8,000 to 30 seconds, while the camera
sets the aperture value.
 Aperture Priority:
The opposite of Shutter Priority mode, this mode lets the user control the
aperture, while the camera sets the shutter speed.
Aperture Priority:
The opposite of Shutter Priority mode, this mode lets the user control the
aperture, while the camera sets the shutter speed.
 Manual: Gives
the user complete control over the exposure (both shutter and aperture settings),
and provides access to the camera's Bulb shutter setting for exposures longer
than 30 seconds.
Manual: Gives
the user complete control over the exposure (both shutter and aperture settings),
and provides access to the camera's Bulb shutter setting for exposures longer
than 30 seconds.
 Auto: The camera
sets everything. Used for snapshots or users who just don't want to be bothered
with the details of how the camera will do its work. Flash is set to front
curtain sync.
Auto: The camera
sets everything. Used for snapshots or users who just don't want to be bothered
with the details of how the camera will do its work. Flash is set to front
curtain sync.
 Portrait:
Adjusts Aperture to soften background details to help the main subject stand
out more clearly. Flash set to front curtain sync
Portrait:
Adjusts Aperture to soften background details to help the main subject stand
out more clearly. Flash set to front curtain sync
 Landscape:
Turns up color, saturation, contrast, and enhances outlines for city and forest
landscape shots. Flash is turned off in this mode.
Landscape:
Turns up color, saturation, contrast, and enhances outlines for city and forest
landscape shots. Flash is turned off in this mode.
 Close up:
Reds and greens are pumped up, camera sets center focus point, flash set to
front curtain sync.
Close up:
Reds and greens are pumped up, camera sets center focus point, flash set to
front curtain sync.
 Sports: Uses
high shutter speed, camera switches to continuous focus, both flash and AF
illuminator are turned off and will not fire.
Sports: Uses
high shutter speed, camera switches to continuous focus, both flash and AF
illuminator are turned off and will not fire.
 Night Landscape:
Uses a slow shutter speed with no flash.
Night Landscape:
Uses a slow shutter speed with no flash.
 Night Portrait:
Uses slow shutter speed with flash, balancing the two so that night portraits
look natural even with flash.
Night Portrait:
Uses slow shutter speed with flash, balancing the two so that night portraits
look natural even with flash.
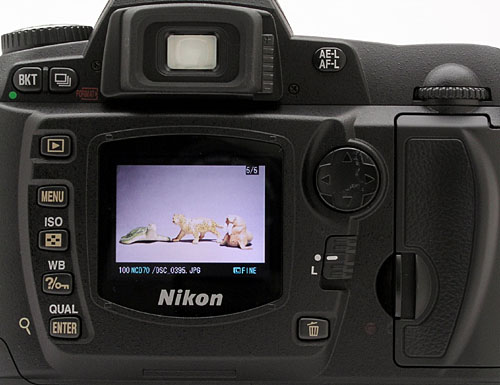
Control Enumeration, Rear Panel Controls
Most of the rest of the camera's controls are located on the rear panel. The controls along the top of the back panel generally relate to shooting settings, while those on either side of the LCD monitor are associated with playback and menu navigation. We'll start our tour at the top left. - Refer to the photo below to orient yourself.

Auto Bracketing Button: Positioned in the top left corner of the camera's
back panel and marked "BKT," pressing this button and rotating the
Main Command Dial enables the Auto Bracketing function. Turning the Sub-Command
dial instead of the Main Command Dial changes the bracketing step size. Pressing
and holding this button in conjunction with the Metering Mode button resets
the main camera settings to their default values. (Very handy for quickly getting
back to "neutral" when you have a number of settings active. More
kudos to Nikon for this useful shortcut.)

Shooting Mode Button: To the right of the Auto Bracketing button, pressing
this button and rotating the Main Command Dial switches between Single frame,
Continuous, Self-timer, Delayed remote, and Quick response remote modes. Pressing
and holding down this button together with the Illuminate button formats the
memory card.
![]()
Diopter Adjustment Switch: Sitting vertically next to the right side of
the viewfinder eyepiece, this slide control adjusts the optical viewfinder to
accommodate eyeglass wearers. (Range is -2 to +1 diopters.)
![]()
AE/AF Lock Button: Located just right of the viewfinder, this button locks
the exposure and/or focus when pressed. The settings remain locked as long as
you hold the button down, regardless of any action of the shutter button. Several
options for this control can be set via Custom Settings Menu 15. You can program
it to lock either focus or exposure separately, or both together (the default).
You can also change its operation so a single press locks and holds the exposure
setting. (No need to keep the button pressed down.) Finally, you can set the
AE/AF lock button so it alone controls the autofocus system, meaning the autofocus
won't actuate when the shutter button is half-pressed, only when the AE/AF lock
button is pressed instead.
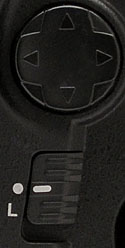
Multi selector / Focus Area Selector and Lock / Four-Way Arrow Rocker Pad:
Just off the top right corner of the LCD monitor on the back panel, this rocker
button with its associated locking switch (directly below it) controls the autofocus
area in Record mode. (Unless the Closest Subject focus mode is enabled, in which
case the camera automatically selects the AF area corresponding to the closest
subject.) The switch beneath it unlocks the rocker control and pressing any
side of the rocker moves the active AF selection in that direction.
In Playback mode, the rocker pad's up and down arrows scroll through captured images while the right and left arrow buttons cycle through various information displays for each image. When you zoom in on an image in playback mode, the rocker pad lets you scroll around the magnified image.
In any settings menu, the arrow directions on this control are used to navigate through the LCD menu system.
![]()
Delete Button: Just below the locking switch of the Four-Way Arrow pad,
this button deletes individual images in playback mode, with a confirmation
screen to give you the opportunity to change your mind.
![]()
Playback Button: Just off the top left corner of the LCD monitor, this button
displays the most recently captured image, putting the camera into Playback
mode. Once an image is displayed, the arrow keys navigate through the other
images saved on the memory card. This button also dismisses the image display.
![]()
Menu Button: Below the Monitor button, this button displays or dismisses
the LCD menu system.

ISO/Thumbnail View Button: Just below the Menu button, this button works
in capture mode to set the ISO. Press and hold this button and rotate the Main
command dial to adjust the ISO. When the camera is displaying captured images
in Playback mode, pressing this button repeatedly cycles through four-image
and nine-image thumbnail displays or a full-screen display. The chosen display
mode remains selected indefinitely, even if the camera is turned off. When a
thumbnail view is activated, you can scroll a cursor through the thumbnail images
very rapidly with the rocker pad. Pressing the Enter button magnifies the image
that's currently selected. Once an image has been magnified, turning the Main
Command dial while the Thumbnail View button is held down changes the level
of magnification, showing the current zoomed display area as a red-bounded rectangle.
Releasing the Thumbnail View button displays the magnified portion of the image
full-screen. See the previous Viewfinder section of this review for a more complete
description of this function.

White Balance/Protect/Help Button: In capture mode, this button sets the
overall color balance. Standard preset values are set by holding this button
and turning the Main command dial, and include Auto, Incandescent, Fluorescent,
Direct Sunlight, Flash, Cloudy, and Shade settings. A PRE (Preset or Custom)
mode is the manual adjustment. Turning the Sub-Command Dial in any exposure
mode but Manual varies the white balance from the default for that setting.
This lets you shift the color balance in relatively small increments, a very
handy feature. Once the Playback button is pressed, this button write-protects
individual images, protecting them from accidental deletion. (Note though, that
even "protected" images will be lost when a card is reformatted.)
If an image is already protected, pressing the Protect button removes protection.
Finally, when in Menu mode/Custom Settings, pressing and holding this button
brings up help to explain each custom setting.

Quality/Enter/Magnify Button: Just below the Protect button, this button
confirms menu selections. In conjunction with the Main command dial, it sets
image resolution, and with the Sub-command dial it sets compression. Finally,
it also activates the playback magnification, when a captured image is displayed
in the LCD monitor.
Control Enumeration, Front Controls:
There are only two controls on the front of the camera body. They are:

Depth of Field Preview Button: On the right side of the body (as viewed
from the back), tucked underneath the right of the lens mount, this button lets
you check the depth of field with the current aperture setting. Pressing the
button stops down the lens, so you can get an idea of the depth of field through
the viewfinder.

Lens Release Button: Just above the Focus Mode Selector Dial, this button
releases the lens from its mount when pressed and held as you turn the lens.
It's best to hold the lens with your right hand while pressing the button and
turning the lens to the left.
Reader Comments! --> Visit our discussion forum for the Nikon D70!

Follow Imaging Resource: