Go to Kodak DC-215 Data Sheet
Go to Kodak DC-215 Pictures Page
Up to Imaging Resource Cameras Page
This page has been formatted to facilitate printout of the review.
Use your browser's "Back" button to return to the previous page, or the links at the top and bottom of this page to navigate to related information. If you have difficulty fitting the text on this page onto your printer output, simply resize your browser window to a narrower width and print again.
![]() Back to Full Kodak DC-215 Review
Back to Full Kodak DC-215 Review
Go to Kodak DC-215 Data Sheet
Go to Kodak DC-215 Pictures Page
Up to Imaging Resource Cameras Page
![]()

![]()
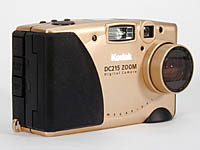
Kodak DC-215 Digital Camera
Kodak updates their popular DC210 with better resolution, better color, and a rugged new all-metal case.
(Review first posted 26 November, 1999)
 |
|
1152x864 megapixel resolution |
|
|
Fixed-focus 2x optical zoom lens | |
|
|
29-58mm equivalent focal lengths | |
|
|
Simple user interface | |
|
|
"Kodak color" |
EZ Print Link
Readers have requested free-formatted versions of our reviews (without the graphical accouterments of our page design), to make printing easier. We are accommodating this request with special copies of each review, formatted to allow the text flow to be dictated by the browser window. Click here for a print-optimized page. ![]()
Manufacturer Overview
Kodak has to be near the top of the list in anyone's mind when you mention "photography." While the bulk of their enormous business is built upon conventional film-based photography, they clearly recognize that the future lies with digital. Accordingly, they have developed arguably the broadest line of digital cameras in the business, ranging from basic point & shoot models to professional ones costing in excess of $20,000.
The DC215 represents the current entry point for their line of cameras, aimed at the casual point & shoot user looking for good color and ease of use in an inexpensive digital camera. It's an update of the enormously popular DC210 and DC210 Plus, using the same lens and CCD, but with improved processing hardware and algorithms.
Highlights
![]()
Executive Overview
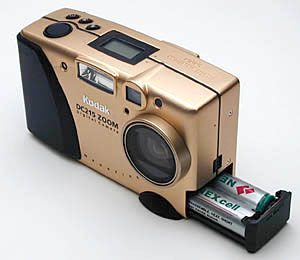
The DC215 is the latest entry-level camera in Kodak's extensive digicam lineup. We reviewed the "Millennium Edition" of the camera, which sports an all-metal, gold-toned body, and comes equipped with a USB-based card reader to greatly speed image downloads to your computer. (The "Standard Edition" has a silver-toned body, and doesn't include the card reader.) The compact metal case and mass provided by the four AA batteries give the camera a solid heft, distinct from many of its plastic-bodied contemporaries.
![]()
As the follow-on to their very successful DC210 digital camera, the Kodak DC215 is designed first and foremost to be easy to use for the non-technologist point & shoot camera user. The most common control settings (flash mode, macro setting, and self-timer) are made directly through external buttons. Other functions are selected via a very graphic and user-friendly menu system on the camera's back-panel LCD screen. The menu system is navigated intuitively by using up and down, right and left arrow buttons adjacent to the LCD, and the aptly named "Do-It" button to confirm selections. A slider switch selects major camera operating modes (capture, review, connect (to the computer), and preferences setup). A toggle control for the zoom lens and the shutter button complete the user interface.
![]()
Shots can be framed using either the "real view" optical viewfinder, or the more accurate LCD preview display: As in most digital cameras, relying on the optical viewfinder saves considerable battery power.
![]()
The fixed-focus zoom lens covers a somewhat wider field of view than those of most digicams, with an equivalent focal length range of 29-58 mm. When not in use, the lens retracts into the body, and a snap-on lens cover protects it from scratches and dust. (The lens cover is thoughtful attached to the camera body by a short tether, preventing its loss: Other digicam makers take note!) As noted, the lens is a fixed-focus design, which means the camera is a bit quicker to snap a shot, as it doesn't need to wait for an autofocus mechanism to complete its work. The camera likewise has no trouble when shooting flash pictures in near-dark conditions, where autofocus designs may not focus properly. The downside of the fixed-focus design is some softness in subjects shot at infinity, and a restricted macro focusing range.
![]()
Images are stored on a CompactFlash memory card. An 8 megabyte card is included with the Millennium Edition version, a 4 megabyte one with the Standard Edition. Under control of the menu system, the camera can capture images in either of two resolutions (1152 x 864 or 640 x 480 pixels), and with any of three "quality" settings. (The three quality settings correspond to varying amounts of data compression applied to the images: "Good" quality images take less space in memory than do ones shot in "Better" or "Best" modes, but they are less sharp and show more artifacts from the compression process.)
![]()
A Video Out cable allows you to connect to a television set for image playback, and the camera supports both NTSC and PAL video standards. Several CDs come with the camera, including both Mac and Windows versions of Adobe PhotoDeluxe and PageMill, as well as ArcSoft's handy PhotoPrinter program for efficiently printing multiple images on full sheets of paper. Computer interface is easy regardless of whether you use the Millennium Edition's card reader, or just connect via the serial cable: Kodak's desktop Mounter software makes the camera appear as just another disk drive on your desktop, on Windows systems. While rather slow (as are all serial-interfaced cameras), the "mounter" interface is very intuitive and convenient. On Mac, the standalone transfer application is very easy to use as well.
![]()
Camera Design
The DC-215 is a visually appealing box of 4.5 x 2.6 x 1.7 in. (115 x 43 x 67.5 mm), much like traditional point and shoot cameras. The warm gold tone metal body (silver tone for the regular edition) and matte black rubber hand grip and lens cap give a pleasing appearance. Weighing in at 10.56 oz. (303 g), excluding the requisite 4 AA batteries, the DC215 has a solid heft, and will likely prompt many users to use both hands when shooting. The rubber hand grip is of benefit (to right-handed users at least) in maintaining a good grip, as is the thumb impression on the right rear. With its heft encouraging a two-handed grip though, the lens position to the far left of the camera makes it easy to place a finger in front of the lens without seeing it in the viewfinder. While QuickView mode will allow for immediate deletion and retaking of such shots, initial caution is still advisable. While the camera is too heavy to carry solely by the wrist strap, using it when taking photos will protect the camera from being dropped.
![]()
![]()
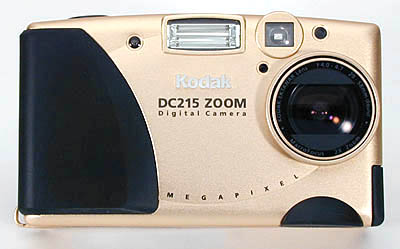
Taking a "walk around the camera," a front view shows the on-board flash, viewfinder window (just above the lens), the lens itself, and several small openings for exposure and flash sensors and the self-timer alert LED.
![]()
![]()
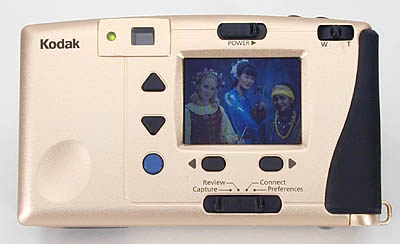
The rear of the camera is where most of the controls are located. From left to right across the top are the viewfinder eyepiece, the power switch, and the toggle control for the zoom lens. A "mode" switch is at the bottom, selecting major camera operating modes. The color LCD screen is in the center, flanked by up/down, right/left arrow buttons for navigating the LCD menu screens, and controlling exposure compensation and exposure lock in capture mode. The blue button at the lower left hand corner of the LCD screen is the aptly-named "Do-It" button, which confirms selected menu options, and also turns the LCD panel on or off for viewfinder operation when in capture mode.
![]()
![]()
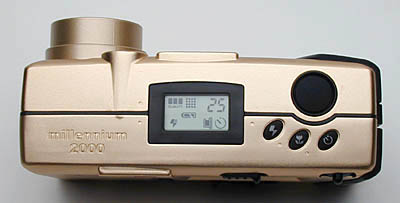
The camera's top contains a small black & white LCD data readout showing camera status and settings, as well as three buttons controlling flash, macro, and self-timer modes, respectively. The top-panel controls are rounded out by the shutter button, at upper right in the picture above.
![]()
![]()
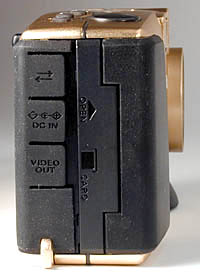
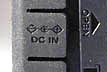
The right hand side of the camera provides access to the CompactFlash memory card, and the video output, computer I/O, and power input jacks. The CompactFlash slot is covered by a hard plastic hatch, while flexible rubber flaps cover the smaller I/O and power jacks.
![]()
![]()
The left hand side of the camera contains only the battery compartment hatch and its latch. Although it causes problems with the tripod socket location (see below), we liked the slide-out battery tray, which we felt made battery changes somewhat easier than do typical built-in battery compartments.
![]()
![]()
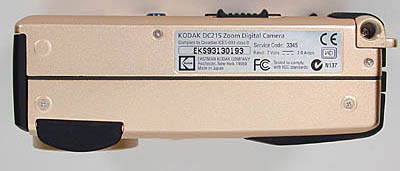
The bottom of the DC215 shows only the tripod socket, located in the extreme upper right-hand corner, as shown in the photo above. This socket location is mandated by the location of the battery compartment, which occupies most of the bottom of the camera. While we applaud the all-metal construction of the socket, we found its location in the extreme corner of the case very awkward.
![]()
Viewfinder
Like most current digicams, the DC215 offers both optical and LCD viewfinders. The optical viewfinder is the "real view" type, meaning that you frame your shots based on the boundaries of the area you see in the viewfinder, rather than having to rely upon smaller framing marks within a larger view. The optical viewfinder zooms in and out to follow the action of the zoom lens, and its representation of the final image is slightly more accurate than average: We measured the optical viewfinder's accuracy at 90% of the final image area for both wide angle and telephoto shots. (Most optical viewfinders show between 85 and 90% of the final image area.) In contrast, the LCD viewfinder provides the near-100% accuracy we've come to expect (and value) in Kodak digicams. The LCD viewfinder defaults to "off" to conserve battery power, but may be turned on at any time by pressing the "Do-It" button. A second press of the button turns it off again.
![]()
Kodak doesn't provide any pixel-count for the LCD display on the DC215, but it isn't one of the highest-resolution units we've seen: We'd estimate its resolution as something on the order of 70K pixels. This is certainly enough for framing shots, but the LCD menu items could be a bit sharper. The LCD's refresh rate seems reasonably high, helping with the framing of moving subjects. As is common among lower-end digicams, the optical viewfinder lacks a dioptric adjustment for eyeglass wearers. The DC215's LCD display is about typical in its viewability in bright light. (Most LCDs are difficult to see in very bright light or direct sunlight.)
![]()
Optics
The lens is an optical glass, fixed focus 2x zoom design, with a focal length range equivalent to 29 mm to 58 mm on a 35mm camera. This focal length range is shifted toward the wide-angle end, a characteristic that made the 215's predecessor (the DC210) very popular with realtors. (The wider-angle range of the lens made it well-suited to squeezing in more of the room in interior shots.) The lens' focusing range is 1.6 feet (0.5m) to infinity at the wide angle end of its range, and 3.3 feet (1.0m) to infinity at the telephoto end. Macro mode has a fixed focusing distance of 8 inches. In our tests, the DC215's lens is reasonably sharp at close and medium distances, but somewhat soft when photographing distant objects, as evidenced in our outdoor "real estate" test shot of the house. The fixed-focus design does have the advantage though that it's always in focus, experiencing none of the autofocus problems common to more-sophisticated cameras when shooting with flash in dark surroundings. (Many autofocus cameras will simply refuse to fire if the light level is too low for their autofocus systems to work.)
![]()
Macro
Macro or close-up mode is accessed by the close-up button, also located on the top of the camera. In macro mode, a subject as small as 2.23 x 3 inches (57 x 76 mm) can fill the frame. This isn't as close as many higher-end digicams can manage, but is adequate for typical shots of small household objects. The shooting distance in Macro mode is fixed at 8 inches. The LCD monitor automatically turns on when entering Macro mode and the Macro indicator appears on the display. To cancel the mode, hit the macro button again, or turn off the camera.
![]()
Exposure
Almost fully automatic, the Kodak DC215 Zoom handles shutter speed (range of 1/2 to 1/362 second), aperture (wide f/4.0 to f/6.0; telephoto f/4.9 to f/13.5), and focus on its own. A plus or minus 2 EV (f-stop, for us old-timers) exposure adjustment setting is available, as is exposure locking, recommended for panoramic pictures where the lighting will vary as you pan to shoot the separate segments of the panorama. The range of exposure settings and Kodak's stated light sensitivity rating of ISO 140 should result in a usable light range from about 6 to 12,000 foot-candles (66 to 130,000 lux, or about 9.5 to 20.5 EV in the measuring system we've used previously in these reviews). The lower end of this range would correspond to an average-to-bright residential interior, while the upper end is about equivalent to full sun at mid-day. (Extremely bright beach or snow scenes could be overexposed somewhat.)
![]()
 The +/- 2EV exposure adjustment is useful in situations where your subject is significantly brighter or darker than the background, or where the entire image is much brighter or darker than normal (e.g., beach and snow scenes). Cameras' exposure systems generally assume that the scene you're photographing averages out to a neutral gray. Accordingly, they adjust the exposure to produce this light level in the final image. Problems arise when the whole scene is very bright (a beach or snow scene, as mentioned above), in which case the exposure system would under-expose, rendering the bright subject as a rather gray tone, rather than the light color it actually is. Likewise, if your subject is silhouetted against the sky or other bright background, the exposure system will underexpose it. Most digicams, the DC215 among them let you adjust the default exposure the metering system would select. On the DC215, this adjustment is activated by pressing the right arrow button under the LCD window while in capture mode. Once you're in this mode, you can adjust the exposure up or down in 0.5EV increments by pressing the up or down arrow buttons. Press the purple "Do It" button to confirm your choice. (Note that the LCD viewfinder must be enabled to use this function.)
![]()
To use the exposure-lock feature, you must set it before taking the first of a series of pictures. It locks-in the exposure setting determined for the first picture shot after it's set, and uses that same setting for all subsequent shots until the function is canceled or the camera is turned off. The exposure lock function is accessed by pressing the right-arrow key twice while in capture mode. (One press takes you to the exposure compensation menu, as described above, the second takes you to the exposure lock screen.)
![]()
 When either the exposure compensation or exposure lock feature is used, icons will appear in the LCD window when previewing pictures.
![]()
Flash
The DC215's built-in flash offers five settings or "modes" for different picture-taking conditions. These include off, always on ("fill"), auto, red-eye reduction auto, and red-eye reduction fill. The flash setting shows in the Status Display window at the top of the camera. Adjustments are conveniently made when in capture mode by pressing the flash button located on top of the camera, near the shutter control.
![]()
In wide angle mode, the flash range is specified as being from 1.6 to 9.84 feet (0.5 to 3.0 m), while in telephoto it is specified at 3.2 to 8.8 feet (1.0 to 2.7m). These ranges in fact agreed fairly well with our own measurements, although we're puzzled by the increased minimum-distance specification in telephoto mode. Our standard tests are really oriented toward checking the maximum range in telephoto mode, and we found that the DC215's flash worked well out to about 9 feet, reasonably well to 10 feet, then fell off rather rapidly beyond that distance. In macro shooting conditions, we found that the flash was a bit bright at the minimum focusing distance, but still somewhat usable: A piece of copier paper taped (loosely) across the flash opening would doubtless make the flash entirely usable for close-up photos.
![]()
Quick Delete
One of the great features of digital cameras is the ability to review and throw away images you don't want - No more wasted exposures! The DC215 has an optional "QuickView" mode (enabled via the setup menu) that briefly displays each shot on the LCD just after it's taken. When the QuickView image is displayed, a small trash can icon appears above the left arrow button. Pressing this button while the image is still being displayed prevents it from being saved to the memory card.
![]()
Self-Timer
The Self-Timer function is controlled via the Self-Timer button on the top of the camera. After pressing the Self-Timer button, focus the subject and then fully press the shutter button. The shutter will fire in 10 seconds. The Self-Timer LED on the front of the camera will light for the first 8 seconds and then blink for the remaining two. The self-timer function can be used in conjunction with Macro mode (see below), helping insure sharp macro shots when the camera is used with a tripod.
![]()
Shutter Lag/Cycle Times
All cameras have some delay between when the shutter release is pressed and when the shutter actually fires. In digital cameras, this time is used to focus the lens and set the exposure parameters (exposure time, aperture, and white balance adjustment). The DC215 was somewhat faster in this area, thanks to its fixed-focus lens, which eliminated the time normally required for autofocus operation. Shutter delays averaged 0.55 seconds for normal picture-taking, falling to 0.38 seconds when exposure and white balance were precomputed by half-pressing the shutter button before the shot was actually taken
![]()
Shot-to-shot cycle times are a bit on the slow side, compared to the current crop of digicams. Maximum-resolution/quality images can be captured every 11.4 seconds, while minimum-quality ones require about 10.2 seconds between shots.
![]()
Operation & User Interface:
The DC215 user interface is quite easy to grasp, with major camera feature settings accessed via the "Setup" menu system. As experienced digicam users, we found the need to switch to setup mode to make virtually any setting a bit tedious, but recognize that grouping all the camera settings together in a single menu system will make the unit much easier to operate for beginning users. Frequently-used controls (flash mode, self-timer, and macro setting) are accessed via top-panel buttons, and controls specific to capture mode (EV compensation and exposure lock) can be accessed with one or two presses of the right-arrow button under the LCD screen. The zoom lens control is right under your right thumb as you hold the camera, and the CompactFlash memory card slot and various I/O ports (computer connection, video out, and power connector) live on the left side of the camera (viewed from behind), protected by a plastic door and rubber flaps. The batteries are located in a tray that conveniently slides out from the right-hand side of the camera when they need to be changed.
![]()
![]()
Power Switch
The camera turns on when you slide the power switch to the right, the lens telescoping out when you do so. It turns off in the same manner, by actuating the power switch again. The power switch is located on the rear of the camera, just above the LCD screen.
![]()
Shutter Button
Located on the top right of the camera, this button sets white balance and exposure when halfway pressed and takes the exposure once fully pressed.
![]()
![]()
Zoom Lever
Located on the back of the camera at upper right, this lever rocks back and forth to control the optical zoom from wide angle to telephoto. The letters "W" and "T" indicate the direction to press the lever to take the appropriate action.
![]()
![]()
The Mode Selector Switch
Located on the back of the camera at the bottom, under the LCD display. Slide back and forth to select one of four major operating modes:
![]()
![]()
![]()
The "DO-IT" Button
Located on the back of the camera at lower left, just off the corner of the LCD screen.
![]()
![]()
![]()
The Arrow Keys
Located on the back of the camera, to the left and below the LCD display screen.
![]()
![]()
Camera Modes and Menus
Capture Mode
Automatically adjusts each image based on existing light conditions. The camera is almost completely automatic, providing options only for exposure compensation or exposure lock, as described earlier. (White balance is fully automatic, with no manual overrides.)
![]()
Review Mode
Review mode on the DC215 provides several options for viewing your pictures. The default mode shows smaller thumbnails of images, letting you step through images stored on the memory card very quickly. Other options include magnified display, print ordering, and slide show display.
![]()

The screen shot at right shows the default thumbnail-based review-mode display. Only a single photo is in the camera in this shot: If there were more than one, other thumbnails would appear along the bottom of the display. Pressing the DO-IT button in this mode brings the selected image up full-screen. The left and right arrow keys select the prior or subsequent images on the memory card, while the up/down arrow keys select other menu options. With an image displayed full-frame, you can start a "slide show" by pressing the DO-IT button again. In slide-show mode, the camera will cycle continuously between all photos on the card, displaying each one for five seconds. To save battery power, slide-show mode will stop after 5 minutes if you're not using an AC adapter.
![]()

This screen shot shows the delete menu, which allows you to delete either the current photo, or all pictures in the camera's memory at once. (The menu entry below this one provides for a 2x magnified playback on the LCD screen, allowing you to scroll the magnified "window" around the full image via the arrow keys. We unfortunately neglected to capture a screen shot for this option.)
![]()

The DC215 supports the "DPOF" (Digital Print Order Format) standard. This lets you mark prints on the memory card for subsequent output on a Kodak PictureMaker kiosk, or on an inkjet printer with a built-in card reader. (In fall of 1999, Kodak and Lexmark announced the Lexmark/Kodak "Personal Picture Maker" inkjet printer, which has slots to accept both CompactFlash and SmartMedia memory cards.) Using the Print Order option, you can order prints of individual pictures on the card, or an "index print" containing small versions of all the images on a single page. You can order different numbers of prints for each image on the card, unless you're requesting an index print.
![]()
Connect Mode
The DC215 has an RS-232 serial port to connect to the host computer. (See the software description below.) To connect to your computer, slide the mode switch to the "Connect" position, and plug in the serial cable.
![]()
Preferences (Setup) Mode
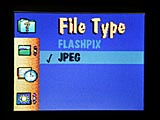
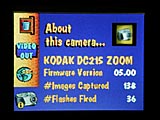
As we mentioned earlier, most of the details of the DC215's operation are controlled from the Setup menu. A series of icons provide several screens' worth of menu options. As you scroll through the menus, the current setting of each option appears next to the icon corresponding to that function. Since the individual menu displays show both the initial icon and the options, we'll include small versions of each menu screen here, so you can better see the available options for each.![]()


![]()
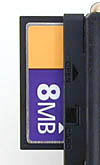
Image Storage and Interface
Images are stored on ATA-compatible CompactFlash (CF) memory cards. A 4 megabyte (standard edition) or 8 megabyte (Millennium edition) card comes with the camera. Additional cards of varying capacity can be purchased.
![]()
The remaining image capacity in the current resolution/quality mode is shown on the LCD monitor when the camera is turned on. When the number reaches zero, the camera beeps and the green LED next to the optical viewfinder flashes. The table below shows the number of images of each size that can be stored on the 8MB memory card provided with the Millennium edition (divide the number of images by two for the standard edition, to allow for the smaller included memory card), and the approximate level of JPEG compression used for each.
![]()
| Resolution/Quality vs Image Capacity |
|
|
||
|
|
Compression |
|
Compression |
|
| Fine Quality |
|
|
|
|
| Normal Quality |
|
|
|
|
| Basic Quality |
|
|
|
|
![]()
![]()
The DC215 connects to the host via a standard RS-232 serial connection. Until recently, this was the only way digicams connected to host computers, and it is still by far the most common. (The alternative is the much-faster USB port.) The DC215 transfers images to the host computer at a rate of about 6 kilobytes per second, taking 38 seconds for a typical maximum resolution file (247K) to cross the wire.
![]()
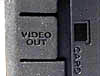 Video Out
The DC215 has a video output connector for viewing images on a television set (in either NTSC or PAL formats). Once the camera is connected to the TV, switch the camera to Review mode, and turn it on. All the Playback mode menus and options are available, and will appear on the video monitor instead of the internal LCD screen. (The LCD monitor will automatically turn off once connected to the TV.) Note that the output from the DC215 is a video signal, not a television one. Thus, you'll need either to have a TV set with direct video inputs on it, or to run the signal through a VCR or camcorder with video-in jacks first.
![]()
Power
The DC215 runs on four rechargeable AA batteries, either nickel metal hydride (NiMH), lithium, alkaline or NiCd. Both the Millennium and Standard editions of the camera ship with four alkaline cells, which will at least let you power it up out of the box. We strongly recommend rechargeable NiMH batteries for any digicam using AA cells though, as alkaline batteries generally can't handle the power drain of digital cameras for very long. The table below details power consumption in various operating modes:
![]()
|
|
|
| Capture Mode, w/LCD |
|
| Capture Mode, no LCD |
|
| Capture, half-pressed shutter w/LCD |
|
| Capture, half-pressed w/o LCD |
|
| Memory Write (transient) |
|
| Flash Recharge (transient) |
|
| Image Playback |
|
| "Sleep" Mode |
|
![]()
With the LCD display on, the DC215's power consumption is somewhat higher than equivalent models from other manufacturers, or even some of Kodak's higher-end units. With the display off, power consumption is about average. As mentioned above, we strongly recommend high-quality rechargeable NiMH batteries for any digital camera. (Preferably a couple of sets so one can be charging while you're using the other in the camera.)
![]()
Included Software
The DC215 is packed with an unusually complete bundle of software programs, providing everything you need, not only to download and manipulate pictures shot with the camera, but also to print them efficiently (at least on the Windows platform) and even make your own web pages using a very nice visual layout tool. The provided software bundle includes:
![]()
![]()
Software installation was quite easy on our test systems, both Mac and PC, and the Kodak picture transfer application worked well on the Mac, as did the "Mounter" software on the PC. A brief word of explanation about the latter may be in order, as few readers will have encountered it previously: On Windows computers, Kodak's driver software makes the camera appear as just another disk drive when you plug it into the computers serial port. This makes the process of downloading images very intuitive, but can be extremely slow over the serial connection. We actually quite like the "Mounter" approach on Kodak's higher-end cameras that employ the faster USB interface, but overall much preferred using the TWAIN drivers with the serial-connected DC215, to import images directly into our applications. On the Mac, image transfer is accomplished with a small utility program dedicated to that purpose, or via a Photoshop(tm)-compatible "plug in".
![]()
PhotoDeluxe provide wide range of image-manipulation functions, for "tweaking" your images after you shoot them. PageMill is one of our favorite visually-oriented web page layout tools: It's a very easy-to-use package for creating web pages. PhotoPrinter is a handy utility for arranging multiple photos on a single sheet of paper, to save paper costs when printing on your inkjet or other photo-capable printer.
![]()
Test Results
In keeping with our standard policy, our comments here are rather condensed, summarizing our key findings: For a full commentary on each of the test images, see the DC215's "pictures" page.
![]()
As with all Imaging Resource camera tests, we encourage you to let your own eyes be the judge of how well the devices performed: Explore the images on the pictures page, to see how well the DC215 performed, and how its images compare to other cameras you may be considering buying.
![]()
Overall, the DC215 produces pictures with excellent color, and sufficient resolution to look good when printed on a photo-capable printer at up to roughly 4x6 size. Other than the excellent color, it's primary attribute is probably ease-of-use, making it a good camera for people who don't care for a lot of technology between them and the picture-taking experience. As an entry-level device, it isn't as fast from shot to shot as some more advanced cameras, taking about 11 seconds to store one picture before its ready for the next.
![]()
The DC215's resolution tested out at about 600 lines per picture height in both the horizontal and vertical directions, about typical for 1.0 megapixel cameras we've tested, and a fair improvement over the earlier DC210. In common with the '210 though, the fixed-focus lens is noticeably sharper at short and medium distances than when shooting objects at infinity. Unlike some higher-end cameras, the DC215 takes excellent pictures in its lower-resolution mode as well, making it well-suited for email and web applications. Macro performance is good but not extraordinary, restricted to a single focusing distance by the fixed-focus lens. It should nonetheless be acceptable for typical photography of small household items. (Probably not sufficient though, if you want to put your stamp collection on the web, with each stamp filling the screen.) The lens shows fairly minor barrel distortion at the wide angle end of its setting, and none at all at the telephoto end of its range. Chromatic aberration was very slight, estimated at ~0.5 pixels at all focal lengths.
![]()
The optical viewfinder is a bit more accurate than most, showing roughly 90% of the final image area, while the LCD viewfinder is 100% accurate. (A characteristic we've come to particularly appreciate in the Kodak digicam family.)
![]()
We mentioned the DC215's excellent color: It also has a very effective "white balance", producing color-correct images even under lighting with a strong color cast. (Our indoor portrait test is a very tough test of white balance, and the DC215 did very well there.) Low-light performance is fairly modest, suited for use in average residential or office interiors, but probably not for outdoor photography after dark.
![]()
Overall, the DC215 provide good color and ease of use for people interested in digital photos for use on the internet, or printed at sizes up to 4x6 inches.
![]()
Conclusion
With its simplified controls and focus-free lens, the Kodak DC215 camera is clearly intended to meet the needs of the point & shoot user, and succeeds well in that goal. First-time users will appreciate its simplicity and ease of use. At just exactly a megapixel, the DC215's resolution is adequate for ~4x6 prints, but will look noticeably soft if enlarged much beyond that size. Like all the Kodak digicams though, the DC215's output is characterized by rich, vivid "Kodak" color. Overall, the DC215 would be a good choice for someone who enjoys most of their pictures at 4x6 inch size, wants straightforward, simple operation, and excellent color.
![]()
Reader Comments!
See what other Imaging
Resource readers have had to say about the Kodak DC-215, or add
comments of your own. (Read what's here, then add
your own!)![]()
Reader Sample Images!
Do you have a Kodak DC-215 camera? If you'll post an online album of your samples with one of the online photo-sharing services and email us at [email protected], we'll list the album here for others to see!
|
For More Info:
View the Imaging Resource Data Sheet for the Kodak DC-215![]()
![]()
See the Kodak DC-215 Pictures Page![]()
![]()
Visit the Kodak home page for the DC-215![]()
![]()
Back to the Imaging Resource Digital Cameras Page![]()
Or, Return to the Imaging Resource home page.![]()
This document copyright (c) 1999, The Imaging Resource, all rights reserved. Visitors to this site may download this document for local, private, non-commercial use. Individuals who have themselves downloaded this page may print a copy on their personal printers for convenience of reading and reference. Other than this explicit usage, it may not be published, reproduced, or distributed in print or electronic and/or digital media without the express written consent of The Imaging Resource.

