 Back
to Full Kodak DC3400 Review
Back
to Full Kodak DC3400 ReviewGo to Kodak DC3400 Data Sheet
Go to Kodak DC3400 Pictures Page
Up to Imaging Resource Cameras Page
Use your browser's "Back" button to return to the previous page, or the links at the top and bottom of this page to navigate to related information. If you have difficulty fitting the text on this page onto your printer output, simply resize your browser window to a narrower width and print again.
Remember us when it's time to buy!
Dave here: Have our reviews been helpful to you? (Is this article you're reading right now useful?) Preparing this level of information on as many products as we do is incredibly hard work, not to mention expensive. Things on the Internet may look like they're free, but they're not. (As a lot of big dot.com companies are finding out these days.) Somewhere, somebody has to pay to produce worthwhile content. YOU can help us though, by remembering us when it comes time to make your purchase. Would you consider coming back to our site and clicking-through to one of our advertisers to make your purchase? Every dollar you spend with one of our advertisers helps us directly (in affiliate fees) or indirectly (the advertiser will keep renewing their ad contract with us). To make it easy for you to support us, here's a URL you can visit, to see all our current advertisers, with links to click on that will register your visit to them as having come from our site. It's up to you where you buy, but Mike, Mike, Kim, Yazmin, Marti and I would be really grateful if you'd help us out by choosing one of our advertisers to purchase from.
Thank you for your support!
Dave Etchells, Founder & Publisher
Visit our "Buy Now" Page:
https://www.imaging-resource.com/buynow.htm
Back
to Full Kodak DC3400 Review
Go to Kodak DC3400
Data Sheet
Go to Kodak DC3400
Pictures Page
Up to Imaging Resource Cameras
Page
Kodak DC3400Kodak updates the popular DC280 with a new sensor, lower power consumption, and a new color scheme... Review First Posted: 10/5/2000 |
|
 |
|
2.3 million pixel sensor for 1760x1168 pixel images |
|
|
2x optical plus 3x digital zoom | |
|
|
Autofocus lens with macro | |
|
|
Fast startup and cycle times | |
|
|
USB computer interface |
Executive Overview
The DC3400 measures 5.2 x 2.0 x 3.0 inches (133 x 51 x 76 mm) and weighs a solid 12.1 ounces (342 g). It is equipped with a 2x, 6.5 to 13mm lens (30-60 mm equivalent focal lengths) with a maximum aperture of f/3.0. Focus ranges from 1.6 feet (0.5m) to infinity in normal mode and from 0.82 to 1.6 feet (0.25 to 0.5 m) in Macro mode. There's also an Infinity Focus mode that sets focus at infinity for far away subjects like landscapes. The 3x digital telephoto extends the camera's zooming capabilities somewhat, but remember that digital telephoto decreases image quality (noticeable as excess noise and lower resolution), because it simply enlarges the center of the image. A real-image optical viewfinder features central autofocus and exposure targets, and a rear panel, color LCD monitor allows you to compose images, play them back and navigate menus.
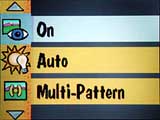
Exposure is automatically controlled on the DC3400, but you do have a few options to play with. The built-in flash operates in Automatic, Off, Fill and Redeye Reduction modes, all selected via the flash button. Exposure compensation (EV) can be adjusted from -2.0 to +2.0 through the capture menu. White balance can be set to Automatic, Daylight, Fluorescent or Tungsten, to match ambient light sources. For metering, you can choose between Multi-Pattern, which averages the light values of the entire image, or Center-Weighted, which simply meters from the very center of the subject (good for high contrast or backlit subjects). The ISO menu selection optionally enables the Auto ISO Sensitivity function, automatically increasing the shutter speed when the flash is turned off in low light conditions. You can adjust the image sharpness and there's a selection of image borders and effects to dress up your images. There's even a Document mode that increases the contrast and image brightness so that captured text stands out. Finally, a 10 second self-timer gives you an opportunity to get into the picture before the shutter fires.
Images can be saved at 1760 x 1168 or 896 x 592 file sizes, with three quality levels available at each image size. Files are saved as JPEGs to standard Type I CompactFlash cards (a 10MB card comes with the camera). The DC3400 has NTSC and PAL video output capabilities for reviewing images on a TV set, and comes with the appropriate cable for the country of origin. (NTSC for the US & Japan, PAL for Europe.) For downloading images to your computer, a combination serial/USB port provides faster download times than the earlier serial-only interfaces. Accompanying the camera are two software CDs containing Kodak's own digital camera software and ArcSoft's Photo Impression 2000, letting you download and organize images as well as make minor corrections and apply creative picture effects. For power, the DC3400 runs on four alkaline, Ni-Cd or Ni-MH batteries (four alkaline batteries are supplied with the camera), and an AC adapter is available as an accessory. (As always, we strongly recommend the purchase of high-capacity NiMH batteries and a charger with any digital camera: Alkaline cells really aren't adequate to the power demands of digicams.)
We were already impressed with the versatility and good image quality of the DC280 (Kodak's first two megapixel camera, and the foundation for the DC3400), which succeeded in delivering great resolution and color while maintaining a very user friendly interface. On the DC3400, we found the same quality and ease of use, with slightly reduced power consumption.
Design
The Kodak DC3400 sports a lightweight, compact design, weighing in at 12 ounces (343 g) without batteries, about 15.5 ounces (443 g) with the batteries included, much like the preceding DC280. It has a compact, ergonomic design much like a traditional camera, and caters to right-handed camera users, as do most cameras we've tested. While it doesn't quite pass the "shirt-pocket" test, all-in-all it's an easy-to-master design, and small enough to encourage packing it along on most trips.
The body, at 5.2 x 2.0 x 3.0 inches (133 x 51 x 76 mm), consists of metallized plastic and has a nice "grip" area on the right-hand side. The power switch is easily activated with your thumb while holding the camera in your right hand. The shutter button is readily accessible without stretching your finger, which makes for easy, one-hand capturing of images. The camera mode dial on the rear of the camera is easily rotated with the thumb of your right hand, again facilitating one-handed shooting. The picture card compartment is also easy to access on the left-hand side of the camera, and it's equally easy to load or eject the 10 megabyte picture card, even when the camera is mounted on a tripod.

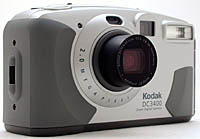
The picture above shows the front of the camera. From right to left, key features are the onboard flash, viewfinder, light sensor (flash and autofocus), lens, and indicator light for the self-timer. The lens extends when the camera is turned on, and retracts when turned off. A plastic lens cap grips the camera case when the lens is retracted, but lightly enough to not strain the mechanism when the lens extends.
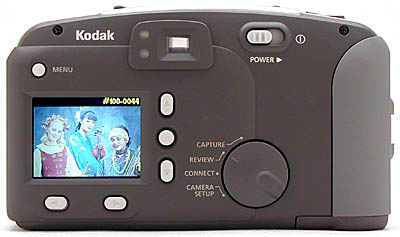
This picture shows the back side of the camera, with a control layout that will be immediately recognizable to anyone familiar with Kodak's previous DC280 and DC210 models. Most camera functions are controlled via the LCD menu system, activated by the "Menu" button at upper left. Major operating modes are selected with the rotating function dial at lower right, while menu options are selected with the buttons to the right of the LCD screen. The central button (which Kodak calls the "Do-It" button) also serves to turn on the LCD screen for use as a viewfinder when in Capture mode.
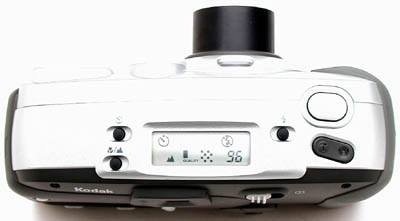
The top of the camera features a data readout LCD that displays information about the camera's current status, including the image size/quality settings, flash mode, macro and self-timer status, a number of shots remaining on the memory card at the current quality setting. Three buttons next to the readout let you enable the self timer, select normal, infinity, or macro focusing, and change the flash modes. The shutter button and toggle control for the zoom lens are on the right side of the top panel.
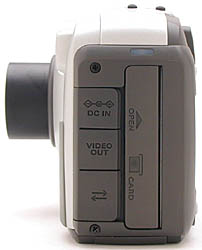
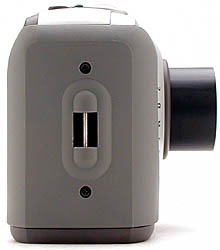
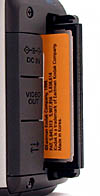
The left side of the camera holds the connectors for external power, video output, and computer input/output, protected beneath flexible rubber flaps. The memory card is also accessed from this side, hidden behind a rigid plastic door. The right side of the camera holds only an attachment lug for the wrist strap.
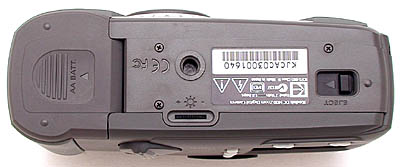
Batteries load easily in the battery compartment in the bottom of the camera, and the AC adapter, video out, and serial ports are neatly tucked into the left-hand side of the camera (behind rubber protector flaps).
Viewfinder
 The DC3400 is equipped with both a real-image optical viewfinder, and an LCD display on the rear of the camera. The LCD is used for both previewing and reviewing images, and for scrolling through and selecting camera menu options.
The 1.8-inch LCD can be used to preview an image in Capture mode, or review images in Review mode. The LCD is equipped with a brightness adjustment, a small rotary control projecting from the rear of the camera just below and to the left of the mode dial, to adjust LCD viewing for your particular needs. (Note that this doesn't appear to be a "true" brightness control, in that it seems to just vary the display contrast, rather than the brightness of the LCD's backlight.) The "live" images on the LCD are bright and sharp, with a fairly high refresh rate, albeit not as fast as some cameras we've tested. Regardless, the LCD is still very helpful when framing your subjects, or when experimenting with what you shot will look like if captured in sepia-tone, or black and white mode. In "viewfinder" mode, the DC3400's LCD shows the 100% accuracy we've come to appreciate in the Kodak digital camera line. (100% viewfinder accuracy is handy for framing critical shots, but surprisingly rare among the digital cameras we've tested.)
The LCD always displays your images in color unless you are snapping images with one of the special effects turned on. (Black & white or sepia-tone.) In addition, you'll see helpful icons appear in the LCD if you have adjusted the cameras exposure, locked the exposure, selected a border to appear over your image, or turned on the date stamp. Pressing the Menu button in Capture mode brings up a menu for setting the most commonly used picture-taking controls.
When reviewing images, a press of the Menu button displays a series of icons on the left of the LCD. You can select these icons to view an enlarged portion of the image on the LCD, delete images, print them, and lock them to prevent erasure, among other things. The menu icons displayed on the LCD are easily viewable and easy to navigate through.
As with most digital cameras, using the LCD for preview and review of images can drain battery power fairly quickly. You should limit continuous use of the LCD during your picture-taking sessions for this purpose. For LCD usage, power the camera with an optional AC adapter.
The optical viewfinder on the DC3400 displays about 91% of the actual image taken. It isn't a TTL (Through The Lens) optical viewfinder, but the clarity of the images in the viewfinder is more than acceptable for viewing at both the wide angle and the telephoto settings. Unfortunately, the DC3400 is not equipped with a Diopter Adjustment for those camera users (like us) plagued with near- or far-sightedness, and the viewfinder optics have a fairly low "eye relief." (This last means that your eyeball needs to be pretty close to the viewfinder lens. For eyeglass wearers, this means you'll need to press your glasses against the camera pretty firmly to get a clear view.) On the positive side though, the DC3400's viewfinder is fairly insensitive to lateral eye position, providing an accurate view regardless of the position of your eyeball.
Optics
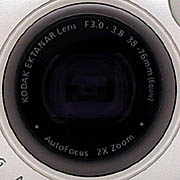 Kodak rates the DC3400 at an equivalent ISO speed of 70 with a maximum aperture setting of F/3 in wide angle mode, and F/3.8 in telephoto mode. This is somewhat lower sensitivity than is common among digicams these days, making the DC3400 less suited to low light shooting than some models. The DC3400 includes an optical-glass lens that automatically focuses on your subject. Depressing and holding the shutter button half-way after framing your subject sets and locks in the auto focus prior to capture, allowing accurate focus for off-center subjects. (Center the subject, lock the focus, then re-frame the shot while still holding the shutter button down, before taking the picture.)
The zoom control toggle on the top of the camera lets you quickly zoom in on your subjects with a standard working range for image capture between 20 inches (0.5 m) and infinity. A macro (close-up) feature adds the flexibility of allowing you to clearly focus on small subjects at relatively close distances from between 9.8 and 20 inches (0.25 to 0.5 m). Selecting close-up mode automatically zooms the lens to the telephoto end of its range, and adjusts the focusing to handle closer objects. We found operation of the zoom lens to be very smooth, with no "preferred" focal-length settings as we've sometimes encountered. (The zoom lenses on some cameras seem to gravitate toward specific focal length settings, producing a set of discrete steps rather than a smooth zoom range. By contrast, zoom operation on the DC3400 is quite smooth.) The lens was also very responsive to the controls, making it easy to get exactly the focal length we wanted.
The 2X zoom lens has a focal length range equivalent to 30 mm to 60 mm on a conventional 35 mm camera. This amounts to a range from fairly wide angle to a rather short telephoto. The additional 3x digital zoom capability can get you closer to your subject by magnifying the center of your image an additional three times, cropping-down to progressively smaller portions of the CCD area as the magnification ratio increases. (As with all digital zooms though, the more the image is magnified, the more blurry it becomes, since it is working with progressively less data.) Some digital zooms simply crop the image to a smaller size, but the DC3400 resamples the image in-camera, so the final images always have the pixel dimensions you've selected via the menu system. Also as with other cameras, the digital zoom only works when the LCD is turned on, because you'd have no way to tell what portion of the image was being viewed otherwise. The camera interpolates the image in real time on the LCD when zooming digitally. The resulting LCD image does appear quite a bit softer (less sharp) than the normal images, but overall, the digital zoom capability of the camera is fairly smooth and viewing the zoom as it happens on the LCD is very helpful in keeping your subject correctly centered. (We have to say though, that at high digital zoom magnifications, the LCD display goes from "soft" to very blurry, making precise framing difficult at the maximum 3x setting.) Another nice touch is the fine gradations available on the digital zoom, varying in 0.1x increments from 1.0 to 3.0x. Other than our general lack of fondness for digital zooms, the one specific complaint we have about the DC3400's digital zoom is that it can't be used in conjunction with the close-up mode: Entering close-up mode disables the digital zoom if it's active, or prevents it from being enabled if it isn't.
Exposure
The DC3400 offers two metering modes, to help produce good exposures under different lighting conditions. The Multi-Pattern option examines the entire image area to determine the best exposure. This setting will generally be the best choice for everyday picture taking, under fairly uniform lighting. The Center-Weighted metering option bases its exposure decision primarily on the central portion of the frame, de-emphasizing the surroundings. The Center-Weighted mode will be most useful for shooting portraits shots, or for dealing with subjects significantly brighter or darker than their surroundings. ("Backlit" portraits are an example of this, where the main light is behind your subject's face into shadow.)
A Sharpness feature provides three options: Sharp, Standard, and Soft. The Sharp option emphasizes the edges of objects, making them stand out; the Standard option is the camera's default setting, making no further sharpness adjustment; and the Soft option blurs the edges in your picture so that they blend in with the background. (This is a little different than most digital cameras we've tested with "sharpness" options: Most seem to simply turn off the sharpening function in the "soft" mode, while the DC3400 appears to actually blur the image somewhat when this option is selected.) Contrary to some cameras we've tested though, we found the sharpness variations on the DC3400 fairly subtle. (In our opinion, some cameras really overdo the sharpening a bit in the "sharp" mode, reducing its utility. Kodak's more subtle approach strikes us as more useful.)
The White Balance feature of the DC3400 lets you capture images under special lighting conditions (fluorescent, evening, or tungsten light, for example), or create special color effects. Normally, the Auto option would be used for everyday pictures, and in most cases produces images of more than acceptable quality. Under some circumstances, when taking pictures outdoors, or under daylight lighting conditions, the Daylight option may be preferable: The difference between the two is pretty subtle when shooting normal subjects, but the "daylight" option would avoid color shifts due to a preponderance of a particular color in the subject.) When capturing images indoors, two white balance options are available: Fluorescent, to correct for the green cast caused by most household fluorescent lights, or Tungsten, to correct for the orange cast frequently seen when capturing images under tungsten lighting. We were particularly impressed with how well the DC3400's white balance system did at removing the strong yellowish cast from the tungsten lighting used in our "indoor portrait" test shot.
Through an LCD menu option, you can dial in exposure compensation from -2EV to +2EV in 0.5EV increments. Exposure compensation lets you adjust the exposure chosen by the camera to allow for unusual situations. (For example, cameras tend to underexpose bright beach and snow scenes: A 1.0 EV exposure boost will brighten the image to match the original scene.) While the 0.5 EV adjustment increments are good for casual users, we ourselves prefer to see 1/3 EV steps, as the 0.5 EV adjustments are sometimes a little large for making precise adjustments. The DC3400 also has a special exposure-lock optoin available via its LCD menu system that locks the exposure and white balance settings when the shutter is tripped for the first shot in a series, or when the Shutter button is half-pressed for the first time after selecting the option. This Exposure Lock feature works especially well for capturing a series of images that require consistent exposure and color balance between them. (For instance, images that will later be combined together to create a panorama.)
Besides the normal exposure modes, the DC3400 sports two special modes, to capture either black & white or sepia-toned images. The black & white option produces smaller file sizes for a given quality level than is possible for color pictures. The "sepia" option recreates the look of old-time photos, rendered in shades of brown.
Like the DC280 and DC5000 before it, the DC3400 offers an "Auto-ISO" function. When enabled (via an LCD menu selection), this option allows the camera to increase its effective ISO rating in low-light conditions from its normal value of 70 to an effective value of ~140. (A guess on our part, based on the approximately one-stop increase in shutter speed that we observed with it enabled.) We were surprised though, that this option doesn't appear to improve the absolute low-light limit of the camera at all: Whether it is engaged or not, the camera is only capable of good exposure down to a limit of about EV 10 (8 foot-candles or 88 lux). Since this sort of ISO increase is achieved by simply boosting the amplification of the signal from the CCD sensor, the noise level of the image is increased also. It's likely then, that Kodak chose not to create a camera that would take obviously noisy pictures in lower light conditions, preferring instead to maintain their image-quality standard, while settling for a less-aggressive low-light capability. Regardless, under typical room lighting conditions, the 1-stop shutter speed increase provided by the Auto-ISO function is very welcome when shooting people-pictures indoors.
Lastly, after an image is captured, the QuickView feature displays the image on the LCD. At this point, you can choose to delete the image immediately and re-shoot, or, if you do nothing, the image will be stored to the cameras picture card. (The QuickView feature can be turned off to conserve battery life.)
Flash
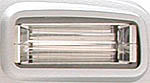 The built-in flash of the DC3400 has a specified working range 1.6 feet to 9.8 feet in wide-angle mode, and 1.6 feet to 7.9 feet in telephoto mode. In our tests though, we found that the flash worked just fine out to at least 10 feet, even in telephoto mode, and so regard Kodak's rated spec as a little conservative. The "customizable" flash settings include auto flash, red-eye reduction flash, fill-in flash, and off. The flash settings are fairly flexible in that you can choose a different setting for each shot, or you can set a default flash setting in Camera Setup mode. The default setting holds through camera power cycles and can be helpful if you regularly shoot images requiring a specific flash option. In common usage, changing a flash setting on the run is so simple, it's not a problem, but the selectable default setting is nonetheless a convenience.
Shutter Lag Time/Cycle Times
Shutter lag time is the amount of time that elapses between pressing the shutter button and the time that the camera actually fires. The camera needs this time to adjust its auto focus and auto exposure setting before capturing the image. We measured the DC3400's shutter lag at 1.16 seconds for shots requiring full autofocus, and at 0.38 seconds for those which were pre-focused by half-pressing the shutter button in advance of taking the shot itself. On the DC3400, the shot-to-shot cycle time varies in an interesting fashion: For the first three shots, you'll be able to snap away once every 3 seconds. If you continue shooting as rapidly as possible, the camera will require more like 20 seconds between shots after the first three are taken. (Apparently, the DC3400 has some internal memory buffering that permits it to cycle more rapidly for the first few shots.) Given its 2 megapixel resolution level, a cycle time of only 2-3 seconds is good, somewhat better than average among competing units that we've tested thus far (September, 2000).
Camera startup time is also quite short at 5.3 seconds and shutdown takes slightly only 1.7 seconds. Switching from Capture to Review mode takes only 1.5 seconds for the image to first appear, then up to a total of 8.5 seconds for it to "fill in" at full resolution. Switching back to Capture mode takes 2.4 seconds to the first image acquired.
Operation and User Interface
As mentioned in our "Executive Overview", we found the user interface for the DC3400 to be very easy to navigate. On first usage, it took us less than 5 minutes to get a handle on the major control functions of the camera by just experimenting with the different dials and buttons. Reading the manual really wasn't even necessary.
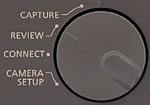
The camera operates in one of four different mode settings: Capture, Review, Connect, and Camera Setup You select which mode you want with the Mode Dial on the rear of the camera. Depending on which mode you select, pressing the menu button-also on the rear of the camera-displays a sequence of menu options that are specific to that mode. Easy-to-access up/down and left/right scroll buttons to the right and below the LCD screen are used to scroll through the different menus and options, while a blue button Kodak calls the "DO-IT" button is used to confirm selections.
The LCD doesn't automatically turn on when in Capture mode. You need to turn it on manually using the DO-IT button. This is mildly annoying if you tend to use the LCD a lot, but does much to conserve battery life. In comparison, the LCD is always on in Review mode and you don't need to enable it. If you need to adjust the LCD brightness, simply use the small thumb wheel on the bottom of the camera. The LCD shuts itself off after 30 seconds of inactivity to save battery power.
While in Capture mode, available menu options include exposure compensation, borders for images, special effect settings, quality and resolution settings, date and time stamp, and white balance and meter mode settings.
Similarly, Review mode provides a variety of options relating to images already captured and stored to the camera's picture card, including deleting, setting print order, "locking" and image, setting slide show timing, and retrieving detailed picture information.
Connect mode lets you connect the camera to a PC or Macintosh computer using the USB or serial cables packaged in the camera box. You can connect to Windows '95 or '98 computers, as well as USB-equipped Apple Macintosh computers. Of course, you first need to install the DC3400's software on your computer before you can acquire images from the camera.
Other control buttons are placed very similarly to other cameras. On the top of the camera, you'll find the Status Display which shows icons for the different camera settings, if the settings are enabled. It's an easy reminder of which menu options you have enabled, the battery power status, and pictures remaining on the picture card, among other things. Also easily accessed atop the camera are the Shutter Button, Zoom Control for telephoto or wide angle shooting, Self-Timer Button, Infinity Focus/Close-up Button, and lastly, the Flash Button to change flash settings for different exposures.
Control Enumeration

Self-Timer Mode
The Self-Timer mode has its own button on the top of the camera. You can use the self-timer in conjunction with any of the camera settings you've enabled, like many other camera models. Depressing the Self-Timer button provides a 10 second delay between pressing the Shutter button and the when the camera fires.

Infinity Focus/Close-up Button
Also located atop the camera, this button toggles between two modes:
Capture Mode
With the Mode Dial on the rear of the camera set to Capture, pressing the Menu Button provides the following options for capturing your images:
 Exposure Compensation: Adjust the exposure set by the camera's automatic metering from +2 EV to -2 EV, in 0.5 EV steps.
 Picture Quality: Select one of three settings: Good, Better, and Best. As you move from Good to Best, more space is needed on the picture card to store the image. The Good setting is more than adequate to capture images for online sharing, while Best would be the appropriate choice for images you want to make high-quality prints from. In high resolution mode (see below), the picture quality settings correspond to the following file sizes:
 QuickView: Displays the image you just captured in the LCD for several seconds after capture. This handy feature lets you review the image before it's saved to the memory card, and decide whether you want to keep it or not. A Delete icon (trash can) appears on the LCD above the left scroll button. If you don't like the image, press the left scroll button to delete it. If you like it, do nothing and it will be stored automatically.
 Exposure Lock: After this option is selected, the camera exposure and white-balance settings will be "locked" as soon as the first shot is taken. The locked settings will remain in effect until the "lock" is released by revisiting this menu option. Use this feature to ensure consistent exposure for multiple shots to be used in panoramas, or other applications requiring consistent exposure across multiple photos.
Review Mode
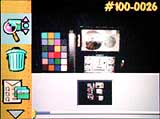
Use Review mode to examine already-captured images. When you change from Capture to Review Mode, the LCD activates and the most recently captured image. Use the left/right scroll buttons to scroll through and view all the images stored on the picture card.
Pressing the menu button changes what is displayed on the LCD. At the bottom of the LCD you'll see smaller versions of the images that you have captured (assuming there's more than 1, of course). You can use the left/right scroll buttons to quickly scroll through the image thumbnails to find a particular image. Once you find it, a larger version of that image appears in the LCD. To the left of the LCD, a series of icons appears. Each of these icons represents an operation you can perform on the selected image. Whenever one of these operations is selected, Delete, for example, the Trash Can icon appears over the image in the LCD.
 Magnify: Lets you magnify and zoom in on a particular portion of a picture for closer examination. The image expands to twice the normal playback size, and the LCD becomes a "window" into the larger image. You can use the up/down and left/right scroll buttons to view different parts of the picture at the magnified level. (We liked the smooth scrolling the direction buttons provide in this mode: Many digicams jump between quadrants of the enlarged image, rather than scrolling smoothly. Smooth scrolling makes it much easier to examine exactly what you're interested in within the image.)
 Protect: Prevents an image from being accidentally erased from the picture card. When you protect an image, the Protect icon appears over the image on the LCD. NOTE though, that "protected" pictures will still be deleted if the memory card is formatted.
Connect Mode
When you want to connect the camera to a PC for downloading of images, you first need to place the camera in Connect mode. Connect mode enables the different ports on the side of the camera for image transfer. The ports include a standard RS-232 connection for Windows-based computers, and a Universal Serial Bus (USB) connection for Windows '98 based computers, as well as USB-equipped Apple Macintosh computers.
Camera Setup Mode
Camera Setup Mode provides several options you can use to customize the camera for your own picture-taking needs:
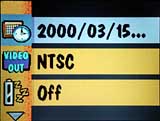 Set Date and Time: Lets you set the month, date, and year.
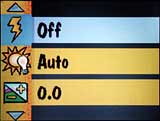 Flash Default: Lets you choose a flash setting as the default each time the camera is turned on. If you consistently capture images in a way that requires only one of the available flash options, you can change the default to the option you need. The available options are Auto (normal default), Fill, Redeye, and Off.
 Auto ISO Default: Sets the Auto-ISO option that will be selected when the camera is powered-up:
 Language Default: Choose from one of seven languages: English (normal default for US cameras), Japanese, French, German, Portuguese, Spanish, or Italian.
Image Storage & Interface
 The
DC3400 comes equipped with a "CompactFlash" ATA-compatible 10 megabyte
memory card. The memory card compartment is easily accessible on the left-hand
side of the camera. Open the compartment door, insert the picture card into
the slot, push it all the way in, and you're all set to take pictures. All images
are captured and stored in standard JPEG format. In addition, the camera lets
you specify the print order of different images that you capture.
The
DC3400 comes equipped with a "CompactFlash" ATA-compatible 10 megabyte
memory card. The memory card compartment is easily accessible on the left-hand
side of the camera. Open the compartment door, insert the picture card into
the slot, push it all the way in, and you're all set to take pictures. All images
are captured and stored in standard JPEG format. In addition, the camera lets
you specify the print order of different images that you capture.
Using the Print option when in Review mode, you can select pictures for printing
and choose how many you want. You can even choose to have an index print of
all your pictures. This information is stored to the picture card along with
the images. If you have a newer PC Card reader, or if you use you picture card
on a Picture Maker kiosk, the reader will recognize the print order format and
print your pictures automatically!
When you first turn on the camera, the status display includes the number of
pictures for which space remains on the picture card. This "Pictures Remaining"
number is displayed in the lower-right hand corner of the status display. This
number, of course, will vary depending on the Quality setting (Best, Better,
Good), and the Resolution level setting (High, Standard). At the high-resolution
level, images are stored at 1760 x 1168 pixels. At the standard level, they
are stored at 896 x 592 pixels. The table below shows the approximate number
of images that can be stored on a 20 megabyte card for each available camera
setting:
|
Resolution/Quality |
|
|
|
|
| High Resolution | Images | 32 | 48 | 86 |
| Approx. Compression |
10:1 | 15:1 | 30:1 | |
| Standard Resolution | Images | 90 | 131 | 245 |
| Approx. Compression |
7:1 | 10:1 | 20:1 | |
Of course, as with all digital cameras, the number of images stored on each
card may vary depending on the complexity of the image being captured. At the
high resolution, best quality setting, the average file size is about 625K.
At the high resolution, good quality setting, the file size is about 230K, and
at the standard resolution, good quality setting, the average file size is about
82K.
The DC3400 is equipped with both USB cable for connecting to Windows '98 and
Apple iMac computers, as well as an RS232 and serial adapter plug for transferring
images to Windows-based, or Macintosh computers. In our data-transfer tests,
the speed advantage of the USB connection became dramatically apparent: We timed
the transfer of a 524K maximum-resolution file from the camera to our 350 MHz
Pentium II Windows '98 computer. Using the conventional serial port, this transfer
required 59.8 seconds, a pretty typical number for an image of this size over
a digicam serial connection. Switching to the USB port, this time dropped to
only 3.1 seconds! This is a data transfer rate of 169 KBytes/second, among the
slower USB ports we've tested. We often recommend external card readers for
our readers, to transfer image files to the host computer more rapidly, but
with a direct USB connection to the camera, such accessories really become irrelevant.
(The DC3400 also ships with "mounter" software that lets it appear
on your computer's desktop as just another disk drive. Kodak has had this software
available for some time now, but with a conventional serial connection it was
really too slow to be useful. With USB however, the "mounter" interface
really comes into its own, making for a very effective way to download images
from the camera.)
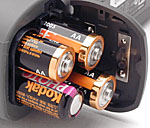 The DC3400 is powered by a set of four AA batteries, either 1.2v nickel metal hydride (NiMH) batteries or 1.5v alkaline batteries. A set of alkaline batteries is included in the box with the camera so you can begin using it immediately, but we really recommend that you invest in a couple of sets of high-capacity NiMH batteries and a decent charger.
|
|
|
| Capture Mode, w/LCD |
|
| Capture Mode, w/o LCD |
|
| Half-pressed shutter, no LCD |
|
| Memory Write (Transient) |
|
| Flash Recharge (Transient) |
|
| Image Playback |
|
| "Sleep" Mode (Auto power-down) |
|
In looking at these figures, it seems that the DC3400 should be able to run for many hours in capture mode with the LCD left off, and for an hour or more with continuous LCD usage, when operating from high-power NiMH batteries. (Note though, that at high power levels such as with the LCD on, you can't just divide the power drain into the batteries' mAh capacity to get run time: Battery capacities are rated for drain at the "0.1C" rate, or a drain of 1/10th of the batteries stated capacity, over 10 hours. Higher drains can greatly decrease the effective capacity.)
Included Software
The DC3400 is packaged with a variety of different software packages for you to use on your home computer, whether it's a Windows-based system or a Macintosh. The software is bundled on two Installer CDs: One for the Kodak and one for the ArcSoft applications.
The following applications are included for both Mac and Windows systems:
Test Results
In keeping with our standard policy, our comments here are rather condensed, summarizing our key findings. For a full commentary on each of the test images, see the Kodak DC3400's "pictures" page.
As with all Imaging Resource camera tests, we encourage you to let your own eyes be the judge of how well the devices performed. Explore the images on the pictures page, to see how well the Kodak DC3400 performed, and how its images compare to other cameras you may be considering buying.
Overall, the Kodak DC3400 gave an excellent performance, with great color balance. The camera's white balance system did a very good job throughout our testing, tackling even our difficult indoor lighting test with ease. We shot mainly in the automatic and daylight white balance settings during our testing, since both were reasonably accurate most of the time. We generally used the daylight setting with the outdoor shots and automatic for the other indoor targets (with the exception of the Musicians poster, which required daylight white balance to deal with the large amount of blue in the image). On our Davebox target, the DC3400 accurately reproduced the large color blocks on the left, and picked up the difference in the magenta and red color blocks in the middle, horizontal color chart. Tonal handling was not as good, as the subtle tonal variations of the Q60 target were only visible up to the "E" range due to slight overexposure by the camera's metering system. On the whole, however, the DC3400 does an excellent job with color balance, even in our difficult Indoor Portrait, No Flash shot.
Visual resolution of the DC3400 in this test is roughly 650 lines per picture height vertically, and 650-700 horizontally, well on a par with other 2 megapixel cameras we've tested. These numbers are lower than we assigned to the DC280, but in the intervening time since the DC280's introduction, we've tightened our standards somewhat in this area. (This is a more subjective "call" than we'd like, and we've decided that some of our earlier ratings weren't taking aliasing and artifacts sufficiently into account.) In side-by-side comparisons, we felt the resolution of the DC3400 was just slightly lower than that of the DC280, which we attribute to what appears to be a smaller CCD chip: Since the lens itself seems to be the same, the smaller pixels of the new CCD make for lower resolving power on a pixel-by-pixel basis, although the difference is rather slight.
The DC3400 is a classic "point & shoot" digicam, with relatively limited exposure control, but enough flexibility to accommodate common lighting/exposure problems. The user can control sharpness, metering, ISO (via the Auto ISO option), flash, exposure compensation and white balance. The DC3400 had some difficulty in the low-light category, as we were only able to obtain relatively useable images at light levels as low as two foot-candles (22 lux). Anything below one foot candle was barely visible. Though the camera isn't able to produce bright images at lower light levels, the resulting images at one foot candle show only moderate noise. Turning on the camera's Auto ISO function produced the same results, but with a higher noise level and shorter exposure time. (This was similar to the behavior of the DC280, and somewhat puzzling to us: Usually, increasing the ISO of the sensor will result in a reduction of the low-light limit, but Kodak appears to have mandated a maximum acceptable noise level, and constrained the camera's exposure time as a result.) Overall, the DC3400 wouldn't be the camera to choose if you really want to be able to do outdoor photography after dark: For reference, a light level of 1 foot-candle is about what you'd find in a city night scene under typical street lighting, and the DC3400 needs about twice that to deliver a good image.
The DC3400 did an excellent job in our Viewfinder Accuracy tests, as its optical viewfinder was only a little tight, showing about 91 percent of the final image area at wide angle and about 90 percent at telephoto. These numbers are for both the 1760 x 1168 and 896 x 592 image sizes. The LCD monitor displayed the high accuracy we've come to recognize as a Kodak hallmark, showing approximately 100 percent of the final image area at both wide angle and telephoto settings (also at both image sizes). Since we generally like to see LCD monitors as close to 100 percent accuracy as possible, the DC3400's LCD passes with flying colors. The DC3400's digital telephoto also produces about 100 percent accuracy at both image sizes, but image quality is highly degraded. These numbers bear some resemblance to those of the Kodak DC280, although the DC3400's optical viewfinder appears to be a little more accurate than the DC280's 89 percent at wide angle and 85 percent at telephoto.
In the macro category, the DC3400 is about an average performer, capturing a minimum area of 4.36 x 2.89 inches (110.71 x 73.47 mm). However, color balance, detail and resolution are all excellent. Likewise, the DC3400's built-in flash does a very nice job of throttling down for the macro area, managing not to be tricked by the shiny coin. The DC3400's performance in the macro category is slightly better than the preceding DC280 model, which captured a minimum area of 4.2 x 6.4 inches (108 x 162 mm).
Overall, the DC3400 did an excellent job throughout our testing. Though its low light capabilities are slightly under par, and the resolution and macro performance about average, the DC3400 manages to provide very nice image quality with wonderful, vibrant, well-balanced color in a wide range of lighting situations. Because the two cameras are very similar in design, we compared the DC3400's performance to that of the preceding DC280, and found that the DC3400 is a very nice update to the earlier model. Both cameras seemed to perform similarly in our testing, though the DC3400 slightly surpassed the DC280 in the macro and viewfinder accuracy categories, while falling very slightly short in image sharpness. Overall, the DC3400 is a worthy contender, particularly for those consumers interested primarily in "point & shoot" photography, but with a few controls to help handle unusual situations.
Conclusion
As noted at the outset, the DC3400 is basically Kodak's upgrade of their prior DC280 model. For all intents and purposes, it appears to function identically to the earlier and very successful DC280, which should help it find a ready market among point & shoot users. It offers good resolution and sharpness, excellent color, and a simple user interface. It strikes a very workable balance between pure point & shoot simplicity, and the features necessary to obtain good pictures under a variety of typical shooting conditions. A good choice for a "family" digicam.
<<DC3400 Sample Images | Additional Resources and Other Links>>
Reader Comments!
Questions, comments or controversy on this product? Click
this link to see what other Imaging Resource readers have had to say about
the Kodak DC3400, or add comments of your own!
