Back
to Full Kodak DC5000 Review
Back
to Full Kodak DC5000 ReviewGo to Kodak DC5000 Data Sheet
Go to Kodak DC5000 Pictures Page
Up to Imaging Resource Cameras Page
Use your browser's "Back" button to return to the previous page, or the links at the top and bottom of this page to navigate to related information. If you have difficulty fitting the text on this page onto your printer output, simply resize your browser window to a narrower width and print again.
Remember us when it's time to buy!
Dave here: Have our reviews been helpful to you? (Is this article you're reading right now useful?) Preparing this level of information on as many products as we do is incredibly hard work, not to mention expensive. Things on the Internet may look like they're free, but they're not. (As a lot of big dot.com companies are finding out these days.) Somewhere, somebody has to pay to produce worthwhile content. YOU can help us though, by remembering us when it comes time to make your purchase. Would you consider coming back to our site and clicking-through to one of our advertisers to make your purchase? Every dollar you spend with one of our advertisers helps us directly (in affiliate fees) or indirectly (the advertiser will keep renewing their ad contract with us). To make it easy for you to support us, here's a URL you can visit, to see all our current advertisers, with links to click on that will register your visit to them as having come from our site. It's up to you where you buy, but Mike, Mike, Kim, Yazmin, Marti and I would be really grateful if you'd help us out by choosing one of our advertisers to purchase from.
Thank you for your support!
Dave Etchells, Founder & Publisher
Visit our "Buy Now" Page:
https://www.imaging-resource.com/buynow.htm
Back
to Full Kodak DC5000 Review
Go to Kodak DC5000
Data Sheet
Go to Kodak DC5000
Pictures Page
Up to Imaging Resource Cameras
Page
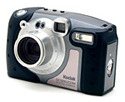
Kodak DC5000Familiar 2 megapixel electronics in a super-rugged case make a *true* take-anywhere camera! Review First Posted: 09/10/2000 |
|
 |
|
2.1 Million pixel sensor |
|
|
1760 x 1168 resolution | |
|
|
2X optical plus 3x digital zoom | |
|
|
Autofocus lens w/macro | |
|
|
Built-in flash | |
|
|
|
Ultra-rugged, water-resistant case! |
Preface
Kodak has long been a "power player" in the world of digital cameras, currently having one of the broadest camera lines on the market. Their models extend from point and shoots for the complete beginner to the highest-resolution professional SLR on the market. For some time now, we've been expecting to see digicams developed that are aimed at specific applications or market niches. With the DC5000, Kodak has become one of the first manufacturers to do so, having developed an unusually rugged, water-resistant digital camera for use in harsh environments. (Think hiking, boating, the beach, as well as industrial/commercial applications.) Built upon Kodak's earlier DC280 model, the DC5000 has the advantage of a tried and true design, already proven in the marketplace.
With a full 2 megapixel resolution, and excellent color, the DC5000 provides the ruggedness many users have asked for, while making no concessions in image quality: Images shot with the DC5000 should look fine printed on photo-quality output devices at sizes up to 8x10 inches. While obviously aimed at a niche market, we believe that the DC5000's ruggedness, good picture quality and ease of operation will find it many devoted users.
High Points
Executive Overview
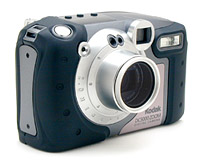
Kodak's new DC5000 Zoom is like a sport utility version of their previous DC280. (Because of their close similarity, we'll focus mainly on the external features of the camera in this review. For information on camera operation and exposure features, refer to the DC280 review.) Internally, the two cameras are identical, sharing the same exposure features, menus and user interface. It's the new rugged exterior that makes all the difference. The shape and style of the DC5000 remain very similar to the DC280, but the addition of a slightly textured, thick rubber covering on the majority of the camera provides excellent protection against shocks and falls, and O-ring seals on its control shafts and access hatches makes it virtually weatherproof. While you can't submerse the DC5000 in water, you can expose it to rain and snow and really dusty environments like construction sites or the gritty sand of the beach without ill effect. And, according to Kodak, the camera can withstand a three foot fall onto concrete without any major damage, thanks to the rubber padding. (We must confess though, that we weren't brave enough to test this feature.) We can think of dozens of situations where this camera would be particularly handy, from ski slopes to rafting trips, to industrial/commercial applications. Its two megapixel resolution is plenty to print full-page images with good detail too, so there's no compromise in the photos you'll bring back.
All this extra protection costs little in terms of added weight and size, as the DC5000 measures 5.5 x 3.5 x 3.25 inches (140 x 89 x 83 mm) and weighs a solid 16 ounces (459g). Another bonus from the rubber covering is that you get a very firm, secure grip on the camera. (It does come with a neck strap, added peace of mind though). To make the camera weatherproof, all the doors and buttons feature rubber seals or "O-rings," that keep any moisture or dust from getting into the camera's interior. Additionally, the compartment doors feature small, turning locks that completely seal the opening once locked shut. There's also a non-removable protective filter over the lens which provides 37mm filter threads for attaching lens accessories in addition to blocking scratches. The rigid aluminum barrel supporting the protective filter guards the delicate lens mechanism itself from damage due to bumps or bangs while it is extended, and provides a sealed environment to keep out moisture and dirt. Finally, the oversized controls and rubberized buttons accommodate sea-soaked fingers as well as gloved hands.
As we mentioned, the DC5000 has all the same features and exposure controls as the DC280, but we'll just briefly cover them here those readers who may be unfamiliar with the earlier model. The camera is equipped with a 2x, 6.5 to 13mm lens (30-60 mm equivalent focal lengths) with a maximum aperture of f/3.0. Focus ranges from 1.6 feet (0.5m) to infinity in normal mode and from 0.82 to 1.6 feet (0.25 to 0.5 m) in Macro mode. There's also an Infinity Focus mode that sets focus at infinity for far away subjects like landscapes. The 3x digital telephoto extends the camera's zooming capabilities somewhat, but remember that digital telephoto decreases image quality (visually noticeable as excess noise and lower resolution), because it simply enlarges the center of the image. A real-image optical viewfinder features central autofocus and exposure targets, and a rear panel, color LCD monitor allows you to compose images, play them back and navigate menus.
Exposure is automatically controlled on the DC5000, but you do have a few options to play with. The built-in flash operates in Automatic, Off, Fill and Red-Eye Reduction modes, all selected via the flash button. Exposure compensation (EV) can be adjusted from -2.0 to +2.0 through the capture menu. White balance can be set to Automatic, Daylight, Fluorescent or Tungsten, to match existing light sources. For metering, you can choose between Multi-Pattern, which averages the light values of the entire image, or Center-Weighted, which simply meters from the very center of the subject (good for high contrast or backlit subjects). The ISO menu selection optionally enables the Auto ISO Sensitivity function, which automatically increases the shutter speed when the flash is turned off (intended for low-lit indoor shooting scenarios). You can adjust the image sharpness and there's a fun selection of image borders and effects to dress up your images. There's even a Document mode that increases the contrast and image brightness so that captured text stands out. Finally, a 10 second self-timer gives you an opportunity to jump into the picture before the shutter is fired.
Images can be saved at 1760 x 1168 or 896 x 592 file sizes, with three quality levels available. Files are saved as JPEGs to CompactFlash Type I cards (a 10MB card comes with the camera). The DC5000 has NTSC and PAL video output capabilities for reviewing images on a TV set, and comes with the appropriate cable. For downloading images to your computer, a combination serial/USB port provides faster download times than the earlier serial-only interfaces. Accompanying the camera are two software CDs containing Kodak's own digital camera software and ArcSoft's Photo Impression 2000, letting you download and organize images as well as make minor corrections and apply creative picture effects. For power, the DC5000 runs on four alkaline, Ni-Cd or Ni-MH batteries (four alkaline batteries are supplied with the camera), and an AC adapter is available as an accessory. (As always, we strongly recommend the purchase of high-capacity NiMH batteries and a charger with any digital camera: Alkaline cells really aren't adequate to the power demands of digicams.)
We were already impressed with the versatility and good image quality of the DC280 (Kodak's first two megapixel camera), which succeeded in delivering great resolution and color while maintaining a very user friendly interface. On the DC5000, we found the same quality and ease of use with the exciting bonus of an attractive, weatherproof exterior. Portable to the ends of the Earth, the DC5000 is a fun camera to use that should withstand the toughest of job-site applications, vacations, and maybe even kids.
The body, at 5.2 x 2.0 x 3.0 inches (133 x 51 x 76 mm), consists of metallized plastic and has a nice "grip" area to the right of the camera. The power switch is easily activated with your thumb while holding the camera in your right hand. The shutter button is readily accessible without stretching your finger, which makes for easy one-hand capturing of images. The camera mode dial on the rear of the camera is easily rotated with the thumb of your right hand, reinforcing the one-hand capture paradigm. The picture card compartment is also easy to access on the left-hand side of the camera, and it's equally as easy to load or eject the 8 MB picture card, even when the camera is mounted on a tripod.
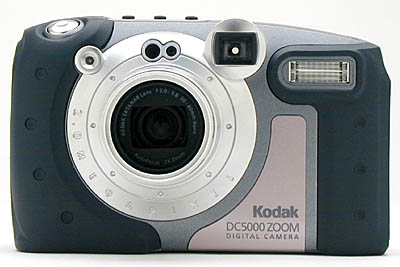
Design
The picture below shows the front of the camera. From right to left, key features are the onboard flash, viewfinder, light sensor (flash and autofocus), lens, and indicator light for the self-timer. The DC280's lens retracted into the camera body when it was shut off, but the DC5000's is protected with a rigidly-mounted tubular metal housing, capped with a glass protective cover. The lens still extends and retracts when the camera is turned on or off, but does so within the safety of this protective assembly. A set of 37mm filter threads are available at the end of the housing assembly, allowing filters and auxiliary lenses to be attached.
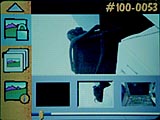
The picture below shows the back side of the camera, with a control layout that will be immediately recognizable to anyone familiar with the previous DC280. Most camera functions are controlled via the LCD menu system, activated by the "Menu" button at upper left. Major operating modes are selected with the rotating function dial at lower right, while menu options are selected with the buttons to the right and bottom of the LCD screen. The central button (which Kodak calls the "Do It" button) also serves to turn on the LCD screen for use as a viewfinder when in Capture mode.
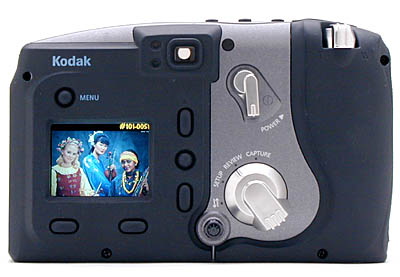
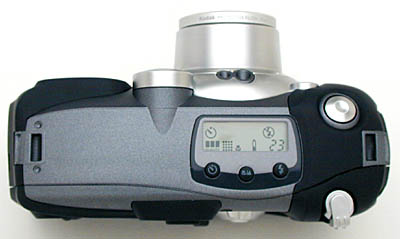
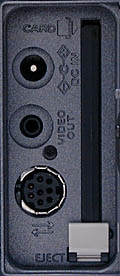
Other control buttons are placed very similarly to other cameras. On the top of the camera, you'll find the Status Display which shows icons for the different camera settings, if the settings are enabled. It's an easy reminder of which menu options you have enabled, the battery power status, and pictures remaining on the picture card, among other things. Also easily accessed atop the camera are the Shutter Button, Zoom Control for telephoto or wide angle shooting, Self-Timer Button, Infinity Focus/Close-Up Button, and lastly, the Flash Button to change flash settings for different exposures. The left-hand side of the camera contains easily accessible ports for the AC Adapter, Video Out, and Serial/USB connections.
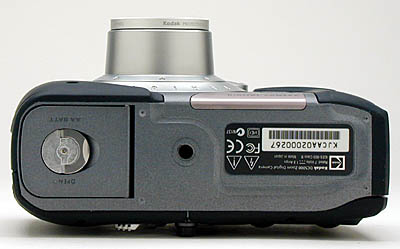
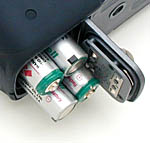
Batteries load easily in the battery compartment in the bottom of the camera, and the AC adapter, video out, and serial ports are nicely tucked into the left-hand side of the camera (behind a sealed, latching cover hatch) for easy accessibility. The CompactFlash memory card is also accessed through this same hatch.![]()
As mentioned, the camera is easily managed with one hand when capturing images, while camera users can navigate through the various buttons and menu options on the LCD viewfinder with the other.
 Viewfinder
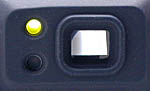
The DC5000 is equipped with both an optical viewfinder, and an LCD display on the rear of the camera. The LCD is used for both previewing and reviewing images, and for scrolling through and selecting camera menu options.
The 1.8-inch LCD can be used to preview an image in Capture mode, or review images in Review mode. The LCD is equipped with a brightness adjustment, a small rotary control projecting from the rear of the camera just below and to the left of the mode dial, to adjust LCD viewing for your particular needs. (Note that this doesn't appear to be a "true" brightness control, in that it seems to just vary the display contrast, rather than the brightness of the LCD's backlight.) The "live" images on the LCD are bright and sharp, with a fairly high refresh rate, albeit not as fast as some cameras we've tested. Regardless, the LCD is still immensely helpful when framing your subjects, or when experimenting with what you shot will look like if captured in sepia-tone, or black and white mode. In "viewfinder" mode, the DC5000's LCD shows the 100% accuracy we've come to appreciate in the Kodak digital camera line. (100% viewfinder accuracy is handy for framing critical shots, but very rare among the digital cameras we've tested.)
The LCD always displays your images in color unless you are snapping images with one of the special effects turned on. (Black & white or sepia-tone.) In addition, you'll see helpful icons appear in the LCD if you have adjusted the cameras exposure, locked the exposure, selected a border to appear over your image, or turned on the date stamp. Pressing the Menu button in Capture mode brings up a menu for setting the most commonly-used picture-taking controls.
When reviewing images, a press of the Menu button displays a series of icons on the left of the LCD. You can select these icons to view an enlarged portion of the image on the LCD, delete images, print them, and lock them to prevent erasure, among other things. The menu icons displayed on the LCD are easily viewable and easy to navigate through.
As with most digital cameras, using the LCD for preview and review of images can drain battery power fairly quickly. You should limit continuous use of the LCD during your picture-taking sessions for this purpose. For continuous preview and review, power the camera with an optional AC adapter.
The optical viewfinder on the DC5000 displays about 91% of the actual image taken. It isn't a TTL (Through The Lens) optical viewfinder, but the clarity of the images in the viewfinder is more than acceptable for viewing at both the wide angle and the telephoto settings. Unfortunately, the DC5000 is not equipped with a Diopter Adjustment for those camera users (like us) plagued with near- or far-sightedness, and the viewfinder optics have a fairly low "eye relief." (This last means that your eyeball needs to be pretty close to the viewfinder lens. For eyeglass wearers, this means you'll need to press your glasses against the camera pretty firmly to get a clear view.) On the positive side though, the DC5000's viewfinder is fairly insensitive to lateral eye position, providing an accurate view regardless of the position of your eyeball.
Optics
Kodak rates the DC5000 at an equivalent ISO speed of 70 with a maximum aperture setting of F/3 in wide angle mode, and F/3.8 in telephoto mode. (This is somewhat lower sensitivity than is common among digicams these days, making the DC5000 less well suited to low light shooting than some units. The DC5000 includes an optical-glass lens that automatically focuses to provide the best capture of your subject. Depressing and holding the shutter button half-way after framing your subject locks in the auto focus prior to capture, allowing accurate focus for off-center subjects. (Center the subject, lock the focus, then re-frame the shot while still holding the shutter button down, before taking the picture.)
The zoom control toggle on the top of the camera lets you quickly zoom in on your subjects with a standard working range for image capture between 20 inches (0.5 m) and infinity. A macro (close-up) feature adds the flexibility of allowing you to clearly focus on small subjects at a relatively close distance from between 9.8 and 20 inches (0.25 to 0.5 m). Selecting close-up mode automatically zooms the lens to the telephoto end of its range, and adjusts the focusing to handle closer objects. We found operation of the zoom lens to be very smooth, with no "preferred" focal-length settings. The lens was also very responsive to the controls, making it easy to get exactly the focal length we wanted. We did find the zoom control lever to be a little stiff to operate though, doubtless due to the O-ring seals around its shaft that provide water resistance.
The 2X zoom lens capability has a focal length range equivalent to 30 mm to 60 mm on a conventional 35 mm camera. The additional 3x digital zoom capability can get you closer to your subject by magnifying the center of your image an additional three times, cropping-down to progressively smaller portions of the CCD area as the magnification ratio increases. (As with all digital zooms though, the more the image is magnified, the more blurry it becomes, since it is working with progressively less data the more the image is magnified.) Some digital zooms simply crop the image to a smaller size, but the DC5000 resamples the image in-camera, so the final images always have the pixel dimensions you've selected via the menu system. Also as with other cameras, the digital zoom only works when the LCD is turned on, because you'd have no way to tell what portion of the image was being viewed otherwise. The camera interpolates the image in real time on the LCD when zooming digitally. The final image does appear somewhat "softer," but overall, the digital zoom capability of the camera is fairly smooth and viewing the zoom as it happens on the LCD is very helpful in keeping the subject of your shot correctly centered. (We have to say though, that at high digital zoom magnifications, the LCD display goes from "soft" to very blurry, making precise framing difficult at the maximum 3x setting.) Another nice touch is the fine gradations available on the digital zoom, varying in 0.1x increments from 1.0 to 3.0x. Other than our general lack of fondness for digital zooms, the one complaint we have about the DC5000's digital zoom is that it can't be used in conjunction with the close-up mode: Entering close-up mode disables the digital zoom if it's active, or prevents it from being enabled if it isn't.
Exposure
The DC5000 offers two metering modes to help obtain the best exposure for your images even in the face of backlight surrounding the subject. The modes include a Multi-Pattern option that examines the entire image area to determine the best exposure. This setting will generally be the best choice for everyday pictures. Conversely, the camera is also equipped with a Center-Weighted setting that bases its exposure decision primarily on the central portion of the frame, while de-emphasizing the background. The Center-Weighted mode will be most useful for shooting portraits shots, or for dealing with backlit subjects.
A Sharpness feature is included that allows you to choose between three sharpness options: Sharp, Standard, and Soft. The Sharp option highlights the edges of your image making them stand out; the Standard option leaves the image as captured and makes no sharpness adjustment; and the Soft option blurs the edges in your picture so that they blend in with the background. (This is a little different than most digital cameras we've tested with "sharpness" options: Most seem to simply turn off the sharpening function in the "soft" mode, while the DC5000 appears to actually blur the image somewhat when this option is selected.) Contrary to some cameras we've tested though, we found the sharpness variations on the C5000 fairly subtle. (In our opinion, some cameras really overdo the sharpening a bit in the "sharp" mode, reducing its utility. Kodak's more subtle approach seems more useful.)
The White Balance feature of the DC5000 lets you capture images under special lighting conditions (fluorescent, evening, or tungsten light, for example), or create a special color effects. Normally, the Auto option would be used for everyday pictures and, in most cases, produces images of more than acceptable quality. Under some circumstances, when taking pictures out-of-doors, or under daylight lighting conditions, the Daylight option may be preferable: The difference between the two is pretty subtle when shooting normal subjects, but the "daylight" option would avoid color shifts due to a preponderance of a particular color in the subject.) When capturing images indoors, two white balance options are available: Fluorescent, to correct for the green cast caused by most household fluorescent lights, or Tungsten, to correct for the orange cast frequently seen when capturing images under tungsten lighting. We were particularly impressed with how well the DC5000's white balance system did at removing the strong yellowish cast from the tungsten lighting used in our "indoor portrait" test shot.
Through an LCD menu option, you can dial in exposure compensation from -2EV to +2EV in .5EV increments. The DC5000 is also equipped with another LCD option that locks the exposure and white balance settings when the shutter is tripped for the first shot in a series, or when the Shutter button is half-pressed for the first time after selecting the option. This Exposure Lock feature works especially well for capturing a series of images that require consistent exposure and color balance between them. (For instance, images that will later be combined together to create a panorama.)
Besides the normal exposure modes, the DC5000 sports two special modes, to take either black & white or sepia-toned images. The black & white option produces smaller file sizes for a given quality level than is possible for color pictures. The "sepia" option recreates the look of old-time photos, which were often rendered in shades of brown, as a result of treating the prints in a sepia toning solution.
Like the DC280, the DC5000 provides an "Auto-ISO" function. When enabled (via an LCD menu selection), this option allows the camera to increase its effective ISO rating in low-light conditions from its normal value of 70 to an apparent value of ~140. (A guess on our part, based on the approximately one-stop increase in shutter speed with it enabled.) We were surprised though, that this option doesn't appear to improve the absolute low-light limit of the camera at all: Whether it is engaged or not, the camera is only capable of good exposure down to a limit of about EV 10 (8 foot-candles or 88 lux). Since this sort of ISO increase is achieved by simply boosting the amplification of the signal from the CCD sensor, the noise level of the image is increased also. It's likely then, that Kodak chose not to create a camera that would take obviously noisy pictures in lower light conditions, preferring instead to maintain their image-quality standard, while settling for a less-aggressive low-light capability. Regardless, under typical room lighting conditions, the 1-stop shutter speed increase provided by the Auto-ISO function is very welcome when shooting people-pictures indoors.
Lastly, after an image is captured, the QuickView feature displays the image on the LCD. At this point, you can choose to delete the image immediately and re-shoot, or, if you do nothing, the image will be stored to the cameras picture card. (The QuickView feature can be turned off to conserve battery life.)
Flash
The built-in flash of the DC5000 has a specified working range 1.6 feet to 9.8 feet in wide-angle mode, and 1.6 feet to 7.9 feet in telephoto mode. In our tests though, we found that the flash worked just fine out to at least 10 feet, even in telephoto mode, and so regard Kodak's rated spec as a little conservative. The "customizable" flash settings include auto flash, red-eye reduction flash, fill-in flash, and off. The flash settings are fairly flexible in that you can choose a different setting for each shot, or you can set a default flash setting in Camera Setup mode. The default setting holds through camera power cycles and can be helpful if you regularly shoot images requiring a specific flash option. In common usage, changing a flash setting on the run is so simple, it's not a problem, but the selectable default setting is nonetheless a convenience.
Shutter Lag Time/Cycle Times
Shutter lag time is the amount of time that elapses between pressing the shutter button and the time that the camera actually fires. The camera needs this time to adjust its auto focus and auto exposure setting before capturing the image. We measured the DC5000's shutter lag at 1.16 seconds for shots requiring full autofocus, and at 0.38 seconds for those which were pre-focused by half-pressing the shutter button in advance of taking the shot itself. On the DC5000, the shot-to-shot cycle time varies in an interesting fashion: For the first three shots, you'll be able to snap away once every 2-3seconds. If you continue shooting as rapidly as possible, the camera will require more like 20 seconds between shots after the first three are taken. (Apparently, the DC5000 has some internal memory buffering that permits it to cycle more rapidly for the first few shots.) Given its 2 megapixel resolution level, a cycle time of only 2-3 seconds is good, somewhat better than average among competing units that we've tested thus far (September, 2000).
Camera startup time is also quite short at just over 4.3 seconds and shutdown takes slightly more than 3 seconds. Switching from Capture to Review mode takes just under 2 seconds while switching back to Capture mode can require up to 7 seconds.
Operation and User Interface
As mentioned in our "Executive Overview", we found the user interface for the DC5000 to be very easy to navigate. On first usage, it took us less than 5 minutes to get a handle on the major control functions of the camera by just experimenting with the different dials and buttons. Reading the manual really wasn't even necessary.
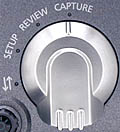 The camera operates in one of four different mode settings: Capture, Review, Connect, and Camera Setup You select which mode you want with the Mode Dial on the rear of the camera. Depending on which mode you select, pressing the menu button-also on the rear of the camera-displays a sequence of menu options that are specific to that mode. Easy-to-access up/down and left/right scroll buttons to the right and below the LCD screen are used to scroll through the different menus and options, while a blue button Kodak calls the "DO-IT" button is used to confirm selections.
The LCD doesn't automatically turn on when in Capture mode. You need to turn it on manually using the DO-IT button. This is mildly annoying if you tend to use the LCD a lot, but does much to conserve battery life. In comparison, the LCD is always on in Review mode and you don't need to enable it. If you need to adjust the LCD brightness, simply use the small thumb wheel on the bottom of the camera. The LCD shuts itself off after 30 seconds of inactivity to save battery power.
While in Capture mode, available menu options include exposure compensation, borders for images, special effect settings, quality and resolution settings, date and time stamp, and white balance and meter mode settings.
Similarly, Review mode provides a variety of options relating to images already captured and stored to the camera's picture card, including deleting, setting print order, "locking" and image, setting slide show timing, and retrieving detailed picture information.
Connect mode lets you connect the camera to a PC or Macintosh computer using the USB or serial cables packaged in the camera box. You can connect to Windows '95 or '98 computers, as well as USB-equipped Apple Macintosh computers. Of course, you first need to install the DC5000's software on your computer before you can acquire images from the camera.
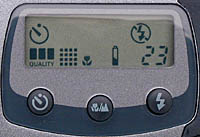
Other control buttons are placed very similarly to other cameras. On the top of the camera, you'll find the Status Display which shows icons for the different camera settings, if the settings are enabled. It's an easy reminder of which menu options you have enabled, the battery power status, and pictures remaining on the picture card, among other things. Also easily accessed atop the camera are the Shutter Button, Zoom Control for telephoto or wide angle shooting, Self-Timer Button, Infinity Focus/Close-up Button, and lastly, the Flash Button to change flash settings for different exposures.
Control Enumeration

Self-Timer Mode
The Self-Timer mode has its own button on the top of the camera. You can use the self-timer in conjunction with any of the camera settings you've enabled, like many other camera models. Depressing the Self-Timer button provides a 10 second delay between pressing the Shutter button and the when the camera fires.

Infinity Focus/Close-up Button
Also located atop the camera, this button toggles between two modes:
Capture Mode
With the Mode Dial on the rear of the camera set to Capture, pressing the Menu Button provides the following options for capturing your images:
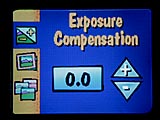 Exposure Compensation: Adjust the exposure set by the camera's automatic metering from +2 EV to -2 EV, in .5 EV steps.
 Border: Allows you to add borders or logos to your pictures. Using the Kodak DC5000 Border Transfer utility, you can save borders onto your picture card. Then, you can use the DC5000's Border feature to add the borders to your image prior to capture. When in Border mode, the LCD automatically turns on and displays the chosen border so that you can see if the border matches well with your subject. Note that formatting the picture card erases all the borders you've loaded: If you reformat, you'll need to reload.
 Effects: Lets you capture images in Black & White, Sepia (for an antique look), or Document (adds contrast when capturing images containing text) mode. When in Effects mode, the LCD automatically turns on and displays the image with the chosen effect. Use the LCD display to see if the image works well with the effect. If so, capture it. If not, choose another effect and see how it looks.
 Picture Quality: Select one of three settings: Good, Better, and Best. Of course, as you move from Good to Best, more space is needed on the picture card to store the image. The Good setting is more than adequate to capture images for online sharing. In high resolution mode (see below), the picture quality settings correspond to the following file sizes:
 Resolution: Choose from one of two settings: High or Standard.
 Date/Time Stamp: Lets you record the date and time that the image is captured on the image itself.
 QuickView: Displays the image you just captured in the LCD for several seconds after capture. This handy feature lets you review the image and decide if you want to keep it and save it to the picture card. A Delete icon (trash can) appears on the image when viewing it. If you don't like the image, press the left scroll button to delete it. If you like it, do nothing and it will be stored automatically.
 White Balance: Select from one of four white balance settings based on the environment in which you are capturing images:
 Metering: Use this option to obtain the best exposure for your images, based on the lighting and subject type. Two metering modes are available:
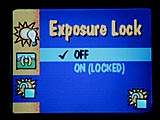 Exposure Lock: After this option is selected, the camera exposure and white-balance settings will be "locked" as soon as the first shot is taken. These settings will remain in effect until the "lock" is released by revisiting this menu option. Use this feature to insure consistent exposure for multiple shots to be used in panoramas, or other applications requiring consistent exposure.
 Sharpness: Provides three options for sharpening or softening a picture:
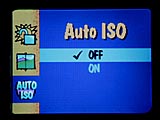 Auto ISO: Enables the camera to automatically increase its light sensitivity (at some cost in image noise) to increase shutter speed in low-light conditions:
Review Mode
Use Review mode to examine already-captured images. When you change from Capture to Review Mode, the LCD automatically activates and displays your images. Use the left/right scroll buttons to scroll through and view all the images currently stored on the picture card.
Pressing the menu button changes what is displayed on the LCD. At the bottom of the LCD you'll see smaller versions of the images that you have captured (if there's more than 1, of course). You can use the left/right scroll buttons to quickly scroll through the images that you have captured to find a particular image. Once you find it, that image appears larger in the LCD. To the left of the LCD, a series of icons appears. Each of these icons represents an operation that you can perform on the selected image. Whenever one of these operations is selected, Delete, for example, the Trash Can icon appears over the image in the LCD.
 Magnify: Lets you magnify and zoom in on a particular portion of a picture for closer examination. The image expands to twice the normal LCD display size. You can use the up/down and left/right scroll buttons to view different parts of the picture at the magnified level. (We liked the smooth scrolling the direction buttons provide in this mode: Many digicams jump between quadrants of the enlarged image, rather than scrolling smoothly.)
 Protect: Prevents an image from being accidentally erased from the picture card. When you protect an image, the Protect icon appears over the image on the LCD.
Connect Mode
When you want to connect the camera to a PC for downloading of images, you first need to place the camera in Connect mode. Connect mode enables the different ports on the side of the camera for image transfer. The ports include a standard RS-232 connection for Windows-based computers, and a Universal Serial Bus (USB) connection for Windows '98 based computers, as well as USB-equiped Apple Macintosh computers.
Camera Setup Mode
Camera Setup Mode provides several options you can use to customize the camera for your own picture-taking needs:
 Set Date and Time: Lets you set the month, date, and year.
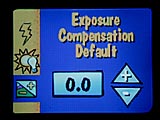 Exposure Compensation Default: Lets you set a default value for exposure compensation. If you capture images in a way that requires a specific exposure value, you can change the default value to the exposure you need. Ambient settings range from +2 EV to -2 EV, in .5 EV steps.
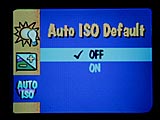 Auto ISO Default: Sets Auto-ISO option that will be selected when the camera is powered-up. Enables the camera to automatically increase its light sensitivity (at some cost in image noise) to increase shutter speed in low-light conditions:
Border Default: If you have borders loaded on your picture card, you can select a default border to use every time you choose the border option. Effects Default: Lets you choose a special effect for your pictures whenever you turn on your camera and begin capturing images. The available options are No Effect (normal default), Black & White, Sepia, and Document.
 Language Default: Choose from one of seven languages: English (normal default for US cameras), Japanese, French, German, Portuguese, Spanish, or Italian.
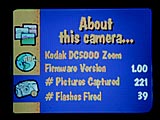 About the Camera: Provides you with information about your camera including the number of pictures captured and the number of flashes fired.
 Format: Lets you format picture cards for use with the DC5000 if they have a different format or have become corrupted in some way. Remember that formatting removes all information on the card including any borders or graphics you may have stored.
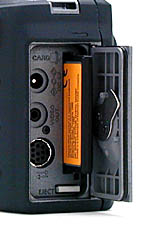 Image Storage & Interface
The DC5000 comes equipped with a "CompactFlash" ATA-compatible 10 MB picture card. The picture card compartment is easily accessible on the left-hand side of the camera. Open the compartment door, insert the picture card into the slot, push it all the way in, and you're all set to capture images. All images are captured and stored in standard JPEG format. In addition, the camera lets you specify the print order of different images that you capture.
Using the Print option when in Review mode, you can select pictures for printing and choose how many you want. You can even choose to have an index print of all your pictures. This information is stored to the picture card along with the images. If you have a newer PC Card reader, or if you use you picture card on a Picture Maker kiosk, the reader will recognize the print order format and print your pictures automatically!
When you first turn on the camera, the status display includes the number of pictures for which space remains on the picture card. This "Pictures Remaining" number is displayed in the lower-right hand corner of the status display. This number, of course, will vary depending on the Quality setting (Best, Better, Good), and the Resolution level setting (High, Standard). At the high-resolution level, images are stored at 1760 x 1168 pixels. At the standard level, they are stored at 896 x 592 pixels. The table below shows the approximate number of images that can be stored on the included 20MB card for each available camera setting:
|
Resolution/Quality |
|
|
|
|
| High Resolution | Images | 32 | 48 | 86 |
| Approx. Compression |
10:1 | 15:1 | 30:1 | |
| Standard Resolution | Images | 90 | 131 | 245 |
| Approx. Compression |
7:1 | 10:1 | 20:1 | |
Of course, as with all digital cameras, the number of images stored on each card may vary depending on the complexity of the image being captured. At the high resolution, best quality setting, the average file size is about 625K. At the high resolution, good quality setting, the file size is about 230K, and at the standard resolution, good quality setting, the average file size is about 82K.
The DC5000 is equipped with both USB cable for connecting to Windows '98 and Apple iMac computers, as well as an RS232 and serial adapter plug for transferring images to Windows-based, or Macintosh computers. In our data-transfer tests, the speed advantage of the USB connection became dramatically apparent: We timed the transfer of a 524K maximum-resolution file from the camera to our 350 MHz Pentium II Windows '98 computer. Using the conventional serial port, this transfer required 59.8 seconds, a pretty typical number for an image of this size over a digicam serial connection. Switching to the USB port, this time dropped to an astonishing 3.1 seconds! We often recommend external card readers for our readers, to transfer image files to the host computer more rapidly: With a direct USB connection to the camera though, such accessories really become irrelevant. (The DC5000 also ships with "mounter" software that lets it appear on your computer's desktop as just another disk drive. Kodak has had this software available for some time now, but with a conventional serial connection it was really too slow to be useful. With USB however, the "mounter" interface really comes into its own, making for a very effective way to download images from the camera.)
 Video Out
The DC5000 supports display of images to a television set through a video out cable supplied with the camera. The video out port is located on the left-hand side of the camera, hidden beneath a latching o-ring sealed protective hatch. Both the NTSC signal format for U.S. and Canadian use, and the PAL signal format for European use are supported. A menu option is available on the camera to switch between these signal formats if needed.
 Power
Power
The DC5000 is powered by a set of four AA batteries, either 1.2v nickel metal hydride (NiMH) batteries or 1.5v Alkaline batteries, both of which are included with the package so that you can start using the camera as soon as you take it out of the box. Also included is a NiMH battery charger and a set of 4 NiMH batteries (1450 mAh capacity). NiMH batteries require at least 8 hours to fully charge in the provided charger, after which the charger drops the current level to a "trickle," to keep the batteries topped-off. We heartily applaud Kodak's inclusion of the rechargeable batteries and charger in the box with the DC5000: High-capacity rechargeable batteries are really a necessity with any digital camera, and Kodak saves users a good $30-50 by including the charger and batteries with the camera.
When the camera is placed in Capture, Review, or Camera Set-Up Mode, the Battery Status Symbol is displayed on the Control Panel on the top of the camera to tell you how much battery power is remaining. The battery compartment on the right, bottom side of the camera is easily accessible for battery changing, but requires the camera to be removed from a tripod in order to access it.
Besides battery power, the DC5000 uses an optional AC adapter to power the camera from a standard AC wall outlet. Simply plug the AC adapter into the AC adapter connector under the connector cover on the left-hand side of the camera and you're ready to snap some pictures.
Use the Power Save feature on the camera to shorten the amount of time that the camera stays on when not in use to save battery power. Kodak also recommends that when you use the LCD on the camera, you should limit usage to less than 10 continuous minutes. More continuous usage will surely drain the battery power. If more than 10 minutes is required, purchase the optional AC Adapter.
We've just recently begun measuring actual power consumption of digicams, to try to introduce some objectivity to the topic. Now, rather than vague impressions of how long a camera can run on a set of batteries, we'll be able to see just how much power the cameras use in each operating mode. Overall, the DC5000 had slightly lower power consumption in non-LCD and image-playback modes than other cameras we've checked recently, but higher consumption when the LCD was operating, or when the camera was readied for a shot by half-pressing the shutter button. Other operating modes appear fairly typical, but we couldn't get the camera to "sleep" when connected to our test-station power supply, so couldn't report on power use in that mode. (We've tested several of the recent 2-megapixel digicams, but haven't reported on them as yet, wanting to develop a consistent approach first. From this point on though, we should be featuring power consumption figures pretty regularly.) Here's a table showing power consumption in various modes ("mA" means "milliamps", or 1/1000 of an ampere of current):![]()
|
|
|
| Capture Mode, w/LCD |
|
| Capture Mode, w/o LCD |
|
| Half-pressed shutter, no LCD |
|
| Memory Write (Transient) |
|
| Flash Recharge (Transient) |
|
| Image Playback |
|
| "Sleep" Mode (Auto power-down) |
|
In looking at these figures, it seems that the DC5000 should be able to run for many hours in capture mode with the LCD left off, and for an hour or more with continuous LCD usage, when operating from high-power NiMH batteries. (Note though, that at high power levels such as with the LCD on, you can't just divide the power drain into the batteries' mAh capacity to get run time: Battery capacities are rated for drain at the "0.1C" rate, or a drain of 1/10th of the batteries stated capacity, over 10 hours. Higher drains can greatly decrease the effective capacity.)
Included Software
The DC5000 is packaged with a variety of different software packages for you to use on your home PC, whether it's a Windows-based system or a Macintosh. The software is bundled on two Installer CDs: One for the Kodak and one for the ArcSoft applications.
The following applications are included for both Mac and Windows systems:
Test Results
In keeping with our standard policy, our comments here are rather condensed, summarizing our key findings: For a full commentary on each of the test images, see the DC 5000's "pictures" page.
As with all Imaging Resource camera tests, we encourage you to let your own eyes be the judge of how well the devices performed: Explore the images on the pictures page, to see how well the DC5000 performed, and how its images compare to other cameras you may be considering buying.
Overall, we found the DC5000 to be a solid performer, with excellent color, very good 2-megapixel resolution, and very accurate viewfinder and exposure systems. It was fast and responsive, apparently using some degree of RAM buffering internally to improve cycle time for the first three shots of a series.
The DC5000's resolution approaches 800 lines per picture height vertically, and 650-700 horizontally on our resolution-target test, well on a par with other 2 megapixel cameras we've tested. It appears that the DC5000 renders high-contrast objects very well, but slips somewhat when the scene is characterized by lower contrast, as was the case with the outdoor model shots. On the plus side, the lens is totally free of geometric distortion, across its full focal-length range. (This is a real rarity in inexpensive zoom optics!)
The viewfinder systems are very accurate, the optical viewfinder showing 85-89% of the final image area depending on the zoom setting, and the LCD finder exactly 100%. The optical finder's view is well-centered in the final image area, particularly at moderate distances.
All in all, the DC5000 turned in a very good performance, marked in particular by the excellent color rendition we've found characteristic of Kodak digicams: With it's workmanlike software bundle, good capabilities, and exceptional ruggedness, we expect it will be very successful both in the "industrial" category Kodak seems to have it pegged for, as well as among personal users looking for the ultimate in a "go anywhere" camera.
Conclusion
As noted at the outset, the DC5000 is Kodak's "industrial-grade" upgrade of their prior DC280 model. For all intents and purposes, it appears to function identically to the very successful DC280, which should help it find a ready market among point & shoot users. The big news of course is the super-rugged, weatherproofed case claimed to be able to withstand dirt, dust, drops, and even (brief) dunking. If you need a digicam that produces great pictures and doesn't need coddling, the DC5000 could be just the ticket!
<<DC5000 Sample Images | Additional Resources and Other Links>>
Reader Comments!
Questions, comments or controversy on this product? Click
this link to see what other Imaging Resource readers have had to say about
the Kodak DC5000, or add comments of your own!