Panasonic DMC-GH1 Operation
Like that of the G1, the Panasonic GH1's user interface can at first seem a little befuddling, because some common functions don't have external buttons visibly labeled. Exposure compensation is a prime example; there's no button labeled with a +/- symbol on the camera's body. To adjust the exposure, you can either push on the front control dial and then turn it, or press the Q.Menu button and scroll among the options there. Unless you've previously been in the Q.Menu and scrolled to another option, the exposure compensation control is the first one you'll see after pressing the Q.Menu button. The adjustment scale is laid out horizontally, but you must hit the up/down buttons to adjust the exposure setting. This seems counterintuitive, as the horizontal scale suggests the use of the left/right arrows or the front control dial, but instead these scroll through the various options on the Q.Menu.
While we found the GH1's user interface a little counterintuitive, a good many first-time users will just leave the camera in Intelligent Auto mode (which we found worked quite well), making the point moot.
Once we became accustomed to the Panasonic GH1's controls, we found that the user interface worked well. Because it would leave the Q.Menu cursor (option selection) on the function you last used, it tended to drop us back to where we wanted to go more times than not. Pushing the front dial to access the exposure compensation control was also very fast and quickly became second nature. The My Menu's keeping of our last five menu selections close at hand saved our delving into the extensive menu system for most choices while we were shooting. At the end of the day, we found the Panasonic GH1 a very pleasant and responsive camera to shoot with.
The four navigation buttons access oft-used commands, including ISO, white balance, AF mode, and a special function button can be assigned to any of several options. Pressing the Preview button gives you a Depth-of-field preview by stopping down the lens to the current aperture, and pressing the Display button immediately after puts the GH1 into Shutter speed preview mode.
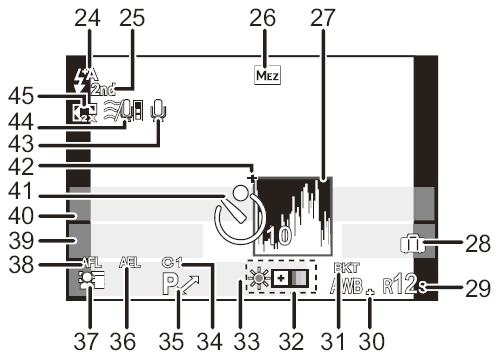
Panasonic DMC-GH1 Record Mode Display
 The Panasonic GH1's rear-panel tilt-swivel 3-inch TFT color LCD monitor can be used for image review, status display, menu display, and as a viewfinder for image framing.
The illustrations below (courtesy of Panasonic) show what information is displayed on the GH1's LCD monitor (or electronic viewfinder) in Record Mode when used to preview. In most cases, the displays are identical, though there are a few items that are only displayed on the LCD monitor, as noted in the table footnotes below. Also, the Viewfinder mode displays more live information in the EVF than does the Monitor mode there: On the LCD, both modes display the same amount of info. (Click here to open a copy of the table describing the callouts in a separate window, if you want to keep it handy while you scroll through the illustrations below.)
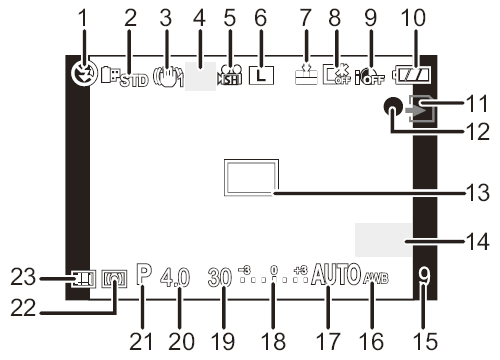
LCD Monitor Style (Initial Display)
Monitor Style (Recording Display)
Panasonic DMC-GH1 Record Settings Display
 We have somewhat mixed feelings about using the rear panel LCD as a settings display. While it provides a much larger area than the more typical small black and white data readouts, it also consumes more power. The Panasonic GH1's battery life is a bit below average when compared to most consumer SLRs, and would arguably be better if it didn't require the main LCD screen to be lit so much of the time. While you can use the EVF as the primary viewfinder display, the info display shown above right isn't available there, and the status overlay that appears in the EVF is much less detailed than that shown on the rear-panel LCD. All that said, though, we do really like the amount of camera information that the GH1 makes available on its rear screen, and you can easily disable this screen with a press of the Display button.
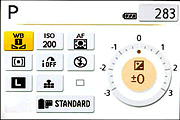
The illustration below (courtesy of Panasonic) shows the setting information available via the GH1's Quick Menu:
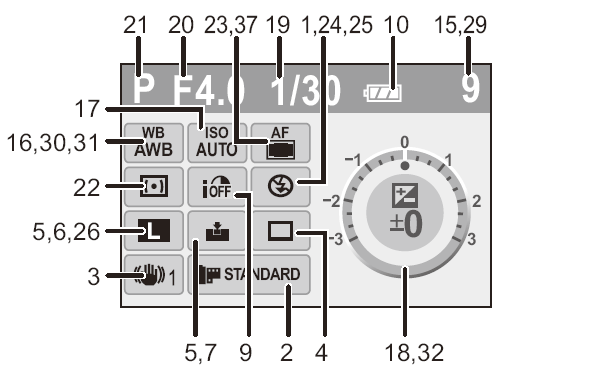
The following table documents the information for all display illustrations above:
|
1
|
Flash Mode
|
24
|
Flash Output Adjustment
|
|
2
|
Film Mode
|
25
|
2nd Curtain Synchro
|
|
3
|
O.I.S. / Jitter Alert
|
26
|
Extended Optical Zoom
|
|
4
|
Drive Mode (Single 1, Burst, Auto Bracket, Self-timer)
|
27
|
Histogram
|
|
5
|
Record Mode
|
28
|
Travel Date
|
|
Recording Quality
|
AF Tracking Operation
|
||
|
6
|
Picture Size
|
29
|
Available Recording Time 3
|
|
7
|
Quality
|
30
|
White Balance Fine Adjustment
|
|
8
|
LCD Mode 2
|
31
|
White Balance Bracket
|
|
9
|
Intelligent Exposure
|
32
|
My Color Mode
|
|
10
|
Battery Indication
|
33
|
Current Date and Time 2,4
|
|
11
|
Card Access
|
Travel Destination Setting 2,4
|
|
|
12
|
Recording State (flashes red)
|
34
|
Custom Settings
|
|
Focus (green)
|
35
|
Program Shift
|
|
|
13
|
AF Area
|
36
|
AE Lock
|
|
14
|
Dial Operation Guide
|
37
|
Face Recognition
|
|
Elapsed Recording Time
|
38
|
AF Lock
|
|
|
15
|
Number of Recordable Pictures 3
|
39
|
Age 2,5
|
|
16
|
White Balance
|
Location 2,4
|
|
|
17
|
ISO Sensitivity
|
40
|
Name 2,5
|
|
18
|
Exposure Compensation Value
|
Number Of Days Passed Since Departure 2, 4
|
|
|
Manual Exposure Assistance
|
41
|
Self-timer 6
|
|
|
19
|
Shutter Speed
|
42
|
Spot Metering Target
|
|
20
|
Aperture Value
|
43
|
Audio Recording
|
|
21
|
Recording Mode
|
44
|
Wind Cut
|
|
22
|
Metering Mode
|
45
|
Digital Zoom
|
|
23
|
AF Mode
|
||
Notes:
|
|||
Panasonic GH1 Playback Mode Displays
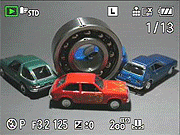 The Playback button on the rear panel accesses Playback mode, where you can review captured images. Pressing the Display button cycles through displays showing basic information about the captured image (aperture, shutter speed, size, JPEG quality, flash use, ISO, and sequence number), a screen showing a small thumbnail and more detailed exposure information (adding exposure compensation, white balance, focus and exposure modes, image stabilization setting, color space, and full file number to the above), a screen with a small thumbnail and RGB + luminance histogram displays, and finally an image with no information overlay at all.
 In playback mode, rotating the command dial located on the front of the camera just below the shutter button zooms in or out on the image being viewed. You can zoom in up to 16x (in steps of 2x), and pan around the full image via the arrow keys.
 When you zoom out beyond the full-image display, you can see displays of 12 or 30 thumbnails, or a calendar-based display that organizes images in groups by the date captured.
 Fujifilm GFX 50S Review
 Fujifilm X-T3 Review
 Olympus E-M5 III Review

Follow Imaging Resource