 Back
to Full Olympus E-10 Review
Back
to Full Olympus E-10 ReviewGo to Olympus E-10 Data Sheet
Go to Olympus E-10 Pictures Page
Up to Imaging Resource Cameras Page
Use your browser's "Back" button to return to the previous page, or the links at the top and bottom of this page to navigate to related information. If you have difficulty fitting the text on this page onto your printer output, simply resize your browser window to a narrower width and print again.
Remember us when it's time to buy!
Dave here: Have our reviews been helpful to you? (Is this article you're reading right now useful?) Preparing this level of information on as many products as we do is incredibly hard work, not to mention expensive. Things on the Internet may look like they're free, but they're not. (As a lot of big dot.com companies are finding out these days.) Somewhere, somebody has to pay to produce worthwhile content. YOU can help us though, by remembering us when it comes time to make your purchase. Would you consider coming back to our site and clicking-through to one of our advertisers to make your purchase? Every dollar you spend with one of our advertisers helps us directly (in affiliate fees) or indirectly (the advertiser will keep renewing their ad contract with us). To make it easy for you to support us, here's a URL you can visit, to see all our current advertisers, with links to click on that will register your visit to them as having come from our site. It's up to you where you buy, but Mike, Mike, Kim, Yazmin, Marti and I would be really grateful if you'd help us out by choosing one of our advertisers to purchase from.
Thank you for your support!
Dave Etchells, Founder & Publisher
Visit our "Buy Now" Page:
https://www.imaging-resource.com/buynow.htm
Back
to Full Olympus E-10 Review
Go to Olympus E-10
Data Sheet
Go to Olympus E-10
Pictures Page
Up to Imaging Resource Cameras
Page
Olympus E-10A 4 megapixel sensor and unique SLR optics make for a major coup for Olympus! (Final review, based on full-production model.) Review First Posted: 1/26/2001 |
|
 |
|
True 4 megapixel sensor for resolution to 2240x1680 |
|
|
High-quality 4x zoom lens, 35-140mm equivalent | |
|
|
Unique SLR design with beam-splitter for live LCD preview | |
|
|
Very flexible exposure controls, good user interface | |
|
|
Amazing low light capability |
Manufacturer Overview
As
this article was written, Olympus already had one of the broadest digicam lines
in the industry. In rapid succession though, they announced the C-2100 Ultra
Zoom, the E-100RS ultra high-speed digicam, and the E-10 four megapixel SLR (the
subject of this review). What we see in each of these cameras is a product
developed to appeal to specific market segments, rather than being just another
"general purpose" digicam.
The
E-10 is clearly intended to compete at the highest image quality levels of the
digital SLR field, thanks to its true 4 megapixel CCD resolution. This current
review was based on a preproduction prototype, so we can't draw any firm
conclusions on issues such as color accuracy, but other image quality parameters
looked very good indeed. (And the color wasn't bad at all either: We
specifically avoided comment on it because Olympus told us there would be about
two more rounds of "tweaking" before the final units hit the stores, but what we
saw even at this early stage looked quite good.) With an initial selling price
of $1,999 US, the E-10 is thousands cheaper than most competing models, and
actually outperforms them in several areas. After spending a week or so with the
camera, we found ourselves liking it quite a bit: The combination of high image
quality, good optics, extraordinary low light capability, and a relatively
compact design (smaller than many film-based SLRs) added up to quite a package.
We suspect there will be a lot of people for whom $4,000 plus for one of the
competing SLR models (including a lens) would be an uncomfortable stretch, but
who'll happily find the $2,000 for an E-10. Olympus could have a real winner
here - Read on for the details...
High Points
Design
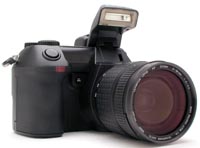
The Olympus E-10
is a much anticipated arrival into the SLR digicam arena. With enough features
and sophistication to lure professional photographers and novices alike, the
E-10 offers full exposure control and the first true four megapixel CCD sensor
in an affordable camera, all in a familiar 35mm camera design. Its durable cast
aluminum body (along with its rather substantial lens) make the E-10 a hefty 37
ounces (1048 grams) without batteries or media, but compact portability isn't
exactly what the E-10's designers were after. An accompanying neck strap should
make things a little easier, although the camera lacks the exceptional balance
we so admired in Olympus' C-2100 Ultra Zoom model. Dimensionally, the E-10
measures 5.0 x 4.1 x 7.0 inches (128 x 105 x 178mm).

The
cast aluminum body design of the E-10 (shown above) is actually important for
several reasons. Not only does it provide a very rigid, rugged housing for the
optics and electronics of the camera, but it also serves as a heat sink for the
E-10's 4 megapixel CCD. We view this last as a significant feature, and it's
very likely a major contributor to the E-10's superb low-light performance.
Noise currents in CCDs are very strong functions of temperature, doubling about
every 6-8 degrees C. Thus, if you're interested in minimizing noise in a digital
camera, controlling the CCD temperature becomes quite important. Due to their
compact size, many consumer-level digicams run quite hot internally,
particularly after being used in capture mode with the LCD running for an
extended period. In the E-10, Olympus has done two things to dramatically reduce
the normal operating temperature of the CCD. The first thing we noticed was the
LCD panel, which is packaged as a separate unit that can tilt out from the back
of the camera. Just having it external to the main camera body cavity will
reduce its contribution to the camera's heat load, and when swung out from the
body, it's impact is even further reduced.

The
most important factor in reducing thermal noise in the E-10 though, is the way
Olympus has designed the entire body to be a heat sink for the imager. The
illustration above (courtesy Olympus) shows a cross-section of the camera, with
the metal body parts highlighted. The dark vertical rectangle at the center is
the CCD imager, which you can see is directly in contact with a metal insert
that in turn connects to the aluminum body casting. This arrangement conducts
heat away from the imager much more efficiently than in any consumer-level
cameras we've seen in the past, and could easily result in CCD operating
temperatures 20 degrees C lower than in competing models. Using the "2x noise
per 6 degrees C" rule of thumb mentioned above, a 20 degree C reduction in
operating temperature could mean as much as a factor of eight difference in image noise. While we don't have
any specifications from Olympus as to the actual temperature reduction due this
design, we can vouch for the fact that the E-10's low light performance not only
exceptionally good, but seemed to degrade much less if the camera was operated
for a long time. Overall, a very intelligent, innovative design that seems to
have a real impact in daily use.
The E-10's SLR design features a "beam splitter" rather
than the traditional mirror, which directs the visual image to the optical
viewfinder and the CCD simultaneously. What this means is that the optical
viewfinder is usable at all times, without the blackout that would normally
occur when the shutter is triggered and the mirror folds up. Our test unit
arrived with several accessory components, including lens attachments with
grips, the lithium polymer battery and grip, and a wired remote. Because the
E-10's lens is not interchangeable, Olympus offers a range of accessory lenses
that attach to the camera's main lens via the 62mm filter threads. This stacking
of lenses can get rather long and heavy, but Olympus provides supports and grips
to help balance out the camera's weight and make it a little easier to hold with
the longest telephoto lens attached. We noticed that with the E-10, Olympus has
made some of its traditionally LCD menu-dependent functions accessible through
external exposure controls. This not only simplifies camera operation, but also
requires less reliance on the LCD menu, which in turn, equates to lower power
consumption.

The
front of the E-10 features the lens, autofocus sensor, shutter release button,
infrared remote control sensor, and the Quick Reference white balance button. As
noted earlier, the E-10 doesn't allow for interchangeable lenses, but there are
significant advantages to this approach, as well as the obvious disadvantage of
less flexibility in your choice of optics. The shutter button rests at an angle
on the hefty hand grip, which features a textured-rubber that grips the fingers
well.

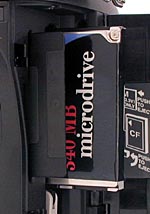
The
hand grip side of the camera features little other than a neck strap attachment
eyelet and the memory card compartment, accessible from the camera's back panel
via a sliding lever. The compartment holds both SmartMedia and CompactFlash Type
I or II memory cards thanks to dual slots, and is protected by a hinged, plastic
door.

The
opposite side of the camera displays a wealth of controls, including the popup
flash release button, PC sync terminal for an external flash, sync terminal for
the wired remote control, auto/manual focus selector switch, I/O connector
compartment, DC power socket, and a handful of exposure controls. The flash and
wired remote control sync terminals are both protected by small, black,
threaded, plastic caps that screw into place. While these small caps provide
good protection, we found them a little difficult to unscrew and very easy to
lose. The DC power socket is covered by a flexible, rubber flap that remains
attached to the camera and simply folds out of the way when the camera is
plugged into its AC adapter. The I/O connector compartment is located under the
neck strap attachment eyelet, and accessed by opening the hinged plastic door.
Inside the compartment are the Video Out and USB jacks. Exposure controls on
this side of the camera include the Macro, Metering, Exposure Compensation, and
Drive buttons, as well as the focus selector switch and the release mechanism
for the LCD monitor, which we'll detail a little further on.
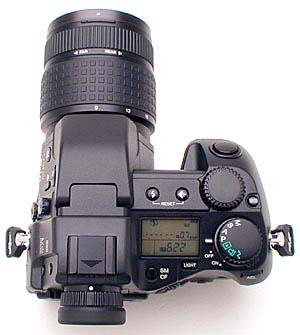
On top
of the camera are more exposure controls and dials, as well as the hot shoe for
mounting an external flash unit, the popup flash, a small status display panel,
and the power switch. The external flash hot shoe features a sliding plastic cap
that protects the contacts from accidental scratching, dirt, or other harm. A
command dial is present for changing camera settings, as is a mode dial for
changing the exposure mode. Other exposure controls include the White Balance,
Flash Mode, Image Quality, memory card selector, and status display panel
backlight buttons. We always like to see status display panels like this, as
they help avoid use of the camera's LCD menu system, saving power and making
control setting much faster. The status display panel's backlight feature
illuminates the panel with a yellow, fluorescent light, so you can check camera
settings in the dark.

The
remaining exposure controls, LCD monitor, and optical viewfinder are all on the
camera's back panel. The SLR optical viewfinder features a notched dioptric
adjustment dial around the outside of the eyepiece, to accommodate eyeglass
wearers. The small lever just left and below the eyepiece controls a shutter
that can be used to block the viewfinder to prevent ambient light from affecting
the exposure when using the camera on a tripod. Camera controls on the rear
panel include a subcommand dial, the display and menu buttons, a set of arrow
keys, and the OK, Info, Protect, and Erase buttons. We loved the design of the
LCD monitor, which actually pops off of the back panel and rotates upwards as
much as 90 degrees for better viewing when shooting from low angles. Because it
lifts off of the back panel slightly, the LCD monitor can also face downwards at
about 20 degrees for high-angle shooting.

The bottom panel of the E-10 is
slightly uneven, holding the battery compartment, speaker, and metal tripod
mount. While the camera bottom isn't perfectly flat overall, there's a very
broad tripod mounting flange for good stability, and the tripod mount also
incorporates sockets to receive the anti-rotation pins some tripod heads have on
them. (Overall, a very rugged-looking tripod mount, in our opinion.) We are also
glad to report that the tripod mount and battery compartment are far enough away
from each other to allow for quick battery changes while mounted. The battery
compartment features a small, silver lock that turns to unlock the compartment,
releasing a sliding tray that holds either two CR-V3 lithium batteries or four
AA alkaline, Ni-MH, or Ni-Cd batteries. The tray slides in and out of the
compartment, which is also nice when working with a tripod.
To head off the emails before they
arrive, we'll note here that the speaker on the camera bottom has nothing to do
with multimedia capabilities, but rather exists for the sole purpose of giving
the camera the familiar "click-whir" sound of a film-based SLR. In fact, Olympus
was so dedicated to verisimilitude in this respect that the E-10 offers your
choice of two camera sounds, corresponding to the digitized sounds of their OM-1
and OM-2 film cameras! We're not sure we see the value in this, but can report
that camera sounds are very handy when shooting portraits and other
people-pictures, as it gives the subject(s) some idea of when the picture was
actually shot, so they can relax and avoid "posing fatigue".

The
optional lithium polymer battery and grip kit provides not only a more powerful,
longer lasting power source, but also a thick grip and secondary shutter release
for holding the camera vertically.
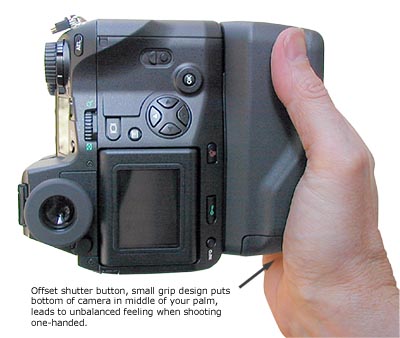
We
found the shape of the hand grip a little uncomfortable for our hands, as the
placement of the shutter button pushed our hand down a bit on the grip. Combined
with the rather diminutive dimensions of the camera overall (when compared to
large professional film SLRs), the result was that the bottom of the hand grip
rested in the center of our palm, rather than against the heel of our hand. This
meant we had less leverage on the camera, and contributed to an unbalanced
feeling when using the grip vertically, single-handed. We assume that Olympus
placed the secondary shutter button below the top corner of the grip to prevent
any accidental triggering, but we would rather see it higher on the grip, with a
lock feature like that of the Nikon D1.
Viewfinder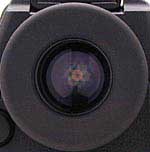 For composing images, the E-10
features an SLR (Single Lens Reflex) optical viewfinder and an LCD monitor. The
optical viewfinder's SLR design utilizes a "beam splitter" method rather than
the traditional mirror design. Oddly, although the image is carried to the CCD
and viewfinder simultaneously, there's still a brief "blackout" each time the
shutter trips. We're not sure why this is, since the optical path looks as
though it should support light going to the viewfinder and CCD at the same time.
One benefit though, is that the beam splitter design should reduce vibration
significantly for shooting under dim lighting conditions with long telephoto
lenses, since there's no mirror slamming up as the exposure begins. Another
benefit is that, with no mirror to flip up, the maximum cycle time can be very
fast. (Some very high-end film-based SLRs have what are called "pellicle"
mirrors, which are partially transmissive, and remain in place as the shutter
opens. This approach is usually adopted in order to achieve very high frame
rates of 10 frames per second or so though, quite a bit beyond the 3 frame per
second capability of the E-10.) The illustration below shows the optical path
through the camera: The beam-splitter is the squarish unit at the rear of the
camera, where one light path branches off vertically to go to the eyepiece, and
the other proceeds straight through to the CCD.
For composing images, the E-10
features an SLR (Single Lens Reflex) optical viewfinder and an LCD monitor. The
optical viewfinder's SLR design utilizes a "beam splitter" method rather than
the traditional mirror design. Oddly, although the image is carried to the CCD
and viewfinder simultaneously, there's still a brief "blackout" each time the
shutter trips. We're not sure why this is, since the optical path looks as
though it should support light going to the viewfinder and CCD at the same time.
One benefit though, is that the beam splitter design should reduce vibration
significantly for shooting under dim lighting conditions with long telephoto
lenses, since there's no mirror slamming up as the exposure begins. Another
benefit is that, with no mirror to flip up, the maximum cycle time can be very
fast. (Some very high-end film-based SLRs have what are called "pellicle"
mirrors, which are partially transmissive, and remain in place as the shutter
opens. This approach is usually adopted in order to achieve very high frame
rates of 10 frames per second or so though, quite a bit beyond the 3 frame per
second capability of the E-10.) The illustration below shows the optical path
through the camera: The beam-splitter is the squarish unit at the rear of the
camera, where one light path branches off vertically to go to the eyepiece, and
the other proceeds straight through to the CCD.

While
the beam-splitter approach does have the advantages described above, there is a
tradeoff in light sensitivity associated with it: Since some portion of the
light must be sent through the viewfinder, there will be that much less reaching
the CCD. If the light were split evenly between the two, this would be a 1
f-stop loss in ISO. That said, we were particularly impressed with the E-10's
low light performance, among the very best we've seen in any camera at any price
range. (Kodak's high-end SLR the DC-620x would very likely do better, due to
it's optimization for high ISO sensitivity, but the E-10 is a fifth the
DC-620x's cost, and has twice its pixel count.) Inside the
optical viewfinder are central autofocus target marks and an LED display that
reports shutter speed, aperture, flash, metering system, exposure compensation,
and whether or not the image is in focus (indicated by a full circle that lights
solid when focus is set). A soft, rubber bezel around the outside of the
eyepiece comfortably cushions the eye, and a notched, dioptric adjustment dial
(also around the outside of the eyepiece) adjusts the focus in the viewfinder to
accommodate eyeglass wearers. The notched dioptric dial is a little difficult to
turn while looking through the viewfinder. We found it easier to pull the camera
away from the face, move the dial a notch, and then look back through the
viewfinder to check the view. This is only slightly annoying, as we'd ideally
like to be able to look through the viewfinder as we adjust the dioptric dial.
We did appreciate that the dioptric adjustment had very definite click-stops in
its rotation though, so it isn't likely to get jostled out of adjustment
inadvertently. It also seemed to offer a wider range of adjustment than we're
accustomed to seeing, but we don't have any quantitative measure to support that
conclusion. As with most SLRs, light entering the rear viewfinder element can
affect exposure, so the E-10 incorporates a lever-actuated shutter to block off
the eyepiece when you're using the camera on a tripod. (That is, whenever your
eyeball isn't blocking light from entering the viewfinder eyepiece.)
Inside the
optical viewfinder are central autofocus target marks and an LED display that
reports shutter speed, aperture, flash, metering system, exposure compensation,
and whether or not the image is in focus (indicated by a full circle that lights
solid when focus is set). A soft, rubber bezel around the outside of the
eyepiece comfortably cushions the eye, and a notched, dioptric adjustment dial
(also around the outside of the eyepiece) adjusts the focus in the viewfinder to
accommodate eyeglass wearers. The notched dioptric dial is a little difficult to
turn while looking through the viewfinder. We found it easier to pull the camera
away from the face, move the dial a notch, and then look back through the
viewfinder to check the view. This is only slightly annoying, as we'd ideally
like to be able to look through the viewfinder as we adjust the dioptric dial.
We did appreciate that the dioptric adjustment had very definite click-stops in
its rotation though, so it isn't likely to get jostled out of adjustment
inadvertently. It also seemed to offer a wider range of adjustment than we're
accustomed to seeing, but we don't have any quantitative measure to support that
conclusion. As with most SLRs, light entering the rear viewfinder element can
affect exposure, so the E-10 incorporates a lever-actuated shutter to block off
the eyepiece when you're using the camera on a tripod. (That is, whenever your
eyeball isn't blocking light from entering the viewfinder eyepiece.)
Olympus estimates the
optical viewfinder to be 95% accurate, which agreed well with our own
measurements of 93-95% accuracy as we zoomed the lens from wide angle to
telephoto settings. The LCD monitor produced almost exactly the same accuracy figures, an unusually close
agreement with the optical finder. We usually like to see LCD accuracy as close
to 100% as possible, so would have liked to see a little more of the frame in
the LCD. The close agreement between LCD and optical is good too though, in that
it avoids the need to compensate mentally as you switch between the two. In our
experience, most film-based SLRs have roughly 95% viewfinders.

The 1.8 inch, color, TFT (Thin-Film Transistor) LCD monitor features 114,000
pixels and a tilting design. A small release lever on the left side of the monitor
pops the top of the LCD monitor outwards from its compartment, allowing you
to tilt the display down by about 20 degrees, useful for times when the camera
is slightly overhead. By lifting it off of the back panel slightly, the LCD
monitor can also face upwards at a 90 degree angle, handy for low-angle shots.
The Display button next to the LCD monitor turns the image display on or off,
and the Menu button just below it calls up the LCD menu system for whatever
mode the camera is currently in.
 Just like the optical viewfinder, the LCD monitor features an information readout
at the bottom of the screen, reporting the exposure settings, focus lock, and
flash mode. Pressing the Info button repeatedly cycles between two information
screens and no information at all. The first information display reports the
shutter speed, aperture and exposure compensation. The second screen displays
a focus range indicator in both meters and feet, reporting the approximate distance
between the camera and the subject. The focus indicator is great, both in autofocus
mode, when it provides a rangefinder capability, or in manual focus mode, where
it would be useful for situations in which you know the distance to the subject.
For more detailed information on battery power, the number of available images,
and more extensive exposure information, the small status display panel on top
of the camera features a more complete information readout. Olympus estimates
that the LCD monitor represents about 100 percent frame accuracy, but as noted
above, we found it closely matched the optical finder on our test unit.
Just like the optical viewfinder, the LCD monitor features an information readout
at the bottom of the screen, reporting the exposure settings, focus lock, and
flash mode. Pressing the Info button repeatedly cycles between two information
screens and no information at all. The first information display reports the
shutter speed, aperture and exposure compensation. The second screen displays
a focus range indicator in both meters and feet, reporting the approximate distance
between the camera and the subject. The focus indicator is great, both in autofocus
mode, when it provides a rangefinder capability, or in manual focus mode, where
it would be useful for situations in which you know the distance to the subject.
For more detailed information on battery power, the number of available images,
and more extensive exposure information, the small status display panel on top
of the camera features a more complete information readout. Olympus estimates
that the LCD monitor represents about 100 percent frame accuracy, but as noted
above, we found it closely matched the optical finder on our test unit.
The E-10 offers a fair bit of exposure information during playback, optionally
available by pressing the Info button on the rear panel while rotating the subcommand
dial. Three levels of information are available, as shown at right. We liked
the control over the amount of information displayed, but would liked to have
been able to simply switch the information overlay on or off just by pressing
the Info button. (That is, without having to resort to the subcommand dial.)
 The E-10 also offers a histogram function displaying the distribution of brightness
throughout the image, although you may have to read the manual (as we did) to
find it: To access the histogram function, you have to first put the camera
into the PC Connection mode (?!) on the mode dial and then activate the histogram
through the settings menu there. (This settings menu also controls other camera
functions, such as the function of the Macro button, date and time setting,
file naming scheme, and RAW file format enabling.) Once activated, you can toggle
between the normal exposure-information display and the histogram by pressing
the Info button. We liked the E-10's histogram display because it was fairly
large, and seemed to show good detail in terms of the number of pixels at various
brightness levels. It seemed to do a bit better job than other histogram displays
we've seen of telling us when a relatively small percentage of the image was
blown out, but we also really like camera displays that show blown-out
regions as black or blinking, to help see just where you're losing highlights
in an image. (Note to Olympus: Any chance of seeing this feature as a firmware
upgrade for the E-10?)
The E-10 also offers a histogram function displaying the distribution of brightness
throughout the image, although you may have to read the manual (as we did) to
find it: To access the histogram function, you have to first put the camera
into the PC Connection mode (?!) on the mode dial and then activate the histogram
through the settings menu there. (This settings menu also controls other camera
functions, such as the function of the Macro button, date and time setting,
file naming scheme, and RAW file format enabling.) Once activated, you can toggle
between the normal exposure-information display and the histogram by pressing
the Info button. We liked the E-10's histogram display because it was fairly
large, and seemed to show good detail in terms of the number of pixels at various
brightness levels. It seemed to do a bit better job than other histogram displays
we've seen of telling us when a relatively small percentage of the image was
blown out, but we also really like camera displays that show blown-out
regions as black or blinking, to help see just where you're losing highlights
in an image. (Note to Olympus: Any chance of seeing this feature as a firmware
upgrade for the E-10?)
The histogram display isn't "live" in capture mode, but rather you
must first capture a frame, then switch to the "quick review" mode
by pressing the display button twice in rapid succession. This actually puts
you in playback mode, in that you have all the normal playback functions available
to you. The advantage is that you can switch back to capture mode instantly,
just by touching the shutter button. (The camera will also revert to capture
mode automatically if you don't touch any of the controls for 60 seconds or
so.) Early comments by the Olympus US staff had led us to believe that the E-10's
histogram display would be "live" on the LCD viewfinder, but this
turned out not to be the case. Still, the ability to quickly switch from capture
mode to "quick review" and back again makes the histogram function
quite usable.
 In Playback mode, the LCD monitor offers a playback zoom function, which enlarges
captured images for closer inspection of fine details. It appears to offer magnifications
up to about 4x, a very useful level, but we've seen higher magnifications on
some recent competing models, and would There's also an index display mode,
which displays up to nine thumbnail images on the screen at one time, perfect
for selecting images to protect, delete, or print.
In Playback mode, the LCD monitor offers a playback zoom function, which enlarges
captured images for closer inspection of fine details. It appears to offer magnifications
up to about 4x, a very useful level, but we've seen higher magnifications on
some recent competing models, and would There's also an index display mode,
which displays up to nine thumbnail images on the screen at one time, perfect
for selecting images to protect, delete, or print.
Optics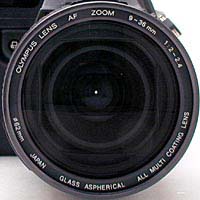 The E-10's lens system is a large
part of the "story" about the E-10: It's a departure from other professional
SLR digicams, in that it doesn't accept interchangeable lenses. For some photographers,
this will undoubtedly be seen as a limitation. On the other hand, Olympus offers
a pretty wide range of front-element auxiliary lenses, the 4x zoom range is
probably sufficient for the bulk of normal studio and location shooting, and
there are advantages to the fixed-lens design that we'll delve into shortly.
Aside from the fixed-mount design, the E-10's optics are unique in their incorporation
of several elements normally found only in very high-end lenses in the 35mm
world.
The E-10's lens system is a large
part of the "story" about the E-10: It's a departure from other professional
SLR digicams, in that it doesn't accept interchangeable lenses. For some photographers,
this will undoubtedly be seen as a limitation. On the other hand, Olympus offers
a pretty wide range of front-element auxiliary lenses, the 4x zoom range is
probably sufficient for the bulk of normal studio and location shooting, and
there are advantages to the fixed-lens design that we'll delve into shortly.
Aside from the fixed-mount design, the E-10's optics are unique in their incorporation
of several elements normally found only in very high-end lenses in the 35mm
world.
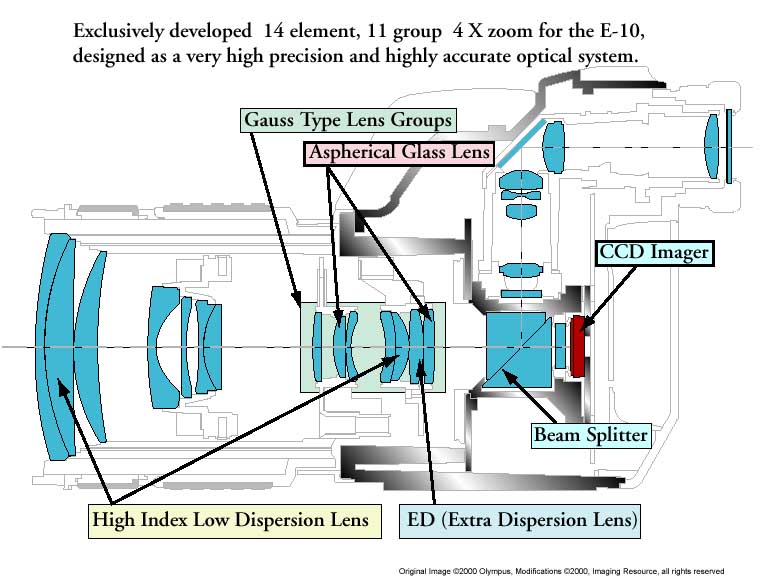
The diagram above shows the E-10's lens optical system in cross-section, with
several key parts of it called out. The first noteworthy feature is that there
are two aspheric elements, and no fewer than three low-dispersion or extra-low-dispersion
elements, both of which are costly to manufacture, and a hallmark of high-end
optics. The second design element is the "Gauss Type Lens Group" appearing in
the middle of the diagram. Gauss groups are normally found only in high-end
wide-aperture telephoto lenses, and help significantly reduce chromatic aberration
and other optical defects in such designs. Another consequence of the arrangement
of elements in the E-10's lens is that the light arriving at the CCD will be
pretty highly collimated, with all the light rays hitting the CCD surface more
or less at right angles. Olympus feels that this is important for digital imaging
systems, due to the strong three-dimensional structure of the CCD surface. (We
didn't have this confirmed by Olympus, but we strongly suspect that the "purple
fringe" problem found on many consumer-level digicams is due to a too-high angle
of incidence light on the CCD surface.)
Another aspect of the E-10's lens system that Olympus calls particular attention
to is that it is designed to have a "circle of confusion" of only 4 microns,
matching the dimensions of the CCD pixels. This is a little bit of a technical
area, but lens systems are generally designed to be able to deliver a particular
maximum resolving power, measured by how tightly they can focus a hypothetical
point source of light. Most film-camera lenses are designed with the resolution
limits of film in mind (no surprise), which apparently results in "circles of
confusion" (sounds like a planning meeting at The Imaging Resource ;) or "blur
spot" size of 6 microns or more. The problem with applying such lenses to digital
imaging is that the lens ends up being the limiting element in the overall optical
path. Olympus' contention is that lenses need to be designed to match the requirements
of the new medium. We don't have any way of verifying the impact of all this
optical technology, but can say that the lens on our E-10 evaluation sample
looked exceptionally sharp. (For a really technical discussion of lenses
for digital imaging, check the Schneider
Optics site.)
Turning to the more mundane aspects of the E-10's lens, it's 4x, professional
ED (Extra Dispersion), glass, 9 to 36mm lens (equivalent to a 35 to 140mm lens
on a 35mm camera) design. With a very fast minimum aperture of f/2.0 ~ f/2.4
(depending on zoom setting), the lens features 14 elements in 11 groups. As
noted above, these groups can be broken down into one extra dispersion glass
element, two aspherical glass elements, two aspherical elements, and two high
index low dispersion elements. Aperture can be manually or automatically adjusted,
with a range from f/2.0 to f/11.0, depending on the zoom setting, in 1/3 EV
steps. Focus ranges from 1.97 feet (0.6m) to infinity in normal mode and from
8.0 to 30.0 inches (0.2 to 0.8m) in macro mode. Macro mode is accessed by pressing
the Macro button and turning the command dial until the traditional macro flower
symbol appears in the status display panel. Zoom is controlled by turning a
textured-rubber bezel around the lens, rather than by pressing zoom control
buttons. We like this method, as it gives you the same feeling as zooming a
traditional 35mm lens, and provides more precise and positive-acting zoom control.
Focus can be automatically or manually controlled, with an AF/MF switch on the
side of the camera to designate the mode. The E-10's autofocus system uses a
Dual AF-Active (IR and Passive TTL) contrast detection method to determine focus,
basing focus on the center of the subject. What this means is that the camera
uses two methods to measure focus. First, the Active Triangulation Reflective
AF bounces an infrared beam off of the subject to judge the distance between
the subject and the lens. The subject is then roughly focused by moving the
lens, followed by a more precise focus based on what the CCD is seeing. Once
the subject is in focus, a green circle in the optical viewfinder lights solid.
When shooting with manual focus, the focus is adjusted by turning the focus
ring on the outside of the lens. The draft manual we received with the first
prototype we tested indicated that the LCD viewfinder would switch to a 2x magnified
view when manual focus was being used, but this proved not to be the case. We
still found it surprisingly easy to focus with the 1x LCD view though, as in
most cases, we could observe moire patterns on the subject when focus was sharpest.
When using manual focus, the camera-to-subject distance is also optionally reported
in the bottom of the viewfinder screen, in both feet and meters. Like most other
digicams with manual focus options that we've tested, the E-10's manual focus
is a "fly by wire" system, in which the focus ring isn't coupled to
the lens elements directly, but rather simply commands the camera's stepper
motors to adjust the focus. It still does a pretty decent job of giving you
the feel of actually adjusting the lens, because the direction and distance
the ring is turned translates pretty directly into focus adjustment. The one
downside of this system we see though, is that the maximum focus-adjust rate
("slew rate") is limited by the camera electronics, rather than by
how fast you can crank the control ring. If you're used to the fairly loose
focus adjustments on modern autofocus 35mm film camera lenses, you may be frustrated
by the focusing speed of the E-10. On the other hand, it is one of the better-feeling
manual focus adjustments we've encountered on a digicam.
As first mentioned in the "design section, although the E-10 does not accommodate
interchangeable lenses, its built-in lens does feature 62mm filter threads for
attaching accessory lenses. Available lenses are a 28mm f/2.0 wide angle lens,
200mm f/2.4 and 420mm f/2.8 telephoto lenses, and a f=35 macro lens. Accessory
grip and support kits are also available, and necessary, since the added lenses
increase the weight and the length of the lens unit.

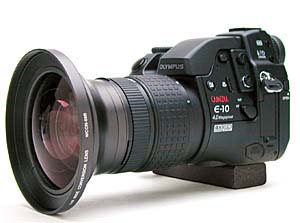
The optional 420mm-equivalent, f/2.8 lens makes the camera quite long and
heavy, requiring a lengthy support bar to hold the camera and lens together.
When combined with the vertical hand grip attachment (as shown in the photo
above), the E-10's lens extension evolves the camera into a rather large,
somewhat awkward device. Still, we applaud the availability of such a long, fast
accessory lens, and found the resulting images to be very sharp. (Take a look at
a 400mm f/2.8 lens on a 35mm film camera though: If your wallet can get past the
several thousand dollar sticker price, you'll find the resulting lens probably
weighs more than the E-10 and it's long telephoto combined.) The 420mm accessory
lens can only be used with the camera's own lens set at maximum telephoto: Any
excursion toward wide-angle focal lengths will result in vignetting. As we "went
to press" with this review, firm pricing for the 420mm extension lens wasn't set
yet, but Olympus representatives told us it would probably cost about $600. - If
true, that's pretty cheap by 35mm standards for a lens of that length and
aperture.

A 200mm, f/2.4 extension lens can also be attached to the camera.
Though no support device is required, the longer lens definitely requires a
second hand to hold the camera steady. As with the 420mm lens, the 200mm unit
can only be used with the main lens set to telephoto focal lengths.
A 28mm wide angle lens attachment is also available, with a minimum
aperture setting of f/2.0. This shorter lens doesn't require any additional
support, and does not vignette at any focal length setting of the primary
lens.

As we mentioned, the E-10 accommodates both an infrared and wired
remote control. What we really appreciated with the wired device is the ability
to halfway press the shutter release to set exposure and focus. Most external
remotes don't provide this capability. The wired remote is also necessary to
take full advantage of the bulb exposure capability: Pressing on the shutter
during a 30 second exposure is likely to introduce camera shake, even with a
sturdy tripod. The infrared remote control is the same unit that Olympus
includes with many of its other digicams, allowing you to trip the shutter and
access several playback functions.
Exposure
The E-10 offers excellent exposure
control, with a range of manual and automatic exposure modes available. Through
the mode dial on top of the camera, you can set the exposure mode to Program,
Aperture Priority, Shutter Priority, or Manual. In Program exposure mode, the
camera selects both the aperture and shutter speed settings, while you can
adjust the exposure compensation, metering mode, ISO, flash, and white balance.
Aperture Priority mode allows you to set the lens aperture (from f/2.0-2.4 to
f/11.0, depending on the zoom setting) while the camera selects the best
corresponding shutter speed. Shutter Priority modes works in the exact opposite,
allowing you to set the shutter speed (from two to 1/640 seconds) while the
camera selects the appropriate lens aperture. In both Aperture and Shutter
Priority modes, you have control over the same exposure variables as in Program
mode. Shooting in Manual exposure mode gives you control over both the shutter
speed and aperture setting, increasing the shutter speed range to eight to 1/640
seconds, with a Bulb setting for exposure times all the way out to 30 seconds.
Manual exposure mode also allows you to change all other exposure variables,
with the exception of exposure compensation and metering mode. In both Aperture
and Shutter Priority modes, the designated variable is changed by simply turning
the command dial on top of the camera. In Manual mode, aperture is set by
turning the small sub-dial on the back panel, and shutter speed is changed by
turning the main command dial on the top panel. The camera doesn't offer a range
of preset shooting modes, for shooting in special situations such as night
scenes or sunsets. However, the camera's instruction manual provides detailed
information and tips for shooting portraits, backlit subjects, action subjects,
etc.
We have to admit being a little disappointed that the fastest
shutter speed is only 1/640 of a second, when we're accustomed to speeds as high
as 1/1,000 or 1/2,000 of a second. This limits your exposure in bright, daylight
shooting situations, in that you're practically forced to use a smaller aperture
setting. (Or pack along a neutral-density filter or two.) Still, the
availability of a Bulb setting is a nice bonus for low light shooting, and the
E-10's low light capability is nothing short of phenomenal.
Three
metering modes are available on the E-10, in all exposure modes other than
Manual. ESP Metering reads multiple locations across the the entire image area
to determine the correct exposure value. Center Metering reads light in a
relatively large area at the center of the subject to determine exposure (the
metering area takes up about 11 percent of the total frame area). The third
mode, Spot Metering, takes a light reading from the very center of the subject
(about 1.6 percent of the viewfinder image). The metering mode is selected by
holding down the Metering button and turning the command dial (or sub-dial)
until the desired icon is displayed in the viewfinder. Like metering, exposure
compensation is adjustable in all exposure modes except Manual. By pressing the
Exposure Compensation button and turning the command dial (or sub-dial), the
exposure can be adjusted from -3 to +3 EV in 1/3 EV increments.
An
exposure lock function is controlled by the AE Lock button on the back panel of
the camera. To use AE Lock, simply point the center of the viewfinder at the
part of the subject you want the exposure based on, press and hold the AE Lock
button, reframe the subject, and trigger the shutter. The separate AE Lock
button is a nice feature, because it lets you completely recompose your shot
(including zoom and focus adjustments) without losing the desired exposure
setting.
We at first thought there was no focus-lock feature per se on the E-10, but a reader note on our discussion forums set us to rights. (Thanks to George Pence for the correction!) As it turns out, you can use the AEL and shutter buttons to effect a focus-lock function. Here's how: Start by half-pressing the shutter button to lock both exposure and focus. Then center on your exposure target, and press the AEL button. This *re-locks* the exposure, while not affecting the focus. Finally, while still holding down the AEL button (and still half-pressing the shutter button), reframe your picture and fully press the shutter button. Not the most straightforward implementation we've seen, but the function is nonetheless there and usable.
White balance on the E-10 offers three operating modes, Auto, Quick Reference, and Preset. The Auto setting selects the whitest portion of the subject and adjusts the color balance to achieve the best white value. The Quick Reference setting is equivalent to a manual white balance mode, in that it allows you to set the white balance by placing a white card in front of the subject to balance the color. You then press the Quick Reference white balance button on the front of the camera to save the setting as a preset value. This saved white value will automatically be used the next time the white balance is set to Quick Reference, unless the value is changed again through the same method. We were very pleased to see the addition of a manually adjustable white balance setting, since most Olympus digicams only offer a range of preset values. In our testing, the manual white balance setting worked very well to remove color casts under difficult lighting conditions. Under the Preset white balance mode, the camera offers a selection of Kelvin temperatures, from 3,000 to 7,500 degrees, to match a variety of light sources. The instruction manual provides a detailed chart reporting the temperature setting and the lighting situation it's intended for.
Image sharpness can be adjusted to Hard, Soft, or Normal on the E-10, through
the record menu. The Hard setting sharpens the borders and outlines in the subject,
probably by increasing the contrast, and also clarifies the noise pattern (making
it more prevalent). On the other end of the spectrum, the Soft setting blurs
borders and decreases contrast slightly. Image contrast can also be adjusted
through the record menu, with options for High, Normal, and Low. The High setting
creates a stark contrast, which may wash out highlight areas and turn shadows
to black. Alternatively, the Low setting subtly blends the highlight and shadow
areas, making them less pronounced.
We mentioned earlier that the E-10 offers a histogram function that allows you
to check the exposure before capturing the image. We couldn't actually get the
histogram to appear on the LCD monitor in Capture mode (our beta evaluation
model still had a few quirks), although we did successfully utilize the the
feature in Playback mode. According to Olympus, you will be able display the
histogram over the bottom of your subject and adjust the exposure compensation
or exposure variables (shutter speed or aperture) to tweak the exposure without
leaving capture mode.
Flash
 The E-10 features a built-in,
pop-up flash with five operating modes, including Automatic, Slow Synchro, Redeye
Reduction, Redeye Reduction with Slow Synchro, and Fill-In. Flash mode is controlled
by pressing the Flash button and turning either the main command dial or the
sub-dial. The Automatic flash mode places the camera in charge of when to fire
the flash, based on the existing light level and exposure. The Slow Synchro
setting selects a slower shutter speed to allow more ambient light into a dark
image, such as a night scene. The Slow Synchro flash can be timed to fire at
the beginning or end of the exposure, depending on the desired effect. In Redeye
Reduction mode, the flash fires a rapid burst of 10 short flashes to contract
the pupils of the subject's eyes before the main flash fires. The Redeye Reduction
with Slow Synchro mode simply combines the two flash modes, for night portraits.
The Fill-in flash mode fires the flash with every exposure, regardless of the
light level. Finally, the flash can be completely disabled by returning it to
its compartment. The built-in flash intensity level can be adjusted through
the record menu, from -2 to +2 in 1/3 EV increments.
The E-10 features a built-in,
pop-up flash with five operating modes, including Automatic, Slow Synchro, Redeye
Reduction, Redeye Reduction with Slow Synchro, and Fill-In. Flash mode is controlled
by pressing the Flash button and turning either the main command dial or the
sub-dial. The Automatic flash mode places the camera in charge of when to fire
the flash, based on the existing light level and exposure. The Slow Synchro
setting selects a slower shutter speed to allow more ambient light into a dark
image, such as a night scene. The Slow Synchro flash can be timed to fire at
the beginning or end of the exposure, depending on the desired effect. In Redeye
Reduction mode, the flash fires a rapid burst of 10 short flashes to contract
the pupils of the subject's eyes before the main flash fires. The Redeye Reduction
with Slow Synchro mode simply combines the two flash modes, for night portraits.
The Fill-in flash mode fires the flash with every exposure, regardless of the
light level. Finally, the flash can be completely disabled by returning it to
its compartment. The built-in flash intensity level can be adjusted through
the record menu, from -2 to +2 in 1/3 EV increments.
Olympus estimates the built-in flash as effective from 0.6 to 18.3 feet (0.2
to 5.6m), at the normal intensity and ISO 100 settings. This seemed consistent
with our own test results, with two caveats: First, the flash seemed rather
dim at all test distances in our studio tests, although it appeared to work
fine under less staged conditions. (The +/- 2 EV flash exposure adjustment could
easily adjust for the underexposure we encountered, but we wanted to present
the unadjusted results for the sake of consistency.) Secondly, our studio only
lets us test flash range to about 14 feet, so we couldn't adequately test the
performance at the maximum rated distance.
A hot shoe on top of the camera accommodates an external flash, as does the
PC sync terminal on the side of the camera. You can use the internal flash and
an external flash together, as the camera automatically sets the internal flash
to Automatic if popped up when the external flash is connected. Flash intensity
level can also be controlled through the camera for a dedicated external flash,
via the same method as for the internal unit. Olympus offers the FL-40 external
flash as an accessory, and the instruction manual contains detailed instructions
for connecting the flash and setting it up. (Note that the flash exposure adjustment
option likely will not be available with third-party accessory flash units,
as it requires extra connections on the flash shoe to implement this function.)
Auto Bracketing
In all exposure modes except for Manual, an auto bracketing feature takes three
exposures of the same image at different exposure values (one at the set exposure
value, one overexposed, and one underexposed). Through the record settings menu,
you can set the EV increment you want each image to differ by, with options
of 1/3, 2/3 or one EV step in either direction. The camera's internal flash
must be closed for auto bracketing to work, and the self-timer is unavailable
when this feature is enabled.
Sequence Mode
The Drive button on the side of the camera accesses the Sequence shooting mode,
which allows you to capture up to four successive shots at roughly three frames
per second with one press of the shutter button. Very rare among digicams we've
tested, the E-10's sequence-mode operation can capture even uncompressed TIFF
images at the full three frames per second. (!)
Self-Timer and Remote Control Photography
Also through the Drive button, the E-10 offers the Self-Timer and Remote Control
shooting modes. The Self-Timer features a 12 second countdown before the shutter
is fired, allowing you to get into the image after pressing the shutter button.
As with normal exposures, the camera sets focus with the half-press of the shutter
button, meaning that you shouldn't stand in front of the camera to start the
countdown and press the shutter button.
The E-10 works with an included infrared remote control as well as an accessory
wired remote control unit. The Remote Control shooting mode, accessed through
the Drive button, sets the camera to receive signals from the infrared remote
control unit, which works as far as 16.6 feet (5m) from the camera's front.
We like Olympus' RM-1 remote trigger a lot, and use it extensively in our studio
for product photography with our (now aging) C-2020 Zoom. On the E-10, the manual
nature of its controls reduce the functionality of the remote somewhat: Since
the zoom is actuated by a lens collar, with no electronic actuation possible,
the zoom controls on the RM-1 aren't effective when used with the E-10. Likewise,
the dual-control (button plus thumbwheel) operation of the exposure compensation
function on the E-10 prevents the remote from controlling that function as well.
The RM-1 is thus reduced to only operating as a shutter release, but we find
it very useful nonetheless.
The wired remote control unit can be used in any capture mode and doesn't require
you to set the Drive setting to Remote Control mode. Instead, when the remote
control wire is connected to the camera via the side terminal, the remote functions
are instantly available. With the wired remote, you can halfway press the shutter
button to set focus, a function that the infrared remote doesn't allow. The
wired remote is perfect for shooting with the Bulb shutter setting or any slow
shutter speed, to reduce any camera movement caused by pressing the shutter
button.
Time-lapse Photography
Through the record menu, the E-10 offers a Time-lapse Photography mode. You
can set the shutter intervals from 30 seconds up to 24 hours, and the camera
will continue to take pictures at the set interval until the batteries die,
the memory card fills up, or the camera is turned off.
Low Light Photography
We don't normally have a separate section in our reviews on a camera's low light
capability, but the E-10 was so exceptional in this respect that we thought
it warranted separate coverage.
Earlier in this review, we described the design of the E-10s body and CCD mount,
and the way the combination acted to conduct heat away from the CCD imager chip.
The net result should be lower operating temperatures for the CCD, and thus
lower image noise levels as well. Given a foreknowledge of this design detail,
we expected pretty good low-light performance from the E-10, but also expected
the smaller pixel dimensions needed to cram 4 million pixels onto the sensor
chip to counteract this somewhat. We therefore began our testing thinking that
the E-10 would have fairly typical low light capabilities overall. What a surprise!
In our studio tests, the E-10 produced beautiful exposures down to the lower
limits that we normally test at (1/16 of a foot-candle, about 0.7 lux). Then
we "discovered" the bulb-exposure mode. (Manuals are for wimps...) Messing about
in the studio that night, we happened to take a 30 second exposure with the
camera pointing out a window to the moonlit ground outside. - There was detail
there! A quick trip to the backyard (the front was too "bright" due to the streetlights)
with our heaviest tripod and a steady hand (we didn't get to keep the wired
remote for our testing) was called for, to see just what the E-10 could see.
|
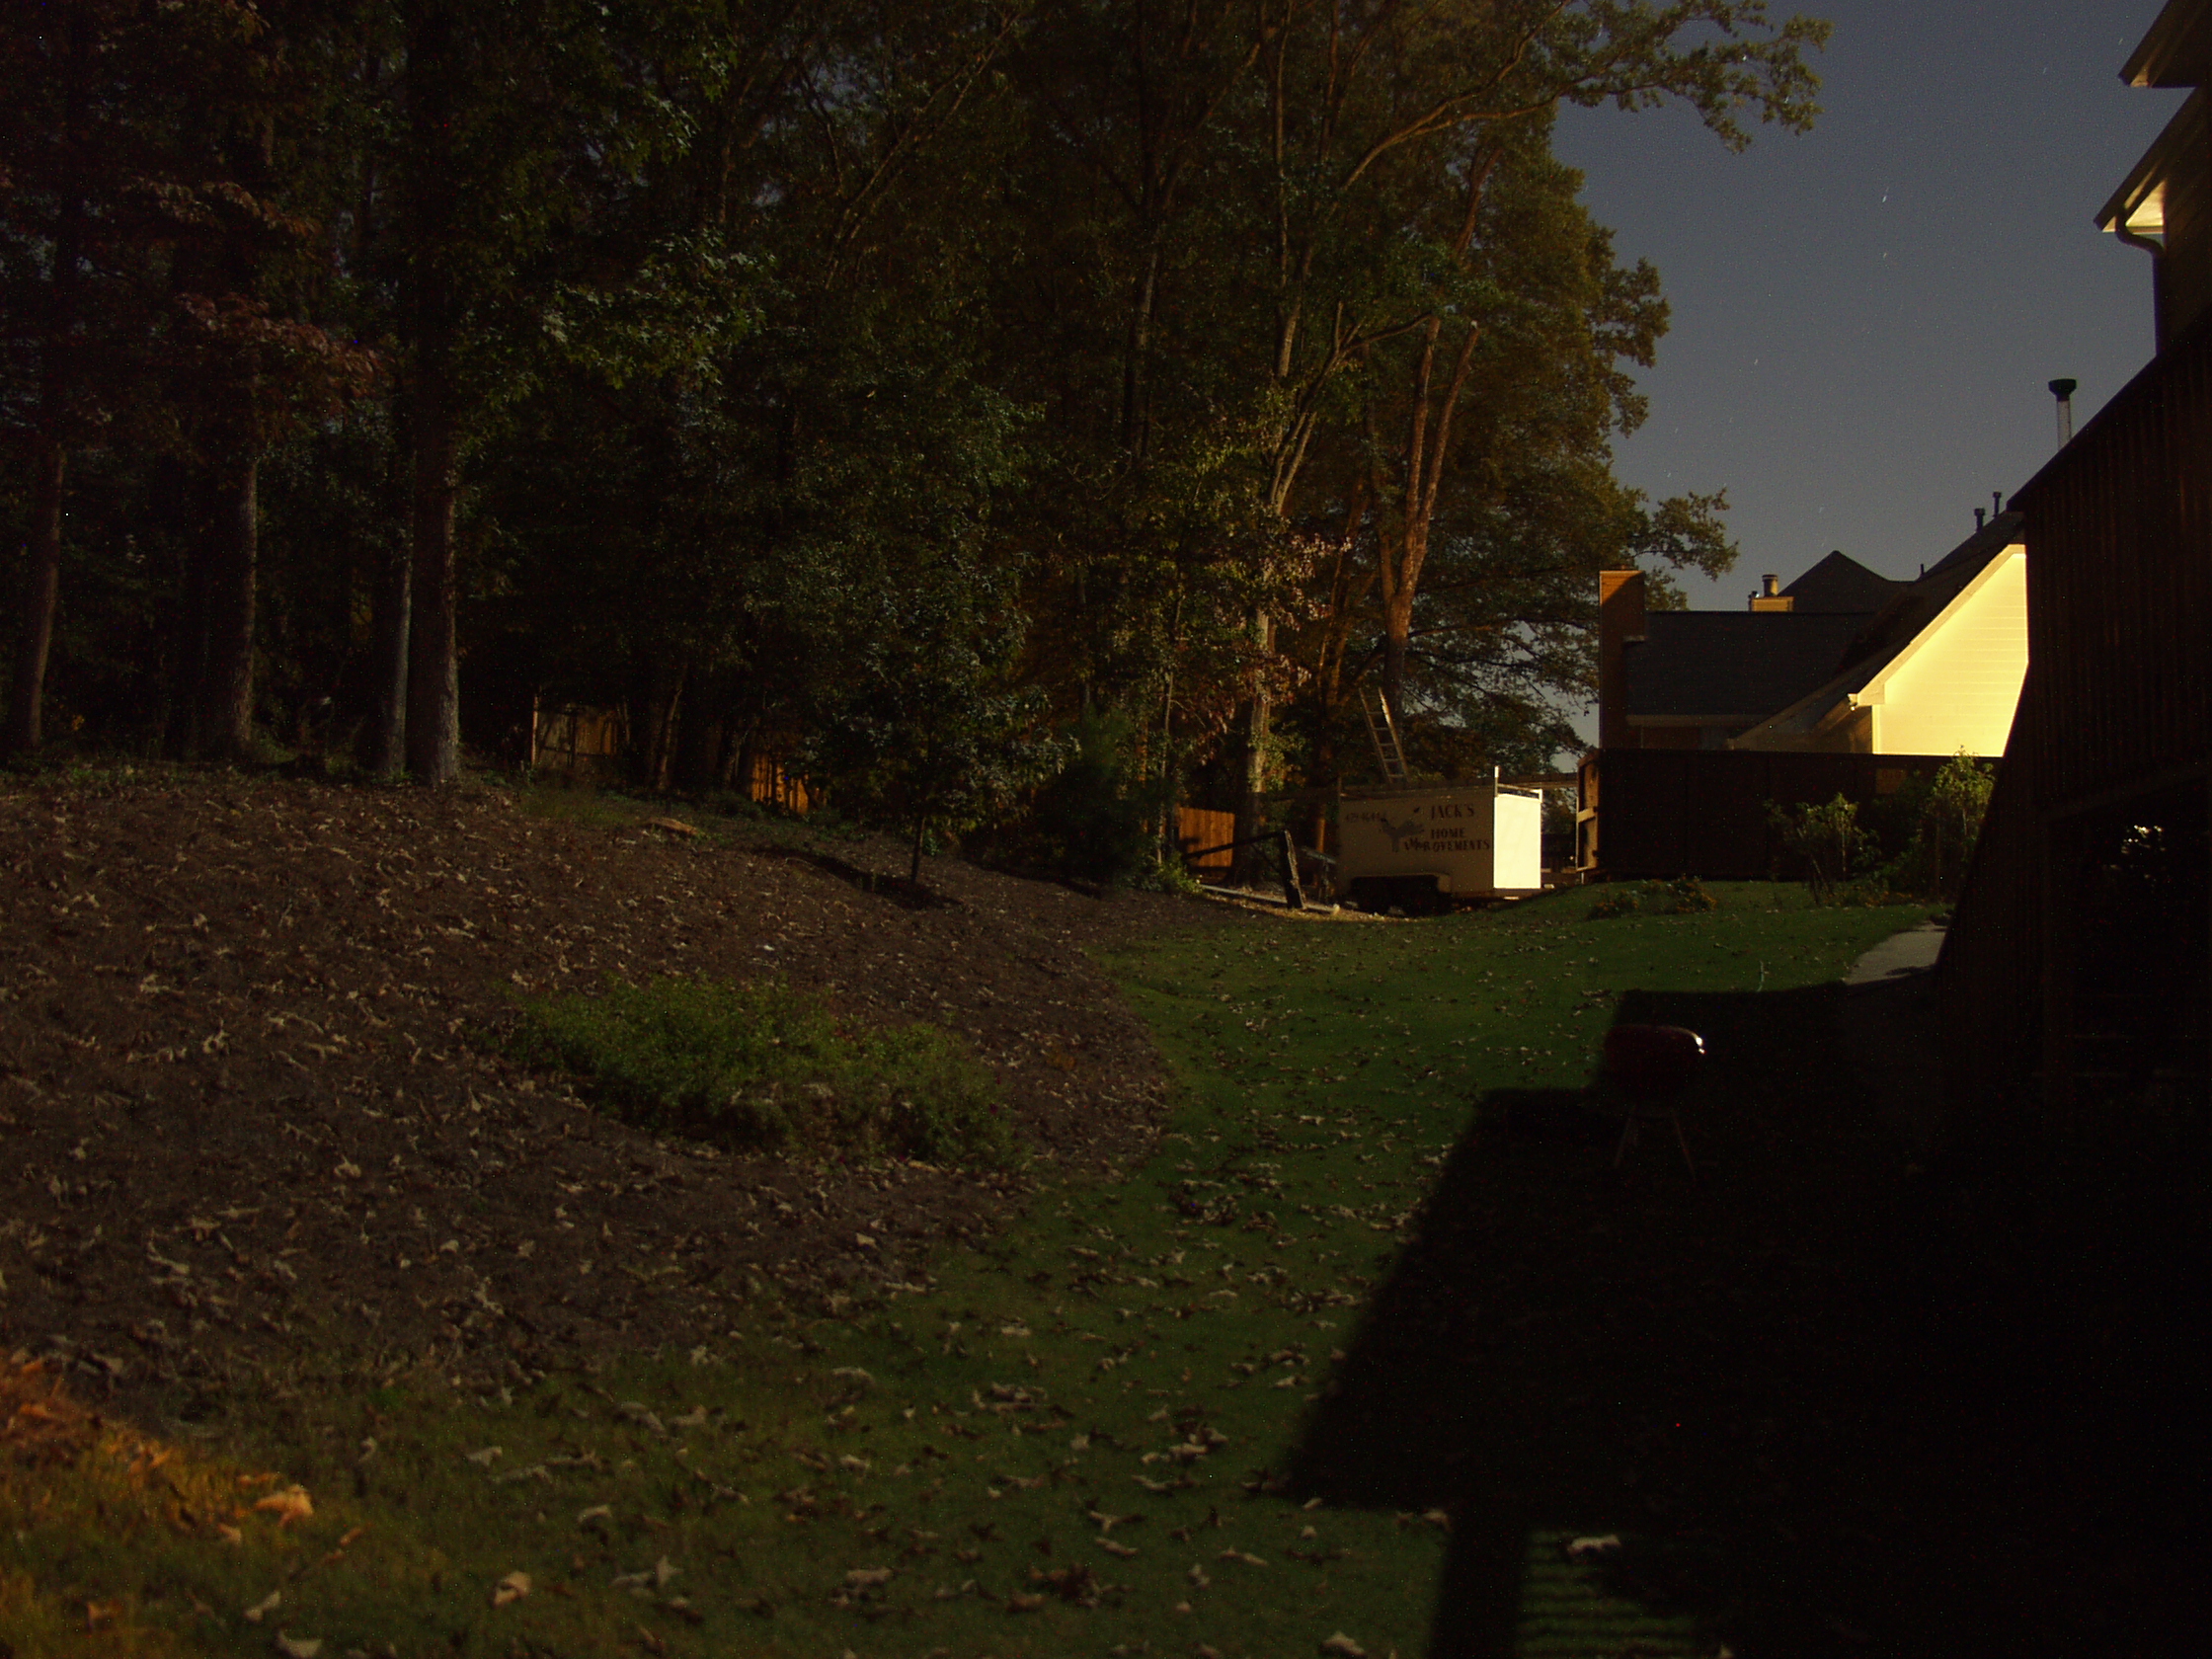
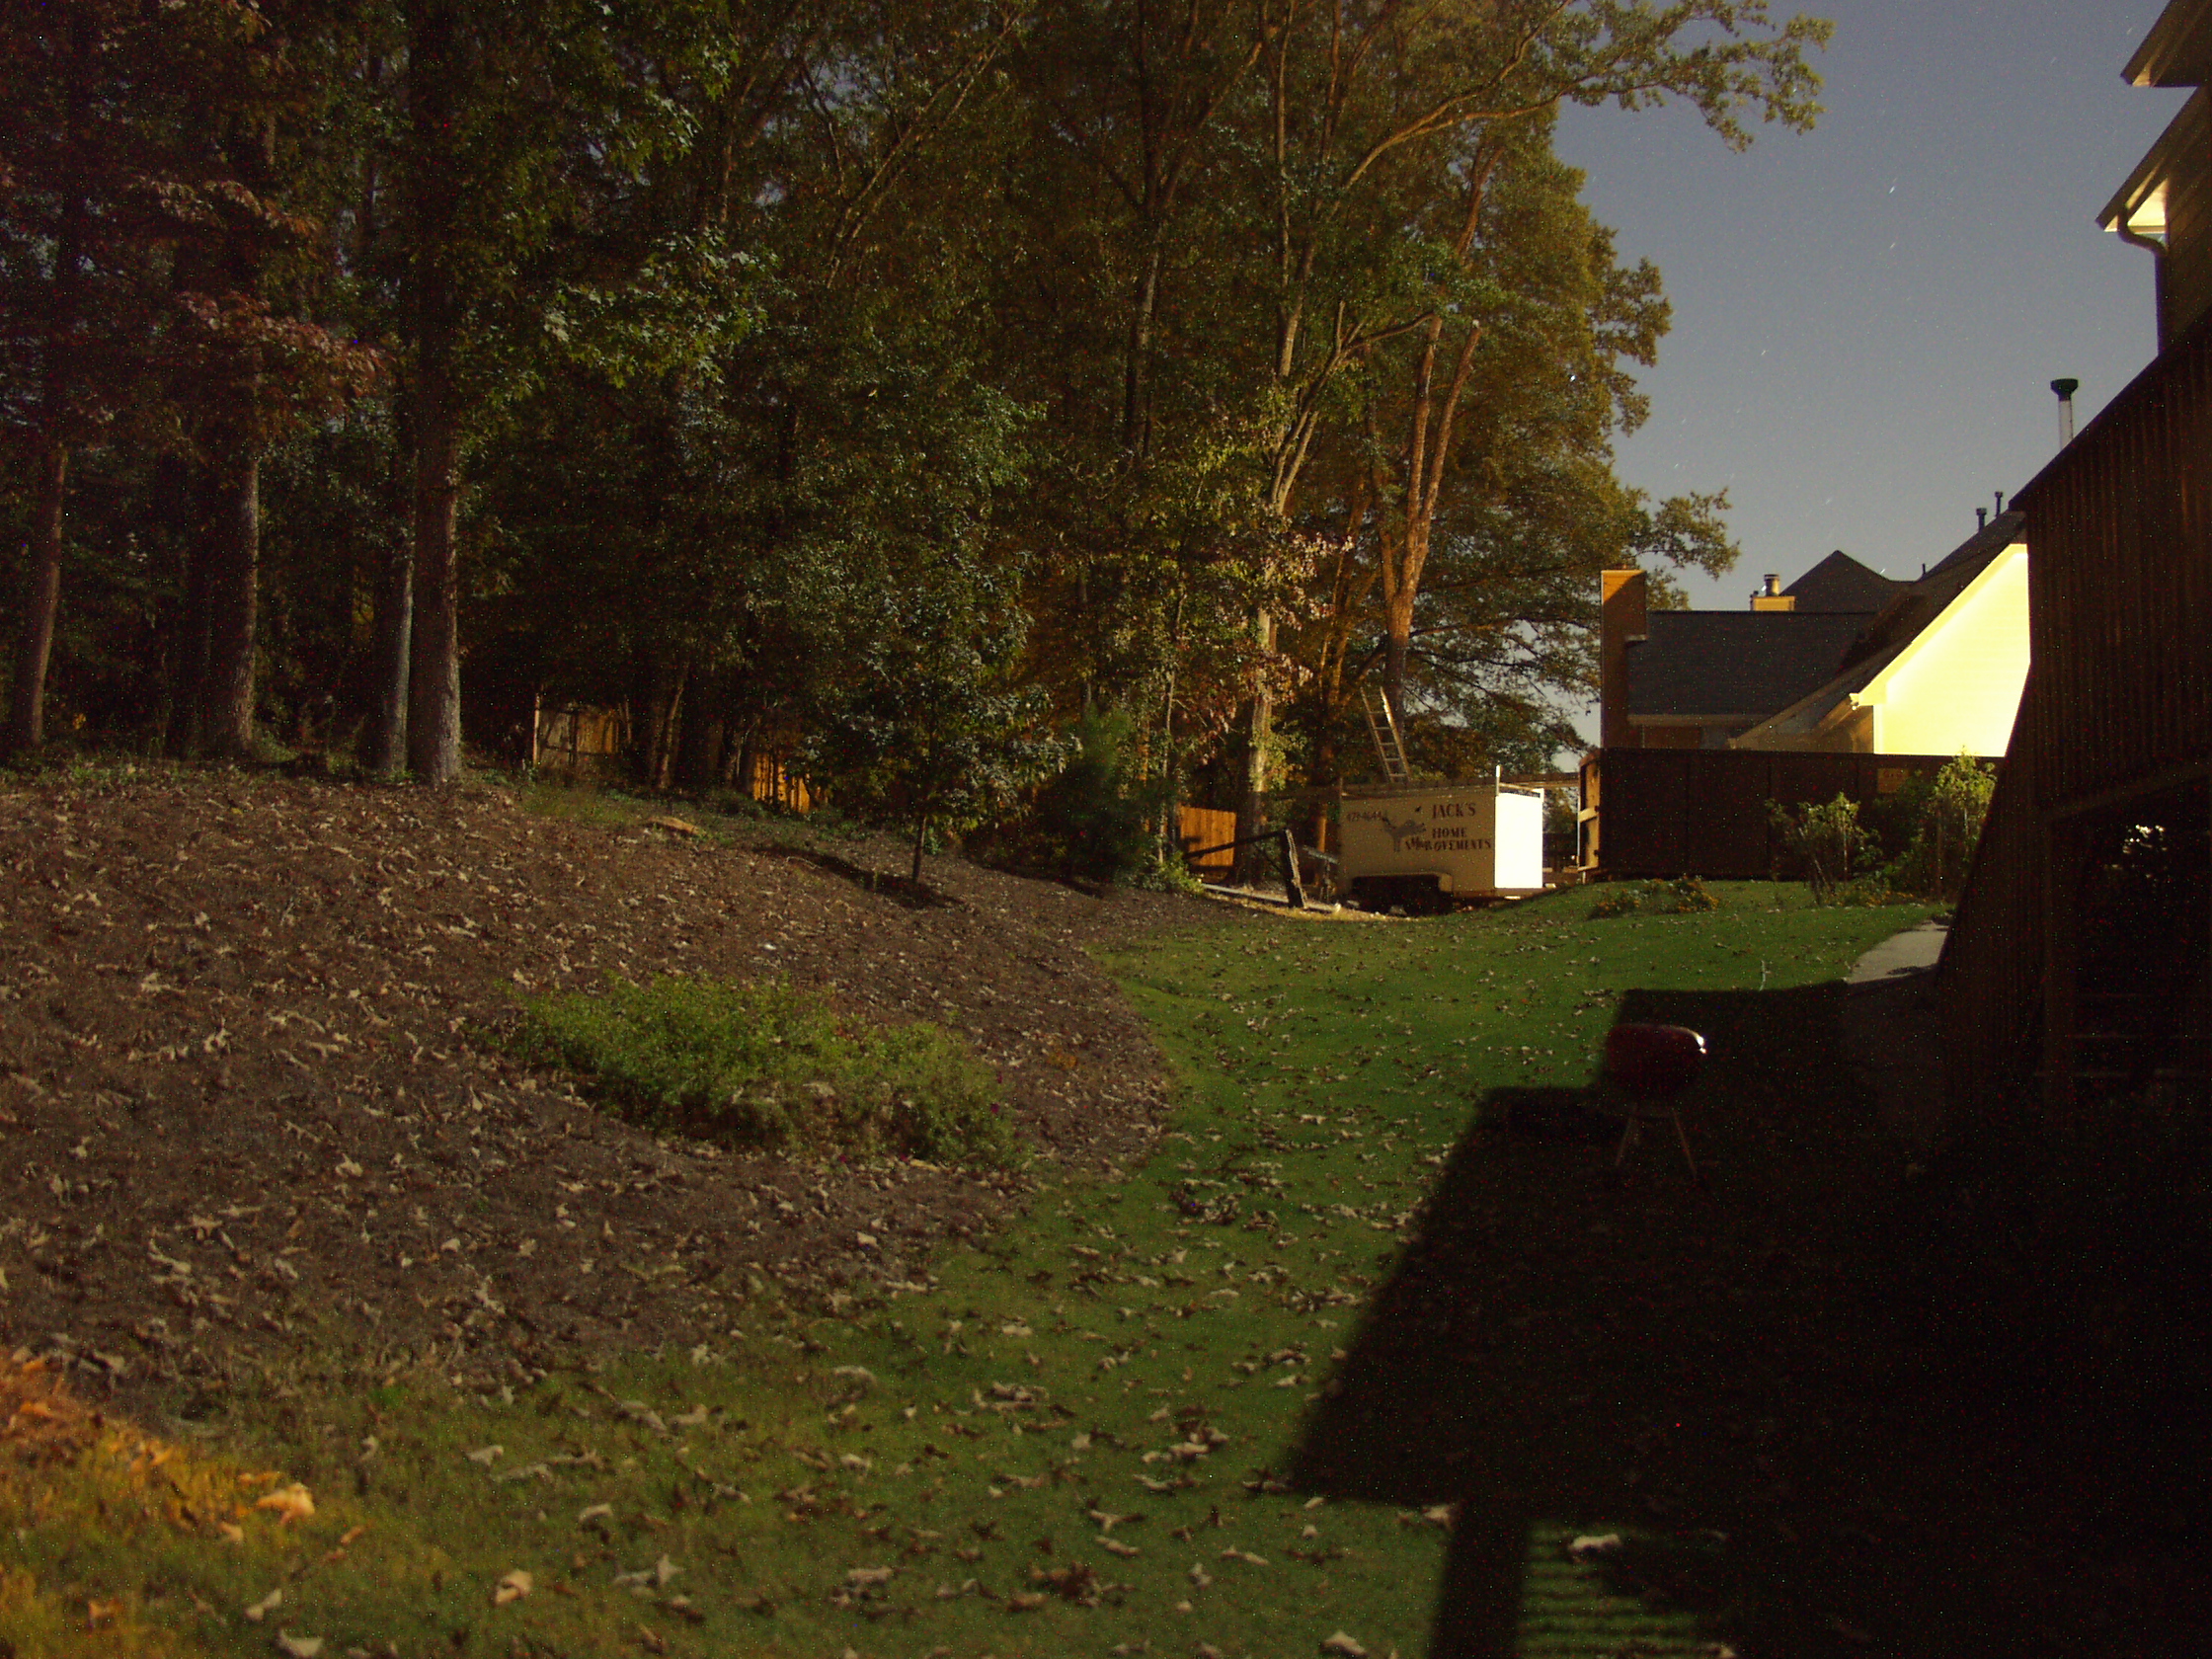
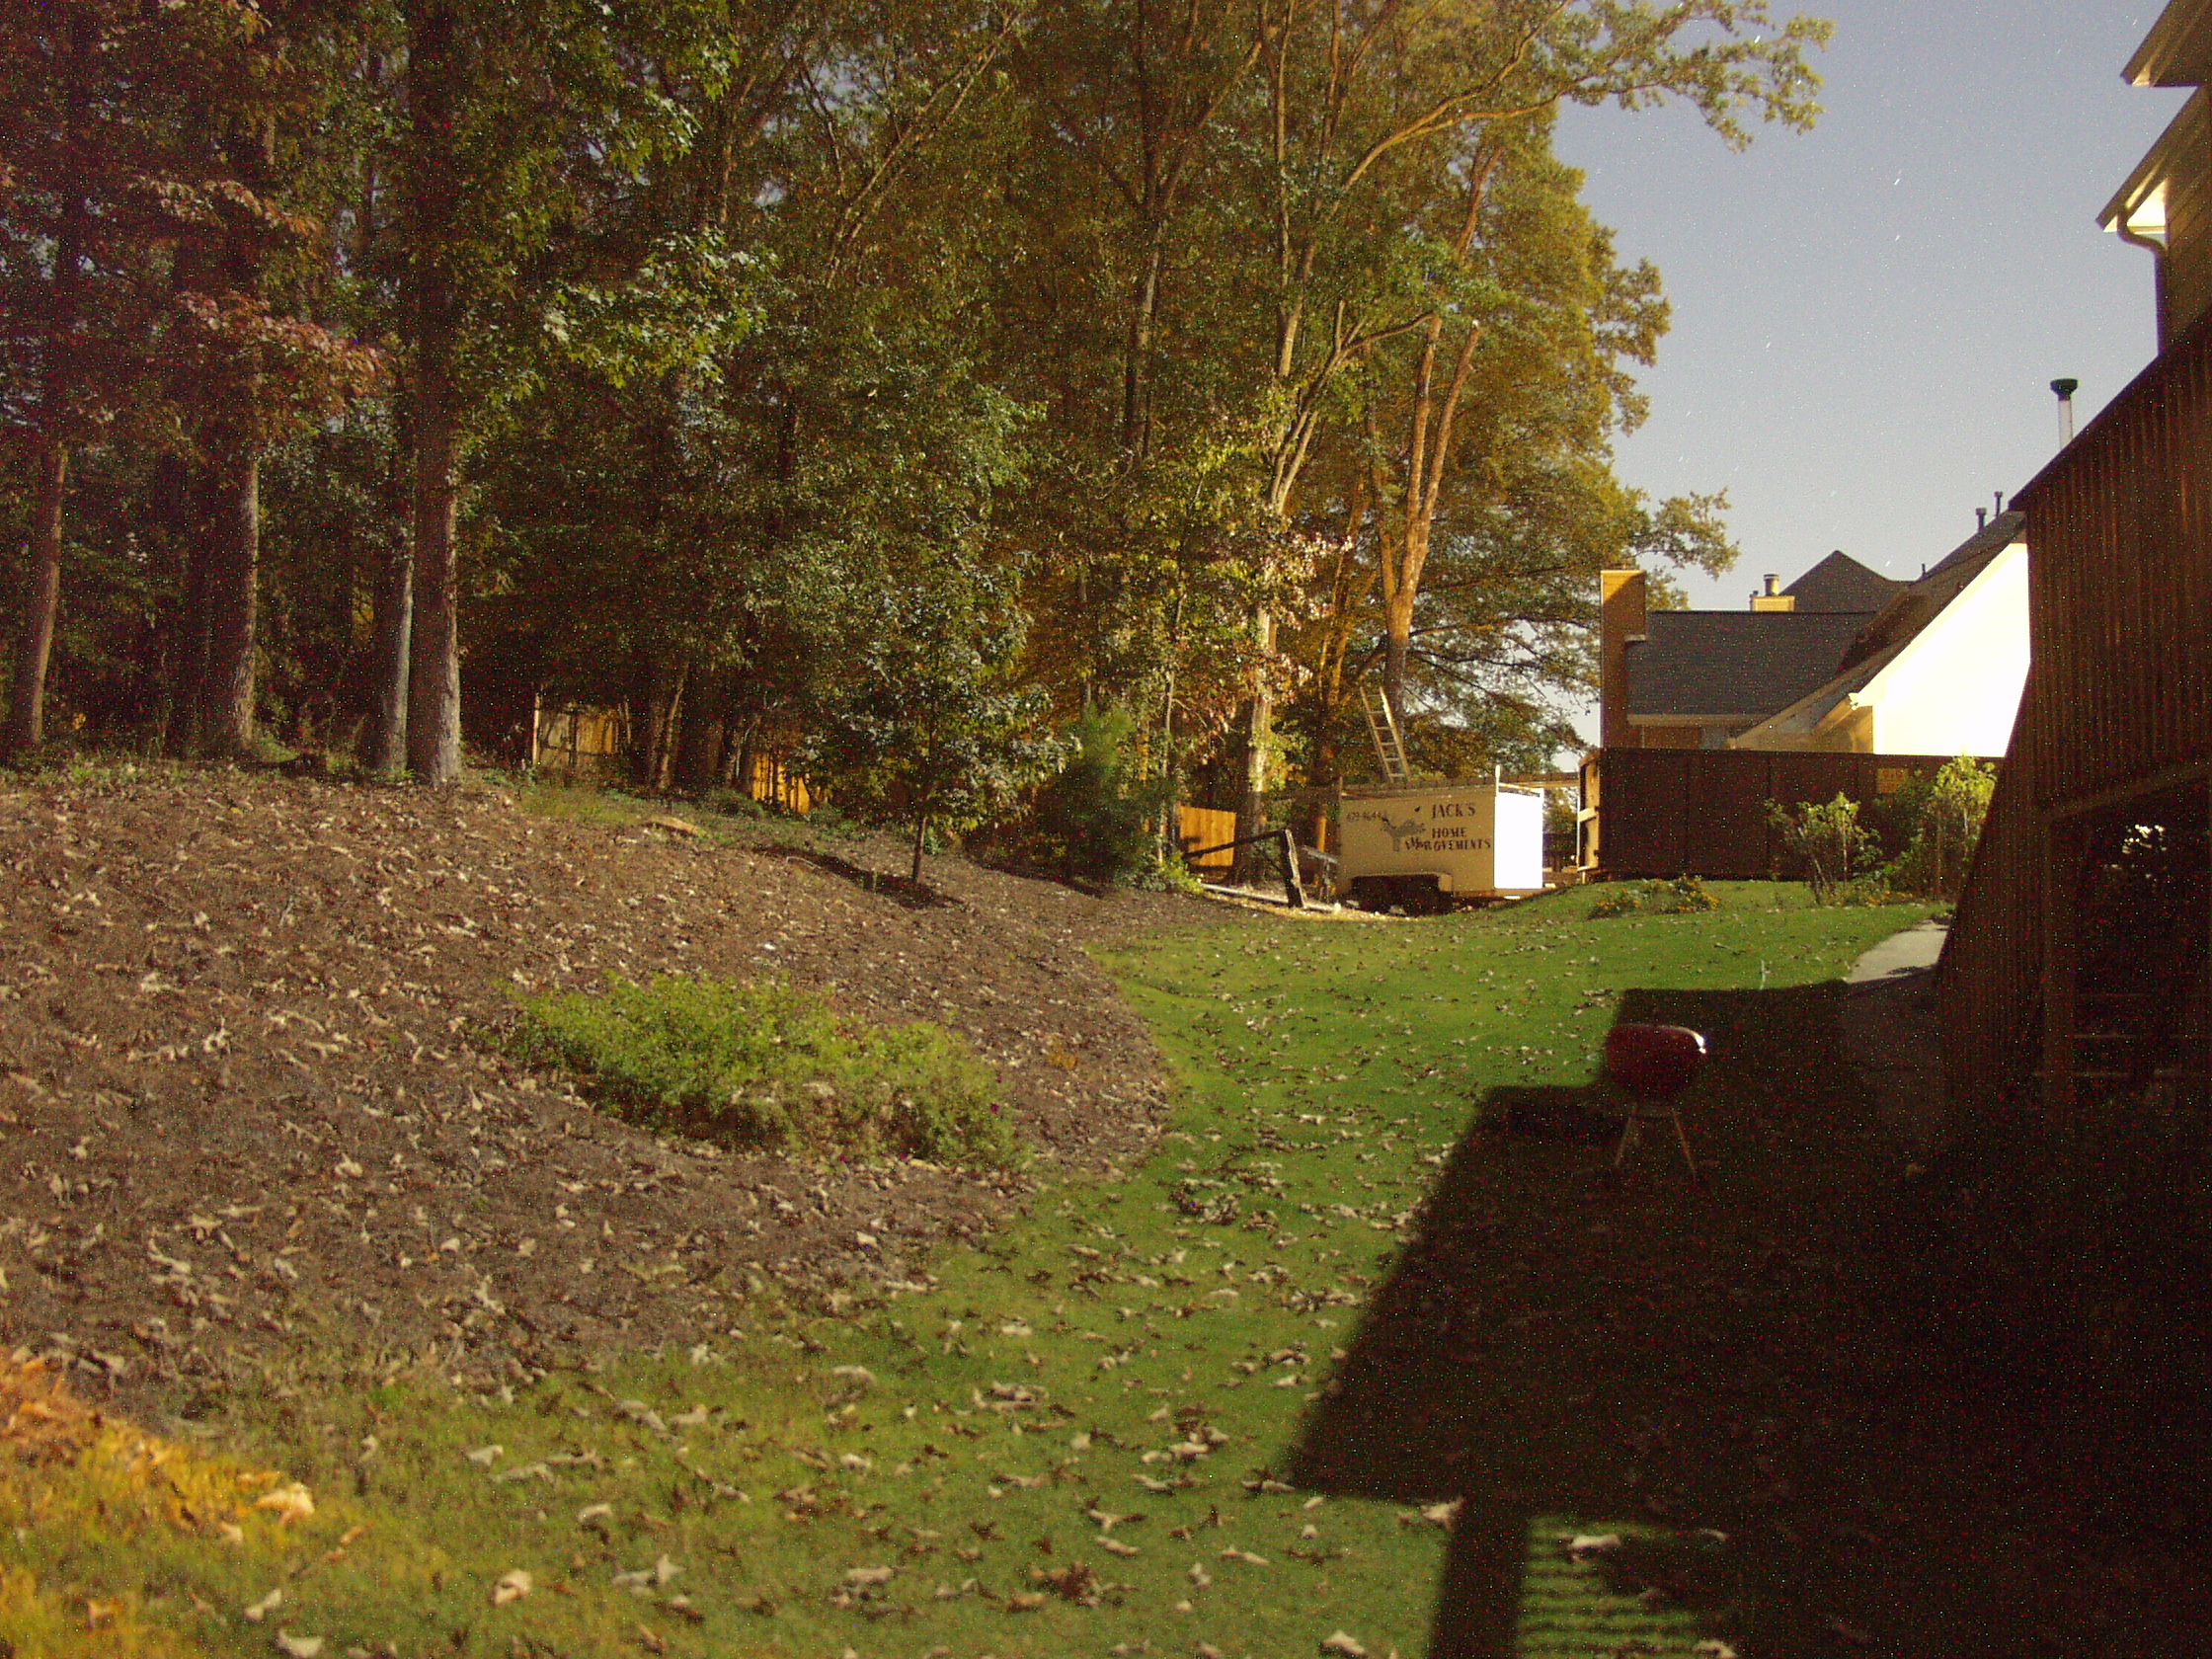
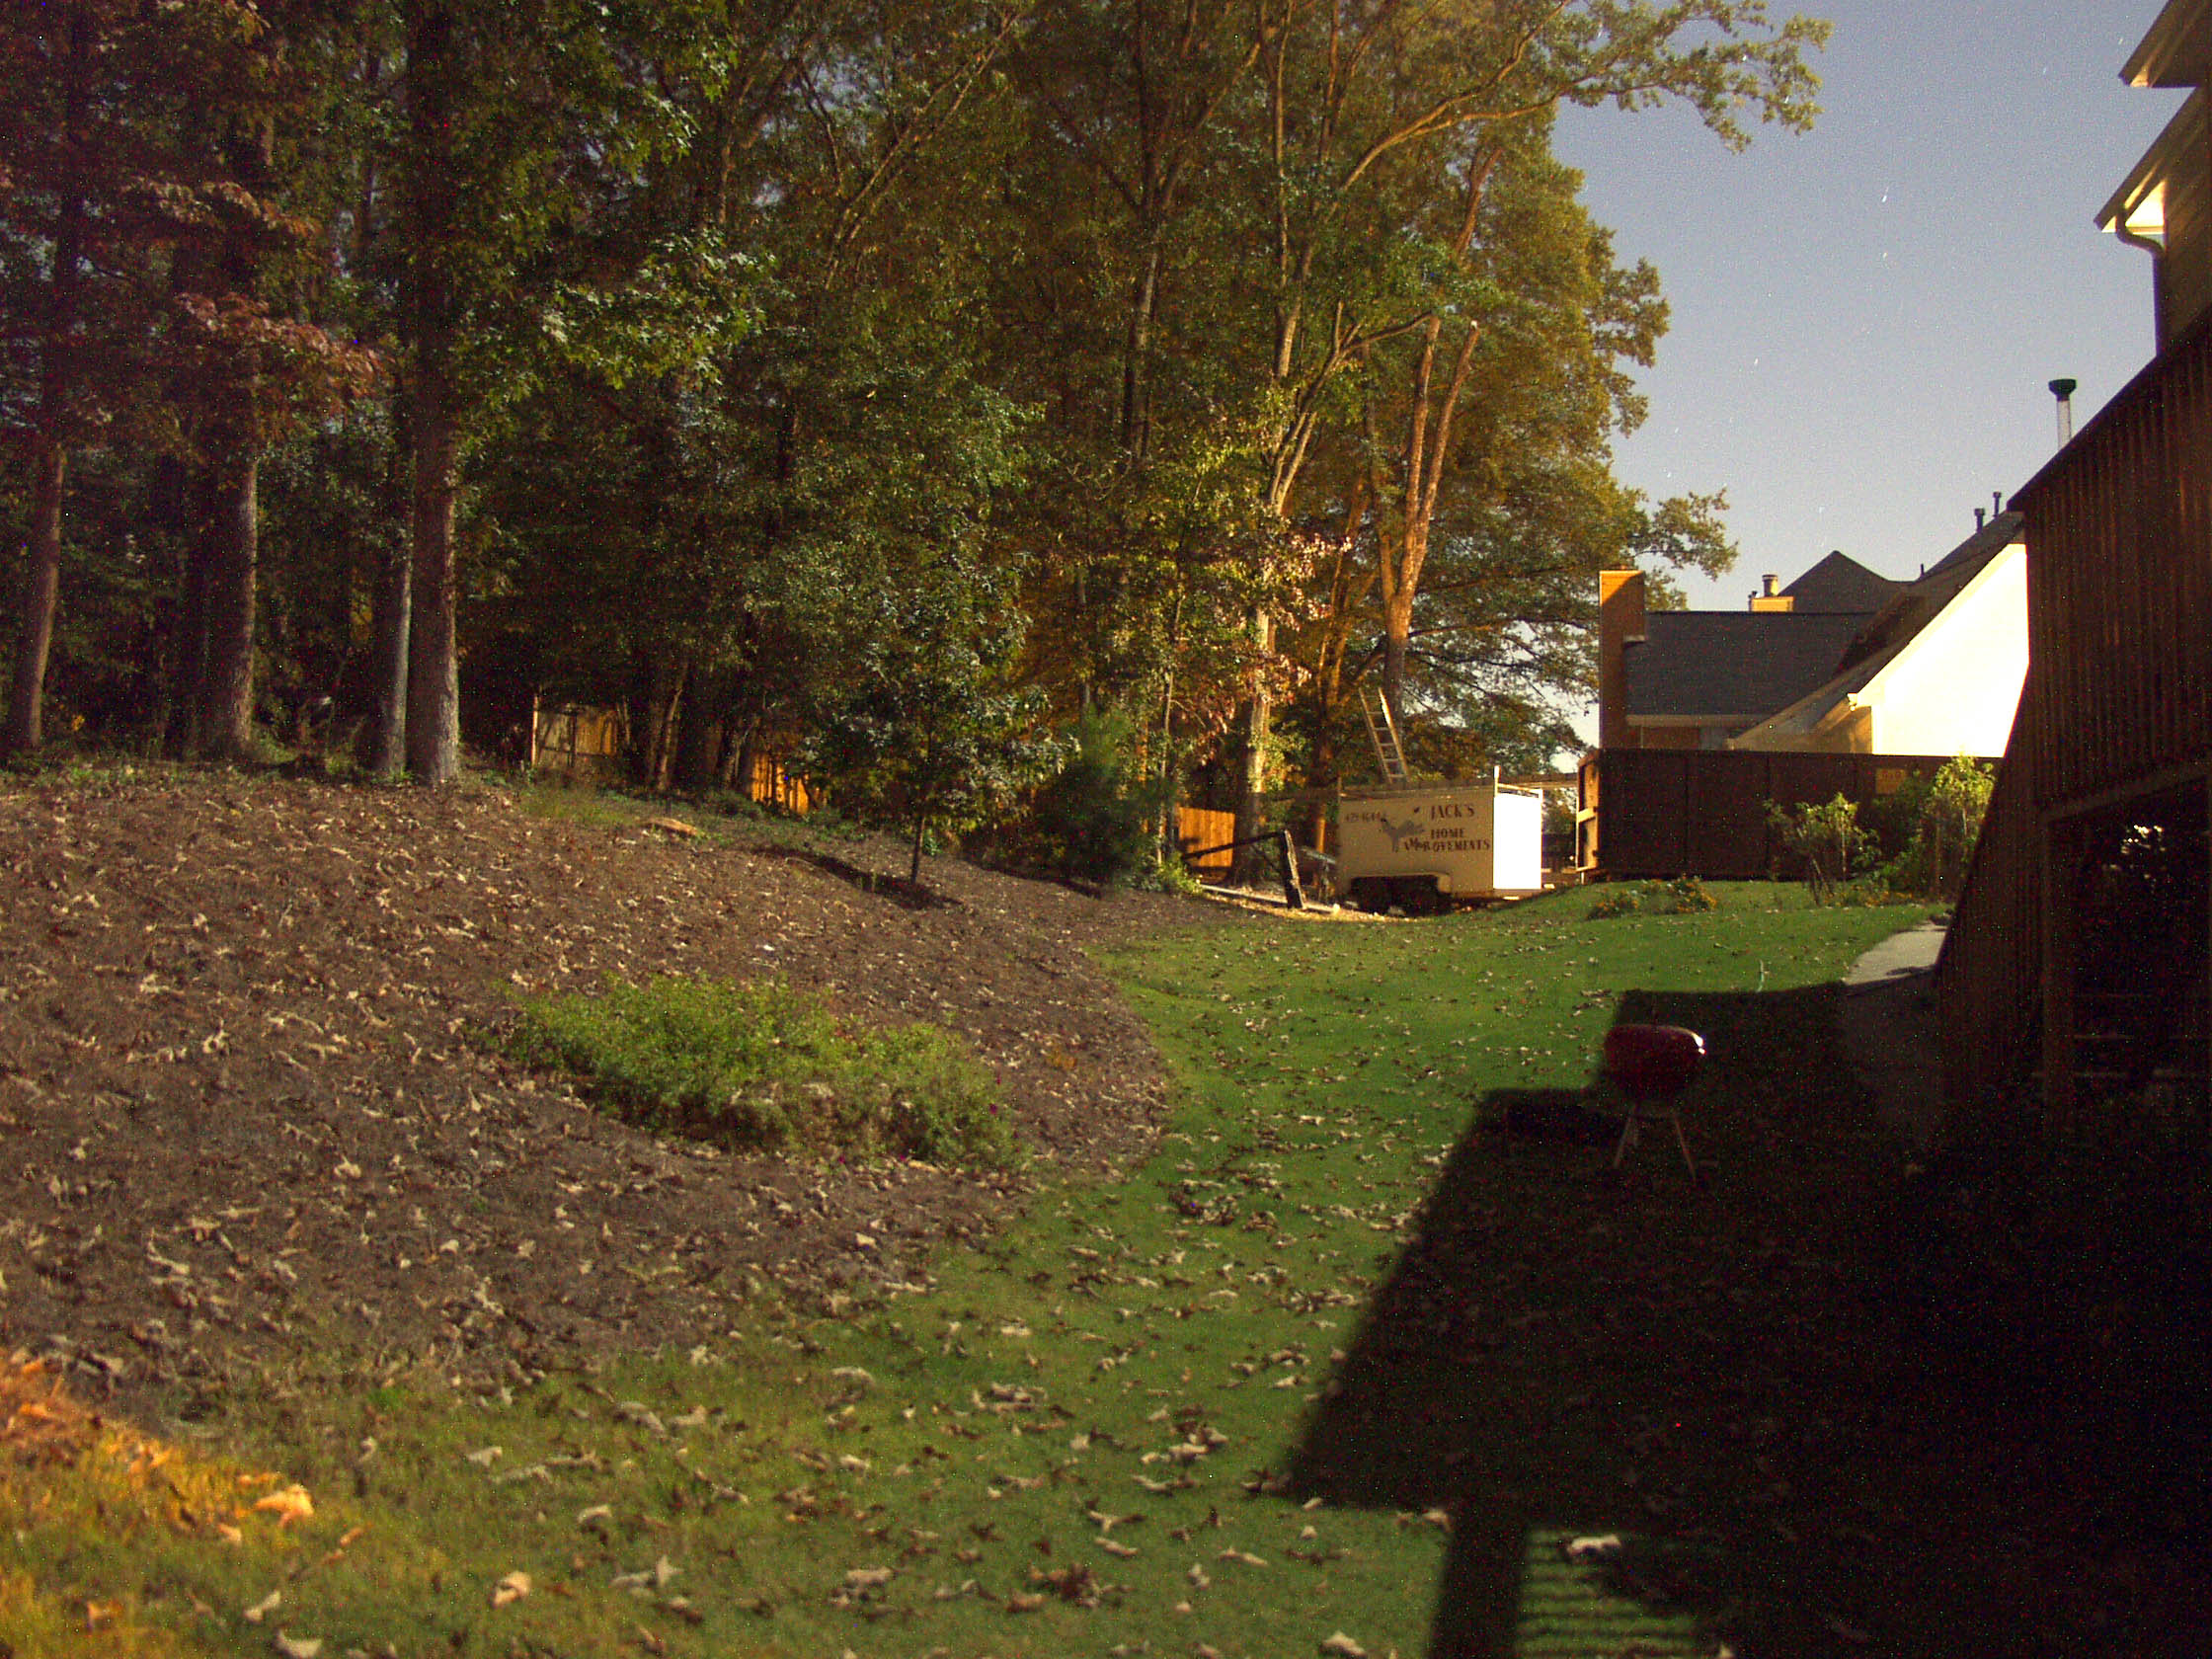
~Full Moon over Georgia, October 14, 2000, a bit after midnight. All exposures 30 second bulb exposures, click on any photo to see full-size image. NOTE though, images average 2.5 MB each! | |||
 |
 |
 |
 |
|
|
|
|
|
30 seconds F/2.2 |
30 seconds F/2.2 |
30 seconds F/2.2 |
Photoshop Levels adjustment, then "Dust & Scratches" Filter, threshold 20, radius 1 |
The shots shown above are all the result of 30 second exposures, with the lens
wide open. (About f/2.2 at the focal length we were shooting with.) We shot
the scene at ISO 80, 160, and 320: The fourth image above is one that was processed
with Photoshop, from the ISO 80 image. We did a fairly extensive tone balance
using the "Levels" function, then hit it with the "Dust & Scratches" filter,
radius 1, threshold 20. The results were literally astonishing, particularly
the incredibly clean image processed from the ISO 80 shot. We normally recommend
Mike Chaney's excellent Qimage
Pro program for processing digicam images with high ISO noise, but in the
case of the E-10, the Photoshop Dust and Scratches filter seemed to do a better
job when used with a relatively high threshold setting. The only light in the
backyard was from a full moon (October, Atlanta area): The totally washed-out
side of the house and small trailer are where light from a streetlight a half-block
away was hitting. - Is that amazing, or what? It was moderately cold outside
when we shot these (probably about 50 degrees F), but we didn't wait for the
camera to cool down to ambient temperature, wanting to see results more typical
of ordinary shooting conditions. Bottom line, we have to say that the E-10 has
the best low light performance of any digicam we've tested to date! (October,
2000. And yes, the Kodak DC620x would almost certainly surpass the E-10, but
that digicam costs roughly 5 times as much, and has half the pixel resolution
of the E-10.) An absolutely outstanding performance!
Shutter Lag / Cycle Times
When you press the shutter release on a camera, there's usually a lag time before
the shutter actually fires. This time allows the autofocus and autoexposure
mechanisms time to do their work and can amount to a fairly long delay in some
situations. Since this number is almost never reported on, and can significantly
affect the picture taking experience, we now routinely measure it using a special
electronic test setup.
|
|
||
|
|
|
|
| Power On -> First shot |
|
A bit slow, surprising, since no need
for a telescoping lens to extend.
|
| Shutdown (Min res/TIFF) |
|
Since the lens doesn't need to retract,
"shutdown" time is effectively zero. The times shown are how
long it takes to finish saving a just-captured image, at minimum resolution,
and max resolution TIFF format.
|
| Play to Record, first shot |
|
Fairly fast to very fast. First
number is time to first shot after switching mode dial. Second number
is time from "quick review" mode to first shot after pressing
shutter button. (That's *blazingly* fast!)
|
| Record to play (max/min res) |
|
A bit slow. "Quick Review" mode
decreases times substantially, to about 5.3 seconds for a high-resolution
image.
|
| Shutter lag, full autofocus |
|
Quite fast. |
| Shutter lag, manual focus |
|
Also faster than average. |
| Shutter lag, prefocus |
|
Quite a bit faster than average. |
| Cycle Time, autofocus (max/min res) |
|
Record view (brief playback on LCD) slows to 4.2 seconds. With record view turned off, shot to shot is very fast at 1.0 seconds. |
| Cycle Time, manual focus (max/min res) |
|
Very fast in continuous mode (even
at high res, 5 shots!)
|
While a little slow starting up and shutting down, the E-10 showed itself to be an impressively fast performer in almost all other respects. Shutter lag was very good, much better than the typical high-end "prosumer" cameras we see so many of. (Of course, the E-10 sells at a much higher price than typical "prosumer" models too.) Cycle time was also very good, provided we left the "Record View" option disabled. And continuous mode was very impressive, particularly in that it could capture even maximum-resolution uncompressed TIFF images at the full 2.95 frames/second speed. (!) Overall, a very fast camera at its price point.
Operation and User Interface
We found the user
interface on the E-10 very straightforward, though the large number of external
camera controls may seem a bit complicated at first glance. We always appreciate
being able to change camera settings without resorting to the LCD menu, as it
helps conserve battery power and makes for much quicker navigation of the
camera's functions. The majority of the E-10's exposure settings are changed by
pressing a control button while turning either the main command dial or
sub-dial, and the status of these settings is reported on the small status
display panel on the top of the camera. While this works rather well, it does
mean you have to use two hands to change the camera setting. This can be a
little hard to do when you're trying to make changes while maintaining your
shooting position. When we did use the LCD menu to change settings, we found it
to be reasonably uncomplicated and navigable, as the arrow buttons allow you to
scroll up and down through options and screens. The tilting LCD monitor was also
helpful, as it kept the viewfinder visible when shooting in awkward positions,
and we enjoyed the ability to manually control the optical zoom and focus with
the lens collar. Overall, the E-10 has the look and feel of a traditional 35mm
SLR, which made for a very comfortable user experience.

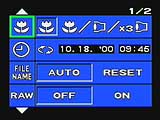
The picture above shows the contents of the small status display panel on the
top of the camera. The E-10 provides an large amount of information there, making
settings changes very fast.
Control Enumeration
![]()
Quick Reference White Balance Button: Located on the very front of the
camera, just beneath the infrared autofocus sensor, and right under your middle
finger as you grasp the hand grip, this button adjusts the camera's white balance
based on a white card held in front of the lens. (A very handy position for
this button.)

Shutter Button: Resting at an angle on the large hand grip, this button
sets both focus and exposure when halfway pressed, and fires the shutter when
fully pressed. When shooting in Self-Timer mode, this button triggers the 12
second countdown before the shutter is fired.
![]()
AE Lock Button: Positioned in the top right corner of the back panel,
this button locks the exposure when pressed and held.
Main Command Dial: Just above the shutter button, this notched dial sets
a variety of camera settings when rotated while a control button is pressed.
In Aperture and Shutter Priority exposure modes, this dial used by itself sets
either the aperture or shutter speed, depending on the mode. In Manual mode,
turning the dial without a control button pressed sets the shutter speed.
![]()
White Balance Button: Situated on the outside edge of the command dial,
this button controls the camera's white balance mode. Holding down this button
while turning either command dial cycles through the Auto, Preset, and Quick
Reference white balance modes.
![]()
Record Mode Button (Image Quality): Positioned on the top of the camera,
just inboard of the main command dial, this button lets you cycle through the
available image quality settings by pressing it and rotating either command
dial. Available modes are TIFF, SHQ (Super High Quality), HQ (High Quality),
and SQ (Standard Quality). The specific resolution/compression settings for
SHQ, HQ, and SQ are configured via the LCD menu system. - This struck us as
a neat feature, in that you can set up the E-10's three "standard" image quality
choices to match your exact needs. When pressed in conjunction with the Flash
button just beside it, all of the camera's exposure and control settings are
reset to their factory defaults.
![]()
Flash Button: Directly to the left of the Record Mode button, this button
controls the camera's flash mode. Pressing it and rotating either command dial
(while the flash is in its operating position) cycles through the Automatic,
Slow Synchro, Redeye Reduction, Redeye Reduction with Slow Synchro, and Fill-in
flash modes. When pressed in conjunction with the Record Mode button, all of
the camera's exposure settings are reset to their factory defaults.

Mode Dial: Located on the far right edge of the camera's top panel, this
notched dial rests on top of the power switch. Turning the mode dial controls
the camera's operating mode, with the following choices:
 Playback Mode: Displays the
images on the memory card, allowing you to protect or delete them, as well as
make copies or view their exposure data and histograms (if the latter option
is enabled).
Playback Mode: Displays the
images on the memory card, allowing you to protect or delete them, as well as
make copies or view their exposure data and histograms (if the latter option
is enabled).
Power Switch: The power switch is located underneath the mode
dial, in the form of a rotating collar with a projecting tab. A flip of the
thumb turns the camera on or off.![]()
Light Button: Situated just beneath the small
status display panel, this button turns on a gentle backlight for viewing the
panel in the dark. The backlight stays on for eight seconds after the button is
pressed.![]()
SM / CF
Button: Just to left and back of the Light button, this button selects
either the SmartMedia or CompactFlash memory card slot for saving or retrieving
images. (The camera can carry both types of cards simultaneously, which could be
handy for squeezing out a few extra megabytes of storage space on and extended
sortie.![]()
Subcommand Dial: On the camera's back, just left of the AE
Lock button, this dial duplicates the function of the main Command dial for many
functions. (A convenience factor.) In Manual exposure mode, turning this dial
adjusts the lens aperture setting. In Playback mode, turning the dial to the
left activates the index display mode, while turning the dial to the right
activates the playback zoom feature. (Five zoom steps ranging from 1.5x to 4.0x
are provided.)![]()
Display Button: Just below the subcommand dial, this button
enables and disables the LCD monitor display in any mode. Also in any capture
mode, pressing this button twice in quick succession puts you into "quick image
review mode", displaying the most recently captured image. This quick review
mode is actually offers all the standard Playback functions, but is instantly
canceled when you touch the shutter button again.
Menu Button: Just below the
Display button on the E-10's back panel, the Menu button calls up the settings
menu in all camera modes. It also cancels the menu display.
Arrow Keys: Located
to the right of the LCD monitor, these four arrow buttons each point in one of
the four cardinal directions (up, down, left, and right). While in any settings
menu, these buttons navigate through menu options and selections. In Playback
mode, the left and right buttons scroll through captured images. When playback
zoom is enabled, the four arrows let you scroll around within the enlarged image
to check on the details.![]()
Memory Card Slot Release Lever: On the far right side of
the camera's back panel, next to the memory card slot, this lever releases the
spring-loaded card slot door.![]()
OK Button: Centered between the arrow key pad and the
Memory Card Slot Release lever, this button confirms menu selections in all
settings menus.![]()
Erase Button: Situated beneath the lower right corner of
the LCD monitor, this button lets you delete the currently displayed image, with
an option to cancel.![]()
Protect Button: To the left of the Erase button, this
button write-protects the currently displayed image while in Playback mode. Once
protected, a key symbol appears in the LCD monitor. This button also removes
write-protection.![]()
Info Button: Beneath the lower left corner of the LCD
monitor, this button controls the information display in all capture modes, as
well as in Playback mode. In any capture mode, pressing this button repeatedly
cycles between the exposure information display and the distance display on the
LCD monitor. The exposure display reports the current exposure settings, and the
distance display reports the approximate distance between the subject and the
camera. In Playback mode, pressing this button and rotating either command dial
selects one of three levels of exposure information overlaid on the images.
Pressed by itself, it toggles between the histogram (when enabled) and the image
information display.
Viewfinder Switch: Located to the left of the optical
viewfinder eyepiece, this lever flips an internal shutter into the optical
viewfinder's light path, preventing light entering the viewfinder eyepiece from
affecting the exposure.![]()
Dioptric Adjustment Dial: Surrounding optical viewfinder
eyepiece, this rotating collar adjusts the focus of the viewfinder to
accommodate eyeglass wearers.![]()
Metering Button: The topmost button of the camera's lens
side, using this button with either command dial cycles through the three
metering modes: ESP, Center, and Spot. Metering mode selections are available in
all exposure modes except for Manual.![]()
Drive Button: Just below the Metering button, this
button cycles through the camera's shooting modes when pressed while turning the
either command dial. Available drive modes are Sequence, Self-Timer, and Remote
Control.
LCD
Release Switch: Situated next to the LCD monitor (but on the lens side of
the camera), this latch releases the LCD monitor allowing it it to swivel upward
by 90 degrees, or downward by 20 degrees.![]()
Popup Flash Release Button:
Located on the side of the popup flash compartment, this button releases the
popup flash into its operating position.
Macro Button: Directly below the Popup Flash
Release button, pressing this button and rotating either command dial puts the
camera into macro mode or returns it to normal shooting mode again. The Macro
button is only active in Autofocus mode: In manual focus mode, you can focus the
lens across its entire range without switching modes.![]()
Exposure Compensation Button: To
the left of the Macro button, this button controls the amount of exposure
compensation in all capture modes except for Manual. Pressing the button while
turning the command dial adjusts the exposure from -3 to +3 EV in 1/3 EV
increments.
AF /
MF Switch: Centrally located on the lens side of the camera, this switch
selects Auto or Manual focus mode.
Battery Compartment Lock Switch: Located on the
bottom of the camera, in the center of the battery compartment door, this switch
locks and unlocks the battery compartment. When unlocked, the battery tray
slides out from the compartment for changing batteries (holds either four AA
alkaline, NiCd, or NiMH batteries, or two CR-V3 lithium ion
batteries).
Camera Modes and Menus
(Because the capture
modes all share the same menu options, we'll discuss each capture mode
individually and then list the record menu selections.)
Manual
Exposure Mode: Accessed by turning the mode dial to the "M" position, this
mode allows you to control the shutter speed (from eight to 1/640 seconds, with
a Bulb setting) and lens aperture (from f/2.0 to f/11.0, depending on the zoom
setting). You also have control over all other exposure variables, except for
metering mode, exposure compensation, and AE Lock.
Shutter Priority
Exposure Mode: Marked on the mode dial with an "S," this mode puts you in
control of the shutter speed while the camera controls the lens aperture. The
lens aperture range remains the same, but the shutter speed range changes to two
to 1/640 seconds. All exposure variables are available, including flash mode,
ISO, metering, exposure compensation, AE Lock, sharpness, contrast, and white
balance.
Aperture Priority Exposure Mode: This mode is noted on
the mode dial with an "A," and allows you to set the lens aperture while the
camera selects the best corresponding shutter speed. Aperture and shutter speed
values remain the same as with Shutter Priority mode, as does the amount of
exposure control available with other features.
Program Exposure
Mode: Denoted on the mode dial with a "P," this mode puts the camera in
charge of both aperture and shutter speed, basing the exposure values on the
available light. Aperture and shutter speed ranges remain the same as with
Aperture and Shutter Priority modes, and all exposure features are
available.
Record Menu: Available in all four capture modes, this
menu is accessed by pressing the Menu button. The following options are
available:
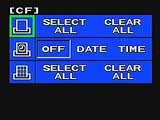
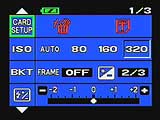 Card Setup: Reformats the SmartMedia or CompactFlash card,
erasing all images on the card (even write-protected ones).
Card Setup: Reformats the SmartMedia or CompactFlash card,
erasing all images on the card (even write-protected ones).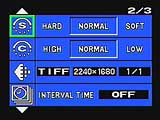 Sharpness: Selects the image sharpness setting (Hard, Soft, or
Normal).
Sharpness: Selects the image sharpness setting (Hard, Soft, or
Normal). Shutter Sound: Chooses between two different shutter sounds,
and sets the volume to off, low, or high volume levels.
Shutter Sound: Chooses between two different shutter sounds,
and sets the volume to off, low, or high volume levels.
Playback Mode: This mode is marked on the mode dial with the
traditional green playback symbol. In Playback mode, you can scroll through
captured images, delete them, protect them, or copy them. You can also view an
index display of nine thumbnails on a page, or digitally enlarge the captured
image and check fine details. Pressing the menu button displays the following
selections:
 Slide Show: Begins an automatic slide show of all captured
images on the memory card.
Slide Show: Begins an automatic slide show of all captured
images on the memory card.
Print Mode: Marked on the mode dial with a green printer symbol,
this mode allows you to mark images for printing on a DPOF compatible device,
and set the number of prints. You can also create index print files. Pressing
the Menu button calls up the following Preprint menu:
 Print: Selects all images for printing or cancels the print
request.
Print: Selects all images for printing or cancels the print
request.
PC Connection Mode: This mode, marked on the mode dial with a
crooked arrow, sets up the camera for connection to a computer. It also accesses
the main camera settings menu, once the Menu button is pressed. Options are:
 Conversion Lens: Determines which conversion lens is in use.
 Histogram: Switches the histogram function on or off.
Image Storage and Interface
 The E-10 can store images
on either a SmartMedia (3.3V) or CompactFlash Type I or II memory card, with
slots for both cards available on the side of the camera. The SM / CF button
on top of the camera selects whether the camera accesses the SmartMedia or CompactFlash
card slot. The E-10 also features a built-in 32 megabyte, SDRAM buffer memory,
for capturing burst sequences. A 32 megabyte SmartMedia card comes with the
camera, with an upgrade to 64 megabytes available, and 128 megabyte cards available
by the end of the year. Although the card slot supports the Type II form factor,
Olympus doesn't currently recommend using the IBM MicroDrive with the E-10,
as they're apparently still working out compatibility issues. We used a 340
MB MicroDrive in our prototype unit, and it worked fine for the most part, but
we did have a problem starting the camera up once or twice with the MicroDrive
inserted. (It produced a "Card Error" error message.) We never experienced
a problem with the production model we tested, but given Olympus' lack of endorsement
of the MicroDrive, would have to caution against its use in critical picture-taking
situations. (You wouldn't want to miss that once-in-a-lifetime shot because
the MicroDrive was balky starting up!) Type II CompactFlash cards currently
provide storage capacities into the hundreds of megabytes (albeit at a price),
so the lack of MicroDrive support doesn't impose too drastic a restriction on
image storage.
The E-10 can store images
on either a SmartMedia (3.3V) or CompactFlash Type I or II memory card, with
slots for both cards available on the side of the camera. The SM / CF button
on top of the camera selects whether the camera accesses the SmartMedia or CompactFlash
card slot. The E-10 also features a built-in 32 megabyte, SDRAM buffer memory,
for capturing burst sequences. A 32 megabyte SmartMedia card comes with the
camera, with an upgrade to 64 megabytes available, and 128 megabyte cards available
by the end of the year. Although the card slot supports the Type II form factor,
Olympus doesn't currently recommend using the IBM MicroDrive with the E-10,
as they're apparently still working out compatibility issues. We used a 340
MB MicroDrive in our prototype unit, and it worked fine for the most part, but
we did have a problem starting the camera up once or twice with the MicroDrive
inserted. (It produced a "Card Error" error message.) We never experienced
a problem with the production model we tested, but given Olympus' lack of endorsement
of the MicroDrive, would have to caution against its use in critical picture-taking
situations. (You wouldn't want to miss that once-in-a-lifetime shot because
the MicroDrive was balky starting up!) Type II CompactFlash cards currently
provide storage capacities into the hundreds of megabytes (albeit at a price),
so the lack of MicroDrive support doesn't impose too drastic a restriction on
image storage.
SmartMedia cards can be write-protected by placing a small sticker in the designated
area. Stickers must be clean to be effective and can only be used once. CompactFlash
cards cannot be entirely write-protected, but the E-10 allows you to write-protect
individual images by pressing the Protect button on the back panel. Write-protecting
an image doesn't save it from being erased through card reformatting, however.
The E-10's image resolution/quality selection scheme is a little different than
we've encountered on other cameras, but having seen it, we wonder why it isn't
the rule, rather than the exception. Rather than a family of preset size/quality
settings, the E-10 has four "standard" settings of TIFF (uncompressed)
SHQ (super high quality), HQ (high quality) and SQ (standard quality). Historically
in Olympus cameras, the SHQ, HQ, and SQ designations have been associated with
image quality levels corresponding to the names given them. In the E-10 though,
you're free to program them to be whatever you'd like. Each of the three standard
settings can be programmed to correspond to any of the five image sizes supported
by the E-10, namely 2240 x 1680, 1600 x 1200, 1280 x 960, 1024 x 768, and 640
x 480 pixels. Likewise you can assign any of the three compression levels supported
by the E-10 (1:2.7, 1:4, or 1/8) to any setting. The beauty of this approach
is that you can preprogram three image size/quality combinations into the camera
and switch rapidly between them without having to resort to the menu system.
You're not tied to what some camera designer thought you ought to have available,
but can tailor the camera's image settings to your own needs. Very nice. (Oddly
though, the uncompressed TIFF format is restricted to the 2240 x 1680 size only.)
There is one restriction to this freedom though: According to the manual,
the resolution selected for SQ can't be higher than that chosen for HQ, nor
HQ higher than SHQ.
The smaller image sizes are an area in which Olympus claims special technology:
Their "TruePic" image technology supposedly incorporates a more intelligent
sub-sampling algorithm than commonly used in digicams, meaning that images at
resolutions lower than that of the full CCD pixel count should be of higher
quality than with other cameras. We didn't do any close study of this, but the
smaller image sizes we saw shot with the E-10 were indeed very smooth, with
no jaggies or other artifacts evident in them.
There's also a RAW image mode, which records images as 10 bit/channel data files
directly from the CCD. RAW files feature the .ORF filename extension. An Olympus
RAW File Import Plug-in comes with the camera, so that you can process images
later with Adobe PhotoShop. The plug-in allows you to perform RGB color adjustments
without affecting the white balance or any other color adjustment, or automatically
process the image to adjust the white balance, color, sharpness, and contrast.
Following are the approximate number of storable images and compression ratios
for a 32 megabyte SmartMedia card.
| Resolution/Quality vs Image Capacity |
RAW Data
|
Uncompressed TIFF
|
SHQ
|
HQ
|
SQ
|
|
|
2240 x 1680
|
Images
|
7
|
2
|
11
|
16
|
32
|
|
Approx. Compression
|
1:1
|
1:1
|
2.7:1
|
4:1
|
8:1
|
|
|
1600 x 1200
|
Images
|
N/A
|
N/A
|
22
|
32
|
64
|
|
Approx. Compression
|
N/A
|
N/A
|
2.7:1
|
4:1
|
8:1
|
|
|
1280 x 960
|
Images
|
N/A
|
N/A
|
32
|
51
|
103
|
|
Approx. Compression
|
N/A
|
N/A
|
2.7:1
|
4:1
|
8:1
|
|
|
1024 x 768
|
Images
|
N/A
|
N/A
|
53
|
80
|
160
|
|
Approx. Compression
|
N/A
|
N/A
|
2.7:1
|
4:1
|
8:1
|
|
|
640 x
480 |
Images
|
N/A
|
N/A
|
139
|
200
|
400
|
|
Approx. Compression
|
N/A
|
N/A
|
2.7:1
|
4:1
|
8:1
|
|
Interface software and a USB cable also accompany the camera, for high speed connection to a computer.The E-10 is apparently a "storage class" USB device, as opposed to a "device class" one. This means that, unlike most USB-equipped digicams, the E-10 is about as fast as a USB card reader, as opposed to 1/3 to 1/2 the speed. - A welcome feature, given the very large file sizes the E-10 can generate. Our testing upheld this contention, as we clocked the E-10's transfer rate at a very respectable 554 KBytes/second.
![]() One
of the first things any new digicam owner will need is a larger memory card
for their camera: The cards shipped with the units by the manufacturers should
really be considered only "starter" cards, you'll definitely want a higher capacity
card immediately. - Probably at least a 32 megabyte card for a 1.3 or 2 megapixel
camera, 64 megabytes or more for a 3, 4, or 5 megapixel one. (The nice thing
about memory cards is you'll be able to use whatever you buy now with your next
camera too, whenever you upgrade.) To help you shop for a good deal on memory
cards that fit the E-10, we've put together a little memory locater, with links
to our price-comparison engine: Just click on the "Memory Wizard" button above
to go to the Olympus memory finder, select your camera model , and click the
shopping cart icon next to the card size you're interested in. You'll see a
list of matching entries from the price-comparison database. Pick a vendor &
order away! (Pretty cool, huh?)
One
of the first things any new digicam owner will need is a larger memory card
for their camera: The cards shipped with the units by the manufacturers should
really be considered only "starter" cards, you'll definitely want a higher capacity
card immediately. - Probably at least a 32 megabyte card for a 1.3 or 2 megapixel
camera, 64 megabytes or more for a 3, 4, or 5 megapixel one. (The nice thing
about memory cards is you'll be able to use whatever you buy now with your next
camera too, whenever you upgrade.) To help you shop for a good deal on memory
cards that fit the E-10, we've put together a little memory locater, with links
to our price-comparison engine: Just click on the "Memory Wizard" button above
to go to the Olympus memory finder, select your camera model , and click the
shopping cart icon next to the card size you're interested in. You'll see a
list of matching entries from the price-comparison database. Pick a vendor &
order away! (Pretty cool, huh?)
Lost Images? - Download this image-recovery program so you'll have it when
you need it...
Since we're talking about memory and image storage, this would be a good time
to mention the following: I get a ton of email from readers who've lost photos
due to a corrupted memory card. It's tragic when it happens, there are few things
more precious than photo memories. Corrupted memory cards can happen with any
card type and any camera manufacturer, nobody's immune. "Stuff happens,"
as they say. A surprising number of "lost" images can be recovered
with an inexpensive, easy to use piece of software though. Given the amount
of email I've gotten on the topic, I now include this paragraph in all my digicam
reviews. The program you need is called PhotoRescue, by DataRescue SA. Read
our review of it if you'd like, but download the program now,
so you'll have it. It doesn't cost a penny until you need it, and even then
it's only $29, with a money back guarantee. So download PhotoRescue for
Windows or PhotoRescue for
Mac while you're thinking of it. (While you're at it, download the PDF
manual and quickstart
guide as well.) Stash the file in a safe place and it'll be there when you need
it. Trust me, needing this is not a matter of if, but when... PhotoRescue
is about the best and easiest tool for recovering digital photos I've seen.
(Disclosure: IR gets a small commission from sales of the product, but I'd highly
recommend the program even if we didn't.) OK, now back to our regularly
scheduled review...
Video Out
 The
E-10 has a video-out port which supports the NTSC timing format on US and Japanese
models (we assume that the PAL standard is supported on European models). The
video output can be used for reviewing previously shot images or running slide
shows from the camera, but also shows all the LCD menu screens as well as the
preview display from the LCD viewfinder. Combined with the flexible infrared
remote control we mentioned earlier, the availability of a live viewfinder display
via the video signal opens interesting possibilities for portrait photography,
using a video monitor as a remote viewfinder.
The
E-10 has a video-out port which supports the NTSC timing format on US and Japanese
models (we assume that the PAL standard is supported on European models). The
video output can be used for reviewing previously shot images or running slide
shows from the camera, but also shows all the LCD menu screens as well as the
preview display from the LCD viewfinder. Combined with the flexible infrared
remote control we mentioned earlier, the availability of a live viewfinder display
via the video signal opens interesting possibilities for portrait photography,
using a video monitor as a remote viewfinder.
Power
 The E-10 can use a variety of power sources. The battery compartment features
a sliding tray design, in which a tray pops out from the compartment for easier
battery loading. The camera's internal battery compartment can accommodate either
four AA alkaline, NiCd, or NiMH batteries, or two CR-V3 lithium battery packs.
An AC adapter is available as an accessory, and plugs into the DC-in port in
the connection compartment. Also available as an accessory is a lithium polymer
battery pack, which provides twice the power capacity of even the highest-capacity
NiMH cells (15.4 vs 7.7 watt-hours) and requires an external battery holder.
This external battery compartment doubles as a vertical grip for the camera,
complete with a secondary shutter button. Olympus estimates that two CR-V3 batteries
should provide approximately 300 minutes of operating time, and four AA NiMH
batteries should provide about 150 minutes. This is consistent with our own
test results on the E-10, and in fact may be somewhat conservative. Current
battery status is reported on the status display panel with a small battery
icon. When the icon appears full, the batteries should be fully charged. If
the icon blinks, the batteries are getting low, and if it lights for a short
time and then disappears, the batteries are dead.
The E-10 can use a variety of power sources. The battery compartment features
a sliding tray design, in which a tray pops out from the compartment for easier
battery loading. The camera's internal battery compartment can accommodate either
four AA alkaline, NiCd, or NiMH batteries, or two CR-V3 lithium battery packs.
An AC adapter is available as an accessory, and plugs into the DC-in port in
the connection compartment. Also available as an accessory is a lithium polymer
battery pack, which provides twice the power capacity of even the highest-capacity
NiMH cells (15.4 vs 7.7 watt-hours) and requires an external battery holder.
This external battery compartment doubles as a vertical grip for the camera,
complete with a secondary shutter button. Olympus estimates that two CR-V3 batteries
should provide approximately 300 minutes of operating time, and four AA NiMH
batteries should provide about 150 minutes. This is consistent with our own
test results on the E-10, and in fact may be somewhat conservative. Current
battery status is reported on the status display panel with a small battery
icon. When the icon appears full, the batteries should be fully charged. If
the icon blinks, the batteries are getting low, and if it lights for a short
time and then disappears, the batteries are dead.
|
|
|
| Capture Mode, w/LCD |
|
| Capture Mode, no LCD |
|
| Half-pressed shutter w/LCD |
|
| Half-pressed, no LCD |
|
| Memory Write (transient) |
|
| Flash Recharge (transient) |
|
| Image Playback |
|
For a camera with its resolution and capabilities, the E-10 is surprisingly frugal in its power consumption. Capture mode power is lower than average, and drops even further after a few seconds of inactivity. Playback power consumption is also noticeably lower than average. Overall, the E-10 should display very good battery life, although our standard recommendation that users purchase at least two sets of high-capacity NiMH cells and a good charger still stands. (As noted above, we feel that Olympus' claim of 150 minutes of operating time on a set of batteries is actually fairly conservative.)
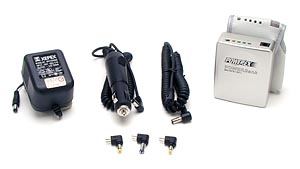
While the E-10's inherent battery life is quite good, its pro-oriented design
means many owners will need the ability to shoot all day with the camera. The
Olympus battery-equipped hand grip is certainly a good option for that, although
it adds a fair bit of bulk, not to mention expense. Many photographers rely
on belt-clipped battery packs to power their digicams for extended periods,
but most of these are NiMH-based, with output voltages of less than 6 volts.
The E-10 requires a substantially higher voltage at it's external-power jack,
which means that the popular NiMH external packs won't work. Fortunately, a
LiIon "PowerBank" is available from Maha that has a high enough voltage
to power the E-10. Running about $60, this unit provides about 1400 mAh of power
at a terminal voltage (under moderate load) of a bit over 8 volts. Given the
E-10's frugal power consumption, the LiIon PowerBank should keep the camera
running for a good 4+ hours of continous use in capture mode. One note - Maha
makes both NiMH and LiIon versions of the PowerBank, make sure you get the LiIon
model for the E-10. (Model number MH-DPB140LI.) You can order these online from
Thomas-Distributing.
Highly recommended!
Included Software
| |
||
|
Although we didn't receive them with our prototype unit, two software CDs and
a USB cable will come with the E-10, for connecting the camera to a PC or Macintosh
and downloading images. One of the software packages is the Olympus RAW File
Import Plug-in, which provides a utility for processing RAW data images later
with Adobe PhotoShop. Direct camera control and image downloading are provided
by an updated version of Olympus' own Camedia software package which allows
you to download and save images to your hard drive, and perform rudimentary
organization and correction functions.
Test Results
In keeping with our standard
policy, our comments here are rather condensed, summarizing our key findings.
For a full commentary on each of the test images, see the Olympus E-10 SLR's "pictures" page.
As with all
Imaging Resource camera tests, we encourage you to let your own eyes be the
judge of how well the devices performed. Explore the images on the pictures page, to see how well the Olympus E-10
performed, and how its images compare to other cameras you may be considering
buying.
First, we should note that the E-10 evaluation unit we worked
with was a prototype, so we won't over-examine the camera's color performance.
Olympus told us that they figured there'd be about two rounds of further
tweaking on the color between the unit we worked with and the final production
models. Despite the early status of the unit we tested though, we felt the E-10
actually showed pretty good color.
Overall, the E-10 did an excellent
job, handling some of our most difficult light sources very well. We shot with
the manual and Kelvin white balance options during most of our testing, which
did a very nice job of interpreting the light source and producing an accurate
white value. Despite the camera's prototype status, the E10 reproduced the large
color blocks in the Davebox test target reasonably well, and tonal handling
looked very good, as the subtle tonal variations of the Q60 target were visible
up to the "B" range, and shadow detail was excellent as well. The tonal
gradations of the gray scales on our test target were clearly visible quite far
into the extreme shadow end, the E-10 barely managing to discriminate between
the two darkest steps in the large Kodak gray scale. (This is fairly unusual,
most digicams stop a step or two short of the very bottom of that
scale.)
As you'd expect, given its 4 megapixel sensor, the E-10 did very
well on our resolution test. For now, we took just a single shot in wide-angle
mode (generally the best focal length for a zoom lens, we'll fill in with a full
resolution series once we get our hands on the production model). The results
were very impressive: In the horizontal direction, the E-10 resolved a good 850
lines per picture height before showing any trace of aliasing, and detail was
clearly visible well beyond 1000 lines. Vertically the numbers were a bit lower,
but still very good, with the first indication of aliasing appearing at about
770 lines per picture height, and good detail visible out to around
950.
The E-10 offers a full range of exposure control, with Program,
Aperture Priority, Shutter Priority, and Manual exposure modes available. The
user also has control over flash mode, metering, exposure compensation, ISO, AE
Lock, sharpness, contrast, and white balance. The E-10's low-light performance
was outstanding, as we obtained bright, useable images as low as 1/16 of a foot
candle (0.67 lux). Noise levels stayed very low at all three ISO settings,
although the 320 ISO setting did produce a slightly higher noise level (but it's
very fine-grained and surprisingly minimal). (We direct readers to Mike Chaney's
excellent Qimage
Pro program, for a tool with an amazing ability to remove image noise
without significantly affecting detail.) We also noticed that the 160 and 320
ISO settings produced slightly warm images, but the 80 ISO setting resulted in a
more true color balance. To put the E-10's low light performance into
perspective, an average city night scene under modern street lighting
corresponds to a light level of about one foot candle. Out of curiosity, we also
shot with the camera's Bulb setting, using a 30 second shutter speed under the
light of a full moon: We were absolutely amazed with the results, which looked
like the image was shot in daylight, although noise was rather high in the 30
second ISO 320 exposure.
We found the E-10's SLR optical viewfinder to be
just a little tight, with the frame accuracy varying slightly with image size.
At the 2240 x 1680 resolution size, the optical viewfinder showed about 92.9
percent of the final image area at wide angle, and about 94.7 percent at
telephoto. At the smaller 1280 x 960 resolution size, the optical viewfinder
showed about 93.7 percent of the final image area at wide angle, and about 95.5
percent at telephoto. We found similar results with the LCD monitor, which also
varied in accuracy with the resolution size. The 2240 x 1680 size resulted in
approximately 92.9 percent accuracy at wide angle, and about 94.5 percent at
telephoto. The 1280 x 960 image size resulted in about 93.6 percent accuracy at
wide angle, and about 95.4 percent at telephoto. Since we generally like to see
LCD monitors as close to 100 percent accuracy as possible, the E-10 does a
pretty good job, and overall performs about as well as most 35mm film-based
SLRs.
The E-10 did an excellent job in the macro category, capturing a
minimum area of just 2.88 x 2.16 inches (73.03 x 54.77mm). Detail and resolution
both look great, though the printing detail on the dollar bill is just a little
soft, which we think was because we got a little too close to the subject for
the lens to focus. The E-10's built-in flash does a good job of throttling down
for the macro area, though it's tricked by the shiny coin just a
little.
Overall, we were very impressed with the performance of our
prototype model of the Olympus E-10 SLR. Color balance was surprisingly good for
a model this early in its development cycle, and the camera's white balance
system does a good job with most light sources. The manual white balance option
in particular was very effective at dealing with tough lighting conditions. The
camera's low-light performance is very commendable, especially with the very low
noise levels the camera achieves for very long exposures. Add to this the E-10's
great macro performance and extensive exposure controls, and you have a very
worthy pro-level digicam.
Conclusion
With its true 4.0 megapixel CCD, extensive
exposure control, SLR format, and advanced lens design, the Olympus E-10 carves
out new territory on the boundary between the professional and advanced-amateur
digicam markets. With a selling price thousands less than all of its competitors
in the professional SLR world, it also offers higher resolution than anything
within five times its cost. As an added bonus, Olympus' use of metal castings
and other metal components to heat-sink the CCD appears to have paid real
dividends in the form of reduced CCD noise on long exposures. Our review of the production model confirmed our early experience with a prototype: The E-10 has all the earmarks of a world-beater. Very highly recommended!
<<E10 Sample Images | Additional Resources and Other Links>>
Reader Comments!
Questions, comments or controversy on this product? Click
this link to see what other Imaging Resource readers have had to say about
the Olympus E-10, or add comments of your own!
