Canon EOS-1D Mark III (Prototype) Imaging Characteristics
High Tone Priority Mode
NOTE: All crops shown here are from a prototype camera, however thumbnails and full resolution images are from a production model.
By Dave Etchells
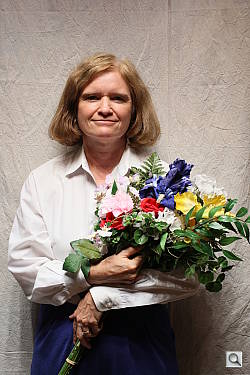
One of the most distinctive new features in the Canon EOS-1D Mark III is its "High Tone Priority" option, available via C.Fn. II-3. This is exactly the sort of thing our horribly-lit "Outdoor Portrait" shot is intended to test. (For those wondering, I do know not to light shots like this in real life: The purpose here has always been to present cameras with a true torture test for highlight handling.)
The Mark III did a very credible job of holding detail in the strong highlights of Marti's shirt here even in its normal exposure mode (and can do even better if you dial the contrast setting down below its default value), but the results we got from High Tone Priority mode were impressively better.
As noted below, after shooting these images, I saw that the HTP versions were captured at ISO 200, even though I'd set the camera to ISO 100 at the start. It turns out that HTP is only available with a minimum ISO of 200. This doubtless has to do with the maximum "fill" level of the Mark III's pixels, in terms of how much light-produced charge they can handle. What Canon is clearly doing here is to exploit the much greater headroom available in the sensor pixels when shooting at elevated ISO settings (that is, with less total light striking the sensor) to recover highlight detail that would otherwise be lost. (One of those things that are totally obvious once someone's done them, but that take a creative mind to think of in the first place.) It'll be very interesting to play with the RAW files from HTP-mode shots, once key third-party tools like Bibble, QImage, Capture One, and Adobe Camera Raw support the Mark III's RAW format.
In the images below, we look at normal- and HTP-mode shots side by side, captured under identical lighting a few minutes apart, with both nominally-exposed and slightly overexposed examples.
| EOS-1D Mark III Prototype High Tone Priority Mode Demonstration | |
|---|---|
| Nominally-exposed images | |
| Normal Exposure | High Tone Priority |
+0.33 EV |
+0.33 EV |
 |
 |
|
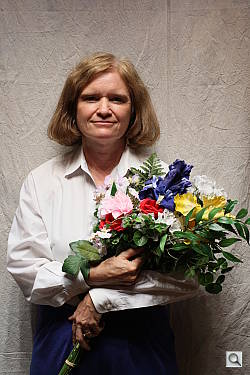
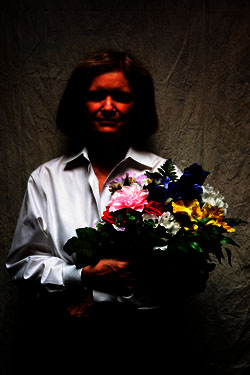
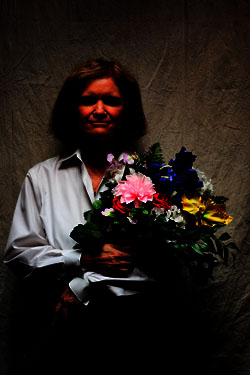
Images straight from the camera (JPEGs)
The two shots above were captured under identical conditions, the only difference being that High Tone Priority was set for the one on the right. Well, the conditions were identical, but HTP made one adjustment to the camera that I wasn't aware of until long after the session was over: I was initially shooting at ISO 100, but when I turned HTP on, the camera reset itself to ISO 200. (!) When HTP is active, the minimum ISO setting is 200. |
|
 |
 |
|
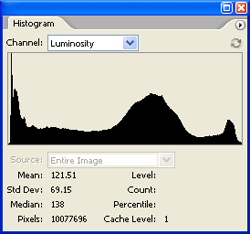
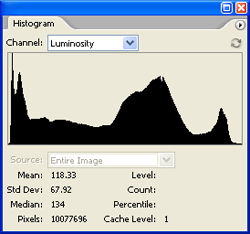
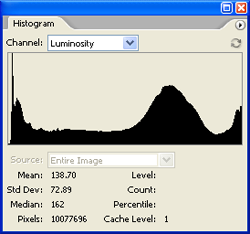
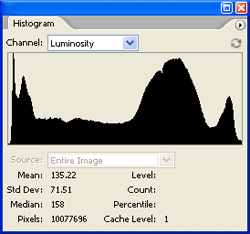
Photoshop histograms corresponding to the images above
The way Photoshop displays its histograms makes the results a little confusing, in that the vertical scale shifts to accommodate the highest peaks. Particularly when there's a large spike at one or the other end of the tone scale (as above in the shadows), the vertical scales can change a fair bit between shots. (The graph above right shows higher values than the one on the left, apparently because the High Tone Priority exposure pulled some deep-shadow pixels up out of the murk on the extreme left edge of the graph. Despite the vertical distortion of the two curves, you can see HTP at work in both the highlight and shadow areas. (The latter was a surprise to us.) At the right-hand edge of the plot (corresponding to highlights), neither image shows any evidence of lost highlight detail, but there's clearly more headroom between the large spike corresponding to the white shirt and the right-hand edge of the plot, corresponding to the saturation point. Surprisingly, the shadow end shows a bit more detail as well, as there's now some separation between absolute black (the left-hand edge of the plot) and the spike corresponding to the deep shadow areas of the image. (The spike is probably from Marti's dark blue pants, strongly shadowed with this lighting.) |
|
 |
 |
|
Photoshop midtone slider adjusted to gamma 0.15 to show highlight preservation
Looking at Marti's shirt in these shots, it's clear that the HTP version holds a lot more subtle detail. |
|
 |
 |
|
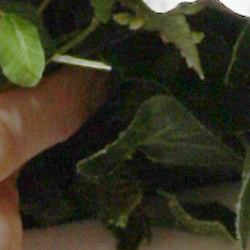
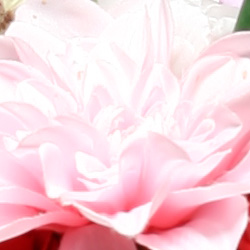
Highlight preservation crops of images straight out of the camera
Even though the histograms didn't show any outright clipping in either image, there's definitely a lot more detail in the highlights with HTP enabled. |
|
 |
 |
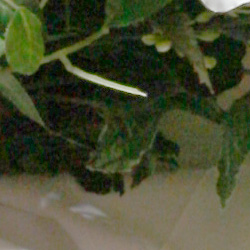
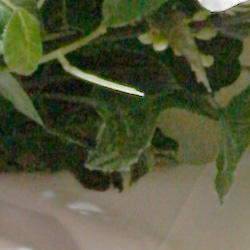
Shadow crops of images straight out of the camera
While HTP clearly seemed to be doing something in the shadows, the effect is barely noticeable without fiddling with the tone curve in Photoshop to see what's down there. |
|
 |
 |
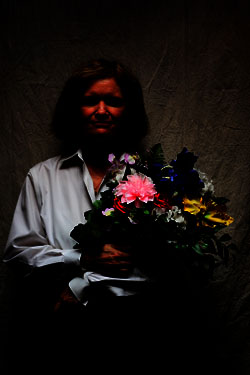
Photoshop midtone slider adjusted to gamma 3.0 to show shadow detail and noise levels
Here, we've jacked the gamma up to 3.0, to open up the shadows. (Marti moved slightly, so there isn't an exactly corresponding point in the two images. Lighting under the leaves of the bouquet can be trusted to be very equivalent though.) There's definitely more to see in the shadows of the HTP version, but there's also more image noise. How much of that is the work of HTP itself, and how much is simply from the doubling of the ISO between the two shots isn't clear at this point. (I'll reshoot this test once we get a production sample of the Mark III, and at that time will do both sets of shots at ISO 200, to keep it more apples-to-apples.) |
|
|
|
|
Slightly Overexposed Images
|
|
+0.67 EV |
+0.67 EV |
 |
 |
|
Images straight from the camera
When we go to a greater overexposure, we can see more of HTP's effect. Viewed on-screen, both shots look pretty blown out, the one on the right only less so. While it doesn't look it though, there's actually a lot of detail preserved by HTP here. |
|
 |
 |
|
Photoshop histograms
Here, we really see the way HTP has pulled detail out of blown highlights: See how much the lump in the curve corresponding to Marti's shirt has been pulled back off the right-hand edge of the plot. (Once again, we see some lightening of the deepest shadows as well though, on the left-hand side of the graph.) |
|
 |
 |
Photoshop midtone slider adjusted to gamma 0.15 to show highlight preservation
These adjusted thumbnails clearly show that full detail is preserved in the white shirt. (Checking in Photoshop, it turns out the only things blown out in the image are parts of the pink and yellow flowers, both in the red channel.) | |
 |
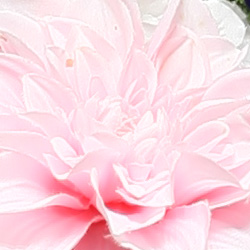 |
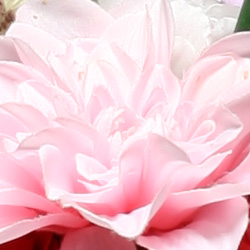
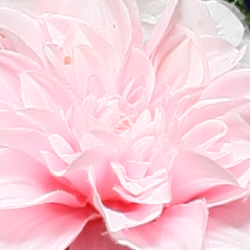
Highlight preservation crops of images straight out of the camera
There's still some detail lost in the pink flower in the HTP version, but the difference between it and the normal-mode exposure is pretty dramatic. |
|
 |
 |
Shadow preservation crops of images straight out of the camera
Unadjusted shadows are still pretty hard to see, although there's a bit more detail visible in the HTP version. |
|
 |
 |
Photoshop midtone slider adjusted to gamma 3.0 to show shadow noise
Pushing the midtone slider down to a gamma value of 3.0 does indeed show more detail in both shots, but more in the HTP version than in the normally-exposed one. |
|
 Fujifilm GFX 50S Review
 Fujifilm X-T3 Review
 Olympus E-M5 III Review

Follow Imaging Resource