Fujifilm FinePix E900 Design
 Both stylish and fairly durable looking, the FinePix E900's body is mostly wrapped in a black-metallic shell that's highlighted with silver accents. The right-hand grip has a large, contoured patch of textured rubber, front and back, giving the camera a solid and comfortable place to put your fingers and thumb. Most of the E900's buttons and switches have an upgraded design and layout from earlier E models--they look better and may make the Fujifilm FinePix E900 just a bit faster and easier to use.
Mid-sized for a point-and-shoot, the E900 measures 4.0 by 2.5 by 1.4 inches with the lens retracted and weighs 9.2 ounces with two AA batteries and an xD memory card. That's small enough to fit in a small bag, but too large to carry around comfortably in anything smaller than a large coat pocket.

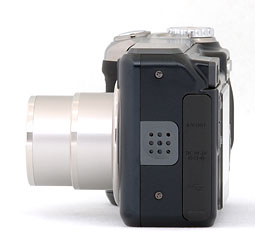
When fully-extended, the 4x optical zoom increases the camera's depth by nearly an inch (measured from the grip). In normal shooting the lens can focus as close as two feet; in macro mode, as close as three inches. A metal and plastic ring surrounds the lens--pressing the small silver button below and to the right of the lens barrel and rotating the ring releases it, revealing the camera's accessory lens mount. You can add a 1.94x tele converter (TL-FXE01) or a .76X wide-angle converter (WL-FXE01)--about $95 each--but you'll also need the AR-FXE01 lens adapter ring (approximately $20). The adapter ring also lets you use 43mm filters on the Fujifilm FinePix E900. To the right of the viewfinder window is the camera's microphone, and below that is the self-timer lamp. Fujifilm did not give the E900 a focus-assist lamp for low-light conditions.
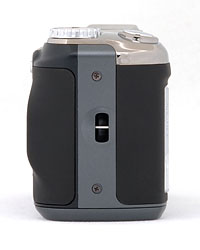
The right, or grip side of the camera has a recessed lug for the wrist strap. On the camera's left side you'll find the camera's speaker and connection ports. These include composite video socket, USB connector, and plug for an optional AC adapter. All are protected by a rubber cover attached to the camera by a thin tab.

The top view of the Fujifilm FinePix E900 reveals the large silver trigger button, small mode dial and the power button. The mode dial is just large enough to be worked easily by photographers with large fingers, and the power button is small and recessed enough that your trigger finger is unlikely to mistake it for the shutter release while you have your eye at the optical viewfinder. Not readily apparent is the pop-up flash, which sits hidden in the top-middle of the camera. This pops straight up when you press the flash release, and it's placed where it's not likely to be in the way or accidently covered with your fingers while you're holding the camera.

The back of the camera is where the FinePix E900 has a number of small improvements over the earlier E-series models. The E900's zoom control, located just below and to the left of the Mode dial, is now thinner and wider, which may make it a little easier to use if you have large fingers. Below that zoom control sits the playback button--an improvement over the sliding shooting/playback switch of previous models. The DISP/BACK button is in the same location (below and to the left of the four-way selector), but the Photo Mode (F) button has been moved from upper-left of the four-way to lower-right--a position that makes it slightly easier to reach. (Photo mode controls ISO, resolution, and color. See below for more on this.) The Fujifilm E900's four-way selector has a cleaner design than the previous model. It's slightly less-dished, making the center MENU/OK button a bit more accessible. All of the controls are labeled with easy-to-see and easy-to-interpret icons.
To the left of these control buttons is the Fujifilm FinePix E900's 2.0-inch TFT color LCD. It displays sharp images with good color; status icons, menu text and exposure setting are all sharp and easy to read. Above the LCD is the flash activation button. It's easy to work with either hand; which is a good thing because the flash does not pop up automatically. On the left edge of the back panel sits two more buttons: the exposure value and the new drive-mode controls. The former is well-placed because some functions--changing the aperture in full-manual exposure mode, for example, require two hands to set.

On the bottom of the E900 is the standard tripod mount and a large door for the battery compartment. Four plastic tabs hold the door closed, so you should be okay if one breaks (which has been know to happen with other small digital cameras.) The xD-Picture Card slot is also in this compartment.
Fujifilm FinePix E900 External Controls
For the most part, the layout of the Fujifilm FinePix E900's controls is fairly typical for this class of point-and-shoot. There are a few dedicated buttons and a four-way selector that does most of the work in terms of settings. There are only two screens of menu options in still photography mode and each is only two layers deep. There is no obvious organization to the menus, but they are fairly intuitive, quick to roll through and set. Novices will likely find the menu icons confusing at first, but as you work through them, a text-based label appears at the top of the screen. One knock is the SET menus, used for changing basic camera functions such as LCD brightness, sound alerts, time, etc: Just getting to it requires scrolling to the bottom of the main menu. Most cameras make jumping to this group of settings much faster.

Power Button: Located to the left of the mode dial, the Fujifilm FinePix E900's power button is small and slightly recessed; making it unlikely you'll accidently turn the camera on or off.

Shutter Button: This large, silver button is placed forward on top of the hand grip protrusion, well away from the other controls. It's easy to locate while you are squinting though the optical viewfinder, and there is a solid distinction between the half-press for locking focus and exposure and the full-press for tripping the shutter.
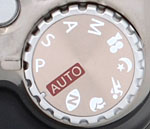
Mode Dial: Located on top of the camera between the shutter release and the zoom control, the Fujifilm FinePix E900's mode dial is just large enough to be workable for someone with big fingers. Its layout is typical of digital cameras, with the standard icons representing the following functions:
- AUTO: The camera takes complete control of nearly all exposure settings--exceptions include image resolution, ISO, and the FinePix Color option (standard, F-Chrome, and black-and-white). Flash, macro, and continuous shooting modes can still be changed by the photographer. AUTO disables the exposure-value (EV) control, but the E900 does display a real-time histogram on the color LCD, which might be helpful for the photographer who knows how to use it.
- P (Program): Automatically sets both the aperture and shutter speed, but gives the photographer access to all other controls. Pressing the up and down portions of the four-way button changes the combination of aperture and shutter speed, without changing the overall exposure.
- S (Shutter-priority): In this mode the photographer can manually set shutter speeds from three seconds to 1/1000 second by pressing the up and down portions of the four-way switch. The camera automatically sets the appropriate aperture, which is shown real-time in the LCD display, next the shutter speed. (Some cameras require you to press the shutter release half-way down in order to see the camera's aperture setting.) If your shutter speed is set too high or too low for the E900's aperture range, the aperture number is displayed in red. All other exposure settings are available.
- A (Aperture-priority AE: Allows the photographer to set the lens aperture from f/2.8 to f/8.0, while the camera controls the shutter speed. The maximum aperture depends on the zoom setting, ranging from f/2.8 at the wide angle end to a relatively high f/5.6 at the telephoto position. In all other ways, it works like the shutter-priority mode, including displaying the shutter speed in red of camera cannot set an accurate exposure with the given aperture.
- M (Manual): Lets the photographer set both the shutter speed and aperture by using the four-way switch. To change shutter speed, you simply press up or down; to change the aperture, you have to simultaneously hold down the dedicated exposure-value button and press the four-way up and down keys. In manual mode, the aperture range remains the same as aperture-priority, but the shutter range widens: 15 seconds to 1/2000.
- Natural light: Used in low light conditions where you cannot fire the flash (museums) or where is would be intrusive (weddings, for example). In natural light mode, the flash is disabled--even if it is popped up--and in some informal tests, the camera used a higher ISO than it did taking the same low-light scene in program mode.
- Portrait: Softens the tone of the shot and enhances skintones.
- Sport: Skews the exposure values to faster shutter speeds and lower apertures to freeze action.
- Night: Is the opposite of Sport. The camera skews towards lower shutter speeds, letting you capture more ambient light in dark settings, even when you use a flash to illuminate the main subjects (a candle-lit dinner party, for instance). The photo is likely to be blurred, however, if you do not use a tripod and your subjects don't stay still during exposure. You can use the red-eye reduction mode minimize red-eye in night portraits.
- Movie: The E900 records video at 30 frames per second and resolutions of 640 by 480 or 320 by 240. The length of a single movie clip is only limited by the amount of space left on the x-D Picture Card inserted in the camera.
Zoom Lever: A typical rocker switch placed on the upper right quadrant of the Fujifilm FinePix E900's back panel, the zoom control falls right where your thumb wants to find it. Zooming between full-wide angle to full-telephoto feels smooth and quick. There is a good separation between optical and digital zoom: once at the top of the telephoto range, you have to release the "T" button and press it again for the camera to move into digital zoom.
In playback mode, pressing the "T" side of the zoom switch enlarges (and crops) the displayed photo. You use the circular four-way buttons to pan within the enlarged image, and a nice graphic box in the display shows what part of the whole photo you're looking at. Unlike most cameras, pressing the "W" side of the zoom control does not pop a nine-frame set of thumbnail photos--you hold down the right or left side of the four-way switch for a second to do that; you have to hold it down to scroll through the images, and once it's released the selected photo displays on the screen.

Four-way Selector and Menu/OK button: The four-way selector's functions are pretty typical: In Record mode, pressing the left arrow turns macro mode on and off; pressing the right arrow changes the flash mode, but only when the flash is up and ready to fire. You use the top and bottom arrows to change aperture and shutter speeds in program, aperture-priority, shutter-priority, and full-manual shooting modes. Once you press the Menu button, the four-way selector also lets you scroll through and select menu options.
In Playback mode, the left and right buttons scroll through captured images. When an image has been enlarged, the four arrows allow you to pan within the image. As noted above, holding the right or left arrows down for a second pops up a set of nine thumbnail images.

F button (Photo Mode): In shooting mode, this button pops up the resolution, ISO, and FinePix Color controls.
- Quality settings: 9-megapixel/Fine (3,488 x 2,616), 9-megapixel/Normal (3,488 x 2,616), 3:2 ratio (3,696 x 2,464), 5-megapixel (2,592 x 1,944), 3-megapixel (2,048 x 1,536), 2-megapixel (1,600 x 1,200), and 0.3-megapixel (640 x 480)
- ISO settings: Auto, 80, 100, 200, 400, or 800
- Color: Standard (no color correction), Chrome (in which contrast and saturation are set to high, for more vivid photos) and black and white.
In playback mode, the Photo Mode button lets you mark shots for a Print Order (DPOF) and set the number copies for each shot.
![]()
DISP/BACK: When using the menus, pressing this button lets you exit without changing the setting. When shooting, the button lets you pick from four displays: your image with settings listed; the image without settings; settings with framing gridlines added; or a smaller image with thumbnails of your last three shots stacked on the left side of the screen. The fifth setting turns the monitor off to save battery life.

EV: When held down and used with the right and left arrows of the four-way selector, it adjusts your exposure up or down, up to two stops, in 1/3-stop increments. It also pops up a small histogram in the lower part of the screen.
![]()
Continuous Shooting: Lets you pick from four continuous modes: a burst of four frames at a maximum of 1.5 frames per second; three-shot auto bracketing; a burst of up to 40 frames with only the last four being recorded; and a burst of up to 40 recorded shots at a slower .6 frames per second.
 Fujifilm GFX 50S Review
 Fujifilm X-T3 Review
 Olympus E-M5 III Review

Follow Imaging Resource