Canon EOS-1DCanon leaps into the professional SLR arena, with the fastest digital SLR on the planet!<<Executive Overview :(Previous) | (Next): Viewfinder>> Page 3:DesignReview First Posted: 12/08/2001 |
Design
The introduction of the EOS-1D represents Canon's first excursion into the true
professional digicam arena. (The earlier EOS-D30 had neither the ruggedness
nor speed required by the professional marketplace, although many pro Canon
shooters used them.) Weighing in at a hefty 2.7 pounds (1,250 grams) without
the battery, lens, or CompactFlash card installed, the Canon EOS-1D is more
than a handful. Its magnesium-alloy body is exceptionally tough and durable,
ready for heavy use. Size and portability weren't top design considerations
for the 1D. Instead, Canon opted for maximum speed, ruggedness, and compatibility
with the EOS-1v film camera. The EOS-1D measures a whopping (by consumer digicam
standards) 6.1 x 6.2 x 3.1 inches (156 x 157.6 x 79.9mm ), and definitely requires
a two-handed grip. Compared to other pro digital SLRs though, the EOS-1D is
actually pretty compact, thanks to Canon's being able to integrate all the camera
electronics directly into a conventional body design. (No need for a bulky electronics
compartment tacked onto the bottom of the camera.)
The resemblance between the EOS-1D and the film-based EOS-1v (introduced a year earlier) is more than close -- the two cameras are virtually identical. All of the conventional controls (AF, Mode, Drive, ISO, Exposure Compensation, etc.) are exactly the same, except for the obvious differences, such as those digital controls on the 1D that simply don't apply to a film camera, and the lack of a film compartment door -- but everything that can be the same is. This extends even to the Custom Function options. In some cases, Canon has left an "empty" function on the 1D, simply so the function numbers shared with the 1v will be the same. If you're comfortable using an EOS-1v, you'll be able to transition to the 1D with almost no learning curve, and switching rapidly back and forth between the two should involve no confusion.
One of the most welcome aspects of the EOS-1D's design is that it needs little protection from the elements. A feature inherited from the EOS-1v, its weatherproof body features rubber-sealed compartments and controls (with no fewer than 72 sealing components), making the camera ideal for shooting in any type of inclement weather -- driving rain, snow, dust storms, or mud -- it should make little difference to the 1D. Though it's not certified for submersion, I'm willing to bet you could give it a quick dunk with no ill effects. This is a huge advantage over other pro digital SLRs on the market today (October, 2001), and I think it will be of major significance to practicing pros.
|
|
| EF 16-35mm f/2.8L USM |
| EF 70-200mm f/2.8L IS USM |
| EF 300mm f/2.8L IS USM |
| EF 400mm f/2.8L IS USM |
| EF 400mm f/4 DO IS USM |
| EF 500mm f/4L IS USM |
| EF 600mm f/4L IS USM |
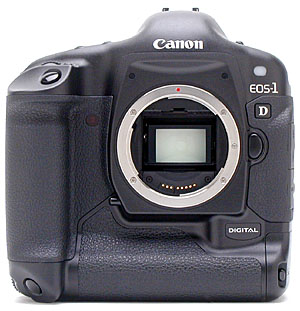
The front of the EOS-1D is simple in design, featuring only the lens mount and a few controls. A small release button on the right side of the lens (when looking from the front) releases the lens from its mount, allowing you to remove it completely. The large, hefty hand grip is big enough to provide a secure hold on the camera, even with a lens attached. At the bottom of the hand grip is a secondary shutter button and Main dial, for use when holding the camera vertically. Also visible from the front of the camera is the main Shutter button, mounted at a sloping angle from the top panel, as well as the front of the battery compartment. (The latter being the low bulge along the bottom of the camera that also serves as a hand grip when holding it vertically.) Hidden on the right front side (when looking from the front) is the ambient-light White Balance sensor, covered by a white diffuser window. (Just above the EOS-1 logotype.) This sensor helps the camera determine the proper color balance, using its "hybrid" white balance technology. Finally, the Depth of Field Preview button can be seen on the left side of the lens mount.
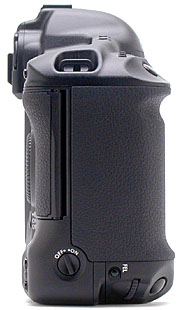
The right side of the camera (as viewed from behind) holds the secondary Flash Exposure Lock button; the On/Off switch, which activates the secondary camera controls; the secondary function dial; and the secondary shutter button.
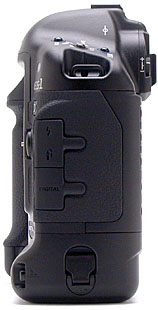
Lining the opposite side of the camera are the Flash PC socket, Remote Control, and Digital input jacks, each covered by a flexible synthetic rubber flap. At the bottom is the battery compartment and its release controls -- a rotating lock and a release button which must both be activated to open the compartment door. Though I found this system a little difficult to operate at times, it does ensure that the battery stays in place, and won't accidentally end up on the ground.
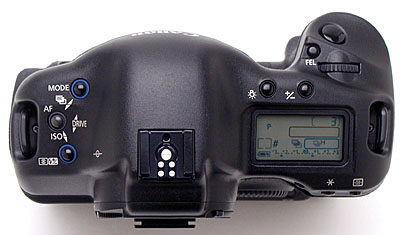
The EOS-1D's top panel holds several camera controls, including the Mode, AF, Drive, ISO, Metering/Flash Exposure Compensation, LCD Illumination, Exposure Compensation, Flash Exposure Lock, and Shutter buttons. A small Main dial is located just behind the Shutter button, and is used to adjust camera settings. (The Main dial is used by itself to set aperture and shutter speed in some modes, or works with the plethora of other buttons to engage the actual setting changes.) The external flash hot shoe crowns the camera's top panel, and a small, black-and-white LCD monitor reports camera information such as battery power, exposure mode, aperture, shutter speed, and exposure compensation, among others.
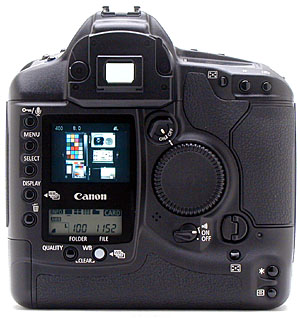
The remaining camera controls are located on the back panel, along with the LCD monitor and optical viewfinder eyepiece. A diopter adjustment dial and the optical viewfinder eyepiece shutter flank the eyepiece on either side. A removable soft rubber eyecup (included in the box with the 1D) can be attached to improve viewing in strong ambient lighting. In the center of the back panel is a large Quick Control dial, which also selects camera settings when turned on (a small switch above the dial turns it on or off). While it does work in conjunction with some of the camera's buttons, the Quick Control dial primarily serves as part of the user interface for the LCD menu system. Camera controls on the back panel include the Assist, AE Lock, AF Point Selection, Sound/Protect, Menu, Select, Display, Erase, Quality, and White Balance buttons. In the lower right corner are the secondary Assist, AE Lock, and AF Point Selection buttons, for use when holding the camera vertically. The 2.0-inch LCD monitor displays image playback and menu screens, and a secondary, black-and-white LCD panel just below it reports more camera information. Also on the back panel is the CompactFlash card slot, released by turning the small release key just below it.
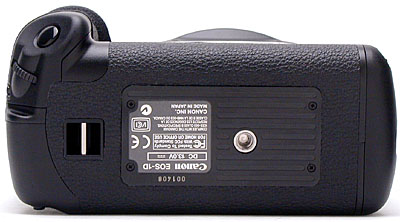
The bottom panel of the EOS-1D holds only a tripod socket and an attachment eyelet for the wrist strap. The tripod mount is directly below the centerline of the lens, reducing parallax errors between shots when panning.
Reader Comments! --> Visit our discussion forum for the Canon EOS-1D!

Follow Imaging Resource: