Canon EOS-1DCanon leaps into the professional SLR arena, with the fastest digital SLR on the planet!<<Shutter Lag & Cycle Time Tests :(Previous) | (Next): Camera Modes & Menus>> Page 8:Operation & User InterfaceReview First Posted: 12/08/2001 |
Operation and User Interface
The EOS-1D's user interface is certainly one of the most complex I've encountered,
with extensive external camera controls that have multiple functions, and duplicate
controls for vertical shooting. I admit that I had to refer to the manual on
a number of occasions to fully understand what each control did. However, once
I became familiar with the layout and began to memorize each button's function(s),
camera operation was straightforward and quite efficient. This is definitely
not a camera for a casual user, but professional shooters will find it very
fast and flexible to operate. Dual controls for the Shutter button, AE Lock,
AF Point Selection, and the Assist button enable you to comfortably operate
the camera horizontally or vertically, a mandatory option for pro photographers.
The combination of control dials and buttons allows you to adjust most of the
camera's settings without venturing into the LCD menu system, a great time-saver
in fast-paced shooting situations. For those times when the LCD menu is unavoidable,
the menu system offers straightforward navigation, once you get the hang of
Canon's user interface. (A silly thing, but it took us an inordinate amount
of time to get used to the operation of the "Select" button and the
Quick Control dial. Once I became acclimated, it was very fast, but there was
a fair bit of frustration in the first day of shooting.) Following are a few
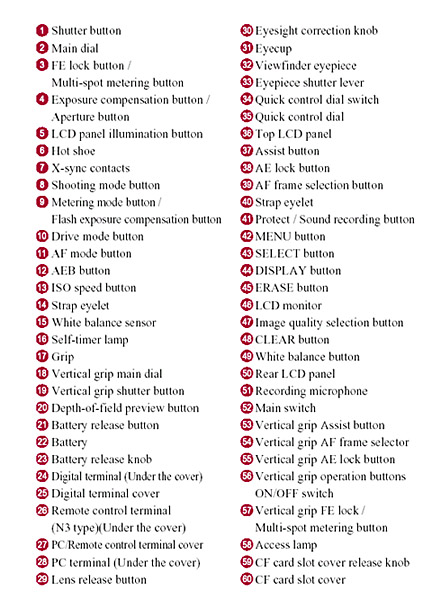
illustrations of the camera's operating controls and readouts, courtesy of Canon
USA, with callouts and other modifications ©Imaging Resource. I then step
through all the controls in my usual fashion, followed by descriptions of the
camera's various menu screens.
)
|
 |
)
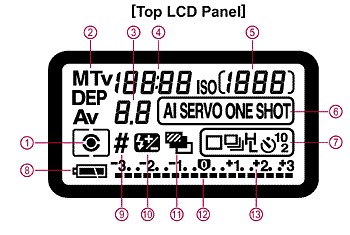
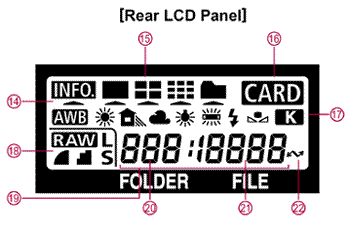
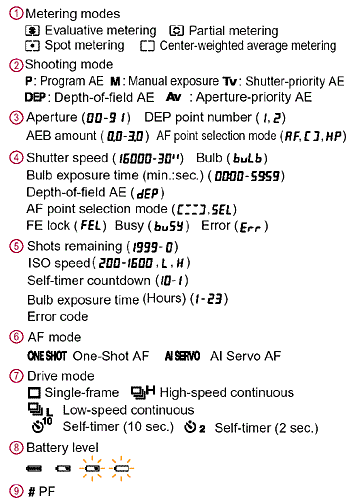
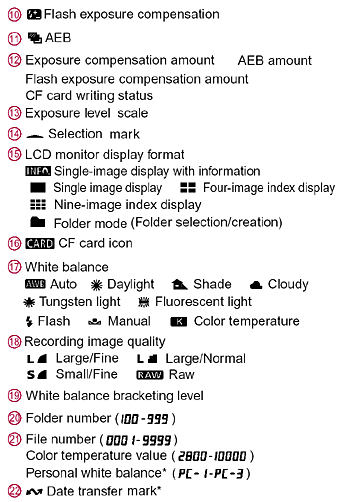
LCD Data Readouts
The EOS-1D uses two monochrome LCD data readouts to report camera status, and
provide a visual user interface to the various knobs, dials, and buttons. As
with the D30, you can actually control quite a bit of the camera's operation,
without venturing into the menu system on the color LCD screen. This not only
saves power (by avoiding the hefty drain of the large LCD screen), but makes
the camera much quicker to operate. Here are the details of the information
provided by the two LCD readouts, on the top and back of the camera:
Control Enumeration
With the foregoing as background, here's a step-by-step description of the 1D's various controls and their operation:
Shutter Button: Located on the top of the camera body, sloping down toward
the front panel, this button sets focus and/or exposure when pressed halfway.
A full press fires the shutter.

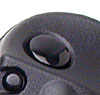
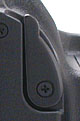
Depth of Field Preview Button: Hidden on the lower left side of the lens
mount (when looking from the front), this button previews the depth of field
in the viewfinder. Pressing the button stops the lens down to the selected aperture,
letting you visually check the depth of field.

Lens Release Button: On the right side of the camera's front panel, this
semicircular button releases a latch so the lens can be removed.

FE Lock / Multi-Spot Metering Button ("FEL"): Situated on the
top panel of the camera, just behind the Shutter button, this button controls
the flash exposure lock and Multi-Metering functions, just like its vertical
grip counterpart. Pressing the button when a Canon Speedlight is in use locks
the exposure based on a test flash. In Multi-Spot Metering mode (with the flash
off), this button selects up to eight metering points for exposure calculation.
Main Dial: To the right of the FE Lock / Multi-Spot Metering button,
this dial controls a variety of camera functions when turned while pressing
a control button. Depending on the exposure mode, turning the dial on its own
adjusts some of the functions listed on the top LCD panel, such as aperture
or shutter speed. In Program AE mode, turning this dial cycles through a range
of equivalent exposure settings.

LCD Panel Illumination Button: Directly behind the FE Lock / Multi-Spot
Metering button, this button activates a blue background illumination for both
the rear and top status LCD panels. You can turn off the illumination by pressing
the button a second time. Pressing the button once leaves the light on for six
seconds, and the light will automatically shut off if the shutter is opened.
(A custom menu function lets you leave this backlight on during bulb exposures,
handy for watching the display that shows the cumulative exposure time.)

Exposure Compensation / Aperture Button: To the right of the LCD Panel
Illumination button, this button controls the exposure compensation in conjunction
with the Main dial (in all exposure modes except Manual). Pressing the button
blanks all the top-panel LCD readouts except the exposure compensation indicator,
and connects the Main dial to the exposure compensation adjustment. Pressing
the button again or half-pressing the shutter button registers the exposure
compensation setting you've selected, and puts the camera back in shooting mode.
In Manual mode, pressing this button while turning the Main dial controls the
aperture setting. (This is a little awkward: Using the rear-panel Quick Control
dial to set the aperture in Manual mode is much easier.)
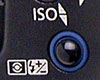
Metering Mode / Flash Exposure Compensation Button: The first button
on the far left side of the top panel (when looking from the back), this button
changes the current metering mode when pressed while turning the Main dial,
cycling through Evaluative, Partial, Spot, Center-Weighted, and AF Point-Linked
Spot metering modes. When pressed while turning the Quick Control dial on the
back panel, the flash exposure compensation is adjusted from -3 to +3 exposure
values (EV) in one-third-step increments. (Note that this only applies to Canon
dedicated Speedlights.) Pressing this button in conjunction with the Shooting
Mode button while turning the Main dial adjusts the camera's Drive mode, cycling
through Single Frame, High-Speed Continuous, Low-Speed Continuous, 10-Second
Self-Timer, and Two-Second Self-Timer modes. Finally, pressing this button in
conjunction with the AF Mode button while turning the Main dial sets the ISO
sensitivity.
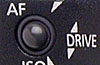
AF Mode Button: The next button on the left, just in front of the Metering
Mode / Flash Exposure Compensation button, this button sets the autofocus mode
when pressed while turning the Main dial, cycling between One-Shot AF and Al
Servo AF (which focuses continuously to track moving subjects). Pressing this
button while holding down the Metering Mode / Flash Exposure Compensation button
and turning the Main dial adjusts the ISO setting. Additionally, holding down
this button while pressing the Shooting Mode button and turning the Main dial
activates the Auto Exposure Bracketing mode and sets the amount of exposure
variation.

Shooting Mode Button: The last button on the left side of the top panel,
this button sets the camera's exposure mode when held down while turning the
Main dial, cycling through the following modes:
- Program AE: The camera selects the best shutter speed and aperture settings, while the user chooses all other exposure variables. Turning the Main dial in this mode adjusts the exposure program through a range of equivalent exposure settings, using different combinations of aperture and shutter speed.
- Aperture Priority: In this mode, the user chooses the lens aperture setting, while the camera selects the best corresponding shutter speed.
- Depth of Field AE: This mode allows the user to select the desired depth of field, while the camera chooses the best exposure settings (shutter speed and aperture) to maintain that depth of field.
- Manual: The user controls all aspects of the exposure, including both shutter speed and aperture.
- Shutter Priority: As the opposite of Aperture Priority mode, this mode allows the user to select the shutter speed, while the camera chooses the best corresponding aperture setting.
- Bulb: Extends the Manual exposure mode by allowing unlimited-length shutter
times. (Limited by battery life to 1.5 hours, but on a practical basis to
a couple of minutes or less, due to sensor noise.)
When pressed in conjunction with the AF Mode button while turning the Main
dial, this button activates the Auto Exposure Bracketing mode and adjusts the
amount of exposure variation. Pressing this button while holding down the Metering
Mode / Flash Exposure Compensation button adjusts the camera's Drive mode, cycling
through Single Frame, High-Speed Continuous, Low-Speed Continuous, 10-Second
Self-Timer, and Two-Second Self-Timer modes.

Diopter Adjustment Dial: Located on the camera's back panel, to the left
of the viewfinder, this dial adjusts the optical viewfinder display to accommodate
eyeglass wearers.
Eyepiece Shutter Lever: On the opposite side of the viewfinder, this
lever opens and closes a small shutter inside the eyepiece, which prevents incident
light from affecting the exposure when the camera is mounted on a tripod. (Normally,
the photographer's eye prevents ambient light from entering the viewfinder eyepiece.)

Assist Button: Directly to the right of the Eyepiece Shutter lever, this
button registers the selected AF point when pressed in conjunction with the
Flash Exposure Lock button. Pressing this button with the AF Point Selection
button switches between the normal AF mode and the registered AF point. Very
handy for quickly switching between a specific AF point and normal multi-area
AF operation. The operation of this control may be modified somewhat through
Custom Function menu 18.

AE Lock ("*") Button: To the right of the Assist button, this
button locks the exposure when pressed. (The AE Lock is canceled six seconds
later, or when a shot is taken, whichever comes first.)

AF Point Selection Button: Directly to the right of the AE Lock button,
this button selects one of the 45 AF points when pressed while turning either
the Quick Control or Main dials. (The Quick Control dial selects vertically,
while the Main dial selects horizontally.) Pressing this button simultaneously
with the Assist button switches between the normal AF mode and the registered
AF point.
Quick Control Dial Switch: In the center of the back panel, above the
Quick Control dial, this switch turns the dial on or off, as a precaution against
changes being made if it is accidentally turned.
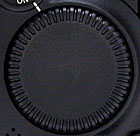
Quick Control Dial: The large dial in the center of the back panel, this
dial controls a variety of camera settings when turned while pressing control
buttons. During image playback, turning this dial scrolls through captured images,
and it is a primary user interface element for navigating the LCD menu system.
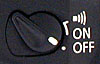
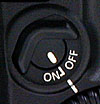
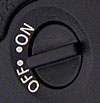
Main Switch: Directly below the Quick Control dial, this switch turns
the camera on or off. In its third position (marked with a little speaker icon),
the beeper is enabled, to signal when focus is achieved.

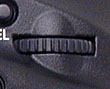
CompactFlash Slot Release Switch: Located at the bottom left corner of
the CompactFlash compartment, this switch unlocks the compartment door, allowing
you to remove the CompactFlash card.

Protect / Sound Recording Button: The first button in a series lining
the left side of the LCD monitor, this button assigns or removes write protection
for selected files during image playback. Also in Playback mode, this button
allows you to record as long as 30 seconds of audio to attach to an image file,
by holding down the button for two seconds. (Very handy for pros needing to
keep track of what's recorded in various shots.)

Menu Button: Directly below the Protect / Sound Recording button, this
button displays the LCD menu system.

Select Button: The third button in the series on the left side of the
LCD monitor, this button selects menu settings while in the LCD menu system.
When playing back images, this button selects individual images for manipulation.

Display / White Balance Bracketing Button: Just below the Select button,
this button controls the LCD display mode when playing back images. A full press
of the button turns the display on or off. Holding down the button while turning
the Quick Control dial cycles through the image playback display modes, including
Info (with histogram), Single Image Display, Four-Image Display, and Nine-Image
Display. When the LCD monitor is disabled, holding down this button while turning
the Quick Control dial allows users to create new image storage folders. In
Record mode, pressing this button in conjunction with the White Balance button
activates the White Balance Bracketing mode.

Erase Button: The last button in the series, this button erases selected
images or folders.

Quality Button: Located below the LCD monitor, this button cycles through
the file resolution and quality settings when pressed while turning the Quick
Control button. Pressing and holding this button with the White Balance button
for two seconds returns the camera's settings to their defaults.
![]()
White Balance Button: Directly to the right of the Quality button, this
button cycles through the available White Balance settings when pressed while
turning the Quick Control dial. When held down in conjunction with the Quality
button, this button resets the camera settings to their defaults. Holding this
button while pressing the Display button activates the White Balance Bracketing
mode.
Vertical Grip Operation On/Off Switch: Located on the right side of the
camera (when looking from the back) and near the cluster of vertical grip controls,
this switch turns those controls on or off. Disabling the controls prevents
accidental activation when shooting with the camera in a normal horizontal orientation.
Vertical Grip Shutter Button: Directly below the primary Shutter button,
but on the bottom panel of the camera, this button performs the same shutter
functions when shooting with the camera held vertically.
Vertical Grip Main Dial: Like the Main dial on top of the camera, this
dial controls a variety of camera settings when rotated while holding down a
control button. Located just behind the Vertical Grip Shutter button, this dial
controls several functions on the top LCD panel when turned by itself, such
as aperture or shutter speed, depending on the exposure mode. When turned while
in Program AE mode, the dial cycles through a range of equivalent exposures.

Vertical Grip FE Lock / Multi-Spot Metering Button ("FEL"):
Just behind the Vertical Grip Main dial, this button locks the exposure when
an external flash is used. Like the main FE Lock button, when no flash is in
use, this button sets the metering points for the Multi-Spot Metering mode,
which averages the exposure from as many as eight separate readings.

Vertical Grip Assist Button: Just like the Assist button at the top of
the back panel, this button (located in the lower right corner of the back panel)
registers the AF point when pressed in conjunction with the Flash Exposure Lock
button. It also switches between the normal AF setting and the registered point
when pressed simultaneously with the AF Point Selection button.

Vertical Grip AE Lock Button: To the right of the Vertical Grip Assist
button, this button locks the exposure for a maximum of six seconds when pressed
once.
![]()
Vertical Grip AF Point Selection: The final vertical grip control in
the lower right corner of the back panel, this button performs the same functions
as its main counterpart, allowing you to select an AF point for use by holding
down the button and turning the Quick Control or Main dial. Pressing this button
with the Assist button selects between the normal AF mode and the registered
AF point.

Battery Compartment Release Button: Situated on the left side of the
camera, when looking from the back, this button unlocks the battery compartment
door handle, which can be turned to release the battery.

Follow Imaging Resource: