Canon EOS-1DSCanon extends the EOS-1D with 11.1 megapixels, and a full-frame CMOS sensor!<<Optics :(Previous) | (Next): Shutter Lag & Cycle Time Tests>> Page 6:Exposure & FlashReview First Posted: 9/24/2002 |
Exposure
Wide Range of Exposure Options
With a design mimicking the 35mm EOS-1v model and the EOS-1D before it, the EOS-1Ds offers full manual exposure control, as well as a complement of partial manual and automatic exposure modes. For example, you can choose between Program AE, Aperture Priority, Shutter Priority, Depth of Field AE, Manual, and Bulb modes. The majority of these are fairly self-explanatory, as Program AE, Aperture Priority, Shutter Priority, and Manual modes provide varying degrees of manual and automatic exposure control. While available apertures vary with the lens used, shutter speeds range from 1/8,000 to 30 seconds in all modes except Bulb, which keeps the shutter open as long as the Shutter button is depressed. (Interestingly, Bulb mode has no time limit, other than the available charge in the battery, claimed in the manual to be good for about 1.5 hours!) Canon's optional RS-80N3 remote switch and TC-80N3 Timer Remote Controller allow you to take long time exposures without having to hold your finger on the Shutter button. One interesting note is that in Program AE mode, turning the Main dial on top of the camera cycles through a range of equivalent exposure settings, allowing you to pick the best exposure with an emphasis on either aperture or shutter speed, while letting the camera determine the exposure. (This is commonly referred to as a "program shift" or "vari-program" option.)
Depth of Field AE Mode
Canon's unique Depth of Field AE (DEP) mode works well when shooting scenes with subjects that are separated from each other. (An example might be a shot with one person standing in front of another.) Quite often, you'll want to stop down the lens enough to guarantee that both of your subjects are in focus, but won't know just how small an aperture is needed. You'll also want to keep the aperture as large as possible, to reduce shutter times. Without the tedious use of a depth-of-field table, it can be difficult to accurately determine the best aperture and focus point to use. The EOS-1Ds takes the guesswork out of situations like this, with its DEP mode. In this mode, the camera calculates the maximum aperture that can be used to keep both subjects sharply focused. When DEP is selected, the 1Ds uses only a single autofocus sensor in the center of the field of view. You use this sensor to "show" the camera which two objects you want to have simultaneously focused, and the camera does the rest. You center the viewfinder on the first object (near or far, it doesn't matter) and half-press the Shutter button. The viewfinder displays "dEP 1" to indicate that it's measured the distance to the first object. You repeat the process with the second object, upon which the viewfinder shows "dEP 2." The camera computes the maximum aperture that will hold both subjects in focus, and sets the lens focal distance accordingly. Half-pressing the Shutter button will show the aperture and shutter speed the camera has selected. Fully pressing the Shutter button takes the picture. If six seconds past before the shutter is pressed, the camera forgets the DEP points, letting you set a new pair.
Noise Reduction System
The remaining exposure mode is Bulb, which simply allows you to take long exposures for unlimited periods of time, depending on the type of power source (Canon estimates a fully charged battery pack will allow for a 1.5-hour maximum exposure time, however, the AC adapter allows unlimited exposure times.) The EOS-1Ds automatically employs a noise reduction system in exposures longer than 1/15-second (this function can be turned off through the Record menu when shot-to-shot cycle time is an issue). To reduce image noise, the camera 1Ds captures a second, blank, image with the shutter closed, which is then compared against, and subtracted from, the original to remove the noise. (I was somewhat surprised to find that the noise reduction system worked even in Bulb exposure. The top LCD readout displays "busy" if you try to take another shot while it's capturing the dark frame reference image. Very slick! It's the first time I've seen a noise reduction system that works with such extremely long exposure times.) To prevent any camera movement during long exposures (from holding down or releasing the Shutter button), it's best to work with the accessory remote control and attach the camera to a tripod.
In my testing, I found the EOS-1Ds' noise reduction system very effective. It won't work miracles with a warm camera (image noise roughly doubles for every 8°C rise in temperature), but it does an excellent job of eliminating image noise under normal shooting conditions. Depending on exposure times and sensor temperature, you can still end up with a few "stuck" pixels in bulb exposures, but the level is far below what it is with the noise reduction turned off. (And for dealing with those remaining stuck pixels, I highly recommend Mike Chaney's Qimage Pro, a program with an amazing ability to remove spot noise without disturbing the underlying image.
Actually, after all this discussion of the EOS-1Ds' noise reduction system,
I have to say that the camera's unprocessed images (noise reduction turned off)
are surprisingly "clean." To be sure, there are a fair number of hot
pixels in images shot with 30 second exposure times, but the level of them is
quite a bit below what I recall seeing with the original 1D, or most CCD-based
cameras, for that matter. - I'd say that dark-current noise is one of the areas
where CMOS sensors show a decided edge over CCDs.
Metering Sensors
 To determine exposure, the EOS-1Ds uses a 21-Zone Evaluative Metering system, which divides the image area into 21 zones of different sizes, with a honeycomb pattern in the central portion of the frame. The full Evaluative Metering mode determines the exposure by assessing each of the 21 zones and evaluating contrast and brightness across all of them to determine the best exposure value for the entire frame. The 21-zone system also offers Center-Weighted and Partial metering modes. In Center-Weighted metering, the camera reads the exposure from the entire scene, but places emphasis on a large area in the center of the frame. Partial metering works along similar lines, but only places emphasis on approximately 8.5 percent of the center area.
Spot Metering Options
In addition to the Evaluative Metering options, the EOS-1Ds also offers a range of Spot metering choices. Normal Spot metering bases the exposure on a reading taken from the very center of the frame, and is usually chosen for use with high-contrast subjects. Alternatively, in some autofocus modes, you can choose to link the Spot metering area to one of 9 or 11 active AF points. When you use Custom Function menu 13 to limit the selectable AF points to either 9 or 11, the manually-selected AF point is linked to a 2.4 percent Spot Metering sensor, centered on that point. Another option is to choose the Multi-Spot metering option, which bases the exposure on as many as eight separate readings from different parts of the image. In Multi-Spot metering mode, the central spot metering sensor is activated, and a meter reading is taken every time you press the "FEL" button on the top front of the camera. As you take successive readings, the exposure readouts in the viewfinder show the current aperture and shutter speed settings the camera has computed, while the vertical exposure level indicator shows the relative light levels corresponding to each of the points you measured. This is a pretty powerful exposure option, giving the photographer great control over the final exposure. The exposure level indicator gives you a pretty good idea of how much dynamic range the shot requires, and you can choose to give more weight to a given area of the image by taking multiple readings there. Very slick, a great feature!
Exposure Lock
As you'd expect, the EOS-1Ds also offers an Exposure Lock option, which lets you lock exposure independently from the autofocus determination. You simply center the frame on the part of the subject you want to expose for, and press the AE Lock button, marked with an "*" on the camera. What's interesting though, is that this same AE Lock capability is extended to flash exposures when using Canon Speedlights. When shooting with an external flash, a Flash Exposure Lock option (the same FEL button used in the Multi-Spot metering mode) works with Spot metering to determine and lock the flash exposure. While not a multi-spot system, you can select a specific portion of the image on which to meter for flash exposure, just as you can with non-flash shots using the AE Lock button. You can also lock non-flash exposures, by pressing the AE Lock button marked with an "*" on the camera body.
Exposure Compensation
Exposure Compensation is adjustable from -3 to +3 exposure values (EV) in one-third-step increments. An Auto Exposure Bracketing option is available when you're not sure about the best exposure. Three images are captured in succession -- one at the metered exposure, one overexposed, and one underexposed. The amount of exposure variation can vary as much as +/-3 EV steps. In addition to aperture or shutter-speed based bracketing, the EOS-1Ds offers a unique ISO speed bracketing option. In this mode, the camera leaves the aperture and shutter settings at their predetermined values, and brackets the exposure by varying the ISO light sensitivity of the camera. I'm not pro shooter myself, but this feature has elicited some interest from folks like Rob Galbraith, who says that ISO bracketing just might convert him to automatic exposure bracketing.
ISO Sensitivity
The EOS-1Ds' light sensitivity is adjustable from 100 to 1,250 ISO equivalents, which is expandable to 50 to 1,250 ISO equivalents through an on-screen menu option. You can experiment with a range of ISOs, by using the ISO Auto Bracketing function to capture three images at different ISO settings. The first image is taken at the set ISO value, followed by one at the next lowest value, and one at the next highest value. For example, bracketing the ISO around the 200 value results in a series of images taken at 100, 200, and 400 ISO equivalents.
A natural question that will occur to many readers is how image noise levels
with the EOS-1Ds compare to those from the original 1D and Canon's other CMOS-based
cameras, the most recent of which is the six-megapixel EOS-D60. The results
of my testing in this area were quite interesting: See the subsequent Test
Results section of this review for the details. Basically, the 1Ds did worse
than the D60 at low ISOs, but better at higher ISOs and long exposure times.
I was also quite impressed by how fine-grained and unobtrusive the noise was.
This seems to confirm my earlier experience with CMOS sensor noise, in comparing
the noise between the EOS-1D and EOS-D30. There, the 1D tested as having lower
numerical noise values, but the D30's images seemed cleaner to my eye.
It seems that the noise from Canon's CMOS sensors has such a fine, tight grain
pattern that it is less visually obvious than noise from conventional CCD chips.
10 White Balance Modes
The EOS-1Ds offers 10 White Balance modes from which to choose, including Auto, Daylight, Shade, Overcast, Tungsten, Fluorescent, Flash, Custom, Color Temperature, and Personal White Balance. Custom is the manual white balance option, which determines the white balance setting from a previously-captured image of a gray card. This method differs from the customary use of a white card held in front of the lens. (The D30, D60, and EOS-1D also used this approach.) While slightly less convenient for on-the-fly white balance adjustment (you have to shoot the test image, then go back into the menu system to select it as the white balance reference), the advantages are actually manifold. First, you can easily store several different reference images on the camera's card, letting you quickly switch between different custom white balance settings. This can be very handy in environments where you need to quickly switch between radically different lighting environments. (Consider sports shooting, where you may want one custom setting for the stadium lights and another for the fluorescent lighting of the locker room.) Another advantage of Canon's custom white balance approach comes in scenarios where multiple photographers are covering the same event. The same set of white balance reference images can be loaded onto each shooter's CF cards, making for perfect color consistency between all the cameras and shooters. (A great help for post-event image workflow!). Here's a list of the available White Balance modes:
- Auto - (see below for information on Canon's unusual "Hybrid Auto" white balance)
- Daylight - Balanced for sunlight, approximately 5,200°K
- Shade - Balanced for open shade on sunny days, approximately 7,000°K
- Overcast - Balanced for cloudy skies or dusk, approximately 6,000°K
- Tungsten - Set up for professional tungsten studio lighting, approximately 3,200°K
- Fluorescent - "Typical" fluorescent (is there such a thing?), about 4,000°K
- Flash - Set to match EOS Speedlights, approximately 5,600°K
- Custom - The usual custom or "manual" white balance option, which bases the white balance adjustment on a shot of a white or gray reference card. The EOS-1Ds can accommodate a range of roughly 2,000°K - 10,000°K in this mode. (Wow! That's a very wide white balance range.)
- Manual Color Temperature Setting - This is an unusual mode I suspect will be very popular with photographers. You can specify the color temperature for neutral white balance in 100-degree increments from 2,800 to 10,000°K. Very nice, a feature I'm surprised isn't widespread. (Why not extend it all the way down to the 2,000°K that the Custom option can handle, though?)
- Personal White Balance Settings (as many as three) - You can use Canon's software to create up to three custom white balance settings on the computer, and then upload them to the camera. These settings will then appear as options in the 1Ds' menu system. (This strikes me as potentially very useful for news organizations or in other situations where you'd have multiple shooters working an event, and want to ensure color consistency between them.)
Hybrid Auto White Balance
Here's a feature I'd been expecting to turn up in digicams for a while now, and that first appeared on the EOS-1D -- white balance determination that's independent of subject color! Normally, digicams compute white balance by analyzing the image captured by the sensor. This is fine if the subject has no predominant coloration of its own, but fails miserably for subjects with dominant color casts. (For instance, a model wearing a red dress against a maroon background would trick the camera into thinking the scene lighting was very reddish. The result would be an inappropriate cyan correction being applied to the image, to counterbalance the red.) In the EOS-1D and 1Ds, Canon has integrated an incident illumination sensor on the front of the camera that ties into the white balance system. This gives the camera additional information about the lighting, which is unaffected by subject coloration. A great idea, kudos to Canon for implementing it!
White Balance Bracketing
White Balance Bracketing is another useful feature that Canon included in the EOS-1Ds. You can set the camera to shoot three images at the same exposure level, varying the White Balance setting between shots by up to +/- 3 steps, each step being equivalent to 5 Mireds (Micro-reciprocal degrees). Mireds are a bit of an arcane measurement, but represent the units most directly applicable to the mathematics of color adjustment, their main benefit being that they're additive. A filter that shifts 3200°K light by 100°K will produce a much different shift (measured in degrees Kelvin) with 7000°K light, hence the use of mireds to describe the shift, rather than degrees Kelvin. (For example, 5 mireds at 3200°K is a shift of only 52°K, while 5 mireds at 7000°K is a shift of about 257°K.) This is all a little convoluted for the uninitiated, but pro photographers are accustomed to working with mireds in calculating filter factors, and professional color meters generally offer a mired scale for calculating filter corrections.)
White Balance in Degrees Kelvin
I also liked Canon's provision of a Color Temperature white balance option, which allows the user to select the desired color temperature in 100-degree increments from 2,800°K to 10,000°K. I'd actually like to see the lower end of this range extend a little further, since household and commercial incandescent lighting tends to be more in the range of 2,300°K to 2,800°K. Still, the Color Temperature white balance is very handy, particularly if the shooter has access to a color temperature meter.
"Personal" White Balance Settings for Rapid-fire Custom Changes
Finally, the Personal White Balance feature allows you to create as many as three different white balance settings on a computer and load them into the EOS-1D for quick use. This strikes me as another great option for pros who have to shoot under highly variable lighting, or for groups of pros needing consistency between their setups. Not quite as flexible as the Custom option, because the Personal settings must be downloaded to the camera from a host computer, but arguably more powerful, not to mention having the advantage of allowing you to switch between three distinct custom settings very quickly.
"Color Matrix" options
We're (finally) starting to see a move away from the tyranny of the sRGB color space. sRGB produces bright, saturated color on computer monitors, but has a woefully restricted color gamut. Bottom line, sRGB is fine for consumer-level devices, but is really unsuited for color-critical professional applications. Nikon took a step away from sRGB in its D1x and D1h models, by providing support for the so-called Adobe RGB color space in addition to the default sRGB. With the EOS-1D and now the EOS-1Ds, Canon goes a step further, offering no fewer than five color-space options through the Record menu. Canon calls these "Color Matrix" settings, and they offer an interesting range of possibilities. The table below lists their attributes.
|
|
|
| Color Matrix 1 | Default color matrix. Normal saturation, sRGB color space. |
| Color Matrix 2 | sRGB color space, but hue and chroma optimized for reproduction of skin tones. (A little warmer, more saturated in the reds and pinks.) |
| Color Matrix 3 | sRGB color space, extra saturation. Intended to reproduce the characteristics of high-chroma slide film. |
| Color Matrix 4 | Adobe RGB color space, normal hue and chroma within that space. Much wider color gamut than sRGB, which means images will look dull on sRGB monitors. Excellent for use in color-managed workflows, particularly ones going to print as final output. |
| Color Matrix 5 | Mysterious low-saturation color space. Apparently sRGB-based, but color saturation is lower than normal. |
For the pros likely to buy this camera, I call particular attention to Color Matrix settings 4 and 5. Setting 4 is matched to Adobe RGB, although Canon's documentation is careful to point out that the files created in this mode do not contain any ICC tag information identifying the color space as such. This means that you'll have to explicitly set the color space in your color management software to achieve accurate results. Color Matrix setting 5 is a little mysterious, as there are some indications Canon intended it to be a special wide-gamut color space, but now treats it simply as a low-saturation sRGB.
Tonality and Custom Tonal Curves
Canon recognizes that different pros may prefer different tone curves, and has thoughtfully provided a means to implement custom curves via the host computer. Canon's included File Viewer Utility (which really does much more than just display the contents of image files) lets you create a custom tonal curve and then download it into the computer. This tonal curve then becomes available via the "Parameters" option in the LCD record menu.
While I really like the ability to custom edit the EOS-1Ds' tonal curves, I unfortunately can't say the same for the software interface Canon provides to perform the task. This was one of my biggest complaints about the EOS-1D, and there don't seem to be any substantive changes in how the application provided with the 1Ds behaves in this regard. It's one of the most unfriendly applications I've encountered in recent memory -- not so much because it's particularly difficult to understand, but because it provides essentially no feedback on the effects of the adjustments you're making, or for that matter, on the correspondence between the tonal curve controls and what part of the visible tonal range they affect.
The screenshots below show the tone-curve editing window and a preview image of my horribly contrasty "outdoor portrait" test shot. (Before I get taken to task yet again for how horrid the lighting is on this image, please note that the awful lighting is deliberate, intended to be a stress-test of how well cameras handle extreme contrast and harsh highlights. Of course you'd never set up a serious shot like this, but I wanted a test subject that would stretch the limits of the cameras I tested. This lighting certainly does that.) These screenshots were taken using the software that was included with the EOS-1D. The behavior I describe below is the same, but there has been an important cosmetic change made: The tone curve is now plotted using a semilog coordinate system, so it now resembles the "DlogE" curve most film-savvy photographers will be familiar with.
NOTE that in the following, the "default" exposure and tone curve examples were taken from an early prototype EOS-1D, not any final product. The point here is to simply show how the tone-curve editing feature works, and what it's results are, so please regard the photos as illustrative examples only, and NOT representative of the production cameras' actual performance!
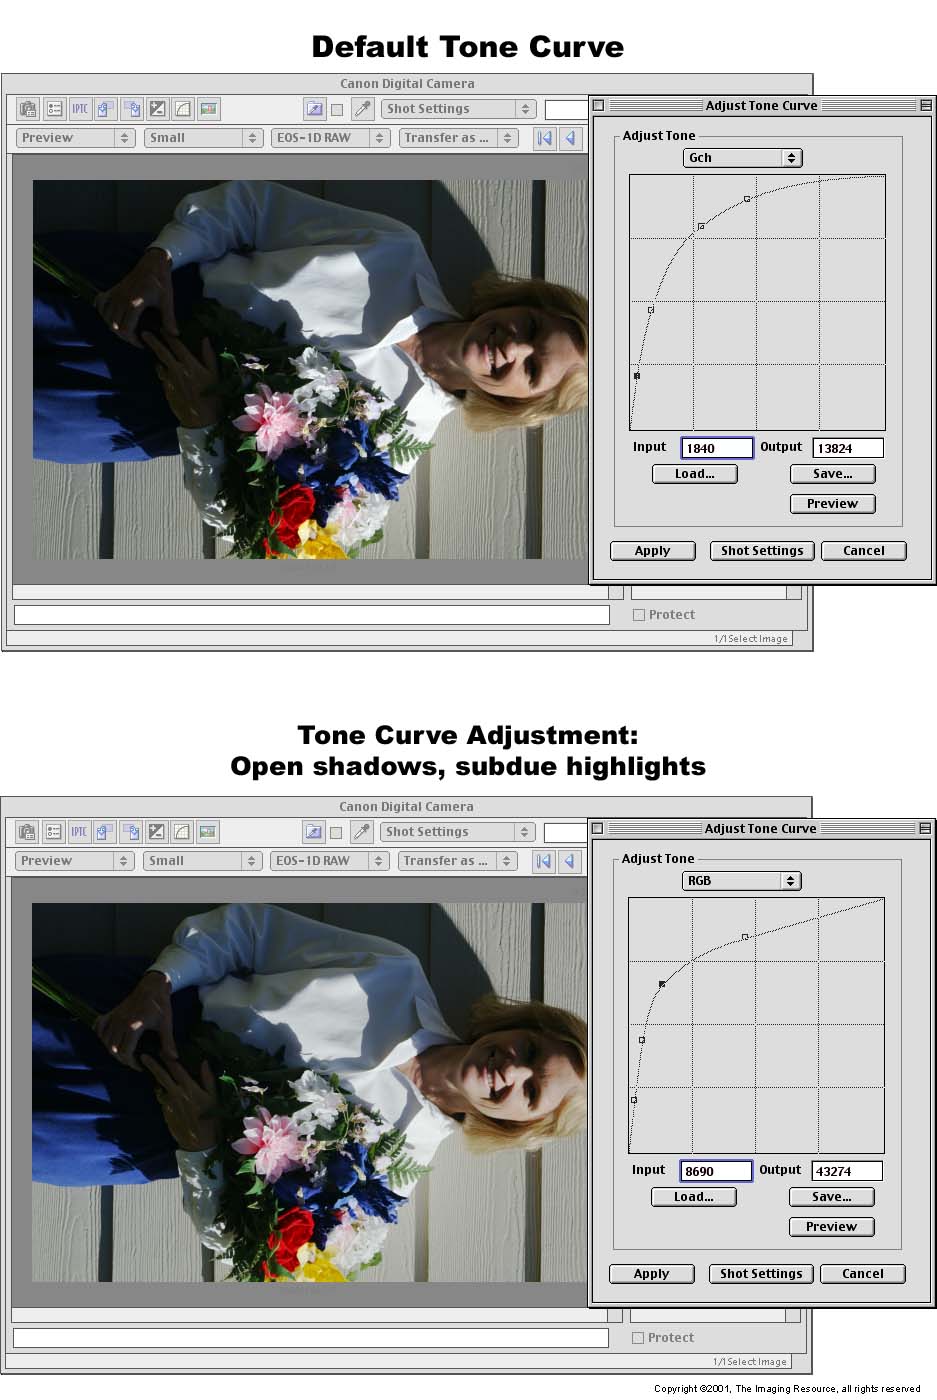 The top shot in the table at right shows a default exposure and tonal curve from a prototype camera, while the bottom one shows a considerably modified tonal curve, and the preview image resulting from it. (Click on the images to see them 1:1 at their original size.) I can't say I'm completely happy with the result, but that's a reflection of my limited skills, lack of time, and how time-consuming the tool is to use, much more so than any lack of power in the tool itself. This is all really straightforward, but as usual, the devil is in the details. First of all, the preview images aren't generated in real-time, but rather they take a good 15 seconds or so (on a 500 MHz G4 PowerMac) to be generated when you request them. By the time you wait for the preview to appear and make a few adjustments to the curve, it can easily take 30 seconds for iteration of the curve. Worse, you have only a vague idea of what part of the image's tonal curve you're actually affecting when you're making adjustments. The cosmetic change I mentioned above that changes the display at right into a more conventional-looking S-curve helps a great deal, but the correlation between the tone curve and any given part of the image is only approximate at best. I suggested in my 1D review that Canon add an eyedropper control to the tonal curve function, so you could click on a portion of the image and see where that particular point fell along the curve,. This would let you quickly see what you needed to adjust and by about how much. As it is, you end up "flying blind," reduced to guessing and then waiting for the preview image to find out whether or not you guessed right. I didn't find such eyedropper control in this year's iteration of the software, and it still needs it every bit as badly as it did a year ago. (Soft applause for the semilog coordinates though, which at least produce a familiar-looking S-curve.)
Once you have a tonal curve you like, you can apply it to the image as you convert it to a JPEG, save it to disk to apply to other images, or (this is the cool part) download it to the camera, where it can be applied as part of the custom parameter sets. (Note though, that all three sets of custom parameters share the same tonal curve. The camera has room for only two tonal curves, its default and one custom one.) It's entirely possible that more experience twiddling with the curves would leave you more comfortable about what to move and by how much, but it looks to us like this would take a long time to achieve. Bottom line, I'm happy to see the custom tone curve capability included in the EOS-1Ds, but suggest that you allow a lot of time for playing with it! (A long weekend wouldn't be too much.)
 Flash
Flash
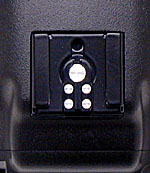
Though the EOS-1Ds doesn't feature an onboard flash, the camera does have an external flash hot-shoe as well as an external PC socket for connecting a strobe. The hot-shoe accommodates all Canon EX series speedlights, as well as a variety of third-party flash units. A Flash Exposure Lock button lets users lock the flash exposure in advance of the shot, and a Flash Exposure Compensation option adjusts the overall flash power from -3 to +3 EV in one-third-step increments (only for Canon EX series speedlights). Automatic flash exposure bracketing is also available. A High Speed Sync option synchronizes the flash with all shutter speeds available on the EOS-1Ds, from 1/8,000 to 30 seconds. When using a Canon EX flash unit, you can also sync up wireless slave units for greater coverage, with no connecting wires, special codes, or anything. Full TTL flash metering is available even with multi-flash wireless setups. (Canon's series of dedicated Speedlights has a remarkable range of capabilities, really deserving of a review of their own, rather than the very brief treatment I'm giving them here. Unfortunately, I really don't have the time or space to go into all their functions, and the details of how they integrate with the EOS-1Ds.)
Continuous Shooting
The EOS-1Ds has a Continuous Shooting mode, activated through the camera's Drive setting. The maximum frame rate is three frames per second, with a maximum continuous burst of 10 images per series. The maximum number of images depends on the amount of available memory card space. Additionally, the number of images that the camera can capture in a series appears in the lower right corner of the viewfinder. (Continuous drive mode is one of the areas where the differences between the 1D and 1Ds are most apparent. The huge amount of data associated with each of the 1Ds' images mean that its frame rate is only 3 fps, vs the 1D's incredible 8 fps. The 1Ds' buffer memory also holds only 10 frames, to the 1D's 21. It's actually surprising that Canon managed to maintain the frame rates and buffer depth they did with the 1Ds though, given that it's dealing with nearly 3x the data of the original 1D.)
Self-Timer Modes
The EOS-1Ds offers two Self-Timer modes, 10-Second and Two-Second. Both modes are accessed through the Drive button on top of the camera, the same button that activates the Continuous Shooting mode.
Reader Comments! --> Visit our discussion forum for the Canon EOS-1DS!

Follow Imaging Resource: