 Back
to Full Canon EOS-1Ds Mark II Review
Back
to Full Canon EOS-1Ds Mark II ReviewGo to Canon EOS-1Ds Mark II Data Sheet
Go to Canon EOS-1Ds Mark II Pictures Page
Up to Imaging Resource Cameras Page
Use your browser's "Back" button to return to the previous page, or the links at the top and bottom of this page to navigate to related information. If you have difficulty fitting the text on this page onto your printer output, simply resize your browser window to a narrower width and print again.
Remember us when it's time to buy!
Dave here: Have our reviews been helpful to you? (Is this article you're reading right now useful?) Preparing this level of information on as many products as we do is incredibly hard work, not to mention expensive. Things on the Internet may look like they're free, but they're not. (As a lot of big dot.com companies are finding out these days.) Somewhere, somebody has to pay to produce worthwhile content. YOU can help us though, by remembering us when it comes time to make your purchase. Would you consider coming back to our site and clicking-through to one of our advertisers to make your purchase? Every dollar you spend with one of our advertisers helps us directly (in affiliate fees) or indirectly (the advertiser will keep renewing their ad contract with us). To make it easy for you to support us, here's a URL you can visit, to see all our current advertisers, with links to click on that will register your visit to them as having come from our site. It's up to you where you buy, but Mike, Mike, Kim, Yazmin, Marti and I would be really grateful if you'd help us out by choosing one of our advertisers to purchase from.
Thank you for your support!
Dave Etchells, Founder & Publisher
Visit our "Buy Now" Page:
https://www.imaging-resource.com/buynow.htm
Back
to Full Canon EOS-1Ds Mark II Review
Go to Canon EOS-1Ds Mark II
Data Sheet
Go to Canon EOS-1Ds Mark II
Pictures Page
Up to Imaging Resource Cameras
Page
Canon EOS-1Ds Mark IICanon upgrades their "ultimate" d-SLR with 16.7 megapixels of resolution and significant performance improvements. Review First Posted: 9/26/2005 |
|
Comparison, Canon EOS-1Ds Mark II vs EOS-1Ds
Since many of our readers will already be familiar with the earlier Canon EOS-1Ds, we've prepared the following table showing differences between the two models:
| Canon EOS-1D Mark II vs EOS 1-D | ||
| Camera | EOS-1Ds Mark II | EOS-1Ds |
| Sensor Type | 35.8 x 23.8 mm CMOS w/ RGBG filter | 36 x 24 mm CMOS w/ RGBG filter |
| Sensor Improvements | Larger microlenses, size of gaps between microlenses reduced by 50%. Greater area of each pixel on the sensor sensitive to light, due to elimination of transistors in each pixel. Canon claims higher sensitivity, higher dynamic range | - |
| Sensor Resolution (total) | 17.2 megapixels | 11.4 megapixels |
| Sensor Resolution (effective) | 16.7 megapixels | 11.1 megapixels |
| Image Sizes | 4,992 x 3,328 3,600 x 2, 400 3,072 x 2,048 2,496 x 1,664 |
4064 x 2704 2032 x 1352 |
| File Formats | Four JPEG sizes, 10 possible levels of compression, plus CR2 RAW format. (CR2 format allows more room for metadata, much of which is supported by Photoshop CS and CS2.) |
Two JPEG quality settings (adjustable via host software), Original CRW RAW format |
| Image Storage | Compact Flash and Secure Digital cards supported.
Can write to either card separately, or both cards simultaneously (redundant backup) or sequentially ("reserve tank"). Opening card compartment halts writing, but does not erase written data. Writing resumes when cover is closed again. |
Compact Flash only |
| FAT 32 file system support | Yes | No |
| IPTC data support | RAW and JPEG files | RAW files only |
| RAW File Format | .CR2 (Canon RAW, Second Edition) | .CRW (Canon RAW) |
| Compliance | EXIF 2.21 (Adds Adobe RGB support to EXIF 2 spec.) | DCF (EXIF 1?) |
| ISO Sensitivity | ISO 100 - 1600 (extendable to 50 to 3200 via menu option) |
ISO 100 - 1250 (extendable to ISO 50 via menu option) |
| Image Noise | High sensitivity CMOS sensor and new second-generation on-chip 3-stage noise reduction circuit. CMOS sensor consumes less power, so less temperature rise and noise in longer exposures. Digital control circuit board completely separated from analog circuitry. Flex circuit wiring reconfigured to shorten analog signal paths. Noise is lower at all ISO ratings, especially above ISO 400. | - |
| Noise Reduction | New noise reduction uses CMOS technology to eliminate the need for a dark-frame noise reference, greatly speeding shot to shot times for long exposures and bulb exposures. Power to the output amp and circuit-driving standard current is cut off during long exposures to reduce noise. | Dark-frame subtraction required dark frame to be captured after every "live" shot. |
| White Balance Sensing |
CMOS image sensor only (New white balance algorithm eliminates need for external sensor) |
External light sensor plus CCD image sensor |
| White Balance and Color Rendering | Auto white balance now more precise and accurate in low color temperatures (eg, tungsten light sources). False colors and noise in low light have been reduced.
White balance compensation function added, permits up to 9 levels of adjustment for each color. Blue/amber and magenta/green bias adjustments can be set simultaneously. Overall white balance range (including the effect of the WB compensation function) now extends as low as 2000K, vs 2800K in the 1Ds. White balance bracketing now done in a single shot (3 bracketed files from one exposure). Color reproduction of high-saturation, bright subjects improved. |
- |
| Color Matrix | 4 sRGB, Adobe RGB, 2 user-set
User-set color matrices can be set to sRGB or Adobe, any of 5 saturation levels, or 5 color tone levels Menu now states what each color matrix setting is (standard, portrait, etc), rather than just displaying a number. |
4 sRGB, Adobe RGB |
| Contrast Control | Tone curve, plus 5-level contrast adjustment | Tone curve |
| Sharpness Control | Level | Level, radius |
| Orientation Sensor | Yes | No |
| Shutter Durability | 200,000 cycles | 150,000 cycles |
| Shutter Speed | 1/8,000 to 30 sec, bulb | 1/8,000 to 30 sec, bulb |
| X-sync Speed | 1/250 sec. (FP sync at all shutter speeds) |
1/250 sec. (FP sync at all shutter speeds) |
| Burst Speed | 3.93 frames per second (By actual measurement) |
3.0 frames per second (By actual measurement) |
| Burst Depth (Large / Fine JPEG) | 16-17 frames | 10 frames |
| Burst Depth (RAW) | 11 frames | 10 frames |
| Start-up Time (approx.) | 0.3 seconds | 1.3 seconds |
| Shutter Lag (approx.) | 57 milliseconds (By measurment, manual focus mode) (40 msec with Personal Function 26, not tested) |
83 milliseconds (Measured) |
| Autofocus Improvements | Autofocus function now divided between two 32-bit RISC microprocessors. Twice as many focus operations per unit time than the (already very fast) EOS-1Ds.
AI Servo AF/Predictive AF uses statistical information from previous focusing operations to enhance speed and improve precision. Faster predictive AF means AF more likely to catch subject movement just prior to the shutter release. Bottom line, one-shot AF speed is higher for Mark II, and AI Servo AF precision is higher. |
(Single processor for AF operations.) |
| Shooting Modes | P, M, Tv, Av (DEP mode dropped) |
P, M, Tv, Av, DEP (Depth of field priority) |
| Flash Metering | E-TTL II | E-TTL |
| Flash Metering Improvements | Ambient light measurement before pre-flash and distance information from lens helps to identify and ignore highly reflective or specular objects, avoiding underexposure.
Flash autoexposure no longer dependent on active AF point. Compares ambient and flash exposures at 17 central metering zones, uses match between ambient and flash to exclude reflective and non-subject objects. Distance information from EF lenses also incorporated into flash exposure determination. |
N/A |
| Image Processor | DIGIC II | DIGIC |
| Image Processor Improvements | Generally much faster image processing.
CompactFlash maximum write speed now 5.0 MB/sec. |
Data read from sensor two channels at a time.
CF max write speed 3.2 MB/sec. |
| Control and Layout Improvements | Color Matrix settings now labeled with description vs just a number.
White balance color temperatures now entered directly via WB button and the main dial, vs in a menu window. JPEG, RAW, and RAW+JPEG formats all selectable via a single control. (No need for menu entry.) ISO speed extension moved to main menu from Custom Function menu. Enlarge button added to control playback magnification. Erase button moved to bottom row with Quality and White Balance buttons. Erase button now has small raised point in center to distinguish from other buttons. Camera settings can now be saved to a memory card, allowing settings to be copied to multiple cameras used for covering a large event, or preserved when the camera is sent in for service. |
- |
| Custom/Personal Functions | 21 custom functions. New or changed functions are: C. Fn-03, ISO expansion has been dropped. (ISO 50 ("L") and 3200 ("H") are always available) C. Fn-06, Exposure level increments, has been modified slightly, to give separate options for exposure settings and compensation adjustments. C.Fn-14 E-TTL II - was formerly "Auto reduction of daylight sync. C. Fn-21, Drive speed priority AI Servo, is newly added., Exposure level increments, has been changed to 0: 1/3 stop and 1: 1/2 stop. (Moved from Personal Function menu.) P.Fn-26 added, Shortened release time lag P.Fn-30 added, Quick Control switch turns off main dial too. P.Fn-31 added, Add original decision data. |
21 custom functions |
| Connectivity | IEEE 1394 (FireWire), 4-pin connector USB v2.0 (For both image download and printing, with PictBridge support) |
IEEE 1394 (FireWire), 6-pin connector |
| Direct Printing | Supports PictBridge via USB v2.0 | N/A |
| LCD Display | 2.0", 230,000 pixels
White LED backlight |
2.0", 120,000 pixels
Fluorescent backlight |
| Playback Enhancements | Zoom option on playback, up to 10x in 15 steps. Scroll around magnified image, view next image while retaining magnification and location settings(!).
RGB histogram facilitates checking color-related information that the LCD can't show. |
- |
| Orientation Sensor | Yes | No |
| Video Out | Yes, NTSC or PAL timing, user-selectable | No |
| Audio Recording | Yes | No |
| Size | 6.1 x 6.2 x 3.1 in (156 x 157.6 x 79.9 mm) |
6.1 x 6.2 x 3.1 in (156 x 157.6 x 79.9 mm) |
| Weight | 42.9 oz. (1215 g) body only | 44.6 oz. (1265 g) body only |
Executive Overview
For professional Canon shooters accustomed to working with Canon's top-of -the-line EOS-1v film SLR, or even the EOS-1D or 1Ds digital SLRs, the Canon EOS-1Ds Mark II will be immediately familiar, with a body design and control layout that is virtually identical to its predecessors. The 1Ds Mark II is practically a twin to the preceding 1D Mark II, but with a noticeably higher sensor resolution of 1.67 megapixels. Canon has maintained a very uniform user interface throughout their "1" series of top-of-the-line cameras, and the EOS-1Ds Mark II holds true to form. EOS-1v, 1D, and 1Ds shooters should have little difficulty switching among the cameras, and Mark II users will enjoy its larger CMOS sensor and enhanced image playback functions. The 1Ds Mark II does not have the Depth of Field AE shooting mode that I found so useful on the earlier 1D model, but the Canon 1Ds Mark II sports both a Video Out and a USB port (the latter usable either for direct printing to a range of Canon printers or connecting to a computer), and accepts both SD/MMC and CompactFlash (Type I and II) memory cards.
The Canon EOS-1Ds Mark II's lens mount accommodates the full line of Canon EF lenses (but not the new EF-S lenses, with their shorter lens/focal plane distance and smaller image circles), employing the same highly-praised 45-point Area Ellipse autofocus system used throughout the EOS-1 line. This sophisticated system allows you to manually select a specific autofocus area from within a 45-point elliptical area, or you can set the camera to determine focus area based on the subject. You can also opt for One-Shot focusing or select the AI Servo AF, which tracks rapidly moving subjects. The TTL optical viewfinder uses a pentaprism design to display the full view of the lens, along with an information readout that reports all of the most important exposure information, including aperture, shutter speed, resolution, and exposure compensation.
The 2.0-inch, TFT color LCD monitor provides both image playback and on-screen menu viewing, and has a brightness adjustment for bright or dark viewing situations. An image information display reports in-depth exposure information, and includes a histogram showing the tonal distribution throughout the image. Additionally, a highlight feature "blinks" any blown-out highlights in the captured image. This is a feature that I've found exceptionally useful on past Canon digicam models. An RGB Histogram mode also shows three individual histograms for Red, Green, and Blue.
The Canon EOS-1Ds Mark II offers total exposure control, with Program AE, Aperture Priority, Shutter Priority, Manual, and Bulb exposure modes available. In Program AE, you can select from a range of equivalent exposure settings simply by turning the Main dial on top of the camera. Aperture and Shutter Priority modes offer limited manual control, while the Manual mode gives total control of aperture and shutter time to the photographer. Bulb mode simply extends the Manual mode to include unlimited shutter times. Here, you can keep the shutter open for as long as the camera has power. (Quite unusual, as most digital cameras set a fixed limit on maximum bulb exposure times.) A Noise Reduction menu option engages Canon's very effective Noise Reduction technology for any exposures longer than 1/15 second.
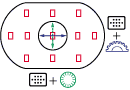
The Canon EOS-1Ds Mark II employs a 21-Zone Evaluative Metering system, which divides the image area into 21 zones of different sizes, with a honeycomb pattern in the central portion of the frame. Each of the 21 zones is assessed to determine exposure, using an algorithm that takes contrast and tonal distribution into account, going much further than does simple averaged metering. Other metering options include Center-Weighted, Partial, Spot, Multi-Spot, Spot AF, and Flash Exposure Lock. Exposure compensation is adjustable from -3 to +3 exposure values (EV) in one-third-step increments. If you're unsure about the exposure, an Auto Exposure Bracketing feature captures three shots at different exposures. The Mark II also offers White Balance and ISO Auto Exposure Bracketing options. (This last option should be particularly interesting for pros, who may want to bracket without disturbing the aperture or shutter speed settings.)
Ten white balance modes are provided, including Auto, Daylight, Shade, Overcast, Tungsten, Fluorescent, Flash, Custom (manual setting), Color Temperature, and Personal White Balance. Color Temperature covers a range of color temperatures from 2,800°K to 10,000°K, in 100-degree increments, and Personal White Balance allows you to download as many as three white balance settings from a host computer. The Canon 1Ds Mark II's extensive menu system offers a variety of Color Matrix options, for both sRGB and Adobe RGB color spaces, and a Custom Functions menu lets you extensively customize the user interface. A Personal Functions menu option also allows you to download image attribute settings (including a custom tone curve) from a computer.
An external flash hot-shoe and PC sync socket offer two external flash connection options, but the camera has no built-in strobe. Canon recommends using its EX series of flash units, though some third-party units are compatible as well. The Flash Exposure Lock button locks the exposure for the flash, and a Flash Exposure Compensation button alters the flash exposure from -3 to +3 EV in one-third-step increments. You can also alter the ambient exposure compensation without altering the flash intensity.
The Mark II offers only a single-speed Continuous shooting mode through the Drive setting, which captures a maximum of four frames per second. (The actual frame rate and number of frames in a sequence will vary depending on memory card space, image size, and the amount of image information to record.) The Drive options also include two different Self-Timer options, with delay times adjustable via the LCD menu system.
The Canon EOS-1Ds Mark II captures images at either 4,992 x 3,328; 3,600 x 2,400; 3,072 x 2,048; or 2,496 x 1,664 pixels, with JPEG compression levels from one to 10 available. A RAW image option is also available, recording the full pixel information from the CCD without any processing, and a RAW+JPEG option lets you record any size JPEG as well as a RAW file for each shot. The Mark II is accompanied by an IEEE-1394 "FireWire" interface cable for a super-speedy connection to a computer, as well as a USB cable for connecting to a range of Canon printers, as well as to host computers. Canon's Solution Disk software and a copy of Canon's new Digital Photo Professional program are included with the camera, for use on both PC and Macintosh computers. A Video Out jack and cable connect the camera to a television set for reviewing images. For power, the Mark II uses an NP-E3 rechargeable NiMH battery pack or an AC adapter (both accompany the camera). A CR2025 lithium coin cell serves as backup for the camera's calendar and clock settings.
I was very impressed with the original EOS-1Ds, due to its similarities to the 35mm 1v model, the exceptional amount of photographic control it offered, and its exceptional (at the time) resolution. This latest EOS addition, the Canon 1Ds Mark II, further ups the ante, with its very large 16.7-megapixel CMOS sensor and wide range of other improvements. The sturdy camera body can handle extensive shooting, with well-sealed openings to prevent intrusion from dust and water. Its user interface is customizable and straightforward (once you get the hang of it), and its extensive controls are enough to make any pro photographer happy. Designed for professionals who want the convenience of digital imaging and uncompromising image quality, combined with the look, feel, and interface of Canon's already successful pro 35mm line, the Mark II appears ideally suited for professional sports and photojournalistic shooters.
Design
 The Canon EOS-1Ds Mark II has just about all of the excellent features of the original EOS-1Ds and the preceding EOS-1D Mark II, including dust and water sealing around all moving parts exposed to the outside (one must use an L glass lens with a rubber seal to get weather sealing around the lens opening, however), but ups the ante with an impressive 16.7-megapixel CMOS sensor. Weighing in at a hefty 55.13 ounces (1,563 grams) with the battery and memory card installed (but no lens attached), the Canon EOS-1Ds Mark II is more than a handful. Its magnesium-alloy body is exceptionally tough and durable, ready for heavy use. Like the rest of the 1D line, size and portability weren't top design considerations, as the camera is clearly intended for the serious photographer. Instead, Canon opted for maximum speed, ruggedness, and compatibility with the EOS-1v film camera and previous 1D and 1Ds models. The EOS-1Ds Mark II measures a whopping (by consumer digicam standards) 6.1 x 6.2 x 3.1 inches (156 x 157.6 x 79.9mm ), and definitely requires a two-handed grip.
The front of the Canon EOS-1Ds Mark II is simple in design, featuring just the lens mount and a few controls. A small release button on the left side of the lens (when holding the camera from the rear) releases the lens from its mount, allowing you to remove it completely with a turn to the right. The large, bulky hand grip is big enough to provide a secure hold on the camera, even with a lens attached. A smaller ridge runs along the bottom, serving as the vertical handgrip and battery compartment, with a secondary Shutter button and Command dial, for use when holding the camera vertically. Also visible from the front of the camera is the main Shutter button, mounted at a sloping angle from the top panel, as well as the front of the battery compartment. Almost hidden between the lens mount and hand grip is the self-timer lamp, behind a dark window. Finally, the Depth of Field Preview button can be seen on the right side of the lens mount (on the left in the image above).
On the right side of the camera (as viewed from behind) is an On/Off switch that activates the secondary camera controls; the secondary Flash Exposure Lock button; the secondary Main Dial; and the secondary Shutter button. Also on this side of the camera is one of the hefty neck strap attachment eyelets.
Lining the opposite side of the camera are the Flash PC socket, Remote Control, Video Out, and Digital input jacks (USB and IEEE-1394 Firewire), each covered by a flexible synthetic rubber flap that swings around out of the way for easier access. At the bottom are the battery compartment and its release controls -- a rotating lock and a release button, both of which must be activated to open the compartment door. Though I found this system a little difficult to operate at times, it does ensure that the battery stays in place, and won't accidentally end up on the ground.
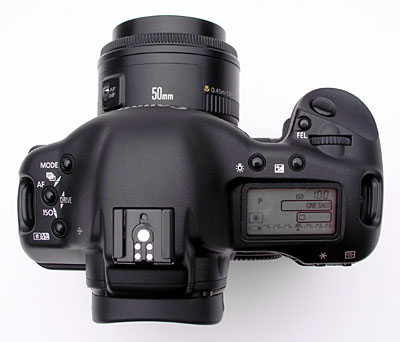
The Canon EOS-1Ds Mark II's top panel holds several camera controls, including the Mode, AF, Drive, ISO, Metering/Flash Exposure Compensation, LCD Illumination, Exposure Compensation, Flash Exposure Lock, and Shutter buttons. The small Command Dial located just behind the Shutter button, is used to adjust camera settings. (The Command Dial is used by itself to set aperture and shutter speed in some modes, or works with many of the plethora other buttons to engage the actual setting changes.) The external flash hot shoe crowns the camera's top panel, and a small, black-and-white LCD monitor reports camera information such as battery power, exposure mode, aperture, shutter speed, and exposure compensation, among others.
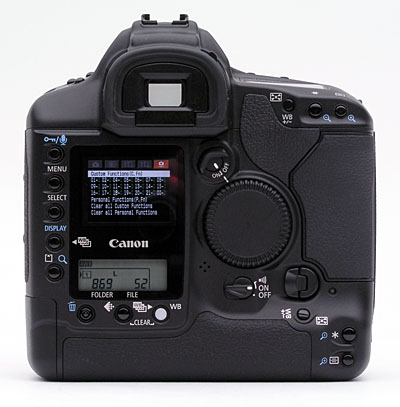
The remaining camera controls are located on the back panel, along with the LCD monitor and optical viewfinder eyepiece. A diopter adjustment dial and the optical viewfinder eyepiece shutter lever flank the eyepiece on either side. A removable soft rubber eyecup (included in the box with the Mark II) can be attached to improve viewing in strong ambient lighting. In the center of the back panel is the large Quick Control dial, which also selects camera settings when turned on (a small switch above the dial turns it on or off). While it does work in conjunction with some of the camera's buttons, the Quick Control dial primarily serves as part of the user interface for the LCD menu system. Camera controls on the back panel include the Assist, AE Lock, AF Point Selection, Sound/Protect, Menu, Select, Display, Memory Card/Magnify, Erase, Image Size Selection, and White Balance buttons. In the lower right corner are the secondary Assist, AE Lock, and AF Point Selection buttons, for use when holding the camera vertically. The 2.0-inch LCD monitor displays image playback and menu screens, and a secondary, black-and-white LCD data readout just below it reports more camera information. Also on the back panel is the dual memory card slot whose door is released by turning the small release key just below it. The black and white LCD data display on the camera's rear panel shows a variety of current shooting settings, including image size and quality and white balance.
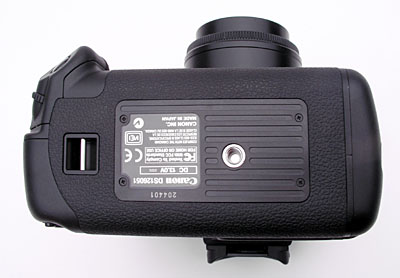
The bottom panel of the Canon EOS-1Ds Mark II holds only a tripod socket and a secondary neck strap attachment eyelet (presumably for attaching the neck strap for vertical shooting). The tripod mount is directly below the centerline of the lens, designed to reduce parallax errors between shots when panning.
Viewfinder
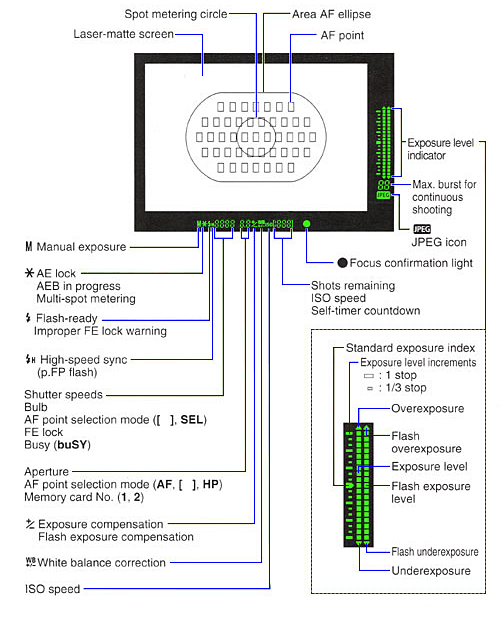
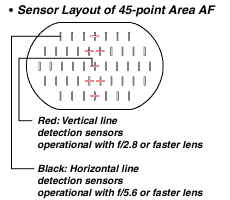
 A TTL (Through The Lens) optical viewfinder is the sole mechanism for composing images on the Canon EOS-1Ds Mark II, as the 2.0-inch LCD monitor is purely for image review and menu navigation. (This is typical of most SLRs, because by nature the light path is either through the eyepiece or onto the CCD, with no provision for a "live" LCD viewfinder display.) Fortunately, the optical viewfinder on the Mark II offers a true 100 percent field of view, a relative rarity, even among high-end SLRs. The optical viewfinder has a glass pentaprism design, using a mirror to reflect the view from the lens, just as in a traditional SLR viewfinder design. A full information overlay along the bottom and right of the viewfinder window reports the current exposure settings, including shutter speed, aperture, exposure compensation, and ISO, among other information. A circular black outline at the center of the viewfinder window indicates the central spot-metering area, (although as I'll explain later, the Mark II is capable of spot metering at a number of locations within the field of view). A large, black elliptical outline marks the boundaries of the autofocus area. A total of 45 discrete autofocus sensors are distributed within this ellipse, and may be used singly or in combination as I'll describe later, in the "Optics" section of this review. Active AF points are normally invisible, illuminating red when the Shutter button is half-pressed and focus is achieved at one or more of the points.
The amount of information conveyed by the 1Ds Mark II's viewfinder readout is quite impressive, all the more so because the display is actually quite uncluttered and easy to understand. The illustration below (courtesy Canon USA) shows all the internal viewfinder displays and their functions. (Readers familiar with the EOS-1v film SLR or the previous EOS-1Ds will immediately recognize this display as being the same one used on those cameras.)
On the left side of the viewfinder eyepiece is a diopter adjustment dial, which corrects the viewfinder display from -3.0 to +1.0 diopter units to accommodate eyeglass wearers. The viewfinder has a moderately high eye point, meaning that the view should be reasonably clear, even with fairly thick eyeglasses. (In addition to the rather wide range of diopter adjustments available on-camera, Canon also offers dioptric correction lenses for the viewfinder ranging from -4 to +3 diopters in 10 steps. These clip on externally, and act in addition to the built-in diopter adjustment, for a total range of -7 to +4 diopters. If you can see well enough to pick up the camera, you should be able to see through the viewfinder!) Nine interchangeable focusing screens are available for the 1Ds Mark II. On the right side of the viewfinder eyepiece is a small lever that opens and closes a shutter behind the eyepiece. This prevents any additional light from filtering into the camera through the viewfinder eyepiece during long exposures on a tripod. The 1Ds Mark II also features a removable eyecup that fits over the viewfinder eyepiece, handy for high ambient light environments.
 The 2.0-inch, TFT color LCD monitor is used only for image playback and menu viewing, and is made up of approximately 230,000 pixels. A brightness control offers five brightness levels, helpful for improving viewing in excessively dark or bright conditions. Images can be displayed with or without the relevant image information, and the 1Ds Mark II offers four- or nine-image index display modes. A very useful feature is the optional Highlight Alert, which flashes overexposed sections of the image gray/white during playback. An optional histogram display is also available, which is handy for assessing overall exposure, though I've personally found the blinking highlight display much more useful for showing where I've blown out highlights. (The problem with a histogram display is that blown highlights usually represent only a small percentage of overall image area, meaning it's hard to pick them up on the histogram readout. A blinking area on the LCD playback display is pretty hard to miss.)
 The RGB Histogram also displays individual histograms, stacked one atop the other, one for each color channel.
 A zoomed playback, via the Magnify and Reduce buttons on the camera's rear panel, is handy for checking fine framing details, or even for checking focus and depth of field. The 1Ds Mark II offers magnification from 1.5x to 10x. The 10x magnification level in particular is very useful for checking focus and depth of field.
Active Mirror Technology
The Canon 1Ds Mark II employs the "Active Mirror Control" technology that also appeared on the earlier members of the 1D line as well. It turns out that in normal situations, even the bounce of the mirror as it settles back into position after each shot would prevent frame rates this high. To overcome this, Canon developed "Active Mirror" technology for the EOS-1v model, which uses active drive electronics to damp out mirror vibrations in half the time that would be required otherwise. The sheer shot-to-shot speed of Active Mirror technology is only part of the equation though -- because the mirror moves so fast, the viewfinder blackout time between exposures is reduced to only 45 milliseconds. The viewfinder remains very usable, even when the shutter is clattering away at the maximum frame rate. Quite impressive, especially when you consider that the mirror is really a two piece design, with a big half-mirror that allows light through for the smaller sub-mirror behind it that reflects light down to the AF sensors below.
Sensor, Noise Reduction, and Optics
Sensor
| Free Photo Lessons | |
|
Image noise reduction
One of the most notable improvements in the 1Ds Mark II's sensor technology though, is in its noise performance. As with the 1D Mark II, this latest 1Ds model incorporates a range of engineering advances that act together to provide dramatic improvements in image noise, particularly at high ISOs and long exposure times. The changes involve not only the sensor circuitry itself, but microlens design, algorithm changes, and even the physical arrangement of digital and analog circuitry within the camera body.
Canon's advanced CMOS sensor technology uniquely allows significant image-processing functions to be integrated right onto the sensor chip, before the image data even reaches the digitizing electronics. In the 1Ds Mark II's sensor, Canon has implemented no fewer than three different anti-noise processing techniques directly on-chip. While remaining very close-mouthed about the specifics of these anti-noise techniques, Canon does note that they affect both fixed-pattern and random noise generated within the sensor elements.
A common but little-recognized source of image noise in digital cameras is electrical noise generated by the digital signal-processing circuitry. The current spikes generated by high-speed digital circuitry can couple back into the sensitive analog circuitry, if circuit designers aren't careful. In the EOS-1Ds Mark II, Canon's engineers went to the extreme of completely separating analog and digital circuitry onto physically separate circuit boards, each with its own ground plane. It's hard to say just how much this reduced image noise levels, but it's notable that Canon invested the required engineering effort and manufacturing expense to achieve the required separation.
It's important to note here that noise reduction is only one path to producing noise-free images. What ultimately matters is not how much noise is present in an absolute sense, but how the noise level compares with that of the signal you're interested in. (In this case, the "signal" is the image data itself.) This is why engineers speak in terms of "signal to noise ratio" (SNR for short), when characterizing noise levels in an electronic system.
The concept of signal to noise ratio makes it clear that there are two ways to improve the "cleanliness" of images. You can reduce the noise levels in absolute terms, or you can increase the magnitude of the image "signal" itself. In the CMOS sensor used in the EOS 1Ds Mark II, Canon has worked both sides of the equation, with two enhancements to the sensor design working specifically to increase the amount of signal the sensor has to work with.
Improved Sensor Cell Layout
In any semiconductor image sensor, some portion of the silicon real estate has to be devoted to circuit wiring and other functions not directly related to light measurement. This reduces the amount of surface area that can be devoted to the light-sensitive detectors themselves, in turn reducing the sensitivity of the chip as a whole.
For the CMOS sensor used in the EOS 1Ds Mark II, Canon developed a more efficient pixel layout, that reduces the amount of surface area lost to ancillary functions. This increases the image "signal" directly, since each pixel is able to collect more of the light falling on it. Canon hasn't told us how much the improved pixel layout helps relative to earlier designs of theirs, but it could easily amount to 10-20%, possibly even more.
Larger Microlenses
To make the most of the light-sensitive area that they do have, most digicam sensor chips incorporate an array of "microlenses" on the surface of the chip. Constructed right on the surface of the chip itself, each microlens is positioned above a single pixel. The job of the microlens is to collect the light that's falling on the full area of the pixel, and concentrate it on just the light-sensitive part.. (Anyone who's played with a magnifying lens and light from the sun will understand immediately how this works.)
Like many things, microlenses are simple in concept, but tricky to implement well. The lens material itself is less than perfectly transparent, and the fabrication process makes it difficult to create lenses that cover a large percentage of the pixel's real estate. This was thus another area to which Canon's chip engineers devoted considerable effort, with very salutary results. The microlenses on the 1D Mark II's sensor are larger than those on previous chips, and the gaps between them are much smaller. Here again, Canon has declined to say just how much improvement they've achieved in this area, but they claim that the new microlens design and fabrication techniques "greatly increase the efficiency of light convergence, while greatly reducing birefringence." (I believe that this last refers to the optical phenomenon that produces the "purple fringe" seen around dark objects against bright backgrounds in the images from many digicams.)
Image Noise bottom Line
The net result of all the aforementioned improvements in both noise reduction and light gathering ability is immediately apparent when you examine high-ISO images produced by the 1Ds Mark II. Noise levels are indeed remarkably low, and what noise is present has a very fine-grained pattern to it, making it even less obtrusive than it would be otherwise. While perceived (as opposed to measured) noise levels are a very subjective matter, my own reaction to the 1Ds Mark II's images is that shots from it at ISO 1600 look as good as those from many competing d-SLRs shooting at ISO 400. - Even if some readers disagree agree with my subjective evaluation, it's safe to say that pretty much any photographer will be impressed by the quality of the 1Ds Mark II's high-ISO images, when comparing them to those from other d-SLRs currently on the market.
Lenses
The 1Ds Mark II features a Canon EF lens mount, which accommodates the full range of Canon EF lenses. I normally cite the aperture and focal length of a digital camera's lens in this part of the review, but because the Mark II accepts a wide range of lenses, these characteristics will vary depending on the lens in use. We shot our test images with a variety of lenses, a 28-70mm f/2.8L for the far-field and a number of the "gallery" shots, a 17-40mm f/4.0L for the Sunlit and Indoor Portrait tests, and the excellent 100mm f/2.8 macro for our laboratory tests. All three of these lenses are excellent optically, and we stop the 100mm down slightly for the lab shots, in order to get the best possible results.Since Canon seems to be promoting this lens for use with the 1Ds Mark II somewhat, I shot my Outdoor and Indoor Portrait and Far Field tests with it, as well as a fair number of our "Gallery" shots for the Mark II. For images subjected to critical analysis though, we stuck with the 100mm f/2.8 EF Macro lens, a lens known to be very sharp and distortion-free.
Antialiasing Filter
Essentially all of today's digital cameras use "antialiasing" filters in front of the CCD array to reduce color aliasing in images containing high spatial frequencies (high-contrast, closely spaced lines). These filters work by slightly blurring the image -- technically, by knocking off the high spatial frequencies, while hopefully leaving the lower frequencies undisturbed. The problem of course, arises in trying to balance the need for antialiasing with the desire to maintain good image sharpness. Too strong a filter produces soft-looking images, while too weak a filter results in color "twinkles" and "jaggies" appearing in the fine details. Some high-end cameras leave the choice up to the user, with a removable antialiasing filter that allows the user to choose whether or not to use it, based on specific shooting conditions.
In the original 1D, Canon claimed to have taken a different approach, deliberately choosing an antialiasing filter with a higher cutoff frequency, and relying on fancy image processing to eliminate or reduce any aliasing that might creep in as a result. It's not clear whether Canon stuck with this approach on the 1Ds Mark II, or if they went back to a more aggressive antialias filter. The softness of the 1Ds Mark II's images at its default settings suggest a possibly stronger antialias filter, but it's equally likely that this is just a matter of different default settings than were used on the original 1D.
This would probably be a good point to discuss the softness of the Canon EOS-1Ds Mark II's images: Out of the box, the 1Ds Mark II's default image processing parameters produce rather soft images, when compared to those from other d-SLRs, including its ancestor, the original 1D. Much has been made of this in some internet forums, but the fact is that it has everything to do with the settings to use for the 1Ds Mark II's defaults, and almost nothing to do with the actual amount of detail the camera actually captures. Setting a sharpening level of 2 or 3 in the Parameters sub-menu of the Capture menu sharpens the images a fair bit, while introducing only negligible artifacts in the process. Images captured with the default sharpening setting take strong/tight unsharp masking in Adobe Photoshop(tm) or other image-processing software very well, revealing excellent detail. Bottom line, the Canon EOS-1Ds Mark II delivers excellent resolution and detail, you just need to allow for Canon's deliberately conservative approach to in-camera sharpening.
 Autofocus
The Canon EOS-1Ds Mark II employs a very fast autofocus system, with a myriad of focusing options. At the heart of Canon's advanced AF is an unusually large AF frame. (The region over which the AF system can take readings to determine focus.) As in the original EOS-1v, no fewer than 45 autofocus points cover a large portion of the overall field of view. As shown in the diagram at right, seven of these are "cross" sensors, sensitive to both horizontal and vertical detail, while the remaining 38 respond to texture in the horizontal axis only. The 1Ds Mark II can select the specific AF point automatically (based on the closest subject with reliable autofocus characteristics), or the user can select a specific AF point manually. The AI Servo AF system can also track moving subjects anywhere in the AF frame, if they're initially locked-in via the central AF area.
 In the Manual/45-point mode, you can select any one of the 45 AF points manually, and the camera will use that point exclusively in its focus determinations. Selection is made by using both the front and back Command dials.
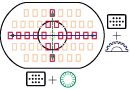
 No question, 45 focus points are probably a lot more than you need for manual selection, and choosing just one of them could be more time-consuming than you'd like, particularly in a fast-paced shooting situation. Custom Function menu item 13-1 and 13-2 simplify the AF choice, reducing the number of available AF points to 11, and arranging them in a cross pattern. Selection is again made using both the front and back Command dials.
 When speed is really the issue, Custom Function menu option 13-3 further reduces the available AF points to nine, all located around the periphery of the AF frame area. The advantage of this is that only the Quick Control dial is needed to select an AF point, rotating the selection point around the edge of the AF area as it is rotated. This allows for a much faster selection, and is particularly useful for situations where the photographer is dealing with an off-center subject.
 Sometimes, you may want to use more than one focusing point (for example, if your subject is fast-moving, low-contrast, or if you're working in low-light conditions). For these situations, Canon has provided the AF Point Activation Area option, available as Custom Function menu items 17-1 and 17-2. In these modes, you can still manually select a single focus point, but the camera then looks at up to six surrounding points to determine focus. Only the selected point lights up in the viewfinder, but as many as six other points are used to determine focus.
In addition to being able to select the AF area, you can also set the camera to One-Shot AF or AI Servo AF. One-Shot AF is intended for stationary subjects, and locks in focus on one area. In AI Servo AF mode, the camera tracks moving subjects, keeping the subject in sharp focus no matter where it appears in the frame. (As fast as 186 mph or 300 km/h when using the 300mm f/2.8L IS lens, according to Canon.) I admit that I'm not quite sure what this spec means, as the focusing behavior of the lens would obviously depend on the range from camera to subject, something not specified in the brochure where this performance figure was mentioned.)
Depending on the lens, you can also employ standard Manual focus, controlled by turning the focus ring encircling the lens barrel. Canon's USM autofocus lenses support a camera mode that autofocuses when the Shutter button is first pressed, but that allows you to focus manually while continuing to depress the Shutter button, to permit manual tweaking of the focus point after the AF system has put you into the ballpark.
A Depth of Field Preview button on the camera's front panel allows you to check the depth of field and focus for the current aperture setting. The preview is displayed in the viewfinder, and is helpful for determining how much of the scene will be in focus.
Overall, the Mark II's AF technology is very impressive, as it employs the same technology as the 1D, 1Ds, and 1v, but with the added benefit of two powerful signal-processing chips to run the AF-related computations, vs the single chip used in the earlier 1D. It's both flexible and very fast, well-suited to the demands of professional sports shooters and photojournalists.
Exposure
Wide Range of Exposure Options
| Free Photo Lessons | |
|
Noise Reduction System
The remaining exposure mode is Bulb, which simply allows you to take long exposures for unlimited periods of time, depending on the type of power source (With the new DIGIC II chip, Canon estimates a fully charged battery pack will allow for a 3-hour maximum exposure time, double that of the previous 1D and 1Ds; however the AC adapter allows for unlimited exposure times.) The 1Ds Mark II automatically employs a noise reduction system in exposures longer than 1/15-second (this function can be turned off through the Record menu when shot-to-shot cycle time is an issue). Most digital camera noise reduction systems use a "dark frame" approach, in which the camera shoots a reference frame the same duration as the exposure of the subject, only with the shutter closed, and then subtracts the resulting noise pattern from the captured sensor data to produce a final, reduced-noise image. Canon's CMOS sensor technology can apparently accomplish the fixed-pattern noise reduction processing right on the sensor chip itself, and so doesn't need to capture a separate dark frame to perform its anti-noise processing. As a result, the Canon 1Ds Mark II can capture long bulb exposures one right after another, without needing to wait in between to capture dark frames. This can greatly speed up long time-exposure photography, and would be especially helpful with the very long exposures required for astrophotography. To prevent any camera movement during long exposures (from holding down or releasing the Shutter button), it's best to work with the accessory remote control and attach the camera to a tripod. As was the case with the original EOS-1Ds, I was pleased to find that the noise reduction system worked even in Bulb exposure: The dark-frame noise suppression systems on most digital cameras I test are limited to timed exposures of relatively short duration.
In my testing, I found the Canon 1Ds Mark II's noise reduction system exceptionally effective. It won't work miracles with a very warm camera (image noise roughly doubles for every 8°C rise in temperature), but I rarely found any "hot pixels" in any of the bulb exposures I did, although I only tested it to roughly three minute exposure times. (If you do encounter any stuck pixels, I highly recommend Mike Chaney's Qimage Pro, a program with an amazing ability to remove spot noise without disturbing the underlying image.)
Metering Sensors
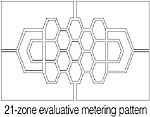 To determine exposure, the 1Ds Mark II borrows the 21-Zone Evaluative Metering system employed by other members of the EOS-1 series. Evaluative metering divides the image area into 21 zones of different sizes, with a honeycomb pattern in the central portion of the frame. The full Evaluative Metering mode determines the exposure by assessing each of the 21 zones and averaging the best exposure value for the entire frame. The 21-zone system also offers Center-Weighted and Partial metering modes. In Center-Weighted metering, the camera reads the exposure from the entire scene, but places emphasis on a large area in the center of the frame. Partial metering works along similar lines, but only places emphasis on approximately 8.5 percent of the center area. (Those readers familiar with the EOS-1D Mark II should note that the center metering area in the 1Ds occupies a smaller portion of the frame, only 8.5 percent, vs 13.5 percent in the 1D. - This is because the metering sensor is the same size in the two cameras, and so occupies a greater portion of the total frame area on the 1D, with its smaller sensor array.)
Spot Metering Options
In addition to the Evaluative Metering options, the 1Ds Mark II also offers a range of Spot metering choices. Normal Spot metering bases the exposure on a reading taken from the very center of the frame, and is usually chosen for use with high-contrast subjects. Alternatively, in some autofocus modes, you can choose to link the Spot metering area to one of nine or 11 active AF points. When you use Custom Function menu 13 to limit the selectable AF points to either nine or 11, the manually-selected AF point is linked to a 2.4 percent Spot Metering sensor (vs 3.8 percent in the 1D Mark II), centered on that point. Another option is to choose the Multi-Spot metering option, which bases the exposure on as many as eight separate readings from different parts of the image. In Multi-Spot metering mode, the central spot metering sensor is activated, and a meter reading is taken every time you press the "FEL" button on the top front of the camera. As you take successive readings, the exposure readouts in the viewfinder show the current aperture and shutter speed settings the camera has computed, while the vertical exposure level indicator shows the relative light levels corresponding to each of the points you measured. This is a pretty powerful exposure option, giving the photographer great control over the final exposure. The exposure level indicator gives you a pretty good idea of how much dynamic range the shot requires, and you can choose to give more weight to a given area of the image by taking multiple readings there. Very slick, a great feature!
Exposure Lock
As you'd expect, the 1Ds Mark II also offers an Exposure Lock option, which lets you lock exposure independently from the autofocus determination. You simply center the frame on the part of the subject you want to expose for, and press the AE Lock button, marked with an "*" on the camera. What's interesting though, is that this same AE Lock capability is extended to flash exposures when using Canon Speedlights. When shooting with an external flash, a Flash Exposure Lock option (the same FEL button used in the Multi-Spot metering mode) works with Spot metering to determine and lock the flash exposure. While not a multi-spot system, you can select a specific portion of the image on which to meter for flash exposure, just as you can with non-flash shots using the AE Lock button. You can also lock non-flash exposures, by pressing the AE Lock button marked with an "*" on the camera body.
Exposure Compensation
Exposure Compensation is adjustable from -3 to +3 exposure values (EV) in one-third-step increments. An Auto Exposure Bracketing option is available when you're not sure about the best exposure. Three images are captured in succession -- one at the metered exposure, one overexposed, and one underexposed. The amount of exposure variation can vary as much as +/-3 EV steps. In addition to aperture or shutter-speed based bracketing, the Mark II offers a unique ISO speed bracketing option. In this mode, the camera leaves the aperture and shutter settings at their predetermined values, and brackets the exposure by varying the ISO light sensitivity of the camera. Normal exposure bracketing is controlled by pressing and holding down the Mode and AF buttons on the left side of the camera, while rotating the (front) Main Dial. ISO bracketing is controlled by pressing and holding down the AF and metering/flash compensation buttons on the left side of the camera, while rotating the (rear) Quick Control Dial. The first image is taken at the set ISO value, followed by one at the next lowest value, and one at the next highest value. For example, exposure bracketing via the ISO setting in one-stop increments around the 200 value results in a series of images taken at 100, 200, and 400 ISO equivalents.
ISO Sensitivity
The EOS-1Ds Mark II's light sensitivity is adjustable from 100 to 1,600 ISO equivalents, which is expandable to 50 to 3,200 ISO equivalents through an custom menu option. ISO can be varied in 1/3 stop increments across the 100 - 1,600 range, but the extremes of 50 and 3200 are a full stop away from the nearest standard-range settings.
12 White Balance Modes
The EOS-1Ds Mark II offers 12 White Balance modes from which to choose, including Auto, Daylight, Shade, Overcast, Tungsten, Fluorescent, Flash, Custom, Color Temperature, and up to three separate Personal White Balance settings. Custom is the manual white balance option, which determines the white balance setting from a previously-captured image of a gray card. This method differs from the customary use of a white card held in front of the lens. (Other Canon pro SLRs also use this approach.) While slightly less convenient for on-the-fly white balance adjustment (you have to shoot the test image, then go back into the menu system to select it as the white balance reference), the advantages are actually manifold. First, you can easily store several different reference images on the camera's card, letting you quickly switch between different custom white balance settings. This can be very handy in environments where you need to quickly switch between radically different lighting environments. (Consider sports shooting, where you may want one custom setting for the stadium lights and another for the fluorescent lighting of the locker room.) Another advantage of Canon's custom white balance approach comes in scenarios where multiple photographers are covering the same event. The same set of white balance reference images can be loaded onto each shooter's CF cards, making for perfect color consistency between all the cameras and shooters. (A great help for post-event image workflow!). Here's a list of the available White Balance modes:
White Balance Bracketing
White Balance Bracketing is another useful feature common to Canon's high-end d-SLRs. You can set the camera to shoot three images at the same exposure level, varying the White Balance setting between shots by up to +/- 3 steps, each step being equivalent to five Mireds (Micro-reciprocal degrees). Mireds are a bit of an arcane measurement, but represent the units most directly applicable to the mathematics of color adjustment, their main benefit being that they're additive. A filter that shifts 3200°K light by 100°K will produce a much different shift (measured in degrees Kelvin) with 7000°K light, hence the use of mireds to describe the shift, rather than degrees Kelvin. (For example, five mireds at 3200°K is a shift of only 52°K, while five mireds at 7000°K is a shift of about 257°K.) This is all a little convoluted for the uninitiated, but pro photographers are accustomed to working with mireds in calculating filter factors, and professional color meters generally offer a mired scale for calculating filter corrections.)
White Balance in Degrees Kelvin
I also like Canon's provision of a Color Temperature white balance option, which allows the user to select the desired color temperature in 100-degree increments from 2,800°K to 10,000°K. I'd still like to see the lower end of this range extend a little further, since household and commercial incandescent lighting can reach as low as 2,500°K. Still, the Color Temperature white balance is very handy, particularly if the shooter has access to a color temperature meter.
"Personal" White Balance Settings for Rapid-fire Custom Changes
Finally, the Personal White Balance feature allows you to create as many as three different white balance settings on a computer and load them into the 1Ds Mark II for quick use. This strikes me as another great option for pros who have to shoot under highly variable lighting, or for groups of pros needing consistency between their setups. Not quite as flexible as the Custom option, because the Personal settings must be downloaded to the camera from a host computer, but arguably more powerful, not to mention having the advantage of allowing you to switch between three distinct custom settings very quickly.
"Color Matrix" options
The Canon 1Ds Mark II offers a nice range of color options, moving away from the tyranny of the sRGB color space. sRGB produces bright, saturated color on computer monitors, but has a woefully restricted color gamut. Bottom line, sRGB is fine for consumer-level devices, but is really unsuited for color-critical professional applications. Most d-SLRs these days include an option to use the so-called Adobe RGB color space in addition to the default sRGB. The Canon EOS-1Ds Mark II goes a step further, offering no fewer than five color-space options through the Record menu, plus the ability to store two customized settings. Canon calls these "Color Matrix" settings, and they offer an interesting range of possibilities. The table below lists their attributes.
| |
|
| Color Matrix 1 (Standard) |
Default color matrix. Normal saturation, sRGB color space. |
| Color Matrix 2 (Portrait) |
sRGB color space, but hue and chroma optimized for reproduction of skin tones. (A little warmer, more saturated in the reds and pinks.) |
| Color Matrix 3 (High Saturation) |
sRGB color space, extra saturation. Intended to reproduce the characteristics of high-chroma slide film. |
| Color Matrix 4 (Adobe RGB) |
Adobe RGB color space, normal hue and chroma within that space. Much wider color gamut than sRGB, which means images will look dull on sRGB monitors. Excellent for use in color-managed workflows, particularly ones going to print as final output. |
| Color Matrix 5 (Low Saturation) |
Mysterious low-saturation color space. Apparently sRGB-based, but color saturation is lower than normal. |
| Color Matrix Settings 1 and 2 |
Preset settings. |
| Color Matrix Setup |
Lets you set your own custom color matrix. |
For the pros likely to buy this camera, I call particular attention to Color Matrix settings 4 and 5. Setting 4 is matched to Adobe RGB, providing the greater color gamut that color space offers. The EOS-1Ds Mark II's handling of Adobe RGB JPEGs is another area that's been enhanced relative to the performance of the original 1D. Thanks to its support of the EXIF 2.21 standard, the 1D Mark II now embeds an ICC color profile into the EXIF header of JPEG files, so EXIF 2.21-aware image editing applications can recognize and apply the proper color space parameters automatically. (With the original EOS-1Ds, it was up to you to be alert and configure your image editor properly when opening images shot with the Adobe RGB color space.) Note though, that only the more recent versions of most imaging applications will be EXIF 2.21-aware: Adobe Photoshop version 7 doesn't recognize the 1D Mark II's Adobe RGB tags in its JPEG files, but Photoshop CS does.
Color Matrix setting 5 is a little mysterious, as there are some indications Canon intended it to be a special wide-gamut color space, but now treats it simply as a low-saturation sRGB.
The "Red Problem," Description and Workaround
Soon after production models of the 1D Mark II began hitting retail shelves, users reported odd behavior when photographing strong reds. As time went on, some users also found similar issues with some shades of blue, under certain ill-defined conditions. In our review of the EOS-1D Mark II, we reported in quite some detail on this problem, and how to work around it.
It turns out that the EOS-1Ds Mark II also has the same problem, albeit not quite as severely. To study the problem, I put together a "red-hue torture test" in the studio, using our artificial "sunlight" lighting setup. (The smooth spectrum of the dichroic-filtered incandescent lighting of this setup should give rise to fewer potential problems with metamerism than the more "spiky" spectral distribution of HMI lights, and would avoid potential problems with fluorescence from the UV content of strobes.)
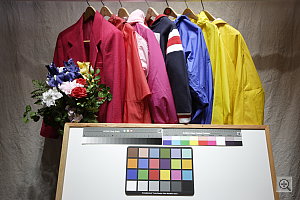
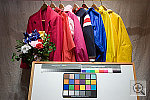
The image above shows the test scene I set up (as rendered by Digital Photo Professional, which did indeed produce the best results). There's a collection of bright colors in the red/magenta portion of the spectrum, as well as a bright blue and yellow, some greens in the flower bouquet, and several color and grayscale reference targets, so I could see how the color management affected other portions of the spectrum.
This test revealed that the 1D Mark II and (to a slightly lesser extent) the 1Ds Mark II oversaturate the red channel when faced with very strong, out-of-gamut red hues, when shooting in an sRGB color space. This has the effect of losing considerable detail in strong reds and magentas. The problem is greatly alleviated by shooting in the Adobe RGB color space, and pretty much entirely goes away if you shoot in RAW format, and then process the images in Canon's Digital Photo Professional software.
In early communications with them, Canon felt that the problem was caused by people inadvertently shooting with the 1D Mark II configured with a high-saturation color matrix setting. Our tests on that model, though, indicated that this was not the issue. Rather, the problem seems to lie in the camera's internal color management processing, as it rendered the images into sRGB JPEGs -- RAW files processed through the Digital Photo Professional application did just fine, and JPEGs in the Adobe RGB color space don't show the problem nearly as strongly.
For a full discussion of the issue, and the diagnostic tests that led us to the conclusions just stated, see page 8 of my Canon EOS-1D Mark II review.
Rather than go back over all the ground I covered with the 1D Mark II, this time around, I'll simply show you the results produced by the 1Ds Mark II straight from the camera, as well as after processing from RAW files in Digital Photo Professional and Adobe Camera Raw.The results were very interesting, and underscore the importance of RAW shooting and the use of the Digital Photo Professional software package for color-critical work with the EOS-1Ds Mark II. The thumbnails below show the results with various combinations of color settings and conversion methods. The color of the magenta jacket on the left side of the frame should be more purplish, with more color separation between it and the red nylon shell to the right of it. Also, because the red channel completely saturates in the highlight on the shoulder of the jacket, considerable detail is lost.
| EOS-1Ds Mark II Red Hues (All examples rendered in the sRGB color space) |
||
| sRGB JPEG straight from the camera | Digital Photo Professional from RAW |
Adobe Camera Raw, processed through Adobe Photoshop CS2 |
 |
 |
 |
 |
 |
 |
The color of the magenta jacket on the left side of the frame should be more purplish, with quite a bit of color separation between it and the red nylon shell to the right of it, and the EOS 1Ds Mark II does a pretty good job of this. Because the red channel completely saturates in the highlight on the shoulder of the jacket though, considerable detail is lost. From this, it's pretty clear that the 1Ds Mark II has difficulty with the (admittedly very tough, out-of-gamut) magenta of the jacket on the left, and also somewhat oversaturates the magenta jacket that's more towards the middle of the frame as well. While not shown here, it seemed that reducing the camera's saturation setting had relatively little effect. As noted, close inspection reveals that what's happening is that the red channel saturates completely, well short of the point of maximum brightness/saturation. This is a not-uncommon issue in color management when dealing with out-of-gamut colors: The color management scheme just tries for the best match it can manage, and when the color goes out of gamut, it "clips", the affected color channel staying pegged at its maximum value, while the others change in accordance with the color-mapping equations.
A better (or at least, more often preferable) approach is that taken by the Digital Photo Professional software. Rather than aiming for the best accuracy for in-gamut colors, and letting out-of-gamut ones clip, this approach is to compress the color at the edges of the available color space, so some range of out-of-gamut colors are mapped to the edge of the color space. Typically, colors are mapped exactly in areas that are well within the available color space, but a region of color space near the edge of the gamut is selectively compressed, so at least some differences in relative color will still be displayed as the subject moves out of gamut, but a broader range of color can still be accommodated. (This is a very simple description of the concept of gamut compression. - The real art comes in deciding exactly how to compress the color, over what range of values, and how to transition from exact mapping to varying degrees of compression.)
Adobe Camera Raw (Version 3.0, running from within Photoshop CS2) seems to do an even better job of holding onto detail in the highlights on the magenta jacket, but the result is a little open to interpretation: A larger version of the image, viewed in Photoshop itself (rather than via a web browser) reveals an unnatural-looking level of contrast in the weave of the magenta fabric, and the hues are shifted further away from the actual colors of the original objects.
Bottom line then, there are issues to be found in some areas of the spectrum (strong magentas and reds in our testing, possibly other colors as well - Shawn also had issues with a bright orange on a model's bikini he shot with the 1D Mark II), but when working with the JPEG files generated in-camera. Processing RAW images through Canon's Digital Photo Professional software seems to avoid these color issues almost entirely, and Adobe Camera Raw also does a much better job than the camera's internal processing.
Tonality and Custom Tonal Curves
This was a major feature of the original 1D, but also a bit an Achilles heel. In the 1Ds Mark II, most limitations have been addressed. The original 1D's default tone curve was rather contrasty, but its support for custom tone curves at least gave you a way to deal with the issue. The remaining problem though, was that the process of manipulating tone curves in Canon's EOS Capture utility was glacially slow, at least on Macintosh computers. With the version shipped with the 1Ds Mark II though, not only is the camera's default tone curve less contrasty, but the software is much more responsive when you're interactively adjusting a tone curve. Now, creating a custom tone curve and downloading it into the camera is a relatively painless process. (Although I would still like to see it be a little faster in displaying the results of a tone curve tweak.)
Flash
Like most pro cameras, the Canon 1Ds Mark II has both an external flash hot-shoe as well as an external PC socket for connecting a strobe. The hot-shoe accommodates all Canon EX series speedlights, as well as a variety of third-party flash units. A Flash Exposure Lock button allows users to lock the flash exposure in advance of the shot, and a Flash Exposure Compensation option adjusts the overall flash power from -3 to +3 EV in one-third-step increments (only for Canon EX series speedlights). Automatic flash exposure bracketing is also available. A High Speed Sync option synchronizes the flash with all shutter speeds available on the 1Ds Mark II, from 1/8,000 to 30 seconds. (Note though, that a full-power flash almost invariably lasts longer than 1/8,000 second, so you won't see the full flash power when working with a shutter speed that fast.) When using a Canon EX flash unit, you can also sync up wireless slave units for greater coverage, with no connecting wires, special codes, or anything. Full TTL flash metering is available even with multi-flash wireless setups. (Canon's series of dedicated Speedlights have a remarkable range of capabilities, really deserving of a review of their own, rather than the very brief treatment I'm giving them here. Unfortunately, I really don't have the time or space to go into all their functions, and the details of how they integrate with the 1Ds Mark II.)
Continuous Shooting
The 1Ds Mark II's Continuous Shooting mode captures as many as four frames per second, provided you're using a fast enough shutter speed. Of course, actual frame rates and the number of available images will vary with the image size and quality settings, as well as the exposure and memory status.
Self-Timer Modes
The 1Ds Mark II offers two Self-Timer modes, 10-Second and Two-Second. Both modes are accessed through the Drive button on top of the camera, the same button that activates the Continuous Shooting mode.
Shutter Lag / Cycle Times
When you press the shutter release on a camera, there's usually a lag time or delay before the shutter actually fires. This corresponds to the time required for the autofocus and autoexposure mechanisms time to do their work, and can amount to a fairly long delay in some situations. Since this number is rarely reported on (and even more rarely reported accurately), and can significantly affect the picture taking experience, I routinely measure both shutter delay and shot to shot cycle times for all cameras I test, using a test system I designed and built for the purpose. (Crystal-controlled, with a resolution of 0.001 second.) Here are the numbers I measured for the Canon EOS-1Ds Mark II:
| |
||
| |
(secs) |
|
| Power On -> First shot | |
Barely noticeable. |
| Shutdown | |
First time is simple shutdown, second time is worst-case buffer-clearing time. (After 9 RAW+Large JPEGs, with a Lexar 80x CF card. Slower cards will clear more slowly.) |
| Play to Record, first shot | |
Nearly instantaneous. |
| Record to play | |
First time is that required to display a large/fine file immediately after capture, second time is that needed to display a large/fine file that has already been processed and stored on the memory card. First time is modest, but considering the 16 megapixels of data involved, not bad. Second time is quite fast. |
| Shutter lag, full autofocus | |
Measured with 100mm Macro lens (a slower than average lens), times will vary somewhat with the lens in use. Very fast. |
| Shutter lag, continuous autofocus |
|
Extremely fast. |
| Shutter lag, manual focus | 0.057 |
Extremely fast. |
| Shutter lag, prefocus | 0.052 |
Time to capture, after half-pressing shutter button. Extremely fast. |
| Cycle Time, JPEG, max/min resolution | 0.51 / 0.52 | First number is for large/fine files, second number is time for small/basic files. Times are averages. Shoots 17 large/fine frames this fast, then slows to about 3.7 seconds per shot. (With a Lexar 80x CF card, slower cards will show longer post-buffer-fill cycle times and longer clearing times.) In small/basic mode, continues at this rate for over 100 shots. Buffer clears in 43 seconds for large/fine images, only 1 second for lowest resolution. |
| Cycle Time, RAW | 0.55 / 0.52 | First number is for RAW files, second number is for RAW + large JPEG files. (Yes, the latter is just ever so slightly faster, I don't know why.) Times are averages. Shoots 12 RAW frames this fast, then slows to about 3.7 seconds per shot. In RAW + large JPEG mode, shoots 9 frames this fast, then slows to about 6.4 seconds per shot. Buffer clears in 40 seconds for RAW images, 56 seconds for RAW + large JPEG images. (As above, times measured with a Lexar 80x CF card, slower cards will clear the buffer more slowly.) Good speed, and a deep buffer, particularly considering the enormous size of the images. |
| Cycle Time, continuous mode, JPEG, max/min resolution | 0.25 (3.93 fps) |
Times are averages. Shoots 16 large/fine frames this fast, then slows to about 2.8 seconds per shot. In small/basic mode, continues at this rate for over 100 shots. Buffer clears in 42 seconds for large/fine images, 10 seconds for lowest resolution. (As above, times measured with a Lexar 80x CF card, slower cards will clear the buffer more slowly.) Excellent speed, and buffer depth, especially given the huge image size. |
| Cycle Time, continuous mode, RAW | 0.26 (3.92 fps) |
Times are averages. Shoots 11 RAW frames this fast, then slows to about 3.7 seconds per shot. In RAW + large JPEG mode, shoots 9 frames this fast, then slows to about 6.4 seconds per shot. Buffer clears in 39 seconds for RAW images, 56 seconds for RAW + large JPEG images. Excellent speed, and buffer depth, especially given the huge image size. |
Excellent shooting speed, very good buffer depth. By any measure, the Canon 1Ds Mark II is a fast-shooting camera, with near instant startup times, absolutely top-drawer shutter response (0.18 second in full autofocus mode), and excellent shot to shot cycle times (almost two frames/second in single-shot mode, nearly four frames/second in continuous mode), with a surprising buffer capacity (16-17 large JPEGs, 11-12 RAW files) in light of its enormous image size. There really isn't much to fault here, although it must be said that its lower-resolution sibling the 1D Mark II makes it seem positively pokey when compared with its own 8.5 frame/second performance. Still though, an amazingly nimble shooter for all of its physical bulk.
Operation and User Interface
The Canon EOS-1Ds Mark II's user interface is certainly among the more complex that I've encountered, with extensive external camera controls that have multiple functions, and duplicate controls for vertical shooting. However, the interface is very similar to the previous EOS-1Ds and EOS-1D Mark II, which I had to refer to the manual on a number of occasions to fully understand what each control did. Once I became familiar with the layout and began to memorize each button's function(s) though, camera operation was straightforward and quite efficient. This is definitely not a camera for a casual user, but professional shooters will find it very fast and flexible to operate. Dual controls for the Shutter button, AE Lock, AF Point Selection, and the Assist button enable you to comfortably operate the camera horizontally or vertically, a mandatory option for pro photographers. The vertical controls can also be turned off if they're not compatible with a photographer's shooting style. The combination of control dials and buttons allows you to adjust most of the camera's settings without venturing into the LCD menu system, a great time-saver in fast-paced shooting situations. For those times when the LCD menu is unavoidable, the menu system offers straightforward navigation, once you get the hang of Canon's multi-button and dial-based user interface.
LCD Data Readouts
As mentioned earlier, the 1Ds Mark II uses two monochrome LCD data readouts to report camera status, and provide a visual user interface to the various knobs, dials, and buttons. As with the EOS-1Ds before it, you can actually control quite a bit of the camera's operation without venturing into the menu system on the color LCD screen. This not only saves power (by avoiding the hefty drain of the large LCD screen), but makes the camera much quicker to operate. Here are the details of the information provided by the two LCD readouts, on the top and back of the camera. (Illustrations courtesy Canon USA, Inc. Used with permission.)
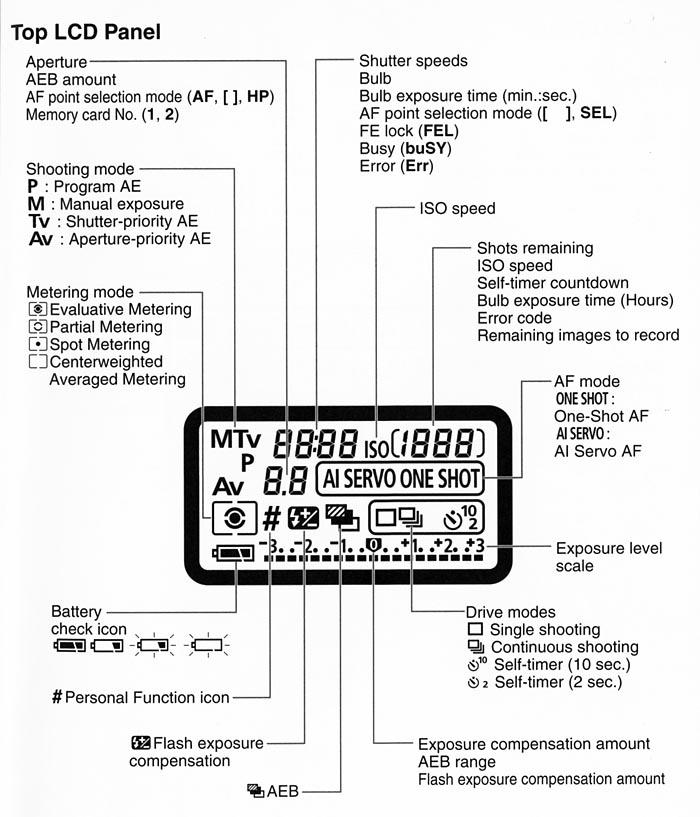
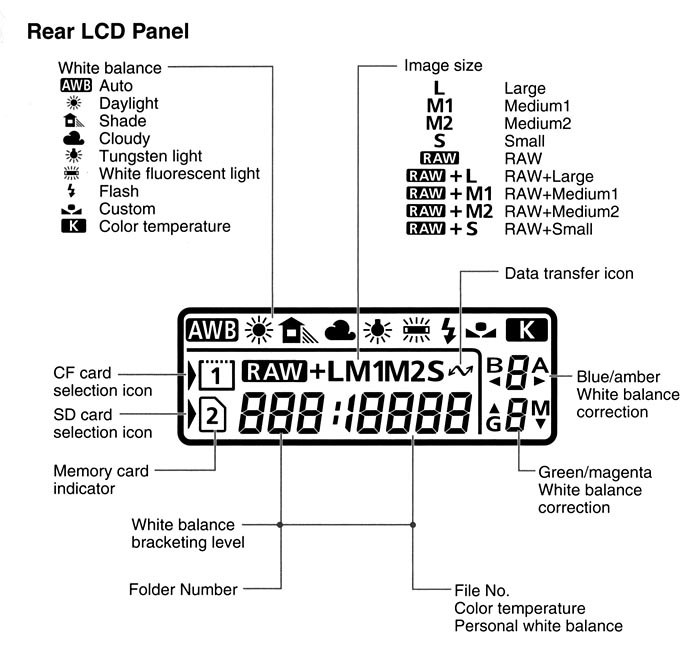
Control Enumeration
With the foregoing as background, here's a step-by-step description of the 1Ds Mark II's various controls and their operation:

Shutter Button: Located on the top of the camera body, sloping down toward the front panel, this button sets focus and/or exposure when pressed halfway. A full press fires the shutter.

Depth of Field Preview Button: Hidden on the lower right side of the lens mount (when holding the camera from behind), this button previews the depth of field in the viewfinder. Pressing the button stops the lens down to the selected aperture, letting you visually check the depth of field.

Lens Release Button: On the left side of the camera's front panel, this semicircular button releases a latch so the lens can be removed with a turn to the right.

FE Lock / Multi-Spot Metering Button ("FEL"): Situated on the top panel of the camera, just behind the Shutter button, this button controls the flash exposure lock and Multi-Metering functions, just like its vertical grip counterpart. Pressing the button when a Canon Speedlight is in use locks the exposure based on a test flash. In Multi-Spot Metering mode (with the flash off), this button selects up to eight metering points for exposure calculation.
![]()
Main Dial: To the right of the FE Lock / Multi-Spot Metering button, this dial controls a variety of camera functions when turned while pressing a control button. Depending on the exposure mode, turning the dial on its own adjusts some of the functions listed on the top LCD panel, such as aperture or shutter speed. In Program AE mode, turning this dial cycles through a range of equivalent exposure settings.

LCD Panel Illumination Button: Behind and to the left of the FE Lock / Multi-Spot Metering button, this button activates an electroluminescent blue background illumination for both the rear and top status LCD panels. You can turn off the illumination by pressing the button a second time. Pressing the button once leaves the light on for six seconds.

Exposure Compensation / Aperture Button: To the right of the LCD Panel Illumination button, this button controls the exposure compensation in conjunction with the Main dial (in all exposure modes except Manual). Pressing the button blanks all the top-panel LCD readouts except the exposure compensation indicator, and connects the Main dial to the exposure compensation adjustment. Pressing the button again or half-pressing the Shutter button registers the exposure compensation setting you've selected, and puts the camera back in shooting mode. In Manual mode, pressing this button while turning the Main dial controls the aperture setting.

Metering Mode / Flash Exposure Compensation Button: The first button on the far left side of the top panel (when looking from the back), this button changes the current metering mode when pressed while turning the Main dial, cycling through Evaluative, Partial, Spot, Center-Weighted, and AF Point-Linked Spot metering modes. When pressed while turning the Quick Control dial on the back panel, the flash exposure compensation is adjusted from -3 to +3 exposure values (EV) in one-third-step increments. (Note that this only applies to Canon dedicated Speedlights.) Pressing this button in conjunction with the Shooting Mode (MODE) button while turning the Main dial adjusts the camera's Drive mode, cycling through Single Frame, Continuous, 10-Second Self-Timer, and Two-Second Self-Timer modes. Finally, pressing this button in conjunction with the AF Mode button while turning the Main dial sets the ISO sensitivity.

AF Mode Button: The next button on the left, just in front of the Metering Mode / Flash Exposure Compensation button, this button sets the autofocus mode when pressed while turning the Main dial, cycling between One-Shot AF and AI Servo AF (which focuses continuously to track moving subjects). Pressing this button while holding down the Metering Mode / Flash Exposure Compensation button and turning the Main dial adjusts the ISO setting. Additionally, holding down this button while pressing the Shooting Mode button and turning the Main dial activates the Auto Exposure Bracketing mode and sets the amount of exposure variation.

Shooting Mode Button: The last button on the left side of the top panel, this button sets the camera's exposure mode when held down while turning the Main dial, cycling through the following modes:
When pressed in conjunction with the AF Mode button while turning the Main dial, this button activates the Auto Exposure Bracketing mode and adjusts the amount of exposure variation. Pressing this button while holding down the Metering Mode / Flash Exposure Compensation button adjusts the camera's Drive mode, cycling through Single Frame, Continuous, 10-Second Self-Timer, and Two-Second Self-Timer modes.

Diopter Adjustment Dial: Located on the camera's back panel, to the left of the viewfinder, this dial adjusts the optical viewfinder display to accommodate eyeglass wearers.

Eyepiece Shutter Lever: On the opposite side of the viewfinder, this lever opens and closes a small shutter inside the eyepiece, which prevents incident light from affecting the exposure when the camera is mounted on a tripod. (Normally, the photographer's eye prevents ambient light from entering the viewfinder eyepiece.)

Assist / White Balance Correction Button: Directly to the right of the Eyepiece Shutter lever, this button registers the selected AF point when pressed in conjunction with the Flash Exposure Lock button. Pressing this button with the AF Point Selection button switches between the normal AF mode and the registered AF point. Very handy for quickly switching between a specific AF point and normal multi-area AF operation. The operation of this control may be modified somewhat through Custom Function menu 18.
When pressing the WB button on the rear panel and this button simultaneously, you can adjust the white balance by altering the amount of blue, amber, magenta, or green, using the Main and Command dials.

AE Lock ("*") / Reduce Button: To the right of the Assist button, this button locks the exposure when pressed. (The AE Lock is canceled six seconds later, or when a shot is taken, whichever comes first.)
In Playback mode, this button reduces the magnified image display when pressed while holding down the Format / Magnify button.

AF Point Selection / Magnify Button: Directly to the right of the AE Lock button, this button selects one of the 45 AF points when pressed while turning either the Quick Control or Main dials. (The Quick Control dial selects vertically, while the Main dial selects horizontally.) Pressing this button simultaneously with the Assist button switches between the normal AF mode and the registered AF point.
In Playback mode, this button magnifies the displayed image, as much as 10x, when pressed while holding down the Format / Magnify button.

Quick Control Dial Switch: In the center of the back panel, above the Quick Control dial, this switch turns the dial on or off, as a precaution against changes being made if it is accidentally turned.
Quick Control Dial: The large dial in the center of the back panel, this dial controls a variety of camera settings when turned while pressing control buttons. During image playback, turning this dial scrolls through captured images, and moves up and down in a zoomed image (while the main dial handles left and right movement), and it is a primary user interface element for navigating the LCD menu system.

Main Switch: Directly below the Quick Control dial, this switch turns the camera on or off. In its third position (marked with a little speaker icon), the beeper is enabled, to signal when focus is achieved.

Memory Card Slot Release Latch: Located at the bottom left corner of the dual-slot memory card compartment, this switch unlocks the compartment door, allowing you to remove the memory cards.

Protect / Sound Recording Button: The first button in a series lining the left side of the LCD monitor, this button assigns or removes write protection for selected files during image playback. Also in Playback mode, this button allows you to record as long as 30 seconds of audio to attach to an image file, by holding down the button for two seconds. (Very handy for pros needing to keep track of what's recorded in various shots.)

Menu Button: Directly below the Protect / Sound Recording button, this button displays the LCD menu system. Unlike most digital cameras, you must press and hold this button and use the Quick dial to move between the different Menu tabs. Only when you release this button are you able to press and hold the select button to scroll through each menu item.

Select Button: The third button in the series on the left side of the LCD monitor, this button selects menu settings while in the LCD menu system. Like the Menu button, it must be held down as you scroll through the options. Releasing it selects the option and moves you to the next step in selecting (a fly out menu or selection buttons, for example. You must press the button again to make further selections with the Quick dial as you move through the settings. It can be confusing at first, but will seem plenty natural after a short time. When playing back images, this button lets you scroll through captured frames when pressed while turning the Quick Control dial.

Display / White Balance Bracketing Button: Just below the Select button, this button controls the LCD display mode when playing back images. A full press of the button turns the display on or off. Holding down the button while turning the Quick Control dial cycles through the image playback display modes, including Info (with histogram), Single Image Display, Four-Image Display, Nine-Image Display, and Storage (which allows users to create new image storage folders). In Record mode, pressing this button in conjunction with the White Balance button activates the White Balance Bracketing mode, letting you adjust the parameters before shooting.

Format / Magnify Button: The last button in the series, this button lets you format the memory card when pressed in Record mode. In Playback mode, you can enlarge the captured image by holding down this button and pressing the Reduce or Magnify buttons mentioned above.

Erase Button: Located below the LCD monitor as the first button in a series, this button erases selected images or folders.

Image Size Selection Button: To the right of the Erase button, this button cycles through the file resolution settings when pressed while turning the Quick Control button. Pressing and holding this button with the White Balance button for two seconds returns the camera's settings to their defaults.

White Balance Button: Directly to the right of the Quality button, this button cycles through the available White Balance settings when pressed while turning the Quick Control dial. When held down in conjunction with the Quality button, this button resets the camera settings to their defaults. Holding this button while pressing the Display button activates the White Balance Bracketing mode.

Vertical Grip Operation On/Off Switch: Located on the right side of the camera (when looking from the back) and near the cluster of vertical grip controls, this switch turns those controls on or off. Disabling the controls prevents accidental activation when shooting with the camera in a normal horizontal orientation.
![]()
Vertical Grip Shutter Button: Directly below the primary Shutter button, but on the bottom panel of the camera, this button performs the same shutter functions when shooting with the camera held vertically. It may be a little more sensitive in our experience, especially when shooting in High or Low speed Continuous modes, more frequently firing off two or three shots than the main shutter button.

Vertical Grip Main Dial: Like the Main dial on top of the camera, this dial controls a variety of camera settings when rotated while holding down a control button. Located just behind the Vertical Grip Shutter button, this dial controls several functions on the top LCD panel when turned by itself, such as aperture or shutter speed, depending on the exposure mode. When turned while in Program AE mode, the dial cycles through a range of equivalent exposures.

Vertical Grip FE Lock / Multi-Spot Metering Button ("FEL"): Just behind the Vertical Grip Main dial, this button locks the exposure when an external flash is used. Like the main FE Lock button, when no flash is in use, this button sets the metering points for the Multi-Spot Metering mode, which averages the exposure from as many as eight separate readings.
![]()
Vertical Grip Assist / White Balance Correction Button: Just like the Assist button at the top of the back panel, this button (located in the lower right corner of the back panel) registers the AF point when pressed in conjunction with the Flash Exposure Lock button. It also switches between the normal AF setting and the registered point when pressed simultaneously with the AF Point Selection button.
When pressed with the WB button, this button lets you adjust the amount of blue, amber, magenta, and green in the color balance.

Vertical Grip AE Lock / Reduce Button: To the right of and below the Vertical Grip Assist button, this button locks the exposure for a maximum of six seconds when pressed once.
In Playback mode, this button reduces the enlarged playback view when pressed while holding down the Magnify button.

Vertical Grip AF Point Selection / Magnify Button: The final vertical grip control in the lower right corner of the back panel, this button performs the same functions as its main counterpart, allowing you to select an AF point for use by holding down the button and turning the Quick Control or Main dial. Pressing this button with the Assist button selects between the normal AF mode and the registered AF point.
In Playback mode, this button enlarges the review display when pressed while holding down the Magnify button.

Battery Compartment Release Button: Situated on the left side of the camera, when looking from the back, this button must be pressed to fully release the battery after turning the Battery Release Handle.

Battery Release Handle: Also on the left, centered on the battery itself, must be turned to the left, then the Battery Compartment Release Button must be depressed.
Camera Menus
The 1Ds Mark II offers five menus, all of which are available at all times by pressing the Menu button. The last item you had selected in any given menu is the first selected when you re-select that tab. It is not reset until you power the camera off and on.
Record Menu
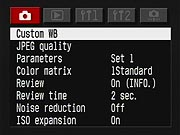 Custom WB: Lets you select an image for the Custom White Balance setting. For example, to set the Custom White Balance, you capture an image of a gray card in the lighting in question. You would then select that image through the Custom WB menu option as the image to base the white balance on, and apply that to the current subject. You could also apply the white balance from a previously captured image.
Playback Menu
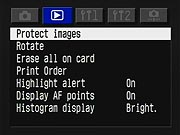 Protect Images: Write-protects the selected image(s), preventing accidental erasure or manipulation in any other way. Does not protect from erasure due to card formatting, however. Protection can also be removed here.
Setup Menu 1
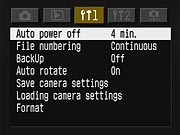 Auto Power Off: Specifies the period of time of inactivity that must pass before the camera automatically shuts itself off. Options are 1, 2, 4, 8, 15, or 30 minutes, or Off.
Setup Menu 2
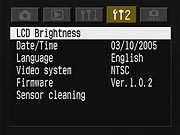 LCD Brightness: Adjusts the brightness of the LCD monitor display.
Custom Menu
Custom Functions
The 1Ds Mark II continues with the extensive Custom Menu and Personal Function options that appeared on the original 1D, making it one of the most customizable cameras I've seen. An amazing range of the camera's operating functions is subject to user configuration, with no fewer than 21 "Custom" function menus and 27 "Personal" functions.
To help you manage the 1Ds Mark II's configurability, you can group both custom and personal functions into "custom function groups," letting you quickly switch between different sets of them for different shooting conditions or photographers.
Here's a list of the Custom Function options, and the camera features they control. (I didn't bother showing you screen captures of these, as there's really not much information displayed on these screens other than a list of options for each. The list below has more detail on the actual operation of each menu than is in the menus themselves.)
Personal Functions: A wide variety of secondary camera options can be controlled via the "Personal Functions" menu system. These are options that are less integral to basic camera operation, but that fall more into the realm of personal preferences. (Examples include things like setting the continuous shooting speed, enabling or disabling metering modes, whether or not to illuminate the LCD panels during bulb exposures, etc.)
These functions are enabled or disabled via the host software provided with the camera. The default is for none of the personal function options to be available: You'll have to connect the camera to the computer and turn them on before they'll be accessible on the LCD menu system. The menu displays in this mode are unusually informative, as Canon has made excellent use of the high-resolution LCD panel to show explanatory information. Changes in the specific settings must be made from a host computer, using Canons EXIF Viewer software. Once a particular P.Fn has been enabled, you can turn it on or off from the camera's P.Fn menu. (But you'll have to go back to the host computer to actually change the settings themselves.) Given the fairly self-explanatory nature of these screens, I'll simply show screenshots of each Personal Function menu in the table below.
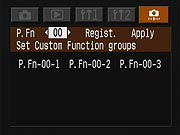 |
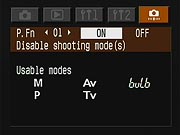 |
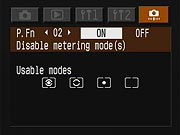 |
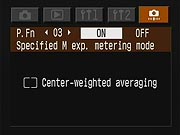 |
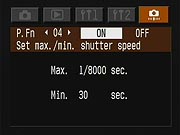 |
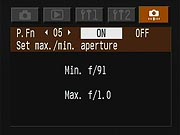 |
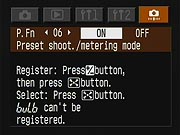 |
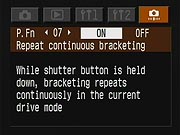 |
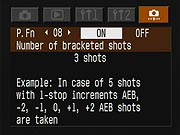 |
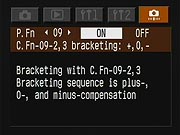 |
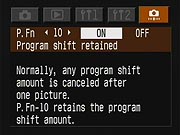 |
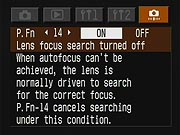 |
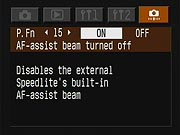 |
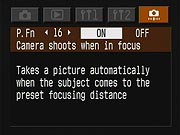 |
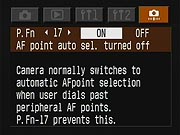 |
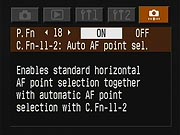 |
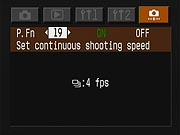 |
 |
 |
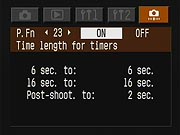 |
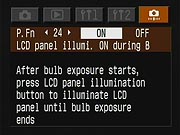 |
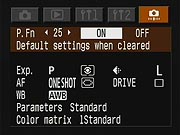 |
 |
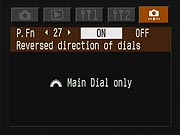 |
 |
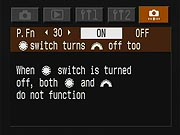 |
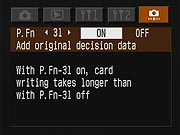 |
Image Storage and Interface
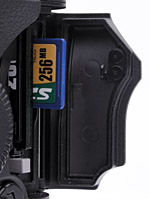 The Canon EOS-1Ds Mark II stores images on either a CompactFlash Type I or II or SD/MMC memory card (or both), and is compatible with Hitachi MicroDrives. A dual-slot memory card compartment on the rear panel accommodates both formats. The Mark II does not come with a memory card, but accessory cards are currently available in a large range of sizes. The 1Ds Mark II allows you to write-protect individual images via the Protect option of the Playback menu, which saves them from accidental erasure or manipulation, but not from card formatting, which erases the entire card.
The Mark II offers four resolution sizes: 4,992 x 3,328; 3,600 x 2, 400; 3,072 x 2,048; and 2,496 x 1,664 pixels. A full range of JPEG compression levels are available as well, from one to 10. There's also a RAW mode, which records all the information from the CCD, without any processing. The camera can be configured to save both a RAW and JPEG-compressed image at the same time, for every shot captured. Given a large enough memory card, this looks like a very useful operating mode, giving you a ready-to-use JPEG file as well as a "digital negative" in the form of the RAW file. RAW-format images can be processed on the host computer to change White Balance and even Color Matrix settings. Exposure can also be adjusted by as much as +/- 2 EV on a RAW file. Canon includes a utility for processing and viewing RAW files as part of its Solution disk.
Following is the approximate number of storable images and the associated compression ratios for a 256 MB CompactFlash card. File sizes and compression ratios shown here are based on the default JPEG compression settings used by the camera (8). Higher or lower compression ratios would obviously increase or decrease file sizes.
| Resolution/Quality 256 MB Memory Card |
RAW | Fine (10) | Normal (5) | |
|
| 4992 x 3328 |
Images (Avg size) |
13 19.3 MB |
20 12.5 MB |
61 4.2 MB |
138 1.8 MB |
| Approx. Compression |
1.3:1 | 4:1 | 12:1 | 27:1 | |
| 3600 x 2400 |
Images (Avg size) |
- | 36 7.0 MB |
105 2.4 MB |
218 1.2 MB |
| Approx. Compression |
- | 4:1 | 11:1 | 22:1 | |
| 3072 x 2048 |
Images (Avg size) |
- | 47 5.4 MB |
132 1.9 MB |
264 968 KB |
| Approx. Compression |
- | 4:1 | 10:1 | 20:1 |
|
| |
Images (Avg size) |
- | 67 3.8 MB |
178 1.4 MB |
699 KB |
| Approx. Compression |
- | 3:1 | 9:1 | |
|
Interface software and an IEEE-1394 "FireWire" cable also accompany the camera, for high speed connection to a PC or Macintosh. A USB cable also comes with the camera, for direct printing to DPOF- and Pictbridge-compatible printers. (And the USB connection on the 1Ds Mark II also works for transferring images to a host computer, an advance over its little brother the 1D Mark II.) Downloading files to my Sony desktop running Windows XP (Pentium IV, 2.4 GHz), I clocked it at 2226 KBytes/second with Firewire, and 2226 KBytes/second with USB as well. (Limited by the 80x CF memory card?) (Cameras with slow USB interfaces run as low as 300 KB/s, cameras with fast v1.1 interfaces run as high as 600 KB/s. Cameras with USB v2.0 interfaces run as fast as several megabytes/second.)
Video Out
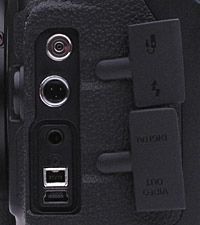
The 1Ds Mark II has a Video Out jack for connecting the camera to a television set, useful for reviewing images on a larger screen. A menu option lets you choose between NTSC and PAL timing, for European or US usage.
Power
 Power is supplied to the 1Ds Mark II via an NiMH rechargeable battery pack or the included "DC Coupler" (AC adapter) accessory. The NP-E3 battery pack and DC coupler both accompany the camera, along with a battery charger. According to Canon, a freshly charged NP-E3 battery pack should produce as many as 1,200 shots at normal temperature (28C/68F). At low temperatures, battery capacity can be significantly reduced, but the manual says that at freezing (0C/32F) the 1Ds Mark II can take 800 shots per charge. The (approximate) amount of battery life remaining is displayed on the top LCD status display panel. An Auto Power-Off feature automatically turns off the camera after 1, 2, 4, 8, 15, or 30 minutes, depending on the time set through the settings menu (you can also turn this off). A CR2025 lithium battery serves as the backup power supply for the camera's internal calendar and clock.
Working with the DC coupler, I performed my usual measurements on the 1Ds Mark II's power consumption in various operating modes. Here's what I found for the 1Ds Mark II's power consumption numbers:
| |
(@ 13v) |
(1650 mAh NP-E3 pack) |
| Capture Mode, "semi-sleep" | |
|
| Capture Mode, "awake" | |
|
| Memory Write (transient) | |
|
| Burst shooting, 4 fps | 927 |
n/a |
| Image Playback | |
|
The EOS-1Ds Mark II's power consumption is rather dramatically lower than that of the original EOS-1Ds across the board, regardless of operating mode. No doubt about it, this is a camera for the long haul, able to keep shooting all day long.
Included Software
Three software CDs come with the 1Ds Mark II, the first containing Canon's Solution Disk software for both PC and Macintosh platforms, the second containing Canon's new Digital Photo Professional software package, and the third Adobe Photoshop Elements. The camera connects to the computer via an IEEE-1394 "FireWire" interface cable. A USB cable is also included, for direct printing to Canon or other PictBridge/DPOF printers. The Solution Disk software package includes Canon Utilities, EOS Capture (for operating the camera from the computer), and the necessary drivers. I mentioned the Canon software earlier, calling particular attention to the ability it provides the user to customize the camera's tone curves. Here's a simple list of what's included on the cross-platform disk:
The two Canon applications shipped with the EOS-1Ds Mark II to some extent overlap in function, to the extent that I expect Canon in the future will merge both into a single application, almost certainly Digital Photo Professional. Here's a look at the two Canon applications:
Canon EOS Viewer Utility (version 1.1.10)
(Note: Screenshots in this section were collected with the EOS-1D Mark II, rather than the 1Ds. This has no effect on the software features though.)
This is Canon's workhorse image viewing utility, shipped in one form or another with Canon digital cameras for the last several years. This latest version has a somewhat updated user interface, as well as significantly improved performance when adjusting RAW-format image files. I unfortunately did still find it to be glacially slow when navigating into folders with large numbers of items in them, a trait shared by both Mac and PC versions of the program.
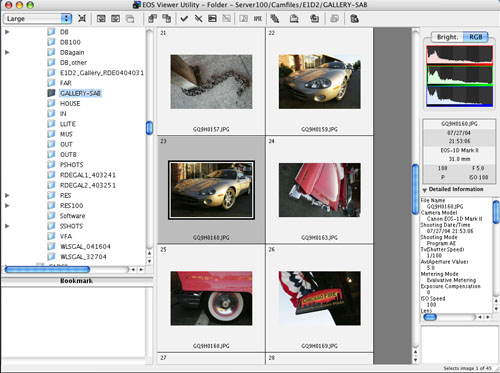
EOS Viewer's main window (shown above) is split into four panes: File/Folder list (upper right), thumbnail display (center), image information (right), and bookmark (bottom right). EOS viewer will display thumbnails directly from the camera (without having downloaded the images to the computer first), from a local hard drive, or from a network-attached drive. Clicking on an image causes its exposure information to be displayed in the righthand pane, where you now have a choice between a single brightness histogram, or a display showing separate histograms for the red, green, and blue color channels. (A nice touch.) You can select multiple images at once by shift-clicking on their thumbnails. Double-clicking on an image opens it for viewing, either fit to the window or 100% (1:1 camera/screen pixels). Icons across the top toolbar let you show or hide the thumbnails or the directory tree, move between open windows, rotate images, mark or unmark them, protect or unprotect them, play any attached sound clips, view and edit IPTC caption information, select all/marked/unmarked/protected/unprotected images, save files, transfer images to another application, start up the Capture application, or delete selected images. When you have an image open for individual viewing, a nifty feature lets you see what autofocus points were active when the image was captured. (This works with both JPEG and RAW formats.)
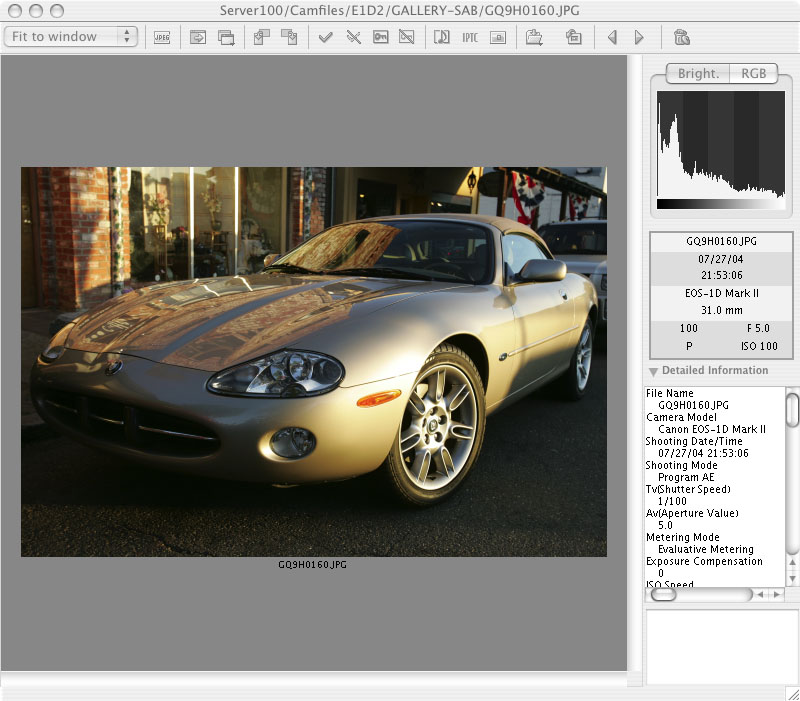
When you have an image open for individual viewing, there's not much else to do with JPEG files than inspect them more closely. - EOS Viewer doesn't provide any tools for editing JPEG files, apart from rotating them.
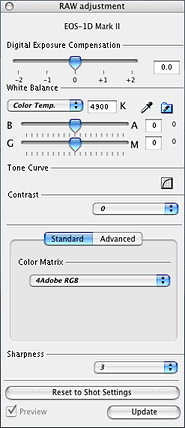 The Tool Palette (access from the View menu, or hit CTRL-T on the keyboard) lets you adjust RAW-mode image files. (If you hit CTRL-T while viewing a JPEG image, you'll just get an empty window.) The Tool Palette works in both Thumbnail or full-frame views, and you can manipulate multiple images simultaneously in Thumbnail view, simply by shift-click selecting them. A wide range of adjustments are possible, including (from the top down):
RAW-file image manipulation is the area where Canon has made the biggest improvements relative to earlier versions of this program, changes that you make now being reflected in the images after only a slight pause. Tone curves developed in EOS Viewer can be saved to disk, and then applied to the camera, stored on the camera in any of the three custom tone-curve memories. You can thus shoot a test image, manipulate the tone curve until you get it looking the way you want on the computer, and then download that custom tone curve into the 1Ds Mark II. Very slick! (This feature was available as far back as the original 1D, but prior to late 2004 the software application was so mind-numbingly slow that it just wasn't practical to create your own tone curves.) Another nice touch is that EOS Viewer saves its RAW-file adjustments in the file header, so they're remembered from one use of the program to another, while leaving the image data itself untouched.
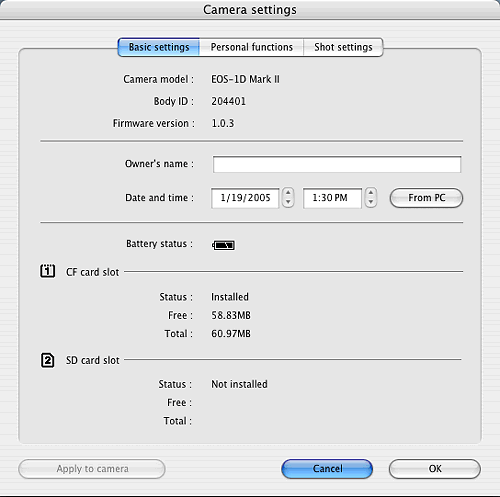
With the camera connected via its FireWire port, you can modify a variety of its internal settings, including Owner's name and date and time (which can be set directly from the PC, nice if your computer uses a time server to keep its clock accurate). The second screen gives you access to all the Personal Functions of the 1D Mark II. Important note: In order to access the Personal Functions from the camera's menu, you have to first enable them (one by one) via the EOS Viewer software. The third screen gives you control over the camera's various shot settings, including Parameters, Tone Curve (this is where you'd go to download a custom tone curve), Personal white balance, Color matrix, and JPEG quality.
Canon Digital Photo Professional (version 1.5.0.8)
This is the latest addition to Canon's imaging software, apparently intended primarily to provide better color management when working from RAW files. Digital Photo Professional's (DPP for short) main screen looks similar to that of EOS Viewer Utility (EVU for short), the most obvious difference being the different graphical treatment of the icons across the top, and the lack of an information pane on the right.
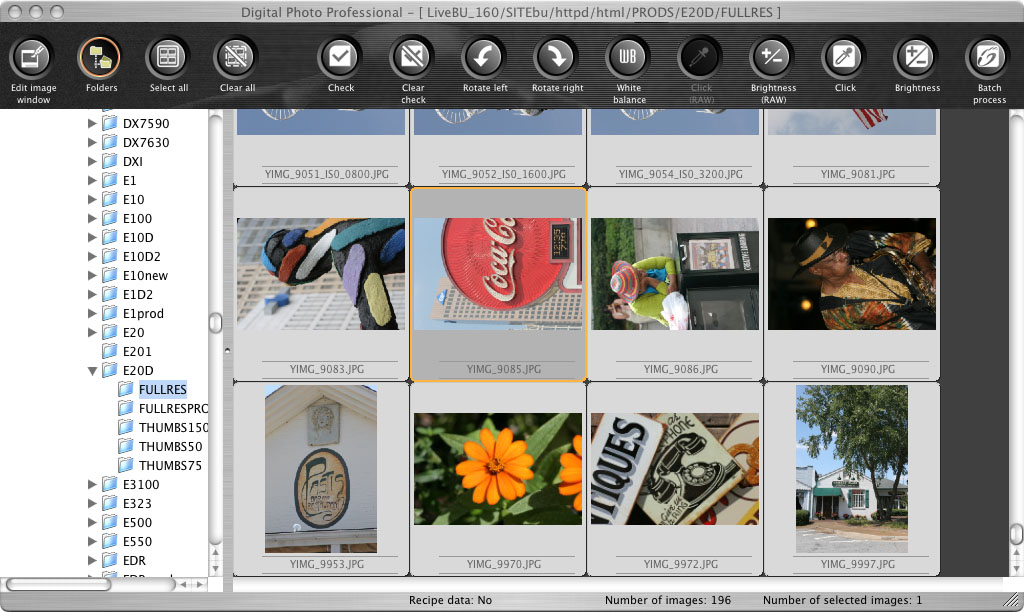
Some functions that were buried on the Tool Palette on EVU are brought out onto the icon bar in DPP, but other things are lacking, mainly anything involving connection to the camera. - You can't download files from the camera in DPP, control the camera, or upload custom settings. DPP does offer the ability to manipulate JPEG files as well as RAW ones though, and as noted elsewhere in this review, it does a significantly better job rendering difficult colors from RAW images, notably some reds and blues.
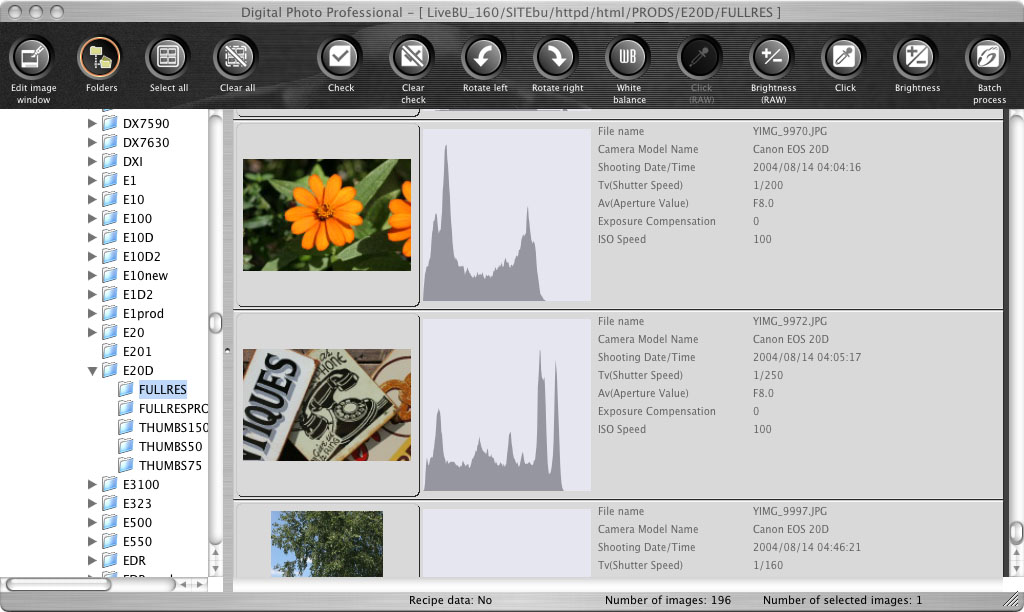
While it lacks EVU's info pane, DPP does offer a useful "Info view" of the files, combining a thumbnail with a brightness histogram and basic exposure information about each file. The information here isn't nearly as extensive as that in EVU's information pane, but it's much easier to access.
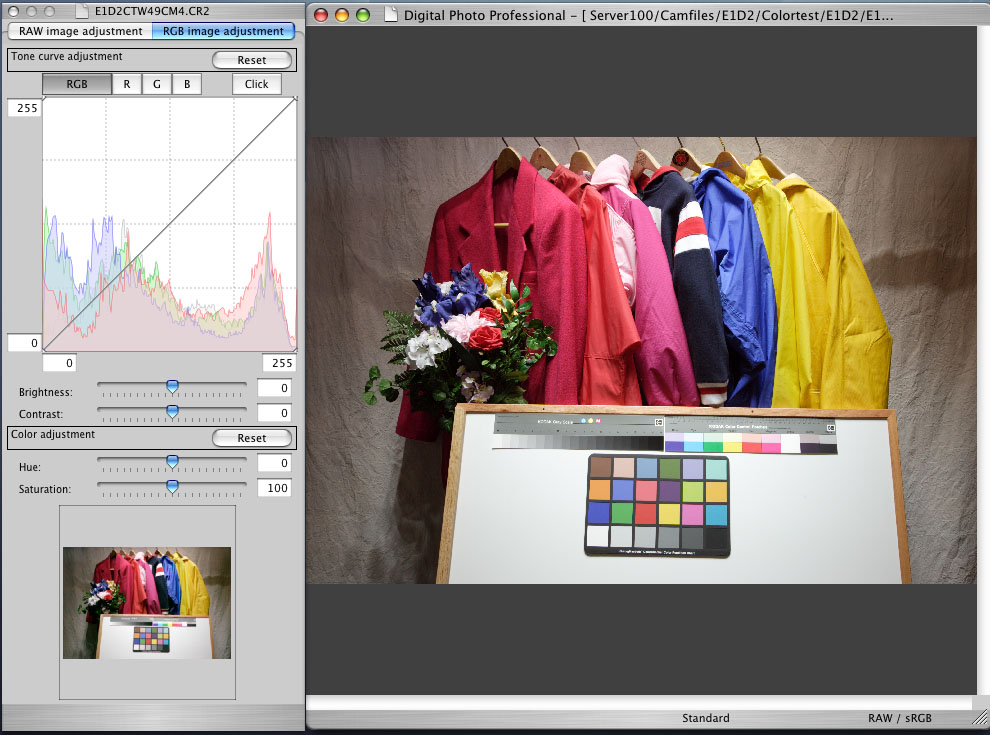
Just as with EVU, double-clicking on an image in DPP opens it into a larger window of its own. Likewise, hitting CTRL-T brings up a tools palette. The biggest difference here though, is that DPP lets you manipulate the tone curve, brightness, contrast, hue and saturation on JPEG files as well as RAW ones.
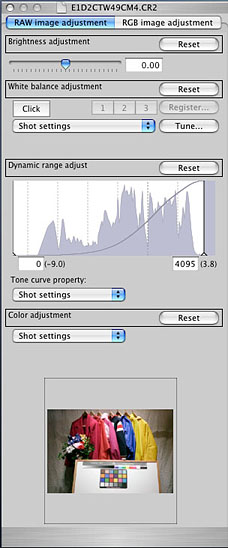 When manipulating RAW images, the tool palette looks slightly different, incorporating some (but not all) of the capabilities of EVU, as well as some new ones particular to DPP. The standard brightness (EV) adjustment leads the list, followed by a range of white balance options. The "Tune" button now leads to a more intuitive color-wheel display for making fine adjustments to color balance, rather than the blue-yellow/red-cyan sliders of EVU. There's a nice combined dynamic range/tone curve adjustment that lets you easily adjust how the 12-bit data of the RAW file maps onto the 8-bit display space, but you have much less control over the tone curve itself than in EVU, with just a single slider to shift it darker or lighter. (EVU lets you place multiple control points along the curve, and push/pull them however you like.) Finally, there's an option to adjust the camera's color handling to the Shot Settings, to a "Faithful" (basically, a setting that tries to match in-gamut colors more precisely, and lets out of gamut colors clip), and a Custom setting that lets you adjust hue and saturation via a pair of sliders.
DPP's batch-processing screen is a new addition, but in actuality, essentially all its capabilities were available in EVU's Save As dialog, just arranged slightly differently. Still, nice to have them arranged cleanly in a separate option screen, as shown here.
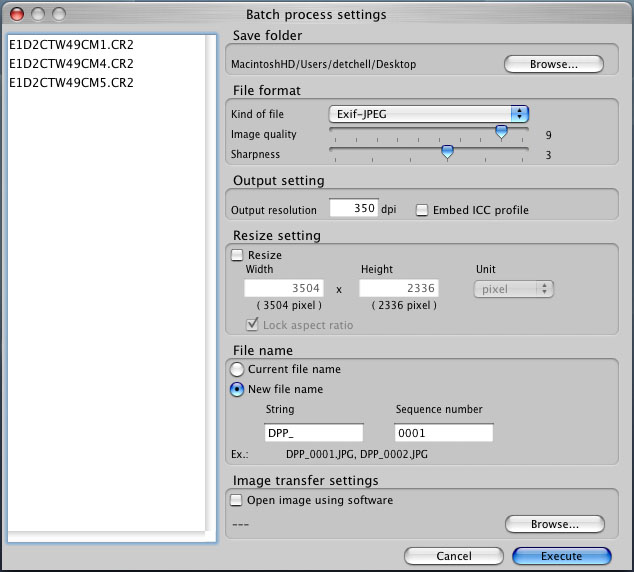
Overall, as I noted at the outset of the software discussion here, there's a fair bit of duplication and redundancy between EVU and DPP. The obvious direction for Canon to go would be to integrate the camera-control functions of EVU into DPP (including most particularly custom tone curve creation), and then dispense with EVU entirely. For anyone doing color-critical work, DPP's color rendering (from RAW files) is significantly more sure-footed than either EVU's or that of the 1Ds Mark II itself.
In the Box
Included with the EOS-1Ds Mark II digital camera are the following items:
NOTE: No memory card is included with the Mark II, so plan on buying a large SD or CF memory card.
Test Results
In keeping with my standard test policy, the comments given here summarize only my key findings. For full details on each of the test images, see the EOS 1Ds Mark II's "pictures" page.
For a look at some more pictorial photos from this camera, check out our Canon EOS 1Ds Mark II Photo Gallery.
Not sure which camera to buy? Let your eyes be the ultimate judge! Visit our Comparometer(tm) to compare images from the Canon EOS 1Ds Mark II with those from other cameras you may be considering. The proof is in the pictures, so let your own eyes decide which you like best!
Conclusion
The EOS-1Ds was an impressive digital SLR at its debut, carrying forward the incredibly rugged camera platform of the original EOS-1D, and boosting resolution to levels previously unheard of in portable 35mm-style digital SLRs. Now, the EOS-1Ds Mark II ups the ante with nearly 17 million effective pixels, faster processing, lower power consumption, and a host of other enhancements. Canon's advanced CMOS sensor technology delivers impressively low image noise at high ISO, but particularly during long exposures. And of course, the big story with the 1Ds Mark II is that it's a full frame digital SLR, with a sensor the same size as a 35mm film frame, making possible true wide angle shots with standard 35mm focal lengths. (If you've been shooting with a d-SLR with a smaller sensor, wait till you see what the world looks like through a 16-35mm lens on the 1Ds Mark II.) Bottom line, just an excellent digital SLR, easily deserving of its place at the top of Canon's d-SLR lineup. Highly recommended!
Free Photo Lessons

Learn how to take stunning photos with simple pro lighting tips, in our free Photo School area!
<<EOS-1Ds Mark II Test Images | Additional Resources and Other Links>>
Reader Comments!
Questions, comments or controversy on this product? Click
this link to see what other Imaging Resource readers have had to say about
the Canon EOS-1Ds Mark II, or add comments of your own!
