Olympus E-P1 Exposure
Metering
Five metering systems are available on the Olympus E-P1: Digital ESP, Center-weighted, Spot, Spot HI (highlights), and Spot SH (shadows). All are accessed through the various menu systems on the camera's LCD monitor. Under the default Digital ESP setting, the camera takes an exposure reading from 324 segments of the image (this is up from 49 segments on Olympus SLRs), and chooses the best exposure based on brightness and contrast across the entire scene. 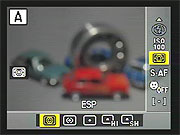 Center-weighted metering reads from the center of the frame, but from a fairly large area. Spot metering simply reads the exposure from the very center of the image, so you can pinpoint the specific area of the photograph you want properly exposed. (Spot metering is very handy when you have a subject that's backlit, or that has a very different brightness, either lighter or darker, than the background.) The two additional Spot options provide highlight and shadow control, whenever shooting in very bright or very dark conditions. Exposure (and autofocus) is optimized for faces when Face Detect is enabled. Metering range is from 0 to 20 EV, at room temperature with a 50mm f/2 lens at ISO 100. The Olympus E-P1 also gives you the ability to tweak the exposure of each metering mode as well, via a new Custom Menu called Exposure Shift. It allows you to assign an offset in 1/6 EV intervals between -1 and +1 EV for Digital ESP, Center-weighted, and Spot metering modes.
An AE/AF Lock button locks the current exposure settings whenever pressed, so you can independently lock exposure and focus. (AE Lock is useful when you want to base your exposure on an off-center subject. Point the camera at the subject, lock the exposure, then recompose your shot however you like. Your subject will be correctly exposed, regardless of what might be in the center of the frame when you finally snap the shutter.) Through a Custom menu, you can designate the function of the AE/AF lock button, and how it works in conjunction with the Shutter button. You can also specify which metering mode is used when this button is pressed. Available options are Auto, Center-Weighted, Spot, Spot HI, and Spot SH.
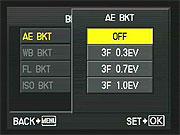 In situations where exposure compensation is necessary, simply press the Exposure Compensation button and turn either dial (in all exposure modes except Manual and Bulb) and the EV value will display on the LCD. You can increase or decrease the exposure in either 0.3, 0.5, or 1.0 EV increments (selected via a menu option), up to a maximum of +/- 3 EV. Or, you can use the Auto Exposure Bracketing (AEB) function to automatically bracket three frames at 0.3, 0.7, or 1.0 EV steps each. The auto bracketing will center its efforts around whatever exposure you've chosen as the starting point, including any exposure compensation adjustments you've made. AEB is handy for those times when you want to make sure you get just the right exposure for a critical subject.
White Balance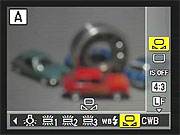 White balance options include Auto, Sunny, Shadow, Cloudy, Tungsten, Fluorescent 1, Fluorescent 2, Fluorescent 3, Flash, One-Touch, and Custom, to accommodate a variety of lighting situations. Pressing the White Balance button and turning either Control dial adjusts the setting, and the Kelvin temperature is displayed in the LCD monitor. The Olympus E-P1 offers a Custom setting, which lets you choose from a range of Kelvin temperature settings, from 2,000K to 14,000K. The One-Touch option is useful for basing the white balance on a white card. You can also adjust the white balance, controlling the amount of amber-blue and green-magenta bias in the color balance, in any of the selected modes, in +/- 7 steps. This ability to "tweak" the white balance, called White Balance Compensation, is very helpful when dealing with difficult light sources. The E-P1 also features a white balance bracketing. If activated, the camera will take three successive images, either biasing between amber and blue or green and magenta. You can set the images to vary by two, four, or six arbitrary adjustment steps.
ISO Sensitivity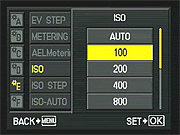 The Olympus E-P1 lets you adjust its light sensitivity, in either 1 or 1/3 EV steps, with options of 100 to 6,400 ISO equivalents, or to an Auto mode in which the camera selects an ISO appropriate to the subject's brightness. You can set a maximum ISO point for the Auto mode which won't risk noise in bright situations, from 200 to 6,400, as well as the default (minimum) ISO, also from 200 to 6,400. The higher ISO settings are helpful when you want faster shutter speeds under normal lighting, to help freeze fast action. There is also a unique ISO bracketing feature, where the camera takes three images, varying the ISO but keeping the shutter speed and aperture fixed. Of course, as with all digicams, the higher ISO settings produce photos with more image noise, in much the same way that higher-ISO films show more film grain. To combat this problem, the E-P1 offers a Noise Reduction option through the Record menu, which reduces the amount of image noise from long exposures, particularly at the higher ISO settings, as well as variable high ISO noise reduction Olympus calls Noise Filter. Noise Filter options consist of Off, Low, Standard, and High.
Picture Modes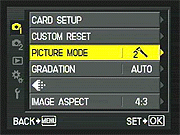 There are also options on the Record menu to set the color mode, which offers Vivid, Natural, Muted, Portrait, and Monotone, as well as custom options. Contrast, Sharpness, and Saturation levels may be adjusted in five steps for Vivid, Natural, Muted, and Portrait; while Contrast and Sharpness levels can be adjusted in five steps for Monotone. Yellow, Orange, Red, or Green filter effects are available for Monotone, as well as Sepia, Blue, Purple, or Green picture tones. In addition, the Olympus E-P1 has a Gradation setting to control the brightness of the entire image. You can choose between the Auto, Normal, Low, and High Key settings. A color space option under the Record menu lets you choose between sRGB (for Windows machines) and Adobe RGB (for Adobe Photoshop) color options.
Multiple Exposures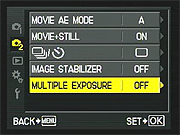 The Olympus E-P1 supports multiple exposures of two frames overlaid as one image. You can overlay images while they are being taken, or overlay up to four RAW frames in playback mode. You can have the camera automatically adjust the gain (brightness) of each image by 1/2, by enabling the Auto Gain feature.
Drive Mode and Self-Timer
The Drive setting accesses Single-shot and Continuous modes, as well as Self-timer modes. Single-shot shoots one frame per shutter press, while Continuous mode shoots bursts at about 3 frames-per-second. As is usually the case, the number of frames you can capture continuously is limited by the camera's buffer memory capacity, the speed of your memory card, and the image file size and quality. 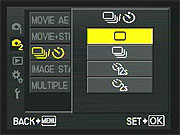
The Olympus E-P1 also offers two Self-Timer modes for self-portraits or those occasions when you don't want to risk camera shake on a long exposure by pressing the Shutter button to trip the shutter. You can choose between a 2 or 12 second countdown. The 2 second countdown is useful for times when you're taking a long exposure with the camera on a tripod. Surprisingly for a camera without a mirror, there is also an Anti-Shock option, which allows a programmable delay from 1/8s to 30s between the shutter button being pressed and the actual exposure taken.
When the optional RM-UC1 Remote Cable is attached via the USB-AV/OUT port, remote operation is available. No wireless remote is available for the E-P1.
Shading Compensation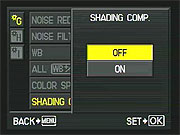 The E-P1 is the third Olympus (after the E-30 and E-620)to implement what the company calls Shading Compensation, which is another term for lens vignetting or corner shading correction. Canon and Nikon offer a similar feature on some of their recent models, and it's nice to see the Olympus E-P1 does too. It's not clear whether the camera applies fixed compensation based on lens type, or by analyzing the actual light fall-off in the corners of captured images.
Art Filters Like the E-30 and E-620 SLRs, the Olympus E-P1 offers what the company calls Art Filters effects. There are six to choose from: Pop Art, Soft Focus, Pale & Light Color, Light Tone, Grainy Film, and Pin Hole. What's unique about these is that the camera performs these filters as it captures the image, taking exposure into account. As one might expect, Art Filters are not applied to RAW files. If RAW mode is chosen, the camera will automatically enable LN+RAW mode, and save the modified image as a large/normal JPEG.
The images above were taken from our standardized test shots. For a collection of more pictorial photos, see our Olympus PEN E-P1 Photo Gallery .
Not sure which camera to buy? Let your eyes be the ultimate judge! Visit our Comparometer(tm) to compare images from the Olympus PEN E-P1 with those from other cameras you may be considering. The proof is in the pictures, so let your own eyes decide which you like best!
 Fujifilm GFX 50S Review
 Fujifilm X-T3 Review
 Olympus E-M5 III Review

Follow Imaging Resource