Olympus E-PL1 Modes and Menus
Olympus E-PL1 Capture Mode
 When powered on, the camera is automatically placed into Record mode. The Exposure Mode dial on top of the camera sets the main shooting mode, with the following options:
 Program AE (Program Shift): This mode places the camera in control over both aperture and shutter speed, while the user has access to all other menu functions.
Pressing the Exposure Compensation (Up Arrow) button once readies the camera
for Program Shift mode, indicated by a Ps icon on the LCD display or EVF.
Subsequent Up or Down arrow presses step through a range of equivalent
exposure settings, while Left or Right arrow presses adjust exposure
compensation. Program Shift is cleared by adjusting the exposure back to the
values originally selected by the camera.
Program AE (Program Shift): This mode places the camera in control over both aperture and shutter speed, while the user has access to all other menu functions.
Pressing the Exposure Compensation (Up Arrow) button once readies the camera
for Program Shift mode, indicated by a Ps icon on the LCD display or EVF.
Subsequent Up or Down arrow presses step through a range of equivalent
exposure settings, while Left or Right arrow presses adjust exposure
compensation. Program Shift is cleared by adjusting the exposure back to the
values originally selected by the camera. Aperture Priority:
Puts the user in control of the aperture setting while the camera selects
the best shutter speed. (The aperture range varies with the lens in use.)
Aperture Priority:
Puts the user in control of the aperture setting while the camera selects
the best shutter speed. (The aperture range varies with the lens in use.)
 Shutter Priority:
The opposite of Aperture Priority, this mode allows the user to set the shutter speed,
from 1/2,000 to 60 seconds, while the camera selects the most appropriate
aperture setting.
Shutter Priority:
The opposite of Aperture Priority, this mode allows the user to set the shutter speed,
from 1/2,000 to 60 seconds, while the camera selects the most appropriate
aperture setting.
 Manual: Provides complete user control over the exposure,
including both aperture and shutter speed settings. A Bulb shutter setting
also becomes available in this mode, allowing variable length exposures for
as long as you hold down the shutter button, up to a maximum of 30 minutes.
Manual: Provides complete user control over the exposure,
including both aperture and shutter speed settings. A Bulb shutter setting
also becomes available in this mode, allowing variable length exposures for
as long as you hold down the shutter button, up to a maximum of 30 minutes. Movie Mode: Used for shooting HD (1,280 x 720) or SD (640 x 480) movies at 30 frames per second with
monaural sound (unless using the optional stereo microphone jack adapter). A menu allows Program, Aperture Priority or Manual modes to be used, as well as the one of the
six available Art Filters.Most of the art filters reduce the capture frame rate, causing the
live preview and captured video to
appear jerky.The Diorama art filter is particularly
strongly affected, and curiously, is played back at roughly 15x realtime
speed. Hence audio recording is disabled when using this
filter.
Movie Mode: Used for shooting HD (1,280 x 720) or SD (640 x 480) movies at 30 frames per second with
monaural sound (unless using the optional stereo microphone jack adapter). A menu allows Program, Aperture Priority or Manual modes to be used, as well as the one of the
six available Art Filters.Most of the art filters reduce the capture frame rate, causing the
live preview and captured video to
appear jerky.The Diorama art filter is particularly
strongly affected, and curiously, is played back at roughly 15x realtime
speed. Hence audio recording is disabled when using this
filter.-
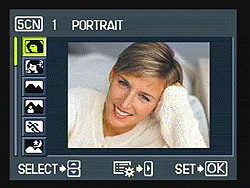
 Scene Mode:This mode provides access to the 19 preset shooting modes via a scene menu. Scene modes available are: Portrait, e-Portrait, Landscape, Landscape + Portrait, Sport, Night Scene, Night + Portrait, Children, High Key, Low Key, DIS Mode, Macro, Nature Macro, Candle, Sunset, Documents, Panorama, Fireworks, and Beach & Snow.
 -

 Art Filters: This mode accesses the six available Art Filter modes: Pop Art, Soft Focus, Grainy Film, Pin Hole, Diorama and Gentle Sepia. As in movie-mode, frame rate is adversely impacted when using most art filters, and the diorama effect in particular causes a very slow refresh rate for live view.
 -
 Intelligent Auto: This mode gives the camera control
over most exposure variables: The E-PL1 analyses the scene and automatically selects from Portrait, Landscape,
Macro, Sports, Night Scene, and Night Scene Portrait exposure modes.
The user can still adjust image resolution / compression, aspect ratio,
drive mode, image stabilizer, focus mode / point, and whether the flash
should fire automatically, or be suppressed
Intelligent Auto: This mode gives the camera control
over most exposure variables: The E-PL1 analyses the scene and automatically selects from Portrait, Landscape,
Macro, Sports, Night Scene, and Night Scene Portrait exposure modes.
The user can still adjust image resolution / compression, aspect ratio,
drive mode, image stabilizer, focus mode / point, and whether the flash
should fire automatically, or be suppressed
A Live Guide function accessed by pressing the Start / OK button allows 15-step control over saturation, hue, brightness, aperture, and shutter speed -- all accomplished with vertical sliders and "friendlier" terminology. For example, instead of Aperture, we have a "Blur Background" slider, labeled "Blur" at the top, and "Sharp" at the bottom. There's also a separate section of Shooting Tips, with advice on how to capture attractive images.
 Movie Record Button: Pressing this dedicated movie record button will start and stop movie recording.
Confusingly, in all but two exposure modes, the movies will be recorded using
Program autoexposure, regardless of what modes are currently selected on the
Mode dial, and in the Custom menu's Movie Mode setting. The sole exceptions are
the Art Filter and Movie mode positions on the Mode dial. In the Art Filter
mode, the movie will be recorded with the same art filter type as used for still
images, overriding the Custom menu Movie Mode setting. In Movie mode, the custom
menu setting will determine which exposure mode to use. The Movie Record button can be enabled or disabled,
or used for something other than movie recording, via a Custom menu setting.
(It's also possible to use the Function button as a Movie Record button, if the
function of the Movie Record button itself has been changed.) If the Movie
Record button is disabled and movie recording not assigned to the Function
button instead, then the Shutter Release button initiates movie recording in the
PL1's Movie mode, and movie recording becomes impossible in all other modes.
Movie Record Button: Pressing this dedicated movie record button will start and stop movie recording.
Confusingly, in all but two exposure modes, the movies will be recorded using
Program autoexposure, regardless of what modes are currently selected on the
Mode dial, and in the Custom menu's Movie Mode setting. The sole exceptions are
the Art Filter and Movie mode positions on the Mode dial. In the Art Filter
mode, the movie will be recorded with the same art filter type as used for still
images, overriding the Custom menu Movie Mode setting. In Movie mode, the custom
menu setting will determine which exposure mode to use. The Movie Record button can be enabled or disabled,
or used for something other than movie recording, via a Custom menu setting.
(It's also possible to use the Function button as a Movie Record button, if the
function of the Movie Record button itself has been changed.) If the Movie
Record button is disabled and movie recording not assigned to the Function
button instead, then the Shutter Release button initiates movie recording in the
PL1's Movie mode, and movie recording becomes impossible in all other modes.
In Playback mode, the Movie Record button serves as a dedicated Protect
button, marking images to be protected from deletion, or clearing the protection
marker. (This doesn't protect images from deletion if the flash card is
formatted, however.)
 Playback Mode: The Playback button on the rear panel accesses Playback mode, where you can review captured images. The left and right arrow keys scroll forward and backward one image at a time, while the up and down keys scroll ten images at a time. You can enlarge captured images or display them in an index format for quick viewing.
It's also possible to convert Raw images to JPEGs, perform basic editing
functions such as cropping and red-eye fix, view a slideshow, and protect or
delete images.
Playback Mode: The Playback button on the rear panel accesses Playback mode, where you can review captured images. The left and right arrow keys scroll forward and backward one image at a time, while the up and down keys scroll ten images at a time. You can enlarge captured images or display them in an index format for quick viewing.
It's also possible to convert Raw images to JPEGs, perform basic editing
functions such as cropping and red-eye fix, view a slideshow, and protect or
delete images.
Olympus E-PL1 Menus
Pressing the Menu button provides access to the camera's full menu system. The following options are available in most camera modes as menu tabs at the left of the display:
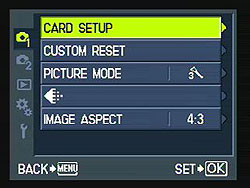
Record Menu 1:
| Record Menu 1 Options: | |||
|
Top-Level
Selection |
Second-Level
|
Third-Level
|
Notes
|
|
Card Setup
|
- All Erase
- Format |
|
Erases images from the memory card or formats the card.
|
|
Custom Reset
|
- Reset
- Reset 1 - Reset 2 |
|
You can register two sets of custom settings, or reset to factory defaults (Reset option). If an exposure shift or level adjust values are set, they will not be reset by the custom reset function.
|
|
Picture Mode
|
- i-Enhance
- Vivid - Natural - Muted - Portrait - Monotone - Custom |
- Contrast (Lo to Hi)
- Sharpness (Lo to Hi) - Saturation (Lo to Hi) - Gradation - Effect (Low, Standard or High) - B&W Filter: Neutral, Yellow, Orange, Red, or Green -Pict. Tone: Neutral, Sepia, Blue, Purple or Green |
Select a preset for specific situations, or manually adjust each preset. New i-Enhance preset identifies the main subject in a scene, then boosts brightness and saturation for just areas of the image which comprise that subject, to help draw your attention to it. Effect is only available for i-Enhance and Custom modes. B&W Filter and Pict. Tone are only available for Monotone mode. Custom mode allows one of the other modes to be duplicated, and combined with a specific gradation level.
|
|
Quality
|
- Still Picture
|
- RAW
- LF JPEG - LN JPEG - MN JPEG - SN JPEG - LF JPEG + RAW - LN JPEG+ RAW - MN JPEG + RAW - SN JPEG + RAW |
Select the image size and quality, and the movie mode. Available options
depend on the setting of Quality Set option in Custom menu G.
Options listed here are defaults.
|
|
- Movie
|
- HD
- SD |
HD: 1,280x720 at 30fps,
SD: 640x80 at 30fps |
|
|
Image Aspect
|
- 4:3
- 16:9 - 3:2 - 6:6 |
|
Sets the still image aspect ratio. Shows the sizes of RAW, Large, Middle, and Small JPEGs.
Raw files are always 4:3 aspect, regardless of this setting.
|
Record Menu 2:

| Record Menu 2 Options: | |||
|
Top-Level
Selection |
Second-Level
|
Third-Level
|
Notes
|
|
Drive Mode
|
- Single
- Continuous - 12s Self-timer - 2s Self-timer |
|
|
|
Image Stabilizer
|
- Off
- I.S. 1 - I.S. 2 - I.S. 3 - Focal Length |
|
I.S. 1 stabilizes in both directions. I.S. 2 stabilizes in vertical plane, I.S. 3 stabilizes in the horizontal plane.
|
|
Bracketing
|
- AE BKT
|
- Off
- 3F 0.3EV - 3F 0.7EV - 3F 1.0EV |
Exposure bracketing.
|
|
- WB BKT
|
- Off
- 3F 2STEP - 3F 4STEP - 3F 6STEP |
White Balance bracketing. Selectable for both Amber-Blue and Green-Magenta directions.
|
|
|
- FL BKT
|
- Off
- 3F 0.3EV - 3F 0.7EV - 3F 1.0EV |
Flash exposure bracketing.
|
|
|
- ISO BKT
|
- Off
- 3F 0.3EV - 3F 0.7EV - 3F 1.0EV |
ISO sensitivity bracketing.
|
|
|
Multiple Exposure
|
Frame
|
- Off
- 2 Frames |
Capture multiple exposures, or overlay existing RAW shot.
|
|
Auto Gain
|
- Off
- On |
||
|
Overlay
|
- Off
- On |
||
|
Flash Exposure Compensation
|
- -3 to +3 in 1/3 EVsteps
|
|
|
|
Flash RC Mode
|
- Off
- On |
|
Enables or disables wireless (remote control) flash. When enabled,
the built-in flash fires in control mode only, and doesn't
contribute to the exposure.
|
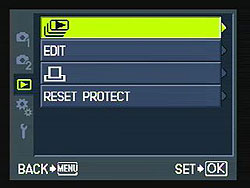
Playback Menu:
| Playback Menu Options: | |||
|
Top-Level
Selection |
Second-Level
|
Third-Level
|
Notes
|
|
Slideshow
|
- Start
|
|
Slideshows of stills (and movies) with optional background music.
|
|
- BGM
|
- Melancholy
- Joy - Cool - Off |
||
|
- Slide
|
- All
- Still Picture - Movie |
||
|
- Slide Interval
|
- 2 - 10 sec
|
||
|
- Movie Interval
|
- Full
- Short |
||
|
Edit
|
- Sel Image
|
RAW Data Edit:
- Yes - No |
Edit still images. You cannot edit movies. Selecting a RAW image creates a JPEG copy for editing.
|
|
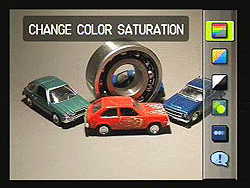
JPEG:
- Shadow Adjustment - Redeye Fix - Crop - Aspect - Black & White - Sepia - Saturation - Resize - e-Portrait |
|||
|
Audio Record:
- No - Start - Erase |
|||
|
- Image Overlay
|
- 2 Images Merge
- 3 Images Merge |
Overlays multiple images, to create a single new image. Only works
with Raw files, and the output image is saved as a JPEG or a Raw+
Large/Normal JPEG, depending on whether Still Picture Quality in
Record Menu 1 is set to JPEG or Raw. Each source image can have its
brightness adjusted from 0.1 to 2.0x individually.
|
|
|
Print
|
- Single Image
- All |
|
Marks single or all frames for printing.
|
|
Reset Protect
|
- Yes
- No |
|
Cancels all write protection marks.
|
Custom Menu:
| Custom Menu Options, Tab A: AF/MF | |||
|
Top-Level Selection |
Second-Level |
Third-Level |
Notes |
|
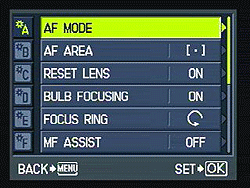
AF Mode
|
- Still Picture
|
- S-AF
- C-AF - MF - S-AF+MF - C-AF + TR |
Sets the autofocus mode in both still capture and Movie mode. Modes are Single, Continuous, Manual, Single with Manual adjust, and Continuous with Tracking.
|
|
- Movie
|
- S-AF
- C-AF - MF - S-AF+MF - C-AF + TR |
||
|
AF Area
|
- All Target
|
|
All automatically selects one of the AF areas.
|
|
- Single Target
|
- AF point selection screen
|
||
|
Reset Lens
|
- Off
- On |
|
Resets focus to infinity when camera turns off.
|
|
Bulb Focusing
|
- Off
- On |
|
Enables focusing during Bulb exposures.
|
|
Focus Ring
|
- Counter-clockwise
- Clockwise |
|
Controls the direction of focus ring.
|
|
MF Assist
|
- Off
- On |
|
Enables automatic magnification during manual focus.
|
|
Set Home
|
- All Target
|
|
All automatically selects one of the AF areas.
|
|
- Single Target
|
- AF point selection screen
|
||
| Custom Menu Options, Tab B: Button | |||
|
Top-Level
Selection |
Second-Level
|
Third-Level
|
Notes
|
|
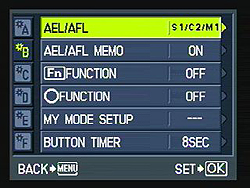
AEL/AFL
|
- S-AF
|
- Mode 1
- Mode 2 - Mode 3 |
Controls the function of the Shutter and AEL/AFL buttons in each AF mode.
|
|
- C-AF
|
- Mode 1
- Mode 2 - Mode 3 - Mode 4 |
||
|
- MF
|
- Mode 1
- Mode 2 - Mode 3 |
||
|
AEL/AFL Memo
|
- Off
- On |
|
Off setting locks exposure only while button is held down.
|
|
Function Button
|
- Fn Face Detect
- Depth of Field Preview - One-Touch WB - AF Home - MF Mode - RAW - Test Picture - My Mode - Waterproof Protector Mode - AEL / AFL - Start / Stop Movie Recording - Backlit LCD - Off |
|
Assigns a function to the Fn button. Other than Off, you can't select the same function currently assigned to the Movie Recording button.
|
|
Movie Recording Button
|
- Fn Face Detect
- Depth of Field Preview - One-Touch WB - AF Home - MF Mode - RAW - Test Picture - My Mode - Waterproof Protector Mode - AEL / AFL - Start / Stop Movie Recording - Backlit LCD - Off |
|
Assigns a function to the Movie Recording button. Other than Off, you can't select the same function currently assigned to the Function button.
|
|
My Mode Setup
|
- My Mode 1
- My Mode 2 |
- Set
- Reset |
Lets you register settings for My Mode.
|
|
Button Timer
|
- 3 Sec.
- 5 Sec. - 8 Sec. - Hold |
|
Sets how long a button's function displays after a quick press.
|
| Custom Menu Options, Tab C: Release/Drive | |||
|
Top-Level
Selection |
Second-Level
|
Third-Level
|
Notes
|
|
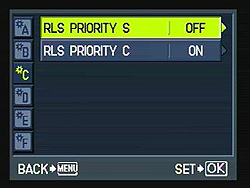
RLS Priority S
|
- Off
- On |
|
If enabled, the camera will
release the shutter before AF function is complete.
|
|
RLS Priority C
|
- Off
- On |
|
If enabled, the camera will release the
shutter before AF function is complete.
|
| Custom Menu Options, Tab D: Disp/Sound/PC | |||
|
Top-Level Selection |
Second-Level |
Third-Level |
Notes |
|
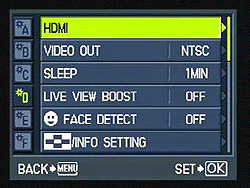
HDMI
|
- 1080i
- 720p - 480p/576p |
|
Selects which format to use for high definition video output, and whether to enable or disable HDMI CEC control of the camera using the TV's remote.
|
|
- HDMI Control
|
- Off
- On |
||
|
Video Out
|
- NTSC
- PAL |
|
Selects which format to use for standard-definion video output.
|
|
Sleep
|
- Off
- 1 minute - 3 minutes - 5 minutes - 10 minutes |
|
Sets the camera to go to sleep after a period of inactivity.
|
|
Live View Boost
|
- Off
- On |
|
If on, boosts the LCD brightness.
|
|
Face Detect
|
- Off
- On |
|
If on, detects faces in the frame and sets focus for those faces.
|
|
Info Setting
|
- Play Info
|
- Image Only
- Overall - Histogram - Highlight & Shadow - Light Box |
Information displayed when the INFO button is pressed.
|
|
- Live View Info
|
- Displayed Grid (4 types or off)
- Histogram - Highlight & Shadow - Multi View - Image Only |
||
|
- Index / Calendar Display Setting
|
- 4-up
- 9-up - 25-up - 100-up - Calendar |
Enables or disables the various index and calendar displays in
playback mode. It is possible to disable all of them, making it
impossible to view more than one image at a time on-screen.
|
|
|
Control Setting
|
- iAuto
- P/A/S/M - Art / Scene |
- Live Guide (iAuto only)
- Live Control - Super Control Panel |
Enables or disables the various control panels in different record
modes.
|
|
Histogram Setting
|
- Highlight
|
- 245 - 255
|
Selects the threshold level at which the Highlight & Shadow display
mode should warn of under or overexposure.
|
|
- Shadow
|
- 0 - 10
|
||
|
EVF Adjust
|
- Hue (15 steps)
- Brightness (15 steps) |
|
Adjusts the brightness and hue of the electronic viewfinder
|
|
Backlit LCD
|
- 8 sec
- 30 sec - 1 min - Hold |
|
Determines how long the LCD backlight should remain lit during
inactivity
|
|
Mode Guide
|
- Off
- On |
|
Display help for the selected mode when the Mode dial is rotated.
|
|
Close Up Mode
|
- Mode 1
- Mode 2 |
|
Determines whether playback zoom should be immediate, or allow
selection of the zoom area with a green frame first, then allow zoom
directly to the framed area.
|
|
Sound
|
- Off
- On |
|
Turns the camera's beep sounds on or off.
|
|
Volume
|
- 5 levels, or off
|
|
Speaker volume.
|
|
USB Mode
|
- Auto
- Storage - MTP |
|
|
| Custom Menu Options, Tab E: EXP/Metering/ISO | |||
|
Top-Level
Selection |
Second-Level
|
Third-Level
|
Notes
|
|
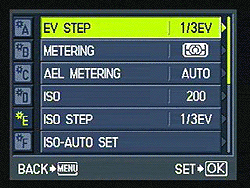
EV Step
|
- 1/3 EV
- 1/2 EV - 1 EV |
|
Sets the exposure compensation increment.
|
|
Metering
|
- ESP
- Center-weighted - Spot - Spot Highlights - Spot Shadows |
|
Sets the exposure metering mode.
|
|
AEL Metering
|
- Auto
- Center-weighted - Spot - Spot Highlights - Spot Shadows |
|
Controls the type of metering performed via the AEL/AFL button.
|
|
ISO
|
- Auto
- 100 - 200 - 400 - 800 - 1,600 - 3,200 |
|
Sets the current ISO sensitivity. (Intermediate values appear if ISO Step is set to 1/3 EV.)
|
|
ISO Step
|
- 1/3 EV
- 1 EV |
|
Sets the ISO EV step size.
|
|
ISO-Auto Set
|
- High Limit
|
- 200
- 400 - 800 - 1,600 - 3,200 |
Sets the upper limit and default of the Auto ISO setting.
(Intermediate values appear if ISO Step is set to 1/3 EV.)
|
|
- Default
|
- 200
- 400 - 800 - 1,600 - 3,200 |
||
|
ISO-Auto
|
- P / A / S
- All |
|
Sets a shooting mode that automatically enables Auto ISO.
|
|
Bulb Timer
|
- 30 minutes
- 25 minutes - 20 minutes - 15 minutes - 8 minutes - 4 minutes - 2 minutes - 1 minute |
|
Sets the maximum time for the Bulb exposure.
|
|
Anti-Shock
|
- Off
- 1/8s to 30s |
|
Select the interval between pressing the shutter button and releasing the shutter.
|
| Custom Menu Options, Tab F: Flash Custom | |||
|
Top-Level
Selection |
Second-Level
|
Third-Level
|
Notes
|
|
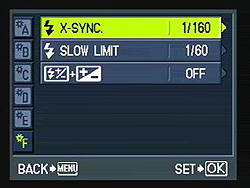
Flash X-Sync
|
- 1/60 to 1/160
|
|
Sets shutter sync speed for external flash firing.
|
|
Flash Slow Limit
|
- 30 to 1/160 (1/60 is default)
|
|
Sets the lower shutter limit for the Slow Sync flash modes.
|
|
Flash EV Comp. + EV Comp.
|
- Off
- On |
|
If on, flash EV comp. will be added to overall EV comp. and flash intensity control.
|
| Custom Menu Options, Tab G: Quality/Color/WB | |||
|
Top-Level
Selection |
Second-Level
|
Third-Level
|
Notes
|
|
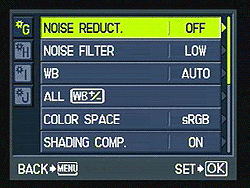
Noise Reduction
|
- Off
- On - Auto |
|
Long exposure noise reduction (dark frame subtraction).
|
|
Noise Filter
|
- Off
- Low - Standard - High |
|
Noise reduction processing setting. Higher values recommended for high ISO.
|
|
White Balance
|
- Auto
- 5300 K (Daylight) - 7500 K (Shade) - 6000 K (Cloudy) - 3000 K (Tungsten) - 4000 K (Fluorescent 1) - 4500 K (Fluorescent 2) - 6600 K (Fluorescent 3) - 5500 K (Flash) - Custom - Kelvin (2000 - 14000 K) |
- Fine tune Amber / Green (15 steps) for all except Kelvin
|
AEL/AFL button can capture a preview shot to confirm the
white balance accuracy.
|
|
All (WB +/-)
|
- All Set
|
- Amber -7 to +7
- Green -7 to +7 |
In All Set, you can apply the same WB compensation values to all WB modes at once.
AEL/AFL button can capture a preview shot to confirm the
white balance accuracy.
|
|
- All Reset
|
- Yes
- No |
||
|
Color Space
|
- sRGB
- Adobe RGB |
|
|
|
Shading Compensation
|
- Off
- On |
|
Enables a shading compensation that attempts to eliminate vignetting with certain lenses.
Doesn't work when using a teleconverter or extension tube, and
may boost noise levels towards the edge of the image.
|
|
Quality Set
|
- 1
- 2 - 3 - 4 |
- L/M/S
- SF/F/N/B |
You can combine three image sizes and four compression ratios and register those settings.
|
|
Pixel Count
|
- Middle
- Small |
Middle:
- 3,200 x 2,400 - 2,560 x 1,920 - 1,600 x 1,200 Small: - 1,280 x 960 - 1,024 x 768 - 640 x 480 |
Set the pixel size for the Middle and Small options.
|
| Custom Menu Options, Tab H: Record/Erase | |||
|
Top-Level
Selection |
Second-Level
|
Third-Level
|
Notes
|
|
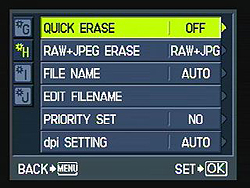
Quick Erase
|
- Off
- On |
|
If on, allows you to immediately erase an image during post-capture display.
|
|
RAW + JPEG Erase
|
- JPEG
- RAW - RAW + JPEG |
|
Designates how JPEG+RAW files are erased.
|
|
File Name
|
- Auto
- Reset |
|
Auto continues file numbering to new cards while Reset starts from 0.
|
|
Edit Filename
|
- Adobe RGB
- sRGB |
- Off
- A-Z - 0-8 |
You can change the 4-digit file name prefix.
|
|
Priority Set
|
- No
- Yes |
|
Sets the priority of cursor display for Erase screen to No or Yes.
|
|
dpi Setting
|
- Auto
- Custom |
- 1 to 9999 dpi
|
Lets you set the resolution for printing images.
|
| Custom Menu Options, Tab I: Movie | |||
|
Top-Level
Selection |
Second-Level
|
Third-Level
|
Notes
|
|
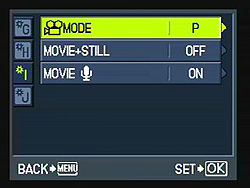
Movie AE Mode
|
- P
- A - M - ART 1 - ART 2 - ART 3 - ART 4 - ART 5 - ART 6 |
|
Sets the exposure mode in movie mode. Programmed, Aperture Priority, Manual, or one of the
six Art Filters can be used.
|
|
Movie + Still
|
- Off
- On |
|
Automatically takes a full-resolution still when movie recording is stopped.
|
|
Movie Audio |
- Off - On |
|
Set to On to record audio with movies. |
| Custom Menu Options, Tab J: Utility | |||
|
Top-Level
Selection |
Second-Level
|
Third-Level
|
Notes
|
|
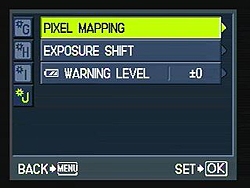
Pixel Mapping
|
- Start
|
|
Enables a self-check of the sensor, and remaps bad pixels.
|
|
Exposure Shift
|
- ESP
|
- 1 to +1 EV
|
Each metering mode can be "fine-tuned" between -1 and +1 EV in 1/6 EV steps.
Note that resetting the camera does not clear these values.
|
|
- Center-weighted
|
- 1 to +1 EV
|
||
|
- Spot
|
- 1 to +1 EV
|
||
|
Warning Level
|
- -2 to +2
|
|
Battery warning level can be tweaked from the default, in arbitrary units.
|
Setup Menu:
| Setup Menu Options: | |||
|
Top-Level
Selection |
Second-Level
|
Third-Level
|
Notes
|
|
Date and Time
|
- Date
- Time - Date Format |
|
Sets the camera's clock and
calendar.
|
|
Language
|
-
English (default)
- French - German - Spanish - Italian - Portuguese - Dutch - Simplified Chinese - Traditional Chinese - Russian - Czech - Greek - Danish - Polish - Romanian - Swedish - Norwegian - Finnish - Croatian - Slovenian - Hungarian - Slovakian - Turkish - Latvian - Bulgarian - Estonian - Lithuanian - Ukranian - Serbian - Korean - Indonesian - Bahasa Malay - Thai - Japanese |
Sets the menu language. Options available varies with region. You can download additional options with the included software.
|
|
|
LCD Color & Brightness
|
- Brightness
|
-7 to +7
|
Adjusts LCD brightness and color response.
|
|
- Hue
|
-7 to +7
|
||
|
Rec. View
|
- 1 to 20s
- Off - Auto Playback |
|
Controls a post-capture display and the display
time.
Auto setting displays image then switches to Playback mode for quick deletion. |
|
Custom Menu Display
|
- Off
- On |
|
Enables display of the Custom Menu.
|
|
Firmware
|
|
|
Displays the current firmware version.
|
 Fujifilm GFX 50S Review
 Fujifilm X-T3 Review
 Olympus E-M5 III Review

Follow Imaging Resource